Herunterladen Inhalt Inhalt Diese Seite drucken

Werbung

Verfügbare Sprachen

Verfügbare Sprachen

ORIGINAL BETRIEBSANLEITUNG
ORIGINAL OPERATING INSTRUCTIONS
CONSIGNES D'UTILISATION
TRADUCCIÓN DEL MANUAL ORIGINAL DE USO
EGRET EIGHT
EGRET-TEN
V 5- 02/2018

Werbung

Inhaltsverzeichnis
loading

Inhaltszusammenfassung für Egret EGRET EIGHT

  • Seite 1 ORIGINAL BETRIEBSANLEITUNG ORIGINAL OPERATING INSTRUCTIONS CONSIGNES D‘UTILISATION TRADUCCIÓN DEL MANUAL ORIGINAL DE USO EGRET EIGHT EGRET-TEN V 5- 02/2018...
  • Seite 2 DEUTSCH ORIGINAL BETRIEBSANLEITUNG ENGLISH ORIGINAL OPERATING INSTRUCTIONS...
  • Seite 3 FRANÇAIS CONSIGNES D‘UTILISATION ESPAÑOL TRADUCCIÓN DEL MA- NUAL ORIGINAL DE USO...
  • Seite 4 DEUTSCH ORIGINAL BETRIEBSANLEITUNG...
  • Seite 5: Inhaltsverzeichnis

    INHALTSVERZEICHNIS Bestandteile Einführung Allgemeine Hinweise Technische Daten Vor Inbetriebnahme beachten Akku und Ladegerät Erste Schritte und Losfahren Auffalten Reinigung und Instandhaltung Konformitätserklärung Häufige Fragen und Antworten...
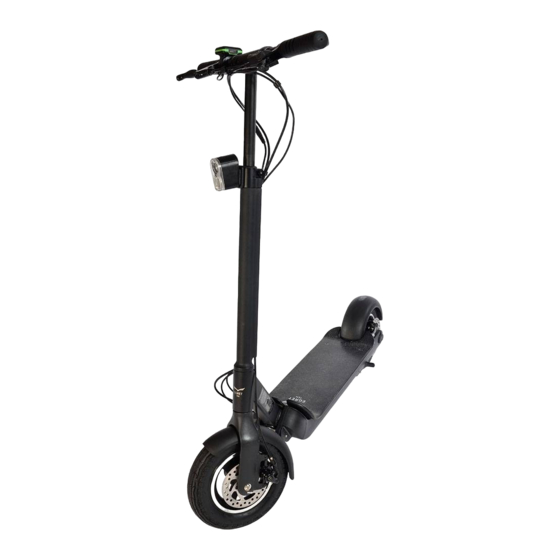
  • Seite 6: Bestandteile

    Seite des Rollers) 7 Scheibenbremsen 8 Rücklicht 9 Trittbrett 10 Seitenständer 11 Klappmechanismus Lenker 12 Bajonettverschluss 1 Lenker 2 Teleskopstange EGRET EIGHT 3 Hauptlenkstange 4 Faltmechanismus Roller 5 Sicherungshebel 6 Ladebuchse 7 Bremsen 8 Rücklicht 9 Trittbrett 10 Seitenständer...
  • Seite 7 GASGRIFF Km/h Batterie- Einstellen der kapazität Geschwindigkeitsstufen und Anzeige der Stufe Ein- und Ausschalter Rücklicht- Anzeige Service-Menü & 6 km/h-Knopf Gashebel Erläuterungen zu den Funktionen des Gasgriff es ab Seite 26...
  • Seite 8: Einführung

    Beachten Sie bitte auch unbedingt die Ladeintervalle, da hierdurch Schäden am Akku vermieden werden können und sich die Lebensdauer des Fahrzeugs deutlich erhöht. Eine Übersicht der Vertragswerkstätten und Händler in Ihrer Nähe finden Sie auf unserer Website unter www.my-egret.com oder erhalten Sie unter unserer Service Hotline. EGRET SERVICE- HOTLINE...
  • Seite 9: Allgemeine Hinweise

    • Die Fahrgestellnummer des Rollers befindet sich auf der Unterseite (EGRET- TEN) bzw. auf der Seite (EGRET EIGHT) des Batteriefachs. Bitte notieren Sie diese Nummer auf der Rückseite dieser Betriebsanleitung, um sie im Bedarfsfall z.B. für Servicefälle bereit zu haben.
  • Seite 10 (lange Bremswege, Wegrutschen in Kurven) und zum anderen kann Spritzwasser die Funktionalität der Bremsen beeinflussen • Springen Sie nicht mit EGRET! Dieses führt zu einer großen Belastung des Fahrwerks und kann somit Schäden verursachen. • Befahren Sie mit EGRET nur ebene Bereiche. EGRET ist nicht für Gelände oder starke Steigungen ausgelegt.
  • Seite 11 Sollten sich Schlechtwetterfahrten (Nässe, Schnee, Glatteis) nicht vermei- den lassen, müssen Sie besonders vorsichtig und langsam fahren. EGRET ist nicht für die Fahrt durch Nässe o. Ä. ausgelegt, da die rutschige Fahrbahn die Bremswege deutlich verlängern kann. Nach der Rollerpflege kann die Bremsanlage aufgrund von Feuchtigkeit verzögert ansprechen.
  • Seite 12: Technische Daten

    TECHNISCHE DATEN EGRET EIGHT EGRET-TEN Ladezeit für 70% Leistung ca. 2 Stunden ca. 2 Stunden Ladezeit für 100% Leistung ca. 4-6 Stunden ca. 4- 6 Stunden max. Zuladung 100 kg 100 kg Gesamtgewicht 14 kg 17,5 kg Motorleistung 350W 500W Max.
  • Seite 13: Vor Inbetriebnahme Beachten

    VOR INBETRIEBNAHME BEACHTEN Bitte beachten Sie, dass EGRET EIGHT und EGRET-TEN in Deutschland nicht für den Straßenverkehr zugelassen sind. Zu Ihrer eigenen Sicherheit sollten Sie immer einen Helm sowie geeignete feste Kleidung tragen. Tragen Sie auffällige und helle Farben, damit Sie von anderen Fahrzeugführern besser und schneller gesehen werden.
  • Seite 14: Akku Und Ladegerät

    Ladung ausgestattet. Sie können zwar sofort nach dem Auspacken losfahren, müssen jedoch mit einer geringeren Reichweite rechnen. • Bitte laden Sie EGRET EIGHT und EGRET-TEN initial für ca. 6 Stunden auf. • Regelmäßiges Laden schützt Ihren Akku. Längeres Lagern ohne Ladung kann zu einer Beschädigung (Tiefentladung) des Akkus führen und so irreparablen...
  • Seite 15 • Das Lagern des Rollers mit verbundenem Ladegerät für länger als 24 Stunden führt zu einem Defekt an Ladegerät und Akku! • Verwenden Sie nur den mitgelieferten und integrierten Akku bzw. Original ersatzteile. Laden Sie den Akku nur mit dem original Ladegerät des Herstellers.
  • Seite 16 Lebensdauer ab. Laden Sie den Akku auch bei Nichtbenutzung alle zwei Monate. Hinweis zur Entsorgung / Batterieverordnung Indem Sie EGRET EIGHT oder EGRET-TEN fahren, leisten Sie bereits einen großen Beitrag zum Umweltschutz. Beachten Sie bitte auch folgende Hinweise zur Entsorgung des Akkus: Entsorgen Sie EGRET EIGHT und EGRET-TEN und alle dazugehörigen...
  • Seite 17 Netzstecker trennen und im Anschluss den Ladestecker vom Roller entfernen. EGRET EIGHT: Das Ladegerät enthält nur eine LED. Diese wechselt die Farbe zu Beginn des Ladevorgangs von Grün zu Rot. Nach Abschluss des Ladevorgangs wechselt die LED wieder zu Grün.
  • Seite 18: Erste Schritte Und Losfahren

    Plastikstecker aus der Ladebuchse (EGRET EIGHT). Die Ladebuchse befi ndet sich beim EGRET-TEN vorne rechts am Rahmen des Rollers, beim EGRET EIGHT vorne links. Zuerst das Ladegerät mit der Steckdose verbinden. Im Anschluss Ladekabel mit der Buchse am Roller verbinden. Bitte unbedingt vermeiden, dass das Fahrzeug auf den Stecker kippt.
  • Seite 19: Auffalten

    Faltme- chanismus liegt. NICHT GESCHLOSSEN RICHIG GESCHLOSSEN Roller NICHT NUTZEN! Nutzen Sie EGRET Roller nicht mit off enem Sicherungshe- ACHTUNG bel! Der Mechanismus ist so nicht gesichert und könnte im schlimmsten Fall während der Nutzung zusammenfalten.
  • Seite 20: Auffalten Egret-Ten

    Sie bitte wie im Folgenden beschrieben vor und beachten Sie die Sicherheitshinweise in diesem Kapitel. 1. Stellen Sie den EGRET-TEN auf dem Boden ab, so dass er sicher auf dem Bat- teriefach steht. 2. Drücken Sie den Sicherungshebel mit der Hand in Richtung Batteriefach und ziehen Sie gleichzeitig die Lenkstange in eine aufrechte Position.
  • Seite 21 Sicherungsknopf hör- und sicht- bar eingerastet ist, der Bajonett-Verschluss und der Sicherungshebel vollständig ge- schlossen sind. RICHIG GESCHLOSSEN Nutzen Sie EGRET Roller nicht mit off enem Sicherungshebel! ACHTUNG Der Mechanismus ist so nicht gesichert und könnte im schlimmsten Fall während der Nutzung zusammenfalten.
  • Seite 22: Justierung Des Sicherungshebels

    JUSTIERUNG DES SICHERUNGSHEBELS Der Widerstand des Sicherungshebels lässt sich bei EGRET-TEN und EGRET EIGHT über die Rändelmutter im vorderen Bereich des Rollers justieren. Die Schraube muss vor jeder Fahrt nachgestellt werden. Die Schraube sollte bei off enen Sicherungshebel, ausschließlich mit der Hand, niemals mit einem Werkzeug, nachgestellt werden, so das der Sicherungs- hebel noch Handfest geschlossen werden kann.
  • Seite 23: Aufklappen Des Lenkers

    AUFKLAPPEN DES LENKERS Klappen Sie die linke und rechte Seite der Querlenkstange nach oben. Sichern Sie diese Position, indem Sie die Sicherungsringe auf jeder Seite in Richtung Lenksäule schieben, bis diese Ringe spürbar arretieren. RICHTIG GESCHLOSSEN NICHT GESCHLOSSEN Roller NICHT NUTZEN! Der rote Bereich unter den Sicherungsringen darf nicht mehr sichtbar sein, sonst ist der Mechanismus nicht gesichert.
  • Seite 24: Einstellen Der Lenkstange

    EINSTELLEN DER LENKSTANGE Der Teleskop-Mechanismus des Lenkers kann mit Hilfe des Schnellspanners gelöst und arretiert werden. Zur Einstellung der Lenkerhöhe lösen Sie den Schnellspanner und ziehen Sie die Lenkstange auf die gewünschte Höhe. Befestigen Sie den Schnellspanner, wenn sich der Lenker auf der gewünschten Höhe befi ndet. Die Festigkeit des Schnellspanners lässt sich an der Rändelmutter mit der Hand justieren.
  • Seite 25 Klappen Sie den Seitenständer hoch und nehmen Sie eine mittige Standposition . Bitte während der Fahrt den Lenker immer mit beiden Händen halten. Gewöhnen Sie sich vor der ersten Fahrt mit EGRET an das Fahrgefühl, indem Sie den Roller zuerst ohne Motorunterstützung zum „Rollern“ nutzen. Schalten Sie den Motor erst an, wenn Sie sich beim „Rollern“...
  • Seite 26 GASGRIFF Am Gasgriff Ihres EGRET-TEN oder EGRET EIGHT können Sie verschiedene In- formationen über Ihr Fahrzeug ablesen und Ihr Telefon laden. Im Folgenden stellen wir Ihnen die wichtigsten Funktionen vor. Der Knopf unten links auf dem Gasgriffes ist der Ein- und Ausschalter. Zum Ein- schalten drücken Sie diesen.
  • Seite 27 Eingabe des Passwortes, wenn die Wegfahrsperre eingeschaltet ist. Gesperrtes System, nachdem das Passwort wiederholt falsch eingegeben wurde. BITTE KONTAKTIEREN SIE IHREN EGRET HÄNDLER Der Roller ist betriebsbereit (Standardeinstellung). Drücken Sie den „An/Aus Schalter“ für weniger als 2 Sekunden, um das Rücklicht aus- und wieder anzuschalten.
  • Seite 28 PASSWORTEINGABE (Standard: 555) Drücken Sie „+“ um die Zahl zu erhöhen, Drücken Sie „-“ um die zu Zahl zu verringern. Drücken Sie den Serviceknopf unten, um die eingegebene Zahl zu bestätigen. Drücken Sie „+“ um die Zahl zu erhöhen, Drücken Sie „-“ um die zu Zahl zu verringern. Drücken Sie den Serviceknopf unten, um die eingegebene Zahl zu bestätigen.
  • Seite 29: Wegfahrsperre An/Ausschalten

    WEGFAHRSPERRE AN/AUSSCHALTEN Drücken Sie den Service-Knopf ca. 2 Sekunden, um in das Menü zu gelangen. Die Startanzeige des Menüs ist aktiviert, wenn eine rote „0“ zu sehen ist. Drücken Sie „+“ um zu Menüpunk „1“ zu gelangen. Drücken Sie anschließend wieder den Service-Knopf. Drücken Sie „+“...
  • Seite 30: Eingabe Eines Neuen Passwortes

    EINGABE EINES NEUEN PASSWORTES Drücken Sie den Service-Knopf ca. 2 Sekunden, um in das Menü zu gelangen. Die Startanzeige des Menüs ist aktiviert, wenn eine rote „0“ zu sehen ist. Drücken Sie „+“ um zu Menüpunkt „2“ zu gelangen. Drücken Sie anschließend wieder den Service-Knopf. Drücken Sie „+“...
  • Seite 31: Aktivierung Des Tempomaten

    AKTIVIERUNG DES TEMPOMATEN Drücken Sie den Service-Knopf ca. 2 Sekunden, um in das Menü zu gelangen. Die Startanzeige des Menüs ist aktiviert, wenn eine rote „0“ zu sehen ist. Drücken Sie „+“ um zu Menüpunkt „3“ zu gelangen. Drücken Sie anschließend wieder den Service-Knopf. Drücken Sie „+“...
  • Seite 32: Vorderradfederung Egret Eight

    BREMSEN Beim Betätigen des linken oder rechten Bremshebels des EGRET-TEN wird die Funktion des Gashebels ausgesetzt, beim EGRET EIGHT beim Betätigen des linken Bremshebels. Bremsen müssen regelmäßig justiert werden. Wir raten dazu, die Bremsen regel- mäßig von Ihrem Händler oder einer Fahrradwerkstatt überprüfen zu lassen.
  • Seite 33 HINWEIS • Zunächst groben Schmutz abfegen, dann mit einem feuchten Tuch nachwischen. • Verwenden Sie geeignete Reinigungs- und Pflegemittel und einen weichen Schwamm. • Keinesfalls Lösungsmittel verwenden. • Bitte immer nur wenig Wasser zur Reinigung nutzen, am besten ein feuchtes Tuch. •...
  • Seite 34 Alle 500 km empfehlen wir eine weitere Überprüfung dieser Komponenten durchführen zu lassen. Vorderradfederung EGRET EIGHT: Die Vorderradfederung muss von Zeit zu Zeit überprüft werden. Bei häufiger Nutzung kann sich diese lösen. Eine Liste der relevanten Ersatzteile finden Sie auf unsererer Webseite unter www.my-egret.com.
  • Seite 36: Konformitätserklärung

    WALBERG URBAN ELECTRICS GMBH ALTER WANDRAHM 6 20457 HAMBURG sind Verantwortlicher für technische Unterlagen und erklären hiermit, dass das Produkt EGRET EIGHT ELEKTROROLLER Serien-Nr.: WUE IGHT in Übereinstimmung ist, mit den einschlägigen Bestimmungen den nachstehenden EG-Richtlinien Maschinenrichtlinie gemäß 2006/42/EG Richtlinie über die elektromagnetische Verträglichkeit 2014/030/EU...
  • Seite 37 WALBERG URBAN ELECTRICS GMBH ALTER WANDRAHM 6 20457 HAMBURG ist Verantwortlicher für technische Unterlagen und erklärt hiermit, dass das Produkt EGRET-TEN ELEKTROROLLER Serien-Nr.: WUE TEN in Übereinstimmung ist, mit den einschlägigen Bestimmungen den nachstehenden EG-Richtlinien: Maschinenrichtlinie gemäß 2006/42/EG Richtlinie über die elektromagnetische Verträglichkeit 2014/030/EU...
  • Seite 40 Wie kann ich meinen EGRET gegen Diebstahl sichern? EGRET ist klein und handlich, so dass Sie ihn in der Regel überall mit hineinnehmen können. Muss der Roller doch mal draußen bleiben, sichern Sie ihn einfach mit einem Kabel- oder Bügel- schloss für Fahrräder durch die Speichen des Vorderrades oder um den Lenker.
  • Seite 41: Kontaktieren Sie Unseren Kundenservice

    Ich habe ein Problem mit meinem EGRET – wer hilft mir? Sollten Sie Probleme mit Ihrem e-Roller haben, wenden Sie sich an den Händler, bei dem Sie Ihr Fahrzeug erworben haben oder an eine Fahrradwerkstatt. Natürlich haben auch wir einen Werkstatt-Service.
  • Seite 42 ENGLISH ORIGINAL OPERATING INSTRUCTIONS...
  • Seite 43 CONTENTS Components Introduction General information Technical data Prior to fi rst-time operation Battery and charger First steps and getting started Unfolding Cleaning and servicing Declaration of conformity Frequently Asked Questions...
  • Seite 44: Components

    8 Rear light 9 Footboard 10 Kickstand 11 Handlebar folding mechanism 12 Bayonet lock 1 Handlebars 2 Telescopic rod EGRET EIGHT 3 Main steering rod 4 Scooter folding mechanism 5 Securing lever 6 Charging port 7 Brakes 8 Rear light 9 Footboard...
  • Seite 45 THROTTLE Km/h Set speed levels and Battery capacity display of the level ON/OFF Rear light status Service menu & 6 km/h button Lever...
  • Seite 46: Introduction

    INTRODUCTION Welcome to the club of EGRET riders! We are sure that you will have lots of fun with your new electric scooter! These instructions provide an overview of the functions, care, maintenance and operation of your new vehicle. Please read it carefully to ensure your electric scooter has a long service life and yourself a safe ride.
  • Seite 47: General Information

    Every 500 km we recommend having another check of these components carried out. • The battery is not delivered fully charged, but your EGRET can be used right away without charging it first.
  • Seite 48 CAUTION • If at all possible, avoid using the EGRET on wet surfaces or in the rain. For one, slippery road surfaces increase the risk of accidents (longer braking dis- tances, slipping in curves) and splashing water may affect how the brakes work.
  • Seite 49 If riding in poor weather conditions (rain, snow, ice) cannot be avoided, be especially careful and go slowly. The EGRET is not designed for use in wet weather, because slippery roadways greatly increase the distance needed to brake. After scooter maintenance, moisture may cause a delayed response in the braking system.
  • Seite 50: Technical Data

    TECHNICAL DATA EGRET EIGHT EGRET-TEN Duration for 70% charge approx. 2 hours approx. 2 hours Duration for 100% charge approx. 4-6 hours approx. 4-6 hours Max. payload 100 kg 100 kg Total weight 14 kg 17.5 kg Motor output 350W 500W Max.
  • Seite 51: Prior To First-Time Operation

    For your own safety, we recommend attaching them to the sides of the fender next to the rear light. The EGRET EIGHT and EGRET- TEN come with a low basic charge and can be used straight away.
  • Seite 52: Battery And Charger

    Engaging one or both brakes at the same time interrupts power to the rear wheel and deactivates the throttle. This is why the motor does not respond to the throttle when the brakes are engaged. Note that the EGRET EIGHT has a power interruption when the left brake handle is pressed.
  • Seite 53 • Use only the integrated battery provided or original spare parts. Use only the original charger from the manufacturer to charge the battery. • When charging the battery, make sure of the following: • The charger is properly connected to the charging socket provided •...
  • Seite 54 Information on disposal/battery directive You are already making a major contribution to environmental protection by dri- ving an EGRET EIGHT or EGRET-TEN. Heed the following information about battery disposal: Dispose of the EGRET EIGHT and EGRET-TEN and all associated components (such as batteries) through an authorised disposal facility or your communal dis- posal point.
  • Seite 55 You can pull out the mains plug and then remove the charger plug from the scooter. EGRET EIGHT: The charger has only one LED. At the beginning of the charging process it turns from green to red. The LED turns green again when the charging process is completed.
  • Seite 56: First Steps And Getting Started

    (EGRET EIGHT). The charging socket is located on the front right frame of the EGRET-TEN and on the front left of the EGRET EIGHT. First connect the charger to the power socket. Then connect the charging cable to the port on the scooter.
  • Seite 57: Unfolding

    NOT CLOSED PROPERLY CLOSED DO NOT USE scooter Do not use the EGRET scooter with an open securing lever. CAUTION This means that the mechanism is not secured and in the worst case could fold during use.
  • Seite 58 1. Place the EGRET-TEN on the floor so that it securely stands on the battery compartment. 2. Press the securing lever towards the battery compartment while at the same time pulling the steering rod into an upright position.
  • Seite 59 PROPERLY CLOSED Do not use the EGRET scooter with an open securing lever. CAUTION This means that the mechanism is not secured and in the worst case could fold during use.
  • Seite 60 ADJUSTING THE SECURING LEVER On the EGRET-TEN and EGRET EIGHT the resistance of the securing lever can be adjusted via the knurled nut at the front of the scooter. The screw needs to be readjusted prior to every ride. The screw should be adjusted with an opened locking lever and by hand –...
  • Seite 61 2.1 UNFOLDING THE HANDLEBARS Fold up the left and right side of the traverse steering rod. Secure them into position by sliding the retaining rings on both sides towards the steering column until the rings noticeably lock into place. PROPERLY CLOSED NOT CLOSED DO NOT USE scooter The red area below the retaining rings should not be visible or else the mechanism...
  • Seite 62 3. ADJUSTING THE STEERING ROD The handlebars’ telescopic mechanism can be released and locked using a quick release. To adjust the height of the handlebars, release the quick release and pull the steering rod to the desired height. Fasten the quick release when the handle- bars are at the desired height.
  • Seite 63: Getting Started

    Fold up the kickstand and take a standing position in the middle. Always keep both hands on the handlebars when riding. Before riding the EGRET for the first time, get used to it by first “rolling” the scooter without support from the motor. Don’t switch on the motor until you feel comfortable just rolling around.
  • Seite 64 6. THROTTLE You can view a variety of information about your vehicle and charge your phone on the throttle of your EGRET-TEN or EGRET EIGHT. We will be presenting the most important features below. The button on the lower left of the throttle is the on/off switch. Press it to turn the scooter on.
  • Seite 65 The scooter is switched off . Enter the password when immobilizer is switched on. Locked system after repeatedly entering the wrong password. PLEASE CONTACT YOUR EGRET DEALER. The scooter is operational (default setting). Press the ON / OFF switch for less than...
  • Seite 66 ENTERING PASSWORD (Default: 555) Press „+“ to increase the number, Press „-“ to decrease the number. Press the service button above the throttle to confi rm the entered number. Press „+“ to increase the number, Press „-“ to decrease the number. Press the service button above the throttle to confi rm the entered number.
  • Seite 67 IMMOBILIZER ON / OFF Press the service button for about 2 seconds to enter the servie menu. The start display of the menu is activated if a red „0“ can be seen. Press „+“ to get to menu point „1“. Then press the service button again.
  • Seite 68 SETTING A NEW PASSWORD Press the service button for about 2 seconds to enter the servie menu. The start display of the menu is activated if a red „0“ can be seen. Press „+“ to get to menu point „2“. Then press the service button again.
  • Seite 69 ACTIVATING CRUISE CONTROL Press the service button for about 2 seconds to enter the servie menu. The start display of the menu is activated if a red „0“ can be seen. Press „+“ to get to menu point „3“. Then press the service button again. Press „+“...
  • Seite 70 4. BRAKES Squeezing the left or right brake lever on the EGRET-TEN disables the throttle, by squeezing the left brake lever on the EGRET EIGHT. The brakes have to be regularly adjusted. We recommend having the brakes regu- larly checked by you dealer or a bicycle repair shop.
  • Seite 71: Cleaning And Servicing

    CLEANING AND SERVICING Cleaning and care To prevent wear and tear, we recommend thoroughly cleaning and drying the scooter after riding it in the wet weather conditions. NOTE • Brush off any loose dirt and wipe off with a damp cloth. •...
  • Seite 72 Front suspension EGRET EIGHT: From time to time, the front suspension needs to be maintained. The suspension becomes loose after frequent use. A list of relevant spare parts is available at our website at www.my-egret.com. If a part is not listed here, you are welcome to contact us.
  • Seite 74: Declaration Of Conformity

    ALTER WANDRAHM 6 20457 HAMBURG are responsible for technical documents and hereby declare that the product EGRET EIGHT ELECTRIC SCOOTER Serial number: WUE IGHT Is in accordance with the relevant provisions of the following EC directives including all associated modifications: Maschinenrichtlinie gemäß...
  • Seite 75 WALBERG URBAN ELECTRICS GMBH ALTER WANDRAHM 6 20457 HAMBURG are responsible for technical documents and hereby declare that the product EGRET-TEN ELECTRIC SCOOTER Serial number: WUE TEN Is in accordance with the relevant provisions of the following EC directives including all associated modifications:...
  • Seite 76: Frequently Asked Questions

    Can I take my EGRET on board of an aeroplane? Whether you are permitted to take your EGRET along with you on a plane varies from airline to airline. This is why you should clarify this point with the specific airline.
  • Seite 77 The brake pads become worn over time. This can also be a reason why your EGRET’s braking behaviour has changed. You can easily re-adjust the brakes via the adjustment bolt on the brake lever.
  • Seite 78 How can I protect my EGRET from theft? The EGRET is small and easy to handle, so you can normally take it anywhere you go. If the scoo- ter has to stay outside, simply secure it with a cable or U-lock for bicycles through the spokes of the front wheel or around the handlebars.
  • Seite 79 I have a problem with my EGRET – who can help me? Should you have problems with your e-scooter, consult the dealer you bought your vehicle from or a bicycle repair shop. We of course have a repair shop service. If there’s anything we can do for you, we’re happy to lend assistance.
  • Seite 80: Consignes D'utilisation

    FRANÇAIS CONSIGNES D‘UTILISATION...
  • Seite 81 CONTENU Composants Introduction Informations générales Données techniques Consignes préalables Batterie et chargeur Étapes préliminaires et démarrage Dépliage Nettoyage et entretien Déclaration de conformité Questions fréquemment posées...
  • Seite 82: Composants

    10 Pied (béquille) 11 Mécanisme de pliage du guidon 12 Fermeture à baïonnette 1 Guidon 2 Canne télescopique EGRET EIGHT 3 Barre de direction principale 4 Mécanisme de pliage de la trottinette 5 Levier de sécurité 6 Port de charge 7 Freins 8 Feux arrière...
  • Seite 83: Interrupteur On/Off

    ACCÉLÉRATEUR Km/h Capacité de la batterie Régler les paliers de vitesse et affi cher le niveau Interrupteur On/off Service Menu & Touche 6 km/h Accélérateur...
  • Seite 84: Introduction

    Respecter les intervalles de charge recommandés évitera d‘endommager la batte- rie et optimisera la durée de vie de votre trottinette. Vous trouverez une liste de boutiques et distributeurs agréés à proximité de votre domicile sur notre site Internet www.my-egret.com ou contactez notre ligne d‘assistance gratuite. EGRET LIGNE ASSISTANCE Téléphone +49 180 580 380 180*...
  • Seite 85: Informations Générales

    • Le numéro d‘identification du châssis de la trottinette se trouve au-dessous (EGRET-TEN) ou sur le côté (EGRET EIGHT) du compartiment de la batterie. Prenez note de ce numéro au verso des présentes consignes d‘utilisation. Ainsi, elles seront constamment disponibles en cas de besoin, notamment lors de l‘entretien.
  • Seite 86 (distances de freinage plus importantes, dérapages dans les virages) de même que le fonctionnement des freins risque d’être affecté. • Ne pas sauter avec la trottinette EGRET. Le châssis pourrait subir un stress considérable et s‘abîmer. • Utiliser votre trottinette EGRET uniquement sur une surface régulière. La trottinette EGRET n‘est pas conçue pour une utilisation hors-piste ou sur...
  • Seite 87 Par mauvais temps (pluie, neige, verglas), conduire lentement et prudem- ment. La trottinette EGRET ne doit pas être utilisée en cas de pluie, car une surface glissante augmente considérablement la distance de freinage. Après la maintenance de la trottinette, l‘humidité risque de retarder la ré- ponse du système de freinage.
  • Seite 88: Données Techniques

    DONNÉES TECHNIQUES EGRET EIGHT EGRET-TEN Temps de charge à 70 % approx. 2 heures approx. 2 heures Temps de charge à 100 % approx. 4 à 6 heures approx. 4 à 6 heures Charge utile max. 100 kg 100 kg Poids total...
  • Seite 89: Consignes Préalables

    PRÉCAUTIONS D‘USAGE AVANT LA PREMIÈRE UTILISATION Les modèles EGRET EIGHT et EGRET-TEN ne sont pas homologués pour un usage sur la voie publique. Pour votre propre sécurité, toujours porter un casque ainsi qu‘une tenue adaptée. Porter des couleurs vives et visibles afin d‘être mieux vu, et plus rapidement, des autres usagers.
  • Seite 90: Batterie Et Chargeur

    C‘est pourquoi le moteur ne répond pas à la commande d‘accélération une fois le système de freinage engagé. Noter que le fonctionnement de la trottinette EGRET EIGHT s‘interrompt lorsque vous actionnez la poignée de frein.
  • Seite 91 • Utiliser uniquement la batterie ou les pièces d‘origine. Utiliser uniquement le chargeur d‘origine du fabricant pour charger la batterie. • Lors du chargement, respecter les consignes suivantes: • Le chargeur doit être branché correctement dans la prise prévue à cet effet.
  • Seite 92 à la protection de l‘environnement. Suivre les consignes suivantes pour la mise au rebut de la batterie: Pour mettre au rebut les trottinettes EGRET EIGHT et EGRET-TEN ainsi que tous les composants associés (notamment, les batteries), s‘adresser à une socié- té...
  • Seite 93 LED rouge devient verte une fois la charge terminée. Débrancher la prise d‘alimentation et retirer la prise du chargeur de la trottinette. EGRET EIGHT: Le chargeur présente une seule LED. En début de charge, il passe du vert au rouge. La LED devient verte une fois la charge terminée.
  • Seite 94: Étapes Préliminaires Et Démarrage

    Pour charger la trottinette, déplacer le ca- pot sur le côté (EGRET-TEN) ou retirer la prise en plastique de la prise de chargement (EGRET EIGHT). La prise de chargement se trouve à l‘avant droit du cadre du modèle EGRET-TEN et à...
  • Seite 95: Dépliage

    PAS FERMÉ FERMÉ CORRECTEMENT NE PAS UTILISER la trottinette. Ne pas utiliser la trottinette EGRET si le levier de sécurité ATTENTION est levé. Le mécanisme n‘est pas sécurisé et dans le pire des cas, la trottinette risquerait de se replier en cours d‘utilisation.
  • Seite 96 Procédez comme decrit ci-dessous pour deplier la trottinette et observez les instructions de sécurité dans ce chapitre. 1. Placer la trottinette EGRET-TEN sur le sol de manière à ce qu‘elle soit sur le compartiment de la batterie en toute stabilité.
  • Seite 97 La fermeture à baïonnette et le loquet de sécurité doit être bien fermé. FERMÉ CORRECTEMENT Ne pas utiliser la trottinette EGRET si le levier de sécurité est ATTENTION levé. Le mécanisme n‘est pas sécurisé et dans le pire des cas, la...
  • Seite 98 RÉGLAGE DU LEVIER DE SÉCURITÉ Sur les trottinettes EGRET-TEN et EGRET EIGHT la résistance du levier de sécurité se règle au moyen de l‘écrou moleté à l‘avant du véhicule. Le tire-bouchon doit être rajuster avant chaque utilisation. Le tire-bouchon doit rajuster avec le levier de sécurité...
  • Seite 99: Dépliage Du Guidon

    2.1 DÉPLIAGE DU GUIDON Plier les côtés gauche et droit de la bielle de direction de la traverse. Sécuriser en faisant glisser les anneaux de blocage des deux côtés vers la colonne de direction jusqu‘à ce qu‘ils soient visiblement en place. FERMÉ...
  • Seite 100 3. RÉGLAGE DE LA COLONNE DE DIRECTION Le mécanisme télescopique du guidon peut se déployer et être sécurisé (verrouillé) par un desserrage rapide. La hauteur du guidon se règle en desserrant et en tirant rapidement la colonne de direction. Serrer une fois la hauteur souhaitée obtenue. L‘écrou moleté...
  • Seite 101 Relever le pied (la cheville) et se placer au milieu. Toujours garder les deux mains sur le guidon. Avant la première utilisation de la trottinette EGRET, s‘habituer à « faire rouler » le véhicule sans l‘appui du moteur. Ne branchez le contact que lorsque vous êtes à...
  • Seite 102 6. ACCÉLÉRATEUR Les trottinettes EGRET-TEN ou EGRET EIGHT présentent de nombreuses infor- mations concernant le véhicule et il vous est possible de recharger votre téléphone via la commande d‘accélération. Les fonctionnalités principales seront présentées ci-après. Le bouton se trouvant à droite de la commande d‘accélération est l‘interrupteur ON/OFF.
  • Seite 103 Entrez le mot de passe lorsque l‘antidémarrage est activé. Système verrouillé après avoir entré plusieurs fois le mauvais mot de passe. VEUILLEZ CONTACTER VOTRE REVENDEUR EGRET. La trottinette est opérationnelle (réglage par défaut). Appuyez sur le bouton ON / OFF pendant moins de 2 secondes pour...
  • Seite 104 ENTRER UN MOT DE PASSE (Par défaut: 555) Appuyez sur „+“ pour augmenter le nombre, Appuyez sur „-“ pour diminuer le nombre. Appuyez sur le bouton de service au-dessus de la gâchette de vitesse pour confi rmer le numéro entré. Appuyez sur „+“...
  • Seite 105 ANTIDEMARRAGE ON / OFF Appuyez sur le bouton de service pendant environ 2 secondes pour entrer dans le menu service. L‘affi chage de démarrage du menu est activé si un „0“ peut être vu. Appuyez sur „+“ pour accéder au point de menu „1“. Ensuite, appuyez à...
  • Seite 106 DÉFINIR UN NOUVEAU MOT DE PASSE Appuyez sur le bouton de service pendant environ 2 secondes pour entrer dans lemenu servie. L‘affi chage de démarrage du menu est activé si un „0“ est affi ché. Appuyez sur „+“ pour accéder au menu „2“. Ensuite, appuyez à...
  • Seite 107 ACTIVER LE REGULATEUR DE VITESSE Appuyez sur le bouton de service pendant environ 2 secondes pour entrer dans le menu service. L‘affi chage de démarrage du menu est activé si un „0“ est affi ché. Appuyez sur „+“ pour accéder au -menu „3“. Ensuite, appuyez à...
  • Seite 108 4. FREINS Presser le levier de frein gauche ou droit de la trottinette EGRET-TEN bloque le guidon. Pour la trottinette, EGRET EIGHT il s‘agit du frein gauche. Les freins doivent être réglés fréquemment. Nous vous invitons à faire vérifier régulièrement vos freins auprès de votre distributeur ou de votre réparateur local.
  • Seite 110: Nettoyage Et Entretien

    NETTOYAGE ET ENTRETIEN Nettoyage et entretien Pour minimiser l‘usure, nous vous conseillons de nettoyer et de sécher soigneu- sement la trottinette si vous l‘utilisez lorsqu‘il fait humide. REMARQUE • Brosser délicatement les saletés et frotter au moyen d‘un chiffon humide. •...
  • Seite 111 Tous les 500 km, nous recommandons la vérification de ces mêmes composants. La suspension de la roue avant EGRET EIGHT: la suspension de la roue avant doit être vérifier régulièrement. Avec l’utilisation fréquents la suspension peut s’enlever.
  • Seite 112: Déclaration De Conformité

    ALTER WANDRAHM 6 20457 HAMBURG Sommes responsables des documents techniques et déclarons par la présente que le produit TROTTINETTE ÉLECTRIQUE EGRET EIGHT No de série: WUE IGHT Est conforme aux dispositions des directives européennes suivantes comprenant toutes les modifications connexes: Directive 2006/42/EC (sur les machines) Directive 2014/030/EU (compatibilité...
  • Seite 113 WALBERG URBAN ELECTRICS GMBH ALTER WANDRAHM 6 20457 HAMBURG Sommes responsables des documents techniques et déclarons par la présente que le produit TROTTINETTE ÉLECTRIQUE EGRET-TEN No de série: WUE TEN Est conforme aux dispositions des directives européennes suivantes comprenant toutes les modifications connexes: Directive 2006/42/EC (sur les machines) Directive 2014/030/EU (compatibilité...
  • Seite 114: Questions Fréquemment Posées

    Comment recharger ma trottinette électronique EGRET? Brancher le chargeur livré avec la trottinette EGRET dans la prise et ensuite, insérer le câble du chargeur dans la trottinette. Le port de charge se trouve près du pied pliable à gauche de la trotti- nette.
  • Seite 115 La trottinette est dotée d‘une fonction de démarrage. Il vous suffit de déplacer la trottinette du pied pour activer la commande d‘accélération. Si ces conseils ne suffisent pas, contacter le distributeur EGRET ou notre service à la clientèle. Le chargeur ne recharge pas la trottinette. Quelle pourrait en être la raison? •...
  • Seite 116 Comment nettoyer/entretenir ma trottinette EGRET? À l‘instar d‘un autre véhicule, vous pouvez prolonger la durée de vie de votre trottinette EGRET en la nettoyant régulièrement. Les trottinettes EGRET-TEN et EGRET EIGHT sont composées d‘aluminium, ce qui en fait des véhicules robustes, légers et résistant à...
  • Seite 117 J‘ai un problème avec ma trottinette EGRET – qui peut m‘aider? Si vous rencontrez un problème avec votre trottinette électrique, contacter le distributeur auprès duquel vous avez effectué votre achat, ou un réparateur spécialisé. Nous proposons un service de réparation. Si nous pouvons vous être utiles, n‘hésitez pas à nous contacter. Nos techniciens vous aideront à...
  • Seite 118 ESPAÑOL TRADUCCIÓN DEL MA- NUAL ORIGINAL DE USO...
  • Seite 119 CONTENIDO Componentes Introducción Información general Datos técnicos Antes del primer uso Batería y Cargador Primeros pasos y comienzo Desplegado Limpieza y mantenimiento Declaración de conformidad Preguntas frecuentes...
  • Seite 120: Componentes

    COMPONENTES 1 Manillar EGRET-TEN EGRET-TEN 2 Barra telescópica 3 Barra de dirección 4 Mecanismo de plegado 5 Palanca de seguridad 6 Puerto de carga (No mostrado, localizado en el otro lado del patinete) 7 Frenos de disco 8 Luz trasera...
  • Seite 121 ACELERADOR Km/h Capacidad de la batería Seleccionar los incrementos de velocidad y mostrar el nivel Switch de Encendido/ Apagado Service Menú & Botón 6 km/h Acelerador...
  • Seite 122: Introducción

    útil de su patinete eléctrico. Una lista de los talleres de reparación y distribuidores autorizados de su zona está disponible en nuestro sitio web en www.my-egret.com o desde la línea telefónica de atención. LINEA TELEFÓNICA DE SERVICIO Tel.
  • Seite 123: Información General

    El número de identificación del patinete se puede encontrar en la parte inferior (EGRET-TEN) y a un lado (EGRET EIGHT) del compartimiento de la batería. Por favor anote este número al final de este manual, de esta manera lo tendrá...
  • Seite 124 • No use el EGRET para saltar, puesto que esto supone una gran cantidad de presión en el chasis que puede provocar daños a su patinete.. •...
  • Seite 125 Si es inevitable conducir en condiciones meteorológicas peligrosas (lluvia, nieve, hielo), sea especialmente cuidadoso y vaya despacio. Su EGRET no está diseñado para su uso en condiciones de humedad puesto que los terre- nos resbaladizos incrementan considerablemente la distancia necesaria para frenar.
  • Seite 126: Datos Técnicos

    ESPECIFICACIONES TÉCNICAS EGRET EIGHT EGRET-TEN Tiempo para 70% carga aprox. 2 horas aprox. 2 horas Tiempo para 100% carga aprox. 4-6 horas aprox. 4-6 horas Capacidad máxima de carga 100 kg 100 kg Peso total 14 kg 17,5 kg Salida del motor...
  • Seite 127: Antes Del Primer Uso

    ANTES DEL PRIMER USO Por favor tenga en cuenta que el EGRET EIGTH y el EGRET-TEN no están aprobados para uso en vías públicas en Alemania. Por su propia seguridad siempre debe usar casco y ropa adecuada. Use colores brillantes y llamativos para asegurar qué otros conductores puedan verle mejor y más rápido.
  • Seite 130 Información y directiva sobre la eliminación de la batería Usted ya está llevando a cabo una gran contribución al medio ambiente al con- ducir un EGRET EIGHT o un EGRET-TEN. Preste especial atención a la infor- mación sobre la eliminación de la batería: Puede deshacerse de su EGRET EIGHT o EGRET-TEN y de todos sus com- ponentes asociados (tales como la batería) solo en los lugares aprobados para la...
  • Seite 131 EGRET EIGHT: El cargador tiene únicamente un LED. Al principio del pro- ceso de carga cambiara de verde a rojo. EL LED cambiara a verde de nuevo cuando el proceso de carga este completo.
  • Seite 132: Primeros Pasos Y Comienzo

    Puerto de carga (EGRET EIGHT). El puerto de carga se encuentra en la parte frontal derecho del cuerpo del EGRET- TEN y en el lado izquierdo EGRET EIGHT. Conecte el cable de carga al puerto del patinete. Después conecte el cargador a la toma de corriente.
  • Seite 133: Desplegado

    NO CERRADO APROPIADAMENTE CERRADO APROPIADAMENTE NO USE EL PATINETE No utilice su EGRET si palanca del mecanismo de plagado PRECAUCIÓN esta abierta. Esto signifi ca que el mecanismo no está asegura- do y en el peor de los casos podría doblarse durante el uso.
  • Seite 134 1. Coloque el EGRET-TEN en el suelo para que quede firmemente apoyado en el compartimiento de la batería. 2. Presione la palanca de fijación hacia el compartimiento de la batería mientras al mismo tiempo tira de la barra de dirección en posición vertical.
  • Seite 135 LISTO PARA USARSE NO LISTO PARA USARSE El EGRET-TEN no debe utilizarse con la cerradura de ba- PRECAUCIÓN yoneta abierta. Asegúrese de que la cerradura de bayoneta esté totalmente bloqueada. 4. Ahora cierre la palanca de seguridad empujándola hasta el frente.
  • Seite 136 AJUSTANDO LA PALANCA DE SEGURIDAD En el EGRET-TEN y EGRET EIGHT la resistencia de la palanca de fi jación se puede ajustar a través de la tuerca en la parte delantera del scooter. El tornillo debe ser reajustado antes de cada viaje. El tornillo se debe ajustar con la mano con la palanca de bloqueo abierta - no utilice una herramienta para ello.
  • Seite 137 2.1 DESPLEGANDO EL MANILLAR Desplegar el lado izquierdo y derecho de la barra de dirección transversal. Asegúrelos en su posición deslizando los anillos de retención de ambos lados hacia la columna de dirección hasta que los anillos se fi jen claramente en su lugar.
  • Seite 138 AJUSTE DE LA BARRA DE DIRECCION El mecanismo telescópico del manillar puede liberarse y bloquearse con un des- bloqueo rápido. Para ajustar la altura del manillar, suelte el desbloqueo rápido y tire de la barra de dirección a la altura deseada. Sujete el cierre rápido cuando el manillar esté a la altura deseada.
  • Seite 139 Doble la plataforma y póngase de pie en el centro. Siempre mantenga las dos ma- nos en el manillar cuando monte. Antes de montar el EGRET por primera vez, acostúmbrese primero a „rodar“ el scooter sin el apoyo del motor. No encienda el motor hasta que se sienta cómodo simplemente dando vueltas.
  • Seite 140 6. ACELERADOR Puede ver una variedad de información sobre su vehículo y cargar su teléfono en el acelerador de su EGRET-TEN o EGRET EIGHT. Vamos a presentar las caracterí- sticas más importantes a continuación. El botón en el lado derecho del acelerador es el interruptor de encendido / apagado.
  • Seite 141 Sistema bloqueado después de ingresar repetidamente la contraseña incorrecta. PÓNGASE EN CONTACTO CON SU DISTRIBUIDOR DE EGRET. El scooter está en funcionamiento (confi guración predeterminada). Presione el interruptor de ENCENDIDO / APAGADO por menos de 2 segundos para apagar y encender nuevamente la luz trasera.
  • Seite 142 INGRESAR CONTRASEÑA (Valor predeterminado: 555) Presiona „+“ para aumentar el número, Presione „-“ para disminuir el número. Presione el botón de servicio sobre el acelerador para confi rmar el número ingresado. Presiona „+“ para aumentar el número, Presione „-“ para disminuir el número. Presione el botón de servicio sobre el acelerador para confi rmar el número ingresado.
  • Seite 143 INMOVILIZADOR ACTIVADO / DESACTIVADO Presione el botón de servicio durante aproximadamente 2 segundos para ingresar al menú de servicio La pantalla de inicio del menú se activa si un „0“ rojo se puede ver. Presione „+“ para llegar al punto de menú „1“. Luego presione el botón de servicio nuevamente.
  • Seite 144 ESTABLECER UNA NUEVA CONTRASEÑA Presione el botón de servicio durante aproximadamente 2 segundos para ingresar al menú de servicio La pantalla de inicio del menú se activa si un „0“ rojo se puede ver. Presione „+“ para llegar al punto de menú „2“. Luego presione el botón de servicio nuevamente.
  • Seite 145 ACTIVANDO EL CONTROL DE CRUCERO Presione el botón de servicio durante aproximadamente 2 segundos para ingresar al menú de servicio La pantalla de inicio del menú se activa si un „0“ rojo se puede ver. Presione „+“ para llegar al punto de menú „3“. Luego presione el botón de servicio nuevamente.
  • Seite 147: Limpieza Y Mantenimiento

    NOTA...
  • Seite 148 La suspensión puede aflojarse después de usarse frecuentemente. Una lista de piezas de repuesto relevantes está disponible en nuestro sitio web en www.my-egret.com. Si una pieza no está incluida en esta lista, puede ponerse en contacto con nosotros.
  • Seite 150: Declaración De Conformidad

    ALTER WANDRAHM 6 20457 HAMBURG Somos responsabiles de los documentos técnicos y por la presente declaramos que el producto EGRET EIGHT PATINETE ELECTRICO Número de serie: WUE IGHT Se ajusta a las disposiciones pertinentes de las siguientes directivas CE: Directiva 2006/42/EC (en maquinaria) Directiva 2014/030/EU (compatibilidad electromagnética)
  • Seite 151 ALTER WANDRAHM 6 20457 HAMBURG Somos responsabiles de los documentos técnicos y por la presente declaramos que el producto EGRET-TEN PATINETE ELECTRICO Número de serie: WUE TEN Se ajusta a las disposiciones pertinentes de las siguientes directivas CE: Directiva 2006/42/EC (en maquinaria) Directiva 2014/030/EU (compatibilidad electromagnética)
  • Seite 152: Preguntas Frecuentes

    24 horas. ¿Puedo llevar mi EGRET conmigo en avión? Si se le permite tomar su EGRET junto con usted en un avión varía de una línea aérea a otra. Es por eso que debe aclarar este punto con la aerolínea específica.
  • Seite 153 Primero, presiona y mantén pulsado el botón de on/off durante varios segundos. Si solo lo presio- nas ligeramente, el patinete no se encenderá. Si estos consejos no ayudan, ponte en contacto con tu proveedor EGRET o nuestro servicio de atención al cliente.
  • Seite 154 El EGRET-TEN y el EGRET EIGHT son de aluminio, caracterizado por su robustez, bajo peso y resistentes al oxido. Sólo la tabla del EGRET-TEN está hecha de madera y nuestros pernos son de acero y tienen un recubrimiento de zinc para prevenir la oxidación. Si el revestimiento está dañado por la abrasión, puede formarse óxido en estos lugares, lo que puede prevenir con un mantenimiento regular.
  • Seite 155 CONTACTE CON NUESTRO SERVICIO AL CLIENTE Tel. +49 180 580 380 180* E-Mail info@urban-electrics.com ¢ 14 / min usando la red alemana de telefonía fija, precio del teléfono móvil: Internet www.my-egret.com máx. ¢ 42 / min.
  • Seite 156 IHR EGRET YOUR EGRET VOTRE TROTTINETTE EGRET SU EGRET Bitte tragen Sie hier Ihre Fahrgestellnummer ein. Enter your chassis number here. Saisir votre numéro de châssis ici. Escriba el número de su chasis aqui.
  • Seite 160 Walberg Urban Electrics GmbH Alter Wandrahm 6 D-20457 Hamburg EGRET SERVICE- HOTLINE +49 180 580 380 180* info@urban-electrics.com * ¢14/min from the German fixed-line network, www.my-egret.com mobile phone price: max. ¢42/min.

Diese Anleitung auch für:

Egret-ten

Inhaltsverzeichnis