Herunterladen Inhalt Inhalt Diese Seite drucken
Inhaltsverzeichnis

Werbung

Verfügbare Sprachen
  • DE

Verfügbare Sprachen

  • DEUTSCH, seite 69

Werbung

Inhaltsverzeichnis
loading

Inhaltszusammenfassung für Seac Sub Pro 2000 Adv

  • Seite 2: Pro 2000 Adv

    ITALIANO Pro 2000 Adv Giubbetto Equilibratore Stabilizing Jacket Gilet Stabilizateur Tarierjacket Chaleco Hidrostático 0474 - EN 250 EN 1809 SEAC DIVING PRO srl Via D. Norero, 29 16040 San Colombano Certenoli (GE), Italy Tel. +39 (0185) 356301 Fax. +39 (0185) 356300 info@seacsub.com...
  • Seite 3: Inhaltsverzeichnis

    La valvola di sovrappressione Distribuzione volumi Tasche inserite di serie e tasche opzionali Istruzioni per un corretto uso del giubbetto equilibratore Pro 2000 Adv Istruzione per la corretta regolazione delle cinghie e degli spallacci Istruzioni per un corretto assemblaggio nella fase pre-immersione...
  • Seite 4: Introduzione

    ITALIANO Introduzione ta e non provveda ad una adeguata manu- tenzione. La Seac Diving Pro s.r.l declina Congratulazione per aver scelto la qualità e ogni responsabilità per qualsiasi proble- l'affidabilità di un prodotto SEAC Diving Pro. ma derivante dalla mancata osservanza L'attrezzatura da lei acquistata è...
  • Seite 5: Riferimenti Alla Normativa Europea En

    ITALIANO Pericolo Limitazioni (EN 250): Profondità massima 50 metri. Non usate questo o qualsiasi altro prodotto della linea Seac Diving Pro con altri gas o SCUBA - Gruppi componenti (EN 250): miscele di aria arricchita di ossigeno (comunemente chiamate NITROX). Non Lo Scuba può...
  • Seite 6: Certificazione

    ITALIANO MARCATURA PRESENTE SU OGNI Attenzione! GIUBBETTO EQUILIBRATORE: 0474 Le istruzioni che seguono dovranno essere integrate con quelle relative alle altre Al fine di garantire la massima attenzione alla apparecchiature componenti il vostro SCUBA sicurezza sul corpetto equilibratore è cucita un (gruppo bombola assemblato).
  • Seite 7: Caratteristiche Tecniche

    ITALIANO Caratteristiche tecniche CARATTERISTICHE Pro 2000 Adv DEFINIZIONE Jacket mono sacco a grande volume interno MARCATURA 0474 ENTE CERTIFICANTE SPINTA DI GALLEGGIAMENTO 13,4 19,2 21,2 22,6 NEWTON DISTRIBUZIONE VOLUMI 2/3 posteriore 1/3 anteriore con perfetto bilanciamento in qualsiasi situazione d'immersione e in superficie...
  • Seite 8: Pro 2000 Adv

    La parte esterna del giubbetto equilibratore Una maniglia per il trasporto del giubbetto PRO 2000 Adv è realizzata in Cordura 1000 equilibratore permette durante la fase di resinata PU, questo materiale è estremamen- assemblaggio di assicurare la stessa alla...
  • Seite 9: Air Control - Sistema Pneumatico Di Carico E Scarico

    Air control - Sistema pneumatico di carico e scarico Il giubbetto equilibratore PRO 2000 Adv è dotato di un innovativo sistema integrato di Dis. 2 Pulsanti di scarico gonfiaggio/gonfiaggio (Patented) denomina- to "AIR CONTROL".
  • Seite 10 ITALIANO La particolare forma permette l'immediata indi- viduazione al tatto dei pulsanti da utilizzare. I due pulsanti di colore grigio, che permetto- no l'apertura delle valvole di scarico sono dif- ferenziati e contrapposti tra di loro (Dis. 2). Ogni singolo meccanismo è indipendente e interagisce con la valvola corrispondente (Dis.
  • Seite 11: Oral Inflator

    La valvola di sovrappressione sicurezza. Il sistema, comunemente chiamato "Oral Inflator", permette di gonfiare il giubbetto Il giubbetto equilibratore PRO 2000 Adv è equilibratore con un sistema autonomo e indi- inoltre equipaggiato con una classica valvola pendente. Per poter utilizzare questo sistema di...
  • Seite 12: Distribuzione Volumi

    Tasche inserite di serie e tasche opzionali Dis. 11 Tasche porta piombi posteriori Il giubbetto equilibratore Pro 2000 Adv è equipaggiato con due tasche anteriori a soffietto molto capienti, tasca supplementare porta maschera (Dis.
  • Seite 13: Istruzione Per La Corretta Regolazione Delle Cinghie E Degli Spallacci

    La prima volta che usate il vostro giubbetto equilibratore Pro 2000 Adv e tutte le volte che ne è necessario bisogna procedere alla regolazione degli spallacci, del fascione ventrale e della cinghia di serraggio della bombola.
  • Seite 14: Istruzioni Per Un Corretto Assemblaggio Nella Fase Pre-Immersione

    Posizionare la bombola davanti a noi con l'u- La maniglia di trasporto in dotazione sul scita della rubinetteria di fronte a noi. giubbetto PRO 2000 Adv ha il solo scopo di Posizionare lo schienalino sulla bombola stes- trasportare il giubbetto equilibratore in superficie...
  • Seite 15 ITALIANO segno di vernice, in modo da rimontare il giub- betto equilibratore sempre nella posizione otti- male. Questo procedimento vi potrà sembrare un attimo eccessivo, ma vi garantirà l'uso cor- retto del giubbetto equilibratore per tutte le immersioni future. Ricordate che il sistema di bloccaggio è...
  • Seite 16 ITALIANO Successivamente montate la frusta di Attenzione! collegamento con attacco rapido ad un'uscita di bassa pressione del vostro erogatore avendo cura di non formare grovigli tra la In caso di erogazione continua il gruppo coman- frusta del manometro e quelle degli do Air Control presenta la possibilità...
  • Seite 17: Prima, Durante E Dopo L'immersione

    ITALIANO Prima dell'immersione evitate di porre il giub- betto equilibratore ad prolungata esposizione alla luce del sole e non appoggiatelo su super- fici taglienti, pungenti o ruvide tipo rocce o altro che potrebbero danneggiarlo, evitate inoltre di porre il giubbetto sulla sabbia. Predisponete gli spallacci e i cinghiaggi alla massima espansione per agevolare la vestizio- ne, fate scorrere le cinghie degli spallacci sino...
  • Seite 18 ITALIANO Dis. 23 Dis. 24 Apertura della valvola superiore tramite Scarico d'aria in superficie tramite valvola di pressione sul pulsante grigio sovrappressione Importante Il premere contemporaneamente i due pulsanti grigi di scarico non comporta nessun problema. L'azione porterà all'apertura automatica di entrambe le valvole con la fuoriuscita immediata dell'aria, il sistema "one way"...
  • Seite 19 ITALIANO Giunti alla profondità desiderata, tenete pre- Giunti in superficie potete gonfiare completa- muto il pulsante di carico sino a quando non mente il sacco e rimanere comodamente in avrete regolato l'assetto in modo da trovarvi attesa di essere ricuperati dall'imbarcazione. in assetto neutro.
  • Seite 20: Cura E Manutenzione Del Giubbetto Equilibratore Pro 2000 Adv

    ITALIANO Cura e manutenzione del giubbetto equilibratore PRO 2000 Adv mantenere vostro giubbetto equilibratore in perfetta efficienza sono necessarie le seguenti precauzioni. 1. Dopo ciascuna immersione, comprese quelle in piscina o in acque dolci tipo laghi o fiumi, il giubbetto equilibratore...
  • Seite 21: Certificato Di Garanzia

    ITALIANO volta accuratamente all'interno, scaricate l'acqua e, quando è perfettamente asciutto, riponetelo parzialmente gonfio in un locale fresco ed aerato. 7. Per evitare indesiderate proliferazioni batteriche, disinfettate periodicamente l'interno del giubbetto equilibratore utilizzando prodotti appropriati che potrete trovare nella linea accessori delle Seac Diving Pro.
  • Seite 22 ITALIANO 2. La garanzia è riconosciuta esclusivamente fiscale o della fattura (o di altro documen- al primo acquirente del prodotto presso un to equipollente di registrazione fiscale da rivenditore autorizzato Seac Diving Pro. cui risultino il nominativo del rivenditore Essendo strettamente nominativa, non è autorizzato Seac Diving Pro presso cui il cedibile a terzi se non previo espressa prodotto è...
  • Seite 23 ITALIANO PER METTERE IN TENSIONE LA CINGHIA AVVALETEVI DELLA NUMERAZIONE PROGRESSIVA E DELLE FRECCE DIREZIONALI RIPORTATE SULLA FIBBIA Seguendo la freccia (1), inserite l'estremità della cinghia dal lato Passate attraverso la fessura contrassegnata dalla freccia (3) e fate interno verso l'esterno della fibbia (tra la staffa cucita e la parte mobi - scorrere la cinghia.
  • Seite 24: Pro 2000 Adv

    ENGLISH Pro 2000 Adv Giubbetto Equilibratore Stabilizing Jacket Gilet Stabilizateur Tarierjacket Chaleco Hidrostático 0474 - EN 250 EN 1809 SEAC DIVING PRO srl Via D. Norero, 29 16040 San Colombano Certenoli (GE), Italy Tel. +39 (0185) 356301 Fax. +39 (0185) 356300 info@seacsub.com...
  • Seite 25 Overpressure valves Volume distribution Standard and optional pockets Instructions for the correct use of the stabilizing jackets Pro 2000 Adv Instructions for the correct adjustment of belts and shoulder straps Instructions for a correct assembly in the pre-dive phase Before, during, and after the dive...
  • Seite 26: Introduction

    ENGLISH Introduction For any other eventuality, please contact your authorized SEAC Diving Pro dealer Congratulations for having chosen the quality or SEAC Diving Pro directly. In order to and reliability of a SEAC Diving Pro product. The guarantee maximum safety, every repair equipment you have purchased was made with or maintenance intervention must only be selected and tested materials.
  • Seite 27: References To European Law En

    ENGLISH Danger Limitations (EN 250): Maximum depth 50 metres Do not use this or any other product of the SEAC Diving Pro line with other SCUBA Components assemblies (EN 250): gases or other oxygen-enriched gas mixtures (commonly known as NITROX). Scuba can consist of components groups Ignoring this recommendation may like: Tank assembly includes regulator,...
  • Seite 28: Certification

    ENGLISH SEAL PRESENT ON EACH STABILIZING Attention! JACKET: 0474 The following instructions must be integrated with those of the other components of your In order to guarantee maximum attention to SCUBA (tank assembly). Before using your tank the safety of the stabilizing vest, there is a assembly, carefully read all of the instructions label with the following text: for usage as found in the relative manuals.
  • Seite 29: Technical Characteristics

    ENGLISH Technical characteristics Pro 2000 Adv CHARACTERISTICS DEFINITION High-volume, single-bladder jacket MARKING OF CERTIFICATION AUTHORITY 0474 BUOYANCY 13.4 19.2 21.2 22.6 NEWTON VOLUME DISTRIBUTION 2/3 rear 1/3 front with perfect balance in any underwater or surface situation BLADDER MATERIAL Polyurethane-coated Cordura 1000...
  • Seite 30: Pro 2000 Adv

    ENGLISH Pro 2000 Adv The backpack The Pro 2000 Adv is the natural evolution of The perfect connection between the stabilizing the consolidated line of "Semiback" jackets jacket and tank is guaranteed by a backpack in successfully introduced by SEAC Diving Pro shock-proof nylon with an internal, preformed in its range of professional diving equipment.
  • Seite 31: Air Control - Pneumatic Inflation-Deflation System

    Both the intake and outlet flows are increased system in order to give optimum and rapid buoyancy control. The PRO 2000 Adv stabilizing jacket is equipped with a patented, innovative, The internal components are made of nickel- integrated inflation-deflation system called plated brass and then chrome-plated to offer "AIR CONTROL".
  • Seite 32 ENGLISH Drawing 1 Drawing 4 Position of the AIR CONTROL unit Opening of both valves by two buttons Drawing 2 Drawing 5 Dump buttons Inflation button Drawing 3 Drawing 6 Connection between button and valve Male fitting for rapid hose connection...
  • Seite 33: Overpressure Valves

    In the PRO 2000 Adv version, this valve is located on the upper right part of the bag. As mentioned previously, this overpressure valve can be activated by pulling the knob at the end of the cable.
  • Seite 34: Standard And Optional Pockets

    Drawing 10 Extra mask or accessory pocket adjustment of belts and shoulder straps The first time you use your Pro 2000 Adv stabilizing jacket and whenever necessary, regulate the shoulder straps, the waist belts, and the tank connection straps. It is also possible to adjust the length of the...
  • Seite 35 ENGLISH the sternum. (Drawing 13) The same operation may be carried out by adjusting the lower straps on the backpack. (Drawing 14) The Velcro strap may also be adjusted by regulating the fabric part connected to the backpack and positioning the Velcro at the desired position.
  • Seite 36: Instructions For A Correct Assembly In The Pre-Dive Phase

    The transport handle on the backpack of the correct use of the stabilizing jacket for all PRO 2000 Adv must be placed on the neck of future dives. Remember that the locking the valves (Drawing 16) as an extra safety...
  • Seite 37 ENGLISH Drawing 17 Drawing 20 Dual tank kit assembled Connection to rapid fastener Assemble the connection hose with the rapid attachment to a low pressure outlet of your regulator, taking care not to tangle the pressure gauge hose with those of the regulator. We advise positioning the service hose (pressure gauge, jacket hose, and the dry suit hose) to the left and the breathing hoses...
  • Seite 38 ENGLISH To disconnect the quick-attachment, it is Inflate the stabilizing jacket fully and wait sufficient to push the collar back and the about 15 minutes. If the stabilizing jacket hose will be released automatically (practice starts to deflate, do not use it and contact an this operation in order to eventually intervene authorized SEAC Diving Pro assistance in case of continuous air flow due to a...
  • Seite 39: Before, During, And After The Dive

    ENGLISH Drawing 21 Blocking the shoulder straps Drawing 23 Opening of the upper valve by pushing Drawing 22 Blocking the straps positioned over the on the grey button main strap 2) Hold the handle of the upper quick dump Before, during, and after the dive valve on the right and pull it, or even pull Once on the surface, begin your dive by on the black tube of the cable: air will exit...
  • Seite 40 ENGLISH Important!! Pushing both grey discharge buttons at the same time will cause no problem. This action will cause the automatic opening of both the valves with the immediate dumping of air. The "one way" system (membrane in silicone located on the flange) will not allow water inside the bag.
  • Seite 41 ENGLISH Attention! It is strictly necessary to regulate hydrostatic balance during the ascent in order to avoid rising too quickly. Consult with your instructor or your diving manual for further information concerning this necessity. Always follow the required regulations and those dictated by your underwater computer or your decompression tables during each phase of diving.
  • Seite 42: Care And Maintenance Of The Pro 2000 Adv Stabilizing Jacket

    (compo- nents 15 and 18 in the exploded drawing of the Pro 2000 Adv power inflator). By activating both grey buttons, the water will be discharged. 2. We advise that the internal bag be rinsed periodically with fresh water.
  • Seite 43: Certificate Of Warranty

    ENGLISH 6. If you think you will not use the stabilizing Being a strictly nominative warranty, it is jacket for more than a month, rinse it very not transferable to third parties unless well inside, drain the water, and when it is previously and explicitly authorized by perfectly dry, place it partially inflated in a SEAC Diving Pro.
  • Seite 44 ENGLISH If SEAC Diving Pro receives a product that: is not accompanied by a proof of purchase document with abovementioned characteristics has been subject to conditions that determine the extinction of the warranty according to point 4 above presents defects due to causes that are external or other than those explicitly indicated in point 3 above has been used inappropriately and/or...
  • Seite 45 ENGLISH TO STRETCH THE BELT, USE THE PROGRESSIVE NUMERATION AND THE DIRECTION ARROWS ON THE BUCKLE Following the arrow (1) insert the extremity of the belt from the Pass through the opening marked by the arrow (3) and let innerside towards the external part of the buckle (between the sewn the belt glide.
  • Seite 46: Pro 2000 Adv

    FRANÇAISE Pro 2000 Adv Giubbetto Equilibratore Stabilizing Jacket Gilet Stabilizateur Tarierjacket Chaleco Hidrostático 0474 - EN 250 EN 1809 SEAC DIVING PRO srl Via D. Norero, 29 16040 San Colombano Certenoli (GE), Italy Tel. +39 (0185) 356301 Fax. +39 (0185) 356300 info@seacsub.com...
  • Seite 47 La purge/soupape de surpression Distribution volumes Poches de série et poches facultatives Instructions pour un usage approprié du gilet stabilisateur Pro 2000 Adv Comment bien régler les sanglages et les sangles d'épaule Instructions pour un assemblage correct en phase de pré-immersion Avant, pendant et après la plongée...
  • Seite 48: Introduction

    FRANÇAISE Introduction Seac Diving Pro s.r.l décline toute responsabilité pour tout problème Félicitations, vous avez choisi la qualité et la résultant de la non observation des fiabilité d'un produit SEAC Diving Pro. Le recommandations exprimées dans le matériel que vous venez d'acheter a été présent manuel.
  • Seite 49: Références À La Norme Européenne En

    FRANÇAISE Danger Limites (EN 250) : Profondeur maximum 50 mètres Ne pas utiliser cet article ou tout autre produit de la ligne Seac Diving Pro avec SCUBA - Composants (EN 250) : d'autres gaz ou mélanges d'air enrichi en oxygène (couramment appelés Le scaphandre autonome peut être cons- NITROX).
  • Seite 50: Certification

    FRANÇAISE ATTENTION ! Attention! Ce stabilisateur n'est pas un gilet de sauvetage Il ne permet pas de flotter à la surface le visage Les instructions suivantes devront être intégré- hors de l'eau! es avec celles qui concernent le reste du maté- Pour pouvoir utiliser ce stabilisateur, il faut avoir riel composant votre SCUBA (appareil respira- suivi des cours dispensés par des moniteurs cer-...
  • Seite 51: Caractéristiques Techniques

    FRANÇAISE Caractéristiques techniques CARACTÉRISTIQUES Pro 2000 Adv DEFINITION Gilet stabilisateur mono enveloppe à grand volume interne MARQUAGE 0474 ORGANISME DE CERTIFICATION POUSSEE DE FLOTTABILITE 13,4 19,2 21,2 22,6 NEWTON DISTRIBUTION VOLUMES 2/3 arrière 1/3 avant avec parfait équilibre en toute situation de plongée et de surface...
  • Seite 52: Pro 2000 Adv

    Pro 2000 Adv résistance absolue, doté, en même temps, de caractéristiques essentielles d'un point de Le Pro 2000 Adv est l'évolution technique et vue élastique et anatomique. naturelle de la ligne de gilets "Semiback" introduits avec succès par Seac Diving Pro Le back-pack ou dosseret sur la scène des équipements professionnels...
  • Seite 53: Air Control - Système Pneumatique Degonflage Et De Purge

    à un flux rapide et progressif. En correspondance de ce Le gilet stabilisateur PRO 2000 Adv est équi- piston est appliqué un adaptateur mâle à pé d'un système intégré innovant de gonfla- connecteur rapide spécial pour le flexible de...
  • Seite 54 FRANÇAISE Dessin 1 Dessin 4 Position de l' inflateur AIR CONTROL Ouverture des deux soupapes au moyen des deux commandes Dessin 2 Dessin 5 Boutons de purge Commande de gonflage Dessin 3 Dessin 6 Connexion entre le bouton et la soupape Adaptateur mâle à...
  • Seite 55: Inflateur Oral

    à sa place dans la poche. La purge/soupape de surpression Le gilet stabilisateur PRO 2000 Adv est aussi Attention! muni d'une soupape de surpression classique, qui garantit une évacuation rapide de l'air grâce à...
  • Seite 56: Distribution Volumes

    Poches de série et poches facultatives Le gilet stabilisateur Pro 2000 Adv est équipé Dessin 9 Traction du cordon de commande de la de deux poches avant à soufflet de très soupape de surpression grande capacité, d'une poche supplémentaire...
  • Seite 57: Comment Bien Régler Les Sanglages Et Les Sangles D'épaule

    Comment bien régler les sanglages et les sangles d'épaule La première fois que vous utiliserez votre gilet stabilisateur Pro 2000 Adv et chaque Dessin 12 Réglage des sangles d'épaule hautes fois que cela sera nécessaire, vous devrez régler les sangles d'épaule, la ceinture ventrale et la sangle de fixation de la bouteille.
  • Seite 58: Instructions Pour Un Assemblage Correct En Phase De Pré-Immersion

    Dessin 16 Poignée en position correcte La poignée de transport cousue directement sur l'enveloppe du PRO 2000 Adv devra être placée sur le col de la robinetterie Attention! (Dessin 16) afin de garantir un point de sécurité...
  • Seite 59 FRANÇAISE supplémentaire une fois que le gilet est assemblé sur la bouteille. La poignée de transport ne doit jamais être employée pour soulever le bloc SCUBA assemblé. A présent, endossez le gilet stabilisateur et, en station debout, baissez la nuque vers l'arrière : si la position est bonne, vous ne devriez sentir aucune gêne.
  • Seite 60 FRANÇAISE Pour brancher le raccord rapide du flexible à l'inflateur, procédez comme suit : serrez entre le pouce et l'index la bague métallique à l'extrémité du flexible et rabattez-la vers l'a- rrière, poussez le raccord rapide à fond sur l'adaptateur mâle de l'inflateur et relâchez la bague (Dessin 20).
  • Seite 61: Avant, Pendant Et Après La Plongée

    FRANÇAISE Précautions Lorsque vous relâchez le bouton, l'alimentation doit cesser immédiatement , au cas où cela n'arriverait pas, veuillez vous adresser à un centre agréé Seac Diving Pro pour les contrôles nécessaires. Gonflez complètement le gilet stabilisateur et attendez environ 15 minutes, si le gilet stabilisateur a tendance à...
  • Seite 62 FRANÇAISE Dessin 23 Dessin 24 Purge de l'air par inflateur Air Control Purge de l'air par titrage pommeau soupape haute soupape de surpression 2) Saisissez le levier de la soupape de purge rapide haute située sur la droite et tirez- le, ou encore mieux, vous pouvez tirer le tuyau noir contenant le cordon, l'air s'échappera rapidement par la soupape...
  • Seite 63 FRANÇAISE Important !! Attention! Si vous enfoncez en même temps les deux boutons gris de purge, cela ne pose pas de problème. Il est absolument nécessaire de régler l'équili- Cela entraînera l'ouverture automatique des bre hydrostatique pendant la remontée afin d'é- deux soupapes, et l'air s'échappera immédia- viter une trop grande vitesse.
  • Seite 64: Soin Et Entretien Du Gilet Stabilisateur Pro 2000 Adv

    Démontage de la soupape de surpression clapet de non retour et le joint à rondelle (composants 15 et 18 sur la vue éclatée de l'inflateur Pro 2000 Adv). Actionnez les deux boutons gris pour évacuer l'eau. 2. Il est conseillé de procéder périodique- ment au rinçage de la vessie interne à...
  • Seite 65: Certificat De Garantie

    FRANÇAISE liter l'évacuation de l'eau précédemment introduite, il est conseillé de gonfler le gilet stabilisateur au maximum pour que les soupapes de surpression s'ouvrent automatiquement (Dessin 30). Enfin, laissez sécher le gilet sans l'exposer longtemps aux rayons directs du soleil. 3.
  • Seite 66 FRANÇAISE 2. La garantie est reconnue exclusivement document équivalent d'enregistrement au premier acquéreur du présent produit fiscal portant le nom du revendeur agréé auprès d'un revendeur agréé Seac Diving Seac Diving Pro chez qui le produit a été Pro. acheté ainsi que la date d'achat du dit Etant strictement nominative, elle ne peut produit) attestant l'achat.
  • Seite 67 FRANÇAISE POUR METTRE EN TENSION LA SANGLE PORTE BOUTEILLE, SUIVEZ LES INDICATIONS DU DESSIN, LA NUMÉROTATION ET LES FLÈCHES GRAVÉES SUR LA BOUCLE Insérer l'extrémité libre de la sangle du côté interne de la boucle vers Passer dans la fente entre la flèche (3) et la flèche (1) et faire sortir la l'extérieur (entre la bride consue et la partie mobile).Du côté...
  • Seite 68: Pro 2000 Adv

    DEUTSCH Pro 2000 Adv Giubbetto Equilibratore Stabilizing Jacket Gilet Stabilizateur Tarierjacket Chaleco Hidrostático 0474 - EN 250 EN 1809 SEAC DIVING PRO srl Via D. Norero, 29 16040 San Colombano Certenoli (GE), Italy Tel. +39 (0185) 356301 Fax. +39 (0185) 356300 info@seacsub.com...
  • Seite 69 Mundinflator Das Überdruckventil Verteilung des Volumens Eingesetzte Taschen(serienmäßig oder fakultativ) Anleitung zum richtigen Gebrauch der Tarierweste Pro 2000 Adv Die Einstellung der Gurte und Schulterriemen Der korrekte Zusammenbau vor dem Tauchgang Vor, während und nach dem Tauchen Pflege und Wartung der Tarierweste Pro 2000 Adv...
  • Seite 70: Einführung

    DEUTSCH Einführung den, um ein langfristig vertrauenswürdi- ges Produkt liefern zu können. Wir von Seac Diving Pro s.r.l. (im Folgenden Der Gebrauch des Jackets ist jedoch dann kurz "Seac" genannt) danken Ihnen, dass Sie ineffizient, wenn der Taucher es nicht kor- sich für die Qualität und die Zuverlässigkeit rekt benutzt oder nicht korrekt wartet.
  • Seite 71: Hinweise Zur Europanorm En

    DEUTSCH Gefahr Tauchermaske oder Taucherhelm) 6. Bedienungsanleitung Benutzen Sie dieses Produkt oder andere Produkte der Seac nie mit einem SCUBA - Komponentengruppen (EN 250) anderen Gas als Atemluft oder einer Gasmischung, Sauerstoff Das SCUBA kann aus verschiedenen angereichert ist (allgemein NITROX Komponentengruppen bestehen, und genannt).
  • Seite 72: Zertifikation

    DEUTSCH Garantie dafür sein, bei Bewusstlosigkeit oder KENNZEICHNUNG AUF JEDER Unfähigkeit des Tauchers, den Kopf an der TARIERWESTE: Wasseroberfläche hoch zu halten. 0474 Um die größtmögliche Aufmerksamkeit für Achtung! Sicherheitsaspekte zu garantieren, ist auf jedem Tarierjacket ein Etikett mit folgendem Text eingenäht: Vervollständigen dieser...
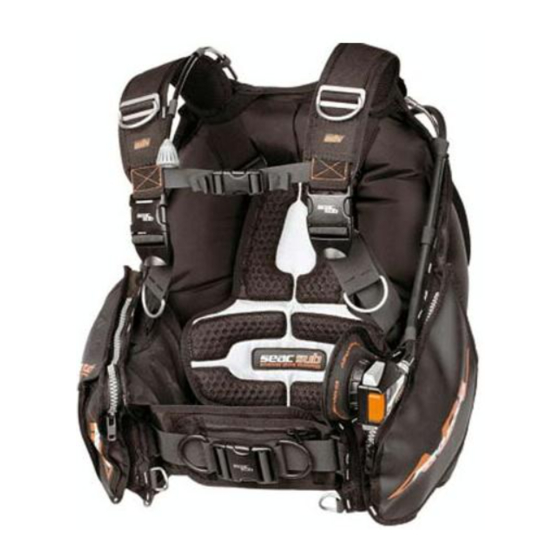
  • Seite 73: Technische Eigenschaften

    DEUTSCH Technische Eigenschaften EIGENSCHAFTEN Pro 2000 Adv DEFINITION Einkammerjacket mit großem Innenvolumen ZERTIFIKATIONSBEZEICHNUNG 0474 AUFTRIEB 13.4 19.2 21.2 22.6 NEWTON VOLUMENVERTEILUNG 2/3 vorne 1/3 hinten bei perfektem Ausgleich in jeder Tauchsituation MATERIAL AUSSENHAUT PU-Harz verstärktes Cordura 1000 SCHWEISSNÄHTE hochfrequenzverschweißt RÜCKENTRAGE Rückentrage aus stoßfestem Plastik mit Gegenplatte zur...
  • Seite 74: Pro 2000 Adv

    DEUTSCH Pro 2000 Adv Eigenschaften Elastizität Körperanpassung. Das Pro 2000 Adv ist die technische und natürliche Weiterentwicklung der bewährten Die Rückentrage "Semiback" Linie von Seac, die sich erfol- greich auf dem Tauchsportmarkt positioniert perfekte Verbindung zwischen hat. Das neue pneumatische System der Tarierjacket und der Sauerstoffflasche wird Überdruckventile (patentiert) erlaubt eine...
  • Seite 75: Air Control ( Luftkontrolle)- Pneumatisches Ein-Und Auslasssystem

    Air control ( Luftkontrolle)- Pneumatisches Ein-und Auslasssystem Wichtig! Sowohl Luftzufuhr als auch Luftablass sind Das Tarierjacket Pro 2000 Adv ist mit einem erhöht, um die Tauchlage im Wasser schnell innovativen integrierten Luftaufblassystem und optimal kontrollieren zu können. (patentiert) ausgerüstet, das den Namen "AIR CONTROL "...
  • Seite 76 DEUTSCH Zeichnung 4 Zeichnung 1 Öffnung beider Ventile mit zwei Position des Inflators (Bedienteil) AIR CONTROL Bedienknöpfen Zeichnung 5 Zeichnung 2 Bedienknopf zum Lufteinlass Bedienknopf für den Luftauslass Zeichnung 3 Zeichnung 6 Verbindung zwischen Bedienknopf Schnellanschluss zur Schlauchverbindung und Ventil...
  • Seite 77: Mundinflator

    Achtung! Nicht vergessen, den kleinen Gummischlauch vor dem Einblasen vollständig zu entrollen. Das Überdruckventil Das Tarierjacket Pro 2000 Adv ist außerdem mit einem klassischen Überdruckventil ver- sehen, das mit einem einfachen und robusten Zeichnung 7 Mundinflator an der rechten Tasche Mechanismus einen weiteren und schnellen Luftablass sicherstellt.
  • Seite 78: Eingesetzte Taschen(Serienmäßig Oder Fakultativ)

    DEUTSCH Eingesetzte Taschen (serienmäßig oder fakultativ) Das Tarierjacket Pro 2000 Adv ist mit zwei großen, vorne sitzenden Falttaschen ausges- tattet sowie mit einer Zusatztasche für die Tauchmaske (Zeichnung 10) und zwei Bleitaschen hinten (Zeichnung 11), jede mit einer Tragfähigkeit von 2,5 kg. Vorrichtungen vorne rechts und links ermöglichen das fakul-...
  • Seite 79: Die Einstellung Der Gurte Und Schulterriemen

    DEUTSCH Die Einstellung der Gurte und Schulterriemen Beim ersten Anlegen der Tarierweste Pro 2000 Adv und jedes Mal, wenn es nötig ist, sind die Schultergurte, der Bauchgurt und die Befestigungsgurte entsprechend Erfordernissen des Tauchgangs, der gewähl- ten Ausrüstung sowie des individuellen Körperbaus des Tauchers einzustellen.
  • Seite 80: Der Korrekte Zusammenbau Vor Dem Tauchgang

    Herausrutschen der Flasche zur Folge hätte. Wir raten dringend, den Gurt vor dem Anlegen nass zu machen. Die direkt an die Luftkammer des Pro 2000 Adv genähte Sicherheitsschlaufe/der Transportgriff muss sich als zusätzliche Sicherheit in Höhe des Flaschenventils befinden (Zeichnung 16) damit...
  • Seite 81 DEUTSCH Achtung! Achtung! Die dafür vorgesehenen Gurte mit exzentrischer Kontrollieren Sie bitte sorgfältig, ob der Schnalle ermöglichen es, die Tarierweste mit jeder Schlauch Tarierweste einem Einzelflasche mit einem Mindestdurchmesser von Mitteldruckanschluss der Ersten Stufe anges- 140 mm und einem maximalen Durchmesser von chlossen ist! Ein eventuelles Einlassen von 220 mm (Stahlflasche mit 18 Litern) zu gebrau- hohem Druck in den Schlauch kann zu Rissen...
  • Seite 82 DEUTSCH Achtung! Im Falle eines kontinuierlichen Luftaustritts gibt es am AIR CONTROL-Inflator die Möglichkeit, den Luftfluss sofort zu unterbrechen. Dazu muss die linke Hand zum eben beschriebenen Schnellanschluss des Schlauches geführt wer- den und der kleine Ring zurückgeschoben wer- den. So löst sich der Schlauch automatisch und der Luftfluss wird unterbrochen.
  • Seite 83: Vor, Während Und Nach Dem Tauchen

    DEUTSCH Nachdem Sie Ihr SCUBA nun zusammenge- baut haben, füllen Sie die Tarierweste kom- plett mit Luft und warten ungefähr 15 Minuten. Falls die Weste Zeichen von Luftverlust zeigt, wenden Sie sich bitte an ein autorisiertes Zentrum von Seac. Tauchen Sie in diesem Fall nicht mit dieser Tarierweste.
  • Seite 84 DEUTSCH Zeichnung 23 Zeichnung 24 Öffnung des oberen Ventils durch das Luftauslass an der Oberfläche durch drücken auf dem grauen Knopf Überdruckventil 2) Nehmen Sie den Knauf des oberen Schnellablassventiles rechts und ziehen Sie daran. Sie können auch direkt am kleinen schwarzen Schlauch mit dem Verbindungsdraht ziehen, so entweicht die Luft sehr schnell aus dem Ventil...
  • Seite 85 DEUTSCH Wichtig! Achtung! Das gleichzeitige Drücken der beiden grauen Luftablassknöpfe bringt keinerlei Probleme mit sich. Dieser Vorgang öffnet beide Ventile Es ist unbedingt notwendig, das hydrostatische und sorgt für sofortigen Luftablass. Das Gleichgewicht beim Wiederaufstieg zu regulie- System "one way" verhindert dabei das ren, um einen zu schnellen Aufstieg zu vermei- Eindringen von Wasser in die Luftkammer.
  • Seite 86 DEUTSCH Zeichnung 26 Zeichnung 29 Zweitonpfeife Anleitung zum Einlassen von Süßwasser in das Jacket Zeichnung 27 Zeichnung 30 Handhabung des Clips zur Ablassen des Wassers aus dem Erleichterung beim Ausziehen Überdruckventil Zeichnung 31 Zeichnung 28 Funktionskontrolle des Überdruckventils Abbau des Überdruckventils...
  • Seite 87: Pflege Und Wartung Der Tarierweste Pro 2000 Adv

    Einwegventil 8. Am Ende einer besonders intensiven Ringdichtung ansammeln (Komponenten Tauchsaison oder auch nach einer langen 15 und 18 des Inflators Pro 2000 Adv). Pause, ist es angebracht, die Weste einer Durch Drücken auf beide grauen Knöpfe autorisierten Werkstatt anzuvertrauen, entweicht dieses Wasser.
  • Seite 88 DEUTSCH 1. Die Garantiedauer beträgt 2 (zwei) Jahre heriger Genehmigung auch ein anderer ab dem Datum des Kaufs des Produktes Seac-Vertragshändler mit der Übersen- bei einem Seac-Vertragshändler und ist dung des fehlerhaften Produktes beauf- ohne weitere Formalitäten oder tragt werden. Zur Gewährung der Bestätigungen gültig.
  • Seite 89 DEUTSCH UM DEN FLASCHENGURT ANZULEGEN, FOLGEN SIE DER ANSTEIGENDEN NUMERIERUNG UND DEN RICHTUNGSPFEILEN AUF DER SCHNALLE Führen Sie das Gurtende dem Pfeil (1) folgend von der Innenseite der Führen Sie den Gurt durch die Öffnung mit der Pfeilmarkierung (3) Schnalle nach außen (zwischen dem mit dem Gurt vernähten Bügel und ziehen Sie den kompletten Gurt durch.
  • Seite 90: Pro 2000 Adv

    ESPAÑOL Pro 2000 Adv Giubbetto Equilibratore Stabilizing Jacket Gilet Stabilizateur Tarierjacket Chaleco Hidrostático 0474 - EN 250 EN 1809 SEAC DIVING PRO srl Via D. Norero, 29 16040 San Colombano Certenoli (GE), Italy Tel. +39 (0185) 356301 Fax. +39 (0185) 356300 info@seacsub.com...
  • Seite 91 La válvula de sobrepresión Distribución de los volúmenes Bolsillos de serie y bolsillos opcionales Instrucciones para un correcto uso del chaleco hidrostático Pro 2000 Adv Instrucciones para regular correctamente las correas y las hombreras Instrucciones para un correcto ensamblado durante la fase pre-inmersión Antes, durante y después de la inmersión...
  • Seite 92: Advertencias Generales

    ESPAÑOL Introducción utiliza el chaleco estabilizador de manera correcta y no realiza un adecuado mante- Nuestra enhorabuena por haber preferido la nimiento. calidad ,y poner su confianza en un producto La Seac Diving Pro s.r.l declina toda res- SEAC Diving Pro. El equipo que ha adquirido ponsabilidad ante cualquier problema ha sido realizado con materiales selecciona- causado por no haber respetado las reco-...
  • Seite 93: Referencias A La Norma Europea En

    ESPAÑOL Peligro Limitaciones (EN 250): Profundidad máxima 50 metros No utilizar este o cualquier otro artículo de la línea Seac Diving Pro con otros gases o SCUBA - Grupos componentes ( EN 250): mezclas de aire enriquecido con oxígeno (comúnmente denominadas NITROX). El El Scuba puede estar constituido por gru- no respetar esta recomendación puede pos componentes distintos, como el...
  • Seite 94: Certificado

    ESPAÑOL MARCA PRESENTE EN CADA CHALECO Atención! HIDROSTÁTICO: 0474 Las instrucciones que siguen a continuación deberán ser integradas con aquéllas de los otros Con el objeto de garantizar la máxima atención equipos que componen su SCUBA (grupo botella a la seguridad, el chaleco hidrostático lleva ensamblado).
  • Seite 95: Características Técnicas

    ESPAÑOL Características técnicas CARACTERÍSTICAS Pro 2000 Adv DEFINICIÓN Jacket mono bolsa de gran volumen interno MARCA ENTIDAD CERTIFICADORA 0474 IMPULSO DE FLOTACIÓN 13,4 19,2 21,2 22,6 NEWTON DISTRIBUCIÓN DE VOLÚMENES 2/3 posterior 1/3 anterior con perfecto equilibrio en cualquier situación de inmersión y en superficie...
  • Seite 96: Pro 2000 Adv

    ESPAÑOL Pro 2000 Adv La espaldera El modelo Pro 2000 Adv es la evolución técnica La perfecta conexión entre el chaleco hidros- natural de la consolidada línea de chalecos tático y la botella está asegurada por una "Semiback", introducidos con éxito por Seac espaldera realizada en nylon antichoque con Diving Pro en el ámbito de los equipos profesio-...
  • Seite 97: Air Control - Sistema Neumático De Carga Y Descarga

    50 mm conectados a la correa permiten la regulación del clip incluso con guantes. Air control - Sistema neumático de carga y descarga El chaleco hidrostático PRO 2000 Adv está dotado de un innovador sistema integrado de inflado/desinflado (patentado) denominado "AIR CONTROL". El mecanismo de funciona- miento aplicado a las válvulas de sobrepre-...
  • Seite 98 ESPAÑOL Su forma particular permite distinguirla inmediatamente al tacto de los pulsadores que se desea utilizar. Los dos pulsadores de color gris, que permi- ten la abertura de las válvulas de descarga, están diferenciados y contrapuestos (Fig. 2). Cada mecanismo es independiente e interac- túa con la válvula correspondiente (Fig.
  • Seite 99: Oral Inflator

    (operación efectuada a menudo para acelerar el descenso o para regular rápidamente el equilibrio durante el ascenso). En la versión PRO 2000 Adv esta válvula está ubicada en la parte superior derecha de la bolsa.Como dicho anteriormente, la válvula de sobrepre- sión puede ser accionada a través de la trac-...
  • Seite 100: Distribución De Los Volúmenes

    Bolsillos de serie y bolsillos opcionales El chaleco hidrostático Pro 2000 Adv está Fig. 11 Bolsillos porta plomos posteriores equipado con dos bolsillos anteriores tipo fuelle con gran capacidad, un bolsillo com- plementario porta máscara (Fig.
  • Seite 101: Instrucciones Para Regular Correctamente Las Correas Y Las Hombreras

    La primera vez que utilice su chaleco hidros- tático Pro 2000 Adv, y cada vez que sea nece- sario, regule las hombreras, el fajín ventral y la correa de fijación de la botella. Es posible regular el largo de las hombreras según la corporatura y el tipo de equipo que...
  • Seite 102: Instrucciones Para Un Correcto Ensamblado Durante La Fase Pre-Inmersión

    El asa de transporte cocida directamente a la excéntrica ubicada en la parte trasera de la bolsa del modelo PRO 2000 Adv deberá ser espaldera, deberá ser regulada y estar lista colocada sobre el cuello de la grifería (Fig. 16) para el ajuste final en la botella.
  • Seite 103 ESPAÑOL cedimento podrá parecerle exagerado, pero garantiza el uso correcto del chaleco hidros- tático en todas las sucesivas inmersiones. Recuerde que el sistema de bloqueo ha sido proyectado para ser montado en cualquier monobotella sin ulteriores accesorios. Atención! Las correas con hebilla de cierre excéntrica per- miten asegurar al chaleco hidrostático cualquier tipo de monobotella con un diámetro mínimo de Fig.
  • Seite 104 ESPAÑOL Luego, monte el latiguillo de conexión con Atención! enganche rápido a una salida de baja presión de su regulador, teniendo cuidado de no for- mar nudos entre el latiguillo del manómetro En caso de flujo continuo, el grupo de mando Air y los de los reguladores.
  • Seite 105: Antes, Durante Y Después De La Inmersión

    ESPAÑOL Antes de la inmersión, no ponga el chaleco hidrostático al sol y no lo apoye sobre super- ficies cortantes, aguzadas o ásperas, como rocas u otras que podrían dañarlo; además, evite poner el chaleco sobre la arena. Predisponga las hombreras y las correas de modo que la vestición sea más fácil, deslice las correas de las hombreras hasta su máxi- ma apertura y póngase el cinturón de lastre.
  • Seite 106 ESPAÑOL Fig. 23 Fig. 24 Apertura de la válvula superior mediante pre- Descarga del aire en superficie a través de la sión del pulsador gris válvula de sobrepresión Importante Presionar contemporáneamente ambos pul- sadores grises de descarga no ocasiona nin- gún problema.
  • Seite 107 ESPAÑOL Cuando alcance la profundidad deseada, Una vez en la superficie, puede desinflar mantenga presionado el botón de carga completamente la bolsa y permanecer hasta haber regulado el equilibrio para estar cómodamente a la espera de ser recuperado en posición neutra. Durante la permanencia por la embarcación.
  • Seite 108: Cuidado Y Mantenimiento Del Chaleco Hidrostático Pro 2000 Adv

    (componentes 15 y 18 del diagrama grupo comando Pro 2000 Adv). Accionando ambos pulsadores grises se hará salir el agua. 2. Le recomendamos enjuagar periódica- mente la bolsa interna con agua dulce.
  • Seite 109: Certificado De Garantía

    ESPAÑOL te, esta vez internamente; elimine el agua y, cuando esté perfectamente seco, déje- lo parcialmente inflado en un lugar fresco y aireado. 7. Para evitar la proliferación de bacterias, desinfecte periódicamente el interior del chaleco hidrostático utilizando productos apropiados, los que puede encontrar en la línea de accesorios de la Seac Diving Pro.
  • Seite 110 ESPAÑOL salvo expresa autorización por parte de en donde el artículo ha sido adquirido, Seac Diving Pro. además de la fecha de la compra del 3. La garantía cubre todos los defectos de mismo). funcionamiento provocados únicamente En caso de que la Seac Diving Pro reciba por: un producto que: Fallos intrínsecos derivados de mate-...
  • Seite 111 ESPAÑOL PARA TENSAR LA CINCHA OBSERVE LA NUMERACIÓN PROGRESIVA DE LAS RANURAS DE LA HEBILLA Y PASE LA CINCHA EN LA FORMA SIGUIENTE Siguiendo la flecha (1),inserte la extremidad de la cincha por la parte Pase a través de la ranura de la flecha (3) y haga correr la cincha. interna, hacia el exterior de la hebilla.
  • Seite 112: Disegni Tecnici

    Gruppo di comando PRO 2000 ADV - PRO 2000 ADV inflator 1) Meccanismo Air Control completo Complete Air Control mechanism S77310 1B) Set completo valvola Air Control Oil pneumatic dump valve set S77336 2) O-Ring 2031 O-Ring 2031 S101017 3) Maschio attacco rapido...
  • Seite 113 Valvola sovrappressione completa PRO 2000 ADV - PRO 2000 ADV complete overpressure valve Valvola sovrappressione completa PRO 2000 ADV PRO 2000 ADV complete overpressure valve S77325 1) Tirante valvola di sovrappressione arancio Orange overpressure valve knob S75035/B 2) Calotta valvola sovrappressione PRO 2000 ADV...
  • Seite 114 SEACSUB S.p.A.

Inhaltsverzeichnis