IKEA KNÄPPA Montageanweisungen
Verfügbare Sprachen
Verfügbare Sprachen
ENGLISH
KNÄPPA
Desi gn and Quality
IKEA of Sweden
© Inter IKEA Systems B.V. 2012
AA-670669-2
1
2s
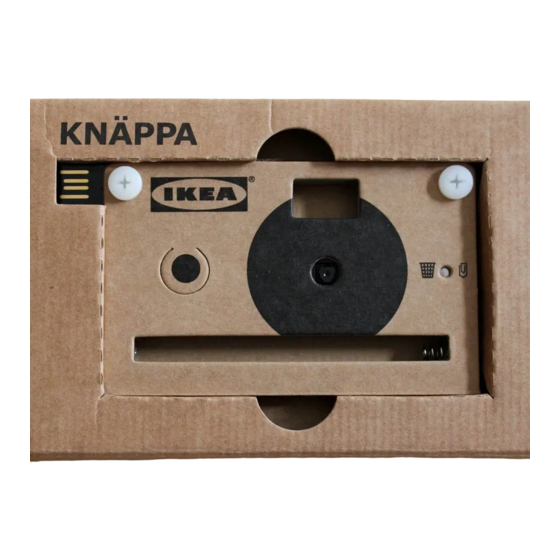
PUTTING THE CAMERA TOGETHER
Please refer to the assembly instructions. The
2 AAA/LR03 batteries need to be inserted as
shown before assembling the camera.
TURNING THE CAMERA ON
Hold down the power/shutter button with your
of the camera under the IKEA logo.
Check that the LED on the back of the camera
the camera is on.
TAKING A PICTURE
shutter button, then LED starts to blink green.
The LED will blink green for about 8 seconds
while the picture data is being processed. The
camera will not take another picture while the
LED is blinking. Once the LED stops blinking it
is ready to take the next picture.
TURNING THE CAMERA OFF
Hold down the power/shutter button with your
goes out. The camera will also turn itself off
after about 60 seconds if it is not used.
CONNECTING YOUR CAMERA TO A
COMPUTER
Connect the camera to your a computer using
the built-in USB connector. The IKEA logo
should face up when plugging the camera into
a USB port. Once connected the camera will
appear:
- on a Mac desktop as a folder.
- as a new device in "My Computer" on a
Windows PC.
The camera does not need to be switched on
to transfer pictures.
2
DELETING PICTURES FROM THE CAMERA
camera's internal memory is full. Before you
can take more pictures, you need to make
room for new pictures by deleting older ones.
To delete pictures make sure the camera is
turned on. Then use a paperclip to press the
delete button on the front of the camera for
pictures on the camera. Please back-up all the
pictures on a computer before pressing the
delete button.
LOW BATTERY
The LED on the camera will shine red when
the camera's battery power is low. You need to
replace the batteries as soon as you can.
BATTERY REPLACEMENT
Remove the plastic nuts and bolts at the top
of the camera, and place them in a safe place.
Remove the old batteries and then replace
making sure that the + and – symbols match
on the new batteries and circuit board. Then
reassemble.
interference that may cause undesired operation.
installed and used in accordance with the instructions, may cause harmful interference to radio communications.
and on, the user is encouraged to try to correct the interference by one or more of the following measures:
—Reorient or relocate the receiving antenna.
—Consult the dealer or an experienced radio/ TV technician for help.
3
TIPS
before click the power/shutter button to
stabilize the sensor exposure time to the aim
in order to make sure your pictures are not
blurry.
something to help keep it stable.
levels.
Inhaltsverzeichnis

Verwandte Anleitungen für IKEA KNÄPPA

Inhaltszusammenfassung für IKEA KNÄPPA
- Seite 2 EINSCHALTEN DER KAMERA übereinstimmen. Danach die Kamera wieder Aufnahmen können erst gemacht werden, schließen. sich vorn an der Kamera unter dem IKEA-Logo. TIPPS Die LED auf der Rückseite der Kamera neben eingeschaltet sein. Danach mit einer ...