Wavetek Meterman Serie Bedienungsanleitung
Inhaltsverzeichnis
Quicklinks
Inhaltsverzeichnis

Verwandte Anleitungen für Wavetek Meterman Serie

Inhaltszusammenfassung für Wavetek Meterman Serie
- Seite 1 ®...
-
Seite 2: Warranty
Any multimeter claimed to be defective during the warranty period should be returned with proof of purchase to an authorized Wavetek Meterman Service Center or to the local Wavetek Meterman dealer or distributor where your multimeter was purchased. See maintenance section for details. - Seite 3 CONTENTS Safety Information....................2 Instrument Familiarization and Preparation for Use .......... 4 Measurement Procedures ................8 Specifications ....................20 Troublehooting and Repair ................28 D • Inhalt Sicherheitsinformationen ................. 2 Vorstellung des Gerätes and Vorbereitung zur Anwendung ......4 Meßprozeduren ....................8 Spezifikationen ....................
-
Seite 4: Warnings And Precautions
WARNINGS AND PRECAUTIONS NOTE: The symbol W on the front panel of the multimeter is an international sym- bol meaning "REFER TO OPERATING INTRUCTIONS. " Warnings and precautions to avoid personal injury and multimeter damage are listed in this section and in section "Operating Instructions ". - Seite 5 Messen an Bildröhrgeräten (hohe Spannungsspitzen) Unsersuchen Sie Gerät, Meßkabel, Verbinder, usw vor jeder Messung. Beschädigte Teile nicht verwenden o Meßspitzen and Stromkreis während der Messung nicht berühren Sich selbst isolieren! Bei Strommessung, Multimeter immer in Serie mit Schaltkreis verbinden -- Nie in parallel mit Schaltkreis. E •...
-
Seite 6: Overload Indication
OVERLOAD INDICATION Whenever an input signal is larger than the range selected, an overload symbol "1" will appear in the display. This indication is nor- mal in the OHMS range when the leads are not connected to anything or when the measured value is higher than the selected resistance range. -
Seite 7: Preparation For Use - Unpacking
PREPARATION FOR USE - UNPACKING Your shipping carton should include the multimeter, one TL-245 Probe Set (one black, one red), one 9V battery (installed), three fuses (two installed and one spare inside the case), plus one TP-255 thermocouple (HD110T only). If any of the items are damaged or missing, immediately return the complete package to the place of purchase for an exchange. - Seite 8 – 6 –...
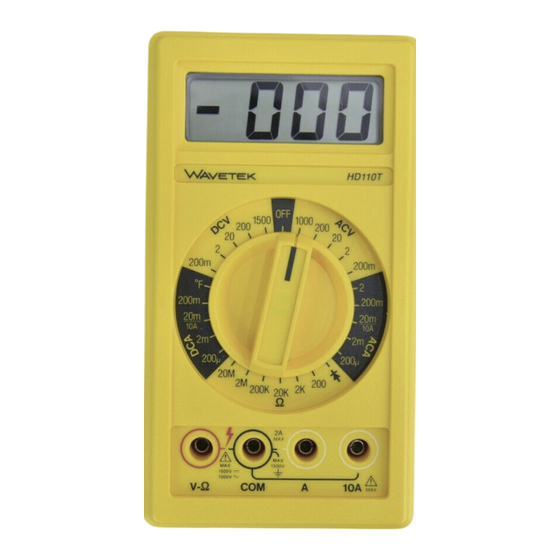
- Seite 9 INITIAL CHECKOUT Connect red test lead to the V-W Input Connector and black test lead to the COM Input Connector. Turn the Function/Range Switch to the 20MW position. With the two test lead tips separated, the Digital Display should read 1 (overload). Turn Function/Range Switch to each W position.
-
Seite 10: Measuring Procedures
MEASURING PROCEDURES General Procedures: When connecting or disconnecting test leads to a circuit, always first turn off power to device or circuit being tested and discharge all capacitors. If magnitude of signal is not known, set switch to highest range and reduce until satisfactory reading is obtained. - Seite 11 – 9 –...
- Seite 12 Los valores eficaces de señales no sinusoídales o distorsionadas pueden medirse directamente, con mayor precisión, utilizando los Modelos RMS22 HD 160 de Wavetek, que proporcionan el 'Verdadero valor eficaz" (TRMS). F • Measure de Tension CC et CA Connectez le cordon rouge à l'entrée V- W et le noir à /entrée COM.
- Seite 13 La valeur efficace de signaux non-sinusoïdaux ou défor- més est obtenue directement et avec une plus grande précison avec les modèles RMS225 ou HD160 de Wavetek. DC AND AC CURRENT MEASUREMENT (seeFig. 2) Connect red test lead to the A Input for current measurements up to two amperes or to the 10A input for current measurements to ten amperes.
- Seite 14 RESISTANCE MEASUREMENT (See Fig. 3) All resistance ranges on the multimeter are low-power ohms which allow accurate Connect red test lead to V W Input and measurements of in-circuit resistance. Set Function/Range Switch to desired W posi- black test lead to COM Input. tion.
- Seite 15 – 13 –...
- Seite 16 E • Medidas de Resistencia Todas las escalas de resistencia del multímetro utilizan una excitación de baja potencia, permitiendo una medida precisa de la resistencia dentro de circuito. Conecte la punta de prueba roja a la entrada V W, y la negra a la entrada COM. Ponga el selector de función/escala en la posición W deseada.
- Seite 17 D • Dioden - und Transistortest Rotes Meßkabel mit VW and schwarzes mit COM verbinden. Funktionsschalter auf G stellen. Meßkabel mit Diode verbinden. Spannungsabfall in Durchlaßrichtung ablesen. Rotes Meßkabel ist mit Anode and schwarzes mit Kathode verbunden. Bei Überlastanzeige "1", Verbindung umdrehen.
-
Seite 18: Continuity Test
E • Comprobación de diodes y transistores Conecte la punta de prueba roja a la entrada VW , y la negra a la entrada COM. Ponga el selector de función/escala en la posición de Comprobación de Diodos G . Aplique las puntas de prueba al disposi- tivo. - Seite 19 E • Prueba de continuidad Ponga el selector de función/escala en 200 W . Conecte la punta de prueba roja a la entrada V W , y la negra a la entrada COM. Con las puntas separadas, o si la resistencia está fuera de escala, la indicación en el visu- alizador será...
- Seite 20 TEMPERATURE MEASUREMENT ( HD110T ONLYSee Fig 5) The HD110T is designed for use with an industry-standard type K thermocouple having a miniature or subminiature input connector. Disconnect the test leads from the multimeter. Insert type K thermocouple into the input connector at the top of the multimeter, above the LCD. Place the Function/Range Switch in the °F position.
- Seite 21 Déconnectez les cordons de test du multimètre. Connectez le thermocouple de type K à la borne d'entrée se trouvant au-dessus de l'appareil. Placez le sélecteur sur la position °F. Placez le thermocouple dans l'endroit à mesurer et lisez la température en °F sur l'afficheur. N N o o t t e e : : Enlevez le thermocouple pour les mesures normales de tension, courant et résistance.
-
Seite 22: Specifications
SPECIFICATIONS G G e e n n e e r r a a l l S S p p e e c c i i f f i i c c a a t t i i o o n n s s high impact fire-retardant plastic. - Seite 23 D D C C C C u u r r r r e e n n t t Accuracy: 200W to 2MW ranges 0.2%rdg ± 1 dgt Ranges: 200mA, 2, 20, 200mA, 2, 10A 20MW range: 1.0%rdg ±1 dgt Max. Resolution: 100nA in 200mA range Test Current (Range/A): 200W/2.5mA;...
- Seite 24 D • Spezifikationen A A a a l l l l g g e e m m e e i i n n e e S S p p e e z z i i f f i i k k a a t t i i o o n n e e n n Modell HD110, HD110T: Verstärkter stoßsicherer, feuerwehrender ABS Genauigkeiten sind als ±(% vMW...
- Seite 25 Transientenschutz: 3kV für 10ms Auflösung: 0.152 im 200W Bereich G G l l e e i i c c h h s s t t r r o o m m Genauigkeit: 200W bis 2MW Bereiche 0.2%vMW ± 1 Dgt 20MW Bereich: Bereiche: 200mA, 2, 20, 200mA, 2, 1.0%rdg ±1 dgt 10A (HD110T: 200mA, 2, 20, 200mA,...
- Seite 26 E • Especificaciones E E s s p p e e c c i i f f i i c c a a c c i i o o n n e e s s g g e e n n e e r r a a l l e e s s E E s s p p e e c c i i f f i i c c a a c c i i o o n n e e s s e e l l é...
- Seite 27 C C o o r r r r i i e e n n t t e e C C C C ±1 dígito; 20MW: 1.0% lect. ±1 dígito Máx. corriente de prueba (Escala/A): Escalas: 200mA; 2, 20, 200mA; 2, 10A 200W/2.5mA;...
- Seite 28 F • Specifications Fournitures: Une pile 9-volts; un S S p p é é c c i i t t i i c c a a t t i i o o n n s s G G é é n n é é r r a a l l e e s s fusible de réserve;...
- Seite 29 (HD110T: 200mA, 2, 20, 200A, 10A) Tension max en circuit ouvert: 0.3V Résolution: 100nA en calibre 200uÁ tous calibres, exc. cal. 200W: 3V Précision: cal. 200mA à 2A: 0.35% Tension max en circuit: 200mV, tons lect ±1 dgt Calibre 1OA:1.5% lect ±1 calibres dgt Temps de réponse: <2 sec Temps de réponse: <2 sec, excepté...
- Seite 30 Excepto la sustitución de la pila o el fusible, cualquier trabajo de reparación del multímetro debe hacerse exclusivamente en un Centro de Servicio autorizado por Wavetek, o por personal técnico cualificado para este tipo de reparaciones, Antes de enviar el multímetro para su reparación, compruebe to siguiente:...
-
Seite 31: Battery/Fuse Replacement
BATTERY/FUSE REPLACEMENT W W a a r r n n i i n n g g : : To prevent electrical shock hazard and/or damage, turn off Multimeter and disconnect the test leads before removing back cover and replacing battery or fuses. - Seite 32 Pour maintenir les spécifications décrites dans ce manuel, votre multimètre doit être calibré une fois par an ainsi qu'après chaque réparation. Le calibrage peut être effectué par un Centre de Services Wavetek, ou contactez Wavetek pour les procé- dures à suivre.
- Seite 33 Meterman Service Center for an over-the-counter exchange for the same or like product. Non-warranty repairs should be sent to a Wavetek Meterman Service Center. Please call Wavetek Meterman or enquire at your point of purchase for the nearest location and current repair rates. All multimeters returned for warranty or...
- Seite 34 Wavetek Meterman o del Centro de Servicio específico. El multímetro se enviará a portes pagados a una de las siguientes direcciones, o al Centro de Servicio que le hayan indicado: en EE.UU.
- Seite 35 à un Centre de Services agrée par Wavetek Meterman . Téléphonez à Wavetek Meterman ou demandez à votre revendeur pour l'adresse la plus proche. Pour les réparations hors garantie, demandez dabord les tarifs. Joignez les informations et documents suivants: nom de sociètè, nom du client, adresse, numéro de téléphone, preuve d'achat (pour réparations sous garantie),...
- Seite 36 Manual Part Number 1566185 1420 75th Street SW Everett, WA 98203 Information contained in this manual is Tel: (877) 956-2680 proprietary to Wavetek Meterman and is Fax: 425-446-6390 provided solely for instrument operation and maintenance. The information in Canadian Service Center...