Herunterladen Inhalt Inhalt Diese Seite drucken
Inhaltsverzeichnis

Werbung

Verfügbare Sprachen
  • DE

Verfügbare Sprachen

  • DEUTSCH, seite 38
Leica DX10
English
Deutsch
Français
Español
Português
Italiano

Werbung

Inhaltsverzeichnis
loading

Inhaltszusammenfassung für Leica DX10

  • Seite 1 Leica DX10 English Deutsch Français Español Português Italiano...
  • Seite 3 Leica DX10 User Manual English Version 1.0 English...
  • Seite 4 The type and the serial number of your product are indicated on the type identification plate. Enter the type and serial number in your manual and always refer to this information when you need to contact your agency or Leica Geosystems authorized service workshop. Type: _______________ Serial No.:...
  • Seite 5 Describes the startup procedure for using the DX10 Field PC and the PowerHolder. To use the DX10 efficiently it’s inalienable to refer to the manual provided together with the software running on it. This is valid for information on software upload also.
  • Seite 6: Inhaltsverzeichnis

    1.2 Suspend and resume the DX10 1.3 Using the stylus 1.4 Cables Used with DX10 1.5 Fixing the DX10-R to a PowerHolder and Pole Getting Started 2.1 Step 1: Install the Battery Pack 2.2 Step 2: Charge the Battery Pack 2.3 Step 3: Establish Basic Settings on the Device...
  • Seite 7: Description Of The System

    The Anatomy of the Field PC Components of the This section illustrates the different parts of your Field PC. For more DX10 details about using the Field PC, see the Technical Reference Manual on the User Documentation CD. a b c d...
  • Seite 8 Available DX10 Your Field PC is available as DX10-R and DX10-Y. Differences between types these types are shown in this segment. DX10-R DX10-Y DX10_12 DX10-R is delivered with following additional parts mounted: a) Clip and accessories b) Angle bracket •...
  • Seite 9: Suspend And Resume The Dx10

    Enters the selected soft key or option. Power button Turns the Field PC on and off, resets, suspends. Four-way Allows you to navigate. directional button Suspend and resume the DX10 1sec. ULTRA-RUGGET FIELD PC 4sec. Description of the System DX10...
  • Seite 10: Using The Stylus

    For instructions on using the transcriber program on your Field PC, see Entering Information in Technical Reference Manual, Chapter 4. The stylus is stored in an open slot at the top of the device. A hole in the stylus end allows you to attach a lanyard. DX10 Description of the System...
  • Seite 11: Cables Used With Dx10

    (5 pin) + RS232 (9 pin) • Disconnect DX10-R from PowerHolder before charging the DX10. • If DX10-R is used on the PowerHolder be sure that only the 9 PIN SubD connector is plugged to DX10. • Use only cables recommended by Leica Geosystems.
  • Seite 12: Fixing The Dx10-R To A Powerholder And Pole

    Fixing the DX10-R to a PowerHolder and Pole Components of the The PowerHolder consists of a number of components, as shown in the PowerHolder diagram. DX10_08 GHT52 clamp a) Plastic sleeve b) Pole clamp c) Clamp bolt PowerHolder d) Tightening screw...
  • Seite 13 DX10-R from a pole Unplug connector from DX10. step-by-step Screw out the safety screw of the bracket on the DX10. Push the DX10 towards top of the PowerHolder to release the clip from the pivot. Always disconnect the cable between the DX10 and the PowerHolder when the DX10 is not in use (over night, etc.).
  • Seite 14: Getting Started

    Insert the battery pack so battery contacts match up. Insert the tabs on the bottom of the battery door into the case slots. Close the battery door. Press on the battery door. Slide the latch to the left to lock it. Reattach the hand strap. DX10 Getting Started...
  • Seite 15: Step 2: Charge The Battery Pack

    +20°C/+50°F to +68°F if possible. • It is normal for the battery to become warm during charging. Using the chargers recommended by Leica Geosystems, it is not possible to charge the battery if the temperature is too high. • For new batteries or batteries that have been stored for a long time (>...
  • Seite 16 If the Field PC suspends and the flashing red LED turns off, the device keeps charging. Warning Batteries not recommended by Leica Geosystems may be damaged if charged or discharged. They may burn and explode. Precautions: Only charge and discharge batteries recommended by Leica Geosystems.
  • Seite 17: Step 3: Establish Basic Settings On The Device

    Step 3: Establish Basic Settings on the Device Basic Settings, Windows Mobile is pre-installed on the DX10 in English step-by-step language. For other language options of Windows Mobile oper- ating systems, please consult the support/downloads section on the website: www.junipersys.com.
  • Seite 18: Step 4: Install Activesync On A Desktop Computer

    Select your language. If ActiveSync 4.5 or higher has not been installed on your desktop computer, follow the directions on the screen to install Install ActiveSync before attaching the USB cable to the desktop or Field PC. DX10 Getting Started...
  • Seite 19: Step 5: Create An Activesync Connection

    Establish an ActiveSync partnership by following the instructions on the desktop computer screen. You are now ready to use your Field PC. See the Technical Reference Manual on the User Documentation CD for instructions on specific tasks. Getting Started DX10...
  • Seite 20: Care And Transport

    Shipping When transporting the product by rail, air or sea, always use the complete original Leica Geosystems packaging, transport container and cardboard box, or its equivalent, to protect against shock and vibration. Shipping, transport When transporting or shipping batteries, the person in charge of the...
  • Seite 21: Safety Directions

    Use after misappropriation. • Use of products with obviously recognizable damages or defects. • Use with accessories from other manufacturers without the prior explicit approval of Leica Geosystems. • Inadequate safeguards at the working site, for example when measuring on roads. •...
  • Seite 22: Limits Of Use

    End User Licence Agreement EULA EULA terms The Leica Geosystems DX 10 includes software licensed from an affiliate of Microsoft Corporation. Documentation for this device includes an End User License Agreement (EULA) for this software. Use of this device by you constitutes your agreement to this EULA.
  • Seite 23: Hazards Of Use

    If computers intended for use indoors are used in the field there is a danger of electric shock. Precautions: Adhere to the instructions given by the computer manufacturer with regard to field use in conjunction with Leica Geosystems products. Safety Directions DX10...
  • Seite 24 Precautions: Do not use the product in a thunderstorm. Warning Batteries not recommended by Leica Geosystems may be damaged if charged or discharged. They may burn and explode. Precautions: Only charge and discharge batteries recommended by Leica Geosystems.
  • Seite 25 • Touching live components • Using the product after incorrect attempts were made to carry out repairs. Precautions: Do not open the product. Only Leica Geosystems authorised service workshops are entitled to repair these products. Safety Directions DX10...
  • Seite 26: Electromagnetic Compatibility Emc

    Warning Electromagnetic radiation can cause disturbances in other equipment. Although the product meets the strict regulations and standards which are in force in this respect, Leica Geosystems cannot completely exclude the possibility that other equipment may be disturbed. Caution There is a risk that disturbances may be caused in other equipment if the...
  • Seite 27 • Do not operate the product with radio or digital cellular phone devices in aircraft. • Do not operate the product with radio or digital cellular phone devices for long periods immediately next to your body. Safety Directions DX10...
  • Seite 28: Fcc Statement, Applicable In U

    • Consult the dealer or an experienced radio/TV technician for help. Warning Changes or modifications not expressly approved by Leica Geosystems for compliance could void the user's authority to operate the equipment. Labelling Type: Art.
  • Seite 29 ........DX10_13 Safety Directions DX10...
  • Seite 30: Technical Data

    Technical Data DX10 Technical Data Design Magnesium case with elastomer overmold and integrated battery. Dimensions Length: 165 mm / 6.5” Width: 89 mm / 3.5” Thickness: 43 mm / 1.7” Weight 0.482 kg / 17 oz Power Reverse polarity protectors; over voltage protection; auto shut off Power consumption: •...
  • Seite 31 Options wireless cellular modem Environmental Temperature specifications Type Operating Storage temperature temperature DX10 with internal -30° to +50°C -30° to +60°C Bluetooth -22° to +122°F -22° to +140°F Charger 0° to 50°C -20° to +75°C 32° to 122°F -4° to +167°F Battery -30°...
  • Seite 32 Standard Rechargeable Li-Ion battery, wall charger (universal voltage), USB sync Accessories cable, captured full-size stylus, hand strap, screen protector, quick start guide, Microsoft Getting Started CD, User Documentation CD Certifications FCC Class B, European CE Mark DX10 Technical Data...
  • Seite 33: Powerholder Technical Data

    Operating temperature [°C] Storage temperature [°C] -30 to +65 -40 to +80 Protection against water, dust and sand Protection IP67 (IEC 60529) Dusttight Protected against water jets Waterproof to 1 m temporary immersion Humidity Protection Up to 100 % Technical Data DX10...
  • Seite 34: Conformity To National Regulations

    • FCC Part 15 (applicable in US) national • Hereby, Leica Geosystems AG, declares that the DX10 is in regulations compliance with the essential requirements and other relevant provisions of Directive 1999/5/EC. The declaration of conformity may be consulted at http://www.leica-geosystems.com/ce.
  • Seite 35: International Limited Warranty, Software License Agreement

    Leica Geosystems. Such software is protected by copyright and other laws and its use is defined and regulated by the Leica Geosystems Software License Agreement, which covers aspects such as, but not limited to,...
  • Seite 36 International Standards of Quality Management and Quality Systems (ISO standard 9001) and Environmental Management Systems (ISO standard 14001). Ask your local Leica Geosystems dealer for more information about our TQM program. Leica Geosystems AG Heinrich-Wild-Strasse...
  • Seite 37 Leica DX10 Gebrauchsanweisung English Deutsch Version 1.0 Deutsch...
  • Seite 38: Einführung

    Die Typenbezeichnung und die Serien Nr. Ihres Produkts ist auf dem fikation Typenschild angebracht. Übertragen Sie diese Angaben in Ihre Gebrauchsanweisung und beziehen Sie sich immer auf diese Angaben, wenn Sie Fragen an unsere Vertretung oder eine von Leica Geosystems autorisierte Servicestelle haben. Typ: _______________ Serien-Nr.: _______________...
  • Seite 39 DX10 QuickGuide Beschreibt den Aufstellungsvorgang zur Verwendung des DX10 Field PC und des PowerHolder. Zur effizienten Verwendung des DX10 muss auch das Handbuch der Software, die auf dem Field PC läuft, gelesen werden. Das gilt auch für Informationen zum Softwareupload. Einführung...
  • Seite 40 1.1 Der Aufbau des Field PC 1.2 Energiesparmodus und Aufwecken des DX10 1.3 Verwendung des Stifts 1.4 Kabel des DX10 1.5 Befestigung des DX10-R an einem PowerHolder und Lotstock Erste Schritte 2.1 Schritt 1: Installieren des Akkupacks 2.2 Schritt 2: Aufladen des Akkupacks 2.3 Schritt 3: Grundeinstellungen des Geräts...
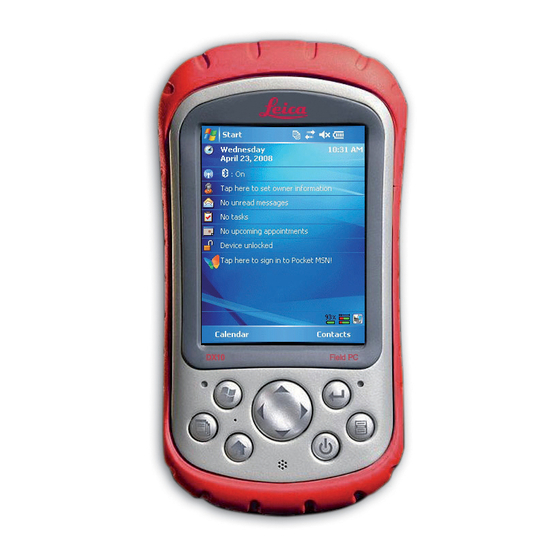
  • Seite 41: Systembeschreibung

    Der Aufbau des Field PC Komponenten des Dieser Abschnitt zeigt die verschiedenen Teile des Field PC. Weiterführende Hinweise zur Verwendung des Field PC finden Sie im DX10 Referenzhandbuch auf der Dokumentations-CD. a b c d n o p g h i DX10_01 a) Taste für Anwendungsma-...
  • Seite 42 Verfügbare DX10 Der Field PC ist verfügbar als DX10-R und DX10-Y. Unterschiede zwischen Modelle den Modellen sind im folgenden Abschnitt beschrieben. DX10-R DX10-Y DX10_12 DX10-R wird mit den folgenden Zusatzteilen geliefert. a) Clip und Zubehör b) Winkelhalter • Für DX10-Y, können Clip und Zubehör in einem seperaten Paket geliefert werden, wärend der Winkelhalter nicht verfügbar ist.
  • Seite 43: Energiesparmodus Und Aufwecken Des Dx10

    Element an (ähnlich wie die rechte Maustaste am Computer). Eingabetaste Bestätigt die ausgewählte Taste oder Option. Betriebsschalter Schaltet den Field PC ein oder aus, Einstellungen zurücksetzen oder Energiesparmodus. Navigatortaste Erlaubt das Navigieren. Energiesparmodus und Aufwecken des DX10 1sec. ULTRA-RUGGET FIELD PC 4sec. Systembeschreibung DX10...
  • Seite 44: Verwendung Des Stifts

    Für eine Anleitung zur Verwendung des Transcriber Programms auf Ihrem Field PC, siehe Eingabe von Informationen im Technischen Referenz- handbuch, Kapitel 4. Der Stift wird in einem Steckplatz auf der oberen Seite des Geräts aufbewahrt. Eine Öffnung am Ende des Stifts erlaubt die Befestigung eines Sicherungs-Bandes. DX10 Systembeschreibung...
  • Seite 45: Kabel Des Dx10

    Entfernen Sie den DX10-R vom PowerHolder vor Ladung des DX10. • Wenn ein DX10-R auf dem PowerHolder verwendet wird, stellen Sie sicher, dass nur die 9 PIN SubD Verbindung an den DX10 angeschlossen ist. • Verwenden Sie nur von Leica Geosystems empfohlene Kabel.
  • Seite 46: Befestigung Des Dx10-R An Einem Powerholder Und Lotstock

    Klemmbolzen PowerHolder d) Anzugsschraube e) Befestigungsarm f) LED g) Befestigungsplatte h) Sicherungsschraube Kabel zur Verbindung des DX10 (9 PIN SubD Verbindung) Batteriefach k) Verriegelungsmechanismus für die Batterie LEMO Port für das Aufsteckgehäuse mit Kommunikationsmodul Befestigung des Beschreibung DX10-R und 1.
  • Seite 47 Drehen Sie die Sicherheitsschraube aus der Halterung des DX10 raus. Drücken Sie den DX10 am PowerHolder nach oben um den Clip vom Drehpunkt zu lösen. Entfernen Sie immer das Kabel zwischen dem DX10 und dem PowerHolder wenn der DX10 nicht verwendet wird (über Nacht, etc.)
  • Seite 48: Erste Schritte

    Setzen Sie die Laschen an der Unterseite des Akkudeckels in die entsprechenden Schlitze im Gehäuse ein. Schließen Sie den Akkudeckel. Drücken Sie auf den Akkudeckel. Schieben Sie den Verschluss nach links, um ihn zu verriegeln. Befestigen Sie den Handriemen wieder. DX10...
  • Seite 49: Schritt 2: Aufladen Des Akkupacks

    Umgebungstemperatur von +10°C bis +20°C/+50°F bis +68°F zu laden. • Es ist normal, dass die Batterie während des Ladevorgangs warm wird. Bei den von Leica Geosystems empfohlenen Ladegeräten ist es nicht möglich, die Batterie zu laden, wenn die Temperatur zu hoch ist. •...
  • Seite 50 Nicht von Leica Geosystems empfohlene Batterien können beim Laden oder Entladen eventuell beschädigt werden. Sie könnten verbrennen oder explodieren. Gegenmassnahmen: Laden und Entladen Sie nur von Leica Geosystems empfohlene Batterien. Ladegerät: Gefahr Das Produkt ist nicht zum Gebrauch in nassen und extremen Bedingungen geeignet.
  • Seite 51: Schritt 3: Grundeinstellungen Des Geräts

    Schritt 3: Grundeinstellungen des Geräts Grundein- Windows Mobile ist am DX10 in englischer Sprache vorinstal- stellungen, Schritt- liert. Für andere Sprachoptionen des Windows Mobile Betriebs- für-Schritt systems, sehen Sie bitte auf der Support/Downloads Seite der website nach: www.junipersys.com Halten Sie zum Kalibrieren des Geräts und zum Durchführen der Grundeinstellung den Stift bereit und folgen Sie den Anweisungen auf dem Bildschirm.
  • Seite 52: Schritt 4: Installieren Von Activesync Auf Einem Desktop Computer

    Wählen Sie Ihre Sprache. Wenn ActiveSync 4.5 oder höher nicht auf Ihrem Desktop- Computer installiert ist, folgen Sie den Anweisungen auf dem Display. Installieren Sie ActiveSync, bevor Sie das USB-Kabel an den Desktop-Computer oder den Field PC anschließen. DX10...
  • Seite 53: Schritt 5: Herstellen Einer Activesync Verbindung

    Stecken Sie den USB-Host-Stecker (großer A-Stecker) des USB-Kabels in den Desktop-Computer. Legen Sie eine ActiveSync-Partnerschaft fest, indem Sie die Anweisungen auf dem Bildschirm des Desktop-Computers ausführen. Jetzt ist Ihr Field PC einsatzbereit. Anweisungen für spezielle Aufgaben finden Sie im Technischen Referenzhandbuch auf der Dokumentations- DX10...
  • Seite 54: Wartung Und Transport

    Transportieren Sie das Produkt niemals lose im Auto. Das Produkt kann durch Schläge und Vibrationen stark beeinträchtigt werden. Versand Verwenden Sie beim Versand per Bahn, Flugzeug oder Schiff immer die komplette Leica Geosystems-Originalverpackung, Transportbehälter und Versandkarton, bzw. entsprechende Verpackungen. Die Verpackung sichert das Produkt gegen Schläge und Vibrationen. Versand, Transport...
  • Seite 55: Sicherheitshinweise

    Inbetriebnahme nach Entwendung. • Verwendung des Produkts mit offensichtlich erkennbaren Mängeln oder Schäden. • Verwendung von Zubehör anderer Hersteller, das von Leica Geosystems nicht ausdrücklich genehmigt ist. • Ungenügende Absicherung des Arbeitsstandortes, z.B. bei Durchführung von Messungen an Strassen. •...
  • Seite 56: Einsatzgrenzen

    End Benutzer Lizenzvertrag (End User Licence Agreement) EULA EULA Bedingungen Der Leica Geosystems DX10 umfasst Software Lizenzen von einer Partnergesellschaft der Microsoft Corporation. Zur Dokumentation für dieses Gerät gehört ein End-Benutzer Lizenzvertrag (EULA) für diese Software. Durch Verwendung des Geräts akzeptieren Sie diese EULA Bedingungen.
  • Seite 57: Gebrauchsgefahren

    Bei Verwendung von Computern, die nicht durch den Hersteller für den Einsatz im Feld zugelassen sind, kann es zu Gefährdungen durch einen elektrischen Schlag kommen. Gegenmassnahmen: Achten Sie auf die herstellerspezifischen Angaben für den Einsatz im Feld in der Systemanwendung mit Leica Geosystems Produkten. DX10...
  • Seite 58 Batterien beschädigt werden. Dies kann zu Brand- und Explosionsgefahren führen. Gegenmassnahmen: Verwenden Sie zum Laden der Batterien nur Ladegeräte, die von Leica Geosystems empfohlen werden. Vorsicht Beim Transport, Versand oder bei der Entsorgung von Batterien kann bei unsachgemässen, mechanischen Einwirkungen auf die Batterie...
  • Seite 59 Produktspezifische Informationen zur Behandlung und Entsorgung stehen auf der Homepage von Leica Geosystems unter http://www.leica- geosystems.com/treatment zum Download bereit oder können bei Ihrem Leica Geosystems Händler angefordert werden. Warnung Lassen Sie die Produkte nur von einer von Leica Geosystems autorisierten Servicestelle reparieren. DX10...
  • Seite 60 Wenn Sie das Produkt öffnen, können folgende Aktionen dazu führen, dass Sie einen Stromschlag bekommen. • Berührung spannungsführender Elemente • Verwendung des Produks nach unsachgemässer Reperatur. Gegenmassnahmen: Öffnen Sie das Produkt nicht. Lassen Sie die Produkte nur von einer von Leica Geosystems autorisierten Servicestelle reparieren. DX10...
  • Seite 61: Elektromagnetische Verträglichkeit Emv

    Möglichkeit einer Störung anderer Geräte durch elektromagnetische Strahlung. Obwohl die Produkte die strengen Anforderungen der einschlägigen Richtlinien und Normen erfüllen, kann Leica Geosystems die Möglichkeit einer Störung anderer Geräte nicht ganz ausschliessen. Vorsicht Möglichkeit einer Störung anderer Geräte wenn Sie das Produkt in Kombination mit Fremdgeräten verwenden, z.B.
  • Seite 62 Schädigung bei Mensch und Tier durch elektroma- gnetische Strahlung. Gegenmassnahmen: Obwohl das Produkt in Kombination mit von Leica Geosystems empfohlenen Funkgeräten oder Mobiltelefonen die strengen Anforderungen der einschlägigen Richtlinien und Normen erfüllt, kann Leica Geosystems die Möglichkeit einer Störung anderer Geräte beziehungsweise die Schädigung bei Mensch und Tier nicht ganz...
  • Seite 63: Fcc Hinweis, Gültig In Usa

    • Lassen Sie sich von Ihrem Händler oder einem erfahrenen Radio- und Fernsehtechniker helfen. Warnung Änderungen oder Modifikationen, die nicht ausdrücklich von Leica Geosystems erlaubt wurden, kann das Recht des Anwenders einschränken, das Gerät in Betrieb zu nehmen. Beschilderung Type: Art.
  • Seite 64 ............DX10_13 DX10...
  • Seite 65: Technische Daten

    Technische Daten DX10 Technische Daten Design Magnesiumgehäuse mit Elastomer-Überzug und integrierter Batterie. Dimensionen Länge: 165 mm / 6.5” Breite: 89 mm / 3.5” Dicke: 43 mm / 1.7” Gewicht 0.482 kg / 17 oz Stromversorgung Verpolungssicher; überspannungssicher; automatische Abschaltung Leistungsaufnahme: •...
  • Seite 66 Integriertes Bluetooth oder Bluetooth- Unterstützung mit CF- oder SD-Bluetooth- Karte; Wi-Fi-Unterstützung; drahtloses Mobiltelefon-Modem Umwelt Temperatur spezifikationen Betriebstemperatur Lagertemperatur DX10 mit internem -30° bis +50°C -30° bis +60°C Bluetooth -22° bis +122°F -22° bis +140°F Ladegerät 0° bis 50°C -20° bis +75°C 32°...
  • Seite 67 Studio 2005 Anzeigen Externe Strom-/Lade-LED und Hinweis-LED; andere Anzeigen im Infobereich Standard Zubehör Wiederaufladbarer Li-Ion Akku, Wandladegerät (Universalspannung), USB-SynchronisationsKabel, Stift, Handriemen, Displayschutz, Quick Start Anleitung, Microsoft Getting Started CD, Dokumentations CD Zertifizierungen FCC Class B, Europäisches CE Kennzeichen DX10...
  • Seite 68: Powerholder Technische Daten

    Temperatur kationen Betriebstemperatur [°C] Lagertemperatur [°C] -30 bis +65 -40 bis +80 Schutz gegen Wasser, Staub und Sand Schutz IP67 (IEC 60529) Staubdicht Geschützt gegen Wasserstrahlen Wasserdicht bis 1 m, bei temporärem Eintauchen Feuchtigkeit: Schutz Bis zu 100 % DX10...
  • Seite 69: Konformität Zu Nationalen Vorschriften

    Konformität zu • FCC Teil 15 (gültig in USA) nationalen • Hiermit erklärt Leica Geosystems AG, dass der DX10 grundlegende Vorschriften Vorschriften und andere wichtige Bestimmungen der Richtlinie 1999/5/EC einhält. Die Konformitätserklärung kann unter http://www.leica-geosystems.com/ce eingesehen werden. Geräte der Klasse 1 entsprechend der Europäischen Richtlinie 1999/5/EC (R&TTE) können ohne Einschränkung...
  • Seite 70: Internationale Beschränkte Herstellergarantie, Software Lizenzvertrag

    Herstellergarantie die auf der Leica Geosystems Herstellergarantie Homepage unter http://www.leica-geosystems.com/international- warranty zum Download bereit steht oder von Ihrem Leica Geosystems Händler angefordert werden kann. Die vorangehende Garantie gilt ausschliesslich und tritt anstelle aller anderen Garantien und Geschäftsbedingungen, ob ausdrücklich oder stillschweigend, tatsächlich oder kraft Gesetzes, statuarisch oder...
  • Seite 71 DX10...
  • Seite 72 Total Quality Management: Unser Engagement für totale Kundenzufriedenheit Gemäss SQS-Zertifikat verfügt Leica Geosystems AG Heerbrugg, über ein Qualitäts-System, das den interna- tionalen Standards für Qualitäts-Management und Qualitäts-Systeme (ISO 9001) und Umweltmanagement- systeme (ISO 14001) entspricht. Mehr Informationen über unser TQM Programm erhalten Sie bei Ihrem lokalen Leica Geosystems Vertreter.
  • Seite 73 Leica DX10 Manuel de l'utilisateur English Deutsch Français Version 1.0 Français...
  • Seite 74 Le type et le numéro de série de votre produit figurent sur sa plaque du produit signalétique. Inscrivez ces deux informations dans votre manuel et indiquez-les toujours lorsqu'il vous faut entrer en contact avec votre représentation Leica Geosystems ou un atelier de réparation agréé. Type: _______________ N° de série: _______________ Symboles Les symboles utilisés dans ce manuel ont les significations suivantes:...
  • Seite 75 Décrit la procédure de démarrage pour le Field PC DX10 et le PowerHolder. Pour utiliser efficacement le DX10, il est indispensable de se référer au manuel fourni avec le logiciel chargé dans le PC. Cela vaut aussi pour les informations sur la mise à jour du logiciel.
  • Seite 76 1.2 Arrêt et remise en marche du DX10 1.3 Utilisation du stylet 1.4 Câbles utilisés avec le DX10 1.5 Fixation du DX10-R sur un PowerHolder et une canne Prise en main 2.1 Etape 1 : Installer le bloc batterie 2.2 Etape 2 : Charger le bloc batterie 2.3 Étape 3 : Définir les paramètres de base de l'appareil...
  • Seite 77: Description Du Système

    Employez-le pour traiter les informations de terrain. Il est conçu pour vous. La description du Field PC Eléments du DX10 Cette section décrit les différents éléments de votre Field PC. Pour en savoir plus sur l'utilisation de ce PC, reportez-vous au manuel de référence qui se trouve sur le CD de documentation utilisateur.
  • Seite 78 Types DX10 Votre Field PC se décline en deux versions : DX10-R et DX10-Y. Les disponibles différences entre ces types sont répertoriées dans le tableau suivant. DX10-R DX10-Y DX10_12 DX10-R est fourni avec les pièces additionnelles suivantes, montées : a) Clip et accessoires b) Orifice de fixation •...
  • Seite 79: Arrêt Et Remise En Marche Du Dx10

    Bouton Entrée Ouvre le raccourci ou l'option sélectionné. Bouton ON/OFF Allume/éteint le Field PC, le remet à zéro, l'interrompt. Bouton quadridi- Permet de naviguer. rectionnel Arrêt et remise en marche du DX10 1sec. ULTRA-RUGGET FIELD PC 4sec. Description du système DX10...
  • Seite 80: Utilisation Du Stylet

    Field PC, reportez-vous à la rubrique Saisie d'informations dans le manuel technique de référence, chapitre 4. Le stylet est rangé dans un logement ouvert sur le dessus de l'appareil. Un orifice à l'extrémité du stylet permet d'y attacher une cordelette. DX10 Description du système...
  • Seite 81: Câbles Utilisés Avec Le Dx10

    • Débranchez le DX10-R du PowerHolder avant de charger le DX10. • Si le DX10-R est placé sur le PowerHolder, assurez-vous que seul le connecteur SubD 9 broches est raccordé au DX10. • Utilisez seulement les câbles recommandés par Leica Geosystems.
  • Seite 82: Fixation Du Dx10-R Sur Un Powerholder Et Une Canne

    Fixation du DX10-R sur un PowerHolder et une canne Eléments du Le support PowerHolder comporte un certain nombre d'éléments, tels PowerHolder qu'indiqués sur la représentation graphique. DX10_08 Bride GHT52 a) Manchon en plastique b) Bride de la canne à plomb...
  • Seite 83 DX10-R Débranchez le connecteur du DX10. d'une canne Dévissez la vis de retenue de l'orifice de fixation du DX10. Poussez le DX10 vers le haut du PowerHolder pour détacher le clip du pivot. Débranchez toujours le câble reliant le DX10 et le PowerHolder quand le DX10 n'est pas utilisé...
  • Seite 84: Prise En Main

    Fermez le volet du compartiment de la batterie. Appuyez sur le volet du compartiment de la batterie. Faites glisser le loquet vers la gauche pour le verrouiller. Remettez la dragonne en place. DX10 Prise en main...
  • Seite 85: Etape 2 : Charger Le Bloc Batterie

    +10 °C et +20 °C (+50 °F et +68 °F), pour autant que cela soit possible. • L'échauffement des batteries durant leur charge est normal. En recourant aux chargeurs recommandés par Leica Geosystems, il n'est pas possible de charger les batteries en cas de température trop élevée. •...
  • Seite 86 L'utilisation de batteries non recommandées par Leica Geosystems peut provoquer un endommagement de celles-ci pendant la charge ou la décharge. Elles peuvent brûler et exploser. Mesure préventive: Ne chargez et ne déchargez que les batteries recommandées par Leica Geosystems. Chargeur: Danger Le produit n'est pas conçu pour être utilisé...
  • Seite 87: Étape 3 : Définir Les Paramètres De Base De L'appareil

    Étape 3 : Définir les paramètres de base de l'appareil Paramètres de Windows Mobile est pré-installé en anglais sur le DX10. Pour base, pas à pas obtenir des informations sur d'autres versions linguistiques des systèmes d'opération Windows Mobile, veuillez consulter la rubrique support/downloads du site Internet www.juni-...
  • Seite 88: Etape 4 : Installer Activesync Sur Un Ordinateur De Bureau

    Si ActiveSync 4.5 ou une version plus récente n'est pas installé sur votre ordinateur de bureau, suivez les instructions apparaissant à l'écran pour l'installer. Installez ActiveSync avant de raccorder le câble USB à l'ordinateur du bureau ou au Field PC. DX10 Prise en main...
  • Seite 89: Etape 5 : Créer Une Connexion Activesync

    à l'écran de l'ordinateur de bureau. Vous êtes maintenant prêt à utiliser votre Field PC. Reportez-vous au manuel de référence technique qui se trouve sur le CD de documentation utilisateur pour obtenir des instructions sur les tâches spécifiques. Prise en main DX10...
  • Seite 90: Entretien Et Transport

    Expédition Utilisez l'emballage d'origine de Leica Geosystems, le coffret de transport et le carton d'expédition ou équivalent pour tout transport par train, avion ou bateau. Le produit sera ainsi protégé des chocs et des vibrations.
  • Seite 91: Consignes De Sécurité

    Utilisation de produits endommagés ou présentant des défauts évidents. • Utilisation avec des accessoires d’autres fabricants sans autorisation expresse préalable de Leica Geosystems. • Non-respect des consignes de sécurité sur le site de travail, par exemple lors de mesures sur les routes.
  • Seite 92: Limites D'utilisation

    Geosystems, est responsable de la fourniture du produit, incluant les notices techniques et les accessoires d’origine, en parfait état de fonctionnement. Fabricants Les fabricants d'accessoires de marques autres que Leica Geosystems d'accessoires de faisant partie de l’équipement sont responsables de l'élaboration, de la marques autres mise en place et de la diffusion des concepts de sécurité...
  • Seite 93: Contrat De Licence Pour Utilisateur Final, Cluf

    Contrat de licence pour utilisateur final, CLUF Dispositions CLUF Le Leica Geosystems DX 10 inclut un logiciel sous licence d'une société affiliée à Microsoft Corporation. La documentation pour ce périphérique renferme un Contrat de Licence pour Utilisateur Final (CLUF) pour ce logiciel.
  • Seite 94: Risques Liés À L'utilisation

    BTP et des installations industrielles. Mesure préventive : Assurez-vous toujours d'avoir balisé correctement le site. Observez les règlements régissant la prévention des accidents de même que le code de la route. DX10 Consignes de sécurité...
  • Seite 95 Mesure préventive : Conformez-vous aux instructions du fabricant de l’ordinateur concernant son utilisation sur le terrain en combinaison avec des équipements Leica Geosystems. Attention Le matériel peut être endommagé ou des personnes peuvent être blessées si les accessoires utilisés avec l’équipement sont...
  • Seite 96 Veillez toujours à empêcher l’accès au matériel à des personnes non habilitées. Des informations spécifiques au produit (traitement, gestion des déchets) peuvent être téléchargées sur le site de Leica Geosystems, à l'adresse http://www.leica-geosystems.com/treatment, ou obtenues auprès de votre représentation Leica Geosystems.
  • Seite 97 Un contact avec des éléments sous tension • L'utilisation du produit après des tentatives de réparation incorrectes Mesure préventive : N'ouvrez pas le produit. Seuls les ateliers agréés par Leica Geosystems sont autorisés à réparer ces produits. Consignes de sécurité DX10...
  • Seite 98: Compatibilité Électromagnétique (Cem)

    Bien que le produit satisfasse aux normes et règles strictes en vigueur en cette matière, Leica Geosystems ne peut totalement exclure la possibilité que son équipement GPS puisse être perturbé par des rayonnements électromagnétiques très intenses, par exemple à proximité d’émetteurs radios, de talkies-walkies ou de générateurs diesels.
  • Seite 99 Bien que le produit, en combinaison avec des radios ou des téléphones mobiles numériques recommandés par Leica Geosystems, satisfasse aux normes et règles strictes en vigueur en cette matière, Leica Geosystems ne peut totalement exclure la possibilité que d’autres équipements puissent être perturbés ou que les hommes et les animaux subissent...
  • Seite 100: Déclaration Fcc (Propre Aux Etats-Unis)

    Demander conseil au revendeur ou à un technicien radio/TV expérimenté. Avertissement Les modifications dont la conformité n’a pas expressément été approuvée par Leica Geosystems peuvent faire perdre à leur auteur son droit à utiliser le système. Etiquetage Type: Art. No.
  • Seite 101 ........DX10_13 Consignes de sécurité DX10...
  • Seite 102: Caractéristiques Techniques

    Caractéristiques techniques Caractéristiques techniques DX10 Conception Boîtier en magnésium avec un surmoulage en élastomère et un bloc batterie intégré. Dimensions Longueur : 165 mm / 6,5 ” Largeur : 89 mm / 3,5 " Epaisseur : 43 mm / 1,7 "...
  • Seite 103 Spécifications Température environnementales Type Température Température de fonctionnement de stockage DX10 avec Bluetooth -30 °C à +50 °C -30 °C à +60 °C interne -22 °F à +122 °F -22 °F à +40 °F Chargeur 0 °C à 50 °C -20 °C à...
  • Seite 104 Accessoires Batterie Li-Ion rechargeable, chargeur mural (tension universelle), câble standard de synchronisation USB, stylet, dragonne, protection d'écran, guide de démarrage rapide, disque Prise en main Microsoft, CD Documentation utilisateur Certifications FCC Class B, CE DX10 Caractéristiques techniques...
  • Seite 105: Caractéristiques Techniques Powerholder

    De -40 à +80 Protection contre l'humidité, la poussière et le sable Protection IP67 (IEC 60529) Etanche à la poussière Protection contre l'eau de ruissellement Etanche jusqu'à une profondeur de 1 m (immersion temporaire) Humidité Protection Jusqu'à 100 % Caractéristiques techniques DX10...
  • Seite 106: Conformité Avec La Réglementation Nationale

    • FCC partie 15, applicable aux Etats-Unis réglementation • Par la présente, Leica Geosystems AG déclare que le DX10 est nationale conforme aux exigences essentielles et autres dispositions pertinentes de la directive 1999/5/CE. La déclaration de conformité peut être consultée sur le site http://www.leica-geosystems.com/ce.
  • Seite 107: Garantie Internationale Limitée, Contrat De Licence De Logiciel

    Garantie interna- Ce produit est régi par les clauses de la Garantie internationale limitée tionale limitée que vous pouvez télécharger depuis le site Internet de Leica Geosystems, http://www.leica-geosystems.com/internationalwarranty, ou demander auprès du distributeur local de produits Leica Geosystems. La présente garantie est exclusive et remplace toutes garanties, dispositions expresses ou tacites de fait ou par application de loi, instructions légales ou autre, y compris les garanties, la valeur...
  • Seite 108 Qualité et aux Systèmes de Qualité (norme ISO 9001) et aux Systèmes de Gestion de l’Environnement (norme ISO 14001). Vous pouvez obtenir de plus amples informations concernant notre programme TQM auprès du représentant Leica Geosystems le plus proche. Leica Geosystems AG Heinrich-Wild-Strasse CH-9435 Heerbrugg...
  • Seite 109 Leica DX10 Manual de empleo English Deutsch Español Versión 1.0 Español...
  • Seite 110 El tipo y el número de serie del producto figuran en la placa de identifi- producto cación. Anote estos números en el Manual e indíquelos como referencia siempre que se ponga en contacto con su agencia o taller de servicio Leica Geosystems Leica Geosystems autorizado. Tipo: _______________ No.
  • Seite 111 Descripción breve del procedimiento para utilizar rápido el DX10 Field PC y PowerHolder. Para utilizar correctamente el DX10 se recomienda consultar el manual y el software que se entregan con el equipo, recomendación válida también para cargar el software. Introducción...
  • Seite 112 1.2 Suspensión y reanudación del DX10 1.3 Uso del lápiz 1.4 Cables que se utilizan con el DX10 1.5 Sujetar el DX10-R al PowerHolder y a un bastón Iniciación 2.1 Paso 1: Instalación de la batería 2.2 Paso 2: Carga de la batería 2.3 Paso 3: Establecimiento de la configuración básica...
  • Seite 113: Descripción Del Sistema

    Componentes del En este apartado se indican las diferentes piezas de Field PC. Si desea obtener información más detallada sobre cómo utilizar Field PC, DX10 consultar el Manual Técnico de Referencia del CD de documentación del usuario. a b c d...
  • Seite 114 Modelos DX10 El Field PC está disponible como DX10-R y como DX10-Y. En esta sección disponibles se presentan las diferencias que existen entre ambos modelos. DX10-R DX10-Y DX10_12 El DX10-R se entrega con las siguientes piezas adicionales instaladas: a) Broche sujetador y accesorios b) Soporte angular •...
  • Seite 115: Suspensión Y Reanudación Del Dx10

    Accede a la tecla de función u opción seleccionada. Tecla de encendido Enciende y apaga el Field PC. También se utiliza para reiniciar o suspender el sistema. Tecla de cuatro Para desplazarse. direcciones Suspensión y reanudación del DX10 1sec. ULTRA-RUGGET FIELD PC 4sec. Descripción del Sistema DX10...
  • Seite 116: Uso Del Lápiz

    Técnico de Referencia, capítulo 4. El lápiz se guarda en una ranura que se encuentra en la parte superior del equipo. El orificio que se encuentra en el extremo del lápiz permite conectarlo a un cordón de conexión-desconexión. DX10 Descripción del Sistema...
  • Seite 117: Cables Que Se Utilizan Con El Dx10

    • Desconecte el DX10-R del PowerHolder antes de cargar el DX10. • Si utiliza el DX10-R con el PowerHolder, asegúrese de que sólo el conector de 9 pines SubD esté conectado al DX10. • Utilice únicamente los cables recomendados por Leica Geosystems.
  • Seite 118: Sujetar El Dx10-R Al Powerholder Y A Un Bastón

    Brazo del soporte f) LED g) Placa de soporte h) Tornillo de seguridad Cable para conectar el DX10 (conector de 9 pines SubD) compartimiento de batería k) Mecanismo de seguro para la batería Espacio para la carcasa insertable con el puerto LEMO Sujetar el DX10-R y Descripción...
  • Seite 119 Retirar el conector del DX10. paso Destornillar los tornillos de seguridad del soporte del DX10. Empujar el DX10 hacia la parte superior del PowerHolder para liberar el broche sujetador del pivote. Siempre desconecte el cable que va del DX10 al PowerHolder cuando no utilice el DX10 (por ejemplo, durante la noche).
  • Seite 120: Iniciación

    Insertar las lengüetas de la parte inferior de la tapa de la batería en las ranuras de la carcasa. Cerrar la tapa de la batería. Presionar la tapa de la batería. Deslizar el seguro de la tapa hacia la izquierda para cerrarla. Enganchar nuevamente la correa de mano. DX10 Iniciación...
  • Seite 121: Paso 2: Carga De La Batería

    +10°C a +20°C/+50°F a +68°F. • Es normal que la batería se caliente durante el proceso de carga. Al utilizar los cargadores recomendados por Leica Geosystems, no será posible cargar la batería si la temperatura es demasiado elevada. •...
  • Seite 122 Aunque el Field PC entre en modo de suspensión y el LED rojo parpadeante se apague, el equipo se seguirá cargando. Advertencia Las baterías que no sean las recomendadas por Leica Geosystems pueden resultar dañadas al cargarse o descargarse, ya que pueden incendiarse y explotar.
  • Seite 123: Paso 3: Establecimiento De La Configuración Básica Del Equipo

    Paso 3: Establecimiento de la configuración básica del equipo Configuración El DX10 se entrega con Windows Mobile instalado previamente básica, paso a paso en inglés. Para opciones del sistema operativo Windows Mobile en otros idiomas, favor de consultar la sección de soporte/descargas del sitio web: www.junipersys.com.
  • Seite 124: Paso 4: Instalación De Activesync En Una Pc

    Si no se ha instalado ActiveSync 4.5 ni una versión posterior en su PC, siga las instrucciones que aparecen en la pantalla para instalarlo. instale ActiveSync antes de conectar el cable USB al ordenador de sobremesa o al dispositivo Field PC. DX10 Iniciación...
  • Seite 125: Paso 5: Creación De Una Conexión Activesync

    PC. Ahora ya está preparado para utilizar el dispositivo Field PC. Consultar el Manual Técnico de Referencia en el CD de documentación del usuario para obtener instrucciones sobre tareas específicas. Iniciación DX10...
  • Seite 126: Cuidados Y Transporte

    Envío Para transportar el producto en tren, avión o barco utilizar siempre el embalaje original de Leica Geosystems completo (estuche de transporte y caja de cartón) u otro embalaje adecuado, para proteger el instrumento de golpes y vibraciones. Envío y transporte Durante el transporte o envío de las baterías, el encargado del producto...
  • Seite 127: Limpieza Y Secado

    Cargador Limpiar únicamente con un paño limpio, suave y que no suelte pelusas. Cables y enchufes Mantener los enchufes limpios y secos. Limpiar soplando cualquier suciedad depositada en los enchufes de los cables de conexión. Cuidados y transporte DX10...
  • Seite 128: Instrucciones De Seguridad

    • Utilización de productos con daños o defectos claramente reconocibles. • Utilización de accesorios de otros fabricantes que no estén autorizados explícitamente por Leica Geosystems. • Protección insuficiente del emplazamiento de trabajo, por ejemplo al efectuar mediciones en carreteras. •...
  • Seite 129: Límites De Utilización

    Fabricantes de Los fabricantes de accesorios que no sean Leica Geosystems para el accesorios que no producto tienen la responsabilidad del desarrollo, la implementación y la sean Leica comunicación de los conceptos de seguridad correspondientes a sus...
  • Seite 130: Contrato De Licencia Para El Usuario Final (Cluf)

    Contrato de Licencia Para el Usuario Final (CLUF) Términos de CLUF El equipo DX10 de Leica Geosystems incluye software bajo licencia de una filial de Microsoft Corporation. La documentación de este equipo incluye el Contrato de Licencia Para el Usuario Final (CLUF) para este software.
  • Seite 131 Medidas preventivas: Tener en cuenta las instrucciones específicas del fabricante para uso en el campo cuando se empleen con productos de Leica Geosystems. Cuidado Si los accesorios utilizados con el producto no se fijan correctamente y el producto se somete a acciones mecánicas (caídas o golpes), existe la...
  • Seite 132 Proteger el equipo en todo momento impidiendo el acceso a él de personas no autorizadas. Las especificaciones para el manejo y desecho del producto se pueden descargar de la página web de Leica Geosystems en http://www.leica- geosystems.com/treatment o solicitarlas directamente a su representante Leica Geosystems.
  • Seite 133 • Tocar alguno de los componentes activos • Utilizar el producto después de intentar repararlo incorrectamente. Medidas preventivas: No abrir el producto. Hacer reparar estos productos sólo en talleres de servicio técnico autorizados por Leica Geosystems. Instrucciones de seguridad DX10...
  • Seite 134: Compatibilidad Electromagnética Emc

    Posibilidad de interferir con otros aparatos a causa de radiación electro- magnética. Aunque el producto cumple los severos requisitos de las directivas y normas aplicables, Leica Geosystems no puede excluir por completo la posibilidad de la perturbación de otros aparatos. Cuidado Posibilidad de perturbación de otros aparatos cuando el producto se...
  • Seite 135 Aunque el producto cumple en combinación con los dispositivos para radio o teléfonos móviles digitales recomendados por Leica Geosystems con los severos requisitos de las directivas y normas aplicables, Leica Geosystems no puede excluir por completo la posibilidad de la perturbación de otros aparatos o de daños a personas o animales.
  • Seite 136: Normativa Fcc (Válida En Ee.uu)

    Advertencia Si en el instrumento se efectúan modificaciones que no estén explíci- tamente autorizadas por Leica Geosystems, el derecho de uso del mismo por parte del usuario puede verse limitado. Rótulo Type: Art.
  • Seite 137 ........DX10_13 Instrucciones de seguridad DX10...
  • Seite 138: Datos Técnicos

    4.5 hrs para 95% 6.0 hrs para 100% Temperatura de carga: 0° a 40°C / 32° a 104°F Unidad de control Características DX10 Sistema operativo Microsoft Windows Mobile 5.0 Procesador Intel XScale PXA270, 520 MHz Memoria RAM de 128 MB de baja potencia...
  • Seite 139 Especificaciones Temperatura ambientales Tipo Temperatura Temperatura de funcionamiento de almacenamiento DX10 con Bluetooth -30° a +50°C -30° a +60°C interno -22° a +122°F -22° a +140°F Cargador 0° a 50°C -20° a +75°C 32° a 122°F -4°...
  • Seite 140 Humedad Tipo Protección DX10 Hasta 100 % Los efectos de la condensación se pueden contrarrestar de forma efectiva secando periódi- camente el equipo. Cargador Hasta 90 % Los efectos de la condensación se pueden contrarrestar de forma efectiva secando periódi- camente el equipo.
  • Seite 141: Powerholderdatos Técnicos

    [°C] -30 a +65 -40 a +80 Protección contra agua, polvo y arena Protección IP67 (IEC 60529) Contra polvo Protección contra salpicaduras Estanco al agua a 1 m de inmersión temporal Humedad Protección Hasta 100 % Datos técnicos DX10...
  • Seite 142: Conformidad Con Regulaciones Nacionales

    • FCC Parte 15 (válida en EE.UU.) regulaciones • Hereby, Leica Geosystems AG, declara que el DX10 cumple los nacionales requerimientos esenciales y las demás disposiciones correspon- dientes de la Directiva 1999/5/EC. La declaración de conformidad se puede consultar en http://www.leica-geosystems.com/ce.
  • Seite 143: Garantía Internacional Del Fabricante, Contrato De Licencia Del Software

    Leica Geosystems. Ese software está protegido por el copyright y otras leyes, y su uso está definido y regulado por el Contrato de Licencia de Software de Leica Geosystems, que cubre aspectos tales como, pero no limitado a, Ámbito de la Licencia, Garantía, Derechos de la Propiedad Intelectual, Limitación de Responsa-...
  • Seite 144 Total Quality Management: Nuestro compromiso para la satisfacción total de nuestros clientes. Según Certificado SQS, Norma ISO9001, Leica Geosystems AG, Heerbrugg, Switzerland, dispone de un sistema de calidad conforme al estándar internacional para gestión de la calidad y sistemas de calidad, así como de sistemas de gestión del medio ambiente (ISO 14001).
  • Seite 145 Leica DX10 Manual de Operação Português Versão 1.0 Português...
  • Seite 146 Introduzir o tipo e o número de série do instrumento no manual e fornecer sempre estes dados em todos os contactos com um Distribuidor ou um centro de serviço autorizado da Leica Geosystems. Tipo _______________ Nº de série: _______________ Símbolos...
  • Seite 147 Descreve o procedimento de arranque para utilização do DX10 Field PC e do PowerHolder. Para uma utilização eficiente do DX10, é fundamental consultar o manual fornecido com o software instalado no instrumento. Esta informação é também válida para informação sobre o carregamento do software.
  • Seite 148 1.2 Suspensão e regresso à operação do DX10 1.3 Utilização do estilete 1.4 Cabos utilizados com o DX10 1.5 Fixação do DX10-R a um PowerHolder e mastro Como começar 2.1 Operação 1: Instalação do pack de baterias 2.2 Operação 2: Carregamento do pack de baterias 2.3 Operação 3: Definição de configuração básicas...
  • Seite 149: Descrição Do Sistema

    Anatomia do Field PC Componentes do Esta secção ilustra as diferentes peças do Field PC. Para mais DX10 informações sobre o modo de utilização do Field PC, contactar o Manual de Referência Técnica no CD de Documentação do Utilizador. a b c d...
  • Seite 150 Mola de fixação e acessórios b) Suporte angular • No caso do DX10-Y, a mola de fixação e os acessórios são fornecidos em embalagem separada e o suporte angular não está disponível para este modelo. • As imagens do manual referem-se ao modelo DX10-Y, com a mola de fixação.
  • Seite 151: Suspensão E Regresso À Operação Do Dx10

    Para entrada da tecla ou opção de ecrã. (Enter) Botão de Para ligação e desligação, reactivação alimentação ou suspensão do Field PC. Botão direccional Botão para navegação. (4 sentidos) Suspensão e regresso à operação do DX10 1sec. ULTRA-RUGGET FIELD PC 4sec. Descrição do sistema DX10...
  • Seite 152: Utilização Do Estilete

    Para instruções sobre o modo de utilização do programa de transcrição no Field PC, ver o Capítulo 4 do Manual de Referência Técnica. O estilete encontra-se armazenado numa ranhura aberta situada no topo do dispositivo. O estilete pode ser ligado a um cordão de pescoço. DX10 Descrição do sistema...
  • Seite 153: Cabos Utilizados Com O Dx10

    Desligar o DX10-R do PowerHolder, antes de efectuar o carregamento do DX10. • Se o DX10-R for utilizado no PowerHolder, apenas o conector SubD de 9 pinos deve estar ligado ao DX10. • Utilizar apenas os cabos recomendados pela Leica Geosystems.
  • Seite 154: Fixação Do Dx10-R A Um Powerholder E Mastro

    Braço de montagem f) LED g) Placa de montagem h) Parafuso de segurança Cabo para ligação do DX10 (conector SubD de 9 pinos) Compartimento da bateria k) Mecanismo de trancagem da bateria Espaço para a caixa de mola com porta LEMO Fixação do DX10-R...
  • Seite 155 Desenroscar o parafuso de segurança do suporte do DX10. Empurrar o DX10 no sentido do topo do PowerHolder para libertar a mola do eixo. Desligar sempre o cabo entre o DX10 e o PowerHolder, quando o DX10 não estiver em utilização (durante a noite, etc.). Descrição do sistema...
  • Seite 156: Como Começar

    Introduzir as patilhas da parte inferior da tampa da bateria nas ranhuras da caixa. Fechar a porta da bateria. Aplicar pressão na porta da bateria. Deslocar o trinco para a esquerda para o travar. Instalar novamente a correia de mão. DX10 Como começar...
  • Seite 157: Operação 2: Carregamento Do Pack De Baterias

    +10 a +20 °C / +50 a +68 °F. • O aquecimento da bateria durante o carregamento é um fenómeno normal. Com os carregadores recomendados pela Leica Geosystems, não é possível carregar a bateria, se a temperatura for demasiado elevada.
  • Seite 158 Se o Field PC entrar em modo de suspensão e o LED vermelho intermitente se desligar, o dispositivo continua a carregar. Atenção As baterias não recomendadas pela Leica Geosystems podem ser danificadas se forem carregadas e descarregadas. A baterias não recomendadas podem queimar-se ou explodir.
  • Seite 159: Operação 3: Definição De Configuração Básicas No Aparelho

    Configurações O Windows Mobile (versão inglesa) encontra-se pré-instalado básicas no DX10. Para outros idiomas dos sistemas operativos Windows Mobile, consultar a secção suporte/descarregamentos (support/downloads) do sítio: www.junipersys.com. Utilizando o estilete, seguir as instruções no ecrã para calibrar o dispositivo e estabelecer as configurações básicas.
  • Seite 160: Operação 4: Instalação Do Activesync Num Computador De Secretária

    Se o ActiveSync 4.5 ou superior não estiver instalado no computador de secretária, seguir as instruções no ecrã para efectuar a sua instalação. Instalar o ActiveSync antes de ligar o cabo USB ao computador de secretária ou ao Field PC. DX10 Como começar...
  • Seite 161: Operação 5: Criação De Uma Ligação Activesync

    Estabelecer uma parceria ActiveSync, seguindo as instruções do ecrã do computador de secretária. O Field PC está agora pronto para ser utilizado. Consultar no Guia de referência no CD de Documentação as instruções sobre tarefas mais específicas. Como começar DX10...
  • Seite 162: Cuidados E Transporte

    Expedição O transporte do aparelho por via férrea, aérea ou marítima deve ser sempre efectuada com a embalagem original completa da Leica Geosystems, estojo de transporte e caixa de cartão (ou outro meio equivalente) de modo a proteger o equipamento contra os choques e vibrações.
  • Seite 163 Limpar o instrumento com um pano limpo, macio e sem pêlos. Cabos e fichas Manter os cabos e as fichas limpos e isentos de humidade. Limpar com ar comprimido a sujidade alojada nas fichas dos cabos. Cuidados e Transporte DX10...
  • Seite 164: Instruções De Segurança

    Utilização de produtos com defeitos ou defeitos claramente existentes. • Utilização com acessórios de outros fabricantes sem aprovação explícita da Leica Geosystems. • Medidas de segurança inadequadas no local de trabalho, como, por exemplo, durante a medição em vias públicas.
  • Seite 165: Limites Da Utilização

    Responsabilidades Fabricante do Leica Geosystems AG AG, com endereço em CH-9435 Heerbrugg (Suíça), produto adiante designada Leica Geosystems, é responsável pelo fornecimento do produto, incluindo o manual de operação e os acessórios originais, em condições de segurança adequadas.
  • Seite 166: Contrato De Licenciamento De Utilizador Final

    Contrato de Licenciamento de Utilizador Final Termos do O Leica Geosystems DX 10 é fornecido com software licenciado por uma Contrato de empresa afiliada da Microsoft Corporation. A documentação fornecida Licenciamento com este instrumento inclui o Contrato de Licenciamento de Utilizador Final (EULA) para este software.
  • Seite 167 Precauções: Não utilizar o produto durante as trovoadas. Atenção As baterias não recomendadas pela Leica Geosystems podem ser danificadas se forem carregadas e descarregadas. A baterias não recomendadas podem queimar-se ou explodir. Precauções: Utilizar apenas baterias recomendadas pela Leica Geosystems.
  • Seite 168 Impedir o acesso ao instrumento a pessoas não autorizadas. A informação específica sobre a gestão e tratamento do produto eliminado pode ser importada do sítio da Leica Geosystems em http://www.leica-geosystems.com/treatment ou fornecido por um distribuidor Leica Geosystems. Atenção A reparação destes produtos deve apenas ser efectuada por Centros de Assistência Leica Geosystems.
  • Seite 169 Contacto com componentes em tensão • Utilização do produto após tentativas incorrectas para a execução de reparações. Precauções: Não abrir o produto. A reparação destes produtos deve apenas ser efectuada por Centros de Assistência Leica Geosystems. Instruções de Segurança DX10...
  • Seite 170: Compatibilidade Electromagnética (Emc)

    Atenção A radiação electromagnética pode provocar perturbações em outro equipamento. Apesar de este produto satisfazer integralmente os mais estritos regulamentos e normas em vigor, a Leica Geosystems não pode excluir completamente a possibilidade de interferência em outros equipamentos. Aviso Existe o risco de poderem ser provocadas interferência em outros equipamentos, se o instrumento for utilizado com acessórios de outros...
  • Seite 171 Apesar de o produto satisfazer, em combinação com rádio ou telefones celulares digitais recomendados pela Leica Geosystems os regulamentos e normas em vigor, a Leica Geosystems não pode excluir completamente a possibilidade de os outros equipamentos poderem ser perturbados ou de as pessoas e os animais poderem ser afectados.
  • Seite 172: Declaração Da Fcc (Aplicável Apenas Nos Eua)

    • Consultar um concessionário ou técnico especializado em equipamento de rádio e TV Atenção As alterações ou modificações funcionais não aprovadas expressamente pela Leica Geosystems podem cancelar a autoridade do utilizador para utilizar o equipamento. Marcação do Type: Art. No.
  • Seite 173 ........DX10_13 Instruções de Segurança DX10...
  • Seite 174: Características Técnicas

    Características Técnicas DX10 - Características Técnicas Concepção Caixa de magnésio com protecções externas de elastómero e bateria integrada. Dimensões Comprimento: 165 mm / 6.5” Largura: 89 mm / 3.5” Espessura: 43 mm / 1.7” Peso 0,482 kg / 17 oz Alimentação...
  • Seite 175 Condições Temperatura ambientais Tipo Temperatura de Temperatura de operação armazenamento DX10 com Bluetooth -30 a +50 °C -30 a +60 °C interno -22 a +122 °C -22 a +140 °C Carregador 0 a 50 °C -20 a +75 °C 32 a 122 °C...
  • Seite 176 Bateria Li-Ion recarregável, carregador de parede universal, cabo de standard sincronização USB, estilete capturado de tamanho completo, correia de punho, protector de ecrã, guia de arranque rápido, CD-ROM "Microsoft Getting Started", CD-ROM com Documentação de Utilização Certificações FCC Classe B, Marcação CE DX10 Características Técnicas...
  • Seite 177: Powerholder Características Técnicas

    -30 a +65 -40 a +80 Protecção contra a entrada de água, poeiras e areia Protecção IP67 (IEC 60529) Estanque às poeiras Protegido contra jactos de água Estanque à imersão temporária a 1 m Humidade Protecção Até 100% Características Técnicas DX10...
  • Seite 178: Conformidade Com Regulamentos Nacionais

    • Regulamento FCC, Parte 15 (aplicável aos EUA) regulamentos • A Leica Geosystems AG declara que o instrumento DX10 satisfaz os nacionais requisitos essenciais e outros requisitos relevantes da Directiva 1999/5/EC. A declaração de conformidade CE pode ser consultada em http://www.leica-geosystems.com/ce.
  • Seite 179: Garantia Internacional Limitada, Contrato De Licenciamento De Software

    Internacional condições estabelecidos na Garantia Internacional Limitada, a qual pode Limitada ser importada na página de Internet da Leica Geosystems em http://www.leica-geosystems.com/internationalwarranty ou solicitada a qualquer distribuidor da Leica Geosystems.Leica Geosystems A referida garantia é exclusiva, substituindo todas as outras garantias, termos e condições, expressos ou implícitos, sejam de facto ou por...
  • Seite 180 Normas Internacionais de Gestão da Qualidade (Norma ISO 9001) e Sistema de Gestão Ambiental (Norma ISO 14001). Solicitar ao Distribuidor Leica Geosystems da sua área mais informações sobre o nosso programa de Qualidade Total (TQM). Leica Geosystems AG...
  • Seite 181 Leica DX10 Manuale d'uso Italiano Versione 1.0 Italiano...
  • Seite 182 Il modello e il numero di serie devono essere trascritti nel manuale e vanno sempre citati ogni volta che ci si rivolge al proprio rappresentante di zona o ad un centro di assistenza autorizzato Leica Geosystems. Tipo: _______________ Numero di serie:...
  • Seite 183 Descrive la procedura per iniziare a lavorare con introduttiva il Field PC DX10 e il PowerHolder. Per poter utilizzare il DX10 in modo efficiente è indispensabile consultare il manuale in dotazione al software che vi viene eseguito. Il manuale contiene informazioni anche sul caricamento del software.
  • Seite 184 1.2 Sospensione e ripresa del DX10 1.3 Utilizzo dello stilo 1.4 Cavi utilizzati con il DX10 1.5 Montaggio del DX10-R su un PowerHolder e una palina Procedure preliminari 2.1 Punto 1: Installare il pacco batteria 2.2 Punto 2: Caricare il pacco batteria 2.3 Punto 3: Creare le impostazioni di base nel dispositivo...
  • Seite 185: Descrizione Del Sistema

    L'analisi del Field PC Componenti del La presente sezione illustra le diverse parti del Field PC. Per ulteriori DX10 dettagli sull'utilizzo del Field PC, consultare il Technical Reference Manual sul CD User Documentation (Documentazione per l'utente). a b c d...
  • Seite 186 Modelli di DX10 Il Field PC è disponibile nei modelli DX10-R e DX10-Y. Qui di seguito sono disponibili specificate le differenze che li contraddistinguono. DX10-R DX10-Y DX10_12 Il DX10-R viene fornito con i seguenti componenti aggiuntivi già montati: a) Clip e accessori b) Staffa angolare •...
  • Seite 187: Sospensione E Ripresa Del Dx10

    Inserisce la soft key o l'opzione selezionata. Pulsante di Accende e spegne il Field PC, resetta, alimentazione sospende. Pulsante delle Consente la navigazione. quattro frecce direzionali Sospensione e ripresa del DX10 1sec. ULTRA-RUGGET FIELD PC 4sec. Descrizione del sistema DX10...
  • Seite 188: Utilizzo Dello Stilo

    Per le istruzioni sull'utilizzo del programma di trascrizione sul Field PC, si rimanda a Informazioni sull'inserimento nel Technical Reference Manual, Capitolo 4. Lo stilo è conservato in uno slot aperto sulla parte superiore del dispositivo. Un foro nell'estremità dello stilo consente di attaccare un cordoncino. DX10 Descrizione del sistema...
  • Seite 189: Cavi Utilizzati Con Il Dx10

    • Scollegare il DX10-R dal PowerHolder prima di ricaricare il DX10. • Se si utilizza il DX10-R sul PowerHolder accertarsi che solo il connettore a SubD a 9 pin sia collegato al DX10. • Utilizzare solo cavi raccomandati da Leica Geosystems.
  • Seite 190: Montaggio Del Dx10-R Su Un Powerholder E Una Palina

    Braccio di montaggio f) LED g) Piastra di montaggio h) Vite di sicurezza Cavo per il collegamento del DX10 (connettore SubD a 9 pin) Vano batteria k) Meccanismo di bloccaggio per la batteria Spazio per alloggiamento a innesto con porta LEMO...
  • Seite 191 Svitare la vite di sicurezza dalla staffa del DX10. Spingere il DX10 verso il bordo superiore del PowerHolder per sganciare la clip dalla cerniera. Scollegare sempre il cavo tra il DX10 e il PowerHolder quando il DX10 non viene utilizzato (di notte, ecc.). Descrizione del sistema...
  • Seite 192: Procedure Preliminari

    Inserire le linguette sul fondo dello sportello della batteria nelle fessure dell'involucro. Chiudere lo sportello della batteria. Premere sullo sportello della batteria. Far scorrere il dispositivo di chiusura verso sinistra per bloccarlo. Fissare nuovamente la cinghia per mano. DX10 Procedure preliminari...
  • Seite 193: Punto 2: Caricare Il Pacco Batteria

    Per le batterie agli ioni di litio è sufficiente un solo ciclo di scarica e ricarica. Consigliamo di eseguire la procedura quando la capacità della batteria indicata sul caricabatterie o su un prodotto Leica Geosystems differisce notevolmente dalla capacità della batteria effettivamente disponibile.
  • Seite 194 Se il Field PC si sospende e il LED rosso lampeggiante si spegne, il dispositivo continua a caricarsi. Avvertimento Le batterie non consigliate da Leica Geosystems si possono danneggiare se caricate o scaricate. Possono incendiarsi ed esplodere. Contromisure: Caricare e scaricare solo le batterie consigliate da Leica Geosystems.
  • Seite 195: Punto 3: Creare Le Impostazioni Di Base Nel Dispositivo

    Punto 3: Creare le impostazioni di base nel dispositivo Fasi per le La versione inglese di Windows Mobile è preinstallata nel DX10. impostazioni di Per le altre lingue opzionali dei sistemi operativi Windows base Mobile consultare la sezione support/downloads del sito web: www.junipersys.com.
  • Seite 196: Punto 4: Installare Activesync In Un Computer Desktop

    Viene visualizzata una finestra, come indicato. Selezionare la lingua. Se ActiveSync 4.5 o superiore non è presente nel computer desktop installarlo seguendo le istruzioni a video. Installare ActiveSync prima di collegare il cavo USB al desktop o al Field PC. DX10 Procedure preliminari...
  • Seite 197: Punto 5: Creare Una Connessione Activesync

    Creare una relazione ActiveSync seguendo le istruzioni sullo schermo del computer desktop. Ora si è pronti ad utilizzare il Field PC. Consultare il Technical Reference Manual sul CD User Documentation (Documentazione per l'utente) per istruzioni su attività specifiche. Procedure preliminari DX10...
  • Seite 198: Cura E Trasporto

    Spedizione Quando si spedisce lo strumento per mezzo di treni, aerei o navi usare l'imballaggio originale Leica Geosystems, il contenitore o il cartone per il trasporto, o un altro imballaggio idoneo che protegga lo strumento da colpi e vibrazioni.
  • Seite 199: Norme Di Sicurezza

    • Uso di strumenti con danni o difetti chiaramente riconoscibili. • Uso con accessori di altre marche senza previa espressa autoriz- zazione di Leica Geosystems. • Protezioni inadeguate sul sito del rilievo, ad esempio quando si effettuano misurazioni su strade.
  • Seite 200: Limiti All'uso

    Responsabilità dei I produttori di accessori per il prodotto non Leica Geosystems sono produttori di responsabili dello sviluppo, dell'implementazione e della comunicazione accessori non Leica delle norme di sicurezza relative ai propri prodotti e sono altresì...
  • Seite 201: Contratto Di Licenza Per L'utente Finale (Eula, End User Licence Agreement)

    Contratto di licenza per l'utente finale (EULA, End User Licence Agreement) Termini del Il Leica Geosystems DX 10 include software su licenza di una società contratto di licenza affiliata di Microsoft Corporation. La documentazione di questo per l'utente finale dispositivo comprende il contratto di licenza per l'utente finale (EULA) per questo software.
  • Seite 202 Contromisure: Non usare lo strumento durante i temporali. Avvertimento Le batterie non consigliate da Leica Geosystems si possono danneggiare se caricate o scaricate. Possono incendiarsi ed esplodere. Contromisure: Caricare e scaricare solo le batterie consigliate da Leica Geosystems.
  • Seite 203 Impedire l'accesso al prodotto a persone non autorizzate. Le informazioni sul trattamento specifico del prodotto e sulla gestione dei rifiuti possono essere scaricate dalla homepage di Leica Geosystems all'indirizzo http://www.leica-geosystems.com/treatment o richieste al proprio rivenditore Leica Geosystems. Avvertimento Questi prodotti possono essere riparati solo presso i centri di assistenza Leica Geosystems autorizzati.
  • Seite 204 Toccare componenti sotto tensione • Usare lo strumento dopo aver tentato, in modo scorretto, di eseguire riparazioni. Contromisure: Non aprire lo strumento. Questi prodotti possono essere riparati solo presso i centri di assistenza Leica Geosystems autorizzati. DX10 Norme di sicurezza...
  • Seite 205: Compatibilità Elettromagnetica (Emc)

    Le radiazioni elettromagnetiche possono causare disturbi ad altre apparecchiature. Benché questo prodotto soddisfi le norme e gli standard più rigidi in materia, Leica Geosystems non può escludere del tutto la possibilità di disturbi ad altri apparecchi. Attenzione Esiste il rischio di disturbi causati ad altri apparecchi se il prodotto viene...
  • Seite 206 Benché quando utilizzato insieme a dispositivi radio o telefoni cellulari digitali raccomandati da Leica Geosystems, il prodotto sia conforme alle normative e agli standard più rigidi vigenti in materia, Leica Geosystems non può escludere completamente la possibilità che disturbi altre apparecchiature o influisca negativamente su uomini e animali.
  • Seite 207: Dichiarazione Fcc, Valida Negli Usa

    è collegato il ricevitore. • Consultando il fornitore o un tecnico radiotelevisivo qualificato. Avvertimento Qualsiasi modifica o variazione non espressamente autorizzata da Leica Geosystems può invalidare il diritto dell'utilizzatore ad utilizzare lo strumento. Etichetta del Type: Art.
  • Seite 208 ........DX10_13 DX10 Norme di sicurezza...
  • Seite 209: Dati Tecnici

    Dati tecnici Dati tecnici del DX10 Design Alloggiamento in magnesio stampato con elastomero e batteria integrata. Dimensioni Lunghezza: 165 mm / 6.5” Larghezza: 89 mm / 3.5” Spessore: 43 mm / 1.7” Peso 0.482 kg / 17 oz Alimentazione Elementi di protezione da polarità inversa; protezione da sovratensione;...
  • Seite 210 Specifiche Temperatura ambientali Tipo Temperatura di Temperatura esercizio di stoccaggio DX10 con Bluetooth da -30° a +50°C da -30° a +60°C interno da -22° a +122°F da -22° a +140°F Caricabatterie da 0° a 50°C da -20° a +75°C da 32°...
  • Seite 211 Batteria ricaricabile agli ioni di litio, caricabatteria a muro (tensione universale), cavo USB sync, stilo a grandezza naturale, cinghia per mano, protezione per lo schermo, guida rapida, CD Microsoft Getting Started, CD User Documentation (documentazione per l'utente) Certificazioni FCC Classe B, marchio europeo CE Dati tecnici DX10...
  • Seite 212: Powerholder Dati Tecnici

    -40 a +80 Protezione dall'acqua, dalla polvere e dalla sabbia Protezione IP67 (IEC 60529) A prova di polvere Protetto contro gli spruzzi d'acqua A tenuta d'acqua fino a 1 m di immersione temporanea Umidità Protezione Fino al 100 % DX10 Dati tecnici...
  • Seite 213: Conformità Alle Disposizioni Nazionali

    FCC parte 15 (applicabile negli Stati Uniti) disposizioni • Con il presente Leica Geosystems AG dichiara che il prodotto DX10 è nazionali conforme ai requisiti fondamentali e ad altre disposizioni rilevanti della Direttiva 1999/5/CE. La dichiarazione di conformità può essere consultata all'indirizzo http://www.leica-geosystems.com/ce.
  • Seite 214: Garanzia Internazionale, Contratto Di Licenza Software

    Leica Geosystems. Il software è protetto dal diritto d'autore e da altre disposizioni di legge e il suo uso è definito e regolato dal Contratto di licenza software Leica Geosystems, che copre, in via esemplificativa ma non esaustiva, aspetti quali l'ambito della licenza, la garanzia, i diritti relativi alla proprietà...
  • Seite 215 Garanzia internazionale, Contratto di DX10 licenza software...
  • Seite 216 Gestione Totale della Qualità - il nostro impegno per la totale soddisfazione del cliente. Leica Geosystems AG, Heerbrugg, Svizzera è dotata di un sistema di qualità che soddisfa gli Standard Internazionali della Gestione della Qualità e dei Sistemi di Qualità...
  • Seite 218 International Standards of Quality Management and Quality Systems (ISO standard 9001) and Environmental Management Systems (ISO standard 14001). Ask your local Leica Geosystems dealer for more information about our TQM program. Leica Geosystems AG Heinrich-Wild-Strasse...

Inhaltsverzeichnis