Swiss Pet Benno Montageanleitung
Quicklinks
Bed.Benno
12.1.2007
16:18 Uhr
A) Screws (16pcs. + 1Spare)
Schrauben (16 Stück + 1 Reserve)
Vis (16pcs. + 1 réserve)
Viti (16pezzi + 1 riserva)
B) Screws (12pcs. + 1Spare)
Schrauben (12 Stück + 1 Reserve)
Vis (12pcs. + 1 réserve)
Viti (12pezzi + 1 riserva)
C) Screws (4pcs. + 1Spare)
Schrauben (4 Stück + 1 Reserve)
Vis (4pcs. + 1 réserve)
Viti (4pezzi + 1 riserva)
D) Screws (2pcs. + 1Spare)
Schrauben (2 Stück + 1 Reserve)
Vis (2pcs. + 1 réserve)
Viti (2pezzi + 1 riserva)
Step 1: Set up wire-mesh panels
Schritt 1: Setzen Sie die Gitterteile zusammen
Etape 1: Assemblez les panneaux en treillis
Tappa 1:Montate i pannelli in grata
Step 4: Vertical combination
Schritt 4: Senkrechte Kombination
Etape 4: Combinaison verticale
Tappa 4: Combinazione verticale
Seite 1
Assembly instructions
Montageanleitung
Notice de montage
Istruzione d'assemblaggio
Side wire-mesh panels 2x
Seitengitterteile 2x
Panneaux latéraux en treillis 2x
Pannelli laterali in grata 2x
Front & Back panel
Front- und Rückwand
Panneau avant & arrière
Pannello anteriore & pannello posteriore
Step 2: Set up panels and put down partition
Schritt 2: Setzen Sie die anderen Teile zusammen und fügen Sie die Trennwand ein
Etape 2: Assemblez les autres panneaux et insérez la cloison
Tappa 2: Montate gli altri pannelli e inserite il divisorio
Step 5: Insert the drawer
Schritt 5: Schieben Sie die Schublade ein
Etape 5: Insérez le tiroir
Tappa 5: Inserite il cassetto
202x93.4x150.2cm
Front & Back wire-mesh panel
Gitterfront- und Rückwand
Panneau avant & arrière en treillis
Pannello anteriore & pannello posteriore in grata
Partition
Trennwand
Cloison
Divisorio
Ridge cap
Abschlusskante
Lisière
Listello
Roof 2x
Dach 2x
Toit 2x
Tetto 2x
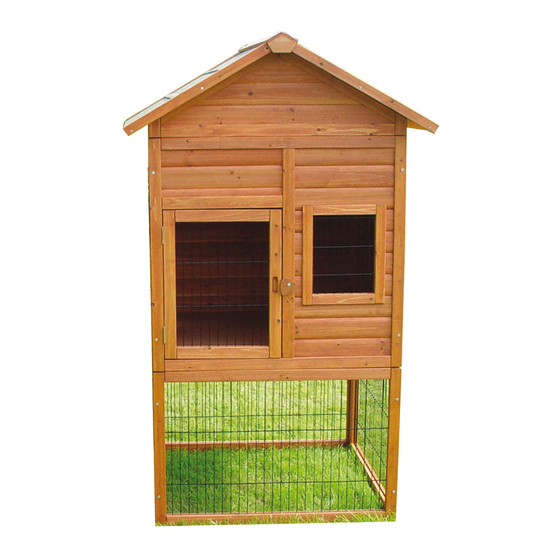
Step 6: The combination is finished
Schritt 6: Die Kombination ist beendet
Etape 6 : La combinaison est finie
Tappa 6 : La combinazione è finita
Benno
Ridge cap
Abschlusskante
Lisière
Listello
Side panels 2x
Seitenteile 2x
Panneaux latéraux 2x
Pannelli laterali 2x
Ramp
Rampe
Rampe
Rampa
Drawer
Schublade
Tiroir
Cassettto
Step 3: Secure roof and ridge cap
Schritt 3: Sichern Sie das Dach und die
Abschlusskante
Etape 3: Vissez le toit et la lisière
Tappa 3: Avvitate il tetto e il listello
Art.-Nr. 403916
www.swisspet.com
Delphin-Amazonia AG - CH-4142 Münchenstein

Verwandte Anleitungen für Swiss Pet Benno

Inhaltszusammenfassung für Swiss Pet Benno
- Seite 1 Bed.Benno 12.1.2007 16:18 Uhr Seite 1 Benno 202x93.4x150.2cm Assembly instructions Montageanleitung Notice de montage Istruzione d'assemblaggio Front & Back wire-mesh panel Gitterfront- und Rückwand Panneau avant & arrière en treillis Pannello anteriore & pannello posteriore in grata Side wire-mesh panels 2x Seitengitterteile 2x Panneaux latéraux en treillis 2x...
- Seite 2 Bed.Benno 12.1.2007 16:18 Uhr Seite 2 Benno 202x93.4x150.2cm Assembly instructions Montageanleitung Notice de montage Istruzione d'assemblaggio Ridge cap Abschlusskante Lisière Listello Left & Right panels Linke- & Rechte Wand Paroi gauche & droite Roof 2x Dach 2x Toit 2x Tetto 2x A) Screws (12pcs.