Werbung
Verfügbare Sprachen
Verfügbare Sprachen
Quicklinks
Werbung

Verwandte Anleitungen für Braun BODYCAM BCX5


Inhaltszusammenfassung für Braun BODYCAM BCX5
- Seite 1 BODYCAM BCX5 BEDIENUNGSANLEITUNG BEDIENUNGSANLEITUNG BEDIENUNGSANLEITUNG BEDIENUNGSANLEITUNG...
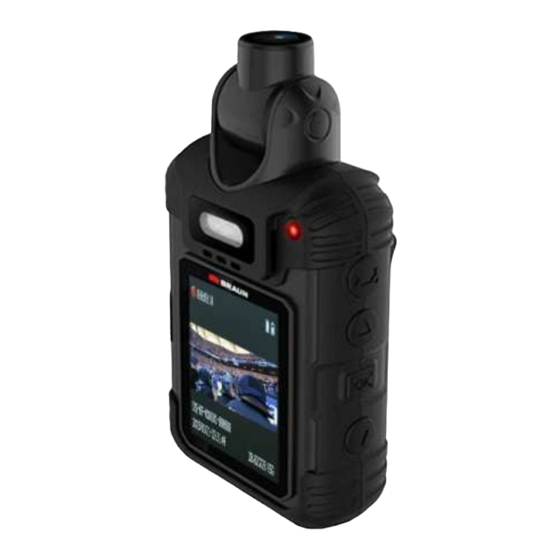
- Seite 2 Produktbeschreibung Funktionsübersicht Anwendung Power An/Aus-Taste : Kurz drücken, um die Kamera anzuschalten; lange drücken (3 Sekunden) um die Kamera auszuschalten. ■ ■】:kurz drücken um die Aufnahme zu starten Videotaste【 oder zu stoppen. 】: kurz drücken, um ein Bild zu machen. Fototaste【...
- Seite 3 Datei sperren: Im Aufnahme-Modus kurz 【M】drücken, um die die Datei zu sperren. Es wird das gelbe "gesperrt-Symbol" im LCD-Bildschirm angezeigt. Nach oben/links Taste 【▲】 : Im Menü "Einstellungen" wird es verwendet, um die Funktionsauswahl nach oben oder nach links zu verschieben. A.
- Seite 4 LED Funktionsanzeige Die folgende Tabelle zeigt den jeweiligen Kamerastatus durch unterschiedliche LED-Beleuchtung. LED 1 LED 2 Power ON Grüne LED Grüne LED Videoaufnahme Rote LED (blinkt) Rote LED (blinkt) Standby Grünes Licht Grünes Licht Aufladen()Ausschalten) Weiße LED Weiße LED Ladevorgang Kein Licht Kein Licht abgeschlossen...
- Seite 5 Bildschirmsymbole STANDBY Auflösung Akku Speicher Datum/Zeit Speicher AUFNAHME Aufnahmedauer Träger/Polizei ID...
- Seite 6 Bildschirmschoner Befindet sich die Kamera im Standby Modus, schaltet sich nach 1 Minute der Bildschirm ab. Die Zeit lässt sich im Menü variieren. Menü- und Systemeinstellungen Durch kurzes Drücken der Menü Taste 【 M 】öffnen Sie die Systemeinstellungen.
- Seite 7 Treffen Menüauswahl durch Drücken Richtungstasten [▲][▼]. Bestätigen sie jeweils durch die OK Taste 【OK】 . Über die Menütaste gelangen Sie jeweils um eine Ebene zurück bis zum Hauptmenü. Einstelloptionen Video-Spezifikationen Artikel Spezifikation wählbar Standardwerte Video- 1920 X 1080 30P 16:9 1920 X 1080 30P 16:9 Auflösung 1280 X 720 60P 16:9...
- Seite 8 Bildauflösung 32M (7552 x 4248 16:9) 30M (6400 x 4800 4:3) (7552 X 4248 16:9) 23M (6400 X 3600 16:9) 20M (5210 X 3840 4:3) 18,5 M (4976 X 3732 4:3) 16 M (5376 x 3024 16:9) 4M (26888 x 1512 16:9) Qualität S.
- Seite 9 Loop-Video EIN-/AUSSCHALTEN Auto Power An / Aus Police ID Vom Benutzer festgelegt 000000 Sprache Englisch/Multi-Sprachen Deutsch Hinweis: Das Einstellen von Datum, Zeiteinstellung, ID Einstellung erfolgt innerhalb der Systemeinstellungen. Einsatz von Farbfilter Die Grundeinstellungen der Kamera sind für die bestmögliche Abbildungsleistung bei Video und Foto auch bei schlechten Lichtverhältnissen konzipiert.
- Seite 10 Aufnehmen von Foto und Video Bilder werden im JPG Format gespeichert. Videos werden als MP4 gespeichert. Die Aufnahmen werden mit Angaben zu Datum und Uhrzeit hinterlegt. Snapshot Funktion Während der Videoaufnahme können sie durch Drücken der Fototaste einen Schnappschuss erstellen. Die Videoaufnahme wird dabei nur kurz unterbrochen und danach automatisch weitergeführt.
- Seite 11 Audioaufnahme Durch kurzes Drücken der Audio taste starten Sie die Audioaufnahme. Durch weiteres Drücken wird diese beendet. Während der Aufnahme wird ein Mikrofonsymbol auf dem Display dargestellt. Aufnahmen wiedergeben Um Dateninhalte abzurufen drücken Sie 【OK】 . Durch die Richtungstasten [▲][▼] wählen sie den Datentyp und nach erneuter Bestätigung durch die 【OK】...
- Seite 12 Daten löschen Audio- und Videodateien können nur gelöscht werden, wenn das Gerät an den Computer angeschlossen ist und das richtige Kennwort eingegeben wurde. Kennwort-Einstellungen Menüfunktion über 【 M 】-Taste aufrufen. Öffnen Sie "Kennwort ändern". Klicken Sie auf "Up" oder "Down" Taste, um Zahlen oder Buchstaben auswählen.
- Seite 13 Systemneustart / Reset der Kamera Sollte die Kamera sich aufgrund unsachgemäßer Bedienung oder anderer Grunde nicht mehr bedienen lassen, ist es erforderlich einen Systemneustart durchzuführen. Hierzu gibt es zwei Möglichkeiten: A. Öffnen Sie das Batteriefach und entnehmen Sie den Akku. Nach Wiedereinsetzen des Akkus bitte die Kamera über den Power Button (An/Aus) einschalten.
- Seite 14 Clip anbringen und lösen:...
- Seite 15 Fernbedienung Diese Kamera können Sie per Fernbedienung steuern. Sie haben so die Option sehr komfortabel Videos, Fotos und Audioaufnahmen zu machen, ohne die Kamera zu berühren. Fernbedienung Funktionen: ① 【 】Kamera-Taste einmal drücken, um ein Foto zu machen, drücken einmal im Videoaufzeichnungsmodus für Snapshot.
- Seite 16 Aufnahmen obliegt einzig und allein dem Benutzer der Kamera und ist vor Anwendung entsprechend durch den Benutzer auf Zulässigkeit zu prüfen. Die Firma BRAUN Photo Technik GmbH übernimmt in keinem Moment der Anwendung die Verantwortung für die gesetzlichen Rahmenbedingungen bezüglich des Einsatzes der BRAUN BCX5.
- Seite 17 Body Worn Camera Instruction...
- Seite 18 I、Product Instruction 1.1 Main Camera’s Instruction...
- Seite 19 1.2 Schematic diagram of the remote control (optional) Indicator light Camera key Video key Power on/off key Audio key II、Key Operating Instructions 1. Power On/Off button: Short press to power on; long press for 3 seconds to shut down. 2. Video【◆■】 :Short press to start or stop recording. 3.
- Seite 20 ‘Locked Symbol’ will be displayed in the LCD screen. When the lock symbol in the LCD screen disappears, the file is under a protection state. 7. Up / Left key【▲】 : In the settings menu, it is used to move up or move left to select the items you want.
- Seite 21 III、Statues LED The following table show the camera’s status when in working or during standby by the LED. LED 1 LED 2 Power ON Green Light Green Light Recording Red Light Flash Red Light Flash Sleeping Green Light Green Light Charging(Power OFF) White Light No Light Finished Charging...
-
Seite 22: Basic Operation
IV、Basic operation 4.1 Switch/Power On Press "switch" key [ ], after you see the LOGO displayed in the screen, then en- ter the normal mode. In any mode, press the "switch" button [ ] for 3 seconds after displaying LOGO screen to shut down. The Normal Mode... - Seite 23 In the normal display screen: ① recording time; (Red point is the under the normal recording statues, blue point is under the pre-recorded on statues) ② Device ID and the ID number of police officers; ③ Display system date and time; ④ Battery level/Statues; ⑤ Display memory card identification; ⑥Display memory cards’...
- Seite 24 A.Menu mode including three items, video , camera , system set- tings 4.3.1 By a short press "Move Up / Left" key [▲] or "Down / Left" key [▼] to select the setting of any one item of these three main items. 4.3.2 By short press "OK "...
- Seite 25 Image Resolution 32M (7552X4248 16:9) 30M (6400X4800 4:3) (7552X4248 23M (6400X3600 16:9) 16:9) 20M (5210X3840 4:3) 18.5M (4976X3732 4:3) 16M (5376X3024 16:9) 4M (26888X1512 16:9) Quality S. Fine/Fine/Normal S. Fine Multi- Capture 1/3/6/12 Stamp ON/OFF System Setting Specifications Language Setting English/Deutsch/Es- English panol/Lingua...
- Seite 26 Note: The date setting, time setting, ID setting three functions can be made in machine directly. 4.4 Turn on/off the infrared night vision lights and install filters A In the video and monitoring interface, long press Down Key to turn on/off infrared lights.
- Seite 27 start video recording. While recoding, the upper left corner of the display shows a red dot, indicator light turns red and flashes slowly, one press to start recording, press it again to stop recording, the video is named by recording date and time with MP4 as suffix stored in the memory card. The indicator will be green.
- Seite 28 2、Press “OK/go back” key 【OK】button to display all files (video / photo / audio), press【▲】or【▼】to select the one you want to view or go back(the selected item turns blue). 3、Press "OK / go back" button 【OK】 again to play the selected file (video / photo / audio), during playback, press the "OK / go back"...
- Seite 29 2. If you choose unencrypted software, just need to press connect cam- era with USB to check file. File protection mode : In video mode, press the "Menu" key 【M】 to open the file protection mode, LCD screen upper appears yellow "lock flag", the file is protected. 4.10 Re-start Because of improper operation or other special reason causes crash or stop responding operation, user should restart the device, the device has no...
- Seite 30 Picture A 1. Clip on/off:refer to picture A, take off the clip by the arrow direction ;put on the clip by opposite direction. ①...
-
Seite 31: Remote Control
Picture B 2、 battery door on/off:use the screw that hang on remote key to take off the 2 screws, take away the battery door, the battery is as picture B shows. VI、Remote control This machine has a remote version, can take pictures, video, audio and power off, convenient, more human friendly. - Seite 32 6.2 Remote operation instruction: ① 【 】Key:camera key,press once to take a picture, press once in recording mode to snapshot. ② 【 】key:video key,Short press to start or stop recording video. ③ 【 】key:audio key, Short press to start or stop recording audio. ④...
- Seite 33 once every 5 seconds beep, the device will automatically shut down after five minutes. After the emergence of low, please charge, so as not to affect your use. There are three ways to charge the device: 1. The product is equipped with an optional replaceable battery, remove the battery, charge the battery with the factory equipped cradle and charging case.
-
Seite 34: Specification
1X CD 1X User Manual 1X Package Box X、Specification Video resolution Built-in camera video resolution 1920*1080; Display 2.0inch 16:9 TFT LCD 960*240 aperture=2.4. Wide angle 140degree, Lens 270degree horizontal, 110degree Vertical Focus range 0.3~∞ CMOS 1/3" Color CMOS sensor Body size 110mm×60mm×35mm(length×width×height) Photo JPG format, max resolution:32M Max... - Seite 35 USB port Mini USB port/USB 2.0 Removable high-capacity lithium battery; Battery 3.7V 2100mAh, 2 pieces(one optional) Operating temperature / -30℃~55℃/<90% humidity Power on about 430mA, video is about 470mA, screen- Working current saver about 230mA, IR to open about 540mA, standby about 0mA Waterproof IP66...
- Seite 36 synchronize the time of the device, if it cannot change the time, please con- tact customer service staff remote networking solution. △! Red equipment image The device uses relay control infrared filter lens. When it has been hit in the course of transportation or fall could lead to an infrared filter lens stuck, the magnetic force cannot be reset after the relay is energized.