Herunterladen Inhalt Inhalt Diese Seite drucken

Werbung

Verfügbare Sprachen
  • DE

Verfügbare Sprachen

  • DEUTSCH, seite 22
Quickstart Guide
Guía de inicio rápido
Guide d'utilisation rapide
Guida rapida
Schnellstart-Anleitung
Snelstartgids
Appendix
Helios
English ( 2 – 6 )
Español ( 7 – 11 )
Français ( 12 – 16 )
Italiano ( 17 – 21 )
Deutsch ( 22 – 26 )
Nederlands ( 27 – 31 )
English ( 32 – 35 )

Werbung

Inhaltsverzeichnis
loading

Inhaltszusammenfassung für ION Helios

  • Seite 1 Helios Quickstart Guide English ( 2 – 6 ) Guía de inicio rápido Español ( 7 – 11 ) Guide d'utilisation rapide Français ( 12 – 16 ) Guida rapida Italiano ( 17 – 21 ) Schnellstart-Anleitung Deutsch ( 22 – 26 ) Snelstartgids Nederlands ( 27 –...
  • Seite 2 Quickstart Guide (English) Introduction Box Contents Helios Micro-USB Cable 1/8” (3.5 mm) Stereo Aux Cable Quickstart Guide Support For the latest information about this product (system requirements, compatibility information, etc.) and product registration, visit ionaudio.com. For complete warranty information, visit ionaudio.com/warranty.
  • Seite 3: Quick Setup

    The rubber foot on the bottom of the speaker allows Helios to sit comfortable on any flat surface. Helios can also be mounted to a wall using the keyhole slots on the back of the unit.
  • Seite 4 If the LEDs appear dim, or if your music cuts out or fails to play, your battery may require recharging. Use the included micro-USB cable to connect Helios to (A) a USB power adapter connected to a power outlet (not included), or (B) your computer...
  • Seite 5 7. Micro-USB Port/Charging LED: Use the included micro-USB cable to connect this port to a computer USB port to charge Helios. The LED is solid red when the battery is charging and turns off when the battery is fully charged/no adapter is connected.
  • Seite 6: Operation

    2. Adjust the volume with the -/+ controls. 3. To disconnect a phone call, press and release the Answer Call button. Standby Mode Helios will power off after 15 minutes if no audio is playing and the LEDs are not active.
  • Seite 7 Guía de inicio rápido (Español) Introducción Contenido de la caja Helios Cable micro-USB Cable auxiliar estéreo de 3,5 mm (1/8 pulg.) Guía de inicio rápido Soporte Para obtener la información más completa acerca de este product (los requisitos del sistema, compatibilidad, etc) y registro del producto, visite ionaudio.com.
  • Seite 8: Instalación Rápida

    Instalación rápida El Helios se puede utilizar apoyado o montado. Cuando lo utilice apoyado, extienda el soporte de la parte trasera de la unidad. La pata de goma en la parte inferior del altavoz le permite al Helios asentarse cómodamente en cualquier superficie plana.
  • Seite 9 Si las LEDs se atenúan, o si la música se corta o no se reproduce, podría ser necesario recargar la batería. Use el cable micro-USB incluido para conectar el Helios a (A) un adaptador de alimentación USB (no incluido) conectado a una toma de...
  • Seite 10: Panel Lateral

    Puerto de carga micro-USB/ LED de carga: Conecte el cable micro-USB incluido para conectar el Helios a un adaptador de alimentación USB conectado a su vez a una toma de corriente o a su ordenador. Este LED se enciende con luz roja permanente cuando se está...
  • Seite 11 2. Ajuste el volumen con los controles -/+. 3. Para finalizar una llamada, pulse y suelte el botón atender-llamada. Modo de espera El Helios se apagará tras 15 minutos sin reproducir ningún audio y sin ninguna actividad en los LED.
  • Seite 12 Guide d'utilisation rapide (Français) Présentation Contenu de la boîte Assistance Helios Pour les dernières informations concernant ce produit (la configuration système minimale requise, la compatibilité, Câble micro-USB etc) et l'enregistrement du produit, veuillez visitez le site Câble auxiliaire stéréo ionaudio.com.
  • Seite 13: Démarrage Rapide

    Démarrage rapide L’enceinte Helios peut être posée sur table, par terre, ou montée au mur. Pour la déposer sur une surface plane, déployez la béquille à l’arrière de l’enceinte. Le pied en caoutchouc de l’enceinte permet de la poser sur n'importe quelle surface plane.
  • Seite 14 Si les DEL apparaissent faibles, ou si la musique coupe ou ne joue pas, il peut être nécessaire de recharger la batterie. Utilisez le câble micro-USB inclus afin de brancher le Helios à (A) un adaptateur d’alimentation USB (non inclus) branché à une prise secteur,...
  • Seite 15: Caractéristiques

    : Utilisez le câble micro-USB inclus afin de brancher le Helios à un adaptateur d’alimentation USB branché à une prise secteur ou à un ordinateur. Cette DEL devient rouge lorsque la batterie est en rechargement et s'éteint lorsqu’elle est entièrement rechargée ou lorsque l’adaptateur n’est pas branché.
  • Seite 16: Répondre À Un Appel

    Remarque : Si votre appareil vous demande un mot de passe ou un NIP, saisissez le numéro zéro (« 0 ») quatre fois. Faites jouer de la musique et réglez la boutons volume -/+ du Helios. Maintenez enfoncée la touche de d'appel-réponse pendant 2 secondes afin de supprimer la connexion à...
  • Seite 17 Guida rapida (Italiano) Introduzione Contenuti della confezione Helios Cavo micro-USB Cavo aux stereo da 3,5 mm Guida rapida Assistenza Per conoscere le ultime informazioni in merito a questo prodotto (i requisiti di sistema complete, compatibilità, ecc) e per la registrazione del prodotto, recarsi alla pagina ionaudio.com.
  • Seite 18: Inizio Rapido

    Inizio rapido Helios può essere utilizzato in via indipendente o installato. Quando si utilizza in via indipendente, allungare il supporto sul retro dell'apparecchio. Il piedino in gomma posto sul fondo dell'altoparlante consente all'Helios di essere collocato comodamente su qualsiasi superficie uniforme. Helios può...
  • Seite 19 Se le LED appaiono offuscate o la musica salta o non suona, la batteria deve essere ricaricata. Servirsi del cavo micro-USB in dotazione per collegare il Helios a (A) un adattatore di alimentazione USB (non in dotazione) collegato a una presa...
  • Seite 20: Pannello Laterale

    Questa funzione potrebbe non essere compatibile con tutti gli smartphone. Porta di ricarica micro-USB/LED di ricarica: Collegare il cavo micro-USB in dotazione per collegare il Helios ad un adattatore di alimentazione USB collegato ad una presa elettrica o al computer. Questo LED è di colore rosso fisso quando la batteria è...
  • Seite 21 2. Regolare il volume servendosi dei comandi volume -/+. 3. Per scollegare una chiamata, premere e rilasciare il tasto di resposta. Modalità Standby Helios si spegnerà dopo 15 minuti se non viene riprodotto alcun audio e i LED non sono attivi.
  • Seite 22 Schnellstart-Anleitung (Deutsch) Einführung Lieferumfang Helios Micro-USB-Kabel 3,5 mm Stereo Aux-Kabel Schnellstart-Anleitung Kundendienst Für aktuelledie neuesten Informationen zu diesem Produkt (System- Anforderungen, Informationen zur Kompatibilität etc.) und zur Produkt- Registrierung besuchen Sie ionaudio.com. Für komplette Garantieinformationen, besuchen Sie ionaudio.com/warranty. Allgemeinhinweis zur Konformitätserklärung: Hiermit erklären wir, daß sich dieses Gerät in Übereinstimmung mit den grundlegenden Anforderungen der europäischen...
  • Seite 23: Schnelles Einrichten

    Gerät freistehend verwenden, klappen Sie den Ständer an der Rückseite heraus. Der Gummifuß an der Lautsprecherunterseite sorgt dafür, dass Helios bequem auf jede ebene Fläche gestellt werden kann. Helios kann mithilfe der Montagelöcher an der Geräterückseite auch an der Wand montiert werden.
  • Seite 24 Wenn die LEDs schwach erscheinen oder die Musikwiedergabe ausfällt oder überhaupt nicht mehr funktioniert, muss wahrscheinlich der Akku aufgeladen werden. Verwenden Sie das mitgelieferte Micro-USB-Kabel, um den Helios (A) mit einem USB-Netzteil (nicht im Lieferumfang enthalten), das in einer Steckdose eingesteckt ist oder (B) mit Ihrem (eingeschalteten) Computer...
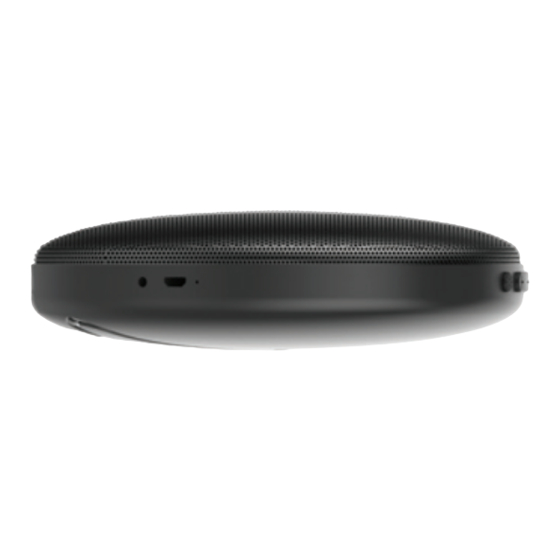
  • Seite 25 Diese Funktion ist möglicherweise nicht mit allen Smartphones kompatibel. Micro-USB-Ladeanschluss/Lade-LED: Stecken Sie hier das mitgelieferte micro-USB-Kabel ein, um den Helios mit Ihrem Computer zu verbinden oder mit einem USB-Netzteil zu verbinden, das in eine Steckdose gesteckt wird. Diese LED leuchtet rot, wenn der Akku aufgeladen wird und erlischt, wenn der Akku vollständig geladen ist/kein Adapter angeschlossen ist.
  • Seite 26: Betrieb

    Drücken Sie die Ruftatse entgegennehmen. Stellen Sie die Lautstärke mit den Lautstärkereglern -/+. Um einen Anruf zu trennen, drücken Sie die Ruftaste entgegennehmen. Standby-Modus Helios schaltet sich nach 15 Minuten aus, wenn keine Musik gespielt wird und die LEDs nicht aktiv sind.
  • Seite 27 Snelstartgids (Nederlands) Introductie Inhoud van de doos Helios Micro-USB kabel Stereo aux-kabel van 3,5 mm Snelstartgids Ondersteuning Voor laatste informatie over product (systeemvereisten, compatibiliteitsinformatie, enz.) en productregistratie, bezoek ionaudio.com. Voor technische ondersteuning, bezoek ionaudio.com/warranty.
  • Seite 28 Het rubberen voetje onderaan de luidspreker zorgt ervoor dat de Helios stevig op elk vlak oppervlak staat. De Helios kan ook op een muur worden gemonteerd met behulp van de sleutelgaten achteraan het apparaat.
  • Seite 29 Als de LED's een zwak licht lijken te geven of als de muziek uitvalt of niet wilt afspelen, moet de accu mogelijk worden opgeladen. Gebruik de meegeleverde micro-USB-kabel om Helios gedurende 5,5 uur te verbinden met (A) een USB-stroomadapter (niet meegeleverd),...
  • Seite 30 Oplaadpoort Micro-USB-ingang/Oplaad-LED: Gebruik de meegeleverde micro-USB-kabel om Helios te verbinden met een stopcontact, of uw pc. Deze LED gaat rood branden wanneer de accu aan het opladen is en gaat uit wanneer de accu volledig is opgeladen / er geen adapter is aangesloten.
  • Seite 31 De knop Bellen-beantwoorden indrukken en loslaten. Regel het volume met de bedieningsknop Volume -/+. Druk de knop Bellen-beantwoorden in om een oproep af te breken. Standby-modus: De Helios gaat automatisch uit na 15 minuten als geen audio wordt afgespeeld en de leds niet actief zijn.
  • Seite 32: Technical Specifications

    Appendix (English) Technical Specifications Output Power 6W (2 x 3W peak) Drivers 2 1.5” woofers A2DP Supported Bluetooth Profile Bluetooth Range Up to 100 feet / 30.5 meters * Up to 7.5 hours Battery Battery life: ** (LEDs only, no audio) Up to 5.5 hours (LEDs and audio at 50% volume) 5.5 hours...
  • Seite 33: Safety Notices

    Bluetooth word mark and logos are owned by the Bluetooth SIG, Inc. and any use of such marks by ION Audio is under license. Google is a registered trademark of Google Inc. Siri is a trademark of Apple Inc., registered in the U.S. and other countries. All other product names, company names, trademarks, or trade names are those of their respective owners.
  • Seite 34 This device complies with Part 15 of the FCC rules. Operation is subject to the following two conditions: (1) this device may not cause harmful interference, and (2) this device must accept any interference received, including interference that may cause undesired operation. FCC RF Radiation Exposure Statement: This equipment complies with FCC radiation exposure limits set forth for an uncontrolled environment.
  • Seite 35 Caution: Danger of explosion if battery is incorrectly replaced. Replace only with the same or equivalent type. Batteries (a battery pack or an installed battery) shall not be exposed to excessive heat such as sunshine, fire, etc. ESD/EFT Warning: This unit may contain a microcomputer for signal processing and control functions.
  • Seite 36 ionaudio.com Manual Version 1.1...

Inhaltsverzeichnis