Seite 1
INSTRUCTIONS POUR LE MONTAGE ET RECOMMANDATIONS POUR L ENTRETIEN FOUR HP-725.1 / HP-730 INSTRUCCIONES PARA EL MONTAJE Y RECOMENDACIONES PARA EL MANTENIMIENTO HORNO HP-725.1 / HP-730 MANUAL DE INSTRUÇÕES FORNO HP-725.1 / HP-730 INSTRUCTION MANUAL OVEN HP-725.1 / HP-730 EINBAULEITUNG UND PFLEGEHINWEISE OFEN HP-725.1 / HP-730...
Seite 3
In Übereinstimmung mit den Anforderungen der Europäischen Este aparato lleva el marcado CE en conformidad con la Directiva 2002/96/EC del Parlamento Europeo y del Consejo sobre residuos de Richtlinie 2002/96/EG über Elektro- und Elektronik-Altgeräte aparatos eléctricos y electrónicos (RAEE). (WEEE) ist vorliegendes Gerät mit einer Markierung versehen. La correcta eliminación de este producto evita consecuencias Sie leisten einen positiven Beitrag für den Schutz der Umwelt und die negativas para el medioambiente y la salud.
PANNEAU DE COMMANDES 1 – Thermostat 4 – Verrouillage de la porte 2 – Sélecteur de fonctions 5 – Programmateur électronique 3 – Témoin du thermostat Four a fonctions multiples Grâce aux différents élements de chauffage commandés par un sélecteur et réglés par un thermostat, ce four offre plusieurs modes de cuisson basés sur trois sources de chaleur principales: Circulation forcée de l'air (four ventilé) Propagation spontanée de la chaleur (convection naturelle)
Seite 9
Eléments et opérations commandées par le sélecteur 9 positions Pos. 1 Eclairage du four L'eclairage du four sera allumés lors des opérations suivantes. Pos. 2 Gril Selectionnez la temperature choisie. Le gril étant réglé par thermostat, on peut aussi faire des grillades avec la porte fermée. Pos.
Seite 10
Pos. 7 Décongélatión Le ventilateur fonctionne sans ses éléments, ainsi le four n’est pas chauffé directement. La porte du four doit rester fermée. On peut décongeler rapidement des aliments congelés en les plaçant sur la plaque du four et en l’insérant sur le gradin inférieur. Grâce à ce système, le temps de décongélation est réduit jusqu’àun tiers.
Seite 11
Table Plat Temp. Niveau * Temps en °C Grille en min. Gâteaux dans moule à pâte battue Conseillé Personelle Galette, fouace 55 - 65 Fouace 60 - 70 Tarte 60 - 70 Gâteaux dans moule de pâte brisée Fond de Tarte 8 - 10 Tarte au fromage, cheesecake 25 - 35...
Seite 12
Comment utiliser le grill Placer les aliments à griller sur la grille ou dans un plat aux bords très bas. Introduire la grille dans le four au niveau le plus élevé possible. Introduire le plat de récupération des graisses au niveau immédiatement sous la Selon le type d'aliment (viandes, poissons, grille.
Seite 13
PROGRAMMATEUR ELECTRONIQUE Le programmateur électronique est un dispositif qui regroupe les fonctions suivantes: - horloge 24 heures avec afficheur illuminé - Minuterie (jusqu’à 23 heures et 59 min.) - Programme de début et fin de cuisson automatique - Programme pour cuisson semi- automatique (uniquement début ou fin).
Seite 14
Cuisson manuelle en cours Cuisson automatique en cours Minuterie en fonction REMARQUE: Après avoir sélectionné mode fonctionnement, une certaine période de temps s’écoule avant la confirmation de la sélection (environ 3-4 secondes) pendant laquelle on peut modifier les données. Horloge digitale Les chiffres de l’horloge indiquent les heures (0-24) et les minutes.
Seite 15
1) Cuisson automatique (début et fin) Programmer la durée de cuisson en appuyant sur le bouton Programmer la fin du temps de cuisson en appuyant sur le bouton Programmer la température et le programme de cuisson en utilisant le bouton du thermostat et le sélecteur. Après cette programmation, le symbole «A»...
Seite 16
Minuterie = avertisseur sonore Le programme minuterie comprend uniquement un avertisseur sonore qui peut être programmé pour un maximum de 23 heures et 59 min. Pour programmer la minuterie, appuyer sur le bouton et, simultanément, sur les boutons + ou - jusqu’à...
Seite 17
Pour des raisons de sécurité, la porte du four se bloque automatiquement quand sélectionne fonction autonettoyante. Dans ce cas, le voyant lumineux ‘bloqué s’allume sur le bandeau. La porte se débloquera quand la température interne descendra en dessous de 300 C. Le ventilateur de refroidissement fonctionnera avec la porte bloquée et s’éteindra quand la température interne rejoindra 200°C (dans certains cas le ventilateur de refroidissement...
SUBSTITUTION DE LA LAMPE DU FOUR ATTENTION: Débrancher l’appareil l’alimentation électrique. Le four doit être froid. S’il est nécessaire de remplacer la lampe du four, enlever le couvercle de protection «A» en le tournant dans le sens contraire aiguilles d’une montre.
El Fabricante declina toda responsabilidad por daños a personas y cosas debidos a una instalación defectuosa o impropia del aparato. TEKA se reserva el derecho de aportar a sus productos todas aquellas modificaciones que considere necesarias y útiles, sin necesidad de previo aviso.
CONEXIÓN ELÉCTRICA Comprobar que la tensión corresponda a la indicada en la placa de características. El aparato debe ser conectado a un interruptor omnipolar , con una distancia entre los contactos de 3mm como mínimo. Pueden utilizarse para esta finalidad interruptores automáticos, fusibles o bien relé.
INSTRUCCIONES PARA EL USUARIO Instrucciones generales ATENCIÓN: Durante el funcionamiento del horno, la superficie externa y el vidro se vuelven muy calientes; por lo tanto, para evitar quemaduras o heridas, no deje que los niños se acerquen al horno. No utilice el aparato para calentar el ambiente. Preste siempre mucha atención cuando se conectan a la red otros aparatos ubicados cerca del horno: los cables de conexión no deben entrar en contacto con partes calientes del horno.
Seite 27
Horno multifunción Gracias a las diversas resistencias conmutadas por un selector y reguladas por un termostato este horno ofrece distintas soluciones de cocción: A. Turbo (ventilado) B. Convencional (eléctrico) C. Rayos infrarojos (grill) Funciones del selector: (9) Pos. 1 Sólo lámpara La lámpara en el interior del horno se enciende.
Seite 28
Pos. 7 Descongelación La luz del horno y el indicador luminosos amarillo se encienden como en todas las demás funciones del horno. Entra en función únicamente el ventilador, pero sin difundir calor (y el termostato no está en función). La puerta del horno tiene que estar cerrada.
Seite 29
Tabla Tipo de alimento Temp. °C Altura Tiempo cocción de guía* en minutos Dulces en molde con masa batida Aconsejado Personal Bizcochos o bollos 55 - 65 Pasteles 60 - 70 Tarta sublime 60 - 70 Fondo Dulces en molde de pastaflora para tartas 8 - 10 Fondo de tarta con requesón...
Seite 30
Cómo se usa el grill B. Posición del selector en Coloque los alimentos que desea dorar en hornos multifunción. la parrilla o en una fuente de bordes muy bajos. La parrilla se tiene que colocar en la Dependiendo del tipo de alimento (carnes, guía más alta, mientras que la bandeja pescados, ave etc.) será...
PROGRAMADOR ELECTRÓNICO El programador electrónico es un dispositivo que cumple las siguientes funciones: - Reloj 24 horas con visor iluminado - Temporizador (hasta 23 horas y 59 min.) - Programa para empezar y terminar la cocción automática - Programa para cocción semi automática (solamente inicio o final).
Seite 32
Cocción manual en curso Cocción automática en curso Temporizador en funcionamiento NOTA: Después de haber seleccionado el funcionamiento, antes de confirmar pasa un determinado periodo de tiempo (aproximadamente 3-4 segundos) durante los cuales es posible modificar los datos Reloj digital. Los números del reloj indican las horas (0-24) y los minutos ------- .
Seite 33
1) Cocción automática (inicio y final) Regular la duración de cocción presionando el botón Regular la final de la cocción presionando el botón Regular la temperatura y el programa de cocción usando el mando del termóstato y el selector. Después de esta regulación, el símbolo «A» parpadeará. Ejemplo: la cocción dura 45 minutos y debe terminar a las 14.00.
Seite 34
NOTA: Las funciones 1) y 2) o bién 1)+ 2) se activan solamente si la función cocción ha sido seleccionada. Temporizador = buzzer El programa temporizador puede ser programado por un máximo de 23 horas y 59 minutos. Para regular el temporizador, presionar el botón simultáneamente los botones + o - hasta que no aparezca el tiempo deseado en el visor.
Seite 35
LIMPIEZA PIROLÍTICA Seleccione la función autolimpiante Con la selección de esta función, se regula automáticamente un ciclo de limpieza que dura 90 minutos ( este tiempo se puede aumentar automáticamente hasta un máximo de 180 minutos si el horno está muy sucio). Esta función efectúa la limpieza del horno haciendo que la temperatura alcance 475°C.
Seite 36
Por motivos de seguridad , la puerta del horno se bloquea automáticamente cuando selecciona función autolimpiante. En este caso el indicador luminoso “bloqueo” en el visor se enciende. La puerta se bloqueará cuando la temperatura interna baje a 300 C. El ventilador de refrigeración funcionará...
Seite 37
CAMBIO DE LA BOMBILLA DEL HORNO ATENCIÓN: Desconecte el aparato de la alimentación eléctrica. El horno debe estar frío. Si quiere cambiar la bombilla del horno, quite la tapa protectora “A” girando en sentido antihorario. Después de haber cambiado la bombilla, coloque nuevamente la tapa protectiva “A”.
INSTALACIÓN ATENCIÓN: LA UNIDAD DEBE SER INSTALADA CORRECTAMENTE SEGÚN LAS INSTRUCCIONES DE LA EMPRESA CONSTRUCTORA Y POR PERSONAL CUALIFICADO ANTES DE EFECTUAR CUALQUIER REPARACIÓN U OPERACIÓN DE MANTENIMIENTO, ES NECESARIO DESCONECTAR EL APARATO DE LA ALIMENTACIÓN ELÉCTRICA. Normas legislativas, reglamentaciones técnicas, directivas La instalación del aparato debe ser efectuada conforme a las leyes vigentes según las normas de seguridad aplicables.
Para que fabrique aparelhos sempre em linha com as modernas tecnologias e/ou com a finalidade de garantir melhoramentos constantes na qualidade dos produtos, TEKA reserva-se o direito de produzir eventuais alterações sem prévio aviso. INFORMAÇÕES GERAIS A etiqueta que traz os dados técnicos encontra-se na base de abertura do forno. A etiqueta vêse, quando a porta do forno estiver aberta e refere o conjunto dos dados e informações necessárias...
LIGAÇÃO ELÉCTRICA Verifique se a tensão nominal corresponde à indicada na chapa de características. A ligação à rede eléctrica deverá ser efectuada através de um interruptor omnipolar correspondente à potência instalada. A distância de separação dos contactos deverá ser de pelo menos a 3 mm e permitir desligar o aparelho em caso de emergência ou para intervenções de manutenção e limpeza.
INSTRUÇÕES DE UTILIZAÇÃO Instruções gerais ATENÇÃO: a porta do forno pode ficar quente durante o funcionamento. Evite que as crianças se aproximem do forno. Durante o cozinhado, os acessórios (grill, tabuleiro) aquecem: é aconselhável a utilização de luvas de protecção. Não utilize o dispositivo para aquecer o ambiente.
PAINEL DE COMANDOS 1. Selector 2. Programador electrónico 3. Termóstato 4. Bloqueio da porta 5. Luz termóstato...
Seite 45
Funções do selector LUZ DO FORNO A lâmpada no interior do forno acende-se. Nesta posição o termostato não está em funcionamento. GRELHADOR Seleccione, com o termóstato, a temperatura desejada (enter 50°C e 250°C). Manter a porta do forno fechada. RESISTÊNCIA INFERIOR Este tipo de cozedura é...
Seite 46
DESCONGELAÇÃO A luz do forno e o piloto acendem-se. O ventilador entra em funcionamento mas sem produzir calor. A porta do forno tem de estar fechada. Esta função permite descongelar alimentos, utilizando aproximadamente 1/3 do tempo normal. VENTILADOR + GRELHADOR Seleccionar uma temperatura entre 50°C e 250°C.
Seite 47
Tabela indicativa para cozinhar no forno Alimento Temp. °C Altura de Tempo de Símbolo cozedura (*) cozedura (min) de cozedura Bolos Pão redondo 55-65 Tartes de fruta 30-40 Bolos com leite 35-40 e manteiga Bolos levedados 25-35 Choux 20-30 Massa folhada 15-25 Biscoitos 15-20...
Seite 49
com display de temperatura - Display de temperatura intermitente lig d manual Funcionamento da cozedura automatica Funcionamento com programador de tempo em função...
Seite 52
Limpeza por pirólise Seleccionar a função de autolimpeza Depois de seleccionar esta função, um período de limpeza de 90 minutos programa-se automaticamente (também se pode escolher um período de 180 minutos se o forno estiver muito sujo). Esta função permite limpar o forno aumentando a temperatura até 475°C. O depósito de cinzas produzido pode ser eliminado com un pano húmido quando o forno arrefeceu mas ainda está...
Seite 53
Substituição da lâmpada do forno - Fig. 8 O forno possui uma lâmpada com as seguintes características: Casquilho de rosca E-14 T 300° C ATENÇÃO: Desligue o aparelho da corrente eléctrica. Se for necessário substituir a lâmpada de iluminação do forno, é necessário retirar a cobertura de protecção A desaparafusando-a no sentido contrário ao dos ponteiros do relógio.
ESPECIFICAÇÕES TÉCNICAS Este a parelho está em conformidade com as normas vigentes em relação à eliminação das interferências rádio-eléctricas. Tensão de alimentação: 220/230V~ 50Hz HP-725.1I Lâmpada do forno 0,025 kW Catalizador fumos pirolítico 0,150 kW Motor ventilador tangencial 0,025 kW Motor ventilador 0,025 kW Resistência superior...
Seite 55
INSTALAÇÃO ATENÇÃO: ESTE APARELHO DEVE SER INSTALADO POR UM TÉCNICO E SEGUNDO AS INSTRUÇÕES FORNECIDAS PELO FABRICANTE. ANTES DE QUALQUER INTERVENÇÃO NO APARELHO, ASSEGURE-SE DE QUE A ALIMENTAÇÃO ELÉCTRICA DO FORNO ESTÁ DESLIGADA. Normas legislativas, regulamentações técnicas e directivas A instalação do aparelho deve ser realizada com o cumprimento das normas legais vigentes e em conformidade com as normas aplicáveis à...
In order to produce appliances that are up-to-date with modern technology and/or to ensure continuous improvement in the quality of its products, TEKA reserves the right to make modifications with no advance notice. GENERAL INFORMATION The label with the technical information is found at the base of the hole of the oven. The label is visible when the oven is open.
ELECTRICAL CONNECTION Check that the nominal voltage corresponds to that on the characteristics label. Connection to the power mains must be made via an omni-polar switch that corresponds to the installed power. The distance of separation of the contacts must be at least 3 mm and allow disconnection of the appliance in case of emergency or for maintenance and cleaning.
Seite 59
INSTRUCTIONS FOR USE General instructions ATTENTION: the door of the oven may be quite hot during operation. Keep children away from the oven. During cooking, the accessories (grill, drip pan) get hot. The use of protective gloves is advisable. Do not use the appliance to heat the room. When connecting other electrical devices near the oven, check that their power cords do not come into contact with the oven.
OVEN FUNCTIONS OVEN LIGHT With this function the thermostat must be on "0" position. GRILL Select your temperature; use this function to grill foods. Keep the oven door closed. BOTTOM ELEMENT ONLY It is recommended for slow cooking. TRADITIONAL OVEN COOKING traditional cooking, it is recommended to preheat the oven.
Seite 62
DEFROST The oven light will stay on during this function. The fan motor comes on, but there is no heat. The oven door should be kept closed. This function will help cut down the defrosting time by about onthird of the normal time. VENTILATED GRILL The fan and the grill element allow a fast and deep cooking for particular food.
Seite 63
Oven cooking chart Shelf Position Cooking tim e Cooking Tem p. °C Food (m ins). Function Cake 55-65 Fruit Cake 30-40 Buttermilk curd cake 35-40 Mould leaven cake 25-35 Choux pastry 20-30 Puff or flaky pastry 15-25 Biscuits 15-20 40-50 Lasagna Meat Fillet beef...
Seite 64
How to use the grill Lay the food in the wire shelf or, in a tray in case of small pieces. The rack must be positioned in the highest runner possible and the grease drip pan in the runner below. Close the door and turn on the element as follows: Cooking time in minutes Dishes for grilling...
Seite 65
ELECTRONIC PROGRAMMER/ TEMPERATURE DISPLAY The electronic programmer is a device, which groups together the following functions: - 24 hours clock with illuminated display - Timer (up to 23 hours and 59 min.) - Program for automatic beginning and end of cooking - Program for semi-automatic cooking (either start or finish only) - Displaying the required...
Seite 66
Manual cooking taking place Automatic cooking taking place Timer in operation NOTE: After having selected the operation, a period of time will pass (about 3-4 seconds) before confirmation, during which the data may be modifies. Digital clock (THE CLOCK MUST BE SET BEFORE OVEN WILL OPERATE) Clock numbers show hours (0-24) and minutes.
Seite 67
1) Automatic cooking (start and end) Set tem p erature and cooking program required by using the thermostat and the selector knobs. Set the length of cooking time by pushing the button. Set the end of cooking time by pushing the button.
Seite 68
Timer = buzzer The timer program consists only of a buzzer, which may be set for a maximum period of 23 hours and 59 min. To set the timer, push the button and, at the same time, + or - until you read the desired time on the display.
Seite 70
Replacing the oven light - Fig. 8 The oven is equipped with a lamp having the following features: screw cap E-14 T 300° C WARNING: disconnect the appliance from the power supply. lf the oven light needs to be replaced, the protective cover «A»...
INSTALLATION ATTENTION: THIS APPLIANCE MUST BE INSTALLED BY A TECHNICIAN IN COMPLIANCE WITH THE INSTRUCTIONS PROVIDED BY THE MANUFACTURER. BEFORE DOING ANY WORK ON THE APPLIANCE, MAKE SURE IT IS DISCONNECTED FROM THE POWER SUPPLY. Legislative standards, technical regulations and directives Installation of the device must be carried out in compliance with current legal standards and with applicable safety standards Oven installation:...
Unfälle, die durch eine unsachgemäße Installation oder ungeeigneten Gebrauch der Vorrichtung verursacht werden. TEKA behält sich das Recht vor, eventuelle Änderungen, die dazu beitragen ein immer auf die modernen Technologien abgestimmtes Produkt und/oder ständige Verbesserungen der Produktqualität zu erzielen, ohne Voranzeige durchzuführen.
Seite 76
ELEKTRISCHER ANSCHLUSS Prüfen, ob die Nennspannung den Merkmalen des Typenschildes entspricht. Der Anschluss an das Stromnetz muss über einen allpoligen Schalter, welcher der installierten Leistung entspricht, erfolgen. Der Trennungsabstand der Kontakte muss mindestens 3 mm betragen und das Gerät im Notfall oder bei Wartungs- und Reinigungsarbeiten isolieren.
Seite 77
GEBRAUCHSANWEISUNGEN Allgemeine Hinweise ACHTUNG: die Backofentür kann während des Betriebes extrem heiß werden. Kinder dürfen sich dem Backofen nicht nähern. Während des Garens werden die Zubehörteile(Grill, Fettauffangschale) sehr heiß: nur mit Schutzhandschuhen anfassen. Das Gerät nicht zum Heizen des Raumes benutzen. Falls noch andere Elektrogeräte in Backofennähe angeschlossen werden, ist zu prüfen, ob ihre Netzkabel mit dem Backofen in Berührung kommen.
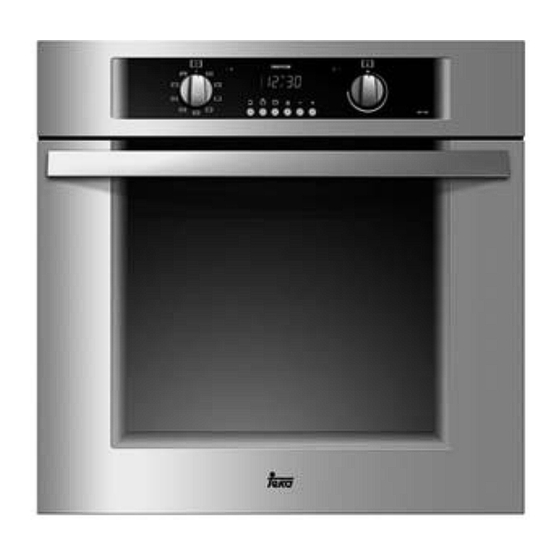
Seite 78
Bedienungsblend 1. Drehschalter 2. Elektronische schaltuhr 3. Thermostat 4. Door locked 5. Thermostat Kontrolleuchte...
Seite 79
OFENFUNKTIONEN OFENBELEUCHTUNG GRILL Diese Einstellung eignet sich besonders bei kleinen Speisenmengen. UNTERHITZE Besonders zum Aufwärmen von Gerichten geeignet. OBER-/UNTERHITZE Die gewünschte Temperatur einstellen. Die gelbe Lampe bleibt bis zum Erreichen der gewünschten Temperatur an. Es ist ratsam, den Backofen vor Einschieben der Speisen vorzuheizen. UMLUFTOBER-/UNTERHITZE TDiese Funktion stellt einen Ergänzung der klassischen Beheizungsartdurch Umluft dar und eignet sich besonders zum Backen von Pizza, Brot, Lasagneusw.
Seite 80
AUFTAUSTUFE Die Backofenbeleuchtung und die grüne Lampe schalten sich ein. Der Ventilator wird eingeschaltet, ohne Wärmeübertragung (der Thermostat wird nicht eingeschaltet). Die Ofentür soll geschlossen bleiben. Mit Hilfe dieser Funktionen kann man in 1/3 der üblichen Zeit auftauen. UMLUFTGRILL Mit dem Thermostat eine Temperatur zwischen 50°C und 250°C einstellen. Die Kombination von Umluft und Grill eignet sich gut zum Braten/Rösten der Oberfläche, wobei aber das Innere weich bleibt.
Seite 81
Tabelle mit Kochhinweisen Lebensmittel Temp. °C Stufe des Kochzeit (Min.) Symbol Backblechs (*) Kuchen Kringel 55-65 Obstkuchen 30-40 Kuchen mit Milch und 35-40 Butter Kuchen aus Hefeteig 25-35 Bignè 20-30 Blätterteig 15-25 Kekse 15-20 Lasagne-Nudeln 40-50 Fleisch Rindsfilet 50-80 Roastbeef 50-80 Kalbsbraten 60-80...
Seite 82
Grillbenützung C. Bei Elektrobackofen Pos. Wahlschalters. Legen Sie bitte die Speise auf den entsprechenden Rost oder in eine Form mit D. Bei Multifunktionsofen Pos. niedrigen Seitenwänden. oder des Wahlschalters. Den Rost in die höchste Schiene und die Fettpfanne in die Schiene direkt darunter Je nach Speise (z.B.
Seite 83
Elektronische Schaltuhr mit Temperaturanzeige Die Schaltuhr hat folgende Funktionen: - Uhr mit 24-Stunden-Leuchtdisplay - Zeitmesser (maximal 23 Stunden und 59 Minuten) - Programmierung von Anfang und Ende des Brat-/Backvorgangs - halbautomatische Programmierung (nur Anfang oder nur Ende des Brat-/Backvorgangs). -Anzeige der gewünschten Temperatur Beschreibung der Knöpfe “...
Seite 84
Digitaluhr Nach diesen Schritten erscheint auf dem Display die Leuchtanzeige "AUTO", was Zeigt die Stunden (0 - 24) und Minuten an. bedeutet, daß der Backofen programmiert Gleich nach Anschluß des Backofens (auch worden ist. nach einer Stromunterbrechung) erschei- Praktisches Beispiel: nen auf der Bedienungblende DREI Die Backzeit soll 45 Minuten dauern und um blinkende Ziffern.
Seite 85
Halbautomatisches Braten oder Backen Elektronisches Signal A. Programmierung der Brat-/Backzeit Der Zeitmesser kann auf eine Maximaldauer B. Programmierung des Brat- von 23 Stunden und 59 Minuten eingestellt /Backendes werden und gibt nach Ablauf der entspre- chenden Zeit ein akustisches Signal ab. A) Die gewünschte Brat-/Backzeit mit dem Schalter einstellen.
Pyr olytische Reinigung Die Funktion Selbstreinigung auswählen. Nach der Auswahl dieser Funktion stellt sich automatisch eine Reinigungszeit von 90 Minuten ein (diese Zeit kann auf eine Dauer von 180 Minuten geändert werden, falls der Backofen sehr schmutzig ist). Mit dieser Funktion kann der Backofen durch eine Temperatursteigerung bis zu 475°C gereinigt werden.
Seite 87
Ersatz der Glühbirne der Ofenbeleuchtung - Abb. 8 Der Ofen ist mit einer Glühbirne ausgestattet, die folgende Merkmale hat: Schraubsockel E-14 T 300° C ACHTUNG: Zuerst die Stromzufuhr unter- brechen. Falls die Glühbirne der Ofenbeleuchtung ausgetauscht werden muß, muß man die Schutzabdeckung “A”...
Seite 89
INSTALLATION ACHTUNG: DIESE VORRICHTUNG MUSS DURCH EINEN TECHNIKER ENTSPRECHEND DEN BEILIEGENDEN ANWEISUNGEN DES HERSTELLERS INSTALLIERT WERDEN. VOR JEDEM EINGRIFF AN DER VORRICHTUNG MUSS MAN SICH VERGEWISSETRN, DASS DIE STROMVERSORGUNG UNTERBROCHEN IST. Gesetzliche Normen, technische Regelungen und Richtlinien Die Installation des Gerätes muss unter Einhaltung der gesetzlich gültigen Normen und gemäß...
Il produttore declina ogni responsabilità per danni alle persone e agli oggetti, dovuti a una cattiva o impropria installazione dell apparecchio stesso. TEKA si riserva il diritto di apportare ai propri prodotti modifiche che si ritenessero necessarie e utili, senza alcun preavviso.
COLLEGAMENTO ELETTRICO Attenzione: il collegamento a terra è obbligatorio a norma di legge. Il produttore declina ogni responsabilità in caso di guasto nel collegamento a terra o in caso di un collegamento a terra non conforme con la normativa in vigore. L apparecchio deve essere installato correttamente da una persona qualificata secondo le istruzioni del produttore.
ISTRUZIONI PER L UTENTE Questo apparecchio è stato progettato per un impiego di tipo domestico. Il costruttore declina ogni responsabilità nel caso di eventuali danni a cose o persone derivanti da una non corretta installazione, da un uso improprio, erroneo, assurdo. L apparecchio è...
Seite 94
Il primo utilizzo del forno Una volta completata l installazione dell apparecchio nel mobile e prima di accenderlo, accertarsi che non ci siano parti sotto tensione elettrica accessibili e che tutte le parti dell imballaggio (polistiroli, sacchetti, ecc.) siano state rimosse. Le parti dell imballaggio possono essere pericolose per i bambini (pericolo di soffocamento).
PANNELLO DI CONTROLLO 1 – Termostato 4 –Luce spia termostato 2 – Selettore funzioni 5 – Programmatore elettronico 3 – Luce spia blocco porta...
Seite 96
Forno multifunzione Grazie alle diverse resistenze comandate tramite il selettore e regolate mediante il termostato, questo forno offre varie soluzioni di cottura: A. Circolazione forzata dell'aria (ventilazione) B. Propagazione spontanea del calore (convezione naturale) C. Raggi infrarossi (grill) Funzioni del selettore: (9) Pos.
Seite 97
Pos. 7 Scongelamento Entra in funzione solamente il ventilatore, senza diffusione di calore. La porta del forno deve essere chiusa. Questa funzione consente di scongelare gli alimenti impiegando circa 1/3 del tempo normalmente necessario. Pos. 8 Grill ventilato Selezionare mediante il termostato la temperatura compresa fra 50°C e 250°C.
Seite 98
Tabella consigli di cottura Tipo di pietanza Temp. Guida * Tempo cottura °C d'inserim. in minuti Dolci a stampo con impasto sbattuto Raccomandata Propria Panettoni o focacce 55 - 65 Focaccia reale 60 - 70 Torta sublime 60 - 70 Dolci a stampo con impasto di pastafrolla Fondo torta 8 - 10...
USO DEL GRILL Collocare la vivanda da grigliare sull'apposita griglia o in una teglia dai bordi molto bassi. La griglia va posta nel livello più alto possibile, mentre la leccarda per la raccolta dei grassi dovrà occupare il livello sottostante. Attivare la funzione grill scegliendo una delle seguenti modalità: In relazione al tipo di vivanda (es.
PROGRAMMATORE ELETTRONICO Il programmatore elettronico è un dispositivo che raggruppa le funzioni seguenti: - Orologio 24 ore con display illuminato - Timer (fino a 23 ore 59 minuti) - Programma per inizio e fine cottura automatica - Programma per cottura semiautomatica (possibilità...
Seite 101
Orologio digitale (da impostare prima di utilizzare il forno) Dopo queste operazioni apparirà costantemente sul display il simbolo «A», Indica le ore (0-24) e i minuti. indicando che il forno è stato programmato. Subito dopo il collegamento (come pure dopo un'eventuale interruzione di corrente) compaiono sul pannello TRE cifre Esempio pratico : Vogliamo fare una cottura intermittenti.
Seite 102
Avvisatore elettronico Cottura semiautomatica La funzione del «timer» consiste unicamente A. Programmazione del tempo di di un avvisatore acustico, che può essere cottura. regolato per un periodo massimo di 23 ore e B. Programmazione dell'ora di fine 59 minuti. cottura. Per regolare il timer premere sul pulsante e nello stesso tempo [+] o [-] fino ad ottenere A) Fissare il tempo di cottura desiderato...
Seite 103
Pulizia pirolitica Selezionare la funzione di autopulizia Dopo avere selezionato questa funzione, un periodo di pulizia di 90 minuti si imposta automaticamente (si può modificare questo periodo per una durata di 180 minuti se il forno è molto sporco). Questa funzione permette di pulire il forno aumentandone la temperatura fino a 475°C. Il deposito di cenere che ne risulta può...
SOSTITUZIONE DELLA LAMPADA DEL FORNO Il forno è provvisto di una lampadina avente le seguenti caratteristiche: Attacco a vite E-14 T 300°C ATTENZIONE: Disinserire l'apparecchio dalla corrente elettrica. Nell'eventualità fosse necessario sostituire la lampada di illuminazione del forno, occorre togliere la copertura di protezione A svitandola in senso antiorario. Dopo aver sostituito la lampada, rimontare la copertura di protezione A.
DATI TECNICI Questo apparecchio è conforme alle norme per la soppressione dei radio disturbi. TENSIONE DI ALIMENTAZIONE 220/230V~ 50Hz POTENZA ASSORBITA MAX. : 3100kW (tol. +5/-10%) Forno multifunzione HP-725.1I - Luce del forno 0,025 kW - Catalizzatore fumi piro 0,150 kW - Motoventilatore tangenziale 0,025 kW - Motoventilatore...
INSTALLAZIONE ATTENZIONE: QUESTO APPARECCHIO DEVE ESSERE INSTALLATO CORRETTAMENTE DA UNA PERSONA QUALIFICATA SECONDO LE ISTRUZIONI DEL COSTRUTTORE. PRIMA DI EFFETTUARE QUALSIASI RIPARAZIONE O OPERAZIONE DI MANUTENZIONE, INTERROMPERE L'ALIMENTAZIONE ELETTRICA. L' INSTALLAZIONE DELL' APPARECCHIO DEVE ESSERE ESEGUITA IN CONFORMITÀ ALLE NORME DI LEGGE VIGENTI E SECONDO LE NORME DI SICUREZZA APPLICABILI. INSTALLAZIONE DEL FORNO Questo apparecchio è...
Seite 108
TEKA CHILE, S.A. 56 2 4386 000 2 4386 097 China (Pop. Rep.) Shanghai TEKA INTERNATIONAL TRADING (Shangha 86 21 511 688 41 21 511 688 44 Czech Republic Libe TEKA CZ S.R.O. 420 2 84 691940 2 84 691923...