Herunterladen Inhalt Inhalt Diese Seite drucken

Werbung

Verfügbare Sprachen

Verfügbare Sprachen

Werbung

Inhaltsverzeichnis
loading

Inhaltszusammenfassung für GOAL ZERO YETI MPPT

  • Seite 2: Important Safety Instructions

    Read all the instructions and cautions before beginning installation. Do NOT disassemble or attempt to repair the module. Do NOT allow water to enter the module, or the Goal Zero Yeti Lithium. Make sure all connections are tight and secure before using.
  • Seite 3: Inhaltsverzeichnis

    GET TO KNOW YOUR GEAR Table of Contents Important Safety Instructions Get To Know Your Gear How It Works Frequently Asked Questions Anderson Power Pole Input Technical Specifications Français 8-13 Deutsch 14-19 2 x 8mm Inputs Español 20-25 Indicator Light Blue Connector Data Transfer Connector...
  • Seite 4: How It Works

    HOW IT WORKS Data Transfer Tools you’ll need: Screwdriver Connector 1. Turn off all the output ports and unplug the Yeti Lithium from any power source. Red Cable (+) Black Cable (-) Blue Connector 3. Take note of the positive and negative terminals on the Yeti’s port, as well as on the blue connector.
  • Seite 5: Indicator Light

    Warranty 12 months Certs Q: Can I plug solar panels into the module and the Goal Zero Yeti Lithium input ports at the same time? A: Yes; however, we recommend using the module’s inputs for solar panels since it can optimize the charging efficiency up to 40%. You may even notice up to 20% more efficiency when charging the Yeti Lithium from the wall when using the module.
  • Seite 6: Français

    Yeti Lithium et d'éventuelles blessures corporelles. Indicateur lumineux Utilisez UNIQUEMENT avec les alimentations portatives Goal Zero Yeti Lithium appropriées. AVERTiSSMENT : Ne jamais connecter une source d'alimentation au module avant de l'avoir installé dans le Yeti Lithium. Connectez toujours le module au Yeti Lithium avant de brancher une source d'alimentation.
  • Seite 7 COMMENT ÇA FONCTIONNE ? Les outils dont vous aurez besoin : Tournevis Connecteur de transfert de données 1 Éteignez tous les ports de sortie et débranchez le Yeti Lithium de toute source d'alimentation. Câble rouge (+) Câble noir (-) Connecteur bleu 3.
  • Seite 8: Indicateur Lumineux

    MPPT externe et, lorsqu'il est installé correctement, trace activement la source d'entrée max. d'énergie que vous utilisez pour charger le Goal Zero Yeti Lithium et optimise la source pour maximiser l'alimentation, entraînant des temps de charge jusqu'à GOAL ZERO Yeti 3000 @ Tension 10 hrs 40% plus rapides, en particulier à...
  • Seite 9: Deutsch

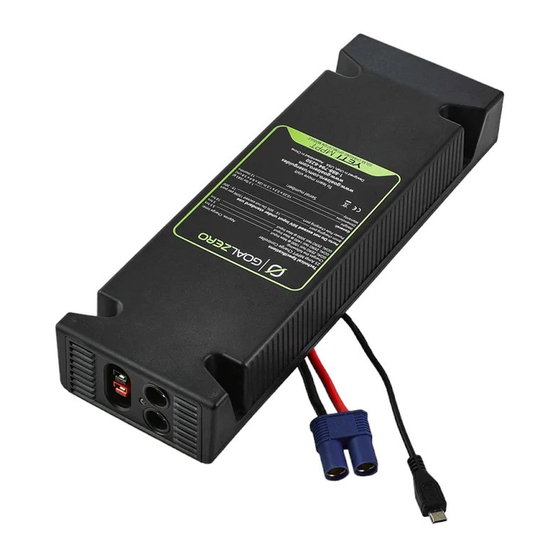
    2 x 8 mm Eingänge Demontieren Sie das Modul NICHT und versuchen Sie NICHT, es zu reparieren. Lassen Sie KEIN Wasser in das Modul oder den Goal Zero Yeti Lithium eindringen. Stellen Sie vor der Verwendung sicher, dass alle Anschlüsse fest und gesichert sind.
  • Seite 10 SO FUNKTIONIERT'S Datentransfer- Benötigte Werkzeuge: Schraubenzieher stecker 1. Schalten Sie alle Ausgangsstecker ab und ziehen Sie den Yeti Lithium von der Stromquelle ab. Rotes Kabel (+) Schwarzes Kabel (-) Blauer Stecker 3. Beachten Sie die den Plus- und Negativpol am Anschluss des Yeti und an dem blauen Stecker.
  • Seite 11: Technische Spezifikationen

    MPPT, der bei korrekter Installation die Energiequelle aktiv GOAL ZERO Yeti 1400 bei 5 Std. überwacht, die Sie für die Aufladung des Goal Zero Lithium nutzen, und der die max. Eingang Quelle maximal optimiert, was, insbesondere im Fall von Solar-Panels zu einer 40 % schnelleren Aufladezeit führt.
  • Seite 12: Español

    2 entradas de 8 mm NO desmonte ni intente reparar el módulo. NO deje que entre agua en el módulo ni en el Goal Zero Yeti Lithium. Asegúrese de que todas las conexiones sean correctas antes de usarlo. NO supere los 22 V (350 W) en el módulo, ya que esto podría provocar daños graves en el Yeti Lithium y posibles daños personales.
  • Seite 13: Cómo Funciona

    CÓMO FUNCIONA Conector de transferencia Herramientas que necesita: Destornillador de datos 1. Desconecte los puertos de salida y desenchufe el Yeti Lithium de cualquier fuente de alimentación. Cable rojo (+) Cable negro (-) Conector azul 3. Observe los terminales positivo y negativo en el puerto del Yeti, así como en el conector azul.
  • Seite 14 25 A etc.). Hemos eliminado las dudas respecto a la conexión en serie de los paneles solares Goal Zero Boulder. El conector con el anillo azul de 8 mm y los cables Datos generales: combinadores conectan adecuadamente los paneles entre sí para un uso admitido con las estaciones de alimentación portátiles Yeti.
  • Seite 16 GOAL ZERO HEADQUARTERS 675 West 14600 South Bluffdale, UT 84065 Designed in the U.S.A. Made in China 1-888-794-6250 This equipment has been tested and found to comply with the limits for a Class B digital device, pursuant to part 15 of the FCC Rules. These limits are designed to provide reasonable protection against harmful interference in a residential installation.

Inhaltsverzeichnis