Vivanco 37687 Gebrauchsanleitung
Dronecamvvm
Quicklinks
37687
D
Gebrauchsanleitung
DRONECAMVVM
WICHTIG, VOR GEBRAUCH SORGFÄLTIG LESEN!
Version 1.0
AUFBEWAHREN FÜR SPÄTERES NACHSCHLAGEN
Vivanco GmbH, Ewige Weide 15
Bestimmungsgemäßer Gebrauch
22926 Ahrensburg, Germany
Der Quadrocopter mit Kamera ist ausschließlich zum privaten Gebrauch in trockenen Innen-
www.vivanco.com
räumen gemäß dieser Anleitung und unter Einhaltung der lokalen Gesetze bestimmt. Bitte informieren
Sie sich vorab über die in Ihrem Land geltenden Gesetze der Zivilluftfahrt, sowie einen potenziell
benötigten Versicherungsschutz. Bitte beachten Sie, dass dieses Produkt nicht für Kinder unter
8 Jahren geeignet ist.
Technische Daten:
Betriebstemperatur:
-25 bis 50°C
Batterietyp (Quadrocopter):
LiPo (751730) 3.7V, 250mAh
Batterietyp (Fernbedienung):
4x AAA 1.5V
Frequenzbereich:
2.4GHz (2405 - 2475MHz), max. Sendeleistung: 10mW
Funktions-LEDs:
4x (grün - vorn, blau und rot - hinten)
Motortyp:
bürstenlose Gleichstrom-Motoren: 3.4V
Max. kontrollierbare Reichweite:
50m (Fernbedienung zu Quadrocopter), abhängig
von Sichtverhältnissen und Sehfähigkeit des Benutzers.
CE EU-Konformitätserklärung: Hiermit erklärt die Vivanco GmbH, dass der Quadrocopter
Vivanco 37687 der Richtlinie 2014/53/EU entspricht. Der vollständige Text der EU-
Konformitätserklärung ist unter der Internetadresse: www.vivanco.de verfügbar.
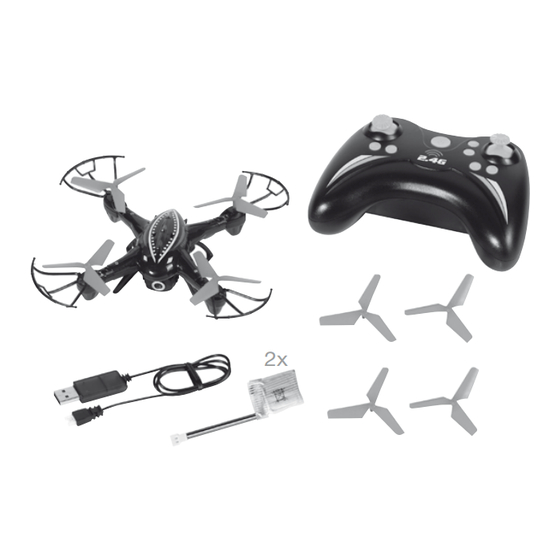
Lieferumfang: 1x Quadrocopter inkl. Batterie und eingebautem Rotorblattschutz,
1x Quadrocopter Ersatzakku, 1x 0.3 MP Kamera, 4x Ersatz Rotorblätter (rot), 1x USB Ladekabel,
1x Fernbedienung (Batterien sind nicht im Lieferumfang enthalten), 1x Gebrauchsanleitung
SICHERHEITSHINWEISE
Bitte achten Sie darauf, dass auch Kinder und Behinderte diese Hinweise beachten!
GEFAHR VON PERSONEN- UND SACHSCHÄDEN
•
Schnittverletzungen, Augenverletzungen, Haaraufwicklung und Quetschungen durch
rotierende Propeller und spitze Ecken
–> Bei Betrieb NICHT in die Propeller greifen
Fig. 1
–> Abstand halten, wenn Propeller im Betrieb sind
–> NICHT in Gesichtsnähe/ -höhe fliegen
•
Unfälle durch Kollisionen und Abstürze durch Kontrollverlust sowie bei Bergung des
Quadrocopters
–> NUR in Innenräumen fliegen
–> Kollisionen vermeiden, ausreichend Abstand von Personen, Tieren und Sachen halten
–> Bei Kontrollverlust SOFORT landen.
–> Quadrocopter ausschließlich im Sichtflug fliegen. Ausrichtung vorn - hinten muss immer klar
erkennbar sein.
–> NICHT auf Stühle, ungesicherte Schränke usw. steigen. Bergung mit äußerster Umsicht
durchführen.
•
Abstürze und Verletzungen durch gebrochene herabfallende Produktkomponenten
–> Vor dem Flug den festen Sitz aller Teile prüfen
•
Brand- und Verletzungsgefahr sowie Verätzungs- und Vergiftungsgefahr durch
Beschädigung, Kurzschluss oder Überhitzung des Akkus oder der Batterien.
–> NUR bei erlaubten Temperaturen fliegen
–> Akkus und Batterien NICHT kurzschließen (z.B. zusammen mit Metallteilen lagern), ins Feuer
werfen, beschädigen, usw.
–> Akkus oder Batterien NICHT einstechen.
–> Austretende Flüssigkeit mit Sand entfernen.
–> Bei Verschlucken von Flüssigkeit Arzt konsultieren.
•
Gesundsheitsgefahren durch Störstrahlungen
–> Mindestabstand Controller (Fernsbedienug) und Quadrocopter zu Herzschrittmacher und
anderen elektronischen medizinischen Hilfsmitteln von 20cm einhalten!
•
Verletzungen durch Verschlucken von Kleinteilen
–> Bei Verschlucken von Kleinteilen, Arzt unverzüglich konsulitieren
Fernbedienung
Lichteinstellung
• An/Aus
(lang gedrückt halten)
Schalter
Flugmodus-Schalter
(2 Modi) •
Fig. 5
Linker Schubregler
(Auf-& Absteigen /
Rechts-& Linksdrehung) •
Rückrufschalter
(kurz gedrückt halten)
Fotoaufnahme
(lang gedrückt halten) •
"Headless mode"
Schalter
• Kalibration:
(kurz gedrückt halten)
Neigung
Videoaufnahme
nach hinten
(lang gedrückt halten) •
MONTAGE / BETRIEB / DEMONTAGE
Inbetriebnahme:
1) Setzen Sie die Batterien gemäß Polung in die Fernbedienung ein. Dazu Öffnen Sie bitte das
Batteriefach an der Rückseite der Fernbedienung mit Hilfe eines Schraubendrehers.
2) Akku Laden: Stecken Sie das USB Ladekabel in einen USB Anschluss (z.B. PC) und verbinden
Sie das andere Ende mit dem Stecker (1) an der Unterseite des Quadrocopters. Sobald der
Ladevorgang beendet ist (ca. 60 min.) leuchtet die im USB Stecker integrierte LED dauerhaft rot
auf. Nach jedem Flug muss ein Akku vor erneutem Laden auf Handwärme abkühlen, um
Beschädigungen zu vermeiden.
3) Akku austauschen: Entfernen Sie den Stecker (1) des Akkus aus der Buchse und lösen die
Schraube am Batteriefach mithilfe eines Schraubendrehers. Öffnen Sie das Batteriefach und
Entnehmen Sie den Akku (2-3). Nun kann der neue Akku eingesetzt werden, das Batteriefach
wieder geschlossen werden und der Stecker (1) wieder eingesteckt werden.
4) Startvorbereitungen: Platzieren Sie den Quadrocopter auf einer ebenen, waagerechten
Oberfläche und schalten Sie ihn ein, indem Sie den Akkustecker des Quadrocopters in die
dafür vorgesehene Buchse (4) an der Unterseite des Quadrocopters einstecken. Die LEDs des
Quadrocopters blinken daraufhin in regelmäßigem Abstand (Pairing-Modus). Schalten Sie nun
die Fernbedienung ein (An/ Ausschalter drücken). Es ertönt ein Piepton und die grünen LEDs
an der Frontseite des Quadrocopters leuchten nun durchgehend, während die der
Fernbedienung blinkt. Anschließend betätigen Sie den linken Schubregler einmal den ganzen
Weg nach vorn und wieder zurück (Bild 5a+5b). Die LED der Fernbedienung leuchtet jetzt
durchgehend, die beiden Geräte sind nun gekoppelt und der Quadrocopter ist startbereit.
Um den Quadrocopter auf waagerechten Flug auszurichten/ zu kalibrieren, schieben Sie
gleichzeitig den linken Schubregler in die linke untere Ecke und den rechten Schubregler in die
rechte untere Ecke (Bild 5c). Sie hören einen Piepton und die LEDs des Quadrocopters beginnen
zu blinken. Sobald die grünen LEDs an der Frontseite wieder durchgehend leuchten, ist die
Ausrichtung / Kalibrierung erfolgreich beendet.
5) Sollte der Quadrocopter nicht exakt ausgerichtet fliegen, nutzen Sie bitte die entsprechenden
Kalibrationsschalter der Fernbedienung. Z.B.: Fliegt der Quadrocopter zu sehr nach links,
drücken Sie den "Kalibrationsschalter Neigung nach rechts" so lange, bis die Ausrichtung wieder
gerade ist.
Fig. 10
Instandhaltung:
Rotate key
Wechseln der Rotorblätter: Sollte eines der Rotorblätter zu Schaden gekommen sein,
tauschen Sie das defekte gegen eines der beigelegten Ersatzrotorblätter aus. Ziehen Sie dafür
Forward
einfach leicht an dem defekten Rotorblatt, bis es sich löst. Daraufhin stecken Sie das neue (mit der
rotate
Beschriftung nach unten) vorsichtig wieder auf den Metallstift. Bitte beachten Sie hierbei die
Right
korrekte Anordnung nach Beschriftung A oder B der Rotorblätter (siehe Bild 6).
Left
Right
joystick
rotate
rotate
Steuerung:
Bitte beachten Sie generell, dass zur Steuerung des Quadrocopters lediglich minimale Korrekturen
Backward
an den Schubreglern nötig sind.
rotate
-
Auf-und Absteigen: linken Schubregler nach vorn/ hinten schieben
-
Rechts- und Linkskurve: rechten Schubregler nach rechts/ links schieben
-
Rechts- und Linksdrehung: linken Schubregler nach rechts/ links schieben
-
Vor- und rückwarts: rechten Schubregler nach vorn/ hinten schieben
Sonderfunktionen:
-
Kamera: Installation: Stecken Sie das Kamerakabel in die dafür vorgesehene Buchse (7) an der
360°
Unterseite des Batteriefaches. Schließen Sie das Batteriefach und setzen die Kamera (laut
Abbildung 8-9) in die Haltevorrichtung auf dem Batteriefach mit dem Objektiv nach vorn.
rotate
-
LED Beleuchtung Kamera
- Blaues Licht: Kamera ist funktionsbereit - blaue LED leuchtet durchgehend
- Blau-rotes Blinken: es ist keine SD Karte eingesteckt oder die SD Karte ist nicht funktionstüchtig
-
Fotoaufnahme: Betätigen des Fotoaufnahme-Schalters (lang gedrückt halten) bei funktions-
tüchtiger Kamera (blaues Licht) löst einen Piepton aus und ein einmaliges Aufleuchten der LED
in rot.
-
Videoaufnahme: Betätigen des Videoaufnahme-Schalters (lang gedrückt halten) bei funktions-
tüchtiger Kamera (blaues Licht) löst einen Piepton aus und die LED leuchtet während des
gesamten Aufnahme Prozesses rot. Um die Aufnahme wieder zu beenden, betätigen Sie des
Videoaufnahme-Schalter erneut und die LED leuchtet wieder blau.
Vivanco International
-
360° Drehung (Bild 10):
Drücken Sie kurz den Rotationsschalter (Piepton) und betätigen Sie daraufhin direkt den rechten
Schubregler in die Richtung, in die Sie die Drehung vornehmen möchten.
Austria
Great Britain
Serbia
-
Automatische Rückflugfunktion:
Vivanco Austria GmbH
Vivanco UK Ltd.
Desk d.o.o.
"Auto return/ Headless mode": Nachdem die beiden Geräte gekoppelt sind, drücken Sie den
Triesterstrasse 10/3
Vivanco House
Bulevar Despota Stefana 110
"Headless Mode" Schalter (vor Abflug), um in den "Headless Mode" zu gelangen. In diesem
2351 Wr. Neudorf
Luton Enterprise Park
11000 Belgrade
Modus wird die Fernbedienung kontinuierlich piepen. Wenn Sie im Flug nun den Rückrufschalter
+43 2236 893 7400
Sundon Park Road
+381 11 32 92 140
betätigen, wird der Quadrocopter automatisch zu der Ausgangsposition/ Startposition
www.vivanco.at
LU3 3GU
Luton
www.desk.rs
+44 1582 579 333
zurückfliegen. Der Rückflug kann durch Betätigen des rechten Schubreglers gestoppt werden
Bulgaria
www.vivanco.com
Slovakia
und es kann weitergeflogen werden. Der Quadrocopter bleibt im „Headless Mode".
Vigo GmbH
DSI Slovakia s.r.o.
Um den „Headless Mode" wieder zu beenden, drücken Sie den „Headless Mode" Schalter erneut.
ul. Deyan Belishki, bl. 62
Greece
Juzna Trieda 117
-
Lichteinstellung:
1404 Sofia
Alfa Lamda S.A.
04001 Kosice
Um die LED Beleuchtung am Quadrocopter auszuschalten, halten Sie den Lichteinstellungs-
+359 2 859 31 90
154 Konstantinoupoleos Str.
+421 556 118 136
Schalter gedrückt bis ein Piepton ertönt. Um die LEDs wieder einzuschalten, drücken Sie den
www.vigo-bg.com
10436 Athens
www.dsi.sk
+30 210 5212 200
Schalter erneut, bis Sie den Piepton hören.
Czech Republic
www.alfalamda.gr
Slovenia
-
Beschleunigung/ Sensibilität: Durch Betätigen des Flugmodus-Schalters (kurz drücken, es ertönt
DSI Czech spol. s.r.o.
Big Bang d.o.o.
ein Piepton) gelangen Sie in die nächst höhere Geschwindigkeits-und Sensibilitätsstufe. Bei
Pernerova 35a
Hungary
Smartinska 152
Betätigen des Schalters zweimal kurz hintereinander (es ertönen zwei kurz aufeinander folgende
18600 Prague 8
Hungaro Flotta Kft.
1000 Ljubljana
Pieptöne) gelangen Sie in die höchste Geschwindigkeits-und Sensibilitätsstufe. Durch
+421 556 118 110
Montevideo u. 2/b
+386 1 309 37 33
Ausschalten der Fernbedienung gelangen Sie wieder in die Werkseinstellung zurück.
www.dsicz.cz
1037 Budapest
www.bigbang.si
-
"Throwing flight": Nachdem die beiden Geräte gekoppelt sind, werfen Sie den Quadrocopter in
+36 88 786 591
korrekter Flugausrichtung in die Luft und schieben umgehend den linken Schubregler komplett
Croatia
www.hungaroflotta.hu
South Africa
nach oben, so wird der Quadrocopter direkt in den Flug übergehen.
Feniks Info d.o.o.
The Galaxy One Group
Il Resnicki Gaj 10
3 Andries Street
Hinweis: Fliegen Sie den Quadrocopter ausschließlich innerhalb der unter technische Daten
Iceland
10000 Zagreb
Nyherji hf.
2090 Kew – Johannesburg
angegebenen Reichweite, um eventuelle Kontrollverluste oder Abstürze zu vermeiden.
+385 1 63 95 277
Borgartun 37
Gauteng
www.feniks-info.hr
105 Reykjavik
+27 11 440 8500
+354 569 7700
FEHLERBEHEBUNGEN
www.nyherji.is
Denmark
Spain
Sales Rep DK
Vivanco Accessorios S.A.U.
URSACHE:
BEHEBUNG:
Soesterhoejvej 9
Italy
Antic Poligon Industrial Güttermann
8270 Hoejbjerg
Cellular Italia S.p.A.
Cami Vell de Sant Celoni s/n
•
Problem: keine Reaktion der Rotorblätter
+45 40 70 50 54
Via Lambrakis 1/a
08460 Santa Maria de Palautordera
Schalterstellung "OFF" an der Fernbedienung
Schalterstellung "ON" an der Fernbedienung
www.salesrep.dk
42122 Reggio Emilia
+34 93 848 35 20
Leerer Akku/ Batterie
Den Akku laden/ Batterien auswechseln
+39 0522 33 40 02
www.vivanco.es
Estonia
www.cellularline.com
Fremdkörper blockiert Rotorblatt
Fremdkörper entfernen
Nordic Digital AS
Switzerland
Tööstuse Tee 6
Netherlands
Vivanco Suisse AG
61715 Tartumaa
Belgium
Alte Landstrasse 15
•
Problem: der Quadrocopter wird langsam, verliert an Flughöhe
+372 733 7700
Luxembourg
8804 Au ZH
Schwacher Akkustand
Den Akku laden
www.photopoint.ee
Mondeno Benelux B.V.
+41 44 782 68 00
Belgium Galvanibaan 8
www.vivanco.ch
Finland
Luxembourg 3439 MG Nieuwegein
•
Problem: die Steuerung über die Fernbedienung funktioniert nicht
AV Komponentti OY
+31 30 600 70 50
Sweden
Schalterstellung "OFF"
Schalterstellung "ON"
Koronakatu 1a
www.mondeno.com
Cenor Nordic AB
02210 Espoo
Brovägen 5
Falsches Einsetzen der Batterien
Richtige Polung beachten
+358 9 8678 0225
Poland
18276 Stocksund
Leere Batterien
Batterien auswechseln
www.avkomponentti.fi
Vivanco Poland Sp.z.o.o.
+46 8446 77 00
Ul. Sosnkowskiego 1
www.cenor.se
France
02495 Warsaw
•
Problem: Quadrocopter steigt nicht auf
Vivanco Accessorios S.A.U.
+48 22 723 0745
Turkey
Rotorblätter rotieren nicht schnell genug
Den linken Schubregler stärker betätigen
Antic Poligon Industrial Güttermann
www.vivanco.pl
Kale Elektronik Dis. Tic. AS
Cami Vell de Sant Celoni s/n
Bakir ve Pirincciler San. Sit. Menekse
Akkuladung ist zu gering
Den Akku laden
08460 Santa Maria de Palautordera
Portugal
Cad No. 2
+34 93 848 35 20
Esoterico
34520 Istanbul
www.vivanco.es
Praceta Alves Redol 2
+90 212 540 0550
2670 Loures
www.goldmaster.com.tr
Germany
+351 219 839 550
Entsorgung des Gerätes
Vivanco GmbH
www.esoterico.pt
Ukraine
Das Gerät darf nicht in den Hausmüll. Bitte geben Sie es bei einer Sammelstelle für
Ewige Weide 15
Dicom Ltd.
Elektrogeräte Ihrer Gemeinde zum umweltgerechten Recycling ab.
D-22926 Ahrensburg
Russia
Likhachova 1/27
Tel. +49(0)41 02 / 231 247
ooo Unibat
03115 Kiev
Batterie- / Akkuentsorgung
hotline@vivanco.de
Ivana Franko Str. 48
+380 4450 16440
Batterien dürfen nicht in den Hausmüll. Bitte geben Sie Alt-Batterien im entladenen
www.vivanco.de
121351 Moscow
Zustand bei einer Batteriesammelstelle Ihrer Gemeinde oder Ihrem Händler ab.
+7 495 23 25 348
www.unibat.ru
Entsorgung der Verpackung
Die Verpackung darf nicht in den Hausmüll! Bitte handeln Sie entsprechend der lokalen
Entsorgungsvorschriften.
F
GB
Notice d'emploi
Instruction manual
IMPORTANT, READ ATTENTIVELY BEFORE USE!
IMPORTANT, LIRE ATTENTIVEMENT AVANT L'USAGE !
KEEP FOR REFERENCE
CONSERVER POUR REFERENCE
Proper use
Utilisation conforme aux prescriptions
Le quadricoptère avec caméra est exclusivement destiné à un usage privé en intérieur et dans un
The quadrocopter with camera is intended solely for private use in dry indoor areas according to these
endroit sec, selon les instructions et en accord avec les lois locales. Veuillez vous renseigner avant sur
instructions and in compliance with local laws. Please get informed in advance of the applicable laws
les lois applicables dans votre pays pour l'aviation civile et sur l'éventuelle nécessité d'une assurance.
in your country for civil aviation and a potentially needed insurance coverage. Please note that this
Veuillez remarquer que ce produit n'est pas adapté pour les enfants ayant moins de 8 ans.
product is not suitable for children under 8 years.
Spécifications techniques :
Technical Data:
Operating temperature:
-25 to 50 °C
Température de fonctionnement :
Battery type (quadrocopter):
LiPo (751730) 3.7V, 250mAh
Type de batterie (quadricoptère):
Battery type (remote control):
4x AAA 1.5V
Type de pile (télécommande):
Frequency range:
2.4GHz (2405 - 2475MHz), max. transmit power: 10mW
Bande de fréquence:
Function LEDs:
4x (green - front, blue and red - back)
Motor type:
Brushless DC motors: 3.4V
4 DELs de fonction :
Max. controllable range:
50m (Remote control for the quadrocopter),
Type de moteur:
depending on visibility conditions and vision of the user
Portée maximale de la télécommande: 50m (sans fil pour le quadricoptère), selon les conditions de
CE EC Declaration of Conformity: Vivanco GmbH hereby declares that the Vivanco
CE EC Déclaration de Conformité : Vivanco GmbH, par la présente, déclare que le
37687 quadrocopter complies with the directive 2014/53/EU. You can read the full text of
quadricoptère Vivanco 37687 est conforme aux directives 2014/53/EU. Vous pouvez lire le
the EU declaration of conformity at the following Internet address: www.vivanco.de.
texte complet de la déclaration de conformité de l'UE en cliquant sur le lien Internet suivant:
www.vivanco.de.
Scope of delivery: 1x mini quadrocopter incl. battery and built-in rotor blade guard, 1x quadro-
copter spare rechargeable battery, 1x 0.3 MP camera, 4x spare rotor blades (red), 1x USB charging
cable, 1x remote control (batteries are not included), 1 instruction manual
Contenu de la livraison: 1x Mini quadricoptère, piles incluses et garde de lame de rotor intégré,
1x recharge de piles supplémentaires pour quadricoptère, 1x 0.3 MP caméra, 4x lames de rotor
SAFETY INSTRUCTIONS:
supplémentaires (rouges), 1x Câble chargeur USB, 1x Télécommande (piles non incluses),
Please pay attention that also children and handicapped people must comply with these
1x Notice d'emploi
instructions!
CONSIGNES DE SÉCURITÉ
DANGER OF PERSONAL INJURY AND MATERIAL DAMAGE
Veuillez aussi vous assurer que les enfants et les personnes handicapées se conforment
à ces instructions !
•
Cutting wounds, eye injuries, hair winding and crushing by rotating propeller and
pointed corners
–> Do NOT touch the propeller when in operation
DANGER DE BLESSURE ET D'ENDOMMAGEMENT DU MATÉRIEL
–> Keep your distance when propellers are in operation
•
Coupures, blessure aux yeux, happement et écrasement des cheveux par l'hélice
–> DO NOT fly near/as high as your face
rotative et les coins acérés
–> NE PAS toucher l'hélice rotative quand elle est en marche
•
Accidents from collisions and crashes caused by loss of control as well as salvage of
–> Rester à l'écart lorsque l'hélice est en marche
the quadrocopter
–> Fy ONLY indoors
–> NE PAS approcher le visage trop près
–> Avoid collisions, keep sufficient distance from people, animals and objects
•
Accidents dus à des collisions et à des chocs, causés par la perte de contrôle ainsi
–> Land IMMEDIATELY, if you loose control.
que lors de la récupération du quadricoptère
–> Utiliser SEULEMENT en intérieur
–> Fly the quadrocopter only in visual flight. Alignment towards the front - back should always be clear.
–> Éviter les collisions, maintenir les personnes, animaux et objets à une distance suffisante
–> Do NOT step on chairs, unsecured cabinets etc. Carry out salvage with extreme caution.
–> Atterrir IMMÉDIATEMENT si vous perdez le contrôle
•
Crashes and injuries by broken falling product components
–> Faire voler le quadricoptère seulement en vol à vue. Positionnement vers l'avant - l'arrière doit
–> Check that all parts are securely positioned before flight
toujours être clair.
•
Risk of fire and injury as well as risk of caustic burn and poisoning due to damage,
–> NE PAS monter sur des chaises, des meubles non sécurisés etc. Récupérer l'appareil avec une
short circuit or overheating of the rechargeable battery or the batteries.
–> Ffly ONLY within allowable temperatures
extrême précaution.
–> Do not short circuit the rechargeable batteries and the batteries (e.g. Store along with metal
•
Chocs et blessures provoqués par des composants du produit, cassés, qui tombent
parts), do not throw them into fire, do not damage them, etc.
–> Vérifier que toutes les pièces sont bien toutes positionnées avant le vol
–> Do NOT pierce the rechargeable batteries or the batteries.
•
Risque d'incendie et de blessure ainsi que risque de brûlure caustique et
–> Remove leaking liquid with sand.
d'empoisonnement dus à un dommage, à un court circuit ou à une surchauffe de la ou
–> If swallowed accidentally seek medical advice.
des piles rechargeables.
•
Healthy hazards due to interference radiation
–> Faire voler SEULEMENT à des températures admissibles
–> Keep a minimum distance of 20cm between the controller (remote control) and the
–> Ne pas court-circuiter les piles rechargeables et les piles (ex: entreposer avec des pièces
métalliques), ne pas les jeter dans le feu, ne pas les endommager, etc.
quadrocopter to cardiac pacemakers and other electronic medical devices!
–> NE PAS percer les piles rechargeables ou les piles
•
Injuries caused by swallowing small parts
–> Arrêter les fuites de liquide avec du sable.
–> In case of swallowing small parts, seek immediately medical advice
–> Si vous en avalez accidentellement, consultez un médecin.
•
Risques pour la santé dus à des rayonnements parasites
–> Maintenir une distance minimale de 20 cm entre le régulateur (télécommande) et le
Remote control
quadricoptère, d'un pacemaker et autres appareils électroniques médicaux !
• Rotary switch
(in combination with the
•
Blessures vous avez avaler des petites pièces
• Rotationsschalter
• On/Off switch
use of the right joystick)
–> Dans ce cas, consultez immédiatement un médecin
(in Kombination mit der
Light settings
Nutzung des rechten
(keep pressed longer)
Joystick)
Flight mode switch
• Calibration:
(2 modes) •
Tilt to the front
Télécommande
• Kalibration:
Neigung nach vorn
Left throttle
(ascending & descending/
Paramètres lumières
• Right throttle
(rester appuyer plus longtemps)
right & left rotation) •
(forward & backward/
• Rechter Schubregler
Bouton mode vol (2 modes) •
right & left turn)
(vor-&rückwärts/ Rechts-
& Linkskurve)
Recall switch
Manette gauche
(press shortly)
• Calibration:
(monter & descendre /
Photo taking
rotation à droite
• Kalibration:
Tilt to the right
(keep pressed longer) •
& à gauche) •
Neigung nach rechts
• Calibration:
Tilt to the left
Bouton de rappel
Headless mode switch
(Appuyer brièvement)
• Kalibration:
• Calibration:
(press shortly)
Prendre une photo
Neigung nach links
Tilt to the back
Video recording
(rester appuyer plus
(keep pressed longer) •
longtemps) •
Bouton mode sans-tête
(Appuyer brièvement)
OPERATION / ASSEMBLY / DISASSEMBLY
Faire une vidéo
Commissioning:
(rester appuyer
1) Insert the batteries in the remote control with the correct polarity. To do this, please open the
plus longtemps) •
battery compartment on the back of the remote control using a screwdriver.
2) Charging the rechargeable battery: Plug the USB charging cable into a USB port (e.g. a PC) and
connect the other end of the cable with the connector at the bottom of the quadrocopter. When
charging is completed (about 60 min.) the built-in LED in the USB connector glows red
OPÉRATION / MONTAGE / DÉMONTAGE :
continuously. After each flight, a rechargeable battery needs to cool down to hand temperature
before reloading, to prevent damage.
Démarrage:
3) Replacing the rechargeable battery: Remove the connector (1) of the rechargeable battery from
1) Insérer les piles dans la télécommande en respectant la polarité. Pour ce faire, veuillez ouvrir
the socket and loosen the screw on the battery compartment using a screwdriver. Open the
le compartiment des piles derrière la télécommande en utilisant un tournevis.
battery compartment and remove the rechargeable battery (2-3). You can now insert the new
2) Chargement de la pile rechargeable: Connectez le câble chargeur USB au port USB (ex.. a PC)
rechargeable battery, close the battery compartment and plug the connector (1) back in.
et l'autre côté du câble dans la prise de charge désignée du quadricoptère. Quand la charge est
4) Start preparations: Place the Quadrocopter on a flat, horizontal surface, and turn it on, by
terminée (environ 60 min.) la DEL intégrée dans le connecteur USB devient rouge et reste fixe.
plugging the rechargeable battery connector of the quadrocopter into the appropriate socket
Après chaque vol, une pile rechargeable a besoin de refroidir jusqu'à une température ambiante
(4) at the bottom of the quadrocopter. The LEDs of the quadrocopter then flash at regular
avant de recharger, pour éviter tout endommagement.
3) Remplacement de la pile rechargeable: Enlevez le connecteur (1) de la pile rechargeable de la
intervals (pairing mode). Now switch on the remote control (press the On/Off switch). A beep
prise et dévissez le compartiment de la pile en utilisant le tournevis. Ouvrez le compartiment et
sound is emitted and the green LEDs on the front side of the quadrocopter will light continuously
enleviez la pile rechargeable (2-3). Vous pouvez maintenant insérer la nouvelle pile rechargeable,
while those on the remote control flash. Then press the left throttle once all the way to the front
fermez le compartiment de la pile et reconnectez le connecteur (1).
and then back again (Figure 5a+5b). The LED on the remote control will now glow
4) Commencer: Placez le quadricoptère sur une superficie plate et horizontale et l'allumer en
continuously, the two devices are now connected and the quadrocopter is ready to start.
branchant le connecteur de la pile rechargeable du quadricoptère à la prise adéquate (4) en
To align/calibrate the quadrocopter to horizontal flight, push at the same time the left throttle to
bas du quadricoptère. Les DELs du quadricoptère clignotent alors à intervalles réguliers (mode
the lower left corner and the right throtle to the lower right corner (Figure 5c). You will hear a beep
and the LEDs of the quadrocopter will start flashing. Once the green LEDs on the front side are
de couplage) Maintenant, allumez la télécommande (appuyez sur le bouton ON/OFF). Un bip est
continuously lit again, alignment / calibration has been completed successfully.
émis et les DELs vertes de l'avant du quadricoptère s'allumeront en continu alors que celles de
5) If the quadrocopter does not fly in exact alignment, please use the corresponding calibration
la télécommande clignoteront. Ensuite, appuyez sur la manette gauche une fois, complètement
switch on the remote control. Example: If the quadrocopter flies too much to the left, press the
vers l'avant et de nouveau vers l'arrière (Figure 5a+5b). La DEL de la télécommande
"Calibration switch Tilt to the right" until the alignment is straight again.
s'allume maintenant en continu, les deux appareils sont maintenant connectés et le
quadricoptère est prêt. Pour aligner/calibrer le quadricoptère en vol horizontal, appuyez en
Maintenance:
même temps sur le coin en haut à gauche de la manette gauche et le coin en bas de la manette
Changing the rotor blades: If any of the rotor blades has been damaged, replace the defective one
droite (Figure 5c). Vous entendrez un bip et les DELs du quadricoptère clignoteront. Quand les
DELs vertes à l'avant sont de nouveau fixes, l'alignement/le calibrage a été effectué avec succès.
with one of the enclosed spare rotor blades. To do this pull the defective rotor blade slightly until it
5) Si le quadricoptère ne vole pas complètement aligné, veuillez utiliser le calibrage correspondant
comes off. Then insert the new one (with the inscription facing down) gently back on the metal pin.
allumez la télécommande. Exemple: si le quadricoptère vole trop sur le côté gauche, appuyez
Please note at this point the correct assembly according to inscription A or B of the rotor blades
sur "bouton calibrage, inclinez à droite" jusqu'à ce que l'alignement soit droit.
(see figure/drawing 6).
Control system:
Dépannage:
Changez les lames de rotor: Si l'une des lames de rotor a été endommagée, remplacez-la par l'une
Please note in general that only minimal corrections to the throttles are required to steer the
quadrocopter.
des lames supplémentaires incluses. Pour ce faire, tirez légèrement sur la lame de rotor jusqu'à ce
qu'elle se détache. Ensuite, insérez doucement la nouvelle (inscription vers le bas), de nouveau sur
-
Ascending and descending: push the left throttle to the front/ back
la tige de métal. Veuillez noter à ce moment l'assemblage correct selon l'inscription A ou B des
-
Right and left turn: Push the right throttle to the right/left
lames de rotor (voir figure/dessin 6).
-
Right and left rotation: Push the left throttle to the right/left
-
Forward and backwards: push the right throttle to the front/back
Système de contrôle:
Veuillez noter qu'en général, seules des corrections minimes des manettes sont nécessaires pour
Special functions:
piloter le quadricoptère
-
Camera: Installation: Insert the camera cable into the appropriate socket (7) at the bottom of the
-
Monter et descendre: appuyez sur la manette gauche vers l'avant/l'arrière
battery compartment. Close the battery compartment and insert the camera (as shown in
-
Virage à droite et à gauche: Appuyez sur la manette droite vers la droite/la gauche
figure 8-9) in the holding bracket on the battery compartment with the lens facing forward.
-
Rotation à droite et à gauche: Appuyez sur la manette droite vers la droite/la gauche
-
Camera LED lighting
-
Avant et arrière: Appuyez sur la manette droite vers l'avant/l'arrière
- Blue light: Camera is functional - blue LED lights up continuously
- Blue-red flash: no SD card is inserted or the SD card is not functional
Fonctions spéciales:
-
Photo taking: If you press the photographing switch (keep pressed longer) when the camera is
-
Caméra: Installation: Insérez le câble de la caméra dans la prise adéquate (7) en bas du
functional (blue light) you will hear a beep sound and the LED will light up red once.
compartiment de la pile. Fermez le compartiment de la pile et insérez la caméra (comme le
-
Video recording: If you press the video recording switch (keep pressed longer) when the camera
montre la figure 8-9) dans le support du compartiment de la pile, objectif vde face.
is functional (blue light) you will hear a beep sound and the LED will light up red during the entire
-
Lumière DEL caméra
recording process. To stop recording, press the video recording button again and the LED will
- Lumière bleue: la caméra fonctionne - DEL bleue allumée en continu.
turn blue again.
- Flash bleu-rouge: aucune carte SD est insérée ou elle ne fonctionne pas
-
360° rotation (Illustration 10):
-
Prendre des photos: Si vous appuyez sur le bouton de photos (restez appuyer plus longtemps),
Press the rotation switch (beep sound) briefly and then press
quand la caméra fonctionne (lumière bleue) vous entendrez un bip et la DEL clignote en rouge
directly the right throttle in the direction in which you want to take the rotation.
une fois.
-
Automatic return function:
-
Faire une vidéo: Si vous appuyez sur le bouton de vidéo (restez appuyer plus longtemps) quand
"Auto return/ Headless mode": Once the two devices are connected, press the "headless mode"
la caméra fonctionne (lumière bleue) vous entendrez un bip et la DEL clignote en rouge pendant
switch (before take-off), to enter the "headless mode".
toute la vidéo. Pour arrêter la vidéo, appuyez de nouveau sur le bouton de vidéo et la DEL sera
In this mode, the remote control will beep continuously. If you press the recall switch now when
de nouveau bleue.
in flight, the quadrocopter will automatically fly back to the home position/ starting position. You
-
360° rotation (Photo/dessin 10) : Appuyez brièvement sur le bouton de rotation (bruit d'un bip) et
can stop the return flight by pressing the right throttle and you can resume flight again. The
ensuite appuyez directement sur la manette droite dans la direction que vous désirez effectuer
quadrocopter remains in "headless mode". To end the "headless mode" again, press the
la rotation.
"headless mode" switch again.
-
Fonction rappel automatique: "Auto rappel/ mode sans tête": Une fois que les deux appareils
-
Light settings:
sont connectés, appuyez sur le bouton "mode sans tête" (avant décollage), pour activer le mode.
To turn off the LED lighting on the quadrocopter, keep the light setting switch
Dans ce cas-là, la télécommande bipe en continu. Si vous appuyez sur le bouton de rappel en
pressed until you hear a beep sound. To turn the LEDs back on, press the switch again until
vol, le quadricoptère volera directement vers la position de départ. Vous pouvez arrêter le vol
you hear the beep sound.
de rappel en appuyant sur la manette droite et vous pouvez reprendre de nouveau le vol.
-
Acceleration/sensitivity: By pressing the flight mode switch (press shortly, you will hear a beep
Le quadricoptère reste en "mode sans tête". Pour arrêter ce mode, appuyez de nouveau sur le
sound) you will go to the next higher speed and sensitivity level. By pressing the button twice in
bouton "mode sans tête".
quick succession (you will hear two short consecutive beeps) you will go to the highest speed
-
Paramètre éclairage: Pour éteindre la DEL du quadricoptère, restez appuyer sur le bouton de
and sensitivity level. By switching off the remote control you will go back to the default setting.
paramétrage de l'éclairage jusqu'à entendre un bip. Pour rallumer les DELs, appuyez de nouveau
-
"Throwing flight": Once the two devices are connected, you can throw the quadrocopter in the
sur le bouton jusqu'à entendre un bip.
correct flight orientation in the air and push immediately the left throttle fully upward so that the
-
Accélération/sensibilité: En appuyant sur le bouton du mode vol (appuyez brièvement, vous
quadrocopter can start flying directly.
entendrez un bip), vous accélérez et augmentez la sensibilité d'un niveau. En appuyant deux fois
Note: Fly the quadrocopter exclusively within the range specified in the technical data to avoid
rapidement sur le bouton ( vous entendrez deux courts bips), vous accélérez et augmentez la sen-
any loss of control or crashes.
sibilité encore d'un niveau. En éteignant la télécommande vous revenez aux paramètres de départ.
-
"Lancement du vol": Quand les deux appareils sont connectés, vous pouvez lancer le
quadricoptère dans la trajectoire de vol voulue et appuyez immédiatement sur la manette gauche,
orientée complètement vers le haut pour que le quadricoptère puisse directement voler.
TROUBLESHOOTING
Remarque: Faire voler le quadricoptère exclusivement dans la plage spécifiée dans les données
techniques pour éviter une perte de contrôle ou des chocs.
CAUSE:
REMEDY:
•
Problem: the rotor blades do not react
DÉPANNAGE
Switch position "OFF" on the remote control
Turn the switch on the remote control to "ON"
CAUSE :
Empty rechargeable battery/battery
Charge the chargeable battery/ replace
•
Problème: les larmes de rotor ne réagissent pas
the batteries
Mettez sur le bouton "OFF" la télécommande
Foreign bodies block the rotor blade
Remove any foreign bodies
Vider la pile rechargeable/pile
•
Problem: the quadrocopter moves slowly, it loses altitude
Low battery status
Charge the rechargeable battery
Des corps étrangers bloquent la lame de rotor
•
Problème: le quadricoptère bouge lentement, il perd de l'altitude
•
Problem: control via the remote control does not work
Pile faible
Switch position "OFF"
Switch position "ON"
Batteries incorrectly inserted
Note correct polarity
•
Problème: Le contrôle via la télécommande ne fonctionne pas
Empty batteries
Replace batteries
Appuyez sur le bouton "OFF"
•
Problem: The quadrocopter does not ascend
Les piles ne sont pas correctement insérées
The rotor blades do not rotate quickly enough
Press the left throttle harder
Les piles sont vides
Chargeable battery power is too low
Charge the rechargeable battery
•
Problème: Le quadricoptère ne monte pas
Les lames du rotor ne tournent pas assez vite
La puissance de la pile rechargeable est
trop basse
Disposal of the device
Do not dispose the device in the usual dust bin!
Hand it over to a collection point for electric devices of your municipality.
Elimination de l'appareil
Battery/rechargeable battery disposal
Cet appareil ne doit pas être jeté avec les ordures ménagères. Veuillez l'apporter dans un
Do not dispose of batteries in the household waste! Please drop off your old batteries,
centre de collecte d'appareils électriques de votre commune ou de votre quartier.
fully discharged, at a battery collection point in your community or your retailer.
Recyclage pile/pile rechargeable
Entsorgung der Verpackung
Ne jetez pas les piles dans les déchets ménagers. Veuillez jeter vos vieilles piles,
Die Verpackung darf nicht in den Hausmüll! Bitte handeln Sie entsprechend der lokalen
complètement déchargées, dans un point de collecte des piles dans votre ville ou chez
Entsorgungsvorschriften.
votre revendeur.
Elimination de l'emballage
L'emballage ne doit pas être éliminé avec les ordures ménagères. Veuillez agir selon les
dispositions locales d'élimination.
E
Instrucciones de uso
IMPORTANTE, LEA ATENTAMENTE ANTES DE USAR!
CONSERVE PARA REFERENCIA FUTURA
Uso adecuado
El cuadrocóptero con cámara es solamente para ser usado de modo privado en áreas bajo techo
según estas instrucciones, y en cumplimiento con las leyes locales. Obtenga información por
adelantado sobre las leyes aplicables en su país para la aviación civil y sobre la potencial necesidad
de cobertura de seguros. Por favor tenga en cuenta que este producto no es adecuado para niños
menores a 8 años.
-25 bis 50°C
Datos técnicos:
LiPo (751730) 3.7V, 250mAh
Temperatura operativa:
-25 to 50 °C
4x AAA 1.5V
Tipo de batería (cuadrocóptero):
LiPo (751730) 3.7V, 250mAh
2.4 GHz (2405 - 2475 MHz),
Tipo de batería (control remoto):
4x AAA 1.5V
puissance maximale de transmission: 10mW
Rango de frecuencia:
2.4GHz (2405 - 2475MHz),
4x (vert - avant, bleu et rouge - arrière)
max. de transmisión de potencia: 10mW
Moteurs DC sans balais: 3.4V
LEDs de funciones:
4x (verde - frente, azul y rojo - parte posterior)
Tipo de motor:
Motores DC sin escobillas 3.4V
visibilité et de la vue de l'utilisateur.
Rango máximo controlable:
50m (Control remoto para el cuadrocóptero), dependiendo en
las condiciones de visibilidad y visión del usuario.
CE EC Declaración de Conformidad: Vivanco GmbH declara por medio de la presente
que el cuadrocóptero Vivanco 37687 cumple con las directivas 2014/53/EU. Lea el texto
completo para la declaración de conformidad de la UE en la página web: www.vivanco.de.
Alcance del suministro: 1x Mini cuadrocóptero incluyendo batería y guarda de aspas de rotor
integradas, 1x batería recargable de repuesto del cuadrocóptero, 1x cámara de 0.3 MP, 4x aspas
de rotor de repuesto (rojas), 1x Cable de carga USB, 1x Control remoto (baterías no incluídas),
1x Instrucciones de uso
INSTRUCCIONES DE SEGURIDAD
Por favor preste atención al hecho de que los niños y las personas discapacitadas
también deben cumplir con estas instrucciones!
PELIGRO DE LESIÓN PERSONAL Y DAÑO MATERIAL
•
Lesiones por cortes, lesiones en los ojos, tironeo de cabellos y aplastamiento al rotar
las hélices y los esquineros con puntas
–> NO toque las hélices mientras se encuentra operando
–> Mantenga la distancia cuando las hélices están operando
–> NO HAGA volar cerca de su rostro
•
Accidentes de colisiones y choques causados por la pérdida de control así como el
salvataje del cuadrocóptero
–> Volar SOLAMENTE en interiores
–> Evitar colisiones, mantener a distancia suficiente de la gente, animales y objetos
–> Aterrizar DE INMEDIATO si pierde control
–> Vuele el cuadrocóptero solamente en vuelo visual. La alineación hacia el frente o parte posterior
debe siempre estar libre.
–> NO pise sillas, gabinetes mal amurados, etc. Realice el salvataje con extremo cuidado.
•
Choques y lesiones debido a componentes en caída
–> Verifique que todas las partes estén aseguradas antes del vuelo
•
Riesgo de incendio y lesiones y quemaduras cáusticas, y por envenenamiento debido
a daños, cortocircuitos o sobrecalentamiento de la batería o las baterías recargables.
–> Vuele SOLAMENTE dentro de las temperaturas permitidas
–> No haga cortocircuito con la bateria o baterías recargables (ej. almacene junto con las partes
metálicas), no arroje al fuego, no someta a daños, etc.
–> NO agujeree la batería o baterías recargables.
–> Elimine el líquido de pérdidas con arena.
–> Si traga, busque asistencia médica.
•
Peligros de saluddebido a interferencia de radiación
–> Mantenga una distancia mínima de 20 cm entre el control remoto/cuadrocóptero y los
marcapasos cardíacos u otros aparatos médicos electrónicos!
•
Lesiones causadas por tragar pequeñas partes
–> De ser tragado, busque asistencia médica de inmediato
Control remoto
Interruptor de
• Interruptor rotatorio
Configuración de luces
apagado/encendido •
(ein combinación con el
(mantener presionado
más tiempo)
uso del joystick derecho)
• Bouton rotatif
Interruptor de modo
• Bouton On/Off
de vuelo (2 modos) •
• Calibrado:
(en parallèle avec l'utilisation
Vuelco hacia el frente
de la manette droite)
Motor izquierdo
(ascendiente y
• Motor derecho
• Calibrage:
descendiente/ rotación
(hacia adelante y atrás,
Inclinaison vers l'avant
de derecha a izquierda) •
giro a la izquierda
y derecha)
Interruptor de memoria
• Manette droite
(presionar por corto tiempo)
(avant & arrière/virage
Toma de fotos (mantener
• Calibrado:
presionado más tiempo) •
Vuelco a la derecha
à droite & à gauche)
Interruptor de modo
• Calibrado:
• Calibrage:
sin cabeza (presionar
Vuelco a la izquierda
• Calibrado:
Inclinaison
por corto tiempo)
vers la droite
Vuelco hacia
Grabación de video
(mantener presionado más tiempo) •
atrás
• Calibrage:
Inclinaison
• Calibrage:
vers la gauche
OPERACIÓN / ENSAMBLAJE / DESARMADO
Inclinaison
Puesta en servicio:
vers l'arrière
1) Inserte las baterías en el control remoto con la polaridad correcta. Abra el compartimiento de la
batería en la parte de atrás del control remoto usando un destornillador.
2) Cambiando la batería recargable Enchufe el cable USB de carga en un puerto USB (ej. una PC)
y conecte el otro extremo del cable con el conector en la parte inferior del cuadrocóptero.
Cuando la carga esté completa (unos 60 min.) el LED interno en el conector USB brilla en color
rojo de manera continua. Luego de cada vuelo, las baterías recargables deben enfriarse a
temperatura ambiente antes de recargarse, para evitar daños.
3) Reemplazando la batería recargable: Quite el conector (1) de la batería recargable del encastre
y afloje el tornillo del compartimiento de la batería usando un destornillador. Abra el
compartimiento de la batería y quite la batería recargable (2-3). Ahora puede insertar la nueva
batería recargable, cerrar el compartimiento de la batería y enchufar el conector (1) nuevamente
4) Comenzar las preparaciones: Ubique el cuadrocóptero en una superficie plana y enciéndalo,
enchufando el conector de la batería recargable del cuadrocóptero en el encastre
apropiado (4) en la parte inferior del cuadrocóptero. Los LEDs del cuadrocóptero luego
parpadean en intervalos regulares (modo de parejas). Ahora encienda el control remoto
(presione el interruptor On/Off) Se emitirá un sonido de bip, y los LEDs verdes en el lado frontal
del cuadrocóptero se encenderán continuamente mientras que los del control remoto
parpadearán. Luego, presione el motor izquierdo hasta el frente y luego de regreso hacia atrás
(Figuras 5a+5b) El LED en el control remoto brillará ahora de manera continua, los dos aparatos
están ahora conectados y el cuadrocóptero está listo para arrancar. Para alinear/calibrar el
cuadrocóptero en vuelo horizontal, empuje el motor de la izquierda hasta el rincón inferior
izquierdo y el motor derecho hacia el rincón inferior derecho (Figura 5c). Usted escucha un bip,
y los LEDs del cuadrocóptero comienzan a parpadear. Una vez que los LEDs verdes del lado
frontal están iluminados de manera continua nuevamente, la alineación y calibrado se han
completado con éxito.
5) Si el cuadrocóptero no vuela en alineación exacta, use el interruptor de calibrado correspondiente
en el control remoto. Ejemplo: SI el cuadrocóptero vuela demasiado hacia la izquierda, presione el
"Interruptor de calibrado Vuelco hacia la derecha" hasta que la alineación sea correcta nuevamente.
Mantenimiento:
Cambiando las aspas del rotor Si las aspas de un rotor están dañadas, reemplace las defectuosas
con las aspas de rotor de repuesto que se incluyen. Tire ligeramente del aspa del rotor defectuosa
hasta que se salga. Luego, inserte la nueva (con la inscripción hacia abajo) suavemente en el
encastre de metal. Por favor tenga en cuenta en este punto el ensamblado correcto según la
inscripción A o B de las aspas del rotor (ver figura/dibujo 6).
Sistema de control:
Tenga en cuenta que solamente correcciones mínimas en los motores son requeridas para guiar
el cuadrocóptero.
-
Ascendiendo y descendiendo: empuje el motor izquierdo hacia el frente/atrás
-
Giro a derecha o izquierda: empuje el motor de la derecha hacia la derecha o izquierda
-
Rotación a derecha o izquierda: empuje el motor de la izquierda hacia la derecha o izquierda
-
Adelante y atrás: empuje el motor derecho hacia el frente/atrás
Funciones especiales:
- Cámara: Instalación: Inserte el cable de la cámara en el enchufe apropiado (7) en la parte inferior
del compartimiento de las baterías. Cierre el compartimiento de las baterías e inserte la cámara
(tal como se muestra en la figura 8-9) en el encastre de sostén en el compartimiento de las
baterías con los lentes mirando hacia el frente.
SOLUTION :
CAUSA:
REMEDIO:
Appuyez sur le bouton "ON" de la
télécommande
Posición de interruptor en "OFF" en el control remoto
gire el interruptor en el control remoto a "ON"
Chargez la pile rechargeable/remplacez les piles
Vacíe la batería/baterías recargables
Cargue las baterías recargables / reemplace
las baterías
Retirez tous corps étrangers
Cuerpos foráneos bloquean las aspas del rotor
Elimine cuerpos foráneos
Chargez la pile rechargeable
Status de batería baja
Cambie la batería recargable
Appuyez sur le bouton "ON"
Posición de interruptor "OFF"
Posición de interruptor "ON"
Notez la bonne polarité
Baterías insertadas incorrectamente
Verifique la polaridad correcta
Remplacez les piles
Baterías vacías
Reemplace las baterías
appuyez plus fort sur la manette gauche
Las aspas del rotor no rotan de manera
Presione con más fuerza el motor izquierdo
Chargez la pile rechargeable
suficientemente rápida
La energía de la batería recargable es
Cambie la batería recargable
demasiado baja
PL
• Włącznik / wyłącznik
Przycisk ustawień
oświetlenia (przytrzymać
długo wciśnięty)
• Interruttore rotante
Impostazioni di luce
• Interruttore
(in combinazione con
Przycisk trybów lotu (2 tryby) •
(mantenere premuto più a lungo)
On/Off
l'utilizzo del joystick destro)
Tasto modalità volo (2 modalità) •
• Calibrazione:
Lewy suwak (wznoszenie
Inclinazione in avanti
i obniżanie lotu / obrót
Manopola sinistra
w prawo i lewo) •
(ascensione e
discesa/rotazione
• Manopola destra
Przycisk przywołania
a destra e sinistra) •
(avanti e indietro/virata
(przytrzymać krótko
a destra e sinistra))
wciśnięty)
Przycisk aparatu
Tasto di ritorno
(przytrzymać
(premere brevemente)
• Calibrazione:
długo wciśnięty) •
Scattare una foto
Inclinazione a destra
(mantenere
premuto più a lungo) •
• Kalibracja:
• Calibrazione:
Przycisk trybu Headless
Inclinazione a sinistra
(przytrzymać krótko wciśnięty)
przechylenie
w tył
Przycisk kamery
• Calibrazione:
Tasto per modalità
(przytrzymać długo wciśnięty) •
Inclinazione
Headless (premere brevemente)
Registrare un video
indietro
(mantenere premuto più a lungo) •
PRZYCZYNA:
SPOSÓB USUNIĘCIA:
CAUSA:
SOLUZIONE:
Ustawienie przełącznika w nadajniku zdalnego
Przełączyć przełącznik w nadajniku zdalnego
Interruttore del radiocomando posizionato su "OFF"
Portare l'interruttore del radiocomando su "ON"
sterowania w pozycji „OFF"
sterowania w pozycję „ON"
Rozładowanie akumulatora / baterii
Naładować akumulator / wymienić baterie
Batteria ricaricabile/pila scarica
Caricare la batteria/sostituire le pile
Corpi estranei che bloccano una pala del rotore
Rimuovere ogni corpo estraneo
Ciało obce blokuje śmigło
Usunąć ciało obce
Batterie quasi scariche
Ricaricare le batterie
Niski poziom naładowania akumulatora
Naładować akumulator
Interruttore posizionato su "OFF"
Portare l'interruttore del radiocomando su "ON"
Ustawienie przełącznika w pozycji „OFF"
Przełączyć przełącznik w pozycję „ON"
Pile inserite in maniera scorretta
Verificare l'inserimento con la corretta polarità
Nieprawidłowo założone baterie
Zwrócić uwagę na prawidłowe ułożenie biegunów
Rozładowanie baterii
Wymienić baterie
Pile scariche
Sostituire le pile
Le pale del rotore non ruotano abbastanza
Muovere la manopola sinistra in maniera più
Śmigła nie wirują z dostateczną szybkością
Mocniej wcisnąć lewy suwak
velocemente
decisa
Zbyt niski poziom naładowania akumulatora
Naładować akumulator
Batteria ricaricabile quasi scarica
Ricaricare la batteria
NL
• Przycisk rotacji
• Draaischakelaar
Verlichting
• Aan/Uit knop
(gebruik in combinatie
(w połączeniu z użyciem
(langer ingedrukt houden)
prawego joysticka)
met de rechter joystick)
Vliegmodus schakelaar
(2 standen) •
• Kalibratie: naar
• Kalibracja:
voren kantelen
przechylenie w przód
Linker gashendel
(omhoog & omlaag /
rechts- & linksom
• Rechter gashendel
• Prawy suwak
draaien) •
(vooruit & achteruit/
(do przodu i do tyłu /
rechts & linksom
skręt w prawo i lewo)
Terugkeer knop
draaien)
(kort indrukken)
Foto nemen (langer
• Kalibracja:
• Kalibratie: naar
ingedrukt houden) •
przechylenie w prawo
rechts kantelen
• Kalibracja:
• Kalibratie: naar
Headless modus knop
przechylenie w lewo
links kantelen
(kort indrukken)
• Kalibratie:
Video-opname
naar achteren
(langer ingedrukt houden) •
kantelen
OORZAAK:
OPLOSSING:
De schakelaar staat in de "UIT" positie op de
Zet de schakelaar van de
afstandsbediening
afstandsbediening op "AAN"
De oplaadbare accu/batterij is leeg
Laad de oplaadbare accu op/vervang de
batterijen
Vreemde voorwerpen blokkeren het rotorblad
Verwijder eventuele vreemde voorwerpen
Accu is bijna leeg
Laad de oplaadbare accu op
Schakelaar staat in de "UIT" positie
Zet de schakelaar in de "AAN" positie
Batterijen zijn verkeerd geplaatst
Plaats de batterijen correct
Lege batterijen
Vervang de batterijen
De rotorbladen draaien niet snel genoeg
Druk harder op de linker gashendel
Het vermogen van de oplaadbare accu is te laag
Laad de oplaadbare accu op

Verwandte Anleitungen für Vivanco 37687

Inhaltszusammenfassung für Vivanco 37687
- Seite 1 CE EC Déclaration de Conformité : Vivanco GmbH, par la présente, déclare que le CE EU-Konformitätserklärung: Hiermit erklärt die Vivanco GmbH, dass der Quadrocopter 37687 quadrocopter complies with the directive 2014/53/EU. You can read the full text of quadricoptère Vivanco 37687 est conforme aux directives 2014/53/EU. Vous pouvez lire le Vivanco 37687 der Richtlinie 2014/53/EU entspricht.
- Seite 2 CE ЕС Декларация Соответствия: Настоящим Vivanco GmbH заявляет, что квадрокоптер internetadress: www.vivanco.de. 2014/53/EU direktifine uygunluğunu beyan eder. Uygunluk açıklamasına tam metin olarak Vivanco 37687 соответствует стандартам директивы 2014/53/ЕС. С полным текстом ЕС Toimitussisältö: 1x Mini Quadrocopter sisältäen pariston sekä sisäänrakennettu roottorin siiven www.vivanco.de'den ulaşılabilir.