GRE VAINILLE Bedienungsanleitung
Inhaltsverzeichnis
Quicklinks
www.gre.es
IMPEGTR.17
Instruction Manual
EN
Take the reference number of your pool into
account when you do the assembly
Manual de Instrucciones
ES
Tenga en cuenta la referencia y las medidas de
su piscina a la hora de realizar el montaje
Manuel d´instructions
FR
Considérez la référence et les mesures de
votre piscine avant de procéder au montage
Bedienungsanleitung
DE
Bitte beachten Sie die Referenz und die
Masse Ihres Schwimmbads, wenn Sie die
Montage ausführen
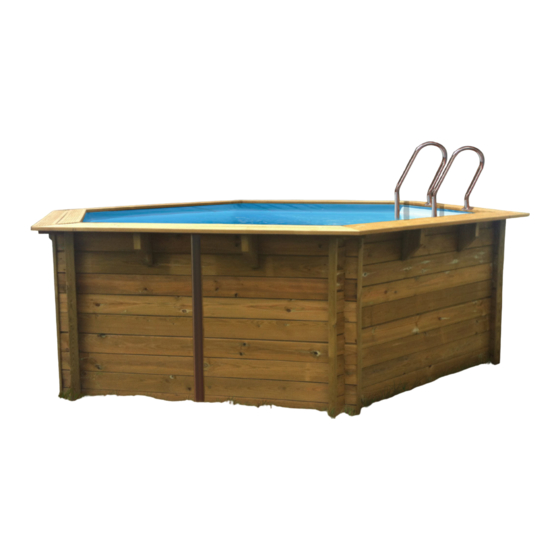
LILLI:
Ref. 786226 (EG)
Ø 2,95m x H 1,19m
6
VAINILLE:
Ref. 783331 (E) (EG)
Ø 4,12m x H 1,19m
6
VIOLETTE:
Ref. 783333 (E)
Ø 5,11m x H 1,24m
8
Manuale delle instruzioni
IT
Tener presente il riferimento della piscina al
momento del montaggio
Handleiding met instructies
NL
Op het moment van monteren dient u
rekening te houden met de referentie en de
afmetingen van uw zwembad
Manual de instruções
PT
Tenha em conta a referência da piscina momento
de realizar a montagem
Inhaltsverzeichnis

Verwandte Anleitungen für GRE VAINILLE


Inhaltszusammenfassung für GRE VAINILLE
- Seite 1 Bitte beachten Sie die Referenz und die www.gre.es Masse Ihres Schwimmbads, wenn Sie die Montage ausführen LILLI: Ref. 786226 (EG) Ø 2,95m x H 1,19m VAINILLE: Ref. 783331 (E) (EG) Ø 4,12m x H 1,19m VIOLETTE: Ref. 783333 (E) Ø 5,11m x H 1,24m IMPEGTR.17...
- Seite 2 En su objetivo constante de mejorar sus productos, Manufacturas Gre se reserva el derecho a modificar en cualquier momento y sin previo aviso las características, los detalles técnicos, los equipamientos estandarizados y las opciones de sus productos.
- Seite 3 ATTENZIONE Leggere attentamente queste informazioni e e conservarle per farvi riferimento in futuro Congratulazioni per la tua scelta. Il modello che hai scelto è stato progettato in modo particolare per una installazione semplice e rapida, ma per un uso corretto della piscina sono necessarie alcune precauzioni. Prima di procedere con l’installazione e il montaggio della tua piscina, informati su quanto previsto dal piano regolatore.
- Seite 4 Keep your manual with the serial number and the purchase justification (payment receipt) for any type of reclamation. Any reclamation against guarantee should be made by an online declaration, via the www.service-gre.com website, products, colour maintenance and wear due to friction of the together with receipt of purchase.
- Seite 5 PROLOGUE STORAGE PRECAUTIONS IN GROUND POOLS AND SPECIFIC REGULATIONS For on ground pools, we recommend protecting access to the pool by one standardized protection element. temperature and humidity. Therefore, certain precautions should be taken for storage. horizontal position on a flat surface, shielding them from humidity ESSENTIAL: cracks in the wood.
- Seite 6 Para cualquier reclamación o servicio posventa, guarde su manual con el número de serie junto con el justificante de compra (ticket de caja). Para cualquier demanda de garantía deberá ponerse en contacto a través de nuestra web www.service-gre.com, junto con el justificante de compra. Se pueden solicitar fotografías para justificarlo. No se aceptará...
-
Seite 7: Antes Del Montaje
ANTES DEL MONTAJE PRECAUCIONES DE ALMACENAMIENTO piscina. Mientras la piscina se encuentra desmontada, es sensible a necesario tomar ciertas precauciones de almacenamiento. PISCINAS ENTERRADAS Y NORMATIVA ESPECÍFICA Para las piscinas en superficie, se recomienda proteger el acceso al vaso por un elemento de protección normalizado. - Seite 8 (ticket de caisse). Toute demande de garantie devra faire l’objet d’une déclaration en ligne sur le site: www.service-gre.com, accompagnée de la preuve d’achat. Il est impératif de conserver l’étiquette du numéro de série Des photos pourront être demandées pour justificatif.
-
Seite 9: Avant-Propos
AVANT-PROPOS PRECAUTIONS DE STOCKAGE AVANT LA CONSTRUCTION DE VOTRE PISCINE ASSUREZ- VOUS stockage. bassin. IL EST IMPERATIF DE : BASSINS ENTERRES ET NORME SPECIFIQUE Pour les bassins hors sol, il est recommandé de sécuriser l’accès au bassin par un élément de protection normalisé. - Seite 10 Für etwaige Beanstandungen oder Kundendienst bewahren Sie Ihr Handbuch mit der Seriennummer sowie dem Kaufbeleg (Quittung) auf. Jegliche Garantieansprüche müssen online auf der Webseite www.service-gre.com, zusammen mit dem Kaufbeleg, geltend gemacht werden. Es können Fotos angefordert werden, um diesen Anspruch zu...
-
Seite 11: Einleitung
EINLEITUNG VORKEHRUNGEN FÜR DIE LAGERUNG VOR DEM AUFBAU IHRES POOLS SORGEN SIE FÜR Solange der Pool noch nicht zusammengebaut ist, reagiert er empfindlich auf Feuchtigkeit und Temperaturschwankungen. elektrischen Leitungen. IN DIE ERDE EINGELASSENE POOLS UND SPEZIFISCHE NORM WICHTIG: Für Pools an der Oberfläche wird empfohlen, den Zugang zum Becken durch ein standardisiertes Schutzelement zu schützen. - Seite 12 In caso di reclami o per assistenza post vendita, conservare il manuale con il numero di serie insieme alla prova di acquisto (scontrino). Qualsiasi richiesta di garanzia deve essere inoltrata on line, tramite la pagina web www.service-gre.com, allegando lo scontrino. È obbligatorio conservare l’etichetta con il numero di serie Possono essere richieste fotografie come prova.
- Seite 13 INTRODUZIONE PRECAUZIONI PER LO STOCCAGGIO piscina precauzioni per lo stoccaggio. PISCINE INTERRATE E RELATIVE NORME Le piscine fuori terra devono essere dotate di un sistema di protezione a norma. IMPRESCINDIBILE: rendono obbligatoria la dotazione di un sistema di protezione e la potrebbe deformare. OBBLIGATORIO: −...
- Seite 14 Voor iedere claim of after-sales service, uw handleiding met het serienummer tezamen met het aankoopbewijs (factuur, kassabon) gereedhouden. Elke aanspraak op garantie zal onderwerp zijn van een online declaratie, via de website www.service-gre.com, tezamen met het aankoopbewijs. Er kunnen foto’s worden verlangd ter justificatie. Er worden...
- Seite 15 WOORWOORD VOORSCHRIFTEN VOOR OPSLAG VERZONKEN ZWEMBADEN EN SPECIFIEKE REGELGEVING VAN HET GROOTSTE BELANG: Voor zwembaden boven de grond, wordt aangeraden de toegang tot het bassin te beveiligen met een standaard beschermingselement. bescherming, omdat de condensatie die door het hout wordt uitgewasemd het nog natter zal maken en daardoor krijgt het te zwembaden, dat de toegang tot het bassin door tenminste een VERPLICHT:...
- Seite 16 Para qualquer reclamação ou serviço pós-venda, conserve o seu manual com o número de série, juntamente com o comprovativo de compra (ticket de caixa). Qualquer reclamação de garantia deverá ser objeto de uma declaração online, no site www.service-gre.com, juntamente com o comprovativo de compra. Podem ser requeridas fotografias para justificá-lo. Não será...
- Seite 17 PRELIMINAR PRECAUÇÕES DE ARMAZENAMENTO piscina. PISCINAS ENTERRADAS E REGULAMENTO ESPECÍFICO Para as piscinas em superfície, é recomendado proteger o acesso ao tanque por meio de um elemento de IMPRESCINDÍVEL: proteção normalizado. Para as piscinas semienterradas e completamente enterradas, a lei de forma.
- Seite 18 LEARN ABOUT THE WOOD WOOD: A LIVING MATERIAL Wood is a natural product, the fissures visible on the edges CONOZCA LA MADERA of the wood are completely normal and do not modify the resistance characteristics of the same. MIEUX CONNÎATRE LE BOIS Wood is always a malleable material (from 3% to 4% of dimensional variations) with humidity and temperature oscillations.
- Seite 19 Retention of sterilization products Differences in shades of colour Diferencias de tonalidad Ritenzione di prodotti per la sterilizzazione Differenze di tonalitá Retenç Diferenças de tonalidade Mould can appear on the surface of wood, although not penetrating into it and not degrading it. After being treated with UV radiation, wood turns greyish with time without this affecting its durability.
-
Seite 20: Installation Drawing / Plano De Instalación / Plan D`implantation / Aufstellplan / Piano Di Installazione
INSTALLATION DRAWING PLANO DE INSTALACIÓN PLAN D´IMPLANTATION AUFSTELLPLAN PIANO DI INSTALLAZIONE TIPS VOOR DE VEILIGHEID Ref. 786226 (EG) Dimensions in mm PLANO DE INSTALAÇÃO Cotas en mm Cotations en mm Höhenangaben in mm Livello in mm Afmetingen in mm Cotas em mm IDENTIFICATION/ IDENTIFICA- CIÓN/REPÉRE/... - Seite 21 Ref. 786226 (EG) Dimensions in mm Cotas en mm Cotations en mm Höhenangaben in mm Livello in mm Afmetingen in mm Cotas em mm You should respect all these dimensions Per sistemare alla perfezione il liner e to perfectly adjust the liner and the i bordi è...
-
Seite 22: Installation Drawing / Plano De Instalación / Plan D`implantation / Aufstellplan / Piano Di Installazione
INSTALLATION DRAWING PLANO DE INSTALACIÓN PLAN D´IMPLANTATION AUFSTELLPLAN PIANO DI INSTALLAZIONE TIPS VOOR DE VEILIGHEID Dimensions in mm Ref. 783331 (E) (EG) PLANO DE INSTALAÇÃO Cotas en mm Cotations en mm Höhenangaben in mm Livello in mm 2054 Afmetingen in mm Cotas em mm 3772 Répère... - Seite 23 Ref. 783331 (E) (EG) Dimensions in mm Cotas en mm Cotations en mm Höhenangaben in mm Livello in mm Afmetingen in mm 2000 Cotas em mm 3553 1776 You should respect all these dimensions Per sistemare alla perfezione il liner e to perfectly adjust the liner and the i bordi è...
-
Seite 24: Installation Drawing / Plano De Instalación / Plan D`implantation / Aufstellplan / Piano Di Installazione
INSTALLATION DRAWING PLANO DE INSTALACIÓN PLAN D´IMPLANTATION AUFSTELLPLAN PIANO DI INSTALLAZIONE TIPS VOOR DE VEILIGHEID Ref. 783333 (E) Dimensions in mm PLANO DE INSTALAÇÃO Cotas en mm Cotations en mm Höhenangaben in mm Livello in mm Afmetingen in mm Cotas em mm 4713 IDENTIFICATION/ IDENTIFICA-... - Seite 25 Ref. 783333 (E) Dimensions in mm Cotas en mm Cotations en mm Höhenangaben in mm Livello in mm Afmetingen in mm Cotas em mm You should respect all these dimensions Per sistemare alla perfezione il liner e to perfectly adjust the liner and the i bordi è...
-
Seite 26: Inhaltsverzeichnis
Ref. 786226 (EG) Ø2,95 x H 1,19m SUMMARY ÍNDICE SOMMAIRE ZUSAMMENFASSUNG Ref. 783333 (E) Ref. 783331 (E) (EG) RIASSUNTO Ø 5,11m x H 1,24m Ø 4,12m x H 1,19m SAMENVATTING RESUMO Installation drawing / Plano de instalación / Plan d`implantation / Aufstellplan / Piano di installazione / Installatieplan / Plano de instalação Ref. - Seite 27 Wooden blocks, reinforcements and trimmings / Tacos, refuerzos y embellecedores / Consoles, renforts et caches / Konsolen, Verstärkungen und Zierleisten / Tasselli, rinfortzi e coperture / Console, verstevi- gingen en sierlijsten / Blocos de madeira, reforços e embelezadores Wooden setpladder / Escalera de madera / Echelle bois / Holztreppe / Scala di legno / Houten trap / Escada de madeira Protective wall blanket / Manta protectora de pared / Feutre de paroi / Schutzdecke an der Wand / Copertura di protezione della parte / Beschermdeken muur / Manta protetora de parede...
-
Seite 28: Previsions / Previsiones / A Prévoir / Vorausplanung / Precauzioni / Rekening Houden Met / Previsões
PREVISIONS PREVISIONES 3,50 m min. A PRÉVOIR VORAUSPLANUNG Fig. 1 Abb. 1 FILTER GROUP GRUPO DE FILTRACIÓN GROUPE DE FILTRATION FILTRATIONSAGGREGAT The filter group and especially El grupo defiltración y en groupe filtration Das Filtrationsaggregat und electric pump should especial la bomba eléctrica notamment pompe besonders... - Seite 29 PRECAUZIONI REKENING HOUDEN MET 3,50 m min. PREVISÕES Fig. 1 Afb. 1 SISTEMA DI FILTRAZIONE FILTERGROEP GRUPO DE FILTRAÇÃO Il sistema di filtrazione e in filtergroep O grupo de filtração, e em particolare la pompa elettrica bijzonder de elektrische pomp especial a bomba elétrica della piscina devono essere van het zwembad moeten...
-
Seite 30: Installation / Instalación / Implantation / Montage / Installazione / Installatie / Instalação
First level Fig. 2 Nivel de filtración Abb. 2 INSTALLATION Niveau de la filtration Filtrationshöhe INSTALACIÓN IMPLANTACIÓN MONTAGE Above ground Semi in-ground In-ground Sobre el suelo Semienterrada Enterrada Hors-sol Semi-enterrée Enterrée An der oberfläche zur Hälfte eingelassen Ganz eingelassen Select the ideal location, in the sunniest spot possible, taking into account the local regulations (distance from the paths, public rights of way, Your pool can be installed in these three ways: Fig. - Seite 31 Fig. 2 Livello di filtrazione INSTALLAZIONE Afb. 2 Filterniveau Nível de filtração INSTALLATIE INSTALAÇÃO Fuori terra Seminterrata Interrata Op de grond Half-verzonken Verzonken Em superficie Semienterrada Enterrada Puoi installare la piscina di uno di questi tre modi: Fig. 2 una sabbia fina e pulita, altrimenti si può macchiare il liner a causa della formazione di alghe nella sabbia. Kies een ideale plaats uit, zo zonnig mogelijk, maar houd daarbij rekening met de plaatselijke normen (afstand tot de grondscheiding, publieke U kunt uw zwembad op deze drie manieren installeren: Afbeelding 2 zand.
- Seite 32 Take the reference number of your pool into account when you do the assembly Tenga en cuenta la referencia de su piscina a la hora de realizar el montaje Considérez la référence et les mesures de votre piscine avant de procéder au montage Bitte beachten Sie die Referenz und die Masse Ihres Schwimmbads, wenn Sie die Montage ausführen Tener presente il codice di riferimento della piscina al momento del montaggio Op het moment van monteren dient u rekening et houden met de referentie en de afmetingen van uw...
- Seite 33 GROUND LAYOUT - TRAZADO EN EL TERRENO - TRACÉ AU SOL Ref. 786226 (EG) Ref. 783331 (E) (EG) Ref. 783333 (E) 3060 mm 053 mm 0 mm 11mm = 30 mm 31mm 50 cm 50 cm 50 cm Surrounding area Fig.
- Seite 34 ABSTECKEN AUF DEM BODEN - TRACCIATURA NEL SUOLO - GRONDLIJNEN UITZETTEN - TRAÇADO NO SOLO Ref. 786226 (EG) Ref. 783331 (E) (EG) Ref. 783333 (E) 0 mm 3060 mm 053 mm 11mm = 30 mm 31mm 50 cm 50 cm 50 cm Randbereich Betonplatte:...
-
Seite 35: Preparing The Land / Preparación Del Terreno / Terrassement / Geländevorbereitung
PREPARING THE LAND UNACCEPTABLE LOCATION: Sloping, uneven ground. Sandy, rocky or soggy ground. MARK THE INSTALLATION AREA In order to avoid any excess humidity in your land, you should install a draining system under the pool, and around it by building a decompression well. -
Seite 36: Preparación Del Terreno
PREPARACIÓN DEL TERRENO NO MONTAR NUNCA EN: Terreno inclinado, desigual, arenoso, con piedras ó blando. MARCAR ZONA DE INSTALACIÓN NIVELAR Como nivelar: Acabado: Importante: en caso de que se trate de terreno no estabilizado, es obligatorio la construcción de una losa de hormigón el lugar del lecho de arena. La losa de hormigón no está... - Seite 37 TERRASSEMENT NE JAMAIS MONTER SUR : terrain incliné, inégal, sablonneux, avec des pierres ou mou. MARQUER LA ZONE D’INSTALLATION montage soit plus commode. NIVELER Comment niveler: Finition: Importante: En cas de sol non stabilisé, la réalisation d´une dalle béton en remplacement du lit de sable est impérative. Dalle béton non incluse.
- Seite 38 GELÄNDEVORBEREITUNG NIE MONTIEREN IN: unebenem, steilen, sandigen oder weichem Gelände oder in Gelände mit. STANDORT MARKIEREN werden die Montagearbeiten erheblich erleichtert. dem Pool und darum herum zu errichten. NIVELLIERUNG Sie sparen sich dadurch Probleme. Wie wird nivelliert: Finish: Wichtig: Sollte es sich um nicht stabilisierten Boden halten, ist der Bau einer Betonplatte anstelle eines Sandbetts obligatorisch. Die Betonplatte ist nicht im Lieferumfang enthalten.
-
Seite 39: Preparazione Del Terreno
PREPARAZIONE DEL TERRENO possibili conseguenze di contaminazione del suolo, incluso il deterioramento della struttura (marciume del legno, deformazione della struttura...) Per garantire una NON MONTARE MAI LA PISCINA IN PRESENZA DELLE SEGUENTI CONDIZIONI: terreno in pendenza, irregolare, sabbioso, con pietre o morbido. TRACCIARE ZONA DI INSTALLAZIONE decompressione. - Seite 40 VOORBEREIDING VAN HET TERREIN NOOIT MONTEREN OP: Een terrein dat hellend, oneffen is, of dat uit zand of zachte grond bestaat, of wanneer het stenen bevat. HER MARKEREN VAN DE PLAATS VOOR INSTALLATIE bij de montage gemakkelijker en met ruimte gewerkt kan worden. NIVELLEREN Wijze voor nivellering: Afwerking:...
- Seite 41 PREPARAÇÃO DO TERRENO NUNCA MONTAR EM: Terreno inclinado, desigual, areoso, com pedras ou brando. MARCAR ZONA DE INSTALAÇÃO NIVELAR Como nivelar: Acabamento: Importante: no caso de se tratar de um solo não estabilizado, é obligatória a construção de uma laje de betão em lugar do leito de areia. imperfeiç...
-
Seite 42: Boards + Protective Ground Blanket / Tablas + Manta Protectora De Fondo / Madriers + Feutre De Fond
BOARDS Ref. 786226 (EG) TABLAS Identification of the boards / Identificación de las tablas / Repérage des madriers / Kennzeichnung der holzbohlen / Identificazione della tavole / MADRIERS Identificatie van de planken / Identificação das tábuas ERDARBEITEN TAVOLE Fig. 7 / Abb. 7 / Afb. 7 PLANKEN TÁBUAS IDENTIFICATION/... - Seite 43 Ref. 786226 (EG) PROTECTIVE GROUND BLANKET MANTA PROTECTORA DE FONDO FEUTRE DE FOND SCHUTZDECKE IM UNTERGRUND COPERTURA DI PROTEZIONE DEL FONDO BESCHERMDEKEN BODEM MANTA PROTETORA DE FUNDO Fig. 8 / Abb. 8 / Afb. 8 de fondo. copertura di protezione del fondo. fundo.
-
Seite 44: Boards + Protective Ground Blanket / Tablas + Manta Protectora De Fondo / Madriers + Feutre De Fond
BOARDS Ref. 783331 (E) (EG) TABLAS Identification of the boards / Identificación de las tablas / Repérage des madriers / Kennzeichnung der holzbohlen / Identificazione della tavole / MADRIERS Identificatie van de planken / Identificação das tábuas ERDARBEITEN TAVOLE Fig. 7 / Abb. 7 / Afb. 7 PLANKEN TÁBUAS IDENTIFICATION/... - Seite 45 Ref. 783331 (E) (EG) PROTECTIVE GROUND BLANKET MANTA PROTECTORA DE FONDO FEUTRE DE FOND which should be cut from the roll included, on the floor. Scrupulously respect the indicated measures to cut the roll. SCHUTZDECKE IM UNTERGRUND COPERTURA DI PROTEZIONE DEL FONDO Respete escrupulosamente las medidas indicadas para cortar.
-
Seite 46: Boards + Protective Ground Blanket / Tablas + Manta Protectora De Fondo / Madriers + Feutre De Fond
BOARDS Ref. 783333 (E) TABLAS Identification of the boards / Identificación de las tablas / Repérage des MADRIERS madriers / Kennzeichnung der holzbohlen / Identificazione della tavole / Identificatie van de planken / Identificação das tábuas ERDARBEITEN TAVOLE Fig. 7 / Abb. 7 / Afb. 7 PLANKEN TÁBUAS IDENTIFICATION/... - Seite 47 Ref. 783333 (E) PROTECTIVE GROUND BLANKET MANTA PROTECTORA DE FONDO FEUTRE DE FOND which should be cut from the roll included*, on the floor. Scrupulously respect the indicated measures to cut the roll. SCHUTZDECKE IM UNTERGRUND COPERTURA DI PROTEZIONE DEL FONDO Respete escrupulosamente las medidas indicadas para cortar.
-
Seite 48: Assembly Of The Structure / Montaje De La Estructura / Assemblage De La Structure / Zusammenbau Des
Ref. 786226 (EG) ASSEMBLY OF THE STRUCTURE MONTAJE DE LA ESTRUCTURA ASSEMBLAGE DE LA STRUCTURE ÃO NO SOLO ZUSAMMENBAU DES TRAGWERKS MONTAGGIO DELLA STRUTTURA MONTAGE VAN DE CONSTRUCTIE 3077 MONTAGEM DA ESTRUTURA Platzieren Sie die „Test“-Bret- Fig. 9 / Abb. 9 / Afb. 9 Coloque as tábuas «de prova»... - Seite 49 at the end of this manual. Take special care when installing this first layer of boards. The precision of this Tras colocar la primera fila, es imprescindible efectuar un control de las dimensiones interiores de la piscina. Para un montaje perfecto, las diagonales deben ser iguales y conformes al plano de montaje del final de este manual.
- Seite 50 IMPORTANT: Position and fit one of the two sides of the boards. Redirect the other side using a joint closer. Fit the board using a mallet and wooden wedge. IMPORTANTE: Presente y enganche uno de los dos lados de la tabla. Redirija el otro lado con ayuda de un cierra juntas. de madera.
- Seite 51 SPECIFIC BOARDS: TABLAS ESPECÍFICAS: MADRIERS SPÉCIFIQUES : SPEZIFISCHE BRETTER: TAVOLE SPECIFICHE: SPECIFIEKE PLANKEN: zwembad wordt geplaats. TAVOLE SPECIFICHE: larger diameter on exterior refrentado lado exterior lamage côté extérieur ßere Seite Senkung äu lato esterno gefreesde gat buitenzijde skimmer desempenamento lado exterior Fig.
-
Seite 52: Assembly Of The Structure / Montaje De La Estructura / Assemblage De La Structure / Zusammenbau Des
Ref. 783331 (E) (EG) ASSEMBLY OF THE STRUCTURE MONTAJE DE LA ESTRUCTURA ASSEMBLAGE DE LA STRUCTURE ÃO NO SOLO ZUSAMMENBAU DES TRAGWERKS MONTAGGIO DELLA STRUTTURA MONTAGE VAN DE CONSTRUCTIE 3077 MONTAGEM DA ESTRUTURA Platzieren Sie die „Test“-Bret- Fig. 9 / Abb. 9 / Afb. 9 Coloque as tábuas «de prova»... - Seite 53 at the end of this manual. Take special care when installing this first layer of boards. The precision of this Tras colocar la primera fila, es imprescindible efectuar un control de las dimensiones interiores de la piscina. Para un montaje perfecto, las diagonales deben ser iguales y conformes al plano de montaje del final de este manual.
- Seite 54 IMPORTANT: Position and fit one of the two sides of the boards. Redirect the other side using a joint closer. Fit the board using a mallet and wooden wedge. IMPORTANTE: Presente y enganche uno de los dos lados de la tabla. Redirija el otro lado con ayuda de un cierra juntas. de madera.
- Seite 55 SPECIFIC BOARDS: TABLAS ESPECÍFICAS: MADRIERS SPÉCIFIQUES : SPEZIFISCHE BRETTER: TAVOLE SPECIFICHE: SPECIFIEKE PLANKEN: zwembad wordt geplaats. TAVOLE SPECIFICHE: skimmer board ª larger diameter on exterior refrentado lado exterior lamage côté extérieur ßere Seite Senkung äu lato esterno gefreesde gat buitenzijde desempenamento lado exterior Fig.
-
Seite 56: Assembly Of The Structure / Montaje De La Estructura / Assemblage De La Structure / Zusammenbau Des
Ref. 783333 (E) ASSEMBLY OF THE STRUCTURE MONTAJE DE LA ESTRUCTURA ASSEMBLAGE DE LA STRUCTURE ÃO NO SOLO ZUSAMMENBAU DES TRAGWERKS MONTAGGIO DELLA STRUTTURA MONTAGE VAN DE CONSTRUCTIE 3077 MONTAGEM DA ESTRUTURA Platzieren Sie die „Test“-Bret- Fig. 9 / Abb. 9 / Afb. 9 Coloque as tábuas «de prova»... - Seite 57 at the end of this manual. Take special care when installing this first layer of boards. The precision of this Tras colocar la primera fila, es imprescindible efectuar un control de las dimensiones interiores de la piscina. Para un montaje perfecto, las diagonales deben ser iguales y conformes al plano de montaje del final de este manual.
- Seite 58 IMPORTANT: Position and fit one of the two sides of the boards. Redirect the other side using a joint closer. Fit the board using a mallet and wooden wedge. IMPORTANTE: Presente y enganche uno de los dos lados de la tabla. Redirija el otro lado con ayuda de un cierra juntas. de madera.
- Seite 59 SPECIFIC BOARDS: TABLAS ESPECÍFICAS: MADRIERS SPÉCIFIQUES : SPEZIFISCHE BRETTER: TAVOLE SPECIFICHE: SPECIFIEKE PLANKEN: zwembad wordt geplaats. TAVOLE SPECIFICHE: skimmer board larger diameter on exterior refrentado lado exterior lamage côté extérieur ßere Seite Senkung äu lato esterno gefreesde gat buitenzijde desempenamento lado exterior Fig.
-
Seite 60: Wooden Blocks, Reinforcements And Trimmings / Tacos, Refuerzos Y Embellecedores / Consoles, Renforts
WOODEN BLOCKS, REINFORCEMENTS AND TRIMMINGS TACOS, REFUERZOS Y EMBELLECEDORES CONSOLES, RENFORTS ET CACHES KONSOLEN, VERSTÄRKUNGEN UND ZIERLEISTEN TASSELLI, RINFORTZI E COPERTURE CONSOLE, VERSTEVIGINGEN EN SIERLIJSTEN BLOCOS DE MADEIRA, REFORÇOS E EMBELEZADORES Corbelets+renforts Ref. 786226 (EG) Ref. 783331 (E) (EG) Ref. 783333 (E) be used for positioning the wooden blocks, see stepladder chapter. - Seite 61 TASSELLI CONSOLES BLOCOS DE MADEIRA bem alinhada com a da tábua. Align the wooden blocks and the reinforcements with Previously drill the boards with a Ø 6 mm bit for wood to the upper part of the top board. facilitate the screwing. Alinee los tacos de madera y los refuerzos de arriba de Para facilitar el atornillado, realice una perforación la tabla superior.
- Seite 62 REINFORCEMENTS: THE REFERENCE 786226 (E) DOES NOT INCLUDE REINFORCEMENTS board and correct possible deformations of the wood (boards). Systematically check that the upper part of the reinforcement is well aligned with REFUERZOS: LA REFERENCIA 786226 (E) NO INCLUYE REFUERZOS RENFORTS : LA RÉFÉRENCE 786226 (E) N’INCLUT PAS RENFORTS VERSTÄRKUNGEN: DIE REFERENZNUMMER 786226 (E) UMFASSTE KEINE VERSTÄRKUNGEN...
- Seite 63 TRIMMINGS L: THE REFERENCE 786226 (E) DOES NOT INCLUDE L TRIMMINGS This finishes the assembly of the structure. Now all that needs doing is to position the edges (see the edges chapter). been decided. EMBELLECEDORES L: LA REFERENCIA 786226 (E) NO INCLUYE EMBELLECEDORES L elegido.
-
Seite 64: Wooden Setpladder / Escalera De Madera / Echelle Bois / Holztreppe / Scala Di Legno / Houten Trap
Models 786226 (EG) and 783331 (EG) do not include the wooden / steel staircase, check your pool WOODEN STEPLADDER kit to verify the ladder assembly. Las Ref. 786226 (EG) y 783331 (EG) no incluyen la escalera madera/inox, consulte su kit de piscina ESCALERA DE MADERA para comprobar el montaje de su escalera. - Seite 65 Consultare i disegni (Vedere a pagina 20). forma rettangolare, la scala si posiziona su uno dei lati corti. Perforare con una punta per il legno di Ø 10 mm i due montanti e i due tasselli. Peso massimo consentito = 150 kg. togliere.
- Seite 66 Fig. 22/ Abb. 22 / Afb. 22 1- Reduce the length of the step by 12 mm. 2- If dimension A is less than 140 mm, reduce the width of the step so that when the step is installed the space below its is completely closed.
- Seite 67 88 mm Fig. 21/ Abb. 21 / Afb. 21 235 mm Admitted maximum weight = 150 kgs. Its is COMPULSORY to remove the stepladder after using the pool. Peso máximo admitido = 150 kg. Retire OBLIGATORIAMENTE la escalera después de cada uso YOU WILL FIND ATTACHED TO THIS MANUAL SOME STICKERS TO de la piscina.
-
Seite 68: Protective Wall Blanket / Manta Protectora De Pared / Feutre De Paroi / Schutzdecke An Der Wand
PROTECTIVE WALL BLANKET MANTA PROTECTORA DE PARED FEUTRE DE PAROI SCHUTZDECKE AN DER WAND COPERTURA DI PROTEZIONE DELLA PARTE BESCHERMDEKEN MUUR MANTA PROTETORA DE PAREDE Fig. 23/Abb. 23/Afb. 23 Fig. 24/Abb. 24/Afb. 24 Fig. 25/Abb. 25/Afb. 25 (THE REFERENCE 786226 (E) DOES NOT INCLUDE PROTECTIVE WALL BLANKET) There are two possibilities to install the wall protecting blanket TWO FACED ADHESIVE TAPE (NOT INCLUDED) - Seite 69 Fig. 23/Abb. 23/Afb. 23 Fig. 24/Abb. 24/Afb. 24 Fig. 25/Abb. 25/Afb. 25 (DIE REFERENZNUMMER 786226 (E) UMFASSTE KEINE SCHUTZDECKE AN DER WAND) Wandschutzdecke. DOPPELSEITIGES KLEBEBAND (NICHT IM LIEFERUMFANG ENTHALTEN) HEFTER (NICHT IM LIEFERUMFANG ENTHALTEN) (IL REFERIMENTO. 786226 (E) NON INCLUDE COPERTURA DI PROTEZIONE DELLA PARTE) ra della parete.
-
Seite 70: Fixing Of The Skimmer Joint / Fijación De La Junta Skimmer / Fixation Du Joint De Skimmer / Befestigung Der
FIXING OF THE SKIMMER JOINT FIJACIÓN DE LA JUNTA DEL SKIMMER FIXATION DU JOINT DE SKIMMER BEFESTIGUNG DER DICHTUNGDES SKIMMER FISSAGGIO DEL GIUNTO DELLO SKIMMER VASTZETTEN VAN DE SKIMMERVERBINDING FIXAÇÃO DA JUNTA DO SKIMMER INSTALLATION Fissaggio del primo giunto dello skimmer ting the illustrated position. -
Seite 71: Location Of The Refilling Fitting With Key / Situación De La Boquilla De Salida / Emplacement Buse De
LOCATION OF THE REFILLING FITTING WITH KEY Wooden structure Estructura de madera Structure bois SITUACIÓN DE LA BOQUILLA DE SALIDA Tragewerk aus Holz Struttura in legno Houten constructie Estrutura de madeira EMPLACEMENT BUSE DE REFOULEMENT Blanket Manta Feutre Decke EINBAUSTELLE DES DRUCKVENTILS Copertura Deken POSIZIONE DELL’UGELLO DI MANDATA PLAASTING VAN HET UITSTROOMMONDSTUK... -
Seite 72: Fixing Of The Liner Fixing Profiles / Fijación De Los Perfiles De Sujeción Del Liner / Fixation Des Baguettes De
FIXING OF THE LINER FIXING PROFILES FIJACIÓN DE LOS PERFILES DE SUJECIÓN DEL LINER BAGUETTE LINER PROFIL LINER INSTALLATION OF THE LINER HOOKING PROFILE COLOCACIÓN DE LOS PERFILES DE ENGANCHE DEL LINER PROFILO LINER POSITIONNEMENT DES BAGUETTES D’ACCROCHE DE LINER POSITIONIERUNG DER EINHAKPROFILE DES LINERS KLEMPROFIEL LINER POSIZIONAMENTO DEI PROFILI DI AGGANCIO DEL LINER... - Seite 73 AJUSTAMENTO E FIXAÇÃO DOS PERFIS: Nao fure previamente as tábuas. 50 mm 50 mm ß Sie Ma Colocación de los listones en un mismo panel perfis num mesmo painel Ends of the profiles at 20 mm from the axis den van de klemprofielen op 20 mm van de Bevestiging van het klemprofiel van de...
- Seite 74 INSTALLATION OF THE LINER HOOKING PROFILE COLOCACIÓN DE LOS PERFILES DE ENGANCHE DEL LINER POSITIONNEMENT DES BAGUETTES D’ACCROCHE DE LINER POSITIONIERUNG DER EINHAKPROFILE DES LINERS POSIZIONAMENTO DEI PROFILI DI AGGANCIO DEL LINER PLAATSING VAN DE KLEMPROFIELEN VOOR INHANGEN VAN DE LINER COLOÇÃO DOS PERFIS DE ENGATE DO LINER Ref.
- Seite 75 Ref. 783333 (E) ADJUSTMENT AND FIXING OF THE PROFILES: AJUSTE Y FIJACIÓN DE LOS LISTONES: AJUSTEMENT ET FIXATIONS DES BAGUETTES : POSITIONIERUNG DER EINHAKPROFILE DES LINERS: REGOLAZIONE E FISSAGGIO DEI PROFILI: AANPASSEN EN VASTZETTEN VAN DE KLEMPROFIELEN: AJUSTAMENTO E FIXAÇÃO DOS PERFIS: 50 mm 50 mm Take the measurement...
- Seite 76 PREVIOUS CHECK BEFORE INSTALLING THE LINER CONTROL PREVIO A LA COLOCACIÓN DEL LINER CONTRÔLES AVANT LA POSE DU LINER KONTROLLE VOR DER POSITIONIERUNG DES LINERS CONTROLLO PRECEDENTE AL POSIZIONAMENTO DEL LINER CONTROLEER VOORAFGAAND AAN DE PLAATSING VAN DE LINER CONTROLO PRÉVIO À COLOCAÇÃO DO LINER...
-
Seite 77: Installation Of The Liner / Colocación Del Liner / Mise En Place Du Liner / Positionierung Des Liners
INSTALLATION OF THE LINER COLOCACIÓN DEL LINER MISE EN PLACE DU LINER POSITIONIERUNG DES LINERS POSIZIONAMENTO DEL LINER PLAATSING VAN DE LINER COLOCAÇÃO DO LINER We extremely recommend putting the liner in the sun a few hours before assembly, so it is flexible and easy to install. The sticker with the serial number of the liner should be kept for future reference. - Seite 78 Er wird dringend empfohlen, den Liner einige Stunden vor dem Einbau der Sonne auszusetzen, damit er für eine einfache Positionierung flexibel wird. Sie müssen den Aufkleber mit der auf dem Liner angegebenen Seriennummer aufbewahren. Für mögliche Anträge auf Übernahme der Garantie wird die Seriennummer verlangt. MONTAGE Si consiglia caldamente di esporre il liner al sole alcune ore prima del montaggio, così...
- Seite 79 The angles of the liner should necessarily correspond to the corners of the pool structure. Some weeks after filling the pool, the liner will show a different colour between the submerged part and that in the air. This decolouration is normal and does not risk the the air, (called water line), we recommend regularly cleaning the liner in this area with a specific cleaner.
- Seite 80 specifico. . Para facilitar a colocaç Deze zijaanblik toont de in een hoek geplaatste liner Fig./Abb./Afb. 32 Fig./Abb./Afb. 33 Ziehen Sie den Liner in de Ecken gut fest Tendere bene il liner negli angoli Span de liner strak in de hoeken Fig./Abb./Afb.
-
Seite 81: Land-Filling / Terraplenado / Remblaiement / Anschüttung / Terrapieno / Grond Effenen / Aterro
LAND-FILLING TERRAPLENADO REMBLAIEMENT ANSCHÜTTUNG TERRAPIENO GROND EFFENEN ATERRO landfill should be done at the same time that you fill the pool. Land-filling with vegetable soil is prohibited. INFORMATION: towards the upper part of the works, where air and soil interact to produce fungi or rot (lower diagram). The absence of draining causes water to ascend by capillary In the case of an attack and if no draining exists, the guarantee cannot be applied to the deterioration. - Seite 82 Eine Anschüttung mit Mutterboden ist untersagt. INFORMATIONEN: Im Falle eines nachgewiesenen Angriffs und falls keine Entwässerung besteht, kann die Garantie die Beschädigung nicht übernehmen. Il rinterro con terriccio è proibito INFORMAZIONI: In caso di attacco comprovato e in assenza di drenaggio la garanzia non potrà coprire il deterioramento. Opvullen met tuinaarde is verboden.
- Seite 83 Fig./Abb./Afb. 35 Ghiaia drenante Peripheral drainage Periphere Drainage Drenaggio periferico Perifere afwatering Fig./Abb./Afb. 36 Peripheral drainage Drenaje periférico Drain périphérique Periphere drainage Drenaggio periferico grind voor drainage Perifere afwatering Drenagem periférica Fig./Abb./Afb. 37...
-
Seite 84: Positioning Of The Sealing Pieces + Skimmer / Posicionamiento De Las Piezas De Sellado + Skimmer
POSITIONING OF THE SEALING PIECES REFILLING FITTING WITH KEY refilling fitting with key. Cutting of the liner: the nozzle in the wood. Assembly of the nozzle: second flat seal. ATTENTION: hold the seals so they do not drop between the liner and the wood. second flat seal, the cork seal and the hole in the wood. - Seite 85 SKIMMER Fig. 38 Locate and mark the position of the screws Liner Screw the flange and hollow out the liner Skimmer cover Connector tube Pool cleaner connector Base board of the pool cleaner connector Square flat seal Flange trimming Skimmer basket Protection flange TB screw 5x25 stainless steel...
- Seite 86 POSICIONAMIENTO DE LAS PIEZAS DE SELLADO BOQUILLA DE IMPULSIÓN de salida. y la segunda junta plana. corcho juntas, centrándolas respecto al eje del orificio (la junta de corcho del lado de la madera). ATENCIÓN: sujete las juntas para que no se deslicen entre la madera y el liner. razonablemente, sin forzar demasiado, para sujetar el liner entre las dos juntas planas.
- Seite 87 SKIMMER Fig. 38 Liner Cubierta del skimmer Conector acanalado Toma limpiafondos Zócalo de la toma limpiafondos Junta plana cuadrada Embellecedor de la brida Cestillo del skimmer Brida de protección Tornillo TB 5 x 25 inox Búsquenos en nuestro canal de Youtube para ayudarle con el montaje.
- Seite 88 POSITIONNEMENT DES PIÈCES À SCELLER BUSE DE REFOULEMENT Montage de la buse: du second joint plat. ATTENTION : veillez à maintenir les joints pour ne pas qu’ils glissent entre le bois et le liner. Installez la filtration avant de procéder aux découpes du liner.
- Seite 89 SKIMMER Fig. 38 Placez le joint sur la bride Liner Couvercle de skimmer Embout cannelé Prise balai Socle prise balai Joint plat carré Cache bride Panier de skimmer Bride faciale Vis TB 5 x 25 inox Look for us in our YouTube channel to help you with the assembly.
-
Seite 90: Positionierung Der Versiegelungsteile
POSITIONIERUNG DER VERSIEGELUNGSTEILE DRUCKVENTIL Einbau der Düse: die zweite Flachdichtung in der anderen. ACHTUNG: Halten Sie die Dichtungen fest, damit sie nicht zwischen Holz und Liner rutschen. Sie sie angemessen fest, ohne sie zu stark zu beanspruchen, um den Liner zwischen den beiden Flachdichtungen zu halten. Bringen Sie die Filtration an, bevor Sie die Zuschnitte des Liners vornehmen. - Seite 91 SKIMMER Abb. 38 Machen Sie die Schrauben ausfindig und Setzen Sie die Dichtung auf den Flansch Liner markieren Sie deren Position Schrauben Sie den Flansch fest und sparen Sie den Liner aus Liner muss konstant sein (kreuzweises Festziehen). Abdeckung Skimmer Geriffelter Steckver- binder Anschluss...
- Seite 92 POSIZIONAMENTO DEI PEZZI DI SALDATURA UGELLO DI MANDATA Taglio del liner. Montaggio dell’ugello: secondo giunto piano. ATTENZIONE: stringere i giunti affinché non scivolino tra il legno e il liner. senza forzare troppo, per spingere il liner tra i due giunti piani. Installare il filtro prima di procedere con i tagli del liner.
- Seite 93 SKIMMER Fig. 38 Liner costante (fissaggio a croce) Copertura dello skimmer Connettore scanalato Prendere il pulitore del fondo Zoccolo dell’imbocco del pulitore del fondo Giunto piano quadrato Copertura del traversino Cestello dello skimmer Traversino di protezione Vite TB 5 x 25 acciaio inox Cerca il nostro canale Sportello dello...
- Seite 94 PLAATSING VAN DE AF TE DICHTEN ONDERDELEN UITSTROOMMONDSTUK uitstroommondstuk. stanleymes. Montage van het mondstuk: LET OP: klem de pakkingen vast opdat ze niet wegglijden tussen het hout en de liner. het bassin. Installeer de filtering voordat u verder gaat met het afsnijden van de van de liner.
- Seite 95 SKIMMER Afb. 38 Liner moet constant zijn (kruiselings klemmen) Skimmerdeksel Slang-pilaarkoppeling Steel bodemreiniger Aansluiting voor de steel van de bodemreiniger Vierkante platte pakking Flensverhulling Skimmernetje Beschermingsflens Schroef TB 5 x 25 rvs Bezoek ons op Youtube- kanaal zodat we u kunnen helpen bij de montaje.
-
Seite 96: Posicionamento Das Peças De Selagem + Skimmer
POSICIONAMENTO DAS PEÇAS DE SELAGEM BOQUILHA DE IMPULSÃO Montagem da boquilha: segunda junta plana. ATENÇÃO: segure as juntas para que não se deslizem entre a madeira e o liner. mente, sem forçar demasiado, para segurar o liner entre as duas juntas planas. Instale a filtração antes de efetuar os cortes do liner. - Seite 97 SKIMMER Fig. 38 Liner parafusos Cobertura do skimmer Conector canelado Tomada limpa- fundos Rodapé da tomada limpa-fundos Junta plana quadrada Embelezador do flange Cesto do skimmer Flange de proteção Parafuso TB 5 x 25 inox Válvula do skimmer Busque-nos no nosso canal do Youtube para o Corpo do skimmer ajudar com a montagem.
-
Seite 98: Filter / Filtración / Filtration / Filtration / Filtrazione / Filtering / Filtração
FILTER FILTRACIÓN FILTRATION FILTRATION FILTRAZIONE FILTERING FILTRAÇÃO ASSEMBLY SUGGESTIONS: The following diagrams explain the movement direction of the water. Check the manual that comes with the filter group for the assembly instruc- tions. CONSEJOS DE MONTAJE: Los esquemas a continuación pretenden explicar el sentido de circulación del agua. Consulte el manual incluido con el grupo de filtración para realizar el montaje. - Seite 99 thread in a counter clockwise direction. LAND-FILLING: contrario a la rosca. TERRAPLENADO: REMPLISSAGE : muss in der zur Spirale entgegengesetzten Richtung aufgerollt werden. ANSCHÜTTUNG: in senso contrario alla filettatura. TERRAPIENO: TERREIN EFFENEN: TERRAPLENAGEM...
-
Seite 100: Sand Filter / Filtro De Arena / Filtre À Sable / Sandfilter / Filtro Per La Sabbia / Zandfilter / Filtro De Areia
SAND FILTER FILTRO DE ARENA This is the oldest of filtering systems. The filtered water passes through the sand (calibrated FILTRE À SABLE allows easy manipulations and cleaning. SANDFILTER DIFFERENT POSITIONS OF THE MULTI-DIRECTIONAL FLAP (4 OR 6)*: When you perform risking seriously damaging the filter and cancelling the guarantee. - Seite 101 2. WASHING POSITION (OR BACKWASH): 2. POSICIÓN LAVADO (O BACKWASH): 2. POSITION LAVAGE (OU BACKWASH) : 2. POSITION RÜCKSPÜLEN (ODER BACKWASH): 2. POSIZIONE LAVAGGIO (O BACKWASH): Skimmer 2. STAND WASSEN (OF BACKWASH): 2. POSIÇÃO LAVAGEM (OU BACKWASH): Skimmer Skimmer 3. RINSE POSITION / DRAINING OF THE FILER** (OR RINSE): 3.
- Seite 102 4. EMPTYING POSITION / DRAIN (OR WASTE): it goes directly to the drain. 4. POSICIÓN VACIADO / DESAGÜE (O WASTE): 4. POSITION VIDANGE / ÉGOUT (OU WASTE): 4. POSITION LEEREN / ABFLUSS (ODER WASTE): 4. POSIZIONE SVUOTAMENTO / SCARICO (O WASTE): esce direttamente dallo scarico.
- Seite 103 6. RECIRCULATION POSITION / CIRCULATION**: Position used so the water circulates through the hydraulic network without passing through the filter. This * Some models are delivered with 4-way flap (available options: Filtering, Washing, Emptying/drain Closed or wintering). ** These positions refer exclusively to the 6-way flap. 6.
-
Seite 104: Edges / Playas / Margelles / Ränder / Bordi / Randen / Bordos
Ref. 786226 (EG) EDGES BORDES MARGELLES RÄNDER BORDI RANDEN BORDOS ˚ EDGES: . Check the drawings (See page 20). PREPARATION ledges. Eliminate these splinters with sandpaper (not included). FIXING PLATE UNDER LEDGES ˚ PLAYAS: . Consulte los planos (Ver página 20). PREPARACIÓN FIJACIÓN PLACA BAJO LOS BORDES... - Seite 105 ˚ BORDI: . Consultare i disegni (Vedere a pagina 20). PREPARAZIONE FISSAGGIO PLACCHE AL DI SOTTO DEI BORDI ˚ RANDEN: . Bekijk de plannen (Zie pagina 20). VOORBEREIDING BEVESTIGEN PLAAT ONDER DE RANDEN ˚ BORDOS: . Consulte os planos (Ver página 20). PREPARAÇÃO FIXAÇÃO PLACA SOB OS BORDOS...
- Seite 106 Ref. 783331 (E) (EG) + Ref. 783333 (E) EDGES Check the drawings (See page 20). PREPARATION sets. FIXING PLAYAS Consulte los planos (Ver página 20). PREPARACIÓN uniformemente los juegos. FIJACIÓN MARGELLES Référez-vous aux plans (Voir page 20). PRÉPARATION FIXATION RÄNDER Betrachten Sie die Zeichnungen (Siehe Seite 20).
- Seite 107 RANDEN Bekijk de plannen (Zie pagina 20). VOORBEREIDING BEVESTIGEN BORDOS Consulte os planos (Ver página 20). PREPARAÇÃO os jogos. FIXAÇÃO Fissaggio dei bordi do interior Renfort madeira...
- Seite 108 Ref. 783331 (E) (EG) + Ref. 783333 (E) PIECE UNDER THE EDGES PLACA BAJO LAS PLAYAS PLAQUE SOUS MARGELLES PLATTE UNTER DEN RÄNDERN PIASTRA SOTTO I BORDI PLAAT ONDER DE RANDEN PLACA SOB OS BORDOS Fissaggio delle piastre sotto i bordi Position des margelles Posizionamento dei bordii...
-
Seite 109: Fixing Of The Stainless Steel Ladder / Fijación De La Escalera Inoxidable / Fixation De L`echelle Inox
FIXING OF THE STAINLESS STEEL LADDER FIJACIÓN DE LA ESCALERA INOXIDABLE FIXATION DE L’ECHELLE INOX BEFESTIGUNG TREPPE AUS ROSTFREIEM MATERIAL FISSAGGIO DELLA SCALA DI ACCIAIO INOSSIDABILE BEVESTIGING VAN DE RVS LADDER FIXAÇÃO DA ESCADA INOXIDÁVEL Fig. 39 Fig. 40 (1) and lower (7) introducing one into the other (figure 39) (6) into the handrails using the bolts (8), the washers (4) and the nuts (9). - Seite 110 Fig/Abb/Afb 39 Fig/Abb/Afb 40 Leiterbausatzes. (figure 39) , des rondelles (4) (9). (10) (5) comme gabarit. (3) et des rondelles (4) (figure 40). (2). (1) und das untere (7), indem sie eines in das andere stecken (Abb. 39) (4) und den Schrauben (9). (10) (5) als Muster.
- Seite 111 IDENTIFICATION/IDEN- TIFICACIÓN/REPÉRE/ DENOMINATION/DENOMINACIÓN/DÉSIGNATION/BEZEICHNUNG/ CTD/QTÉ/ANZ/ KENNZEICHNUNG/IDEN- DENOMINAZIONE/BENAMING/DENOMINAÇÃO/ AANT/TD TIFICAZIONE/IDENTIFICA- TIE/IDENTIFICAÇÃO A salt filter can cause degradation of your stainless steel stepladder and this is not covered by the guarantee. Do not use the stepladder for other needs different to those indicated in this manual. Admitted maximum weight: 150 kg El uso de la filtración por sal puede provocar la degradación de su escalera inoxidable y no será...
-
Seite 112: Putting Into Service
PUTTING INTO SERVICE During the first use, you should wash the filter (check the filer system maintenance). Filtering is a mechanical treatment that allows cleaning the pool water by means of eliminating the impurities and contaminating particles. The hydraulic circuit and water purifying group is an essential element for the optimal operation FILTERING TIME: WATER TEMPERATURE FILTERING TIME FOR ONE DAY (Water Temp / 2) = equals the filtering hours... - Seite 113 The equipment should be connected to a voltage, with earth connection, protected by a residual current device (RCD) having a rated residual operating current not exceeding 30 mA. Read the instructions carefully and keep for future reference. IF YOU HAVE ANY PROBLEM, ..¡CONTACT US! CONTACT: web: www.service-gre.com...
-
Seite 114: Puesta En Servicio
PUESTA EN SERVICIO TIEMPO DE FILTRACIÓN: TEMPERATURA AGUA DURACIÓN FILTRACIÓN 1 DÍA (T° del agua / 2) = número de horas de filtración 15 a 18°C 8 horas 19 a 21°C 10 horas PRINCIPIO DE FUNCIONAMIENTO: 22 a 25°C 12 horas El skimmer aspira el agua de su piscina (este elemento, y especialmente los 26 a 28°C 14 horas... -
Seite 115: Consejos De Seguridad
El equipo se debe conectar a una toma de corriente, con conexión a tierra, protegida con un interruptor diferencial (RCD) con una corriente de funcionamiento residual asignada que no exceda de 30 mA. Lea atentamente las instrucciones y guárdelas para futuras consultas. SI TIENE ALGÚN PROBLEMA, ..¡CONSÚLTENOS! CONSULTAS: web: www.service-gre.com... -
Seite 116: Mise En Service
MISE EN SERVICE TEMPS DE FILTRATION : (T° d’eau / 2 ) = Nbre d’heures de filtration TEMPÉRATURA L’EAU DURÉE DE FILTRATION POUR UNE JOUENÉE 15 à 18°C 8 heures 19 à 21°C 10 heures PRINCIPE DE FONCTIONNEMENT : 22 à 25°C 12 heures 26 à... -
Seite 117: Conseils De Sécurité
L’appareil doit être branché sur une prise de courant avec prise de terre, protégé par un interrupteur différentiel (RCD) avec un courant de fonctionnement résiduel assigné qui n’excède pas 30 mA. À lire attentivement et à conserver pour consultation ultérieure. EN CAS DE PROBLEME... NOUS CONSULTER! web: www.service-gre.com... -
Seite 118: Instandhaltung Des Filtrationssystems
INBETRIEBNAHME Filtration ist nicht antibakteriell. Folglich ist es obligatorisch, ein Produkt (oder ein System) zur Desinfektion des Wassers anzugliedern. FILTRATIONSZEIT: TEMPERATUR DES WASSERS DAUER DER FILTRATION AN EINEM TAG (T° des Wassers / 2) = Anzahl der Stunden im Filtrationsbetrieb 15 a 18°C 8 stunden 19 a 21°C... - Seite 119 Das Gerät muss an einen wechselstromanschluß mit Erdung angeschlossen werden. Dieser muss durch ein Differential (RCD) mit höchstens 30 mA gesichert sein. Anleitung sorgfältig lesen und für spätere Zwecke aufbewahren. BEI PROBLEMEN KÖNNEN SIE SICH MIT UNS UNTER DER FOLGENDEN DEUTSCHEN web: www.service-gre.com...
-
Seite 120: Messa In Servizio
MESSA IN SERVIZIO DURATA DELLA FILTRAZIONE: TEMPERATUR DELL’ACQUA DURATA DELLA FILTRAZIONE PER UN GIORNO (T° dell’acqua/2) = numero delle ore di filtrazione 15 a 18°C 8 ore 19 a 21°C 10 ore 22 a 25°C 12 ore PRINCIPIO DI FUNZIONAMIENTO: 26 a 28°C 14 ore 28 a 30°C... -
Seite 121: Consigli Per La Sicurezza
L’attrezzatura va collegata ad una presa di tensione di corrente alterna, con una connessione a terra, protetta con un interruttore differenziali (RCD) con una corrente di funzionamento residuale assegnata che non ecceda i 30 mA. Leggere le istruzioni attentamente e conservarle quale futuro riferimento. PER OGNI VOSTRA EVENTUALE OCCORRENZA,... INTERPELLA-TECI! PER INFORMAZIONI: web: www.service-gre.com... -
Seite 122: Ingebruikname
INGEBRUIKNAME TIJDSDUUR FILTERING (T° van het water / 2) = aantal uren filtering TEMPERATUUR VAN HET WATER TIJDSDUUR VAN DE FILTERING VOOR EEN DAG wordt gefilterd. 15 a 18°C 8 uur 19 a 21°C 10 uur WERKINGSPRINCIPE: 22 a 25°C 12 uur 26 a 28°C 14 uur... - Seite 123 230 V en 50 HZ, en moet beschermd zijn door een differentieelschakelaar (RCD) met een residuele differentieelstroom van niet meer dan 30 mA. Lees de gebruiksaanwijzing aandachtig en bewaar die voor toekomstige raadplegingen. MOCHT U EEN PROBLEEM HEBBEN... ¡RAADPLEEG ONS! web: www.service-gre.com...
-
Seite 124: Colocação Em Serviço
COLOCAÇÃO EM SERVIÇO TEMPO DE FILTRAÇÃO: (T. da água / 2) = número de horas de filtração TEMPERATURA DA ÁGUA DURAÇÃO DA FILTRAÇÃO PARA UM DIA 15 a 18°C 8 horas 19 a 21°C 10 horas PRINCÍPIO DE FUNCIONAMENTO: 22 a 25°C 12 horas 26 a 28°C 14 horas... -
Seite 125: Informação De Segurança
à terra, protegida com um interruptor diferencial (RCD) com uma corrente de funcionamento residual que não exceda os 30 mA. Leia atentamente estas instruções, e guardeas para futuras consultas. EM CASO DE PROBLEMA...¡CONSULTAR-NOS! CONSULTA: web: www.service-gre.com... - Seite 126 NORMAL MAINTENANCE RESPECT THE ENVIRONMENT DO NOT TAKE APART THE POOL UNLESS IT IS STRICTLY NECESSARY. IF YOU DO SO, PLEASE REUSE THE WATER. WATER IS A SCARCE GOOD. MAINTENANCE AND USE: - Switch on the filter system once a day in to insure a complete water volume renewal and never do it when somebody is in the pool (see filter manual).
- Seite 127 system. MECHANICAL MEASURES: Check the filter, the skimmer, the valves and the pipes are well connected to the pool. Do consider high water temperature will involved more time for the filtering. Theoretic filtering time = Water volume / Filter system discharge (generally 8h/day with water temperature of 21°C), (Ideal: 2h in the morning –...
-
Seite 128: Mantenimiento Habitual
MANTENIMIENTO HABITUAL RESPETA EL MEDIO AMBIENTE «NO DESMONTE LA PISCINA SI NO ES ESTRICTAMENTE NECESARIO. EN CASO DE HACERLO, LE ROGAMOS REUTILICE EL AGUA. EL AGUA ES UN BIEN ESCASO». - Durante la temporada de uso de un kit de piscina ponga a funcionar el sistema de filtración una vez al día para asegurar un renovamiento completo del volumen de agua y siempre cuando no se esté... - Seite 129 Nunca bañarse hasta que se estabilice el nivel de cloro. Utilizar siempre un Dosificador flotante para la disolución del producto químico (pastillas). La dosificación de los productos químicos se hace en función de: El volumen de agua de su piscina, la frecuencia del baño, las condiciones climáticas, temperatura del agua y ubicación.
-
Seite 130: Entretien Courant
ENTRETIEN COURANT RECOMMANDATION POUR L’ENVIRONNEMENT : «NE DÉMONTEZ PAS LA PISCINE SI CELA N’EST PAS ABSOLUMENT NÉCESSAIRE. EN CAS DE DÉMONTAGE, NOUS VOUS PRIONS DE RÉUTILISER L’EAU. IL N’Y A PAS D’EAU EN TROP». ENTRETIEN ET UTILISATION: - Durant la saison d’utilisation du kit piscine, le système de filtration doit obligatoirement être mis en service chaque jour, suffisamment longtemps pour assurer au moins un renouvellement complet du volume d’eau. - Seite 131 et emplacement. Toujours agiter l’eau et attendre la dissolution d’un produit chimique avant d’en rajouter un autre. Attendre environ 12 h. entre chaque ajustement de pH, de Chlore, ou d’anti-algues en faisant fonctionner le système de filtration. TRAITEMENTS MECANIQUES : Vérifier que l’épurateur, skimmer, buses et tuyaux soient correctement connectés à...
- Seite 132 ÜBLICHE INSTANDHALTUNG UMWELTSCHUTZUNG DEMONTIEREN SIE NICHT DAS SCHWIMMBECKEN, WENN DAS NICHT UNBEDINGT NÖTIG IST. IM FALLE SIE DAS MACHEN, VERWENDEN SIE BITTE DAS WASSER. DAS WASSER IST EIN KNAUSERIGES GUTE. WARTUNG UND BENUTZUNG: - Schalten Sie die Filteranlage einmal täglich ein, um sicher zu gehen, dass das gesamte Wasservolumen erneuert wird und immer dann, wenn das Pool nicht zum Baden benutzt wird.
- Seite 133 werden, bevor nicht der Chlorgehalt eingestellt ist. Zum Auflösen des chemischen Produktes (Pastillen) verwenden Sie immer einen Schwimmdosierer. Die Dosierung chemischer Produkte erfolgt in Abhängigkeit: vom Wasservolumen Ihres Pools, der Badehäufigkeit, den klimatischen Bedingungen, der Wassertemperatur und dem Standort. Nach dem Eindosieren immer rühren und abwarten, bis sich das chemische Produkt gelöst hat, bevor ein weiteres zugegeben wird.
-
Seite 134: Manutenzione Ordinaria
MANUTENZIONE ORDINARIA PRECAUZIONE PER L’ECOSISTEMA AMBIENTALE NON SMONTARE LA PISCINA SE NON E’ STRETTAMENTE NECESSARIO.NEL CASO LO FOSSE VI PREGHIAMO DI RIUTILIZZARE L’ACQUA. L’ACQUA NON VA SPRECATA. USO E MANUTENZIONE: - Porre in funzionamento il sistema di filtraggio una volta al giorno, per assicurare un rinnovamento completo del volume d’acqua e sempre quando non si sta utilizzando la piscina per il bagno (vedi manuale del depuratore). - Seite 135 MEZZI MECCANICI: Verificare che il depuratore, lo skimmer, le valvole e i tubi flessibili siano correttamente collegati alla piscina. Tenere sempre presente che a maggior temperatura dell’acqua sarà necessario più tempo di filtraggio. Tempo filtraggio teorico = Volume d’acqua / Portata del sistema di filtraggio (in genere, 8 h/giorno con la temperatura dell’acqua a 21ºC), (Ideale: 2 h.
-
Seite 136: Routineonderhoud
ROUTINEONDERHOUD HOUD REKENING MET HET MILIEU “HET ZWEMBAD NIET DEMONTEREN WANNEER HET NIET STRIKT NOODZAKELIJK IS. MOCHT DIT WEL ZO ZIJN DAN VERZOEKEN WIJ U HET WATER TE HERGEBRUIKEN. WATER IS NIET OVERVLOEDIG.“ ONDERHOUD EN GEBRUIK: - Stel het filtratiesysteem eenmaal per dag in werking om van een volledige verversing van het watervolume verzekerd te zijn en doe dit altijd wanneer het zwembad niet voor het bad in gebruik is (zie de handleiding van de zuiveringsinstallatie). - Seite 137 Algicide te worden toegvoegd om het onstaan van algen te voorkomen. Nooit baden voordat het chloorniveau in evenwicht is. Gebruik altijd een drijvende doseermaat voor de oplossing van het chemische product (tabletten). De dosering van de chemische producten geschiedt in overeenstemming met:Het watervolume van het zwembad, de veelvuldigheid van het baden, de weersomstandigheden, de temperatuur van het water en de ligging van het zwembad.
- Seite 138 MANUTENÇÃO HABITUAL O MEIO AMBIENTE AGRADECE “DESMONTAR A PISCINA SE ABSOLUTAMENTE NECESSÁRIO. NESTE CASO, POR FAVOR REUTILIZE A ÁGUA. A ÁGUA É VIDA.” - Ponha a funcionar o sistema de filtração uma vez por dia para assegurar um renovamento completo do volume de água, e sempre que não se estiver a utilizar a piscina para o banho.
- Seite 139 Verificar se a junção à piscina do depurador, do skimmer, das válvulas e das mangueiras é correcta. Tenha em conta que quanto mais alta for a temperatura da água mais necessitará tempo de filtração. Tempo filtração teórico = Volume de água / caudal do sistema de filtração (em geral 8 h/dia com uma temperatura de água de 21º...
- Seite 140 SERVICIOS TÉCNICOS COBERTURA NOMBRE TELÉFONO COBERTURA NOMBRE TELÉFONO LUGO LUCALOR 982/21-90-01 ALAVA URTEAGA QUIMICA, S.L. 945/26-25-17 LUGO HYDRO-GLOBAL 982/41-14-13 ALBACETE HIDRO BELL 967/22-02-18 MADRID POOL SPA SPORT 91/323-18-83 ALICANTE ELECTROB.S.VICENTE, S.L. 96/566-48-81 MADRID SUM. SANTAGATA, S.L. 91/616-24-58 ASTURIAS RODRIGO Y MARTINO, S.L. 985/13-49-56 MALAGA MARIA ESTHER BANDERAS...
-
Seite 141: Servizio Tecnico In Italia
BASILICATA / SALERNO - EDILMAGGIO SRL SARDEGNA SUD - ECO PISCINE DI TOMMASO RAZZOLINI GESTIONE ARTICOLI IN GARANZIA: No VERDE : 800 781 592 - MAIL: satitalia@gre.es - FAX: 0034. 946740321 SEVICES TÉCNICO Os serviços técnicos são responsáveis pela instalação de piscinas, a venda de peças de reposição e acessórios e manutenção do filtros do tratamento do aguas. - Seite 142 IMPORTANT IMPORTANTE IMPORTANT WICHTIG IMPORTANTE BELANGRIJK IMPORTANTE WITHOUT THESE NUMBERS YOU CAN NOT CLAIM THE WARRANTY posibles reclamaciones. SIN ESTOS NÚMEROS NO SE PODRÁ ACTIVAR LA GARANTÍA mations. SANS CES NUMÉROS, LA GARANTIE NE SERA PAS COUVERTE rechts) finden. OHNE DIESE NUMMERN KANN DIE GARANTIE NICHT GELTEND GEMACHT WERDEN SENZA QUESTI NUMERI NON SI PUÒ...
- Seite 144 DISTRIBUIDO POR MANUFACTURAS GRE S.A. ARITZ BIDEA 57, BELAKO INDUSTRIALDEA 48100 MUNGIA (VIZCAYA) ESPAÑA Nº REG. IND.: 48-06762 FABRICADO EN EUROPA...