Inhaltszusammenfassung für Phottix Aion P9M-AIONTX
Seite 3
Phottix Aion Wireless Timer Instructions Parts Timer Receiver 1. Cable Port 1. Cable Port 2. Function LED 2. Function LED 3. LCD Display 3. Power Button 4. Sound / Mode Button 4. Cold Shoe 5. Backlight / Lock Button 5. 3/16 Mounting Lug 6.
Seite 4
Turning the sound on/off Tip: Turn off all devices – cameras, and Phottix 1. By default sounds on the timer unit are on. Aion Timers or Receivers - when connecting and You will hear audible beeps from the Phottix disconnecting devices.
Seite 5
The Wireless Signal Strength Indicator 1. Turn off the timer and camera. 1. The Wireless Signal Strength Indicator on 2. Attach a compatible Phottix Accessory Cable the LCD shows the signal strength between to the Timer or Receiver. the timer and Receiver if The Aion system is 3.
The LED on the Timer and Receiver will light red. To Using the Timer stop the exposure fully press the Stutter Button to The Phottix Aion Wireless Digital Timer has two close the shutter. modes: Shutter release modes and Timer mode.
will shoot during the current program (-- being unlimited, 199 being programmable maximum.) BKLN: Bracketed Long Exposure. Useful for low-light multiple exposure HDR images. Setting the timer Timer Mode 1. Press the left or right Adjustment Buttons to select DELAY, LONG, INTVL, N, BKLN. A Using Timer mode small indicator line will appear on the LCD 1.
Seite 8
Starting and Stopping the Timer The Aion Timer will double the exposure time (one stop) set under the LONG setting for each of the 1. Pressing the Play / Stop Button will start number of frames set under the N setting. programmed timer functions.
Environmental objects, such as large buildings or walls, trees, fences, or cars can also affect performance. If your Phottix Aion will not trigger move its location slightly.
Seite 10
NOTE: This equipment has been tested and found Company: Phottix (HK) Ltd. to comply with the limits for a Class B digital device, Name: Phottix Aion Wireless Timer Remote pursuant to Part 15 of the FCC Rules. These limits are designed to provide reasonable protection against Model Number: Aion harmful interference in a residential installation.
Seite 11
--Connect the equipment into an outlet on a circuit different from that to which the receiver is connected. --Consult the dealer or an experienced radio/TV technician for help.
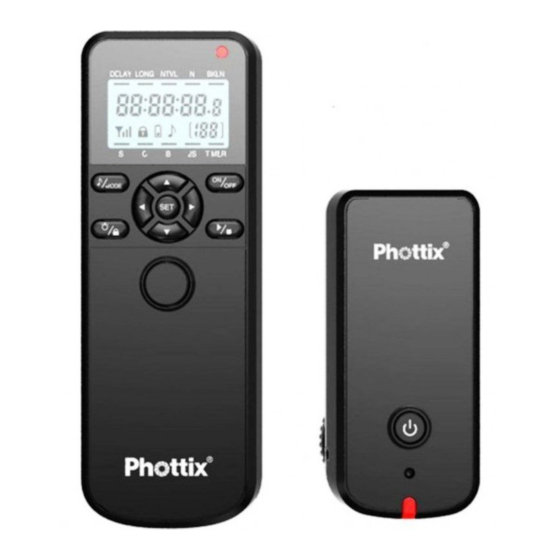
Seite 12
Phottix Aion Funktimer Bedienungsanleitung Bestandteile Empfänger Timer (Sender) 1. Kabelanschluss 1. Kabelanschluss 2. Kontroll-LED 2. Kontroll-LED 3. Power An / Aus 3. LCD Display 4. Blitzschuhanschluss 4. Sound / Modus (Cold Shoe) 5. Hintergrundbeleuchtung / Sperren 5. 3/16“ Mounting Lug 6.
Timer(Sender)und Empfänger ein-/ ausschalten 1. Zum Einschalten des Phottix Aion Timers und Empfängers drücken Sie die Powertaste. 2. Zum Ausschalten des Phottix Aion Timers und Empfängers drücken Sie die Powertaste. Das Phottix Aion System kann als Funk- oder 3. Nach dem Einschalten ertönt ein Kontrollton Kabeltimer und als Funk- oder Kabelauslöser...
F u n k e m p f a n g z w i s c h e n T i m e r u n d um das LCD-Display aufzuhellen. Empfänger an, wenn der Phottix Aion mittels 2. Drücken Sie 1x die Hintergrundbeleuchtung/ Funksignal verwendet wird.
Funktionen Das Phottix Aion Timer-System hat 5 Haupt-Modi: 4 Auslöse -Modi und einen Timer-Modus, der wiederum weitere Funktionen bereit hält. Modusauswahl Timer (Sender) und Empfänger mit der Drücken Sie die Sound/Modustaste bis Sie den Kamera verbinden gewünschten Modus ausgewählt haben. Den ausgewählten Modus erkennen Sie an der kleinen...
2 Sekunden grün und leuchten dann rot, N = Anzahl: Anzahl der Fotos, die während des wenn die Auslösung erfolgt. Programms ausgelöst werden. Es können entweder Timer = Timer-Modus: Das Phottix Aion System 1-199 oder unendlich Auslösungen eingestellt befindet sich im Timer-Modus und kann nun werden.
Timer starten und stoppen 1. Drücken Sie die Start/Stopptaste und Ihr eingestelltes Programm wird gestartet. 2. Drücken Sie die Start/Stopptaste und das laufende Programm wird gestoppt. INT VL, N, BKLN. Die Auswahl wird im Die BKLN Funktion (nur für Kameras mit Display durch eine Linie unter der Funktion angezeigt.
Seite 18
Das Phottix Aion Timer System wird die Zeit, die immer von der 1. Aufnahme. Dies ist bei den Kamera unter LONG eingestellt wurde für jede Aufnahme, HDR-Funktionen meist anders, diese rechnen von die unter N eingestellt wurde automatisch allein hoch und runter.
Empfänger Empfangsempfindlichkeit: -90dBm Betriebsspannung: 3.0V Dimensionen: 85 x 37.4 x 30.9mm Gewicht: 37.5g Große Gebäude, Mauern, Bäume, Zäune oder Autos können sich negativ auf die Leistung auswirken. Technische Daten Reichweite: bis zu 60m Batterien/Akkus: AAA/Micro Lagertemperatur: -10C° bis 60C° Standby-Timer: 48 Stunden Timer (Sender) Sendeleistung:...
Seite 20
Phottix Aion intervallomètre sans fil Mode d'emploi Composants Récepteur Corps 1. Port câble 2. Indicateur LED 1. Port câble 3. Commande démarrage/arrêt 2. Indicateur LED 4. Griffe sans contact 3. Panneau de commande 5. Monture 3/16 4. Bouton de son/mode 6.
Mise en marche/arrêt de Phottix Aion 1. Pour mettre en marche l'intervallomètre et le récepteur Phottix Aion – appuyez sur la commande démarrage/arrêt. 2. Pour mettre en arrêt l'intervallomètre et le récepteur Phottix Aion – appuyez sur la L e P h o t t i x A i o n p e u t ê t r e u t i l i s é c o m m e commande démarrage/arrêt.
1. Utilisez le rétro-éclairage pour activer le distance rétro-éclairage du panneau de commande. 2. Appuyez sur le bouton de verrouillage/rétro- 1. Lorsque le système Phottix Aion est utilisé éclairage. Le rétro-éclairage reste allumé sans fil, l'indicateur de la puissance du pendant environ 10 secondes avant de signal à...
Seite 23
2. S'allumera en fort vert lorsque le signal de mise au point est réceptionné de l'émetteur. Utilisation de l'intervallomètre 3. S'allumera en rouge pendant la prise de vue. Le Phottix Aion fonctionne en deux modes: Connexion de l'intervallomètre ou du déclencheur et retardateur. récepteur à l'appareil...
Seite 24
Réglage des modes de l'intervallomètre d'exposition. L'indicateur LED sur l'intervallomètre et le récepteur s'allumera en rouge. Pour arrêter Appuyez sur le bouton de son/mode pour faire l'exposition et fermer l'obturateur enfoncez votre sélection. Au cours de sélection d'un mode complétement le déclencheur. le petit indicateur s'affichera sur le panneau de 2S: Enfoncez à...
Seite 25
BKLN. La sélection active est indiquée par le curseur sur le panneau de commande. 2. Appuyez sur le bouton de Set (réglage) pour programmer le temps. 3. Appuyez sur le bouton flèche le haut ou le bas pour faire la modification du temps. DELAY (Temporisation): Délai d’ouverture de 4.
Seite 26
L'inte r vall om è t re Phot t ix Aio n d o u blera le en avant. Contrairement à l'auto-bracketing de temps d'exposition réglé en mode LONG (d'un l'appareil, le Phottix Aion déclenchera les photos diaphragme) pour chaque nombre de cadres réglé progressivement et avec une exposition plus en mode N.
Si le Phottix Aion ne déclenche pas repositionnez-le. Spécification technique Portée: 60 mètres Précautions: Batteries: C'est un système électronique. Ne manipulez Température de traitement: -10—60°C pas le produit avec les mains mouillées, ne Temps de veille: 48 heures l’immergez pas et ne l’exposez pas à...
Seite 28
Phottix Aion temporizador sin cable Manual de instrucciones Partes Cuerpo Receptor 1. Puerto para cable 2. Indicador LED 1. Puerto para cable 3. Panel de control 2. Indicador LED 4. Botón de la señal acústica/modo 3. Botón encendido/apagado 5. Botón de la luz/bloqueo 4.
3. M ientras el sistema Phottix Aion está E l P h o t t i x A i o n p r e s e n t a l a s f u n c i o n e s d e encendido, se oirá...
Seite 30
2. Mientras la señal acústica esta activa, 2. Pulse el botón de la luz/bloqueo hasta aparezca el icono de la nota en el panel de que aparezca el icono de bloqueo en el control. panel de control. Todos los controles están 3.
Seite 31
Uso del temporizador El Phottix Aion presenta las funciones de: disparador y temporizador. Co n e x i ó n d e l te m p o r i z a d o r o d e l Ajustar los modos del temporizador receptor a la cámara.
Seite 32
Fotografía temporizada y receptor se pondrá rojo. Puede mantener el disparador para tomar mas de cinco fotografías. Las Uso de la fotografía temporizada fotografías serán agrupadas por 5. 1. Para tener acceso a la fotografía temporizada B: Bulb. Pulse el disparador hasta la mitad para pulse el botón de la señal acústica/modo comprobar el foco y púlselo por completo para hasta que aparezca el icono del temporizador...
Seite 33
Las funciones DELAY, LONG, INTVL y N pueden combinarse una con otra o todas en la misma configuración. Encender/Apagar el temporizador 1. Pulse el botón Play / Stop para disparar las Ajustes del temporizador configuraciones seleccionadas. 1. Utilice el botón de flechas para ajustar el 2.
El temporizador Phottix Aion doble el tiempo tiempo de exposición y serán contadas adelante. En de exposición seleccionado en modo LONG (de contraste al auto-bracketing de la cámara el Phottix un diafragma) para cada número de fotograma Aion disparará las fotografías de manera progresiva ajustado en modo N.
Pilas: Temperatura de guardar: -10—60°C Tiempo de espera: 48 horas Temporizador: - Interferencias : Para transmitir y recibir la señal radio el sistema Phottix Aion Poder de transmisión: ≤-10dBm usa la frecuencia 2.4 GHz. Manténgase Voltaje: 3.0V lejos de campos magnéticos potentes: Dimensiones: 130.4 X 46.2 X 22 mm...
Seite 36
Instrukcja obsługi inter wałometra bezprzewodowego Phottix Aion Odbiornik Elementy 1. Wejście przewodu Interwałometr 2. Kontrolka sygnalizacyjna LED 1. Wejście przewodu 3. Przycisk zasilania 2. Kontrolka sygnalizacyjna LED 4. Zimna stopka 3. Wyświetlacz LCD 5. Gwint mocowania 4. Przycisk dźwięku/trybu 3/16 5.
Seite 37
Włączanie i wyłączanie nadajnika i odbiornika 1. Włączanie nadajnika i odbiornika odbywa się przez przyciśnięcie przycisku zasilania. 2. Wyłączanie nadajnika i odbiornika odbywa się przez ponowne przyciśnięcie przycisku B e z p r z e w o d o w y i n t e r w a ł o m e t r P h o t t i x zasilania.
2. Widoczny symbol muzyczny na wyświetlaczu 3. W c e l u w y ł ą c z e n i a b l o k a d y w c i ś n i j i oznacza włączoną sygnalizację dźwiękową. przytrzymaj przycisk podświetlenia/blokady 3.
Seite 39
2. Świeci na zielono po ustawieniu ostrości. Bezprzewodowy inter wałometr Phottix Aion 3. Z m i e n i a k o l o r n a c z e r w o n o p o d c z a s posiada dwa tryby: wyzwalacz migawki i tryb wyzwalania migawki.
Seite 40
C: Tryb ciągły. Wciśnięty do połowy przycisk Funkcja interwałometru wyzwalania migawki ustawi ostrość, wciśnięty do Używanie interwałometru końca wyzwoli migawkę i wykona 5 zdjęć. Kontrolka sygnalizacyjna na nadajniku i odbiorniku będą 1. W celu włączenia funkcji interwałometru świeciły na czerwono podczas wykonywania zdjęć. wciśnij przycisk dźwięku/trybu do momentu Ciągłe przyciśnięcie przycisku wyzwalania migawki wybrania trybu Timer na wyświetlaczu.
Seite 41
* Tryby DELAY, LONG, INTVL i N mogą być łączone. 6. Wciśnięcie przycisku Play / Stop Button uruchomi program. Phottix Aion podwoi czas ekspoz ycji ( jedna przysłona) ustawiony w trybie LONG dla każej ilości klatek ustawionych w trybie N.
Seite 42
Phottix Aion nie wyzwala, spróbuj zmienić wynosić .5 sekundę. Zdjęcia zostaną wykonane w jego położenie. oparciu o pierwszy czas ekspozycji i liczone naprzód. Inaczej niż ma to miejsce w auto bracketingu w aparatach Phottix Aion będzie wykonywał co raz to dłuższe ekspozycje.
Seite 43
Specyfikacja Zasięg: 60 metrów Zasilania: Baterie AAA Temperatura przechowywania: -10 C do 60 C Czas działania w trybie oczekiwania: 48 godzin Nadajnik Moc nadajnika: ≤-10dBm Napięcie: 3.0 V Wymiary: 130.4 X 46.2 X 22 mm Waga: 56.5g Odbiorni Moc odbiornika: -90 dBm Napięcie: 3.0 V...
Seite 44
Ин струкция для б еспр оводн ого таймера Phottix Aion Компоненты: Таймер Приёмник 1. Порт для кабеля 1. Порт кабеля 2. Лампочка статуса 2. Лампочка статуса 3. ЖК-экран 3. Кнопка питания 4. Кнопка звука/режима 4. Крепление башмака 5. Кнопка подсветки/замка...
Seite 45
4. При включении приёмника, освещение отключения данного устройства, выключите экрана смениться с зелёного на красный, а позже снова на зелёный цвет. фотоаппарат, Phottix Aion таймер и приёмники. Включени/выключение звука Установка батарей 1. По умолчанию звуки таймера включены. 1. Нажмите на батарейную крышку, и плавно...
жк-экране появится графический символ Использование Таймера: замка. Все кнопки будут заблокированы. 3. Для выключения блокировки нажмите и Безпроводной цифровой таймер Phottix Aion удерживатйе кнопку замка пока на экране работает в двух режимах: режим спуска затвора не исчезнет графический символ замка.
Seite 47
дальнейшие серийные снимки, по 5 в группе. В: режим Bulb – длительной экспозиции. Неполное нажатие кнопки спуска активизирует фокус, её полное нажатие откроет створки затвора и заблокирует их. На экране таймер отобразиться отсчёт времени экспозиции. Изменение режимов таймера Лампочки статуса на таймере и приёмнике будут красного...
Seite 48
Режим Таймера Настройка таймера: 1. Нажмите кнопки регулирования (влево Использование режима таймера или вправо) для выбора режимов DELAY, 1. Для доступа к режиму таймера нажмите LONG, INTVL, N, BKLN. Под выбранным кнопку звук/режим и выберите режим режимом появится небольшая полоса- Таймер.
Seite 49
5. Установите количество снимков в режиме N таймера. Количество снимков может быть от 1 до 7. 6. Нажмите кнопку воспроизведения/стоп для начала программы. Старт/стоп таймера Таймер Aion будет удваивать время эскпозиции (с каждым шагом) выбранное для настройки LONG 1. Нажатие кнопки воспроизведения/стоп для...
Seite 50
исходя из первого времени экспозиции и будут заборы или машины могут повлиять на считаться вперёд. Иначе будет происходить при работоспособность устройства. Если ваш автобрекетировании - в фотоаппаратах Phottix приёмник Phottix Aion не срабатывает, Aion будет производить с каждым снимком более переместите его на небольшое растояние...
Seite 51
Приёмник: Чувствительность приёмника сигнала: -90 dBm Рабочее напряжение: 3.0В Размер: 85 х 37.4 х 30,9 мм Вес: 37,5 г Технические характеристики: Дальности действия: 60 метров Батареи: ААА Температура хранения: от -10Ц до 60Ц Время нахождения в режиме ожидания: 48 часов Таймер: Сила...
Seite 58
技术规格: 有效范围: 60 米 电池: 储存温度 : C - 60 待机时间: 48 小时 定时器 发送功率: ≤ -10dBm 工作电压: 3.0 V 尺寸大小: 130.4 X 46.2 X 22 mm 重量: 56.5g 接收器 接收灵敏度 : -90 dBm 工作电压: 3.0 V 尺寸大小: 85 X 37.4 X 30.9 mm 重量:...