Herunterladen Inhalt Inhalt Diese Seite drucken
Inhaltsverzeichnis

Werbung

Verfügbare Sprachen
  • DE

Verfügbare Sprachen

  • DEUTSCH, seite 31
AGATEC
21 Boulevard Littré
78600 Le Mesnil le Roi - France
Tél: +33(0)1 34 93 36 31
Fax: +33(0)1 34 93 35 89
AGATEC Construction Lasers
2202 Redmond Rd.
Jacksonville, AR 72076
Phone: 800.643.9696
Fax: 501.982.0880
Email: sales@agl-lasers.com
QBL
Liegnitzer Str. 1-3
D- 42489 Wülfrath
Tel :+49-(0)2058-7881 0
Fax : +49-(0)2058-7881 52
Info@quante-baulaser.de
PRIM'TOOLS
17/F, Morecrown Commercial Building,
108 Electric Road - North Point
Hong Kong
Tel: 852 2566 3667
Fax: 852 2566 9968
Your dealer/Votre revendeur/Su revendedor/Ihr Händler/Vostro rivenditore
Niveau Electronique
Electronic Level
English
1 - 18
Français
19 - 36
Español
37 - 54
Deutsch
55 - 74
Italiano
75 - 93

Werbung

Inhaltsverzeichnis
loading

Inhaltszusammenfassung für Agatec GAT 220

  • Seite 1 AGATEC 21 Boulevard Littré 78600 Le Mesnil le Roi - France Tél: +33(0)1 34 93 36 31 Fax: +33(0)1 34 93 35 89 AGATEC Construction Lasers 2202 Redmond Rd. Jacksonville, AR 72076 Phone: 800.643.9696 Fax: 501.982.0880 Email: sales@agl-lasers.com Niveau Electronique Liegnitzer Str.
  • Seite 3 Electronic Level...
  • Seite 4: Inhaltsverzeichnis

    LASER LIGHT: AVOID DIRECT EYE EXPOSURE 7. Warranty CONFORMS TO IEC 60825-1; 2001 COMPLIES WITH 21 CFR 1040.10 AND 1040.11 EXCEPT FOR DEVIATIONS PURSUANT TO LASER NOTICE NO. 50 DATED JULY 26, 2001 AGATEC, 2202 Redmond Road Jacksonville, AR 72076...
  • Seite 5: Technical Specifications

    • Keypad overview B. Aperture label 1. On/Off AVOID EXPOSURE. LASER LIGHT 2. Low battery indicator / X axis calibration LED IS EMITTED FROM THIS APERTURE 3. H.I. Alert Function/ Change calibration axis 4. H.I. Alert Indicator/ Y axis calibration LED 5.
  • Seite 6: Rotation Speed

    About 30 seconds after the head starts to rotate, the LED will blink • Manual Mode slowly, indicating the H.I. Alert is activated. 1. Set the laser over a start point. Turn the laser so that X on the If the laser is disturbed while in H.I. Alert mode, the head will stop top of the head protection faces the direction of the slope rotating, the beam will turn off, the LED indicator will be on continu- (and X’...
  • Seite 7: Using Rechargeable Batteries

    3.2 Using rechargeable batteries X’ If your laser has a rechargeable battery, you must charge it for Y’ 15 hours before first using the laser. 1. Insert the charger plug into the jack located at the back of the laser. 2.
  • Seite 8: Horizontal Checking And Calibration

    amount (1/32" at 150' or 1mm at 100m). After pressing 7. After completing the X calibration, press the H.I. key (3) to the key, the LED will blink rapidly as the laser reacts. change the axis and to calibrate the Y axis. (On the remote, press Wait until the LED returns to a slow blink to proceed.
  • Seite 9: Cone Error Checking

    5. Care and Handling 5. Y LED will blink rapidly, indicating leveling. When the LED blinks slowly, the laser is ready to calibrate. 6. If you have not moved the laser, use the Y marks made in previous CAUTION steps of “Checking Y axis”. The use of controls or adjustments or performance of procedures 7.
  • Seite 10: Detector

    • LCD Display 6.1 Detector for grade rods or handheld applications Low battery ATTERY STATUS High Blinking: Normal volume Near On-grade grade high alignment notch Solid: Loud Level vial OUND On-grade No horn: Mute CCURACY screen Near Standard Fine grade low (front) Default mode...
  • Seite 11: Tripods

    • Specifications and maintenance instructions are strictly respected, in particular in case of extreme and/or continuous applications/use of the Range* 500 ft. (150 m) Product. The warranty period begins on the proved purchase Accuracy* Fine: ± <1/16" (1 mm) date, or if applicable, date of delivery or date of acceptance Standard: ±...
  • Seite 12 lect, improper installation, unauthorized attempts to open, repair or modify the Product, inadequate maintenance, disre- gard of operating instructions, excessive load or stress, normal wear and tear, or any other cause beyond the range of its intended use, by accident, fire, or other hazards, or other cause not due or attributable to The manufacturer.
  • Seite 13: Description

    Sommaire Félicitations! Vous venez d’acquérir le niveau électronique GAT220. Bien que très simple d’utilisation, il est recommandé de lire atten- 1. Caractéristiques tivement ce manuel. 1.1 Description 1.2 Avertissement 1.3 Caractéristiques techniques 1. Caractéristiques 1.4 Vue du laser et du clavier 2.
  • Seite 14: Caractéristiques Techniques

    1.3 Caractéristiques techniques • Vue du clavier 1. On /Off 2. Indicateur batterie faible / Signal de calibrage de l’axe X Distance maximale d’utilisation recommandée 300 m de diamètre 3. Fonction Tilt / Calibrage de l’axe Y Précision 0,010% +/- 10 mm a 100 m 4.
  • Seite 15: Vitesse De Rotation

    Le signal lumineux situé près de la touche Tilt (4) clignotera alors pour Les deux indicateurs lumineux (4) et (6) seront allumés pour vous vous informer que la fonction a été activée. Il clignotera rapidement pen- informer que l’axe Y a été sélectionné. dant que le laser est en train de s’auto niveler;...
  • Seite 16: Utilisation De La Batterie Rechargeable

    La LED située à côté de la touche On/Off (2) s’allume pour Voici quelques méthodes simples de contrôle et de réglage indiquer la faible puissance des piles ou de la batterie. de l’instrument qu’il est possible d’effectuer sur le chantier. Remplacer les 2 piles au même moment, en respectant la A défaut apporter l’instrument chez le réparateur.
  • Seite 17: Vérification Des Erreurs De Cône

    9. En utilisant une cellule de détection, marquer sur le mur le Calibrage de l’axe Y centre du rayon laser (ou sans cellule de réception si la visibilité 1. S’assurer que la LED (4) du clavier clignote, sinon : Eteindre le permet).
  • Seite 18 6. Accessoires 5. Déplacer l’instrument à 1 mètre du mur (b). Une fois le GAT220 à niveau, arrêter la rotation et diriger le point vers la marque précédente, faire une nouvelle marque (b’). 6. Marquer la nouvelle position du point sur le mur (a’) en 6.1 Cellule de détection pour mires utilisant le détecteur si nécessaire.
  • Seite 19: Autres Accessoires

    • Caractéristiques techniques • Utiliser la cellule Distance maximale d’utilisation* 150 m 1. Presser le bouton On/Off pour mettre en marche la cellule. Précision* ± 1 mm 2. Presser le bouton central pour choisir le mode de précision. Standard ± 2.5 mm 3.
  • Seite 20 notamment en cas d’application/d’utilisation extrême ou contin- EXCLUSIVITE DE LA DECLARATION DE GARANTIE ue. La période de garantie débute à la date d’achat prouvée Le recours du Client à la garantie est uniquement régi par la (ou, si applicable, à la date de livraison ou à celle du rapport présente déclaration.
  • Seite 21 du prix d’achat de ce dernier. Cette limitation de la responsabil- ité s’applique aussi dans le cas où Le fabricant ou les reven- deurs autorisés ont été informés de la survenance possible de tels dommages. RESTRICTION Si un tribunal n’accepte pas l’entière exclusion ou la limitation des garanties tacites ou de la responsabilité...
  • Seite 22 1.3 Especificaciones tecnicas 1.4 Teclado de funciones • Autonivelacion automatica en horizontal • Facil calibración eletrónica 2. Cómo usar el nivel laser GAT 220 • Pendiente manual en los ejes X e Y 2.1 Nivelacion horizontal 2.2 H.I. alerta (tilt) 1.2 Cuidados...
  • Seite 23: Especificaciones Técnicas

    1.3 Especificaciones técnicas 7. Velocidad de rotación 8. Definir pendiente manual/ Mueve arriba la calibración 9. Definir pendiente manual/Mueve abajo la calibración Uso recomendado para modo Horizontal 300 m. Diámetro Precision modo horizontal Autonivelante +- 10 mm./100 metros Rango autonivelacion +- 10% Velocidad rotación 0-90-600 rpm...
  • Seite 24: Velocidad De Rotación

    Volver a apagar el laser y empezar de nuevo, chequee la ele- • Modo manual vación del rayo si ha sido cambiada de su posición original. 1. Estacionar el láser sobre un punto de inicio. Girar el láser de tal forma que el eje X en la parte superior de la protección de la cabeza quede en dirección de la pendiente (el eje X’...
  • Seite 25 indicado en el boton del compartimiento de las baterias. Cambie El laser tiene 2 ejes X e Y (horizontal indicado en la cabeza del láser). las dos baterias al mismo tiempo. 3. Vuelva a cerrar el compartimiento. X’ 4. Cuando la bateria esta baja la cabeza se parara. La luza localizada cerca de la tecla On/Off permanecera con lo que nos informa de que la bateria esta baja.
  • Seite 26 calibración. Cuando el laser es autonivelado o haciendo un ajuste, 3. Después de los LED efectúen la secuencia de destellos, liber- el led parpadeara rapidamente. ar la tecla MAN (5). 4. El led el eje de las X parpadeara rapidamente por un IMPORTANTE: momento y entonces lentamente indicando si esta preparado cuando presionando una tecla de flecha sobre el detec-...
  • Seite 27: Cuidados Y Mantenimiento

    Si usted no esta en modo calibración: 4.3 Chequeando error conico 1. Ponga su GAT220 a 1 metro de la pared (a) y a 30 metros 1. Poner en off en laser. de otra pared (b). 2. Pulsar y mantener pulsada la tecla MAN (5) y simultánea- 2.
  • Seite 28 6. Accesorios • Pantalla LCD 6.1 Detector SATDO DE LA Batería baja BATERÍA Alto Vial de burbuja ONIDO para Muesca de alineación Papadeo: Volumen normal Nivel varilla de de alta precisión excedido plomo Sólido: Volumen alto Nivel Pantalla Sin bocina: Silencio óptimo (parte frontal) RECISIÓN...
  • Seite 29: Otros Accesorios

    • Especificaciones del fabricante, éste se compromete únicamente a reemplazar o reparar el producto defectuoso o partes del mismo por y a Rango* 150 m cuenta del fabricante o a reembolsar el precio de compra Precisión* Fina ± 1 mm pagado por el producto, según le convenga.
  • Seite 30 excluyéndose éstos expresamente. El fabricante no será respon- sable si el supuesto defecto ha sido causado por abuso, negli- gencia, una instalación inadecuada, un mantenimiento insufi- ciente, el incumplimiento de las instrucciones de servicio, inten- tos inautorizados de abrir, reparar o modificar el producto por parte del cliente o cualquier tercera persona, excesos de carga o de uso, el desgaste normal o por otras razones fuera del uso previsto, o por accidente, fuego u otras razones ajenas a la...
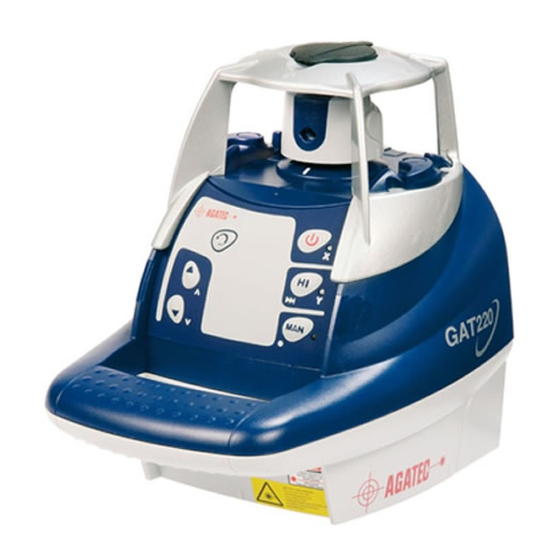
  • Seite 31 Inhaltsverzeichniss Wir beglückwünschen Sie zum Kauf des GAT220 Lasers. Obwohl das Gerät sehr einfach in der Bedienung ist, lesen Sie bitte diese Anleitung vor Inbetriebnahme des Gerätes. 1. Allgemeine Informationen 1.1 Beschreibung 1.2 Laserwarnhinweise 1. Allgemeine Informationen 1.3 Technische Daten 1.4 Laser und Tastenübersicht 2.
  • Seite 32: Technische Daten

    1.3 Technische Daten 9. Manuelle Neigungseinstellung/ Strahl abwärts bewegen (Kalibrierung) Kursiv gedrucktes gibt die Funktion im Kalibriermodus an. Reichweite 1,000 ft. (300 m) Durchmesser Genauigkeit +/- 10 mm auf 100 m; +/-0,010% Horizontierbereich +/- 10% 2. Benutzung des GAT220 Lasers Rotationsgeschwindigkeit 0, 90, 600 UPM Manuelle Neigung...
  • Seite 33: Rotationsgeschwindigkeit

    Der Laser ist nun nicht mehr im H.I. Modus. Drücken Sie wiederum • Manueller Modus Tilt zur Aktivierung. 1. Laser über einem Startpunkt aufstellen. Laser so drehen, dass Es ist sehr wichtig zu prüfen, dass der Laser während das X auf der Oberseite des Kopfschutzes in Neigungsrichtung (und der Messung nicht bewegt wurde und die Einstellungen das X’...
  • Seite 34: Benutzung Der Akkus

    4. Prüfung und Kalibrierung des GAT220 2. Setzen Sie zwei Alkali Batterien (Größe D / LR20) mit der Polarität wie im Batteriefach angegeben ein. Der + Kontakt ist umrandet. Beim Wechsel der Batterien tauschen Sie immer beide Batterien. DIESES KAPITEL IST SEHR WICHTIG. 3.
  • Seite 35: Kalibrierübersicht

    Sie können im Zweifel auch den Laser in einer Service Werkstatt 4.2 Horizontales Prüfen und Kalibrieren prüfen lassen. 4.2.1 Prüfung der X Achse Prüfen und Kalibrieren Sie wie folgt: 1. Stellen Sie den Laser auf einer flachen Oberfläche in 30 Meter Prüfen Sie beide Seiten der X Achse.
  • Seite 36: Kalibrierung Y Achse

    Wand, so bewegt die Taste den Strahl aufwärts und abwärts Wenn Sie nicht im Kalibriermodus sind: 1. Schalten Sie den Laser aus. (wenn X’ zur Wand zeigt, so ist die Bewegung umgekehrt). 2. Taste Manueller Modus (5) gedrückt halten. Gleichzeitig kurz 8.
  • Seite 37: Empfängerandheld Applications

    2. Schalten Sie den Laser ein. Zubehör immer trocken und sauber nach dem Gebrauch. Dies 3. Wenn der Laser horizontiert ist, stoppen Sie die Rotation und erhöht die Lebensdauer der Batterien. markieren die Höhe des Strahls (Mitte Strahl) an der nahen Lagern Sie den Laser nicht bei Temperaturen unterhalb von -20°C Wand (a) oder benutzen Sie einen Empfänger falls die oder über +80°C da elektronische Komponenten beschädigt wer-...
  • Seite 38 Schraube um die sie den Empfänger den Informationen auf der LCD-Anzeige Klammer an den entsprechend rauf oder runter. Es gibt 5 Informations-Kanäle LCD- Empfänger zu oder Höhenanzeigen. Anzeige befestigen. (Rückseite) Ein "runter"-Pfeil zeigt ihnen an, daß sie den Empfänger herun- terbewegen müssen um die Laserebene zu erreichen;...
  • Seite 39: Weiteres Zubehör

    6.3 Stative Drittherstellern und Verbrauchsmaterialien wie beispielsweise Reflektoren, Glühbirnen und Sicherungen. Der GAT220 kann auf einem 5/8-11 Flachkopfstativ befestigt wer- den. Es können auch Kurbelstative benutzt werden um die Höhe INANSPRUCHNAHME DER GARANTIELEISTUNG des Lasers einzustellen. Der Kunde muss innerhalb der Garantiefrist entweder beim autorisierten Händler von dem Hersteller oder einem Servicecenter von dem Hersteller eine Garantieleistungs- 6.4 Weiteres Zubehör...
  • Seite 40: Haftungsbeschränkung

    Kunden oder irgendeine dritte Person, übermässige Belastung oder Beanspruchung, normalen Verschleiss oder aus anderen Gründen, die nicht im Rahmen des vorgesehenen Gebrauchs liegen, oder durch Unfall, Feuer bzw. andere Gründe verursacht wurde, die der Hersteller nicht zu verantworten hat. Diese Garantie deckt keine physischen Schäden oder Fehlfunktionen des Produktes ab, die sich aus dem Gebrauch des Produktes in Verbindung mit irgendwelchen Zusatz- oder Peripheriegeräten...
  • Seite 41 Indice Congratulazioni! Vi ringraziamo per aver acquistato un livello elettronico GAT220. Sebbene esso sia facilissimo da utilizzare, vi raccomandiamo di 1. Informazioni generali leggere questo manuale prima di cominciare ad utilizzarlo. 1.1 Descrizione 1.2 Sicurezza 1.3 Specifiche tecniche 1. Informazioni generali 1.4 Descrizione tastiera e laser 2.
  • Seite 42: Specifiche Tecniche

    1.3 Specifiche tecniche 9. Impostazione pendenza manuale/ Sposta il raggio verso il basso (calibrazione) Le funzioni dopo il simbolo / si riferiscono alla modalità calibrazione. Utilizzo consigliato 300 m di diametro Precisione +/- 10 mm at 100m Campo di autolivellamento +/- 10% Velocità...
  • Seite 43 E' importante controllare, mentre si utilizza il laser, • Modalità manuale che esso non sia stato mosso e che le impostazioni siano corrette. 1. Impostare il laser su un punto di partenza. Ruotare il laser in modo che la X sulla sommità della protezione della testa sia rivolta verso la direzione della pendenza (e X’...
  • Seite 44: Utilizzo Di Batterie Ricaricabili

    4. Controllo e calibrazione GAT220 2. Inserire due batterie alcaline (tipo D o LR20), seguendo la giusta polarità indicata su fondo del vano (il polo + è arro- tondato e rialzato). QUESTO CAPITOLO E' IMPORTANTISSIMO. Quando le batterie vengono sostituite, è consigliabile sostituirle Queste sono semplici istruzioni per controllare la entrambe e con batterie dello stesso tipo.
  • Seite 45 Controllare e calibrare nel seguente ordine: 2. Accendere il laser. 3. Contrassegnare la posizione del raggio. Se il raggio è poco Controllare entrambe le estremità dell'asse X. visibile utilizzare il ricevitore. • Se l'asse X è calibrato, controllare le estremità dell'asse Y. 4.
  • Seite 46 7. Utilizzare i tasti freccia (8 e 9) per muovere il raggio 5. Selezionare l'asse Y premendo il tasto HI sulla tastiera del laser (sul telecomando, premere il tasto con la doppia freccia su e giù verso il centro dei contrassegni. Se l'asse X è rivolto >>l ).
  • Seite 47: Cura E Manutenzione

    6. Accessori 4. Contrassegnare la posizione del centro del raggio sulla parete lontana (b), se la luminosità ambientale è troppo intensa. 5. Posizionare il laser a 1 metro dalla parete lontana. 6.1 Rilevatore Quando il GAT220 è a livello, allineare il raggio al contrasseg- no precedente (b).
  • Seite 48: Altri Accessori

    • Specifiche tecniche • Display LCD (Visualizzatore LCD) Raggio di azione* 150 m Precisione* Alta ± 1 mm Bassa ± 2,5 mm TATO DELLA Batteria scarica Durata batteria 50 ore, 9V alcalina BATTERIA Superiore Impermeabilità ambientale (IP66+) al livello Dimensioni 15 x 8 x 3.5 cm / 2 kg Lampeggiante: Volume normale Leggerment...
  • Seite 49 totale discrezione e a carico del Fabbricante, nella sostituzione sona a seguito d’abuso, negligenza, installazione scorretta, ten- o riparazione del Prodotto o parte di esso, o nel rimborso del tativi non autorizzati di aprire, riparare o modificare il prezzo d’acquisto pagato per il Prodotto. Per ogni Prodotto o Prodotto, manutenzione inadeguata, mancato rispetto delle parte di esso, riparato o sostituito, il Fabbricante concede una istruzioni d’uso, eccessivo carico o stress, usura normale, o...

Inhaltsverzeichnis