LogiLink UA0072A Bedienungsanleitung
Usb2.0 webcam
with 6 leds
Quicklinks
Do not throw the appliance away with the normal household waste at the
end of its life, but hand it in at an official collection point for recycling. By
doing this you will help to preserve the environment.
1.0 Safety Instructions
UA0072A
1. Put the Device always on a stable and straight Surface. In case of falling, the
Device can be damaged.
2. Don't place the Device into direct Sunlight or in Places with high Temperature.
USB2.0 Webcam
This can damage it or shorten his average useful Life.
3. Don't place the Device in the near of Heat Sources, like Radiators or other heat
producing Devices.
with 6 LEDs
4. Don't expose the Device to Rain, Water, Wetness or high Humidity.
5. Don't place it in the Bathroom or the Kitchen in the near of a Sink. Avoid the direct
Contact with Water.
6. Don't try to open the Device.
7. Prior to the first use of our product make a backup of your data.
User Manual
8. We are not liable for any loss of data, unless you can accuse us intention or gross
negligence.
9. In any case, liability for loss of data is limited to the effort that is necessary to
restore from existing backup copies.
Congratulations on the purchase of the UA0072A!
Read the instructions and warning references in this operating instructions carefully,
before you use the product for the first time. During neglect it can come to damages
of the equipment.
2.0 Introduction
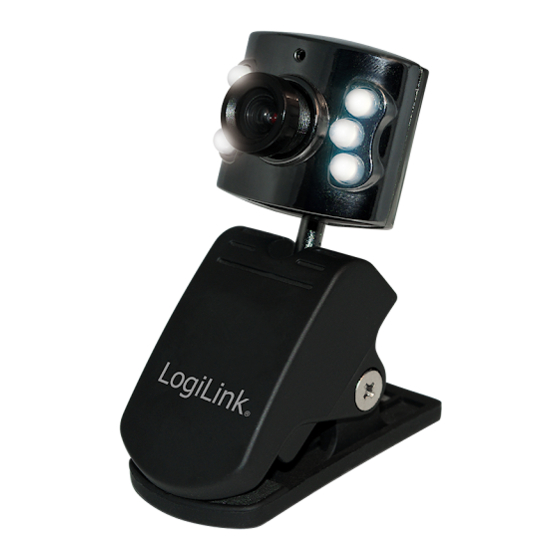
UA0072A USB2.0 Webcam is with stylish metal casing
illuminated by 6 LEDs. It is ideal for both PC and Notebook
use.
2.1 Photo
Adjust Lens Focus
Adjust Lens Focus
Adjust Lens Focus
Geben Sie das Gerät am Ende der Lebensdauer nicht in den normalen
Hausmüll. Bringen Sie es zum Recycling zu einer offiziellen
Sammelstelle. Auf diese Weise helfen Sie die Umwelt zu schonen.
1.0 Sicherheitshinweise
UA0072A
Stellen Sie das Gerät immer auf eine stabile und gerade Fläche. Bei Stürzen kann
es beschädigt werden.
Setzen Sie das Gerät nicht direktem Sonnenlicht oder hohen Temperaturen aus, da
USB2.0 WebCam
dieses sonst ebenfalls beschädigt werden kann oder sich die Nutzungsdauer
verkürzt.
Stellen Sie das Produkt nicht in der Nähe von Wärmequellen wie Heizkörpern oder
mit 6 LED's
anderen Wärme erzeugenden Geräten auf.
Setzen Sie das Gerät nicht Regen, Wasser, Nässe oder hoher Luftfeuchtigkeit aus.
Stellen Sie es nicht im Badezimmer oder in der Küche neben einem Wasch- oder
Spülbecken auf und vermeiden Sie auf alle Fälle direkten Kontakt mit Wasser.
Versuchen Sie nicht das Gerät zu öffnen.
Bedienungsanleitung
Bitte fertigen Sie vor der erstmaligen Verwendung unseres Produktes eine
Datensicherung an.
Wir haften nicht für den Verlust von Daten, es sei denn, es ist uns Vorsatz oder
grobe Fahrlässigkeit vorzuwerfen.
In jedem Falle ist die Haftung bei Datenverlust auf den Aufwand beschränkt, der
notwendig ist, um anhand vorhandener Sicherungskopien die verlorenen Daten auf
der Anlage des Nutzers wiederherzustellen.
Herzlichen Glückwunsch zum Kauf der UA0072A!
Lesen Sie die Anweisungen und Warnhinweise in dieser Bedienungsanleitung
sorgfältig durch, bevor Sie das Produkt zum ersten Mal verwenden. Bei
Nichtbeachtung kann es zu Beschädigungen des Gerätes kommen.
2.0 Einführung
Die UA0072A USB2.0 Webcam ist ideal zur Verwendung mit
ihrem Desktop - PC oder Notebook und erscheint in einem
edlen Metallgehäuse mit 6 LED's.
Adjust Lens Focus
Adjust Lens Focus
Adjust Lens Focus
2.1 Produkt
* 100P 雪銅紙, Size:73.5 x 103.6 mm
* 騎馬釘裝訂,分2本手冊, 一本德文(在前)英文手冊,
一本西班牙文(在前)波蘭文手冊
* 兩面, 正四色反四色,彩色印刷
3. Click "next ", the guide picture of installing driver program for pc camera will
2.2 Product Specification:
• CMOS picture-sensor: 300K pixels interpolated up to 8M pixels
appear as Figure 2.
• Stylish and robust metal casing for secure positioning
• Integrated light meter automatically ensures Iighting is perfect using the webcam's
6 LEDs
• Practical clamp for attaching to notebooks
• Rotates through a full 360 degrees
• Stepless focus lens (30mm to infinity)
• Compatible to Windows 2000/XP/Vista/7
2.3 System requirements
• One available USB Port
• CD-ROM Drive
• Windows 2000/XP/Vista/7
• System required with Pentium II 200/MMX/AMD K6 or above
• DRAM: 32MB or above
4. Click "next" to continue the installing, see Figure 3.
2.4 Packing contents
• 1 x USB Webcam
• 1 x User manual
• 1 x CD Drive
3.0 Installation
UA0072A is a simple plug and play USB 2.0 Webcam. After you plug in the computer,
System like Windows 2000/XP/Vista/7 can install it automatically, no driver required.
However, in order to enjoy all the functions and additional value of this Webcam
UA0072A provided, we suggest users better to install the software ACMAP or Video
Power included first, before you start to use this Cam.
3.1 Software Installation
1. Insert CD drive to CD ROM of your PC.
2. Click the installing camera driving program to enter the installing as the Figure 1.
5. Click "finish" and installation is finished. See Figure 4.
(Figure 1)
Note:
1
2
Please don't insert the USB camera before software installs.
2.2 Spezifikationen
3. Fahren Sie hier fort mit „Next".
• CMOS Bildsensor: 300K Pixel, interpoliert um 8M Pixel
• Stilvolles und robustes Metallgehäuse für einen sicheren Stand
• Integrierter Lichtsensor sorgt mit 6 LEDs automatisch für die richtige Beleuchtung
• Praktische Klemme für eine Befestigung am Notebook
• Vollständig drehbar um 360 Grad
• Stufenloser Fokus von 30 mm bis unendlich
• Windows 2000/XP/Vista/7
2.3 Systemvoraussetzungen
• Ein freier USB Port
• 4-fach-CD-ROM
• Windows 2000/XP/Vista/7
• Mind. Pentium II 200/MMX/AMD K6
• Mind. 32MB RAM
2.4 Packungsinhalt
4. Wählen Sie hier die entsprechende Installationsart, „Vollständig" (empfohlen) oder
• 1 x WebCam UA0072A
„Benutzerdefiniert".
• 1 x Bedienungsanleitung
• 1 x CD (Software Utility + Treiber)
3.0 Software Installation
Bei der UA0072A handelt es sich um eine einfach zu bedienende Webcam. Nach
Verbindung mit einem Desktop - PC oder Notebook wird die Webcam unter den
Betriebssystemen Windows 2000/XP/Vista und 7 ohne zusätzliche, spezielle Treiber
installiert.
Um jedoch alle Funktionen der UA0072A nutzen zu können, empfehlen wir Ihnen im
Vorfeld die beigefügte Software AMCAP oder Video Power zu installieren, bevor Sie
die Kamera in Betrieb nehmen.
1. Legen Sie die beiliegende CD in Ihr CD-ROM Laufwerk.
2. Doppelklicken Sie die setup.exe Datei um die Installation zu starten.
5. Mit Klick auf „Finish" schließen Sie die Installation ab.
Hinweis:
Verbinden Sie die UA0072A nicht mit Ihrem PC bevor die Software Installation
1
1
2
2
komplett abgeschlossen ist.
6. Then, insert the pc camera into computer USB port, the computer system will find
4.2.2 'Device' Function
the new hardware, and finish the install automatically.
If you have 2 webcam in the PC, you have to choose device here.
4.2.3 'Option' Function
a) Preview :
4.0 AMCAP Software
Click preview and you can start to review the pictures.
4.1 How to Use AMCAP software
b) Video Capture Filter:
Under Windows XP, please find Start->Program->PC Camera-UA0072A->
Open AMCAP software, choose options →
"AMCAP". Then, click the right button of AMCAP to send it to the desktop
video capture filter, there are "Settings",
(create shortcut).
"Effect", and "Zoom" Functions.
Settings :
Appear as Figure 6.
(Figure 2)
1. Set up Image Control, Auto Mode Control,
Default, Flicker, Extra Control, and Extra
Control 2.
2. LED light is controlled by the sensor based
on environmental.
Click AMCAP on the desktop, and you can preview the picture as Figure 5.
Effect :
Special function: open AMCAP software,
(Figure 3)
choose options →video capture filter, then
choose "Effect Function" and the Figure 7 will
4.2 AMCAP Function
appear. Then, you can make all kinds of
special function effect which provided.
4.2.1 'File' Function
a) Set Capture File:
Set up the Capture File route.
b) Allocate File Space:
Enter the amount of disk space to set aside
for the capture file.
c) Save Capture Video:
Set up the Capture Video file route.
3
d) Exit
4
(Figure 4)
6. Anschließend können Sie die UA0072A mit einem freien USB Port Ihres PC's
4.2.2. Menüpunkt „Devices"
verbinden. Der PC erkennt die neue Hardware und installiert automatisch
Unter diesem Menüpunkt können Sie Ihre entsprechende/n Kamera/s auswählen.
(empfohlen) die entsprechenden Treiber.
4.2.3. Menüpunkt „Options"
a) Preview
Mit aktiviertem Preview können Sie das Bild der Kamera sehen.
4.0 AMCAP Software
b) Video Capture Filter
4.1 Starten der AMCAP Software
Sie können hier folgende drei verschiedene
Bei Windows XP können Sie die Software unter „Start – Programme – PC
Einstellungen treffen, „Settings" (Einstellungen
Camera-UA0072A– AMCAP" starten. Sie haben auch die Möglichkeit sich eine
für Eigenschaften des Videostreams), „Effects"
Verknüpfung auf dem Desktop zu erstellen.
(Effekte und Rahmen) und „Zoom" (Zoomen
des Videostreams).
- „Settings"
1. Im Reiter Einstellungen stehen folgende
Auswahlpunkte zur Verfügung:
Bildsteuerung, Automodus, Standard,
Flimmern und Zusatzsteuerung.
2. Die LED's der UA0072A werden von einem
Klicken Sie nach erfolgter Installation auf das Icon „AMCap" und Sie können das Bild
Sensor, der sich auf der Oberseite der
der WebCam sehen.
UA0072A befindet, automatisch geregelt.
- „Effects"
Unter „Effects" haben Sie die Möglichkeit
spezielle Effekte und Rahmen anzuwenden.
4.2 Funktionen der AMCAP Software
Auch benutzerdefinierte Rahmen sind möglich.
4.2.1. Menüpunkt „File"
a) Set Capture File
Bestimmen Sie hier den Speicherort der Capture Datei (Foto).
b) Allocate File Space
Legen Sie die Größe der entsprechenden Capture
Datei fest.
c) Save Capture Video
Bestimmen Sie hier den Speicherort der Capture
Video Datei.
d) Exit
3
3
Programm verlassen
4
4
ZOOM :
5.0 Video Power
Open AMCAP software, choose options →
video capture filter, then choose "zoom" in
5.1 Installation of Video Power
the menu, the Figure (8) will appear. Then,
you can zoom the image freely.
1. Put the CD into the CD Driver, and click
"Video Power".
2. Click "Next".
(Figure 8)
c) Video Capture Pin –
You can choose Video Format', 'Color
Space', and "Output Size" (See Figure 9)
3. Click "Browse", choose the folder you'll
(Figure 6)
install, then click "Next".
(Figure 9)
4.3.4 'Capture' Function
a) Start Capture: Click "Start Capture", and you
can select "OK" to start capture of video
sequence to the route you set up on
"File/Save Capture video", or click "Cancel"
to exit.
4. Click "Install".
b) Master Stream: You can choose "None",
"Audio", "Video"
c) Set Frame Rate
d) Set Time Limit
5. Click "Finish" , and Video Power
(Figure 7)
4.3.5 Help
installation is finished.
5
5
Name and Version of the AMCAP Software.
6
- „Zoom"
5.0 Video Power
Unter „Zoom" haben Sie die Möglichkeit das
angezeigt Bild frei zu zoomen.
5.1 Installation
1.Legen Sie die beiliegende CD in Ihr
CD/DVD Laufwerk und klicken Sie auf
die Datei „Video Power".
2.Fahren Sie dann mit „Next" fort.
c) Video Capture Pin
Sie können hier folgende drei Einstellungen
treffen, „Video Format" (Einstellungen der
Framerate), „Color Space" (Farbbereich) und
„Output Size" (Ausgabegröße).
3.Sie können hier das Programm mit „Next"
4.2.4 Menüpunkt „Capture"
unter dem angegebenen Speicherort
a) Start Capture
installieren oder mit „Browse" einen
Nach einem Klick auf „Start Capture", haben
anderen Speicherort auswählen.
Sie die Möglichkeit die Videosequenz mit
„OK" zu speichern oder mit „Cancel"
abzubrechen. Die Videosequenz wird unter
dem in Punkt 4.2.1 c) angegebenen
Speicherort abgespeichert.
b) Master Stream
Hier haben Sie drei Auswahlmöglichkeiten:
„None", „Audio" oder „Video".
4. Klicken Sie dann auf „Install" um die
Installation zu starten.
c) Set Frame Rate
Einstellungen der Framerate
d) Set Time Limit
Einstellungen einer Höchstaufnahmedauer
4.2.5. Menüpunkt „Help"
Hier finden Sie die genaue Bezeichnung und
5. Mit einem Klick auf „Finish" schließen Sie
5
die Versionsnummer der AMCAP Software.
6
die Installation von Video Power.
5.2 How to use VideoPower
software
1. Plug in PC Camera , click
on the
desktop, and you'll see the picture as
below.
2. You can choose the "capture size" from
100K to 8.0 MP.
3. Functions
a) Click
, you can make video recording.
b) Click
, it will take a picture, you'll find the picture in your installation
folder. The default patch is "C:\Program Files\Video Power\Video Power\images".
c) Click
, it will take a picture in five seconds.
d) Click
, you'll see the picture as
below , you can change the effect of the
image according to your need.
e) Click
,you'll see the picture as
below.
The CE mark confirmed that this product meets the main requirements of the
Directive 2004/108/EC of the European Parliament and the Council of Europe
concerning telecommunications and terminals regarding the Safety and
health of users and of electro-magnetic interference compliance. The CE has
7
been demonstrated. These statements are deposited by the manufacturer.
8
5.2 Funktionen der AMCAP
Software
1. Verbinden Sie die Kamera mit Ihrem
Computer und klicken Sie nach erfolgter
Installation auf das
Icon„VideoPower.exe".
und Sie können das Bild der WebCam
sehen.
2. Sie können bei der Auflösung von 100K
bis 8.0MP wählen.
3. Die VideoPower Software bietet Ihnen folgende Funktionen:
a) Mit einem Klick auf
können Sie eine Videoaufnahme starten.
b) Mit einem Klick auf
wird ein Foto erstellt. Das entsprechende Foto wird
standardmäßig unter "C:\Programme\Video Power\Video Power\images".
abgelegt.
c) Mit einem Klick auf
wird ein
Foto nach fünf Sekunden erstellt.
d) Mit einem Klick auf
öffnet sich
folgendes Fenster, indem Sie
verschiedene Einstellungen (Helligkeit,
Kontrast, Farbe, Sättigung, Schärfe,
Gamma, Weißabgleich,
Hintergrundbeleuchtung, usw.) treffen
können.
e) Mit einem Klick auf
sehen Sie
unten angezeigtes Fenster,
Das CE-Zeichen bestätigt, dass dieses Produkt die Hauptanforderungen der Richtlinie
2004/108/EC des Europäischen Parlaments und des Europarates über
Telekommunikations- und Endgeräte bezüglich der Sicherheit und der Gesundheit der
Benutzer und hinsichtlich elektro- magnetischer Störungen einhält. Die CE Konformität
wurde nachgewiesen. Die entsprechenden Erklärungen sind beim Hersteller hinterlegt.
7
8

Verwandte Anleitungen für LogiLink UA0072A

Inhaltszusammenfassung für LogiLink UA0072A
- Seite 1 3.0 Installation Congratulations on the purchase of the UA0072A! UA0072A is a simple plug and play USB 2.0 Webcam. After you plug in the computer, Read the instructions and warning references in this operating instructions carefully, 3. Click “Browse”, choose the folder you’ll System like Windows 2000/XP/Vista/7 can install it automatically, no driver required.
- Seite 2 (Figura 6) carpeta que va a instalar, a continuación, el descuido puede llegar a los daños de los equipos. Sin embargo, para disfrutar de todas las funciones y el valor adicional de esta UA0072A haga clic en "Next". (Figura 9) Webcam siempre, sugerimos a los usuarios mejor para instalar el software ACMAP o Video Power incluyó...