Creative VF0820 Kurzanleitung
Quicklinks
IP SmartHD
Wi-Fi Monitoring Camera
Model No.: VF0820
PN: 03VF082000000 Rev B
4. Add Your Camera
1. Select Add device.
6. Name your camera.
2. Select OK.
3. Select QRCODE SCAN and scan
the QR code on the bottom of
your camera.
4. Enter your Wi-Fi password.
7.
5.
FR
1. Vue d'ensemble
Remarques :
- Vous devez vous connecter à un réseau Wi-Fi 2,4 GHz.
1. Voyant
7. Port USB
- Soyez prêt(e) à indiquer votre nom et votre mot de passe Wi-Fi
2. LEDs infrarouges
8. Câble USB
9. Base magnétique
3. Microphone
3. Créer un compte
10. Vis
4. Emplacement
1. Ouvrez l'application Live! Cam.
MicroSD
11. Plaque de
2. Sélectionnez Register (S'enregistrer) pour créer
5. Haut-parleur
montage
un nouveau compte.
6. Bouton de
12. Adhésif de
3. Entrez votre adresse Email valide et le Password
montage
réinitialisation
(Mot de passe) de votre choix.
4. Sélectionnez Get (Obtenir), puis entrez le
Verification Code (Code de vérification) envoyé à
Indication du voyant
État
votre adresse e-mail.
Rouge
Initialisation
Rouge (clignotant)
Prête à se connecter
4. Ajouter votre caméra
Bleu (clignotant)
Connexion Wi-Fi
Bleu
Wi-Fi connecté
1. Sélectionnez Add device (Ajouter appareil).
2. Sélectionnez OK.
Fixez la plaque de montage sur une surface
3. Sélectionnez QRCODE SCAN (Lecture QR code ) et
plane à l'aide des vis ou de l'adhésif de montage
lisez le code QR situé sur la partie inférieure de la
fournis.
caméra.
4. Entrez votre mot de passe Wi-Fi.
Remarque :
5. Étape suivante
Retirez le film de protection de la partie inférieure de la
6. Nommez votre caméra.
caméra avant de procéder au montage.
7. OK
2. Installer l'application
5. Voir votre caméra
1. Connectez votre appareil intelligent à votre
1. Ajoutez des caméras
réseau Wi-Fi.
(Répéter 4. Ajouter votre caméra)
2. Installez l'application gratuite CREATIVE Live!
2. Vues multiples
Cam à partir de: App Store
®
ou Google Play
™
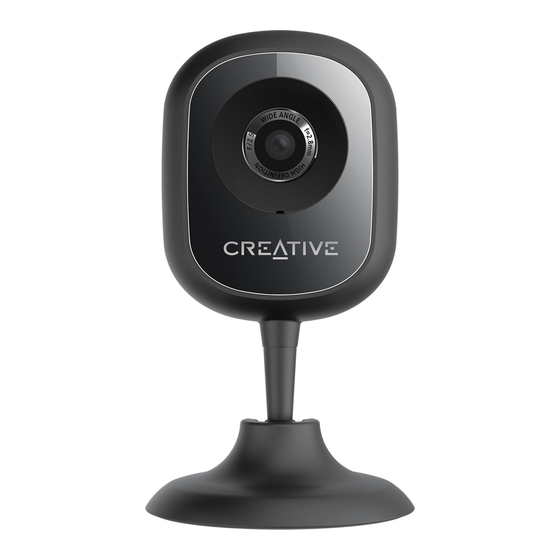
1. Overview
1
2
4
5
3
6
7
1. LED indicator
7. USB port
LED indication
2. Infrared LEDs
8. USB cable
Red
3. Microphone
9. Magnetic base
Red (blinking)
4. microSD slot
10. Screws
Blue (blinking)
5. Speaker
11. Mounting plate
Blue
6. Reset button
12. Mounting tape
5. View Your Camera
1. Add cameras
(Repeat 4. Add Your Camera)
2. Multiview
3. On/off camera microphone
4. Alerts
5. Recording history
6. Full screen view
3. Activer/désactiver le microphone de la
caméra
4. Alertes
5. Historique d'enregistrement
6. Vue plein écran
6. Réinitialiser
1. Insérez une broche et maintenez-la enfoncée
pendant 10 secondes ou jusqu'à ce que vous
entendiez un son.
2. Répéter 4. Ajouter votre caméra
Wi-Fi : IEEE 802.11 b/g/n
Température de fonctionnement : 0 ~ 40°C
N° de modèle de l'adaptateur secteur :
TEKA006-0501000EUU (pour l'Europe et Singapour)
Entrée CA 100 - 240 V 50/60Hz 0,3 A
Sortie CC 5V 1 A
TEKA006-0501000UK
(pour les États-Unis uniquement)
Entrée CA 100 - 240 V 50/60Hz 0,2 A
Sortie CC 5V 1 A
Remarque :
Le marquage de conformité est situé sur la partie inférieure
de ce produit.
Par la présente, Creative Labs Pte Ltd. déclare que le modèle de
caméra IP n° VF0820 est conforme à la Directive 2014/53/EU.
L'intégralité du texte de la déclaration de conformité européenne
est disponible sur http://www.creative.com/EUDoC
8
9
10
11
12
Secure the mounting plate
Status
to a flat surface using either
Booting
the screws or mounting tape
supplied.
Ready to connect
Wi-Fi connecting
Note:
Wi-Fi connected
Peel off the protective film on the bottom of
the camera before mounting.
1
2
3
4
DE
1. Überblick
1. LED-Anzeige
7. USB-Anschluss
2. Infrarot-LEDs
8. USB-Kabel
9. Magnetbasis
3. Mikrofon
10. Schrauben
4. microSD-Steckplatz
5. Lautsprecher
11. Montageplatte
6. Reset-Taste
12. Montageband
LED-Anzeige
Status
Rot
Startvorgang
Rot (blinkt)
Bereit zur Herstellung einer Verbindung
Blau (blinkt)
WLAN-Verbindung wird hergestellt
Blau
WLAN verbunden
Befestigen Sie die Montageplatte mit
den Schrauben oder dem mitgelieferten
Montageband an einem ebenen Untergrund.
Hinweis:
Ziehen Sie vor der Montage die Schutzfolie an der Unterseite der Kamera ab.
2. App installieren
1. Verbinden Sie Ihr Smart-Gerät mit Ihrem
WLAN-Netzwerk.
2. Installieren Sie die App CREATIVE Live! Cam
von: App Store
®
oder Google Play
Hinweis:
- Stellen Sie sicher, dass Sie eine Verbindung zu einem 2,4-GHz-
WLAN-Netzwerk herstellen können.
- Halten Sie Namen und Kennwort Ihres WLAN-Netzwerks bereit.
2. Install App
1. Connect your smart device to your Wi-Fi network.
2. Install the free CREATIVE Live! Cam app from:
App Store
®
or Google Play
™
Notes:
- Ensure you connect to a 2.4GHz Wi-Fi network.
- Keep your Wi-Fi name and password ready
6. Reset
1. Insert a pin and hold for 10 seconds or
until you hear a sound.
2. Repeat 4. Add Your Camera.
Wi-Fi
: IEEE 802.11 b/g/n
Operating Temperature
: 0 ~ 40°C
Power Adapter Model No. :
TEKA006-0501000EUU (for Europe & Singapore)
Input AC 100 - 240V 50/60Hz 0.3A
Output DC 5V 1.0A
TEKA006-0501000UK (for US only)
Input AC 100 - 240V 50/60Hz 0.2A
Output DC 5V 1.0A
5
6
Note:
Compliance markings are located at the bottom of this
product.
Hereby, Creative Labs Pte Ltd. declares the IP camera
model no. VF0820 is in compliance with Directive 2014/53/
EU. The full text of the EU declaration of conformity is
available at http://www.creative.com/EUDoC
3. Ein Konto erstellen
1. Öffnen Sie die App Live! Cam.
2. Wählen Sie zur Erstellung eines neuen Kontos
Register (Registrieren).
3. Geben Sie eine gültige E-Mail-Adresse und Ihr
gewünschtes Kennwort ein.
4. Wählen Sie Get (Beziehen), geben Sie dann
den an Ihre E-Mail-Adresse gesendeten
Verifizierungscode ein.
4. Ihre Kamera zufügen
1. Wählen Sie Add device (Gerät zufügen).
2. Wählen Sie OK.
3. Wählen Sie QRCODE SCAN (QR-Code scannen).
und scannen Sie den QR-Code an der
Unterseite Ihrer Kamera.
4. Geben Sie Ihr WLAN-Kennwort ein.
5. Nächster Schritt
6. Geben Sie Ihrer Kamera einen Namen.
7. OK
5. Ihre Kamera anzeigen
1. Kameras zufügen
™
(wiederholen 4. Ihre Kamera zufügen)
2. Mehrfachansicht
3. Kameramikrofon ein/aus
4. Alarme
3. Create an Account
1. Open the Live! Cam app.
2. Select Register to create a new account.
3. Enter your valid Email address and preferred
Password.
4. Select Get, and then enter the Verification Code
sent to your email address.
Other Information
Supplementary
documentation
for
this
product
includes a detailed user guide, DoC and safety and
regulatory information. Download at support.creative.
com/ipsmarthd.
Product Registration
Registering your product ensures you receive the most
appropriate service and product support available. Visit
register.creative.com. Please note that your warranty
rights are not dependent on registration.
Technical Support
Go to support.creative.com to resolve and troubleshoot
technical queries at Creative's 24-hour self-help
Knowledge Base.
Warranty information is supplied with your product in a
separate document. Please keep your Proof of Purchase
for the duration of the Warranty period.
Any changes or modifications not expressly approved
by the party responsible for compliance could void the
user's authority to operate the equipment. This device
complies with part 15 of the FCC Rules. Operation is
subject to the following two conditions:
1) device may not cause harmful interference, and
2) this device must accept any interference received, including
interference that may cause undesired operation.
Keep this document for
future reference
© 2016 Creative Labs Pte. Ltd. All rights reserved. Creative, the Creative
logo, and Live! are trademarks or registered trademarks of Creative
Technology Ltd. in the United States and/or other countries. App Store is a
trademark of Apple Inc., registered in the U.S. and other countries. Google
Play is a trademark of Google Inc. All other trademarks are properties of
their respective owners. All specifications are subject to change without
prior notice. Use of this product is subject to a limited hardware warranty.
Actual contents may differ slightly from those pictured.
5. Aufnahmeverlauf
6. Vollbildansicht
6. Rücksetzen
1. Halten Sie die Taste mit einem schmalen,
langen Gegenstand 10 Sekunden bzw. bis zur
Ausgabe eines Signaltons gedrückt.
2. Wiederholen 4. Ihre Kamera zufügen.
WLAN
: IEEE 802.11 b/g/n
Betriebstemperatur
: 0 ~ 40°C
Netzteilmodellnummer
:
TEKA006-0501000EUU (Europa und Singapur)
Eingang 100 – 240 V Wechselspannung, 50/60 Hz, 0,3 A
Ausgang 5 V Gleichspannung, 1,0 A
TEKA006-0501000UK (nur USA)
Eingang 100 – 240 V Wechselspannung, 50/60 Hz, 0,2 A
Ausgang 5 V Gleichspannung, 1,0 A
Hinweis:
Compliance-Kennzeichnungen befinden sich an der
Unterseite des Produktes.
Hiermit erklärt Creative Labs Pte Ltd., dass die IP-Kamera mit
der Modellnr. VF0820 der Richtlinie 2014/53/EU entspricht.
Der vollständige Text der EU-Konformitätserklärung ist
unter http://www.creative.com/EUDoC verfügbar.

Verwandte Anleitungen für Creative VF0820

Inhaltszusammenfassung für Creative VF0820
- Seite 1 Compliance markings are located at the bottom of this product. © 2016 Creative Labs Pte. Ltd. All rights reserved. Creative, the Creative logo, and Live! are trademarks or registered trademarks of Creative Hereby, Creative Labs Pte Ltd. declares the IP camera Technology Ltd.
- Seite 2 3. Zapnutie/vypnutie mikrofónu kamery Spoločnosť Creative Labs Pte Ltd. týmto vyhlasuje, že kamera, typ VF0820, vyhovuje směrnici 2014/53/EU. Úplné IP kamera, č. modelu VF0820, je v zhode so smernicou (Opakujte 4. Přidání kamery) 4. Upozornenia č. 2014/53/EÚ. Úplné znenie vyhlásenia o zhode EÚ je k Poznámky:...