Herunterladen Inhalt Inhalt Diese Seite drucken
Olivetti NETTUN@7000 Open Kurzanleitung
Vorschau ausblenden Andere Handbücher für NETTUN@7000 Open:
Inhaltsverzeichnis

Werbung

Verfügbare Sprachen

Verfügbare Sprachen

CASH REGISTER
585411
Q U I C K G U I D E - G U I D E R A P I D E
K U R Z A N L E I T U N G - G U Í A R Á P I D A
open
OLIVETTI S.P.A. VIA JERVIS, 77 10015 IVREA (TO) ITALY www.olivetti.com

Werbung

Inhaltsverzeichnis
loading

Inhaltszusammenfassung für Olivetti NETTUN@7000 Open

  • Seite 1 K U R Z A N L E I T U N G - G U Í A R Á P I D A open OLIVETTI S.P.A. VIA JERVIS, 77 10015 IVREA (TO) ITALY www.olivetti.com OLIVETTI S.P.A. VIA JERVIS, 77 10015 IVREA (TO) ITALY www.olivetti.com...
  • Seite 3 QUICK GUIDE open GUIDE RAPIDE KURZANLEITUNG GUÍA RÁPIDA H REGISTER...
  • Seite 5 open H REGISTER QUICK GUIDE...
  • Seite 6 This manual describes the cash register sold with the name NETTUN@7000 For more detailed information on how to use the cash register functions, the User Manual can be downloaded from the Olivetti site (www.olivetti.com) that contains detailed information. The manufacturer reserves the right to carry out modifications to the product described in this manual at any time without any notice.
  • Seite 7: Inhaltsverzeichnis

    TABLE OF CONTENTS INTRODUCTION ................1 INSTALLATION ................. 2 PACKAGE CONTENTS ................2 INSTALLATION PREREQUISITES ............3 CONNECTING THE CASH REGISTER TO THE POWER SUPPLY ..4 POWERING ON THE CASH REGISTER ........... 6 INSERTING PAPER ................... 7 SAFETY PRECAUTIONS AND GENERAL RULES FOR USE ....7 INSERTING THE PAPER ROLL .............
  • Seite 8 The crossed dustbin symbol on the device means that: - When it to be disposed of, the device is to be taken to the equipped waste collection centres and is to be handled separately from urban waste; - Olivetti guarantees the activation of the treatment, collection, recycling disposal...
  • Seite 9: Introduction

    INTRODUCTION The cash register described in this manual can be used for registering, for fiscal purposes, the data related to the sales of goods and services, and represents an indispensable tool for managing a sales point. Key features of the product and its performance are a 10.1” touch screen monitor with adjustable tilt, a printing unit with an automatic cutter for issuing tickets of widths 80 mm, 57.5 or 60 mm.
  • Seite 10: Installation

    INSTALLATION PACKAGE CONTENTS The cash register is delivered in a single package containing the following components:  Cash register  External power unit with power cord  Quick Start guide with instructions for use  Roll of thermal paper in initial supply ...
  • Seite 11: Installation Prerequisites

    INSTALLATION PREREQUISITES The installation steps for the cash register are: connect the cash register to the mains electricity supply power on the cash register insert the paper connect the barcode reader (not indispensable for general use) connect the drawer (not indispensable for general use) connect other external peripherals (not indispensable for general use).
  • Seite 12: Connecting The Cash Register To The Power Supply

    CONNECTING THE CASH REGISTER TO THE POWER SUPPLY Connect the external power unit first to the cash register (A) and then to the 220V mains power supply (B).
  • Seite 13 General Warnings:  Do not insert foreign bodies into the cash register.  If the cash register is to remain unused for a long period, disconnect it from the mains power socket.  To disconnect the appliance from the electrical power supply, remove the plug from the mains power socket;...
  • Seite 14: Powering On The Cash Register

    POWERING ON THE CASH REGISTER To power on the cash register, you must first have connected the power unit to the cash register as previously described, then positioning the Toggle switch On and then press the key. When the key is pressed the cash register powers on and, after a brief interval, displays the sales environment.
  • Seite 15: Inserting Paper

    INSERTING PAPER Exclusively approved thermal paper should be used on the Warning cash register. If other types of thermal paper are used, in particular paper that is too thin, the ticket may not be fed correctly. Also the writing and logos on the back of the paper must not be visible due to the transparency of the paper.
  • Seite 16: Inserting The Paper Roll

    INSERTING THE PAPER ROLL Open the printer cover. Press the release lever (A) on the control mechanism downwards (until you hear an opening click), then lift the upper part of the printer. Orienting the paper roll as indicated in the figure here, unwind about 20 cm of the paper, then insert the roll into its bay making sure to...
  • Seite 17 Still keeping hold of the unwound paper, close the printer by pressing simultaneously on both right and left sides of the paper output slot. Make sure that the unit closes fully on both sides (you should hear a click from the closing mechanism). Pull through the paper and cut it using the manual cutter.
  • Seite 18: Regulating The Near-End-Of-Paper Sensor

    REGULATING THE NEAR-END-OF-PAPER SENSOR Note The near end-of-paper sensor is set up in the factory to function correctly for the most common types of paper roll. If you notice that when the near end-of-paper condition is notified, there is either too little or too much paper left, you can adjust the sensor setting.
  • Seite 19: Getting To Know Your Cash Register

    GETTING TO KNOW YOUR CASH REGISTER MAIN COMPONENTS The cash register and its principal components. Alphanumeric Customer LCD Display Ticket output slot Power on key Touch screen Paper advancement...
  • Seite 20 RS232 RJ45 Serial Interfaces Drawer Ports 1 and 2 Connection Customer display External power RJ12 connection supply DC IN Remote Display interface (built-in) USB Connectors RJ45 Ethernet Line-out On-Off (master) network port jack Togglet switch USB Connectors (master) VGA Display HDMI Microphone port...
  • Seite 21: Customer Display

    CUSTOMER DISPLAY The customer display consists of a liquid crystal display with 2 rear-lit rows displaying up to 20 alphanumeric characters per row. The display is mounted on a height-adjustable special support which can be swivelled to the most appropriate position as shown in the figure. MAX 90°...
  • Seite 22: Technical Specifications

    TECHNICAL SPECIFICATIONS CASING  Resin body and cover.  10.1” touch screen video  Customer liquid crystal display. CUSTOMER DISPLAY The customer display consists of a rear-lit height-adjustable LCD display, rotatable and tiltable, comprised of 2 rows displaying up to 20 alphanumeric characters per row.
  • Seite 23: Software Available

    SOFTWARE AVAILABLE  Windows Embedded POSready 7 (32 bit) BUILT-IN THERMAL PRINTER  Thermal printer with single printing unit.  Printing speed up to 260 mm/sec.  Programmable printing line length for 36, 44 or 52 characters.  Thermal paper roll of dimensions: 80/60/57.5 mm width x 100 mm max. diameter.
  • Seite 25 open H REGISTER GUIDE RAPIDE...
  • Seite 26 Ce manuel décrit la caisse enregistreuse vendue sous le nom NETTUN@7000 Pour en savoir plus sur les fonctions de la caisse enregistreuse, il est possible de télécharger le Guide Usager depuis le site Olivetti (www.olivetti.com). Ce manuel contient tout ce qu’il faut savoir pour configurer la machine.
  • Seite 27 TABLE DES MATIÈRES GÉNÉRALITÉS .................. 1  INSTALLATION ................. 2    CONTENU DE L’EMBALLAGE ..............2   EXIGENCES DE BASE POUR L’INSTALLATION ........3   BRANCHEMENT DE LA CAISSE ENREGISTREUSE AU SECTEUR ..4   ALLUMAGE DE LA CAISSE ENREGISTREUSE........6   INSERTION DU PAPIER ................7 CONSIGNES DE SECURITE ET NORMES GENERALES D’UTILISATION ..................7 INSERTION DU ROULEAU DE PAPIER ..........8...
  • Seite 28 être traité séparément des déchets municipaux non triés; - Olivetti garantit l'activation des procédures de traitement, de collecte, de recyclage et de mise au rebut de l'équipement, conformément à la Directive 2012/96/CE (et modifications successives).
  • Seite 29: Généralités

    GÉNÉRALITÉS ’ La caisse enregistreuse décrite dans ce manuel permet d enregistrer, à des fins fiscales, les données relatives à la vente de marchandises ou de services et ’ représente un instrument indispensable pour la gestion d un point de vente. ’...
  • Seite 30: Installation

    INSTALLATION CONTENU DE L’EMBALLAGE La caisse enregistreuse est livrée dans un emballage contenant les composants suivants :  La caisse enregistreuse  ’ ’ alimentateur externe avec cordon d alimentation  ’ Le guide rapide avec notice d utilisation  Un premier rouleau de papier thermique ...
  • Seite 31: Exigences De Base Pour L'installation

    EXIGENCES DE BASE POUR L’INSTALLATION ’ installation de la caisse enregistreuse prévoit : Le branchement de la caisse enregistreuse au secteur ’ allumage de la caisse enregistreuse ’ insertion du papier Le branchement du lecteur de codes-barres (non indispensable en cas d’usage générique) Le branchement du tiroir (non indispensable en cas d’usage générique) ’...
  • Seite 32: Branchement De La Caisse Enregistreuse Au Secteur

    BRANCHEMENT DE LA CAISSE ENREGISTREUSE AU SECTEUR ’ ’ Brancher l alimentateur externe à la caisse enregistreuse (A), puis l alimentateur externe au secteur de 220 V (B).
  • Seite 33 Avertissements à caractère général :  ’ Ne pas introduire d objets dans la caisse enregistreuse.  ’ il est nécessaire de laisser la caisse enregistreuse sans surveillance de façon prolongée, la débrancher du secteur.  ’ Pour couper le courant de l appareil, il est nécessaire de le débrancher du ’...
  • Seite 34: Allumage De La Caisse Enregistreuse

    ALLUMAGE DE LA CAISSE ENREGISTREUSE Pour allumer la caisse enregistreuse, il faut d’abord brancher la caisse enregistreuse au secteur tel que décrit précédemment, puis placer le bouton d’alimentation sur Marche et, enfin, appuyer sur la bouton . Une fois le bouton enfoncé, la ’...
  • Seite 35: Insertion Du Papier

    INSERTION DU PAPIER Seul du papier thermique homologué doit être utilisé dans Avertissement cette caisse enregistreuse. En effet, l utilisation d un autre ’ ’ type de papier thermique, notamment d’un type trop léger, peut gêner l acheminement du ticket de caisse. Côté ticket ’...
  • Seite 36: Insertion Du Rouleau De Papier

    INSERTION DU ROULEAU DE PAPIER Ouvrir le capot de ’ imprimante. ’ Appuyer à fond (jusqu à entendre un déclic) sur le ’ bouton d ouverture correspondant (A), présent sur la console de commande et soulever la partie supérieure de ’...
  • Seite 37 En tenant le morceau de papier déroulé, refermer le ’ capot de l imprimante, en appuyant en même temps à droite et à gauche de la fente de sortie du papier. Contrôler que le capot est bien fermé sur les deux côtés (il faut entendre un «...
  • Seite 38: Réglage Du Capteur De Papier Presqu'épuisé

    RÉGLAGE DU CAPTEUR DE PAPIER PRESQU ’ ÉPUISÉ ’ Le capteur de papier presqu épuisé est réglé en usine de façon à Remarque fonctionner avec les rouleaux de papier les plus répandus dans le commerce. ’ En cas de condition de papier presqu épuisé...
  • Seite 39: Connaître La Caisse Enregistreuse

    CONNAÎTRE LA CAISSE ENREGISTREUSE COMPOSANTS PRINCIPAUX La caisse enregistreuse et ses principaux composants : Écran LCD alphanumérique pour les clients Compartiment de sortie du ticket de caisse Touche d'allumage Écran tactile Bouton d’avancement du papier...
  • Seite 40 Interfaces RJ45 RS232 Connection Ports série 1 et 2 tiroir Interface pour Alimentation RJ12 le branchement externe CC IN Écran à distance ’ de l écran des clients Connecteurs USB Port Bouton Port réseau (maître) ligne de marche/arrêt Ethernet RJ45 sortie Ports USB (maître)
  • Seite 41: L'écran Client

    L’ÉCRAN CLIENT ’ ’ écran pour les clients est composé d un afficheur à cristaux liquides avec 2 lignes ’ rétroéclairées, pouvant afficher jusqu à 20 caractères alphanumériques chacune. ’ écran est monté sur un support spécial réglable en hauteur, qui peut être tourné ’...
  • Seite 42: Caractéristiques Techniques

    CARACTÉRISTIQUES TECHNIQUES BOÎTIER  Socle et capot en résine.  ’’ Écran tactile de 10,1  Écran client à cristaux liquides ’ ECRAN CLIENT ’ écran client est un afficheur à cristaux liquides, réglable en hauteur, orientable et inclinable, rétroéclairé, de 20 caractères alphanumériques sur chacune des deux lignes disponibles.
  • Seite 43: Logiciels Disponibles

    LOGICIELS DISPONIBLES  POSready 7 (32 bits) compatible avec Windows IMPRIMANTE THERMIQUE INTÉGRÉE  ’ Imprimante thermique avec poste d impression.  ’ ’ Vitesse d impression jusqu à 260 mm/s.  ’ Longueur de ligne d impression programmable : 36, 44 ou 52 caractères. ...
  • Seite 45 open H REGISTER KURZANLEITUNG...
  • Seite 46 NETTUN@7000 vertrieben wird. Nähere Informationen zum Registerkassenbetrieb, eine Programmieranleitung, in der sämtliche Informationen zu den Anwenderhandbuch enthalten sind, kann von der Olivetti Homepage (www.olivetti.com) heruntergeladen werden. Der Hersteller behält sich das Recht vor, das Produkt, das in diesem Handbuch beschrieben wird, ohne Vorankündigung zu ändern.
  • Seite 47 INHALT ALLGEMEINES ................. 1 INSTALLATION ................. 2 INHALT DER VERPACKUNG..............2 VORAUSSETZUNGEN FÜR DIE INSTALLATION........3 ANSCHLUSS DER REGISTRIERKASSE AN DIE STROMVERSORGUNG ................4 EINSCHALTEN DER REGISTRIERKASSE ..........6 EINLEGEN DER PAPIERROLLE ..............7 SICHERHEITSHINWEISE UND ALLGEMEINE BENUTZUNGSBEDINGUNGEN.............7 EINLEGEN DER PAPIERROLLE............8 EINSTELLEN DES SENSORS FÜR DAS NAHE ENDE DES PAPIERS..................10 DIE DRUCKEREINHEIT ...............10 INFORMATIONEN ZUR REGISTRIERKASSE .......
  • Seite 48 Sammelzentren gebracht werden separat Siedlungsabfällen behandelt werden muss; - Olivetti die Aktivierung der Behandlungs-, Sammel-, Wiederverwertungs- und Entsorgungsprozedur der Geräte in Konformität mit der Richtlinie 2012/96/CE (u. folg.mod.) garantiert. 2. FÜR DIE ANDEREN LÄNDER (NICHT-EG-STAATEN) Das Behandeln, Sammeln, Wiederverwerten und Entsorgen von Elektro- und Elektronik-Altgeräten muss nach den geltenden...
  • Seite 49: Allgemeines

    ALLGEMEINES Mit diesem Fiskal-Messgerät, das in diesem Handbuch beschrieben wird, macht das Speichern der Daten zu steuerlichen Zwecken zum Verkauf von Waren und Dienstleistungen möglich und stellt ein unerlässliches Werkzeug zur Verwaltung der Verkaufsstelle dar. Die wichtigsten Merkmale und Leistungen des Produkts sind der 10.1” Touchscreen- Bildschirm mit regulierbarer Schwenkung und das Druckformular zur Ausgabe von Kassenzetteln mit einer Breite von 80 mm oder von 57,5/60 mm, ausgestattet mit automatischer Schneidevorrichtung.
  • Seite 50: Installation

    INSTALLATION INHALT DER VERPACKUNG Die Registrierkasse wird in einer Verpackung mit folgenden Einzelteilen geliefert:  Die Registrierkasse  Externes Netzteil mit Netzkabel  Kurzanleitung mir Gebrauchsanweisungen  Thermopapierrolle mit Erstausstattung  Schubladen-Befestigungs-Kit  Adapter zur Steuerung von Papierrollen mit einer Breite von 57,5 / 60 mm.
  • Seite 51: Voraussetzungen Für Die Installation

    VORAUSSETZUNGEN FÜR DIE INSTALLATION Die Installation der Registrierkasse sieht Folgendes vor: Anschluss der Registrierkasse an die Stromversorgung Einschalten der Registrierkasse Einlegen der Papierrolle Anschluss des Barcode-Lesegeräts (für den allgemeinen Gebrauch nicht unverzichtbar) Anschluss der Schublade (für den allgemeinen Gebrauch nicht unverzichtbar) Anschluss weiterer Anschlussgeräte (für den allgemeinen Gebrauch nicht unverzichtbar).
  • Seite 52: Anschluss Der Registrierkasse An Die Stromversorgung

    ANSCHLUSS DER REGISTRIERKASSE AN DIE STROMVERSORGUNG Schließen Sie das externe Netzteil erst an die Registrierkasse (A) und dann an den 220V Hausanschluss (B).
  • Seite 53: Allgemeine Warnhinweise

    Allgemeine Warnhinweise:  Keine Fremdkörper in die Registrierkasse stecken.  Bleibt die Registrierkasse für einen längeren Zeitraum ungenutzt, unterbrechen Sie die Verbindung mit dem Hausanschluss.  Um das Gerät vom Stromnetz zu trennen, ziehen Sie den Stecker aus der Steckdose; die verwendete Steckdose muss leicht zugänglich und in der Nähe des Gerätes sein.
  • Seite 54: Einschalten Der Registrierkasse

    EINSCHALTEN DER REGISTRIERKASSE Zum Einschalten der Registrierkasse muss wie zuvor beschrieben zuerst das Netzteil an die Kasse angeschlossen werden. Schalten Sie die den Taste Aus-Umschalter, und dann die taste . Durch Drücken der Taste wird das Messgerät innerhalb von kurzer Zeit eingeschaltet und der Verkaufsbereich ist betriebsbereit.
  • Seite 55: Sicherheitshinweise Und Allgemeine Benutzungsbedingungen

    EINLEGEN DER PAPIERROLLE Warnmeldung Verwenden Sie bei dieser Registrierkasse nur anerkanntes Thermopapier. Andere Arten von Thermopapier, insbesondere zu dünnes, könnten ein falsches Aufwickeln der Kassenbonrolle verursachen. Die Schrift und das Logo auf der Rückseite des Kassenbons sollten aufgrund der Durchsichtigkeit des Papiers auf der Vorderseite nicht sichtbar sein.
  • Seite 56 EINLEGEN DER PAPIERROLLE Öffnen Sie die Druckerabdeckung. Drücken Sie den Entriegelungshebel (A) an der Bedienfläche ganz nach unten (bis Sie ein Entriegelungsklick hören) und heben Sie dann den oberen Teil des Druckers Richten Sie die Thermopapierrolle wie auf der folgenden Abbildung aus.
  • Seite 57 Halten Sie weiterhin das abgewickelte Papier fest und schließen Sie die Druckerabdeckung durch gleichzeitiges Drücken auf der linken und rechten Seite Papierabschneideschlitzes. Vergewissern Sie sich, dass die Abdeckung auf beiden Seiten gut verschlossen ist (Sie sollten dazu ein Einrasten des Schließmechanismus hören).
  • Seite 58: Einstellen Des Sensors Für Das Nahe Ende Des Papiers

    EINSTELLEN DES SENSORS FÜR DAS NAHE ENDE DES PAPIERS Der Sensor für das nahe Ende des Papiers wird werksseitig eingestellt, Merke um den Anforderungen der handelsüblichsten Papierrollenarten zu entsprechen. Sollte die Anzeige für das nahe Ende des Papiers zu früh oder zu später aktiviert werden, kann die Einstellung des Sensors geändert werden.
  • Seite 59: Informationen Zur Registrierkasse

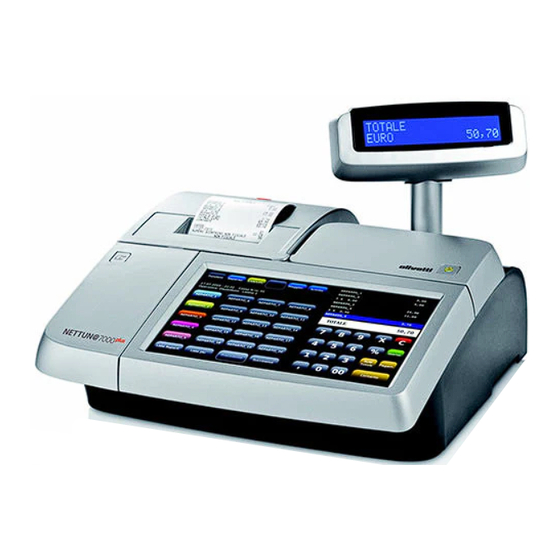
    INFORMATIONEN ZUR REGISTRIERKASSE HAUPTKOMPONENTEN Die Registrierkasse und ihre Hauptkomponenten. ALPHANUMERISCHES LCD- KUNDENDISPLAY AUSGABE KASSENBON EINSCHALTTASTE TOUCHSCREEN PAPIERVORLAUF TASTE...
  • Seite 60 RS232 Serielle RJ45 Schnittstellen Laden- Ports 1 und 2 Verbinder Anschluss zum Externe DC IN RJ12 Anschluss des Versorgung Remote Display Kundendisplays (integriert) USB-Verbinder Line-out Ein-Aus- Anschluss (Master) Stecker Umschalter Ethernet- Anschluss RJ45 USB-Verbinder HDMI Mikrofon- (Master) Display- Display- Stecker Anschluss Anschluss...
  • Seite 61: Kunden-Bildschirm

    KUNDEN-BILDSCHIRM Der Kundenbildschirm ist ein 2-zeiliger, rückbeleuchteter Flüssigkristallbildschirm, auf dem bis zu 20 Zahlen pro Zeile erscheinen können. Der Bildschirm ist auf einem Spezialständer montiert, der in der Höhe reguliert und in die praktischste Stellung gedreht werden kann. MAX 90° ANGABEN ZUM TOUCHSCREEN-EINSATZ Mithilfe des Touchscreens können Sie die Registrierkasse bedienen und alle ihre Funktionen nutzen.
  • Seite 62: Technische Daten

    TECHNISCHE DATEN GEHÄUSE  Gehäuse und Abdeckung aus Harz.  10,1” Touchscreen-Bildschirm  Kunden-Flüssigkristallbildschirm. KUNDEN-DISPLAY Das Display ist ein höhenverstellbarer Flüssigkristallbildschirm höhenverstellbarer, der schwenkbar, neigbar und hinterleuchtet ist und eine Kapazität zum Anzeigen von alphanumerischen Zeichen auf jeder der zwei Reihen hat. MODULEIGENSCHAFTEN ...
  • Seite 63: Software Verfügbar

    SOFTWARE VERFÜGBAR  Windows Embedded POSready 7 (32 bit) INTEGRIERTER THERMODRUCKER  Thermodrucker mit einer Druckstation.  Druckgeschwindigkeit bis zu 260 mm/sec.  Programmierbare Druckzeilenlänge von 36, 44 oder 52 Zeichen.  Abmessungen der Thermopapierrolle: 80/60/57,5 mm Breite x 100 mm max. Durchmesser.
  • Seite 65 open H REGISTER GUÍA RÁPIDA...
  • Seite 66 Para obtener información más detallada acerca de cómo utilizar las funciones de la caja registradora, puede descargar un Guía de Usuario desde el sitio web de Olivetti (www.olivetti.com). Este manual contiene información detallada acerca de la programación de los ajustes.
  • Seite 67 ÍNDICE GENERALIDADES ................1  INSTALACIÓN ................... 2    CONTENIDO DEL PAQUETE ..............2   INSTALACIÓN....................3 CONEXIÓN DE LA CAJA REGISTRADORA A LA TOMA DE   ALIMENTACIÓN..................4   ENCENDIDO DE LA CAJA REGISTRADORA..........6   INSERCIÓN DEL PAPEL ................7 PRECAUCIONES DE SEGURIDAD Y NORMAS GENERALES DE USO....................7 CARGA DEL ROLLO DE PAPEL............8 REGULACIÓN DEL SENSOR DE “POCO PAPEL”......10...
  • Seite 68 - Olivetti garantiza la activación de los procedimientos en materia de tratamiento, recogida, reciclaje y eliminación de los equipos, de conformidad con la Directiva 2012/96/CE (y suces.
  • Seite 69: Generalidades

    GENERALIDADES La Caja Registradora descrita en este manual permite registrar, a efectos fiscales, los datos relativos a la venta de bienes o servicios y representa una herramienta esencial para la gestión del punto de venta. Las principales características y ventajas del producto son el monitor de pantalla táctil de 10.1”...
  • Seite 70: Instalación

    INSTALACIÓN CONTENIDO DEL PAQUETE La caja registradora se suministra en un solo paquete que contiene los siguientes componentes:  Caja Registradora  Unidad de Alimentación externa con cable de alimentación  Guía Rápida con las Instrucciones de uso  Rollo de papel térmico suministrado con la primera entrega ...
  • Seite 71: Instalación

    INSTALACIÓN Los pasos a seguir para la instalación de la caja registradora son los siguientes: conecte la caja a la línea de alimentación encienda la caja registradora inserte el papel conecte el lector de códigos de barras (no es indispensable para un uso general) conecte el cajón (no es indispensable para un uso general) conecte los periféricos externos( no es indispensable para un uso general).
  • Seite 72: Conexión De La Caja Registradora A La Toma De Alimentación

    CONEXIÓN DE LA CAJA REGISTRADORA A LA TOMA DE ALIMENTACIÓN Conecte primero la unidad de alimentación externa a la caja registradora (A) y luego a la toma principal de 220V (B).
  • Seite 73: Advertencias Generales

    Advertencias generales:  No inserte cuerpos extraños en la caja registradora.  Si la caja registradora va a permanecer inactiva por un largo periodo de tiempo, desconéctela de la toma principal.  Para desconectar el dispositivo del suministro eléctrico, quite el enchufe de la toma de electricidad principal.
  • Seite 74: Encendido De La Caja Registradora

    ENCENDIDO DE LA CAJA REGISTRADORA ara encender la caja registradora debe conectar primero la unidad de alimentación a la caja registradora como se ha descrito anteriormente, y a continuación, cambiar el interruptor a la posición de encendido (On) y pulsar la tecla .
  • Seite 75: Inserción Del Papel

    INSERCIÓN DEL PAPEL la caja registradora debe ser utilizada exclusivamente Advertencia papel térmico homologado. Otros tipos de papel térmicos, especialmente papel demasiado fino, podrían causar un avance incorrecto del ticket. El texto escrito y los logotipos en el reverso del ticket no deben ser visibles en el anverso debido a la transparencia del papel.
  • Seite 76: Carga Del Rollo De Papel

    CARGA DEL ROLLO DE PAPEL Abra la tapa de la impresora. Presione la palanca de liberación (A) en el mecanismo de control hasta que esté abajo del todo (hasta que oiga un clic de apertura), a continuación eleve la parte superior de la impresora.
  • Seite 77 Reteniendo la parte de papel desenrollado, cierre la tapa de la impresora presionando al mismo tiempo, a izquierda y derecha, sobre los laterales de la ranura de salida del papel. Asegúrese de que la tapa quede bien cerrada por ambos lados (debe oír el clic de cierre mecánico).
  • Seite 78: Regulación Del Sensor De "Poco Papel

    REGULACIÓN DEL SENSOR DE “POCO PAPEL” el sensor de “poco papel” está regulado de fábrica a fin de satisfacer los requisitos de los tipos de rollo de papel más utilizados. Sin embargo, si cuando recibe un aviso de “poco papel,” comprueba que hay demasiado o demasiado poco, puede ajustar la configuración.
  • Seite 79: Para Conocer La Caja Registradora

    PARA CONOCER LA CAJA REGISTRADORA COMPONENTES PRINCIPALES La caja registradora y sus principales componentes. Pantalla LCD alfanumérica del cliente Ranura de salida tikect Botón de encendido Pantalla táctil Botón de avance papel...
  • Seite 80 RS232 RJ45 interfaces seriales Conexión Puertos 1 y 2 cajón Interfaz para Alimentación RJ12 la conexión de la externa DC IN Pantalla remota pantalla cliente (integrado) Conectores USB Puerto de red Conector Interruptor (master) salida línea de palanca Ethernet RJ45 On/Off Conectores USB VGA Puerto...
  • Seite 81: La Pantalla Para Clientes

    LA PANTALLA PARA CLIENTES La pantalla para clientes consta de una pantalla de cristales líquidos, retroiluminada de 2 filas que puede mostrar hasta 20 caracteres alfanuméricos por fila. La pantalla monta en un soporte especial ajustable en altura y orientable en la posición más cómoda siguiendo las indicaciones de la siguiente imagen MAX 90°...
  • Seite 82: Especificaciones Técnicas

    ESPECIFICACIONES TÉCNICAS CARCASA  Carcasa y tapa de resina.  Pantalla táctil 10,1”  Pantalla de cliente de cristales líquidos. PANTALLA CLIENTES La pantalla clientes consiste en una pantalla de cristales líquidos ajustable en altura, orientable y reclinable, retroiluminada, de 20 caracteres alfanuméricos en cada una de las dos filas disponibles.
  • Seite 83: Software Disponible

    SOFTWARE DISPONIBLE  Windows Embedded POSready 7 (32 bits) IMPRESORA TÉRMICA INTEGRADA  Impresora térmica con una estación de impresión.  Velocidad de impresión de hasta 260 mm/seg.  Longitud línea de impresión programable de 36, 44 o 52 caracteres. ...

Inhaltsverzeichnis