Reloop Digital Jockey 2 Bedienungsanleitung
Professioneller midi-controller professioneller midi-controller
Quelle: reloop.com
Inhaltsverzeichnis
Verfügbare Sprachen
Verfügbare Sprachen
Reloop Digital Jockey 2
mit integrierter 4-Kanal Soundkarte
with integrated 4 channel soundcard
avec carte son 4 canaux intégrée
Master Edition
Professioneller MIDI-Controller
Professional MIDI controller
Contrôleur MIDI professionnel
Bedienungsanleitung
ACHTUNG!
Lesen Sie sich vor der ersten Inbetriebnahme zur eigenen Sicherheit diese
Bedienungsanleitung sorgfältig durch! Alle Personen, die mit der Aufstellung,
Inbetriebnahme, Bedienung, Wartung und Instandhaltung dieses Gerätes zu
tun haben, müssen entsprechend qualifiziert sein und diese Betriebsanleitung
genau beachten. Dieses Produkt erfüllt die Anforderungen der geltenden europäischen
und nationalen Richtlinien, die Konformität wurde nachgewiesen, die entsprechenden Er-
klärungen und Unterlagen sind beim Hersteller hinterlegt.
Instruction Manual
CAUTION!
For your own safety, please read this operation manual carefully before
initial operation! All persons involved in the installation, setting-up, ope-
ration, maintenance and service of this device must be appropriately qua-
lified and observe this operation manual in detail. This product complies
with the requirements of the applicable European and national regulations. Conformi-
ty has been proven. The respective statements and documents are deposited at the
manufacturer.
Mode d'emploi
ATTENTION!
Pour votre propre sécurité, veuillez lire attentivement ce mode d'emploi avant
la première utilisation ! Toutes les personnes chargées de l'installation, de la
mise en service, de l'utilisation, de l'entretien et la maintenance de cet ap-
pareil doivent posséder les qualifications nécessaires et respecter les inst-
ructions de ce mode d'emploi. Ce produit est conforme aux directives européennes et
nationales, la conformité a été certifiée et les déclarations et documents sont en pos-
session du fabricant.
DeuTSCh ........................ 02 - 17
eNGLISh ......................... 18 - 33
FRANçAIS .................... 34 - 52
WARNUNG!
Um Feuer oder einen elektrischen Schock zu vermeiden, setzen Sie dieses Ge-
rät nicht Wasser oder Flüssigkeiten aus! Öffnen Sie niemals das Gehäuse!
WARNING!
To prevent fire or avoid an electric shock do not expose the device to water or fluids!
Never open the housing!
ATTENTION !
Afin d'éviter un incendie ou une décharge électrique, veillez à tenir cet appareil
à l'écart des liquides et de l'humidité ! N´ouvrez jamais le boîtier !
Für weiteren Gebrauch aufbewahren!
Keep information for further reference!
Gardez ces instructions pour des utilisations ultérieurs!
www.reloopdj.com
Reloop Trademark
Global Distribution GmbH
Schuckertstr. 28
48153 Muenster / Germany
© 2009
Nachdruck verboten!
1
Kapitel
Inhaltsverzeichnis

Verwandte Anleitungen für Reloop Digital Jockey 2


Inhaltszusammenfassung für Reloop Digital Jockey 2
- Seite 1 This product complies with the requirements of the applicable European and national regulations. Conformi- ty has been proven. The respective statements and documents are deposited at the Reloop Digital Jockey 2 manufacturer. Mode d‘emploi...
-
Seite 2: Inhaltsverzeichnis
- 9. Minimale Systemanforderungen ..........16 - 10. Support & Download ............... 16 Wir gratulieren Ihnen zum Kauf des Reloop Digital Jockey 2 Master edition. vielen Dank, dass Sie unserer Diskjockey-Technologie Ihr vertrauen schenken. vor Inbetriebnahme bitten wir Sie, alle Anweisungen sorgfältig zu studieren und zu befolgen. -
Seite 3: Bestimmungsgemässe Verwendung
Stellen Sie keine Flüssigkeitsbehälter, die leicht umfallen können, auf dem Gerät oder in dessen Nähe ab. Falls doch einmal Flüssigkeit in das Geräteinnere gelangen sollte, sofort den Netzste- cker ziehen. Lassen Sie das Gerät von einem qualifizierten Servicetechniker prüfen, bevor es erneut genutzt wird. -
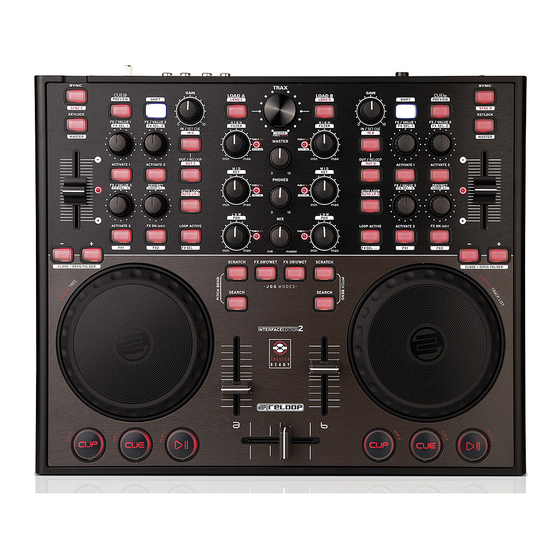
Seite 4: Bezeichnungen
B21. Load-Taste (Shift: Deck C/D-Taste) [Traktor PRO] B22. Loop In / Set Cue-Taste (Shift: Loop In-Taste Deck C/D) [Traktor PRO] B23. Loop Out / Reloop-Taste (Shift: Loop Out Deck C/D) [Traktor PRO] B24. Auto Loop-Taste (Shift: Auto Loop Deck C/D) [Traktor PRO] B25. -
Seite 5: Bezeichnungen Nur Für Die Master Edition
BezeIChNuNGeN NuR FüR DIe MASTeR eDITIoN B35. 6,3 mm Mikrofonanschluss B36. Mic-Lautstärkeregler B37. Mic-Equalizer B38. 3,5 mm & 6,3 mm Kopfhöreranschluss B39. Kopfhörer-Equalizer B40. Crossfader-Kurve B49. MIDI/Phono/Line-Wahlschalter B41. Netzkabel-Zugentlastung B42. Netzteilanschluss B43. Ein/Aus-Schalter B44. USB-Anschluss B45. Audio-Ausgang asymmetrisch Cinch oder symmetrisch 6,3 mm Klinke (Master1) B46. -
Seite 6: Erste Schritte / Asio Treiber Installation
2. Nachdem Sie Ihre Sprache gewählt haben, werden Ihnen die Installations-Optionen angezeigt. Wählen Sie „Install the driver“. 3. Sie werden nun aufgefordert den Reloop Digital Jockey 2 – Master Edition mit Ihrem System zu ver- binden. Verbinden Sie nun das Netzteil mit der DC-Buchse -B42- auf der Rückseite des Gerätes. Schalten Sie das Gerät mittels des Ein/Aus-Schalters -B43- ein. -
Seite 7: Traktor Le Installation
4. PeRIPheRIe ANSChLüSSe Der Reloop Digital Jockey 2 Master Edition besitzt ein integriertes professionelles Audio-Interface mit 24-bit/96 kHz. Somit ist eine weitere externe oder integrierte PC-Soundkarte nicht nötig. Im Folgenden finden Sie eine Auflistung der Anschlüsse, die Sie vornehmen können: a) Audio-Ausgang (Geräterückseite) -B45-... -
Seite 8: Bedienung
Nachdem Sie den Controller angeschlossen und die Software installiert haben, können Sie nun Trak- tor mit dem Digital Jockey 2 Master Edition bedienen. Die Digital Jockey Bedienoberfläche für Traktor PRO unterscheidet sich größtenteils zu Traktor LE in der Effekt- und 4-Deck-Steuerung. - Seite 9 Modus über. Erneutes Drücken auf die Loop Out-Taste verlässt den Loop Out-Modus. Im Wiedergabe- Modus ruft das Drücken der Loop Out-Taste einen zuvor gesetzten, manuellen Loop auf (Reloop). Shift: Loop Out C/D. Setzen des Loop Out-Punkts für Deck C/D. [Traktor PRO] B24.
- Seite 10 B25. Loop Active-Anzeige Die Loop Active-Taste leuchtet auf, wenn ein Loop aktiv ist. Shift: FX Select (Advanced Mode). Im Advanced Effect-Modus kann mit dieser Taste durch die Effek- te gewechselt werden. [Traktor PRO] B26. FX/value 1-3 encoder [Traktor PRo] Je nach eingestelltem Effekt können mit diesen Reglern die Parameter 1-3 eingestellt werden. Shift: FX Select 1-3 im Chained Effekt-Modus können mit den Encodern die Effekte für die Bänke 1-3 gewählt werden.
- Seite 11 B42. Netzteilanschluss An diese Buchse können Sie das Netzteil des Digital Jockey 2 Master Edition anschließen. B43. ein/Aus-Schalter Mit diesem Schalter lässt sich Ihr Digital Jockey ein- bzw. ausschalten. B44. uSB-Anschluss Schließen Sie hier Ihr USB-Kabel an. B45. Audio-Ausgang (Master1) Verbinden Sie hier Ihre Haupt-Soundanlage asymmetrisch mit einem Cinch-Kabel oder symmetrisch mit einem 6,3 mm Klinkekabel.
-
Seite 12: Stand Alone-/Software-Betrieb
6. STAND ALoNe-/SoFTWARe BeTRIeB Ihr Reloop Digtal Jockey 2 – Master Edition ist mehr als ein MIDI-Controller mit einem professionel- len 24-Bit/96 kHz Audiointerface. Sie haben die Möglichkeit ihn, völlig unabhängig von der Verwen- dung einer Software, als analogen Stand-Alone Mixer zu nutzen. -
Seite 13: Midi Controll Values
7. MIDI-CoNTRoL vALueS LINKeS DeCK BuTToN MIDI CoMMAND (PuSheD) MIDI CoMMAND (ReLeASe) SYNC 09 90 01 7F 09 90 01 00 KEYLOCK 09 90 02 7F 09 90 02 00 PITCH BEND- 09 90 03 7F 09 90 03 00 PITCH BEND+ 09 90 04 7F 09 90 04 00... - Seite 14 ReChTeS DeCK BuTToN MIDI CoMMAND (PuSheD) MIDI CoMMAND (ReLeASe) SYNC 09 90 3D 7F 09 90 3D 00 KEYLOCK 09 90 3E 7F 09 90 3E 00 PITCH BEND- 09 90 3F 7F 09 90 3F 00 PITCH BEND+ 09 90 40 7F 09 90 40 00 PREVIEW 09 90 41 7F...
-
Seite 15: Technische Daten
8. TeChNISChe DATeN Folgende Daten des Herstellers werden von der Global Distribution GmbH nicht auf Plausibilität und Richtigkeit geprüft: Stromversorgung: ...............DC6V, 3A Maße: ....................370 x 61 x 307 mm Gewicht: ..................2,9 kg (ohne USB- und Cinch-Kabel) Eigangs-/Ausgangsimpedanz & Empfindlichkeit: ....EQ Flat, Maximum Gain, Load = 100K Ohm eingansimpedanz und Referenz-einganspegel: Line: ....................47K Ohm / -14dBV (200mV) +/-0.1 dB Phono: ...................47K Ohm / -50dBV (3,16mV) +/-0.1 dB... -
Seite 16: Minimale Systemanforderungen
9. MINIMALe SySTeMANFoRDeRuNGeN - Windows XP (Service Pack 2), Vista (32-Bit) - Pentium III, 1 GHz oder Athlon XP 1,4 GHz - 512 MB RAM Mac: - Mac OS 10.4 - G4 1,5 GHz oder Intel Core Duo Familie - 512 MB RAM 10. - Seite 50 NOTES ___________________________________________________________________________________________ ___________________________________________________________________________________________ ___________________________________________________________________________________________ ___________________________________________________________________________________________ ___________________________________________________________________________________________ ___________________________________________________________________________________________ ___________________________________________________________________________________________ ___________________________________________________________________________________________ ___________________________________________________________________________________________ ___________________________________________________________________________________________ ___________________________________________________________________________________________ ___________________________________________________________________________________________ ___________________________________________________________________________________________ ___________________________________________________________________________________________ ___________________________________________________________________________________________ ___________________________________________________________________________________________ ___________________________________________________________________________________________ ___________________________________________________________________________________________ ___________________________________________________________________________________________ ___________________________________________________________________________________________ ___________________________________________________________________________________________ ___________________________________________________________________________________________ ___________________________________________________________________________________________ ___________________________________________________________________________________________ ___________________________________________________________________________________________ ___________________________________________________________________________________________ ___________________________________________________________________________________________ ___________________________________________________________________________________________ ___________________________________________________________________________________________ ___________________________________________________________________________________________ ___________________________________________________________________________________________ ___________________________________________________________________________________________ ___________________________________________________________________________________________ ___________________________________________________________________________________________...
- Seite 51 NOTES ___________________________________________________________________________________________ ___________________________________________________________________________________________ ___________________________________________________________________________________________ ___________________________________________________________________________________________ ___________________________________________________________________________________________ ___________________________________________________________________________________________ ___________________________________________________________________________________________ ___________________________________________________________________________________________ ___________________________________________________________________________________________ ___________________________________________________________________________________________ ___________________________________________________________________________________________ ___________________________________________________________________________________________ ___________________________________________________________________________________________ ___________________________________________________________________________________________ ___________________________________________________________________________________________ ___________________________________________________________________________________________ ___________________________________________________________________________________________ ___________________________________________________________________________________________ ___________________________________________________________________________________________ ___________________________________________________________________________________________ ___________________________________________________________________________________________ ___________________________________________________________________________________________ ___________________________________________________________________________________________ ___________________________________________________________________________________________ ___________________________________________________________________________________________ ___________________________________________________________________________________________ ___________________________________________________________________________________________ ___________________________________________________________________________________________ ___________________________________________________________________________________________ ___________________________________________________________________________________________ ___________________________________________________________________________________________ ___________________________________________________________________________________________ ___________________________________________________________________________________________ ___________________________________________________________________________________________...