Herunterladen Inhalt Inhalt Diese Seite drucken
AMICUS START Bedienungsanleitung

AMICUS START Bedienungsanleitung

Butterfly tischtennis roboter
Inhaltsverzeichnis

Werbung

Verfügbare Sprachen

Verfügbare Sprachen

AMICUS
START
Table Tennis Robot
Owner's Manual | Bedienungsanleitung | Manuel d'utilisation
1

Werbung

Inhaltsverzeichnis
loading

Inhaltszusammenfassung für AMICUS START

  • Seite 1 AMICUS START Table Tennis Robot Owner’s Manual | Bedienungsanleitung | Manuel d’utilisation...
  • Seite 2 • The ball throw wheels rotate at high speed. Avoid touching the wheels during operation! • Use this product only in enclosed and dry rooms. Used properly, your AMICUS START will always be a great training partner and friend (AMICUS is Latin for Friend).
  • Seite 3: Inhaltsverzeichnis

    IMPORTANT: Please read instructions carefully prior to use! The Control Panel chapter describes basic adjustments of the AMICUS START table tennis robot. More detailed instructions can be found in the Operation chapter. Contents 1. Setup ..................................4 2. Control Panel ................................6 3.
  • Seite 4: Setup

    Gently let go of the base and the robot will hang by its own weight as seen in Photo 2. Please note that AMICUS robots are designed to fit onto 25 mm (1 in.) thick tops. If your top is less than 25 mm thick, you will need to adjust the support legs using the height adjusting screws.
  • Seite 5 Photo 3A Photo 3B 4. Standing behind the robot, grip the top points of the net and fold the net down on both sides until the net fully opens (as seen in Photo 4A). Fit the plastic Corner Brackets of the net around the corners of your table as seen in Photo 4B.
  • Seite 6: Control Panel

    Base (see Photo 6A). Pull the Control Panel Cable to the opposite side of the table and connect it to the Control Panel (see Photo 6B). Next attach the Control Panel Mounting Bracket on the side of the table and then hang the Control Panel on the Control Panel Mounting Bracket. You may use a Velcro strip to help secure the bracket onto the side of the table.
  • Seite 7: Operation

    3 Add Ball Button — Press this button to add a ball to your Exercise. After pressing, a new ball is added and its LED starts flashing. 4 Delete Ball Button — Press this button to delete a ball from your Exercise. Works for Balls 2–6. You cannot delete Ball 1.
  • Seite 8: Adjustment Of Head Height

    Balls Thrown To One Placement The easiest way to learn the various controls is to start with a single ball delivered to one location. On the AMICUS START, all Balls in an Exercise will have 1 Ball Type (other models allow different Ball Types for each Ball).
  • Seite 9: Balls Thrown To 2 Or More Placements

    LED. E.g., if you have 3 balls with lit LEDs and #2 is flashing, AMICUS will throw Ball 2, followed by Ball 3, and followed by Ball 1. Then it will start over with Ball 2. It will continue this order of thrown balls until you turn Ball/Min to 0.
  • Seite 10: Random Controls

    Please note: Because the distance is greater from the robot to the corners of the table than from the robot to the center of the table, AMICUS START automatically varies the length of ball delivery so an Exercise runs correctly when it contains mixed placements. This is possible thanks to the built in pro- gram and the special placing mechanism.
  • Seite 11: Linking The Remote Switch To The Robot

    1. If Ball/Min on the Control Panel is set to 0, pushing the top button (Start) of the remote will throw 1 ball (current ball) of the Exercise shown on the Control Panel. 2. If Ball/Min on the Control Panel is not set to 0, pushing the top button (Start) of the remote will cause the exercise shown on the Control Panel to start playing at whatever frequency the Ball/Min is currently set to.
  • Seite 12: Take Down, Storage, & Transport

    Take Down, Storage, & Transport Upon finishing your training session, please power off your robot by unplugging from power; or alterna- tively, plug your robot into a power strip and use the switch on the strip to turn the power off to your robot.
  • Seite 13: Maintenance & Repair

    5. AMICUS robots are designed for use in clean, dry, indoor rooms. Do not use outdoors or in any wet or damp environment. Avoid leaving your robot in a hot car or trunk.
  • Seite 14: Replacing The Wheels

    When the wheels can’t be adjusted anymore, or the special coating on the wheels has worn off, the wheels should be replaced. To do so, start with the lower wheel. Using the smaller 2 mm hex wrench, loosen the small setscrew that holds the wheel onto the shaft of the motor (see Photo 9A) Before tak- ing it off, check and memorize the exact position of the wheel on the shaft of the motor.
  • Seite 15: Ball Jams

    Photo 9A Photo 9B Photo 9C Photo 9D Ball Jams Photo 10 Your robot is equipped with a special system to detect and react to problems in the ball channel. When the system detects a problem, it will attempt to automatically clear the ball jam by turning the Ball Feed Motor and the wheels forward and backward 7-8 times.
  • Seite 16: Other Maintenance

    11-12 times before it stops automatically. If so, place balls back in machine and resume normal operations. If not, it is indicative of problems with the Ball Feed Motor and/or the Ball Feed Mechanism and you should contact your an AMICUS Service Center for further assistance. Other Maintenance After a lot of use, the White Strip found on the inside upper surface of the Deflector Plate can wear out and the machine becomes inaccurate.
  • Seite 17 Attention: If you are not able to solve the problems with the help of the Troubleshooting chart, please consult an AMICUS service center. If you see any exposed wires on the Power Supply, disconnect from power immediately and replace the Power Supply. Failure to do so could result in...
  • Seite 18: List Of Replacement Parts

    Mover tubes Power electronic Ball collecting net Power electronic cover plate Ball catching net Extension cord - Start,Expert Ball feeding tube Control box hanger Ball throwing head AMICUS Start controlbox Left top shooting motors AMICUS Expert controlbox...
  • Seite 20: Technical Data

    93/68/EEC—Registration #: AN 50091861 0001, Report #: 17004848 001. Also Test Reports # NTEK- 2010NT1115351E and NTEK-2010NT1115353SS. The AMICUS START table tennis robot is permitted to bear the CE trademark. Manufacturer: Tamasu Butterfly GmbH, Kommunikationsstr. 8, 47807 Krefeld 8. Warranty Information FULL 2-YEAR MANUFACTURER’S WARRANTY...
  • Seite 21 AMICUS START Tischtennis Roboter Owner’s Manual | Bedienungsanleitung | Manuel d’utilisation...
  • Seite 22 • Der Roboter darf nur mit Spannungen zwischen 100-230 Volt betrieben werden. • Die Ballwurfscheiben rotieren mit hoher Geschwindigkeit, nicht anfassen! • Der Roboter darf nur in trockenen und geschlossenen Räumen betrieben werden. Richtig behandelt wird AMICUS START ein langjähriger Trainingspartner für Sie sein. (AMICUS ist das lateinische Wort für “Freund”)
  • Seite 23 WICHTIG: Bitte lesen Sie die Bedienungsanleitung aufmerksam durch! Inhalt 1. Aufbau ..................................24 2. Control Panel ................................ 26 3. Betrieb ..................................27 Nomenklatur ..................................27 Einstellung der Kopfhöhe ............................... 28 Starten des Roboters ..............................28 Ein Ball, gespielt auf eine Platzierung ......................... 28 Ballauswurf auf 2 oder mehrere Platzierungen .......................
  • Seite 24: Aufbau

    Basis unten durch die Haken, oben durch die Lippe der Basis vom eigenen Gewicht sicher gehalten wird (Foto 2). Die AMICUS Roboter sind von Werk aus auf Tische mit 25mm Oberfläche voreingestellt,. Um auch bei dünneren Oberflächen einen idealen Halt und eine senkrechte Position des Auswurf- kopfes zu gewährleisten, sind die Haltehaken an ihrem oberen...
  • Seite 25 Foto 3A Foto 3B 4. Nun die Ballfangnetze vollständig herunterfalten (Foto 4A), so dass die Eckkappen über den Tisch- ecken sitzen (Foto 4B). Foto 4A Foto 4B HINWEIS: Die beiden kurzen Klettstreifen können zusätzlich auf den Eckkappen angebracht werden, um einen sicheren Halt des Netzes zu gewährleisten. 5.
  • Seite 26: Control Panel

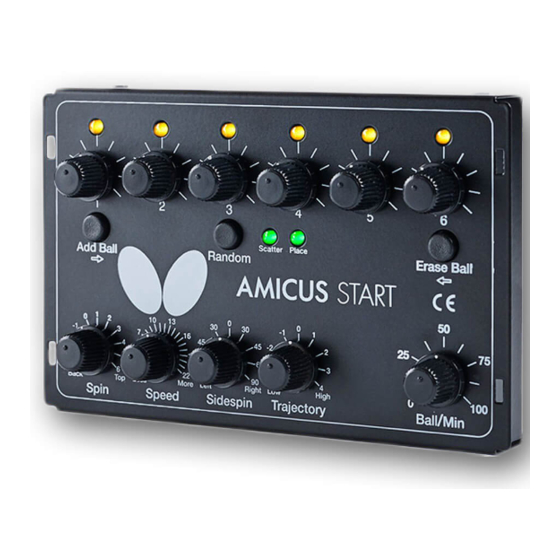
    am Tisch. Auch hier kann ein Klettstreifen für besseren Halt am Tisch angebracht werden. Foto 6A Foto 6B 2. Control Panel Scatter Place Add Ball Random Erase Ball Back Less More Left Right High Spin Speed Sidespin Trajectory Ball Min. Ball LEDs (1–6) —...
  • Seite 27: Betrieb

    Ball oder andere spezielle Übungen verwendet werden. 3. Betrieb Nomenklatur Um die vielfältigen Funktionen ihres AMICUS Roboters zu erklären, werden im Folgenden zunächst einige Begriffe definiert. Ball Typ — 4 Einstellungen verändern den Ball Typ: Spin, Speed, Sidespin und Flugkurve.
  • Seite 28: Einstellung Der Kopfhöhe

    Der einfachste Weg die verschiedenen Steuerungen zu lernen ist, in dem mit einem Ball nur eine Platzierung angespielt wird. Beim AMICUS START haben alle Bälle in einer Übung den gleichen Ball Typ (andere Modelle ermöglichen unterschiedliche Ball Typen für jeden Ball). Nach dem Einschalten des Control Panel, sollte nur die Ball 1 leuchten und blinken.
  • Seite 29: Ballauswurf Auf 2 Oder Mehrere Platzierungen

    Einstellung Ball Typ: • Die Trajectory Taste (9) erhöht oder verringert die Flugkurve des Balls (Auswurfwinkel). Obwohl auf dem Control Panel nur 9 Einstellungen angegeben sind, gibt es zwischen den einzelnen markierten Einstellungen ca. 15 Einstellungsmöglichkeiten. Insgesamt können Sie dann zwischen 150 Einstellun- gen wählen.
  • Seite 30: Random Funktion

    Er beginnt mit dem Ball, bei dem die LED blinkt. Z.B.: Wenn Sie 3 Bälle mit leuchtenden LEDs haben und die zweite LED blinkt, spielt AMICUS erst den zweiten Ball, dann den dritten und dann den ersten Ball. Dann beginnt es wieder mit dem zweiten Ball. Das wird so lange fortgeführt, bis Sie Ball/Min auf 0 drehen.
  • Seite 31: Die Fernbedienung (Optional)

    Ball (einer Übung) ausgeworfen. 2. Ist der Ball/Min Regler auf dem Control Panel nicht auf 0 gesetzt, wird beim Drücken der (Start) Taste auf der Fernbedienung die aktuell einge- stellte Übung mit jener Frequenz gespielt, die am Ball/Min Regler auf dem Control Panel eingestellt wurde.
  • Seite 32: Wechseln Der Batterie Ihrer Fernbedienung

    Wechseln der Batterie Ihrer Fernbedienung Die Fernbedienung wird durch zwei 3V, CR2016 Knopfzellen Batterien betrieben. Nach längerem Ge- brauch werden die Batterien schwächer und müssen ausgewechselt werden. Nach dem Kauf neuer Bat- terien öffnen Sie Ihre Fernbedienung, indem Sie eine Münze oder einen Schlitz-Schraubenzieher in den Schlitz am Ende der Fernbedienung stecken und anschließend drehen, um die Fernbedienung zu öffnen.
  • Seite 33: Wartung Und Reparatur

    Sie nicht, die Räder mit Chemikalien zu reinigen, da diese für die Beschichtung schädlich sein können. 5. AMICUS Roboter sind für saubere und trockene Innenräume konzipiert. Verwenden Sie den Roboter nicht draußen in einer feuchten oder nassen Umgebung. Vermeiden Sie es, Ihren Roboter in einem heißen Auto oder Kofferraum zu lassen.
  • Seite 34: Ersetzen Der Räder

    Längen und hohem Tempo herausgibt. Wenn die Foto 8B Länge der ausgeworfenen Bälle ungleichmäßig ist, sollte der Abstand zwischen den 3 Rädern angepasst werden. Um den Abstand der Räder zu überprüfen, setzen Sie das mitgelieferte Abstandsstück (schwarze Röhre mit 3 Graten) zwischen die 3 Rollen, so dass die Grate die Rollen nicht berühren (Siehe Foto 8A).
  • Seite 35: Ballstau

    boterkopf begrenzt wird. Da die Schussrollen aus Schaumstoff bestehen, können Sie etwas eingedrückt werden um genügend Halt zu bieten. Sollte der Platz dennoch nicht ausreichen, müssen Oszillator- und Trajectory Motor zusätzlich ausgebaut werden. Wir empfehlen, alle 3 Räder auf einmal auszuwechseln, auch wenn nur ein Rad ausgewechselt werden müsste, um einen ungleichmäßigen Ballauswurf zu vermeiden.
  • Seite 36: Andere Wartungen

    Problem erneut auftritt. Ist dies der Fall, überprüfen Sie, dass kein Ball zwischen den 3 Rädern fest- steckt (tritt häufig auf, wenn die Kopfhöhe nach unten bewegt wurde). Wenn ja, entfernen Sie den Ball mit der Hand und setzen Sie den normalen Betrieb fort. Andernfalls kontaktieren Sie bitte ihr AMICUS Service Center.
  • Seite 37: Fehlerbehebung

    E. Wenn der Roboter weiterhin die Bälle auf falsche Platzierun- gen spielt, muss die Deflektorplatte angepasst oder erneuert werden. Wenden Sie sich an ein AMICUS Service Center. 5. Bälle werden in unterschiedli- A. Überprüfen Sie den Abstand der Räder (S. 33).
  • Seite 38 Achtung: Wenn sie nicht in der Lage sind, die Probleme mit dieser Fehlerbehebungsliste zu lösen, wenden Sie sich bitte an ein AMICUS Service Center. Wenn sie irgendwelche freiliegenden Drähte an dem Netzteil sehen, trennen Sie dies sofort vom Strom und ersetzen Sie das Netzteil. Sonst...
  • Seite 39: Liste Der Ersatzteile

    Deflektorplatt Aufhängung Abdeckung Platzierungsmotor Ballfangnetzpfosten Abstandsstücke & Schrauben Ballfangnetzschienen Stromversorgungsplatine Ballwanne Abdeckung Stromversorgungsplatine Ballfangnetz Verbindungskabel (START & EXPERT) Ballrohr Bedienpultaufhängung Auswurfkopf Control Panel START Linker oberer Motor Conrol Panel EXPERT rechter oberer Motor 7-Zoll Tablet (PRIME) 13LO Unterer Motor 24V 3A Adapter...
  • Seite 41: Technische Daten

    #: AN 50091861 0001, Report #: 17004848 001. Also Test Reports # NTEK-2010NT1115351E and NTEK-2010NT1115353SS. The AMICUS START table tennis robot is permitted to bear the CE trademark. The AMICUS START table tennis robot is permitted to bear the CE trademark.
  • Seite 43 AMICUS START Robot de Tennis de Table Owner’s Manual | Bedienungsanleitung | Manuel d’utilisation...
  • Seite 44 • Les roues de distribution des balles tournent à grande vitesse. Évitez de les toucher pendant que le robot est en fonctionnement ! • Utilisez le robot uniquement dans un local fermé et sec. Bien utiliser votre robot AMICUS START garantira un excellent partenaire d’entraînement : AMICUS signifie ami en latin.
  • Seite 45 IMPORTANT : veuillez lire attentivement le manuel avant utilisation. Le chapitre panneau de commande décrit les réglages basiques du robot de tennis de table AMICUS START. Plus d’informations sont disponibles dans le chapitre Operation. Sommaire 1. Montage .................................46 2. Panneau de commande ............................48 3.
  • Seite 46: Montage

    à des plateaux d’une épaisseur de 25 mm. Si le plateau fait moins de 25 mm d’épaisseur, vous devrez ajouter une entretoise au bas de la table pour que votre AMICUS soit correctement ajusté et que les balles soient bien envoyées.
  • Seite 47 Photo 3A Photo 3B 4. Debout derrière le robot, saisissez les bouts supérieurs du filet et pliez-le des deux côtés jusqu’à ce que le filet s’ouvre complètement (voir photo 4A). Installez les supports de coin en plastique du filet autour des coins de votre table comme indiqué sur la photo 4B. Photo 4A Photo 4B CONSEIL : Vous pouvez attacher les deux bandes Velcro les plus courtes aux coins de la table sous...
  • Seite 48: Panneau De Commande

    jack (qui ressemble à une prise casque) sur le côté de la base (voir la photo 6A). Tirez le câble du panneau de commande sur le côté opposé de la table et connectez-le au panneau de commande (voir la photo 6B). Ensuite, fixez le support de montage du panneau de commande sur le côté de la table, puis suspendez le panneau de commande sur le support de montage.
  • Seite 49: Fonctionnalités

    Placement Knobs (1–6) : Définit le placement gauche / droite pour chaque balle. Réglage à la position de 12:00 indique au robot de lancer cette balle sur la ligne centrale. Le réglage d’un bouton à gauche ou à droite de 12:00 indique au robot de lancer la balle sur les parties gauche ou droite. Régler un bouton à...
  • Seite 50: Réglages De La Hauteur De La Tête

    être distribuées le long de la ligne centrale. Appuyez sur Start et observez où les balles atterrissent par rapport à la ligne centrale. Si les balles sont distribuées à gauche ou à droite de la ligne centrale, alors arrêtez la distribution des balles. Sur le robot, desser- rer le grand bouton noir à...
  • Seite 51: Distribution Des Balles

    La façon la plus simple d’apprendre les différents réglages est de commencer avec un seul type de balle distribuée à un emplacement. Sur le robot AMICUS START, toutes les balles d’un exercice auront un type de balle (les autres modèles permettent différents types de balles pour chaque balle). Lors de la mise sous tension du panneau de commande, seule la balle 1 LED devrait être allumée et devrait...
  • Seite 52: Type De Balle Lancé À 2 Et À Plus D'emplacements

    LED. Par exemple, si vous avez 3 balles avec des LED allu- mées, AMICUS lancera la balle 1, suivie de la balle 2 et puis de la balle 3. Ensuite, il recommencera avec la balle 1.
  • Seite 53: La Télécommande (En Option)

    : 1. Si Ball / Min sur le panneau de commande est réglé sur 0, appuyez sur le bouton du haut (Start) de la télécommande qui distribuera une balle (balle actuelle) de l’exercice affiché sur le panneau de commande.
  • Seite 54: Changer Les Piles De La Télécommande

    2. Pendant le compte à rebours, appuyez sur l’une des touches de la télécommande. 3. Le robot termine automatiquement le processus de connexion et reprend son fonctionnement normal. 4. Testez votre télécommande en appuyant sur le bouton A pour voir si votre robot commence à lancer des balles.
  • Seite 55: Entretien Et Réparations

    5. Les robots AMICUS sont conçus pour une utilisation dans des pièces propres, sèches et à l’inté- rieur. Ne pas utiliser à l’extérieur ou dans un environnement humide. Évitez de laisser votre robot dans une voiture ou un coffre chaud.
  • Seite 56: Vérification Et Réglage De L'espacement Des Roues

    Vérification et réglage de l’espacement des roues Les roues du robot AMICUS sont très durables (au moins 1000 heures). Mais finalement, ces roues s’useront après une utilisation longue ou intense. Au fur et à mesure que les roues s’usent, l’espace entre les trois roues s’agrandit, ce qui fait que les roues perdent leur emprise sur la balle.
  • Seite 57 Maintenant, tournez manuellement la roue Photo 8C pour vous assurer qu’elle ne frotte sur aucune surface. Si c’est le cas, desserrez la vis de réglage et déplacez légèrement la position de la roue sur l’arbre et réessayez jusqu’à ce que la roue ne frotte plus sur aucune surface.
  • Seite 58: Bourrage Des Balles

    à plusieurs reprises. Une fois que cette érosion apparaît, il est temps de remplacer la bande blanche (la trajectoire de la balle deviendra moins cohérente). Contactez votre support AMICUS pour obtenir une bande blanche de remplacement et les instructions pour la changer.
  • Seite 59: Problémes De Distribution Des Balles

    3. Les voyants du panneau de A. Réglez le bouton Ball / Min plus haut que zéro. commande s’allument, mais B. Appuyez sur Start / Stop pour lancer la distribution des aucune balle n’est projetée. balles. 4. Des balles lancées aux mau- A.
  • Seite 60 Attention : Si vous n’êtes pas en mesure de résoudre les problèmes à l’aide de ce tableau de dépannage, veuillez consulter un centre de service AMICUS. Si vous voyez des fils dénudés sur l’alimentation, débranchez immédiatement l’alimentation et remplacez l’alimentation. Ne pas le...
  • Seite 61: Pièces De Rechange

    Filet de collecte des balles Cable de commande Tube d’alimentation des balles Support de boite de contrôle Tête d’éjection des balles AMICUS Start Panneau de contrôle Moteurs d’éjection au sommet AMICUS Expert Panneau de contrôle Moteurs d’éjection supérieur Tablette de 7 pouces (Prime) 13LO Moteur d’éjection inférieur...
  • Seite 63: Spécifications & Certifications Électriques

    CEE 93/68 / CEE-Registration #: AN 50091861 0001, Report #: 17004848 001. Également les rapports de test # NTEK-2010NT1115351E et NTEK-2010NT1115353SS. Le robot de tennis de table AMICUS START est autorisé à porter la marque CE. Fabricant : Tamasu Butterfly Europa GmbH, Kommunikationsstr. 8, 47807 Krefeld 8.
  • Seite 64 Tamasu Butterfly Europa GmbH Kommunikationsstr. 8 47807 Krefeld, Germany amicus@butterfly.tt +49 2151 9356-0...

Inhaltsverzeichnis