Werbung
Quicklinks
Werbung

Inhaltszusammenfassung für AEG Ideal Steam
- Seite 1 Ideal Steam iron press/Bügelpresse...
-
Seite 2: Wichtige Sicherheitshinweise
WICHTIGE SICHERHEITSHINWEISE Beim Gebrauch der Dampfbügelpresse beachten Sie bitte die folgenden – Es darf nur kaltes Wasser benutzt werden. Sicherheitsvorkehrungen : – Halten Sie Ihre Hand beim Bügeln nicht zwischen Bügeltisch und Heizplatte. – Nehmen Sie das Gerät nicht in Betrieb, ohne die Gebrauchsanweisung zu –... -
Seite 3: Important Safeguards
IMPORTANT SAFEGUARDS When using your ironing press, basic safety precautions should be followed, – For any repair, take your machine to a registered after-sales service centre, including the following : so that the repair will be in accordance with the standards indicated in this –... -
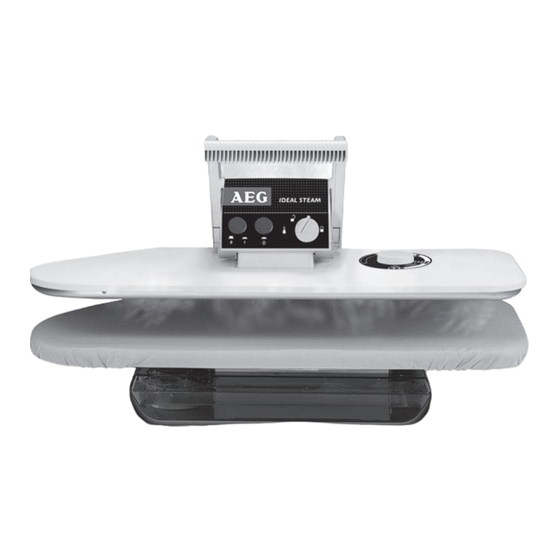
Seite 4: Wichtige Teile
DESCRIPTION WICHTIGE TEILE 1.Betriebschalter (Ein/Aus- 1. Main on-off switch Schalter) 2. Steam switch 3. Thermostat pilot light 2.Dampfschalter 4. Security lock selector 3.Thermostat-Kontrolllampe 5. Temperature selecting 4.Sicherheitsverschluss thermostat 5.Temperatur-Reglerknopf 6. Heating plate 6.Heizplatte 7. Padded 7.Gepolstertes ironing/steaming board Dampfbügelbrett 8. Locating the anti-scale 8.Behälter für cartridge into the Kalkfilterkartusche (im... - Seite 5 ANWENDUNG USING YOUR PRESS 1. Sicherheitsverschluss 1. SECURITY LOCK Um ein versehentliches Öffnen der Presse zu To prevent accidental opening, your ironing press vermeiden, ist Ihre Bügelpresse bei der Lieferung is locked for safety. To unlock the press, turn the verschlossen.
- Seite 6 EINSETZUNG DER INSERTING THE KALKFILTER- ANTI-SCALE KARTUSCHE CARTRIDGE FILLING UP THE WASSERTANK WATER RESERVOIR FÜLLUNG 4. Halten Sie den Wassertank an 4. Take hold the reservoir at both beiden Seiten und ziehen Sie ihn ends and pull it towards you until vor (Vorfüllungsstellung).
- Seite 7 10. Füllen Sie den Behälter mit Leitungs- oder duftlosem, 10. Fill the reservoir with tap or demineralised water destilliertem Wasser. 11. Push the reservoir right in to make sure of a firm 11 Drücken Sie jetzt den Wassertank fest ein bis er ein- connection with the appliance.
- Seite 8 13. Drücken Sie den Betriebsschalter ein. 13. Depress the main On/Off switch. 14. Temperatur-Kontrollampe 14. Temperature control - Gleichzeitig mit dem Einschalten der Presse leuchtet die - Having switched on your press, the temperature signal Kontrollampe der Temperatur auf. lamp will light at the same time. - Die Temperatur-Kontrollampe geht aus, sobald die - The temperature signal lamp goes out when the Heizplatte die gewählte Bügeltemperatur erreicht hat.
- Seite 9 16. DAMPF EIN/AUS SCHALTER 16. ON/OFF STEAM SWITCH Drücken Sie auf den Dampfschalter wenn Sie mit Dampf Depress the steam switch. bügeln bzw. pressen möchten. GENERATION OF STEAM DAMPFERZEUGUNG After having depressed the main On/Off switch, the Nachdem der Betriebsschalter gedrückt wurde, ist der steam generator will be ready to steam after about 3 Dampferzeuger nach ca.
- Seite 10 Elektrische Sicherheitseinrichtung Electrical safety Ihre Dampfbügelpresse verfügt über eine elektrische If the machine is plugged in and closed for about 10 Sicherheitseinrichtung: Wenn Presse etwa seconds, the electrical heating is automatically cut off. 10 Sekunden lang geschlossen bleibt, wird die Heizplatte Opening the machine.
- Seite 11 19. TRANSPORT 19. EASY TO CARRY Das Gerät läßt sich einfach tragen und aufbewahren. It is easy to carry and store the machine. Ensure you Denken Sie daran, das Gerät zu verriegeln, bevor Sie es lock the machine before carrying it by the handle. wegstellen.
- Seite 12 22. HEIZPLATTE 22. HEATING PLATE Wie üblich bei einem Bügelvorgang verursachen Faser, The starches in fabrics, residues of cleaning products Waschmittel- und Appreturrückstände Ihrer Wäsche and particles of yarn fibres can gradually cause spots Verunreinigungen auf der Heizplatte. Reiben Sie on the heating plate.
- Seite 13 WAS TUN WENN… WHAT TO DO IF… PROBLEM URSACHEN SOLUTIONS PROBLEMS CAUSES SOLUTIONS Kontrolllampen - Stecker steckt nicht fest - Steckverbindung und None of the - Power supply problem - Check the plug and leuchten in der Steckdose Stromversorgung lights are lit mains nicht auf.
- Seite 14 BÜGELNTIPS HINTS • Gewöhnen Sie sich von Anfang an daran, die Wäsche vorsichtig auf das • The secret to successful pressing lies in laying your linen carefully on the Dampfbügelbrett zu legen und die Hände nach vorne statt nach oben pressing board and smoothing it down.
- Seite 15 TASCHEN-HAND -UND HANDKERCHIEFS, NAPKINS, KÜCHENTÜCHER TOWELS, KITCHEN LINENS, ETC. 1. Das Wäschestück 1. Carefully place the handkerchief Bügelbrett legen und pressen. or the napkin on the ironing board 2. Wie üblich falten, d.h. untere und and press. obere Hälfte einschlagen und noch 2.
- Seite 16 BETT- UND DUVET COVERS AND PILLOW KOPFKISSENBEZÜGE CASES 7. Zuerst die Knopfleiste bügeln. 7. First press the buttoned end, with Dabei die Knöpfe nach unten auf buttons downwards towards Bügelbrett legen. ironing board. As usual, fold in gewohnt zu Ende bügeln. two or three steps and press.
- Seite 17 Vorderteil mit Knopfleiste: Front, buttonside : 12. Die Knopfleiste nach vorne 12. Put the shirt opening to the front, ziehen. arranging the garment so that the Die rechte Bügelbrettkante muß shoulder and neckline are lined Schulternaht up with the right edge of the Halsausschnitt abschließen.
- Seite 18 17. Kragen: Vor dem Bügeln 17. Collar : Press the reverse once ziehen Sie den Kragen etwas mit and the right side once. Stretch der Hand. well by hand before pressing. Bügeln Sie den Kragen von links 18. Folding : Fold the collar by und von rechts.
- Seite 19 22. Manschettenöffnung: Legen 22. Cuffs : Place the wrist opening Sie die Manschettenöffnung um on the side of the board. Press, die Bügelbrettkante. Pressen Sie pulling the sleeve smoothly und ziehen Sie dabei den Ärmel towards you. Press the cuffs as leicht zu sich.
- Seite 20 26. Faltenlose Ärmel: Beim Pressen 26. Sleeves without pleats : das Bügelkissen in den Ärmel Use the small cushion or a schieben. rolled soft thick flannel. 27. Den Ärmel von der Manschette bis zur Schultermitte gefaltet auf das 27. Place the sleeve on the board, Bügelbrett legen, glattstreichen und folded from the wrist to the pressen.
- Seite 21 HERREN- UND DAMENHOSEN TROUSERS FOR MEN OR 32. Bei Stoffen aus Wolle, wenn nötig WOMEN ein Dämpftuch benutzen. Zuerst 32. For woollen items, use a damp Bund Bundfalten cloth if necessary. Press the waist Bügelbrettende bügeln. Dabei and the belt pleats on the side of gegebenenfalls das Bügelkissen the board.
- Seite 22 37. Pressen Sie nun die hintere Bügelfalte 37. Finish with the back pleat at the am Hosenoberteil. Pressen und upper part of the trousers. Press öffnen. Bügeln Sie das andere and open. Press the second leg. Hosenbein. 38. JEANS 38. JEANS The stitching on Jeans has a tendency Jeansnähte laufen gewöhnlich etwas stär- to shrink more than the fabric.
- Seite 23 WEITERE ANWENDUNGS- SOME USES OF THE PRESSING MÖGLICHKEITEN DES CUSHION BÜGELKISSENS 40. For certain shapes, pressing can 40. Bei bestimmten, Form be completed using the pressing gearbeiteten Kleidungsteilen läßt cushion, furnished with the sich mit dem Bügelkissen, ein machine. It is slipped into or noch perfekteres Bügelergebnis under the garment, in the erzielen.
- Seite 24 - PRINTED IN FRANCE...