Kamado 623514530101 Gebrauchsanleitung
Inhaltsverzeichnis
Quicklinks
Manual/Bruksanvisning/Gebrauchsanleitung
Charcoal BBQ
Kolgrill / Kullgrill / Kohlegrill
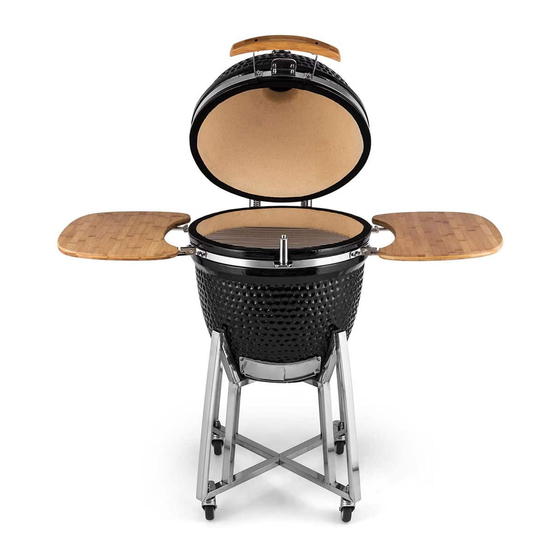
Kamado Outdoor Oven and BBQ
User Instructions - Please keep for future reference
User Instructions - Please keep for future reference
IMPORTANT – Carefully remove any packaging before use, but retain the safety instructions.
These instructions form part of the product.
Please take note of all of the safety warnings listed in these instructions.
KAMADO
Please read these instructions in their entirety and retain them for future reference.
These instructions should be stored with the product.
This product is for domestic use ONLY and should not be used commercially or for contract purposes.
ENG
SE
NO
DE
Item. No. 623514530101
Inhaltsverzeichnis

Verwandte Anleitungen für Kamado 623514530101


Inhaltszusammenfassung für Kamado 623514530101
- Seite 1 Please read these instructions in their entirety and retain them for future reference. These instructions should be stored with the product. This product is for domestic use ONLY and should not be used commercially or for contract purposes. Item. No. 623514530101...
-
Seite 2: Safety Instructions
Rusta! before installation and use! Charcoal BBQ, Kamado Read the user manual carefully to make sure that the product is assembled, used and maintained correctly, as described in the instructions in this user manual. Keep the user manual for future reference. - Seite 3 • Must be cleaned and maintained on a regular basis • The barbecue is a Kamado barbecue for outdoor use. • Use only charcoal or briquettes in this barbecue. DO NOT use petrol, white spirit, ligh- ter fluid, alcohol or other similar chemicals for lighting or relighting.
-
Seite 4: Cooking Tips
COOKING TIPS LOW TEMPERATURE COOKING GUIDE 1. Light the barbecue according to the instructions above. 2. Monitor the barbecue until it has risen to the desired temperature. See page 6 for a temperature cooking guide. 3. Fully close the bottom vent to maintain the temperature. 4. -
Seite 5: Cleaning And Maintenance
EXTINGUISHING THE BARBECUE Stop adding fuel and close all the vents and the lid to allow the fire to die naturally. NOTE! DO NOT use water to extinguish the charcoals as this could damage the ceramic barbecue. CLEANING AND MAINTENANCE •... - Seite 6 • • With the vents closed, the Kamado stays at a high temperature for several hours. If you require a longer With the vents closed, the Kamado stays at a high temperature for several hours. If you require a longer Care and safe use guidelines...
-
Seite 7: Right Of Complaint
RIGHT OF COMPLAINT By law the product must be returned to the place of purchase along with the original receipt in the event of a complaint. The user is liable for any damage to the product that is caused by not using the product for its intended purpose or by not following this user manual correctly. - Seite 8 PARTS x 16 Tools included M10-M6 M10-M8 TIPS FOR SUCCESSFUL ASSEMBLY • Read the assembly instructions thoroughly before starting to build the grill. • Assemble the grill on a clean and even surface where there is no chance of any parts falling off. •...
- Seite 9 Assembly instructions IMPORTANT - Remove any packaging before use, but retain the safety instructions and store the Ensure that the lid is closed prior to assembly. ASSEMBLY INSTRUCTION Attach the four pre-threaded castor wheels (2 and 3) to each of the four brackets (1) by pushing them through the hole.
- Seite 10 Kamado Grill (9) into it. STEP 5 - To place the Kamado Grill (9) on the cart first remove all of the items that are inside of the grill to 2. To place the Kamado Grill (9) on the cart first remove all of the items lifting easier.
- Seite 11 (5) inside of the Kamado Grill as displayed in the assembly diagram. displayed in the assembly diagram. STEP 9 - Press down on the castor levers (2) to lock the castor wheels to ensure the Kamado can not move when in use.
- Seite 12 Ensure that the top vent bolt is on the left hand side when assembling it. Ensure that the top vent bolt is on the left hand side when assembling it. STEP 11 - To attach the top vent (12) to the Kamado Grill (9) place it on top and align both the bolt holes. Secure To attach the top vent (12) to the barbecue (9) using 2x bolts (D) and nuts (E) . Ensure that the top vent bolt is on the left hand side when assembling it.
- Seite 13 Assembly instructions STEP 12 – Attach the 2x table brackets (14) to the Kamado Grill (9) using the 4x pre-attached bolts and dome Attach the 2x table brackets (14) to the barbecue (9) using the 4x headed nuts per bracket. Please note the position shown in the above diagram pre-attached bolts and dome headed nuts per bracket.
-
Seite 14: Säkerhetsföreskrifter
Tack för att du valt att innan montering och användning! köpa en produkt från Rusta! Kolgrill, Kamado Läs bruksanvisNingen noggrant och se till att produkten installeras, används och underhålls på rätt sätt enligt instruktionerna. Spara bruksanvisningen för senare bruk. OBS! Se monteringsanvisning på sidan 20. - Seite 15 Byt ut delar vid behov. • Måste rengöras och underhållas regelbundet. ANVÄNDNING • Grillen är en Kamado barbecuegrill för utomhusbruk. • Använd endast grillkol eller briketter i denna grill. Använd INTE bensin, lacknafta, tändvätska, alkohol eller andra liknande kemikalier för att tända eller återtända grillen.
- Seite 16 TILLAGNINGSTIPS LÅGTEMPERATURSTEKNING – GUIDE 1. Tänd grillen enligt anvisningarna ovan. 2. Bevaka grillen tills den har nått önskad temperatur. Se temperaturguide på sidan 18. 3. Stäng till bottenventilen helt för att bibehålla temperaturen. 4. Grillen är nu klar för matlagning. RÖKNING –...
-
Seite 17: Rengöring Och Underhåll
RENGÖRING OCH UNDERHÅLL • Dra åt banden och olja gångjärnen 2 gånger per år eller mer om det behövs. • Låt grillens delar svalna helt före rengöring. • Grillen måste rengöras noga regelbundet. Om grillen används i miljöer med hög risk för korrosion, till exempel vid havet, är det extra viktigt att rengöra grillen ofta. -
Seite 18: Tillagningstemperaturer - Guide
• • With the vents closed, the Kamado stays at a high temperature for several hours. If you require a longer With the vents closed, the Kamado stays at a high temperature for several hours. If you require a longer Care and safe use guidelines... - Seite 19 REKLAMATIONSRÄTT Enligt gällande lag ska produkten vid reklamation lämnas in på inköpsstället och originalkvitto bifogas. Användaren är ansvarig för eventuella skador på produkten om produkten använts till ändamål den inte är avsedd för eller om bruksanvisningen inte följts. Reklamationsrätten gäller i sådant fall inte. INFORMATION OM MILJÖFARLIGT AVFALL Uttjänt produkt ska hanteras separat från hushållsavfall och lämnas in för återvinning enligt lokala regler för...
- Seite 20 DELAR Antal Antal x 16 Inkluderade verktyg M10-M6 M10-M8 TIPS FÖR EN LYCKAD MONTERING • Läs igenom hela monteringsanvisningen innan monteringen påbörjas. • Montera grillen på ett rent och jämn yta där det inte finns risk att delar kommer bort. •...
- Seite 21 IMPORTANT - Remove any packaging before use, but retain the safety instructions and store the Ensure that the lid is closed prior to assembly. MONTERINGSANVISNING Skjut in de fyra gängade hjulen (2 och 3) genom hålet i vart och ett av de fyra stativbenen (1).
- Seite 22 (A). Kontrollera att stativet är säkert monterat och att alla STEP 5 - To place the Kamado Grill (9) on the cart first remove all of the items that are inside of the grill to skruvar är åtdragna innan du placerar grillen (9) på det.
- Seite 23 (7), övre ringen (6) och grillgallret (5) inuti Kamado-grillen. Se monteringsschema. STEP 9 - Press down on the castor levers (2) to lock the castor wheels to ensure the Kamado can not move when in use. 2. Tryck ner hjulspärrarna (2) för att låsa hjulen så att grillen står still när den...
- Seite 24 Ensure that the top vent bolt is on the left hand side when assembling it. Ensure that the top vent bolt is on the left hand side when assembling it. STEP 11 - To attach the top vent (12) to the Kamado Grill (9) place it on top and align both the bolt holes. Secure För att fästa toppventilen (12) på Kamado-grillen (9) using 2x bolts (D) and nuts (E) . Ensure that the top vent bolt is on the left hand side when assembling it.
- Seite 25 Assembly instructions STEP 12 – Attach the 2x table brackets (14) to the Kamado Grill (9) using the 4x pre-attached bolts and dome Fäst de 2 fästvinklarna för sidobordet (14) på Kamado-grillen headed nuts per bracket. Please note the position shown in the above diagram (9) med hjälp av 4 förmonterade skruvar och kupolmuttrar per...
-
Seite 26: Sikkerhetsinstruksjoner
Takk for at du valgte å kjøpe før installasjon og bruk! et produkt fra Rusta! Kullgrill, Kamado Les bruksanvisningen nøye og sørg for at produkten monteres, brukes og vedlikeholdes riktig i henhold til instruksjonene. Ta vare på bruksanvisningen for fremtidig bruk. - Seite 27 • Må rengjøres og vedlikeholdes regelmessig. BRUK • Grillen er en Kamado-grill til utendørsbruk. • Bruk kun kull eller briketter i denne grillen. IKKE bruk bensin, white spirit, tennvæske, alkohol eller andre lignende kjemikalier til opptenning eller nyopptenning.
- Seite 28 STEKEVEILEDNING FOR LAV TEMPERATUR 1. Tenn grillen som angitt i instruksjonene over. 2. Hold øye med grillen til den har nådd ønsket temperatur. Se side 30 for veiledning om steketemperatur. 3. Lukk bunnventilen helt for å opprettholde temperaturen. 4. Du er nå klar til å bruke grillen til matlaging. RØYKEVEILEDNING 1.
-
Seite 29: Rengjøring Og Vedlikehold
SLUKKE GRILLEN Slutt å legge i opptenningsmateriale og lukk alle ventiler og lokket, slik at fyren dør ut av seg selv. MERK! IKKE bruk vann til å slukke kull med, siden dette kan skade den keramiske grillen. RENGJØRING OG VEDLIKEHOLD •... -
Seite 30: Veiledning For Steketemperatur
• • With the vents closed, the Kamado stays at a high temperature for several hours. If you require a longer With the vents closed, the Kamado stays at a high temperature for several hours. If you require a longer mot høyere motstandskraft mot oksidering enn ikke-rustfritt stål. - Seite 31 REKLAMASJONSRETT I henhold til gjeldende lov skal produktet ved reklamasjon leveres inn på kjøpsstedet med maskinstemplet kvittering vedlagt. Brukeren er ansvarlig for eventuelle skader på produktet dersom produktet brukes til noe annet enn det som er tiltenkt, eller dersom bruksanvisningen ikke følges. I slike tilfeller bortfaller reklamasjonsretten. INFORMASJON OM FARLIG AVFALL Utslitt produkt skal ikke kastes i husholdningsavfall, men leveres til gjenvinning i henhold til lokale...
- Seite 32 DELER Antall Antall x 16 Inkluderte verktøy M10-M6 M10-M8 TIPS FOR EN VELLYKKET MONTERING • Les gjennom hele monteringsanvisningen før du starter. • Monter grillen på et rent og plant underlag der det ikke er risiko for at deler forsvinner. •...
- Seite 33 Assembly instructions IMPORTANT - Remove any packaging before use, but retain the safety instructions and store the Ensure that the lid is closed prior to assembly. MONTERINGSANVISNING Fest de fire forhåndsmonterte hjulene (2 og 3) til hver av de fire brakettene (1) ved å...
- Seite 34 Kamado-grillen (9) i den. STEP 5 - To place the Kamado Grill (9) on the cart first remove all of the items that are inside of the grill to 2. Når du skal plassere Kamado-grillen (9) på vognen, må du først fjerne lifting easier.
- Seite 35 (5) inside of the Kamado Grill as displayed in the assembly diagram. kullplaten (7), øvre ring (6) og stekegrillen (5) på innsiden av Kamado-grillen, STEP 9 - Press down on the castor levers (2) to lock the castor wheels to ensure the Kamado can not move when som vist i monteringsdiagrammet.
- Seite 36 Ensure that the top vent bolt is on the left hand side when assembling it. Ensure that the top vent bolt is on the left hand side when assembling it. STEP 11 - To attach the top vent (12) to the Kamado Grill (9) place it on top and align both the bolt holes. Secure Fest den øverste ventilen (12) til Kamado-grillen using 2x bolts (D) and nuts (E) . Ensure that the top vent bolt is on the left hand side when assembling it.
- Seite 37 Assembly instructions STEP 12 – Attach the 2x table brackets (14) to the Kamado Grill (9) using the 4x pre-attached bolts and dome Fest 2 bordbraketter (14) til Kamado-grillen (9) ved hjelp av 4 headed nuts per bracket. Please note the position shown in the above diagram forhåndsfestede bolter og kuppelformede muttere per brakett.
-
Seite 38: Sicherheitsanweisungen
Kauf eines Produktes von die gesamte Gebrauchsanleitung Rusta entschieden haben! durchlesen! Kohlegrill, Kamado Lesen Sie die Gebrauchsanleitung sorgfältig durch. Achten Sie darauf, dass das Produkt gemäß der Gebrauchsanleitung installiert, verwendet und gewartet wird. Bewahren Sie die Gebrauchsanweisung für eine evtl. spätere Verwendung auf. -
Seite 39: Anzünden Des Grills
• Das gerät muss in regelmäßigen Abständen gereinigt und gepflegt werden. GEBRAUCH • Der Grill ist ein Kamado-Grill zum Gebrauch im Freien. • Verwenden Sie ausschließlich Holzkohle oder Briketts in diesem Grill. Verwenden Sie kein Benzin, Testbenzin, flüssigen Grillanzünder, Alkohol oder ähnliche Chemikalien zum Anzünden oder erneuten Anzünden des Grills. - Seite 40 die Holzkohleplatte. Lassen Sie den Grillstarter auf einer nicht brennbaren Oberfläche abkühlen. HINWEIS!Verwenden Sie kein Benzin, Testbenzin, flüssigen Grillanzünder, Alkohol oder ähnliche Chemikalien zum Anzünden oder erneuten Anzünden des Grills. • Sobald die Anzündwürfel Feuer gefangen haben, lassen Sie die untere Lüftung und den Deckel etwa 10 Minuten lang geöffnet, bis sich ein kleines Glutbett gebildet hat.
-
Seite 41: Auffüllen Des Grills
4. Schließen Sie die obere Lüftung zur Hälfte und kontrollieren Sie einige Minuten lang die Temperatur. 5. Jetzt können Sie den Grill zum Kochen verwenden. HINWEIS! Wenn der Deckel bei hohen Temperaturen geöffnet wird, ist es wichtig, ihn nur leicht anzuheben, so dass Luft langsam und sicher einströmen kann. So vermeiden Sie Ver- letzungen durch Rauchgasexplosionen oder plötzliches Aufflammen. -
Seite 42: Anleitung Für Gartemperaturen
Keramikgrill zerbricht. Wenn sich zu viel Ruß angesammelt hat, verwenden • With the vents closed, the Kamado stays at a high temperature for several hours. If you require a longer • With the vents closed, the Kamado stays at a high temperature for several hours. If you require a longer Care and safe use guidelines... -
Seite 43: Informationen Über Rostfreien Edelstahl
INFORMATIONEN ÜBER ROSTFREIEN EDELSTAHL Ein häufiges Missverständnis über rostfreien Edelstahl ist, dass dieser nicht oxidieren kann. Das ist falsch. Jeglicher Stahl kann oxidieren, wenn für die Oxidation die richtigen Bedingungen vorherrschen. Rostfreier Edelstahl hat hingegen eine höhere Widerstandskraft gegen Oxidation als nicht rostfreier Edelstahl. Das bedeutet, dass auch rostfreier Edelstahl gewartet werden muss, um Oxidation oder andere Korrosion zu vermeiden. -
Seite 44: Tipps Für Einen Erfolgreichen Aufbau
TEILE Anzahl Anzahl x 16 Enthalten Werkzeuge M10-M6 M10-M8 TIPPS FÜR EINEN ERFOLGREICHEN AUFBAU • Vor der Montage die gesamte Gebrauchsanweisung lesen! • Montieren Sie den Grill auf einer sauberen und ebenen Unterlage, bei der kein Risiko besteht, dass Teile weg- kommen. - Seite 45 Assembly instructions IMPORTANT - Remove any packaging before use, but retain the safety instructions and store the Ensure that the lid is closed prior to assembly. INSTALLATIONSANWEISUNGEN Befestigen Sie die vier Räder mit Gewinde (2 und 3) an jeder der vier Halterungen (1), indem Sie sie durch das Loch schieben.
- Seite 46 Schrauben fest angezogen sind, bevor Sie den Kamado-Grill (9) in den Wagen setzen. STEP 5 - To place the Kamado Grill (9) on the cart first remove all of the items that are inside of the grill to lifting easier.
- Seite 47 (5) inside of the Kamado Grill as displayed in the assembly diagram. Grillrost (5) im Grill, wie in der Montageabbildung gezeigt. STEP 9 - Press down on the castor levers (2) to lock the castor wheels to ensure the Kamado can not move when in use.
- Seite 48 Um die obere Lüftung (12) am Kamado-Grill (9) zu STEP 11 - To attach the top vent (12) to the Kamado Grill (9) place it on top and align both the bolt holes. Secure befestigen, stellen Sie sie auf den Grill und richten Sie using 2x bolts (D) and nuts (E) .
- Seite 49 Assembly instructions STEP 12 – Attach the 2x table brackets (14) to the Kamado Grill (9) using the 4x pre-attached bolts and dome Befestigen Sie die 2 Tischhalterungen (14) am Kamado-Grill headed nuts per bracket. Please note the position shown in the above diagram (9).
- Seite 50 NOTES...
- Seite 52 Rusta Kundetjeneste, Box 5064, 194 05 Upplands Väsby, SVERIGE Hjemmesida: www.rusta.com E-post: customerservice@rusta.com Kundenservice Rusta: Tel. +46 (0)771 28 10 10 Kundenkontakt: Rusta Kundtjänst, Box 5064, 194 05 Upplands Väsby, SCHWEDEN Website: www.rusta.com E-mail: customerservice@rusta.com Item. No. 623514530101 10 2016...