Sharp CD-BA250H Bedienungsanleitung
Mini komponenten system
Inhaltsverzeichnis
Verfügbare Sprachen
Verfügbare Sprachen
Quicklinks
MINI KOMPONENTEN SYSTEM
MINI-CHAÎNE
SISTEMA MINI
MINI KOMPONENT SYSTEM
MINI SISTEMI
MINI SYSTEEM
MINI COMPONENT SYSTEM
MODELL
MODELLO
MODÈLE
MODEL
MODELO
MODEL
MODELL
CD-BA250H
CD-BA2600H
BEDIENUNGSANLEITUNG
MODE D'EMPLOI
MANUAL DE MANEJO
BRUKSANVISNING
MANUALE DI ISTRUZIONI
GEBRUIKSAANWIJZING
OPERATION MANUAL
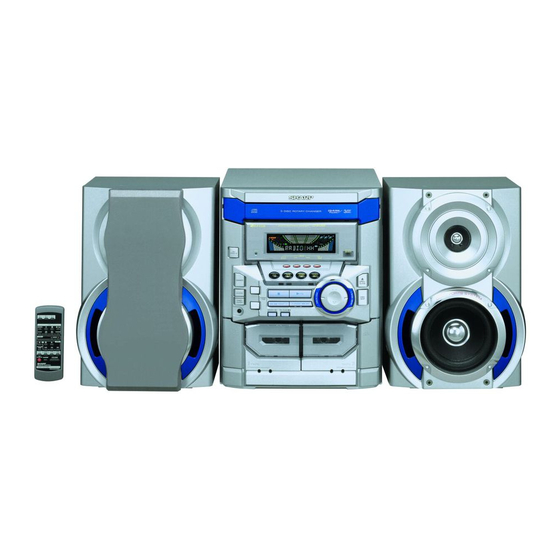
Mini Komponenten System CD-BA250H/CD-BA2600H besteht aus CD-BA250H/CD-
BA2600H (Hauptgerät) und CP-BA250H/CP-BA2600H (Lautsprecher-System).
Mini-chaîne CD-BA250H/CD-BA2600H composée de CD-BA250H/CD-BA2600H (appareil
principal) et de CP-BA250H/CP-BA2600H (enceintes acoustiques).
Sistema mini CD-BA250H/CD-BA2600H que consta de CD-BA250H/CD-BA2600H (aparato
principal) y CP-BA250H/CP-BA2600H (sistema de altavoces).
CD-BA250H/CD-BA2600H mini komponent system bestående av CD-BA250H/CD-
BA2600H (huvudenhet) och CP-BA250H/CP-BA2600H (högtalarsystem).
Mini sistemi CD-BA250H/CD-BA2600H composto da CD-BA250H/CD-BA2600H (apparec-
chio principale) e CP-BA250H/CP-BA2600H (sistema di diffusori).
CD-BA250H/CD-BA2600H mini systeem bestaande uit CD-BA250H/CD-BA2600H (hoofd-
toestel) en CP-BA250H/CP-BA2600H (luidsprekersysteem).
CD-BA250H/CD-BA2600H Mini Component System consisting of CD-BA250H/CD-
BA2600H (main unit) and CP-BA250H/CP-BA2600H (speaker system).
DEUTSCH
Siehe Seiten i bis v und D-1 bis D-35.
FRANÇAIS
Se reporter aux pages i à v et F-1 à F-35.
Consulte las páginas i al v y S-1 al S-35.
ESPAÑOL
SVENSKA
Hänvisa till sidorna i till v och V-1 till V-35.
Leggere le pagine i a v e I-1 a I-35.
ITALIANO
NEDERLANDS
Raadpleeg de bladzijden i t/m v en N-1 t/m N-35.
ENGLISH
Please refer to pages i to v and E-1 to E-35.
Kapitel
Inhaltsverzeichnis

Verwandte Anleitungen für Sharp CD-BA250H


Inhaltszusammenfassung für Sharp CD-BA250H
- Seite 1 Mini Komponenten System CD-BA250H/CD-BA2600H besteht aus CD-BA250H/CD- BA2600H (Hauptgerät) und CP-BA250H/CP-BA2600H (Lautsprecher-System). Mini-chaîne CD-BA250H/CD-BA2600H composée de CD-BA250H/CD-BA2600H (appareil principal) et de CP-BA250H/CP-BA2600H (enceintes acoustiques). Sistema mini CD-BA250H/CD-BA2600H que consta de CD-BA250H/CD-BA2600H (aparato MINI KOMPONENTEN SYSTEM principal) y CP-BA250H/CP-BA2600H (sistema de altavoces). MINI-CHAÎNE CD-BA250H/CD-BA2600H mini komponent system bestående av CD-BA250H/CD-...
- Seite 2 23/EEC, come emendata dalla direttiva 93/68/EEC. possesseur du droit d’auteur, veuillez vous référer aux réglementations Dichiarazione di conformità nationales en vigueur. La società SHARP ELECTRONICS EUROPE GmbH dichiara che il prodotto SHARP MINI SISTEMI CD-BA250H/CD-BA2600H è costruito in conformità El material audiovisual puede consistir en trabajos que tengan derechos alle prescrizioni del D.M.n˚548 del 28/8/95, pubblicato sulla G.U.n˚301 del...
- Seite 3 Bei Eins t el lung d er ON / STAND-BY-Tas te au f STAND-BY is t die Quando il tasto ON/STAND-BY si trova in posizione STAND-BY, all’interno Netzspannung immer noch im Gerät vorhanden. dell’apparecchio c’è ancora la corrente. Wenn die ON/STAND-BY-Taste auf STAND-BY eingestellt wird, kann das Se il tasto ON/STAND-BY si trova nella posizione STAND-BY, l’unità...
- Seite 4 Vorsicht: Advarsel: Das Gerät weder Tropf- noch Spritzwasser aussetzen. Ansonsten besteht Til at forbygge ild og stød risiko, lad vaere med at undsaette denne die Gefahr eines Brandes oder elektrischen Schlages. Es sollten keine mit indretning for drypning eller overstaenkning. Der må ikke anbringes nogen Flüssigkeiten gefüllten Gegenstände wie Vasen auf dem Gerät abgestellt genstande fyldt med vand, som for eksempel vaser, på...
- Seite 5 VORSICHT CAUTION Use of controls, adjustments or performance of procedures other than Verwendung von Regelungen oder Einstellungen bzw. Durchführung von anderen Verfahren als die hierin angegebenen kann zum Aussetzen those specified herein may result in hazardous radiation exposure. gefährlicher Strahlung führen. As the laser beam used in this compact disc player is harmful to the eyes, do not attempt to disassemble the cabinet.
- Seite 6 Eigenschaften der Laserdiode Material: GaAIAs Wellenlänge: 780 nm Emissionsdauer: kontinuierlich Laser-Ausgang: max. 0,6 mW Caractéristiques de la diode laser Matière: GaAIAs Longueur d’onde: 780 nm Durée d’émission: ininterrompue Puissance de sortie laser maximale: 0,6 mW Características del diodo láser Material: GaAIAs Longitud de onda: 780 nm Duración de emisión : continua Salida de láser: máx.
-
Seite 7: Inhaltsverzeichnis
DEUTSCH Einführung Inhalt Vielen Dank für den Kauf dieses SHARP-Produktes. Lesen Sie dieses Handbuch Seite „ Allgemeine Informationen sorgfältig durch, um eine bestmögliche Leistung zu erreichen. Es führt Sie in den Betrieb dieses Produkts von SHARP ein. Zur Beachtung ........... . . 2 Bedienungselemente und Anzeigen . -
Seite 8: Zur Beachtung
Die auf diesem Gerät angegebene Spannung muß verwendet werden. Der Betrieb des Produktes mit einer Spannung, die höher ist als die angegebene, ist gefährlich und kann zu Brand oder anderem Unfall durch Beschädigung führen. SHARP kann nicht für Schäden verantwortlich gemacht werden, die aus Betrieb mit einer unvor- schriftsmäßigen Spannung resultieren. -
Seite 9: Bedienungselemente Und Anzeigen
Bedienungselemente und Anzeigen „ Frontplatte Bezugsseite 1. Disc-Schublade ......... 12 2. - Seite 10 Bedienungselemente und Anzeigen (Fortsetzung) „ Anzeige 1 2 3 1. RDS-Anzeige 2. Programmartenanzeige 3. Verkehrsdurchsage-Anzeige 4. Extrabaßanzeige 5. UKW-Stereo-Betriebsartenanzeige 6. Verkehrsinformationsanzeige 7. Verkehrsfunk-Anzeige 18 19 8. CD-Wiedergabeanzeige 9 10 11 12 13 9. UKW-Stereo-Empfangsanzeige 10.Dynamic-PTY-Anzeige 11.EON-Anzeige 12.Anzeige für wiederholte Wiedergabe der CD 13.CD-Pausenanzeige 14.Discnummer-Anzeigen 15.Timer-Wiedergabeanzeige...
- Seite 11 „ Lautsprechersystem 1. Hochtöner 2. Tieftöner 3. Baßreflex-Öffnung 4. Lautsprecherkabel „ Fernbedienung Bezugsseite 1. Fernbedienungssender ........9 2.
-
Seite 12: Anschluß Des Systems
Anschluß des Systems UKW-Antenne MW-Rahmenantenne Linker Rechter Lautsprecher Lautsprecher Videorecorder, DVD-Player usw. nicht mitgeliefert Wandsteckdose (Wechselspannung 230 V, 50 Hz) DEUTSCH... -
Seite 13: Anschluß Der Antennen
„ Anschluß der Antennen „ Anschluß der Lautsprecher Das schwarze Kabel an der Minusklemme (-) und das rote Kabel an der Plusklemme Mitgelieferte UKW-Antenne: (+) anschließen. Den UKW-Antennendraht an die Buchse FM 75 OHMS anschließen und danach in Rechter Lautsprecher Linker Lautsprecher die Richtung verlegen, wo das stärkste Empfangssignal erhalten wird. -
Seite 14: Helligkeit Des Displays (2 Stufen)
Anschluß des Systems (Fortsetzung) „ Aufstellen des Lautsprecher-Systems „ Demonstrations-Betriebsart Wenn das Gerät zum ersten Mal angeschlossen wird, schaltet es in die Demonstrati- Es gibt keinen Unterschied zwischen dem rechten und dem linken Lautsprecher. ons-Betriebsart. Sie sehen Wörter scrollen. Linker Rechter Lautsprecher Lautsprecher... -
Seite 15: Fernbedienung
Fernbedienung „ Einsetzen der Batterien „ Test der Fernbedienung Die Fernbedienung direkt auf den Fernbedienungssensor am Gerät richten. 1 Den Batteriefachdeckel entfernen. 2 Die Batterien entsprechend der im Batteriefach angegebenen Pola- Die Fernbedienung kann im unten gezeigten Bereich verwendet wer- rität einsetzen. -
Seite 16: Klangregelung
Klangregelung „ Lautstärkeregelung Zum Erhöhen der Lautstärke die VOLUME -Taste drücken; zum Vermindern die VOLUME -Taste drücken..0 1 2 29 30 MAXIMUM „ Baßregelung Wenn das Gerät zum ersten Mal eingeschaltet wird, schaltet es in die Extrabaß- Betriebsart, die die Tiefen betont, und "X-BASS" erscheint. Zum Abbrechen der Extrabaß-Betriebsart die X-BASS/DEMO (X-BASS)-Taste drücken. -
Seite 17: Einstellen Der Uhr
Einstellen der Uhr Die Taste TUNING/TIME ( oder ) drücken, um die Stunde einzu- stellen, und dann die MEMORY/SET-Taste betätigen. z Die Taste TUNING/TIME ( oder ) einmal drücken, um die Uhrzeit um eine Stunde vorzustellen. Sie gedrückt halten, um die Uhrzeit fortlaufend vorzu- stellen. -
Seite 18: Cd-Wiedergabe
CD-Wiedergabe Dieses System kann Audio-CD-Rs und CD-RWs ebenso wie CDs abspielen, aber Zum Einschalten des Gerätes die ON/STAND-BY-Taste drücken. kann keine Aufnahme darauf machen. (Einige CD-Rs und CD-RWs können jedoch nicht abgespielt werden.) Die CD-Taste drücken. Zum Öffnen der Disc-Schublade die Taste OPEN/CLOSE drük- ken. -
Seite 19: Auffinden Des Titelanfangs
„ Auffinden des Titelanfangs Die / ( )-Taste drücken, um mit der Wiedergabe zu beginnen. Weitergehen zum Anfang des nächsten Titels: Während der Wiedergabe die PRESET -Taste weniger als 0,5 Sekunden drücken. z Sie können zu einem Titel dadurch übersprin- gen, das die PRESET -Taste wieder-... -
Seite 20: Beginn Der Wiedergabe Ab Gewünschtem Titel
Beginn der Wiedergabe ab Wiederholte Wiedergabe und gewünschtem Titel Zufallswiedergabe „ Wiederholte Wiedergabe Sie können eine Disc ab gewünschtem Titel abspielen. In der Stopp-Betriebsart eine der Tasten 3 auf der Fernbe- Alle Titel auf bis zu 3 Discs oder eine programmierte Reihenfolge kann ununterbro- chen wiederholt werden. -
Seite 21: Programmierte Wiedergabe
Programmierte Wiedergabe Durch Bestimmen der Discs von 1 bis 3 und der Titel von 1 bis 99 können Sie bis zu Durch Drücken der 32 Titel zur Wiedergabe in gewünschter Reihenfolge auswählen. PRESET - oder PRESET -Taste den gewünschten Ti- tel wählen. - Seite 22 Rundfunkempfang Zum Einschalten des Gerätes die ON/STAND-BY-Taste drücken. Die TUNER (BAND)-Taste wiederholt drücken, um das gewünschte Frequenzband (FM oder AM) auszuwählen. Die TUNING/TIME-Taste ( oder ) drücken, um den gewünschten Sender einzustellen. Manuelle Abstimmung: Die TUNING/TIME-Taste drücken, bis der gewünschte Sender eingestellt wird. Abstimmautomatik: Wenn die TUNING/TIME-Taste mehr als 0,5 Sekunden gedrückt wird, startet der Sendersuchlauf automatisch, und der Tuner stoppt am zuerst empfangbaren...
-
Seite 23: Rundfunkempfang
Empfangen des gespeicherten Senders „ Abspeichern eines Senders „ Abrufen eines gespeicherten Senders Sie können 40 MW- und UKW-Sender abspeichern und per Tastendruck abrufen. Die Taste PRESET oder PRESET weniger als 0,5 Se- (Vorabstimmung) kunden drücken, um den gewünschten Sender auszuwählen. Die Schritte 1 - 3 im Abschnitt "Rundfunkempfang"... -
Seite 24: Benutzen Des Radio-Daten-Systems (Rds)
Benutzen des Radio-Daten-Systems (RDS) „ Durch RDS gebotene Informationen RDS ist ein Rundfunkdienst, der heute von einer zunehmenden Zahl von UKW- Sendern angeboten wird. Diese UKW-Sender senden neben ihren regulären Bei jedem Druck auf die DISPLAY MODE-Taste ändert sich das Display wie Programmsignalen zusätzliche Signale. - Seite 25 Beschreibungen der PTY(Programmartenkennung)-Codes, TP (Verkehrsfunk- SOCIAL Programme über Soziologie, Geschichte, Geographie, Psychologie kennung) und TA (Verkehrsdurchsagekennung). und Gesellschaft. Sie können die folgenden PTY-, TP- und TA-Signale suchen und empfangen. RELIGION Glauben einschließlich eines Gottes oder Göttern, der Natur der Exi- NEWS Kurze Beschreibungen über Fakten, Ereignisse und öffentlich ausge- stenz und Ethik.
-
Seite 26: Benutzen Des Automatischen Senderspeichers (Aspm)
Benutzen des Radio-Daten-Systems (RDS) (Fortsetzung) „ Benutzen des automatischen Senderspei- Abbrechen der ASPM-Operation: Während des Sendersuchlaufs die ASPM-Taste drücken. chers (ASPM) Die bereits abgespeicherten Sender bleiben im Speicher. Hinweise: In der ASPM-Betriebsart sucht der Tuner automatisch nach neuen RDS-Sendern. z Wenn derselbe Sender auf verschiedenen Frequenzen sendet, wird die stärkste Bis zu 40 Sender können gespeichert werden. -
Seite 27: Abrufen Von Abgespeicherten Sendern
„ Abrufen von abgespeicherten Sendern Hinweise: z Wenn das Display mit dem Blinken aufgehört hat, das Verfahren ab Schritt 2 wie- Bestimmen von Programmarten und Wählen von Sendern (PTY-Such- derholen. Wenn eine gewünschte Programmart herausgefunden wird, blinkt ent- lauf): sprechende Kanalnummer etwa 4 Sekunden lang; danach blinkt der Sendername 7 Sekunden lang und wechselt dann zu ständigem Leuchten. -
Seite 28: Automatisches Empfangen Des Gewünschten Programms (Eon-Pty)
Benutzen des Radio-Daten-Systems (RDS) (Fortsetzung) „ Automatisches Empfangen des gewünsch- Wenn das bestimmte Programm auf einem ON (Other Network)- ten Programms (EON-PTY) Sender beginnt, schaltet das Gerät automatisch auf den Sender, und "PTY" blinkt. Wenn die gewünschte Programmart gesendet wird, schaltet das Radio automatisch auf sie. -
Seite 29: Automatisches Empfangen Der Verkehrsinformation (Eon-Ti)
„ Automatisches Empfangen der Verkehrsin- Wenn eine spezifizierte TA bei einem ON (Other Network)-Sender formation (EON-TI) beginnt, schaltet das Gerät automatisch auf den Sender, und "TI" blinkt. Wenn die Verkehrsinformation gesendet wird, schaltet das Radio automatisch auf sie. Einen RDS-Sender einstellen (wenn ein Sendername angezeigt wird). - Seite 30 Benutzen des Radio-Daten-Systems (RDS) (Fortsetzung) „ Hinweise zum RDS-Betrieb Über die "TP"- und "TA"-Anzeigen: "TP" "TA" Bedeutung Wenn ein der folgenden Ereignisse eintritt, bedeutet dies nicht, daß das Gerät defekt ist: Nicht Nicht Keine Verkehrsdurchsagen werden ausgestrahlt und auch z "PS", "NO PS" und ein Sendername erscheinen abwechselnd, und das Gerät leuchtet leuchtet ein Sender, der Verkehrsdurchsagen sendet, über EON nicht...
- Seite 31 „ Einstellen der internen Uhr durch das RDS- Hinweise: z Wenn beim Anzeigen der RDS-Zeit die CLOCK-Taste gedrückt wird, wird die Zeitzeichen interne Uhr angezeigt, gefolgt von der RDS-Uhr. Mit dieser Funktion können Sie die gezeigte Zeit vergleichen. Wenn Sie noch nicht die Uhranzeige-Betriebsart Mit Hilfe des RDS-Zeitzeichens (RDS CT-Daten) können Sie die interne Uhr einstel- eingestellt haben, erscheint "CLOCK".
-
Seite 32: Abspielen Einer Cassette (Tape 1 Oder Tape 2)
Abspielen einer Cassette (TAPE 1 oder TAPE 2) Vor Wiedergabe: Am TAPE 1 bzw. TAPE 2 Cassettenfach ist Wiedergabe möglich. z Für Wiedergabe, zum Erzielen der besten Klangergebnisse Nor- Zum Einschalten der Stromversorgung die ON/STAND-BY-Taste mal- oder Low-Noise-Bänder verwenden. (Reineisen- oder CrO - drücken. -
Seite 33: Aufnahme Von Radio
Für Beschädigung oder Verlust Ihrer Aufnahme, der aus Funktionsstörung dieses Den gewünschten Sender einstellen. (Siehe Seite 16.) Gerätes resultiert, ist SHARP nicht haftbar. z Die Lautstärke- und Klangregelungen haben keinen Einfluß auf das Aufnahmesi- Eine Cassette mit der zu bespielenden Seite nach Ihnen hinwen- gnal (Regelbare Mithöreinrichtung). -
Seite 34: Aufnahme Von Cd (Cds)
Aufnahme von CD (CDs) Sie können 3 CDs ununterbrochen aufnehmen. Zum Einschalten des Gerätes die ON/STAND-BY-Taste drücken. Eine Cassette mit der zu bespielenden Seite nach Ihnen hinwen- dend in das TAPE 2 Cassettenfach einlegen. Das Vorspannband, das nicht bespielt werden kann, vorspulen. Die CD-Taste drücken und die gewünschte Disc einlegen. -
Seite 35: Überspielen Von Band Auf Band
Überspielen von Band auf Band Sie können von TAPE 1 auf TAPE 2 aufnehmen. Zur Aufnahme nur Normalbänder verwenden. Keine Reineisen- oder CrO -Bänder benutzen. Zum Einschalten des Gerätes die ON/STAND-BY-Taste drücken. Eine bespielte Cassette in das TAPE 1 Cassettenfach und eine un- bespielte Cassette in das TAPE 2 Cassettenfach einsetzen. -
Seite 36: Timer- Und Sleep-Funktion
Timer- und Sleep-Funktion „ Timer-Wiedergabe oder Timer-Aufnahme Timer-Wiedergabe: Zu der voreingestellten Zeit schaltet sich das Gerät ein und gibt die gewünschte Ton- quelle (CD, Tuner, Band) wieder. Vor dem Einstellen des Timers: Timer-Aufnahme: 1 Die CLOCK-Taste drücken, um zu prüfen, ob die Uhr richtiggehend ist. Zu der voreingestellten Zeit schaltet sich das Gerät ein und beginnt mit der Auf- nahme von Tuner. -
Seite 37: Sleep-Funktion
„ Sleep-Funktion Die Taste TUNING/TIME ( oder ) drücken, um die Minute zu be- stimmen, und dann die MEMORY/SET-Taste betätigen. Die gewünschte Tonquelle wiedergeben. Die TIMER/SLEEP-Taste wiederholt drücken, bis "SLEEP" ange- zeigt wird. Das Gerät schaltet automatisch in die Timer-Bereitschafts-Be- triebsart. -
Seite 38: Erhöhen Des Systems
Erhöhen des Systems „ Wiedergabe der Töne vom Videorecorder, Das Anschlußkabel gehört nicht zum Lieferumfang. Kaufen Sie ein im Handel erhält- liches Kabel wie unten dargestellt. DVD-Player usw. Videorecorder, DVD-Player usw. Mit Hilfe eines Anschlußkabels den Videorecorder, DVD-Player usw. an die Buchsen VIDEO/AUX anschließen. Beim Benutzen eines Videogeräts den Tonausgang an dieses Gerät und den Bildausgang an ein Fernsehgerät anschließen. -
Seite 39: Fehlersuchtabelle
Falls mit diesem Produkt irgendetwas nicht in Ordnung zu sein scheint, die folgenden Symptom Mögliche Ursache Punkte überprüfen, bevor Sie sich an einen autorisierten SHARP-Fachhändler oder z Aufnahme ist nicht möglich. z Ist die Löschschutzzunge entfernt? an ein SHARP-Kundendienstzentrum wenden. -
Seite 40: Wartung
Wartung Fehlersuchtabelle (Fortsetzung) „ Reinigen der das Band berührenden Teilen „ Wenn Störung auftritt z Durch Verschmutztung von Tonköpfen, Tonwellen oder Andruckrollen wird die Wenn dieses Produkt von starker externer Interferenz (mechanischer Stoß, übermä- Klangqualität verschlechtert, außerdem kann dadurch "Bandsalat" verursacht wer- ßige statische Elektrizität, anormale Speisespannung infolge von Blitz usw.) beein- den. -
Seite 41: Technische Daten
Technische Daten „ Tuner Bedingt durch fortlaufende technische Verbesserungen behält sich SHARP das Recht vor, das Design und die Spezifikationen ohne vorherige Ankündigung ändern zu können. Die angegebenen Leistungswerte stellen die Nennwerte einer in Serien- Frequenzbereich UKW: 87,5 - 108 MHz herstellung produzierten Einheit dar. - Seite 112 SHARP CORPORATION 9906 TINSZ0685AWZZ B0103.HK...