Inhaltsverzeichnis
Werbung
Quicklinks
Instruction manual
Please read these in struc tions care ful ly
and make sure you un der stand them before
using this ma chine.
Anleitungshandbuch
Bitte lesen Sie diese Anleitungen sorgfältig
durch und vergewissern Sie sich, daß Sie
diese verstehen, bevor Sie die Maschine
in Betrieb nehmen.
115 68 59-20
Manuel d'instructions
Merci de lire trés attentivement le manuel
d'instructions. Assurez-vous d'avoir tout
compris avant d'utiliser ce tracteur.
Manual de las instrucciones
Por favor lea cuidadosamente y comp-
renda estas intrucciones an tes de usar
esta maquina.
Manuale di istruzioni
Prima di utilizzare la macchina leggete
queste istruzioni con attenzione ed
accertatevi di averle comprese bene.
Instructieboekje
Lees deze instructies aandachtig en zorg
dat u ze begrijpt voordat u deze ma chine
gebruikt.
ST 324P
Euro
Werbung
Inhaltsverzeichnis

Verwandte Anleitungen für Husqvarna ST 324P


Inhaltszusammenfassung für Husqvarna ST 324P
- Seite 1 Sie sich, daß Sie renda estas intrucciones an tes de usar dat u ze begrijpt voordat u deze ma chine diese verstehen, bevor Sie die Maschine esta maquina. gebruikt. in Betrieb nehmen. 115 68 59-20 ST 324P Euro...
-
Seite 2: Inhaltsverzeichnis
CONTENTS INDICE SAFETY RULES ........PAGE 3-8 REGLAS DE SEGURIDAD ......SIVU 3-8 ASSEMBLY ............11-19 ENSAMBLAJE ..........11-19 OPERATION ............ 20-44 FUNCIONAMIENTO ......... 20-44 MAINTENANCE ..........45-53 MANTENIMIENTO ........... 45-53 SERVICE AND ADJUSTMENTS ..... 54-68 MANTENIMIENTO Y REGULACIONES ..54-68 STORAGE ............ -
Seite 3: Operation
SAFE OPERATION PRACTICES FOR SNOW THROWERS Training Stop the engine whenever you leave the operating position, before unclogging the collector/impeller hous- Read the operating and service instruction manual ing or dis charge guide and when making any repairs, carefully. Be thoroughly familiar with the controls and adjustments or inspections. -
Seite 4: Sichere Bedienung Einer Schneefräse
SICHERE BEDIENUNG EINER SCHNEEFRÄSE Vorkenntnisse Sollte das Gerät ungewöhnlich vibrieren, stellen Sie den Motor ab und suchen Sie umgehend nach der Ursache. Lesen Sie die Bedienungs- und Wartungsanleitung Vibrationen sind grundsätzlich Zeichen dafür, dass ein sorgfältig. Machen Sie sich sorgfältigst mit den Prob lem vorliegt. -
Seite 5: Entretien Et Rangement
MÉTHODES DE FONCTIONNEMENT DANS DES CONDITIONS DE SÉCURITÉ POUR SOUFFLEUSES Instructions Arrêtez le moteur toutes les fois que vous abandonnez la position de fonctionnement, avant la désobstruction du Lisez attentivement le manuel des notices techniques logement collecteur/aube ou du guidage de refoulement d’utilisation et de service d’instruction. -
Seite 6: Mantenimiento Y Conservación
TÉCNICAS DE FUNCIONAMIENTO SEGURO PARA MÁQUINAS QUITANIEVES Formación Parar el motor cada vez que se abandone la posición de funcionamiento, antes de limpiar el alojamiento del Leer atentamente el manual de instrucciones de func- colector / impulsor o el conducto de eyección y cuando ionamiento y mantenimiento. -
Seite 7: Onderhoud En Opslag
VEILIGHEIDSVOORSCHRIFTEN VOOR HET GEBRUIK VAN DE SNEEUWRUIMER Zet de motor af als u de bedieningsplaats verlaat, voordat Instructies u de collector/rotormantel of de afvoergeleider ontstopt en als u reparaties, aanpassingen of controles uitvoert. Lees de gebruiksaanwijzing en bedieningsvoorschriften zorgvuldig door. Zorg dat u vertrouwd raakt met de Zorg dat de collector/rotor en alle roterende onderdelen besturing en het juiste gebruik van het apparaat. -
Seite 8: Manutenzione E Conservazione
PROCEDURE DI SICUREZZA PER L ’UTILIZZO DI SPAZZANEVE Addestramento Quando si eseguono interventi di pulizia, riparazione o verifica, accertarsi sempre che il collettore/ventilatore Lettura attenta del manuale di istruzioni. Esercitazioni espulsore e tutte le parti mobili siano ferme. Stac- all’utilizzo corretto dei comandi e della strumentazione. care il filo della candela e tenerlo lontano per evitare Essere in grado di riconoscere quando è... - Seite 9 These symbols may appear on your machine or in the literature supplied with the product. Learn and understand their mean- ing. Diese Symbole finden Sie auf Ihrer Maschine oder in Unterlagen, die mit dem Produkt ausgehändigt wurden. Bitte machen Sie sich mit deren Bedeutung vertraut.
- Seite 10 ST 324P 2006/42/EC 0-4,2 Notified Body SNCH 11, Route de Luxembourg L-5230 Sandweiler TUV Rheinland No. 0499...
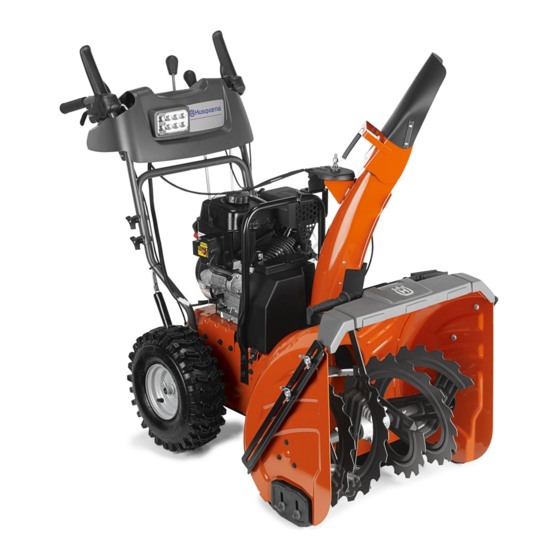
- Seite 11 Before the snow thrower can be used certain parts must be assembled, which for transportation reasons are en closed in the packing. The picture shows which parts must be assembled. Bevor Sie die Schneefräse verwenden können, müssen bestimmte Teile montiert werden, die zum Zwecke des Transports separat verpackt wurden.
-
Seite 12: Entnehmen Der Schneefräse Aus Dem Karton
Sacar la máquina quitanieves del Remove snow thrower from the cartón carton Sacar todas las partes sueltas y las cajas de partes del Remove all accessible loose parts and parts boxes cartón. from carton. Cortar los cuatro ángulos del cartón y apoyar los paneles Cut down all four corners of carton and lay panels en horizontal. -
Seite 13: Zusammensetzen Der Schneefräse Werkzeugkasten
How to set up your snow thrower Como preparar su máquina quita- nieves Tool box Portaherramienta A toolbox is provided on your snow thrower. The toolbox is located on top of the belt cover. Store the extra shear Con su máquina quitanieves se le proporciona un portaherra- bolts, nuts and multi-wrench provided in parts bag in the mientas. -
Seite 14: Oberen Griff Aufklappen
Unfold upper handle Raise upper handle (A) to the operating position and tighten handle knobs (B) securely. Additional carriage bolts, washers and handle knobs are in bag of parts. Use to secure upper handle to lower handle. Install in lower holes in handles. Install speed control rod Remove plastic tie (C) securing rod (D) to lower handle (E). -
Seite 15: Installation Des Fahrantriebssteuerhebels
Install traction drive control rod The traction drive control rod (A) is installed on the snow thrower. Remove plastic tie (B) securing traction drive control rod (A) to rotator bracket. With top end of rod positioned under left side of control panel, push rod down and insert top end of rod into hole in traction drive control lever (C). -
Seite 16: Installation Des Steuerhebels Für Die Einzugsschnecken
Install auger control rod The auger control rod is installed on the snow thrower. Remove plastic tie (A) securing auger control rod (B) to lower handle. Push down on the auger control rod and bring top end of rod up between the metal console and plastic console cover at right control lever (C). -
Seite 17: Installation Der Auswurfrinne / Der Drehvorrichtung Für Die Auswurfrinne
Install discharge chute / chute rotater head NOTE: The multi-wrench provided in your parts bag may be used to install the chute rotater head. Place discharge chute assembly on top of chute base with discharge opening toward front of snow thrower. Position chute rotater head (A) over chute bracket (B). - Seite 18 Montar el conducto de eyección / cabeza rotante del conducto NOTA: La llave de apriete múltipla proporcionada en su bolsa de partes se puede utilizar para instalar la cabeza rotante del conducto Colocar el grupo del conducto de eyección sobre la base del conducto con la abertura de eyección hacia el frente de la máquina quitanieves.
-
Seite 19: Installation Der Fernbedienung Für Das Auswurfrinnenablenkblech
Install chute deflector remote control Install remote cable bracket (A) to discharge chute with carriage bolt (B) and 5/16-18 lock nut (D) as shown. Tighten securely. Install remote cable eyelet (E) to chute deflector (F) with shoulder bolt (G), and 1/4-20 lock nut (K) as shown. Tighten securely. Cable eyelet will be loose on shoulder bolt. - Seite 21 A. TRACTION DRIVE CONTROL LEVER CHUTE DEFLECTOR S. POWER CORD PLUG B. AUGER CONTROL LEVER K. DEFLECTOR REMOTE CONTROL LEVER PRIMER C. THROTTLE CONTROL DRIVE SPEED CONTROL LEVER U. ELECTRIC START BUTTON D. SAFETY IGNITION KEY M. STEERING TRIGGERS RECOIL STARTER HANDLE E.
- Seite 22 HOW TO USE YOUR SNOW COMO UTILIZAR SU MÁQUINA THROWER QUITANIEVES Know how to operate all controls before adding fuel or Conozca como hacer funcionar todos los mandos antes de attempting to start the engine. añadir carburante o intentar poner en marcha el motor. Stopping Pararse TRACTION DRIVE...
-
Seite 23: Benutzung Des Benzin-Absperrventils (F)
To use throttle control (C) The throttle control is located on the engine. Always operate the snow thrower with the engine at full throttle. Full throttle offers the best snow thrower performance. Bedienung des gashebels (C) Der Gashebel befindet sich auf dem Motor. Verwenden Sie die Schneefräse immer bei Vollgas. -
Seite 24: Bedienung Des Choke (E)
To use choke control (E) The choke control is located on the engine. Use the choke control whenever you are starting a cold engine. Do not use to start a warm engine. • To engage choke, turn knob clockwise to “FULL ”. Slowly turn knob clockwise to disengage. -
Seite 25: Regelung Des Schneeauswurfs
To control snow discharge WARNING: Snow throwers have exposed rotating parts, which can cause severe injury from con tact, or from ma te ri al thrown from the discharge chute. Keep the area of op er a tion clear of all persons, small children and pets at all times including startup. - Seite 26 Controlar la eyección de la nieve ADVERTENCIA: Las máquinas quitanieves tienen partes rotantes expuestas, que pueden causar heridas graves por contacto, o por material lanzado desde el conducto de eyección. Mantener siem- pre el área de operación libre de toda per so na, niños pequeños y animales domésticos, incluso du rante la puesta en marcha.
-
Seite 27: Das Schneefräsen
To throw snow The auger rotation is controlled by the auger control lever (B) located on the right side handle. • Squeeze the auger control lever to the handle to engage the auger and throw snow. • Release the auger control lever to stop throwing snow. Das schneefräsen Die Rotation der Einzugsschnecken wird mit Hilfe des Bedienungshebels für die Einzugsschnecken (B) gesteuert, welcher sich am rechten Griff befindet. -
Seite 28: Verwendung Des Reinigungsgeräts
Using the clean-out tool In certain snow conditions, the discharge chute may become clogged with ice and snow. Use the clean-out tool to dislodge this blockage. When cleaning, repairing, or in spect ing, make certain all controls are disengaged and the auger/impeller and all moving parts have stopped. - Seite 29 Usar la herramienta para la limpieza En algunas condiciones de nieve, el pasillo de eyección puede obstruirse con hielo y nieve. Usar la herramienta de limpieza para desalojar este atasco. Cuando se limpia, repara o inspecciona, asegurarse de que todos los mandos estén desconectados y que la barrena/impulsor y todas las partes móviles se hayan parado.
-
Seite 30: Vorwärts- Und Rückwärtsfahren
To move forward and backward SELF-PROPELLING, forward and reverse movement of the snow thrower, is controlled by the traction drive control lever (A) located on the left side handle. • Squeeze traction drive control lever to handle to engage the drive system. •... -
Seite 31: Per Spostarsi In Avanti O All'indietro
Moverse adelante y atrás El movimiento AUTO-PROPULSADO, hacia adelante y marcha atrás de la máquina quitanieves, se controla mediante la palanca de mando de la guía de tracción (A) posicionada en la empuñadura izquierda. • Apretar la palanca de mando de la guía de tracción hacia la empuñadura para conectar el sistema de guía. -
Seite 32: Betrieb Mit Servolenkung
Power steering operation Steering triggers (M) are used to assist in steering your snow thrower. The triggers are located on the underside of each handle. When a trigger is squeezed, it disengages the drive wheel on that side of snow thrower and allows it to turn in that direction. -
Seite 33: Einstellen Der Gleitkufen (N)
To adjust skid plates (N) NOTE: The wrench provided in your parts bag may be used to adjust the skid plates. Skid plates (N) are located on each side of the auger housing and adjust the clearance between the scraper bar (P) and the ground surface. Adjust skid plates evenly to proper height for current surface conditions. - Seite 34 Regular las placas de deslizamiento (N) NOTA: La llave de apriete proporcionada en su bolsa de partes puede uti- lizarse para regular las placas de deslizamiento. Las placas de deslizamiento (N) están posicionadas a cada lado del aloja- miento de la barrena y regulan la distancia entre la barra de arrastre (P) y el suelo.
- Seite 35 Scraper bar (P) After considerable use the scraper bar (P) may become worn. Replace a damaged or worn scraper bar. Schaber (P) Durch langen Gebrauch kann die Abstreiferleiste (P) verschleißen. Eine beschädigte oder abgenutzte Abstreiferleiste muss ausgetauscht werden. Barre de raclage (P) Lorsqu'elle est souvent utilisée, la barre de raclage (P) s'use.
-
Seite 36: Keine Transport-Funktion
Drift Cutters (AA) Use the drift cutters to cut through deep snowdrifts that are higher than the front of the snow thrower. • Loosen adjustment nuts (1) enough to allow drift cutter to be raised to highest position and tighten nuts securely. Repeat for opposite side of snow thrower. -
Seite 37: Before Starting The Engine
BEFORE STARTING THE ENGINE Check engine oil level (Q) The engine on your snow thrower has been shipped, from the factory, already filled with oil. Check engine oil with snow thrower on level ground. Remove oil fill cap/dipstick and wipe clean, reinsert the dipstick and screw tight, wait for a few seconds, remove and read oil level. -
Seite 38: Antes De Poner En Marcha El Motor
ANTES DE PONER EN MARCHA EL MOTOR Controlar el nivel de aceite del motor (Q) El motor de su máquina quitanieves viene de la fábrica ya lleno de aceite. Controlar el aceite del motor con la máquina quitanieves sobre terreno llano. - Seite 39 To start engine Before stopping Your snow thrower engine is equipped with both a 220 Volt Run the engine for a few minutes to help dry off any moisture A.C. electric starter and a recoil starter. The electric starter on the engine. is equipped with a three-wire power cord and plug and is If recoil starter has frozen designed to operate on 220 Volt A.C.
- Seite 40 Drehen Sie den Choke-Bedienungsknopf (E) auf Po si- Branchez l’autre extrémité du cordon d’alimentation tion “FULL ”. sur le moteur dans une prise de cordon d’alimentation trifilaire avec mise à la terre de 220 Volt A.C. Bei Temperaturen unter –10°C (15°F) betätigen Sie die Einspritzvorrichtung (T) vier (4) mal, bei Temperaturen REMARQUE: N’utilisez pas le dispositif d’amorçage (T) über –10°C &...
- Seite 41 Puesta en marcha del motor Tirar la empuñadura del arrancador (V) de retroceso rápidamente. No soltar de golpe la cuerda del arrancador. El motor de su máquina quitanieves está equipado tanto Cuando el motor arranca, soltar la empuñadura del ar- con un arrancador eléctrico de 220 Voltios C.A.
- Seite 42 KOUDE START - TERUGLOOPSTARTER Infilare l’altro capo del cavo di alimentazione in una presa tripolare a 220 Volt C.A. Steek de veiligheidscontactsleutel (D) (Bevestigd aan startkoord) in het contact totdat u een klik hoort. Draai NOTA: Non usare l’iniziatore (T) quando si avvia il motore de sleutel NIET om.
-
Seite 43: Schneefräsen
• Reinigen Sie die gesamte Schneefräse sorgfältig nach SNOW THROWING TIPS jedem Gebrauch und trocknen Sie sie, damit sie für den nächsten Einsatz bereit ist. • Always operate the snow thrower with the engine at full throttle. Full throttle offers the best snow thrower WARNUNG: Verwenden Sie die Schneefräse nie bei performance. - Seite 44 CONSEJOS PARA LANZAR • Houd de motor schoon en vrij van sneeuw tijdens het gebruik. Dit helpt de luchtcirculatie en verlengt de lev- LA NIEVE ensduur van de motor. • Hacer funcionar siempre la máquina quitanieves con • Als het sneeuwruimen voltooid is, laat de motor nog el motor acelerado a todo gas.
- Seite 45 Fill in dates as you Before Every Every Every SERVICE RECORD complete regular service. 25 hours 50 hours 100 hours • Check engine oil ......................• Check for loose fasteners and be sure chute guard is in place ........• Check tire pressure......................
- Seite 46 Anote las fechas cuando ha Antes Cada Cada Cada INFORME DE SERVICIO hecho el servicio normal. del uso 25 horas 50 horas 100 horas • Controlar el nivel del aceite del motor ................. Compruebe que no haya sujeciones sueltas y asegúrese de que la •...
-
Seite 47: Getriebegehäuse Der Einzugsschnecken
V-belts Cinghia a V Check V-belts for deterioration and wear after every 50 Dopo circa 50 ore di attività, controllare lo stato di deteriora- hours of operation and replace if necessary. The belts mento e usura delle cinghia a V e, se necessario, sostituirla. are not adjustable. - Seite 48 Traction drive system Do not lubricate or add oil to the hydrostatic transmission inside your snow thrower. This is a closed system and does not require maintenance. Fahrantriebssystem Bitte füllen Sie auch kein Öl für das Hydrogetriebe in Ihrem Schneeräumer nach, und schmieren Sie dieses Getriebe auch nicht ab.
-
Seite 49: Service And Adjustments
ENGINE MOTOR See engine manual. Siehe Motorhandbuch. Lubrication Ölen Check the crankcase oil level before starting the engine Überprüfen Sie den Ölstand des Kurbelgehäuses, bevor Sie and after each five (5) hours of continuous use. Tighten oil den Motor starten, und nach jeweils fünf (5) Stunden des fill cap / dipstick securely each time you check the oil level. -
Seite 50: Lubrification
MOTEUR MOTOR Voir le manuel du moteur. Ver el manual del motor. Lubrification Lubricación Vérifiez le niveau d’huile du carter avant de mettre en Controlar el nivel de aceite del cárter antes de poner en marcha marche le moteur et après chaque (5) heures d’utilisation el motor y después de cada cinco (5) horas de uso continuo. - Seite 51 MOTOR MOTORE Zie handleiding voor de motor. Si faccia riferimento al manuale relativo al motore. Smering Lubricazione Controleer het oliepeil van het carter voordat u de motor Prima di avviare il motore e dopo circa 5 ore di uso ininter- start en elke keer na vijf (5) uur continu gebruik.
- Seite 52 Muffler Spark plug Inspect and replace corroded muffler as it could create a Replace spark plug at the beginning of each season or after fire hazard and/or damage. every 100 hours of op er a tion, whichever occurs first. Spark plug type and gap setting are shown in the engine manual.
- Seite 53 CLEANING LIMPIEZA IMPORTANT: For best performance, keep snow thrower IMPORTANTE: Para las mejores prestaciones, mantener el housing free of any dirt or trash. Clean the outside of your alojamiento de la máquina quitanieves libre de toda sucie- snow thrower after each use. dad o basura.
- Seite 54 WARNING: To avoid serious injury, before per form ing any service or adjustments: 1. Be sure ON/OFF switch is in OFF position. 2. Remove safety ignition key. 3. Make sure the augers and all moving parts have completely stopped. 4. Disconnect wire from spark plug and place wire where it cannot come in con tact with plug. SNOW THROWER To adjust snow thrower height See “TO ADJUST SKID PLATES”...
- Seite 55 ATENCIÓN: Para evitar heridas graves, antes de efectuar operaciones de mantenimiento o regulaciones: 1. Asegurarse de que el interruptor de ON/OFF esté en la posición OFF. 2. Quitar la llave de encendido de seguridad. 3. Asegurarse de que las barrenas y todas las partes en movimiento se hayan parado completamente. 4.
-
Seite 56: Scherbolzen An Einzugsschnecken
Shear bolts Auger shear bolts Both right and left-hand augers are secured to the auger shaft with a shoul- der/shear bolt and hex nut. Should a foreign object or ice become lodged in the augers, the shear bolts are designed to break, preventing damage to any other com po nents. - Seite 57 Vis de cisaillement Vis de cisaillement de la vis sans fin Les deux vis sans fin de gauche et de droite sont fixées à l’arbre des vis sans fin avec une vis à épaulement /de cisaillement et un écrou hexagonal. Si un objet étranger ou de la glace en venait à...
- Seite 58 Schuifbouten Boorschuifbouten Zowel de rechter- als de linkerboren zijn bevestigd aan de booras met een borstbout/schuifbout en een zeskantmoer. De schuifbouten zijn zo ontworpen, dat ze breken als er voorwerpen of ijs in de boren vast te komen zitten en behoeden zo voor schade aan andere componenten.
-
Seite 59: Entfernen Der Riemenabdeckung
To remove belt cover Loosen the two (2) screws (A) securing belt cover (B) to frame (C). Remove belt cover. • Replace belt cover by installing cover and tightening screws. Entfernen der riemenabdeckung Entfernen Sie die zwei (2) Schrauben (A), mit denen die Riemenabeckung (B) am Rahmen (C) befestigt ist. - Seite 60 To replace belts The auger and traction drive belts are not adjustable. If the belts are damaged or begin to slip from wear, they should be replaced. It is recommended that the belt(s) be replaced by a qualified service center. NOTE: It is recommended that both the auger and traction drive belt be replaced at the same time.
-
Seite 61: Erneuern Der Riemen
Erneuern der riemen Der Einzugsschnecken- und der Fahrantriebsriemen sind nicht verstellbar. Wenn die Riemen beschädigt sind oder wegen Abnutzung lose sitzen, sollten Sie ersetzt werden. Es wird empfohlen, den/die Riemen von einer qualifizierten Kundendienststelle austauschen zu lassen. HINWEIS: Es wird empfohlen, den Einzugsschnecken- und den Fahrant- riebsriemen zur gleichen Zeit auszutauschen. - Seite 62 Pour remplacer les courroies La vis sans fin et les courroies de transmission de traction ne sont pas ajustables. Si les courroies sont endommagées ou commencent à glisser à cause de l’usure, elles devraient être remplacées. Il est recommandable que (la) (les) courroie(s) soient remplacées par un centre des services à la clientèle qualifié.
- Seite 63 Sustituir las correas Las correas de la barrena y de la tracción no se pueden regular. Si las cor- reas están dañadas o empiezan a resbalar por el desgaste, se tendrían que sustituir. Se recomienda que la(s) correa(s) sean sustituidas por un centro de servicio calificado.
- Seite 64 Het vervangen van de riemen De boorriemen en aandrijfriemen zijn niet afstelbaar. Als de riemen zijn be- schadigd of tekenen van slijtage beginnen te vertonen, dienen ze vervangen te worden. Het wordt aanbevolen de riem(en) door een gekwalificeerde reparateur te laten vervangen. N.B.: Wij raden u aan zowel de boorriemen als de aandrijfriemen tegelijkertijd te vervangen.
- Seite 65 Sostituire le cinghie Le cinghie della coclea e della trazione non sono riparabili. Se presentano dei danni o cominciano ad allentarsi troppo per via dell’usura, vanno sostituite. Si consiglia di far cambiare la(e) cinghia(e) da un centro di assistenza qualificato. NOTA: Si consiglia di sostituire contemporaneamente la cinghia della coclea e quella di trazione.
- Seite 66 To remove wheels • Remove the wheel pin (A) and retainer pin (B) and remove wheel from axle (C). Entfernen der räder • Den Sicherungsring (A) und den Sicherungsstift (B) entfernen und das Rad von der Achse (C) abziehen. Pour enlever les roues •...
-
Seite 67: Einstellung Der Traktionsriemen- Und Auger-Riemenspannung
To adjust cable tension Adjust cable tension by turning the adjuster turn buckle (A), located on the right hand cable. Grasp the long section tightly and turn the short section to lengthen the adjuster. Adjust until cable is snug. Zur einstellung der seilspannung Stellen Sie die Seilspannung ein, indem Sie das Spannerschloss (A) des rechten Seils drehen. - Seite 68 ENGINE MOTOR See engine manual. Ver el manual del motor. Carburetor Carburador Your carburetor is not adjustable. Engine performance Su carburador no se puede regular. Las prestaciones del mo- should not be affected at altitudes up to 2,134 meters tor no son afectadas por la altitud hasta 2,134 metros (7,000 (7,000 feet).
-
Seite 69: Storage
LAGERUNG STORAGE Machen Sie Ihre Schneefräse sofort gen Ende der Saison Immediately prepare your snow thrower for storage at the lagerfertig, oder wenn Sie das Gerät 30 Tage oder länger nicht end of the season or if the unit will not be used for 30 days benutzen werden. -
Seite 70: Entreposage
ENTREPOSAGE ALMACENAJE Préparez immédiatement votre souffleuse pour l’entreposage Preparar inmediatamente la máquina quitanieves para guard- à la fin de la saison ou si l’unité n’est pas en fonction pour arla al final de la temporada o si la unidad no se utilizará por 30 jours ou plus. -
Seite 71: Onderhoud
OPSLAG IMMAGAZZINAGGIO Maak uw sneeuwruimer direct aan het einde van het seizoen Alla fine della stagione o se prevedete di non utilizzare la mac- klaar voor opslag of als het toestel niet meer dan 30 dagen china per almeno trenta giorni, preparatela immediatamente gebruikt gaat worden. - Seite 72 PROBLEM CAUSE CORRECTION Does not start 1. Fuel shut-off valve (if so equipped) in 1. Turn fuel shut-off valve to “OPEN” position. “OFF” position. 2. Safety ignition key is not inserted. 2. Insert safety ignition key. 3. Out of fuel. 3.
- Seite 73 FEHLER URSACHE ABHILFE Motor startet nicht 1. Das Benzin-Absperrventil (falls 1. Stellen Sie das Benzin-Absperrventil auf Position “OPEN”. vorhanden) ist auf Position “OFF”. 2. Der Sicherheitszündschlüssel steckt 2. Sicherheitszündschlüssel einstecke. nicht. 3. Benzin leer. 3. Füllen Sie den Benzintank. 4. Gashebel auf Position “STOP” (oder 4.
- Seite 74 PROBLÈME CAUSE SOLUTION Ne se met pas en 1. Le robinet arrêt carburant (si tel 1. Tournez le robinet arrêt carburant dans la position “OPEN”. marche qu’équipé) dans la position “OFF”. 2. La clé de contact de sécurité n’est 2. Insérez la clé de contact de sécurité. pas insérée.
- Seite 75 PROBLEMA CAUSA SOLUCIÓN No arranca 1. Válvula de interrupción de carbu- 1. Meter la válvula de interrupción de carburante en posición rante (si está presente) en posición “OPEN”. “OFF”. 2. La llave de encendido de seguridad 2. Poner la llave de encendido de seguridad. no está...
- Seite 76 PROBLEEM OORZAAK OPLOSSING Wil niet starten 1. De afsluitklep van de brandstoftank (als 1. Draai de afsluitkep van de brandstoftank naar “OPEN”. hij zo is uitgevoerd) in “OFF” zetten. 2. De veiligheidscontactsleutel zit niet 2. Steek de veiligheidscontactsleutel in het contact. in het contact.
- Seite 77 PROBLEMA CAUSA SOLUZIONE La macchina non 1. La valvola di arresto del combustibile 1. Portare la valvola di arresto del combustibile in posizione “OPEN”. parte (se è presente) è posizionata su “OFF”. 2. La chiave di accensione di sicurezza 2. Inserire la chiave di accensione. non è...
- Seite 80 06/04/2014 CL/TH...