Salter SL158 Bedienungsanleitung
Quicklinks
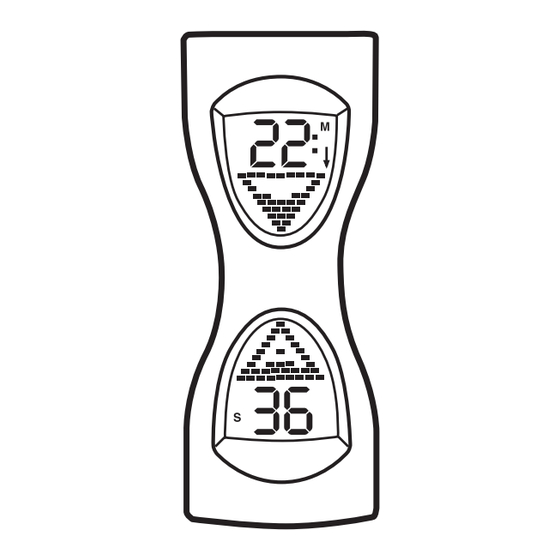
ELECTRONIC TIMER WITH SAND TIMER DESIGN
CHRONOMETRE ELECTRONIQUE MODELE SABLIER
ELEKTRONISCHER KURZZEITMESSER IM SANDUHR-DESIGN
GB
LOCATION OF CONTROL
1. +
2. –
3. TIMER START/STOP
GETTING STARTED
To install battery (battery included) - Remove the battery door. Insert one "AAA" battery,
ensuring +/- terminals are the correct way round. Replace the battery door.
Setting the clock
1. To switch to clock mode upturn the unit so CLOCK SET is at the top.
2. Press & hold CLOCK SET button for 2 seconds until the time display flashes.
3. Press + or – buttons to set the current time.The time will advance quickly if the button
is held down.
4. After setting, press CLOCK SET button again to set the time.
Setting the countdown timer
1. To switch to timer mode upturn the unit so START/STOP is at the top.
2. Press CLEAR button to reset digits to 00:00. Press + or – buttons to set the desired timing
period, up to a maximum of 99 minutes.The time will advance quickly if the button is held down.
3. Press START/STOP button to start countdown.
4. The timer can be temporarily stopped by pressing the START/STOP button.
You can restart it by pressing the START/STOP button again.
5. The alarm beeps for 1 minute when it reaches 0:00.The timer will then count up and flash
the time elapsed on the display.
6. Press START/STOP button to stop alarm.The last countdown time will be recalled and
displayed (This timer has a built-in memory function).
Setting the count-up timer
1. To switch to timer mode upturn the unit so START/STOP is at the top.
2. Press CLEAR button to reset digits to 00:00. Press START/STOP button to start count up.
3. The timer can be temporarily stopped by pressing the START/STOP button.
You can restart it by pressing the START/STOP button again.
12/24 hour clock display
1. Simply press the 12/24 button to choose your desired format.
2. In 12hr format, a 'PM' sign will appear to indicate PM hours.
USE AND CARE
• Wipe clean with a dry cloth. DO NOT immerse in water.
• DO NOT place on or near hot ovens etc.
• Use 1 x AAA battery type. If the display begins to disappear or alarm sound faint, check
battery contact and then try a new battery.Always remove flat batteries.
GUARANTEE - Salter will repair or replace this product*, free of charge if within a year of
the date of purchase it can be shown to have failed through defective workmanship or materials.
This undertaking is in addition to a consumer's statutory rights and does not affect those rights
in any way. *Excludes batteries.
F
POSITION DES COMMANDES
1. +
2. –
3. MARCHE/ARRET
DU SABLIER
MISE EN MARCHE
Installation de la pile (Y compris les piles) - Retirez le couvercle du logement de la pile.
Placez une pile "AAA" en vous assurant que les bornes + et - sont dans le bon sens. Refermez le
couvercle du logement de la pile.
Réglage de l'horloge
1. Pour mettre le sablier en mode horloge, retournez-le de façon à ce que CLOCK SET soit
situé en haut.
2. Appuyez sur le bouton CLOCK SET pendant 2 secondes jusqu'à ce que l'affichage de l'heure
se mette à clignoter.
3. Utilisez les boutons + et – pour le mettre à l'heure. Pour faire défiler rapidement les
heures et les minutes il suffit de maintenir le bouton en position enfoncée.
4. Une fois l'heure réglée, appuyez à nouveau sur le bouton CLOCK SET pour la mémoriser.
Réglage du temporisateur
1. Pour mettre le sablier en mode temporisateur, retournez-le de façon à ce que START/STOP
soit situé en haut.
2. Appuyez sur le bouton CLEAR pour remettre les chiffres à 00:00. Réglez la durée du
temporisateur à l'aide des boutons + et –. La durée maximale est de 99 minutes. Pour un
défilement rapide, il suffit de maintenir le bouton enfoncé.
3. Appuyez sur le bouton START/STOP pour démarrer le temporisateur.
4. Il est possible d'interrompre momentanément le temporisateur en appuyant sur le bouton
START/STOP. Il peut être redémarré en appuyant à nouveau sur le bouton START/STOP.
5. L'alarme émet un bip sonore pendant 1 minute lorsque le temporisateur arrive à 0:00.
Le sablier commence alors à chronométrer et le temps écoulé clignote sur l'affichage.
6. Appuyez sur le bouton START/STOP pour faire taire l'alarme. La dernière durée du
temporisateur s'affiche alors en rappel (ce sablier dispose d'une fonction de mémoire intégrée).
Réglage du chronomètre
1. Pour mettre le sablier en mode chronomètre, retournez-le de façon à ce que START/STOP
soit situé en haut.
2. Appuyez sur le bouton CLEAR pour remettre les chiffres à 00:00.Appuyez sur le bouton
START/STOP pour démarrer le chronomètre.
3. Il est possible d'interrompre momentanément le chronomètre en appuyant sur le bouton START/STOP.
Il peut être redémarré en appuyant à nouveau sur le bouton START/STOP.
Affichage de l'horloge en format 12 ou 24 heures
1. Appuyez simplement sur le bouton 12/24 pour sélectionner le format désiré.
2. En format 12 heures format, le signe "PM" s'affiche pour indiquer les heures d'après-midi.
EMPLOI ET ENTRETIEN
• Pour le nettoyage, essuyer avec un chiffon sec. NE PAS IMMERGER dans l'eau.
NE PAS placer sur ou à proximité des sources de chaleur (comme les fours par exemple).
• Utiliser une pile de type AAA. Si l'intensité de l'affichage commence à s'atténuer ou
l'alarme s'affaiblit en sonorité, contrôlez le dispositif de contact de la pile ou changez-la.
Veillez toujours à retirer les piles usagées.
GUARANTIE - Salter s'engage à réparer ou remplacer gratuitement ce produit*, si dans l'année
suivant sa date d'achat il s'avère être défectueux en raison d'un vice matériel ou de fabrication.
Cette garantie vient s'ajouter aux droits législatifs impératifs du consommateur et ne modifie pas
ces derniers de quelque manière que ce soit. *Piles exclues.
D
BEZEICHNUNG DER TEILE
1. +
2. –
3. KURZZEITMESSER
BEGINN/STOPP
SO FANGEN SIE AN
Einsetzen der Batterie (Batterien werden mitgeliefert) - Entfernen Sie den Batteriekammerdeckel.
Setzen Sie eine AAA-Batterie ein, und stellen Sie sicher, dass die +/- Seiten richtig herum liegen. Setzen
Sie den Batteriekammerdeckel wieder ein.
Einstellen der Uhrzeit
1. Um den Uhrzeitmodus einzustellen, drehen Sie die Einheit bitte um, so dass CLOCK SET oben ist.
2. Halten Sie den CLOCK SET-Button 2 Sekunden lang heruntergedrückt, bis die
Zeitanzeige blinkt.
3. Drücken Sie den + oder den – Button, um die richtige Zeit einzustellen.Wenn der Button
gedrückt gehalten wird, läuft die Zeitangabe schnell vorwärts
4. Drücken Sie nach dem Einstellen wieder den CLOCK SET-Button, um die Zeit einzustellen.
Einstellen des rückwärts zählenden Kurzzeitmessers
1. Um den Kurzzeitmessermodus einzustellen, drehen Sie die Einheit bitte um, so dass
START/STOP oben ist.
2. Drücken Sie den CLEAR-Button, um die Ziffern wieder auf 00:00 zu stellen. Drücken Sie den +
oder den – Button, um die gewünschte Zeiteinstellung einzustellen - bis zu maximal 99 Minuten.
Wenn der Button gedrückt gehalten wird, läuft die Zeitangabe schnell vorwärts.
3. Drücken Sie den START/STOP-Button, um den Ablauf zu beginnen.
4. Der Kurzzeitmesser kann vorübergehend gestoppt werden, indem Sie den START/STOP-
Button drücken. Sie können wiederbeginnen, indem Sie den START/STOP-Button
erneut drücken.
5. Wenn 0:00 angezeigt wird, ertönt das Alarmsignal eine Minute lang. Der Kurzzeitmesser
zählt dann vorwärts weiter und die verstrichene Zeit leuchtet blinkend im Display auf.
6. Drücken Sie den START/STOP-Button, um das Alarmsignal abzuschalten. Die vorherige
Rückwärtszählzeit wird wieder aufgerufen und angezeigt (dieser Kurzzeitmesser verfügt
über eine automatische Speicherfunktion).
Einstellen des vorwärts zählenden Kurzzeitmessers
1. Um den Kurzzeitmessermodus einzustellen, drehen Sie die Einheit bitte um, so dass
START/STOP oben ist.
2. Drücken Sie den CLEAR-Button, um die Ziffern wieder auf 00:00 zu stellen. Drücken Sie den
START/STOP-Button, um den Vorwärtslauf zu beginnen.
3. Der Kurzzeitmesser kann vorübergehend gestoppt werden, indem Sie den START/STOP-
Button drücken. Sie können wiederbeginnen, indem Sie den START/STOP-Button
erneut drücken.
12-/24-Stundenanzeige
1. Drücken Sie einfach den 12/24-Button, um das gewünschte Format zu wählen.
2. Beim 12-Stunden-Format erscheint das Zeichen "PM", um Nachmittagsstunden anzuzeigen.
Verwendungsbereich und pflege
• Mit einem trockenen Tuch sauber wischen. NICHT in Wasser tauchen. NICHT auf heiße
Herde etc. oder in deren Nähe stellen.
• Setzen Sie eine AAA-Batterie ein.Wenn das Display allmählich undeutlich wird oder das
Alarmsignal schwach ist, überprüfen Sie bitte den Batteriekontakt und versuchen Sie
dann, eine neue Batterie einzusetzen. Leere Batterien müssen immer entfernt werden.
GUARANTIE - Salter repariert oder ersetzt dieses Produkt* kostenlos, wenn bewiesen werden kann,
dass dieses innerhalb eines Jahres nach dem Kaufsdatum aufgrund von Ausführungs- oder Materialfehlern
funktionsunfähig ist.Wir bieten diese Zusicherung zusätzlich zu den dem Kunden zustehenden
Gewährleistungsansprüchen, die durch diese Garantie nicht berührt werden. *außer ßatterien.
E
5
8
INSTRUCTION MANUAL
4. TIMER CLEAR
5. LIGHT
6. CLOCK SET
MANUEL D'INSTRUCTIONS
4. REMISE A ZERO
DU SABLIER
5. ECLAIRAGE
6. REGLAGE DE L'HORLOGE
BEDIENUNGSANLEITUNG
4. KURZZEITMESSER
NULLSTELLEN
5. LICHT
6. EINSTELLEN DER UHR
1
3
4
TIMER CONTROLS
7
6
1
CLOCK CONTROLS
7. 12/24 HOUR CLOCK
8. BATTERY DOOR
7. HORLOGE 12/24
HEURES
8. COUVERCLE DU
LOGEMENT DE LA PILE
7. 12-/24-
STUNDENANZEIGE
8. BATTERIE-
KAMMERDECKEL
2
SL158

Verwandte Anleitungen für Salter SL158


Inhaltszusammenfassung für Salter SL158
- Seite 1 GUARANTEE - Salter will repair or replace this product*, free of charge if within a year of the date of purchase it can be shown to have failed through defective workmanship or materials.
- Seite 2 Retire siempre las pilas descargadas. GARANTIA - Salter reparará o sustituirá este producto*, sin coste alguno si durante el primer año desde la fecha de compra muestra algún fallo provocado por una pieza o material defectuoso. Este compromiso es adicional a los derechos legales del consumidor y no afecta en modo alguno a estos derechos.