Werbung
Verfügbare Sprachen
Verfügbare Sprachen
Quicklinks
ALTIMO
Digital Altimeter Watch
Model: RA129
USER MANUAL
EN
INTRODUCTION
Thank you for selecting the Oregon Scientific™ ALTIMO
Digital Altimeter Watch (RA129). Equipped with real-
time clock, stopwatch, alarm, backlight and keypad lock
functions, this watch can also be used for providing daily
altitude reading.
IMPORTANT
•
The measurement functions built into the RA129 are
not meant to substitute professional measurement
or industrial precision devices. Values produced
by this device should be considered as reasonable
representations only.
•
Oregon Scientific™ assumes no responsibility for
any loss, or any claims by third parties that may arise
through the use of this device.
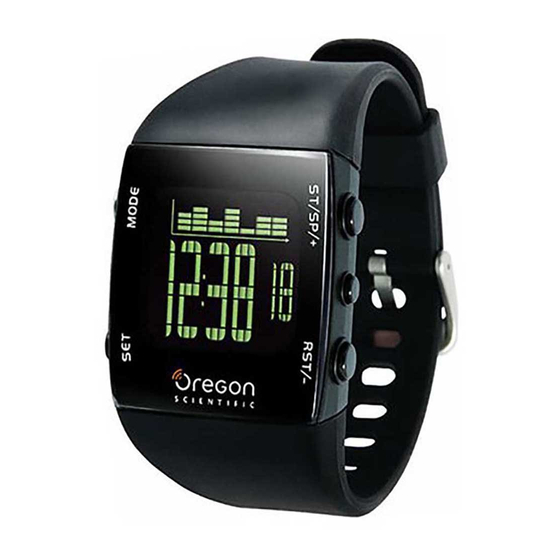
CONTROL BUTTONS
1
3
4
2
5
1.
MODE: Switch to another display; quick exit during any
setting mode
2.
SET: Enter setting mode; confirm setting value
3.
ST / SP / + : Increase value of the setting; start / stop
stopwatch
4.
/
: Activate backlight; lock keypad
5.
RST / -: Decrease value of the setting; reset stopwatch
LCD
1
2
3
5
6
4
7
8
1.
: Indicates beep tone is turned Off
2.
: Indicates keypad is locked
3.
Displays altitude trend bar chart
4.
Displays clock, calendar, stop watch, alarm time, altitude
or mode banners
5.
: Indicates alarm is On
6.
: Indicates stopwatch is displayed or running
7.
: 12 hour clock, altitude unit
8.
or
: Indicates battery power is low
GETTING STARTED
TURN ON DEVICE (FIRST-TIME USE ONLY)
Press any key for 2 seconds to activate the LCD display.
BATTERY REPLACEMENT
The RA129 uses a CR2032 3V battery, which has already
been installed. See below for battery warnings.
INDICATION
DESCRIPTION
The battery is low.
The battery is too low to operate.
The altitude trend bar chart is
cleared.
NOTE While the low battery icon is displayed, altitude
reading, alarm beeping and backlight are disabled. It will
return to normal once battery has been replaced.
NOTE If you need to replace the battery, we highly
recommend you to contact the retailer or our customer
service department.
To replace the battery:
1.
Use a small Phillips screwdriver to remove battery
compartment lid. Once opened, please keep the screws
in a safe place to avoid losing them.
2.
Remove the old battery and insert the new one, matching
the polarities.
3.
Replace the lid by screwing it back into place using a
Phillips screwdriver.
OPERATING MODES
Press MODE to switch between:
•
Time Mode
•
Date Mode
•
Altimeter Mode
•
Chrono (Stopwatch) Mode
•
Alarm Mode
TIME MODE
This mode is used for viewing the current time and altitude
trend bar chart and for setting the time and date.
TO SET TIME AND DATE
1.
Press MODE to navigate to Time Mode.
2.
Press and hold SET to enter settings.
3.
Press ST/SP/+ or RST/- to change values of the setting.
Press and hold ST/SP/+ or RST/- to rapidly change
values.
4.
Press SET to confirm and move to the next setting.
Repeat steps 3-4 for each setting option. The setting
options are as follows: 12 / 24-hour time; hour; minute;
year; month-day / day-month; month; day; altitude unit
(m / ft); beep on/off.
5.
Press MODE anytime to confirm and exit settings.
DATE MODE
This mode is used for viewing the current date and altitude
trend bar chart. Press MODE to navigate to Date Mode.
ALTIMETER MODE
This mode is used for viewing the current altitude reading.
Press MODE to navigate to Altimeter Mode.
TO SET THE ALTITUDE
For the purpose of accuracy, users are recommended to
manually adjust and set the altitude. The corresponding sea
level pressure will be automatically updated.
1.
Press MODE to navigate to Altimeter Mode.
2.
Press and hold SET to enter settings.
3.
Press ST/SP/+ or RST/- to change values of the setting.
Press and hold ST/SP/+ or RST/- to rapidly change
values.
4.
Press MODE to confirm and exit.
ALTITUDE TREND BAR CHART
This bar chart displays the altitude reading of the passed 7
minutes, with the altitude represented by 5 rows (1 row = 10
m or 32.8 ft) and the 7 minutes represented by 7 columns (1
column = 1 min).
The latest reading is displayed at the last column on the
right and is always positioned at the 3rd row. This is to allow
other columns to adjust their height correlative of the latest
reading.
ALTITUDE OUT OF RANGE
When the altitude is out of range, "HIGH" and "LOW" will be
displayed until the altitude is within range again.
when the altitude is above the maximum
value
when the altitude is below the minimum
value
NOTE When the altitude is out of range, the last column on
the right will become blank until the altitude is within range
again. All the other columns will adjust their height to reflect
the latest reading.
STOPWATCH MODE (CHRONO)
TO START / STOP STOPWATCH
1.
Press MODE to navigate to Chrono Mode.
2.
Press ST/SP/+ to start / stop stopwatch.
TO RESET STOPWATCH
Press RST/- to reset stopwatch.
NOTE Stopwatch can be reset to 00:00:00 only if it has been
stopped or paused.
ALARM MODE
TO SET ALARM
1.
Press MODE to navigate to Alarm Mode.
2.
Press and hold SET to enter settings.
3.
Press ST/SP/+ or RST/- to change values of the setting.
Press and hold ST/SP/+ or RST/- to rapidly change
values.
4.
Press SET to confirm and move to the next setting.
Repeat steps 3-4 for each setting option. The setting
options are as follows: hour; minute.
5.
Press MODE anytime to confirm and exit settings.
TO ACTIVATE / DEACTIVATE ALARM
1.
Press MODE to navigate to Alarm Mode.
2.
Press ST/SP/+ or RST/- to activate / deactivate alarm.
indicates that the alarm has been activated.
3.
Press MODE to confirm and exit.
TO SILENCE ALARM
When the alarm clock is activated, it will sound at the set time
every day. Press any button to stop the alarm for that day.
NOTE The alarm clock is still active and will set off again the
following day.
BACKLIGHT AND KEYPAD LOCK
To activate backlight:
Press
/
to turn backlight On for 5 seconds.
NOTE The backlight function will not operate if "
"
" is displayed.
To toggle keypad lock On or Off:
Press and hold
/
for 2 seconds.
indicates keypad
is locked.
USE IN THE WATER
The RA129 is water-resistant up to 30 meters (98 feet).
RAIN
SHOWERING
LIGHT
SHALLOW
SNORKELING/
SPLASHES
(WARM /
SWIMMING /
DIVING /
DEEP
ETC
COOL
SHALLOW
SURFING /
WATER
WATER
WATER
WATER
DIVING
ONLY)
SPORTS
30M /
OK
NO
NO
NO
NO
98 FEET
NOTE Set the watch before exposing it to excessive water.
Pressing the keys while in the water or during heavy
rainstorms may cause water to enter the watch.
SPECIFICATIONS
12/24 format with hour / minute /
Real time clock
second
Stopwatch
00:00:00 to 99:59:59 (hr:min:sec)
-400 m to 9000 m
Altitude range
(-1312 ft to 29520 ft)
Altitude refresh rate
20 sec
Altitude trend bar
1 min
chart refresh rate
Power
1 x CR2032 3V battery
PRECAUTIONS
To ensure you use your product correctly and safely, read
these warnings and the entire user manual before using the
product:
•
Use a soft, slightly moistened cloth. Do not use abrasive
or corrosive cleaning agents, as these may cause
damage. Use lukewarm water and mild soap to clean
the watch. Never use the products in hot water or store
them when wet.
•
Do not subject the product to excessive force, shock,
dust, temperature changes, or humidity. Never expose
the product to direct sunlight for extended periods. Such
treatment may result in malfunction.
•
Do not tamper with the internal components. Doing
so will terminate the product warranty and may cause
damage. The main unit contains no user-serviceable
parts.
•
Do not scratch hard objects against the LCD display as
this may cause damage.
•
Take precautions when handling all battery types.
•
Remove the batteries whenever you are planning to
store the product for a long period of time.
•
When replacing batteries, use new batteries as specified
in this user manual.
•
The product is a precision instrument. Never attempt
to take this device apart. Contact the retailer or our
customer service department if the product requires
servicing.
•
Do not touch the exposed electronic circuitry, as there is
a danger of electric shock.
•
Check all major functions if the device has not been
used for a long time. Maintain regular internal testing
and cleaning of your device. Have your watch serviced
by an approved service center annually.
•
When disposing of this product, ensure it is collected
separately for special treatment and not as normal
household waste.
•
Due to printing limitations, the displays shown in this
manual may differ from the actual display.
•
The contents of this manual may not be reproduced
without the permission of the manufacturer.
NOTE The technical specifications for this product and the
contents of the user manual are subject to change without
notice.
NOTE Features and accessories will not be available in all
countries. For more information, please contact your local
retailer.
ABOUT OREGON SCIENTIFIC
Visit our website (www.oregonscientific.com) to learn more
about Oregon Scientific products. If you're in the US and
would like to contact our Customer Care department directly,
please visit: www2.oregonscientific.com/service/support
OR
Call 1-800-853-8883.
For international inquiries, please visit:
www2.oregonscientific.com/about/international
EU-DECLARATION OF CONFORMITY
Hereby, Oregon Scientific, declares that this ALTIMO Digital
Altimeter Watch (Model RA129) is in compliance with
EMC directive 89/336/CE. A copy of the signed and dated
Declaration of Conformity is available on request via our
Oregon Scientific Customer Service.
ALTIMO
Orologio con altimet
MODELLO: RA
MANUALE PER L'U
IT
INTRODUZIONE
Grazie per aver scelto l'orologio AL
altimetro digitale di Oregon Scientifi
apparecchio è dotato di orologio,
retroilluminazione e blocco dei tasti, e
avere informazioni sull'altitudine corre
IMPORTANTE
•
Le funzioni di rilevazione de
sostituiscono quelle di dispos
industriali di misurazione o di preci
visualizzate da questo dispos
considerate puramente indicative.
" or
•
Oregon Scientific™ declina quals
qualsiasi perdita di informazioni o
di danni da parti di terzi che posso
questo dispositivo.
PULSANTI DI CONTROLLO
1
2
1.
MODE: consente di passare ad un'a
abbandonare rapidamente una mod
2.
SET: consente di accedere alla mo
e di confermare le impostazioni
3.
ST / SP/ + : consente di aumentare il v
e di avviare/interrompere il cronome
4.
/
: consente di attivare la
blocco dei tasti
5.
RST / -: consente di diminuire il va
e di azzerare il cronometro
LCD
1
2
3
4
1.
: indica che il segnale acustico
2.
: indica che il blocco dei tasti è
3.
Visualizza l'andamento grafico de
4.
Visualizza orologio, calendario, c
sveglia, altitudine o dettaglio delle
5.
: indica che la sveglia è attiva
6.
: indica che il cronometro vien
in funzione
7.
: orologio in formato 12 ore, unit
8.
oppure
: indica c
esaurimento
OPERAZIONI PRELIMINARI
ACCENSIONE DEL DISPOSITIVO (S
VOLTA)
Per attivare il display LCD, premere
2 secondi.
SOSTITUZIONE DELLE BATTERI
L'unità RA129 funziona con una bat
già inserita. Fate riferimento alla tabe
informazioni relative alla batteria.
INDICAZIONE
DESCRIZIONE
La batteria è in
La carica è
mettere in funz
delle grafico a
scompare.
NOTA Mentre viene visualizzata l'ic
esaurimento, la funzione delle altitud
acustico della sveglia e la retroillumina
La visualizzazione ritornerà alla n
sostituito la batteria.
NOTA Se è necessario sostituire la
di contattare il proprio rivenditore o
assistenza clienti.
Sostituzione delle batterie:
1.
Con un piccolo cacciavite a stella
del vano batterie. Si consiglia di c
luogo sicuro per evitare di perderl
2.
Togliere la batteria vecchia ed
rispettando le polarità.
3.
Riposizionare e riavvitare la coper
Werbung

Verwandte Anleitungen für Oregon Altimo RA129


Inhaltszusammenfassung für Oregon Altimo RA129
- Seite 1 ABOUT OREGON SCIENTIFIC Visit our website (www.oregonscientific.com) to learn more about Oregon Scientific products. If you’re in the US and would like to contact our Customer Care department directly, please visit: www2.oregonscientific.com/service/support NOTE If you need to replace the battery, we highly recommend you to contact the retailer or our customer Call 1-800-853-8883.
- Seite 2 Use un destornillador de cruz pequeño para retirar la sido detenido o está en pausa. Por medio de la presente, Oregon Scientific declara que Remova a antiga bateria e insira a cubierta del compartimiento para pila. Una vez abierto, el ALTIMO Reloj con altímetro digital (Modelo: RA129)
- Seite 3 Scientific déclare que ALTIMO Öffnen Sie den Batteriefachdeckel mit einem kleinen dèle: RA129) est conforme à la Hiermit erklärt Oregon Scientific, dass ALTIMO Digitaluhr mit Kreuzschraubenzieher. Bewahren Sie die Schrauben ALARMMODUS 9/336/CE. Une copie signée et datée Höhenmesser (Modell: RA129) mit der EMC Richtlinie 89/336/...
-
Seite 4: Manuel De L'utilisateur
Richtwerte angesehen werden. plus ou moins précises. RETRO-ECLAIRAGE ET VERROUILLAGE per 2 secondi. L’icona indica • Oregon Scientific ™ ne peut être tenu responsable de la • Oregon Scientific™ übernimmt DES TOUCHES cati. Verluste oder andere Ansprüche perte de la montre ni des réclamations de tierces parties Verwendung dieser Uhr entstehen relatives à... - Seite 5 NOTA Quando l’altitudine è fuori dal campo di misurazione, l’ultima pecifications for this product and the Per avere maggiori informazioni sui nuovi prodotti Oregon colonna di destra non mostrerà alcun dato finché l’altitudine non manual are subject to change without Scientific visita il nostro sito internet www.oregonscientific.
- Seite 6 INTRODUKTION para navegar até o modo Alarme. Druk ST/SP/+ of RST/- om het alarm te activeren / Dank u dat u voor het Oregon Scientific™ ALTIMO Digitaal Tack för att du valt en Oregon Scien deactiveren. geeft aan dat het alarm geactiveerd is.
- Seite 7 Oregon Scientific declara que Remova a antiga bateria e insira a nova, combinando as A Oregon Scientific declara que este ALTIMO Relógio com NOTA O cronômetro pode ser zerado a 00:00:00 apenas se n altímetro digital (Modelo: RA129) Schroef het klepje weer terug me polaridades.
- Seite 8 Oregon NOTERA Om du behöver byta batteri rekommenderar vi att Scientific kundkontakt besöker du vår lokala hemsida www.