Werbung
Quicklinks
EN / DE
User
Manual
The Entity Combo is compatible with all
North Kiteboarding boards from the product
generation of 2011 and later. The full func-
tional scope is only available together with
The Track System.
Die Entity Combo ist mit allen North Kiteboar-
ding Boards ab der Produktgeneration 2011
kompatibel. Der volle Funktionsumfang der
Entity Combo kommt nur in Kombination mit
dem The Track System zur Geltung.
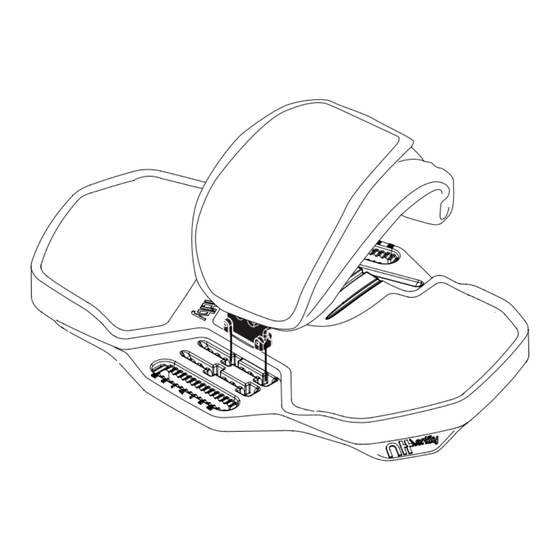
Recommended Stance
The central triangles
on the NTT ContactPad and on the
inside of The Track System indicate the Entity Combo's ba-
sic setup or Recommended Stance. The Recommended
Stance has been individually determined for each North
Kiteboarding board. Some riders may, however, prefer a
different setup. The instructions at the end of this manual
contain helpful information for finding your personal opti-
mum position.
Die mittleren Dreiecke
auf dem NTT ContactPad und
im Inneren des The Track Systems zeigen dir die Grund-
einstellung der Entity Combo an, auch Recommended
Stance genannt. Der Recommended Stance wurde auf
jedes North Kiteboarding Board individuell abgestimmt.
Um die individuell beste Position zu finden, kann je nach
Fahrer von der Empfehlung abgewichen werden. In den
Tipps am Ende der Anleitung, findest Du hilfreiche Informa-
tionen um deine persönliche, optimale Position zu finden.
right
TIP
TAIL
Recommended Stance
Entity Manual_1_2013.indd 1
Attaching the NTT SplitStraps to the NTT
ContactPad
Anbringen des NTT SplitStraps am NTT
ContactPad
Unlike conventional bindings, the NTT SplitStrap and the
NTT ContactPad form a functional unit. Once the strap
has been mounted and adjusted, the entire Entity Combo
can be removed from the board without losing the strap
adjustment.
Anders als bei herkömmlichen Bindungen bilden der NTT
SplitStrap und das NTT ContactPad eine feste Einheit. Ist
der Strap einmal montiert und eingestellt, lässt sich die En-
tity Combo als Ganzes vom Board nehmen ohne die Ein-
stellungen des Strap zu verlieren.
1.
1.
2.
3.
4.
1.
Before you attach the NTT SplitStraps to the NTT Con-
tactPad you will have to decide for one of the three
available strap widths. Your choice depends on the shape
of your foot, on your preferences and whether you want
to kite barefoot or with booties.
Position 1: narrow foot barefoot
Position 2: narrow foot with neoprene bootie / wide foot
barefoot
Position 3: wide foot with bootie
Position 4: the position 4 has the same width as position
2. The difference is that it proved to be more comfortable.
1.
Vor dem Anbringen des NTT SplitStraps am NTT Con-
tacPad, musst du dich für eine der drei Schlaufenbreiten
entscheiden. Diese ist von deiner Fußergonomie, deinen
Vorlieben und davon abhängig, ob du barfuß oder mit
Neopren Schuhen Kiten willst.
Position 1: schmaler Fuß barfuß
Position 2: schmaler Fuß mit Neopren Schuh / breiter Fuß
barfuß
Position 3: Breiter Fuß mit Neopren Schuh
Position 4: Die Position 4 ist von der Breite her mit der Posi-
tion 2 identisch. Die Position 2 hat sich jedoch als komfor-
tabler erwiesen.
2.
2.
Don't mix up left and right pieces when mounting the
NTT SplitStrap and the NTT ContactPad. Straps and pads
are marked left and right.
2.
Bei der Montage ist darauf zu achten, dass der richti-
ge NTT SplitStrap mit dem richtigen NTT ContactPad kom-
biniert wird. Beachte hierzu die Markierungen von links und
rechts auf Strap und Pad.
3.
3.
Insert the sewn-in plastic piece of the NTT SplitStrap
from above into one of the two designated slots at the NTT
ContactPad.
3.
Setze das im NTT SplitStrap eingenähte Kunststoffteil
von oben in einen der beiden äußeren Längsschlitze des
NTT ContactPads ein.
4.
4.
When inserted, the arrows of the "toe side" markings
on the bottom must face each other.
4.
Im eingesetzten Zustand müssen sich die Pfeile der
„toe side" Markierungen an der Unterseite entgegenste-
hen.
5.
1.
2.
3.
S/M US 5-6
S/M US 7-8
S/M US 9-10
L/XL US 8-9
L/XL US 10-11
L/XL US 12-13
5.
Once the plastic piece has been completely inserted,
the NTT SplitStrap can be moved along the longitudinal
axis. Choose the right position according to your size of
shoe. Ideally, your toes should reach over the toe edge.
5.
Ist das Kunststoffteil komplett eingesetzt, lässt sich der
NTT SplitStrap in seiner Längsachse verschieben. Wähle die
richtige Position abhängig von deiner Schuhgröße. Opti-
malerweise solltest Du mit deinen Zehen über die Zehen-
kante ragen.
6.
heel side
toe side
6.
Now insert the two NTT StrapBuckles from underneath
into the inner pair of slots at the NTT ContactPads. Make
sure that the "toe side" and "heel side" markings on the
pad and buckle are facing each other.
6.
Setze nun die zwei NTT StrapBuckles von unten in eines
der zwei inneren Längsschlitzpaare des NTT ContactPads.
Achte darauf, dass sich die Pfeile der „toe side" und „heel
side" Markierungen am Pad und Buckle entgegenstehen.
7.
7.
Thread the two ends of the NTT SplitStraps through the
NTT StrapBuckles and close the straps. Make sure that the
NTT StrapBuckles are inserted as shown in the illustration.
7.
Schlaufe nun die zwei Enden des NTT SplitStraps durch
die NTT StrapBuckles hindurch und schließe den Strap.
Achte darauf, dass die NTT StrapBuckles wie auf dem Pik-
togramm illustriert eingesetzt sind.
8.
8.
The NTT StrapBuckles can be moved along the longi-
tudinal slots. This allows you to adapt the contact surface
to your foot.
As a general rule, the wider the NTT StrapBuckles are apart
(more split), the better the grip on your board. The narro-
wer you adjust the NTT StrapBuckles (less split), the greater
your range of motion within the straps. Find the optimum
balance between grip and freedom of movement accor-
ding to your personal taste.
8.
Die NTT StrapBuckles lassen sich innerhalb der Längs-
schlitze verschieben. Hiermit kannst Du die Auflagefläche
des Straps an deinen Fuß anpassen.
Prinzipiell gilt, umso weiter die NTT StrapBuckles auseinan-
der sind, (mehr Split) desto mehr Halt bekommst Du zum
Board. Je schmäler du die NTT StrapBuckles stellst (weni-
ger Split), desto mehr Bewegungsfreiheit bekommst Du
innerhalb der Schlaufe. Finde das optimale Maß an Halt
und Bewegungsfreiheit für deinen ganz persönlichen Ge-
schmack.
9.
2
1
1
9.
Now that the Entity Combo is mounted to your
board you can use the Velcro to adjust the size of the NTT
SplitStraps to the size of your foot.
9.
Nach der Montage der Entity Combo auf deinem
Board kannst Du über den Klettverschluss die Größe des
NTT SplitStraps an deinen Fuß anpassen.
10.
10. The three different NTT HeelCushions allow you to ad-
just the hardness of the NTT ContactPads to your preferen-
ces.
10. Über die drei verschieden harten Fersenkissen (NTT
HeelCushions) kannst Du die Härte des NTT ContactPads
an deine Bedürfnisse anpassen.
21.03.2012 10:41:43
Werbung

Inhaltszusammenfassung für North Kiteboarding entity combo
- Seite 1 2. The difference is that it proved to be more comfortable. on the bottom must face each other. inside of The Track System indicate the Entity Combo’s ba- Schlaufe nun die zwei Enden des NTT SplitStraps durch 10. The three different NTT HeelCushions allow you to ad- sic setup or Recommended Stance.
- Seite 2 After you have simply slide the Entity Combo to the side and pull it off the The NTT QuickMount function allows you to mount and re- found the desired position you must fasten the screws board.