TOPPOINT Retro Radio Bedienungsanleitung
6000 mah speaker
Deutsch
eInleItUng
Vielen Dank für die Wahl des tragbaren Retro (Bluetooth)-Lautsprechers mit UKW-Radio und
Notstromversorgung. Der Retro Lautsprecher ist mit einer vielseitig einsetzbaren tragbaren
Backup-Batterie ausgerüstet, die zum Laden von Smartphones und anderen tragbaren
elektronischen Geräten wie Tablets, MP3/MP4-Playern, GPS/Bluetooth und tragbaren
Spielgeräten verwendet werden kann. Der Retro Lautsprecher kann über mehrere USB-
Ladeoptionen wieder aufgeladen werden.
FUnktIonen Und Inhalte
• UKW-Radio.
• Bluetooth-Lautsprecher.
• Tragbares Ladegerät für elektronische Geräte.
• Lautsprecher (4Ω, 3W).
• USB-Laden durch Desktop PC, Laptop oder USB-Adapter (nicht enthalten).
• Integrierter Schutz gegen Überladung und Kurzschluss.
• LED-Lade- und Entlade-Anzeigen.
• Skalenbeleuchtung.
• Mikro-USB-Kabel.
• Auflademöglichkeit für mehr als 500 Zyklen.
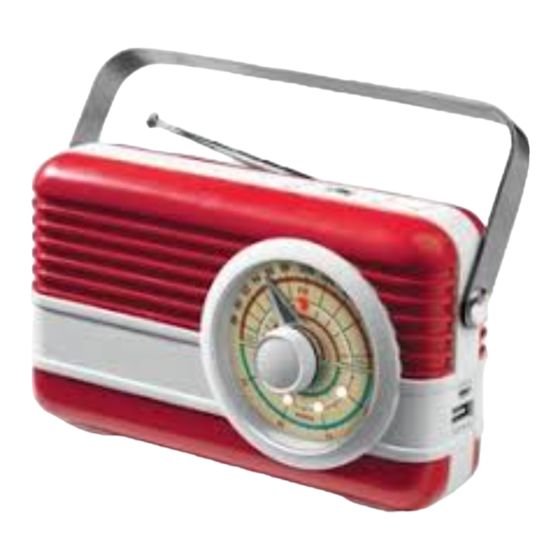
kontrollen Und sChnIttstelle
1. Skalenbeleuchtungen
2. Abstimmungsknopf
3. LED-Kapazitäts-, Lade- und Entlade-Anzeige
4. Pause-Telefonset mit Freisprecheinrichtung anschließen
5. Lautstärkeregelung
6. Zurückspringen
7. Vorspringen
8. Mikrofon
9. Bluetooth-LED
10. Mikro-USB-Port zum Aufladen
11. USB-Ausgang
12. Kapazitäts- und Ladekontrolle
13. Funktionsschalter
14. Line-In (AUX)
15. Ausziehbare FM Antenne
teChnIsChe daten
Batterie: Lithium-Polymer 18650 LIB Klasse A
Kapazität: 6000mAh
Leistungsaufnahme: 5V/1A
Nennleistung: 5V/2.1A
Ladedauer über USB: 5 Std.
BetrIeB
erstnutzung:
Der Retro wird mit vorgeladener, einsatzbereiter Batterie geliefert. Es wird aber empfohlen, den
Retro vor dem ersten Gebrauch vollständig aufzuladen.
aufladen des retro lautsprecher:
Aufladen über USB-Port:
• Aufladen über USB-Port oder Aufladen über USB AC-Adapter (nicht enthalten).
English
IntrodUCtIon
Thank you for choosing the Retro portable (Bluetooth) speaker with FM radio and power back-
up. The Retro speaker is equipped with a versatile portable back-up battery that can be used
for charging (smart)phones and other portable electronics such as tablets, MP3/MP4 players,
GPS/Bluetooth and portable game devices. The Retro speaker can be recharged by several
USB charging options.
FeatUres and Contents
• FM Radio.
• Bluetooth speaker.
• Portable electronics charger.
• Speaker (4Ω, 3W).
• USB charging by desktop, laptop or USB adapter (not included).
• Built in protection against overcharging and short circuit.
• Charging and de-charging indicator LED indicators.
• Dial light.
• Micro USB cable.
• Rechargeable for over 500 cycles.
Controls and InterFaCe
1. Dial lights
2. Tuning control
3. LED capacity, charging and de-charging indicators
4. Pause-hands free phone connect
5. Volume control
6. Skip backward
7. Skip forward
8. Microphone
9. Bluetooth LED
10. Micro USB port charge in
11. USB port out
12. Capacity and charging control
13. On/Off/Function selector switch
14. Line in (AUX)
15. Extendable FM antenna
teChnICal speCIFICatIons
Battery: Lithium Polymer 18650 LIB class A
Capacity: 6000mAh
Rated input: 5V/1A
Rated output: 5V/2.1A
Charging time via USB: 5H
operatIon
First use:
The Retro comes with a pre-charged battery, ready for use. It is however recommended to fully
charge Retro before first use.
Charging the retro:
Charging via USB port:
• Charging via USB port or charging through USB AC adapter (not included).
• Connect the Retro Powerbank port (10) by USB cable (included) to a powersource such as
Deutsch
• Schließen Sie den Retro-Powerbank-Port (10) über USB-Kabel (enthalten) an eine
Stromquelle wie Computer oder mit USB ausgerüstete Wandsteckdose oder Adapter (nicht
mitgeliefert) an.
Die LEDs (3) zeigen durch Blinken den Ladezustand an:
• 1 LED, 25% geladen
(
)
• 2 LED, 50% geladen
(
)
• 3 LED, 75% geladen
(
)
• 4 LED, vollständig geladen (
)
Bei voller Aufladung erlöschen die LEDs.
Zum Überprüfen des Batteriezustands drücken Sie (12), um die LEDs zu aktivieren:
• 1 LED, 25% geladen
(
)
• 2 LED, 50% geladen
(
)
• 3 LED, 75% geladen
(
)
• 4 LED, vollständig geladen (
)
laden mobiler und tragbarer geräte:
• Schließen Sie das tragbare Gerät mit dem USB-Kabel an die Retro Powerbank an und
aktivieren Sie den Ladevorgang durch Drücken von (12).
Die LEDs zeigen den verbleibenden Ladezustand an:
• 1 LED, 25% geladen
(
)
• 2 LED, 50% geladen
(
)
• 3 LED, 75% geladen
(
)
• 4 LED, vollständig geladen (
)
Das Gerät ermöglicht gleichzeitiges Auf- oder Entladen, während Sie den Lautsprecher
benutzen.
• Den Retro Lautsprecher nicht gleichzeitig auf- und entladen. Obwohl das Gerät mit einem
Kurzschluss-Schutz ausgerüstet ist, kann dies zu Schäden an den internen Schaltkreisen
des Retro Lautsprecher führen.
VerwendUng als laUtspreCher
Verwendung als lautsprecher über Bluetooth:
• Erstnutzung.
• Stellen Sie den Wahlschalter (13) auf Bluetooth/Lautsprecher. Ein doppelter Piepton ertönt
English
computer or USB equipped wallsocket or adapter (not included).
The LED's (3) will show the charge level by blinking:
• 1 LED, 25% charged (
)
• 2 LED, 50% charged (
)
• 3 LED, 75% charged (
)
• 4 LED, fully charged (
)
After being fully charged the LED's will shut off.
To check the battery level press (12) to activate the LED's:
• 1 LED, 25% charged (
)
• 2 LED, 50% charged (
)
• 3 LED, 75% charged (
)
• 4 LED, fully charged (
)
Charging mobile and portable devices:
• Connect the portable device to the Retro Powerbank by USB cable activate the charging
process by pressing (12).
The LED's will show the remaining charge level:
• 1 LED, 25% charged (
)
• 2 LED, 50% charged (
)
• 3 LED, 75% charged (
)
• 4 LED, fully charged (
)
The item allows simultaneously charging or de-charging while listening to the speaker.
• Do not charge and de-charge the Retro simultaneously. Although the item is equipped
with circuit protection this may cause damage to the internal circuitry of the Retro.
Use as speaker
Use as speaker through Bluetooth:
• First use.
• Set the selector switch (13) to Bluetooth/Speaker. A double beep will sound and the
Bluetooth LED (9) will flash. The retro is now discoverable for Bluetooth enabled products.
• Follow the instructions for pairing that came with your Bluetooth enabled source device.
You may have to go into the device settings to turn Bluetooth on. Make sure your device is
discoverable or in search mode.
Deutsch
und die Bluetooth-LED (9) blinkt. Der Retro Lautsprecher ist jetzt für bluetooth-fähige
Produkte sichtbar.
• Folgen Sie den Kopplungsanweisungen, die mit Ihrem bluetooth-fähigen Quellgerät
geliefert wurden. Möglicherweise müssen Sie in die Geräteeinstellungen gehen, um
Bluetooth einzuschalten. Stellen Sie sicher, dass Ihr Gerät sichtbar ist oder sich im
Suchmodus befindet.
• Ihr Quellgerät sollte das Profil "Retro" entdecken. Wählen Sie dieses Profil aus. Bei
erfolgreicher Verbindung ertönen drei Pieptöne und die Bluetooth-LED (9) leuchtet
kontinuierlich.
• Sie sind jetzt verbunden und können die Audio-Inhalte auf Ihrem Quellgerät spielen.
• Bei erfolgreicher Verbindung erkennt der Retro Lautsprecher Ihr bluetooth-fähiges Gerät,
wenn es das nächste Mal eingeschaltet ist und Ihr Gerät sich in Reichweite befindet.
• Sie können die Lautstärke über die Lautstärkeregelung (5) einstellen und mit den
Steuerelementen (6/7) vorwärts und rückwärts durch die Songs des Quellgeräts springen.
• Durch Drücken von (4) kann die Musik angehalten werden.
Verwendung als lautsprecher durch das audiokabel:
• Stellen Sie den Wahlschalter (13) auf Bluetooth/Lautsprecher. Die LED (9) leuchtet auf.
• Verbinden Sie das Retro mit der Soundquelle durch das mitgelieferte Line-Kabel
(enthalten).
• Sie können die Lautstärke über die Lautstärkeregelung (5) einstellen.
VerwendUng als Ukw-radIo
• Das Radio mit dem Wahlschalter (13) einschalten. Die Skalenbeleuchtung (1) schaltet sich
ein.
• Positionieren und verlängern Sie die FM Antenne (15) senkrecht.
• Drehen Sie den Abstimmknopf (2), bis der gewünschte Sender gefunden wurde. Passen Sie
die Antennenposition an, um gegebenenfalls einen besseren Empfang zu erhalten.
• Sie können die Lautstärke über die Lautstärkeregelung (5) einstellen.
Beantworten eInes anrUFs Von eIneM üBer BlUetooth
VerBUnden MoBIlteleFon
• Die Retro-Freisprechfunktion ist automatisch eingeschaltet, wenn das Gerät über
Bluetooth mit einem Mobiltelefon verbunden ist.
• Bei einem eingehenden Anruf läutet der Retro Bluetooth-Lautsprecher. Drücken Sie die
Taste für eingehende Anrufe (4), um den Anruf anzunehmen. Die abgespielte Musik wird
stumm geschaltet.
• Sprechen Sie nahe an der Mikrofonposition (8).
• Nach Beendigung des Gesprächs legen Sie auf durch Drücken von (4) Die Musik kehrt zur
ursprünglichen Lautstärke zurück.
wartUng Und sChUtz
Um die Leistungsfähigkeit des Retro Lautsprecher zu erhalten, wird Folgendes empfohlen.
1. Den Retro Lautsprecher nicht Flüssigkeiten, Feuchtigkeit oder übermäßiger Feuchte
aussetzen.
2. Den Retro Lautsprecher nicht übermäßiger Hitze oder offenem Feuer aussetzen.
3. Zerlegen Sie das Produkt nicht. Es befinden sich keine vom Nutzer zu wartenden Teile im
Inneren.
4. Reinigen Sie den Retro Lautsprecher mit einem feuchten Tuch. Verwenden Sie keine
scheuernden Reinigungsmittel oder Tücher, da dies die Produktoberfläche oder die
Solarzellen beschädigen kann.
5. Zum Schutz der Qualität der internen Batterie entladen und laden Sie den Retro
English
• Your source device should discover the profile "Retro". Select this profile. Once connected,
three beeps will sound and the Bluetooth LED (9) will light up continuous.
• You are now connected and can play the source device audio content.
• Once connected the Retro will recognize your Bluetooth enabled device the next time it is
switched on and your item is in range.
• You can adjust the volume through the volume control (5) and skip forward, skip
backward through the songs on the source device using the controls (6/7).
• Music can be paused by pressing (4).
Use as speaker through the audio cable:
• Set the selector switch (13) to Bluetooth/Speaker. The LED (9) will light up.
• Connect the Retro to the sound source by audio cable (included) to the sound source.
• You can adjust the volume through the volume control (5).
Use as FM radIo
• Switch on the radio with the selector switch (13). The dial lights (1) will switch on.
• Position and extend the FM antenna (15) upright.
• Turn the tuning button (2) until the desired station is found. Adjust the antenna position if
necessary to achieve better reception.
• You can adjust the volume through the volume control (5).
answerIng a phone Call FroM a BlUetooth ConneCted
MoBIle phone
• The Retro hands free phone function will be automatically on when the device is
connected by Bluetooth to a mobile phone.
• In case of an incoming call the Retro Bluetooth speaker will ring. Press the incoming call
button (4) to pick up the call. The volume of music playing will be muted.
• Speak close to the microphone position (8).
• Upon finishing the conversation hang up by pressing (4). The music will return to the
original volume.
MaIntenanCe and Care
To keep the Retro performance in good order please take care of the following points, Care:
1. Do not expose the Retro to liquid, moisture or excess humidity.
2. Do not expose the Retro to excessive heat or open fire.
3. Do not dismantle the product. No user serviceable parts inside.
4. Clean the Retro with a damp cloth. Do not use abrasive cleaning solutions or cloths as
these may damage the product surface or solar cells.
5. Discharge and charge the Retro at least once a month to protect the quality of the internal
battery.
6. Product not suitable for children under 3 years of age.
troUBle shootIng
1. LED indicators do not light up – Battery is completely discharged, recharge the battery.
Mobile device does not charge:
1. Cable or connectors are damaged or do not match, test the unit with a different set of
cables.
2. The Retro is completely discharged, recharge the Retro first.
3. The Retro is designed to charge portable electronics. 1 to 1,5A is generally for (smart)
phones and other small mobile devices. 1,5 to 2A for tablets.
4. Please check if the connectors are correctly connected.
Deutsch
Lautsprecher mindestens einmal monatlich.
6. Das Produkt ist nicht geeignet für Kinder unter 3 Jahren.
FehlersUChe
1. LED-Anzeigen leuchten nicht - Batterie ist vollständig entladen, laden Sie die Batterie
wieder auf.
Mobilgeräte werden nicht aufgeladen:
1. Kabel oder Stecker sind beschädigt oder passen nicht, überprüfen Sie das Gerät mit
einem anderen Kabelsatz.
2. Der Retro Lautsprecher ist vollständig entladen, laden Sie zuerst den Retro Lautsprecher
wieder auf.
3. Der Retro Lautsprecher wurde zum Aufladen tragbarer elektronischer Geräte entwickelt. 1
bis 1,5A ist für Smartphones und andere kleine Mobilgeräte üblich. 1,5 bis 2A für Tablets.
4. Bitte prüfen Sie, ob die Stecker richtig angeschlossen sind.
5. Es ist normal, dass der Retro Lautsprecher während des Aufladens warm wird.
laUtspreCher Ist nICht hörBar
1. Kabel oder Stecker sind beschädigt oder passen nicht. Testen Sie das Gerät mit einem
anderen Kabelsatz.
2. Der Retro Lautsprecher ist vollständig entladen. Laden Sie zuerst den Retro Lautsprecher
wieder auf.
3. Bitte prüfen Sie, ob die Kabel richtig angeschlossen sind.
4. Prüfen Sie, ob die Lautstärkeregelung auf Null steht.
5. Prüfen Sie, ob die Lautstärkeregelung der Quelle niedrig ist oder auf Null steht.
6. Prüfen Sie, ob sich der Funktions- und Wahlschalter in der gewünschten Position befinden.
es Besteht keIne BlUetooth-VerBIndUng
1. Bitte schlagen Sie im Benutzerhandbuch Ihres bluetooth-fähigen Audio-Geräts nach
Anweisungen für eine korrekte Verbindung nach.
2. Stellen Sie sicher, dass Bluetooth sowohl auf Ihrem mobilen Gerät als auch am Retro
Lautsprecher aktiviert ist und beide Geräte aufgeladen sind.
3. Versuchen Sie, den Retro Lautsprecher aus- und wieder einzuschalten.
4. Stellen Sie sicher, dass kein anderes bluetooth-fähiges Gerät mit dem Lautsprecher
verbunden ist.
5. Überprüfen Sie die Entfernung zur Bluetooth-Soundquelle und überprüfen Sie, ob
Hindernisse oder Wände im Weg sind. Versuchen Sie, den Retro Lautsprecher näher an
der Quelle zu bewegen oder bewegen Sie die Quelle oder den Retro Lautsprecher an
einen anderen Standort.
entsorgUng
Der Retro Lautsprecher enthält eine interne Batterie. Bitte entsorgen Sie dieses Produkt gemäß
den landesüblichen Bestimmungen.
glossar
A
= Ampere
(m)A = (Milli-)Ampere
(m)Ah = (Milli-)Amperestunden
V
= Volt
LED = Leuchtdiode
W
= Watt
Ω
= Ohm'scher Widerstand
English
5. It is normal that the Retro can feel warm during charging.
speaker Is not aUdIBle
1. Cable or connectors are damaged or do not match. Test the unit with a different set of
cables.
2. The Retro is completely discharged. Recharge the Retro first.
3. Please check if the cables are connected correctly.
4. Check if the Volume control is at zero.
5. Check if the source volume control is low or zero.
6. Check if the function and selector switch are set to the desired positions.
BlUetooth not ConneCtIng
1. Please consult the User Manual of your Bluetooth enabled audio device for correct
connecting instructions.
2. Make sure that Bluetooth is turned on both on your mobile device and the Retro and that
the devices are charged.
3. Try turning the Retro speaker off and on again.
4. Make sure there is not another Bluetooth enabled device connected to the speaker.
5. Check the distance to the Bluetooth sound source and check if there are any obstacles
or walls in the way. Try moving the Retro closer to the source or moving the source or the
Retro to a different location.
dIsposal
The Retro contains an internal battery. Please dispose of this product according the regulation
in your country.
glossary
A
= Ampere
(m)A = (mili) Ampere
(m)Ah = (mili ) Ampere hour
V
= Volt
LED = Light Emitting Diode
W
= Watt
= Ohm resistance
Ω
Ref. LT91110 - M1

Verwandte Anleitungen für TOPPOINT Retro Radio


Inhaltszusammenfassung für TOPPOINT Retro Radio
- Seite 1 English English English English IntrodUCtIon computer or USB equipped wallsocket or adapter (not included). • Your source device should discover the profile “Retro”. Select this profile. Once connected, 5. It is normal that the Retro can feel warm during charging. three beeps will sound and the Bluetooth LED (9) will light up continuous. Thank you for choosing the Retro portable (Bluetooth) speaker with FM radio and power back- speaker Is not aUdIBle • You are now connected and can play the source device audio content. up. The Retro speaker is equipped with a versatile portable back-up battery that can be used 1. Cable or connectors are damaged or do not match. Test the unit with a different set of • Once connected the Retro will recognize your Bluetooth enabled device the next time it is for charging (smart)phones and other portable electronics such as tablets, MP3/MP4 players, cables.
- Seite 2 Français Français Français IntrodUCtIon • Branchez le Retro powerbank sur une source d’énergie comme par exemple un PC, une • Suivre les instructions d’appareillage de votre appareil Bluetooth. Vous allez peut être prise USB (inclus) murale ou sur un adaptateur (non inclus). devoir activer l’option Bluetooth. Assurez-vous que votre appareil soit visible. Nous vous remercions d’avoir choisi notre enceinte Retro avec Radio et Batterie de secours • Après avoir lancé la recherché d’autres appareils Bluetooth, sélectionnez le profil “Retro” intégrés. L’enceinte Retro est équipée d’une batterie de secours qui peut être utilisée pour sur la liste de résultats de votre appareil source. Une fois connecté trois bips retentirons et recharger votre téléphone portable ou d’autres appareils électroniques comme par exemple la LED Bluetooth (9) clignotera.