Herunterladen Diese Seite drucken

WAVEMASTER CUBEmini Bedienungsanleitung

2 channel 2-way stereo sound system

Werbung

Verfügbare Sprachen

Verfügbare Sprachen

2 Channel 2-Way Stereo Sound System
Bedienungsanleitung..........................................3
User Manual........................................................7
Mode d'emploi...................................................11

Werbung

loading

Inhaltszusammenfassung für WAVEMASTER CUBEmini

  • Seite 1 2 Channel 2-Way Stereo Sound System Bedienungsanleitung..........3 User Manual............7 Mode d'emploi...........11...
  • Seite 3 Deutsch Bedienungsanleitung Sehr geehrter Anwender, wir freuen uns, dass Sie das CUBE mini Lautsprecher-System von wavemaster gewählt haben und gratulieren Ihnen zu dieser Entscheidung. Sie haben mit dem wavemaster CUBE mini ein gleichermaßen anspruchsvolles wie attraktives Audioprodukt erworben. Wir sind überzeugt, dass Ihnen unser Produkt viele Jahre nützliche Dienste erweisen und vor allem eine Menge Freude bereiten wird.
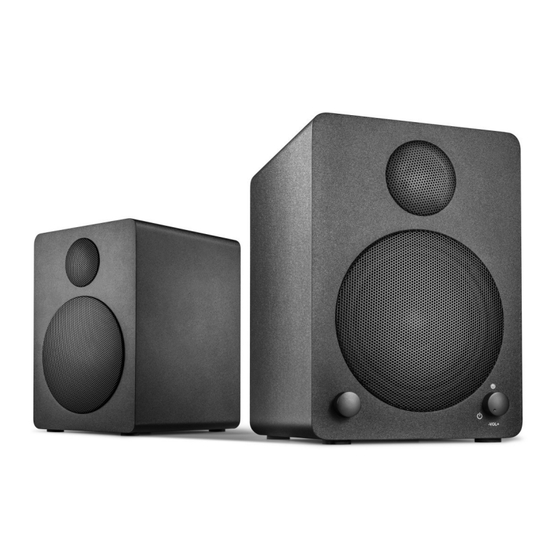
  • Seite 4 Deutsch Aufbau & Bedienung Der Aufbau und die Bedienung des wavemaster CUBE mini sind sehr einfach. Bitte beachten Sie, alle Anschlüsse nur im ausgeschalteten Zustand (POWER OFF) durchzuführen. • Die rechte Box enthält die Elektronik, Sie erkennen das an den Schaltern und Knöpfen auf Front und Rückseite der rechten Box.
  • Seite 5: Bluetooth-Audio-Wiedergabe

    Deutsch • Schalten Sie die Netzspannung mit dem POWER-Schalter auf der Rückseite ein. • EIN/STANDBY sowie LAUTSTÄRKE steuern Sie mit dem Einstellknopf rechts auf der Frontseite der rechten Box des CUBE mini Sound Systems. BASS und Höhen (TREBLE) justieren Sie bei Bedarf mit den Reglern auf der Geräterückseite. •...
  • Seite 6 LVD: EN60065: 2002 + A1: 2006 + A11: 2008 + A2: 2010 + A12: 2011, Erp: EU, EC 1275/2008 Dieser Erklärung liegen die Prüfberichte eines EMV - Labors zugrunde. Alle Abbildungen und Texte wurden mit grösster Sorgfalt bearbeitet. wavemaster kann jedoch für fehlerhafte Angaben und daraus resultierende Folgen keinerlei Haftung übernehmen.
  • Seite 7 CUBE mini loudspeaker system from wavemaster and congratulate you on this choice. With this wavemaster CUBE mini you have acquired a modern piece of audio technology that is in equal measure attractive and of high quality. We are sure that this product will provide useful service and a lot of fun to you over the coming years.
  • Seite 8 English Assembly and operation Assembly and operation of your CUBE mini speaker system is very easy to do. General connections are shown in the following drawing. Please connect all components only when the mains power switch is switched OFF. • The right speaker box contains the electronics, You can identify the right speaker by its controls and connectors on front and backside of the right speaker box.
  • Seite 9 English • Switching ON/STANDBY as well as VOLUME control of your sound system can be done by the front control knob of the right speaker box. • Adjust the BASS and TREBLE level by the controls at the rear panel, if required. If you emphasize the bass control too much, the maximum total volume will be limited since the woofer may run at overstroke earlier.
  • Seite 10 LVD: EN60065: 2002 + A1: 2006 + A11: 2008 + A2: 2010 + A12: 2011, Erp: EU, EC 1275/2008 This statement is based on the test reports of an EMC laboratory. All texts and illustrations were produced with greatest care. wavemaster cannot however accept any legal or other responsibility for any remaining incorrect information and its consequences.
  • Seite 11 Mode d'emploi Cher utilisateur, Vous avez opté pour le kit stéréo CUBE mini de wavemaster. Nous vous félicitons et sommes heureux de vous compter parmi nos clients. Lorsque vous avez fait l’acquisition du kit stéréo CUBE mini, vous avez fait le choix d’un matériel audio de haute technologie à...
  • Seite 12 Francais Assemblage et fonctionnement L’assemblage et le fonctionnement du kit stéréo CUBE mini est extrêmement simple. Veuillez trouver les connexions disponibles sur les dessins suivants. Ne branchez les composants que lorsque l’interrupteur est en position OFF. • Le Haut-Parleur de droite est celui qui contient l’ensemble de la partie électronique. Il est facilement identifiable à...
  • Seite 13 Francais • Activez l’interrupteur principal à l’arrière. • Vous pourrez allumer et mettre en veille les haut-parleurs ainsi que régler le volume sonore grâce au bouton de réglage situé sur la façade du boîtier du haut-parleur droit. Réglez les BASSES et les AIGUS grâce aux boutons situés à l’arrière. Si vous réglez les •...
  • Seite 14 électromagnétique. Toutes les figures et tous les textes ont été élaborés avec la plus grande minutie. Toutefois, wavemaster ne pourra assumer aucune responsabilité pour des indications erronées, ni pour les conséquences qui en résultent. Sous réserve de modifications techniques.
  • Seite 16: Specifications

    LVD: EN60065: 2002 + A1: 2006 + A11: 2008 + A2: 2010 + A12: 2011, Erp: EU, EC 1275/2008 This statement is based on the test reports of an EMC laboratory. All texts and illustrations were produced with greatest care. wavemaster cannot however accept any legal or other responsibility for any remaining incorrect information and its consequences.