Sicherheitsinformationen Sicherheitsinformationen Entsorgung Sie sind verpfl ichtet, Verbrauchsgüter in Bitte lesen Sie diese Übereinstimmung mit den zutreffenden Bedienungsanleitung sorgfältig durch. gesetzlichen Bestimmungen ordentlich Öffnen Sie unter keinen Umständen zu entsorgen. Das nebenstehende das Gerät oder führen selbst etwaige Symbol auf dem Produkt zeigt an, dass Reparaturarbeiten durch.
Seite 4
Inbetriebnahme Inbetriebnahme Anschluss der Basisstation Schließen Sie die Basisstation wie Prüfen Sie den Inhalt der Verpackung in der Abbildung dargestellt an. Inhalt RF100 RF200 Verwenden Sie aus Sicherheitsgründen RingFlash-Einheit nur den Netzadapterstecker und das Telefonanschlusskabel, die zum Netzadapterstecker Lieferumfang gehören. Telefonanschlusskabel Türklingel-Einheit 12 Volt-Batterie...
Seite 5
Inbetriebnahme Anschluss der Türklingel-Einheit Setzen Sie die im Lieferumfang enthaltene (nur RingFlash 200) 12V Batterie ein. Lösen Sie dafür die Die Türklingel hat eine vier Schrauben der Abdeckung auf der Standardeinstellung der Klingel auf Rückseite. Achten Sie darauf die Batterien 1.
Seite 6
‘((o))’ auf der Rückseite der RingFlash- Einheit einstecken. Bei Eingang eines Anrufs beginnt das Vibrationskissen zu vibrieren. Unter www.amplicom.eu fi nden Sie die Bezugsquellen für ein kompatibles Vibrationskissen. Service Hotline Deutschland: Tel. 0180 5 001388, Kosten aus dem dt. Festnetz bei Drucklegung:...
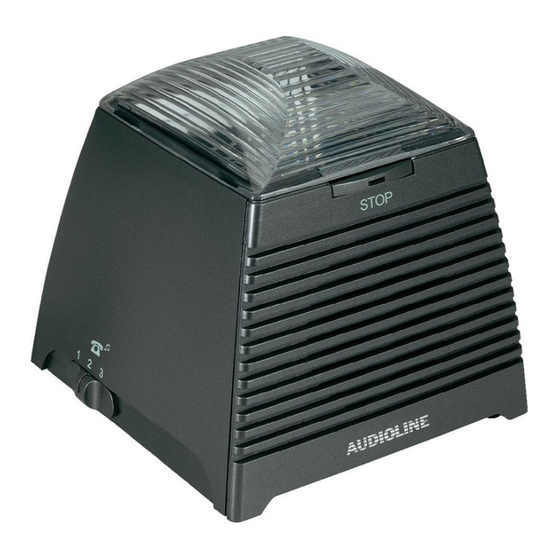
Seite 7
Ihr RingFlash 100/200 Anschluss STOP-Taste Telefonleitung Verbindung Telefon/Ringfl ash (mitgeliefertes Netzgeräteanschluss Kabel) Vibrationskissen -Buchse Frontansicht Rückansicht Klingeltonauswahl Klingeltonauswahl für Türklingel (nur RingFlash 200) Lautstärkeregler Alarmmodus Linke Seite Rechte Seite Service Hotline Deutschland: Tel. 0180 5 001388, Kosten aus dem dt. Festnetz bei Drucklegung:...
Seite 8
So benutzen Sie Ihr RingFlash 100/200 Einstellen des Klingeltons Modus Telefon Türklingel Auf Ihrer RingFlash-Einheit stehen 3 Klingelton vom Klingeltöne zur Auswahl. Bewegen Sie Lautsprecher einfach den Schiebeschalter an der linken Seite Ihres Produkts, um Klingelton 1, 2 Blinklicht und...
Seite 9
So benutzen Sie Ihr RingFlash 100/200 Gebrauch der Türklingel Danach müssen Sie auch die 8 Schalter in (nur RingFlash 200) der Türklingel entsprechend ändern. Dazu Drücken Sie den Knopf der Türklingel. lösen Sie die 4 Schrauben der hinteren Das rote Licht im Knopf schaltet sich ein.
Seite 10
So benutzen Sie Ihr RingFlash 100/200 Wandbefestigung Bei Verwendung geeigneter Schrauben und Wanddübel (nicht im Lieferumfang enthalten) können Sie Ihre RingFlash- Einheit mittels der Löcher im Boden befestigen. Service Hotline Im Fall technischer Probleme können Sie auch unsere Hotline anrufen: Tel. 0180 5 00 1388 (Kosten via Telekom zum Zeitpunkt der Drucklegung: 14 ct/Min.).
Intervention des Käufers oder dritter verwenden Parteien annulliert. Schäden, die das Garantie Ergebnis unsachgemäßer Handhabung AMPLICOM-Geräte werden gemäß oder Betriebs, inkorrekter Platzierung oder neuester Produktionsmethoden hergestellt Lagerung, unsachgemäßen Anschlusses und geprüft. Die Nutzung sorgfältig oder Installation, höherer Gewalt oder ausgewählten Materials und hochentwickelter...
Seite 12
Sie es bitte zusammen mit Download. dem Kaufbeleg zu Ihrem Händler zurück, bei dem Sie das AMPLICOM-Gerät gekauft haben. Alle Rechte auf Ansprüche gemäß der Garantiebedingungen in Übereinstimmung mit dieser Vereinbarung müssen ausschließlich gegenüber Ihrem Händler geltend gemacht werden.
Consignes de sécurité Consignes de sécurité Mise au rebut Vous êtes tenu de jeter tous les Veuillez lire attentivement ce manuel consommables conformément aux d’instruction. réglementations applicables. Le symbole N’ouvrez en aucun cas l’appareil ou ne fi gurant sur le produit indique que procédez à...
Seite 14
Bien commencer Bien commencer Branchement du socle Connectez le socle comme illustré Vérifi ez le contenu de l’emballage sur le diagramme. Pour des raisons de sécurité, veillez à n’utiliser que la Contenu RF100 RF200 fi che d’adaptation ainsi que le câble de branchement fournis.
Bien commencer Connexion de l’appareil “Doorbell” (Uniquement “RingFlash” 200) Retirez les 4 vis situées à l’arrière du 1 2 3 4 5 6 7 8 “Doorbell”. Le “Doorbell” possède un réglage par défaut à Bell 1. Si vous souhaitez le faire basculer en Bell 2, veuillez déplacer les interrupteurs situés à...
Seite 16
(non inclus) dans la prise ‘((o))’ située à l’arrière de l’appareil “RingFlash”. L’appareil vibre lorsque vous recevez un appel. Pour en savoir plus sur l’endroit où acheter un accessoire vibrant compatible, veuillez visiter le site www.amplicom.eu. Assistance téléphonique au 0826 805 674 (numéro indigo)
Seite 17
Votre “RingFlash” 100/200 Bouton STOP Connexion ligne téléphonique Téléphone vers prise vers la prise murale “RingFlash” Prise Prise du adaptateur vibreur d’alimentation Vue arrière Vue de face Sélection Sélection de la de la tonalité “Doorbell” sonnerie (Uniquement Contrôle du “RingFlash” 200) volume Mode alarme Côté...
Seite 18
Utilisation de votre “RingFlash” 100/200 Réglage de la sonnerie Mode L’alarme L’alarme Bell Votre appareil “RingFlash” possède 3 sonnerie sonneries au choix. Eteint Son de cloche venant Il suffi t de déplacer l’interrupteur à tirette du haut-parleur vers le côté gauche de votre produit pour sélectionner la sonnerie 1, 2 ou 3.
Seite 19
Utilisation de votre “RingFlash” 100/200 Utilisation de “Doorbell” Sous l’appareil “RingFlash”, vous (Uniquement “RingFlash” 200) trouverez 8 petits interrupteurs situés sous Appuyez sur le bouton “Doorbell”, le un couvercle. Vous pouvez changer le voyant rouge dans le bouton s’allumera. réglage de ces interrupteurs pour remédier L’appareil “RingFlash”...
Seite 20
Utilisation de votre “RingFlash” 100/200 Replacez le couvercle arrière, positionnez et resserrez les 4 vis. Réinstallez le “Doorbell” sur l’extérieur de votre porte d’entrée comme avant. Montage mural A l’aide de vis appropriées et de prises murales (non fournies), vous pouvez fi...
Les dommages Garantie résultant d’une mauvaise manipulation ou Les appareils AMPLICOM sont conçus et fonctionnement, d’un positionnement ou d’un testés conformément aux techniques de stockage inappropriés, un branchement ou production les plus récentes. L’utilisation une installation défi...
Seite 22
AMPLICOM accompagné du reçu. Les droits de réclamation conformément à la garantie dans le cadre de cet accord doivent exclusivement certifi és pour ce qui est du point de vente.
Safety Information Safety Information Disposal You are obliged to dispose of Please read this operating instruction consumable goods properly in manual thoroughly. accordance with the applicable legal Under no circumstances open the regulations. The adjacent symbol on device or complete any repair work the product indicates that electrical yourself.
Seite 24
Starting Up Starting Up Connecting the base Connect the base as illustrated in Check the contents of the package the diagram. For reasons of safety, Contents RF100 RF200 only use the power adaptor plug and telephone connection cable supplied. RingFlash unit Power adaptor plug Telephone connection cable...
Seite 25
Starting Up Connecting the doorbell unit (RingFlash 200 only) Remove the 4 screws from the back 1 2 3 4 5 6 7 8 of the Doorbell. The Doorbell has a default setting of Bell 1, if you wish to change this to Bell 2, please move the switches inside the Doorbell to the positions indicated below.
Seite 26
For details of where to purchase a compatible Shaker, please go to www. amplicom.eu. Service Hotline UK Tel. 0844 800 6503, cost via UK landline at time of going to print: 6p connection charge and 5p/min. thereafter, different charges may apply if calling from a mobile phone. Hotline hours are Monday to Friday, 9am to 5pm, excluding public and national holidays...
Seite 27
Your RingFlash 100/200 STOP button Telephone line connection to Telephone to wall socket RingFlash socket Power adaptor Shaker socket socket Rear view Front view Doorbell tone Ring tone selection selection (RingFlash 200 only) Volume control Alarm mode Left side Right side Service Hotline UK Tel.
Seite 28
Using your RingFlash 100/200 Set the ring tone Mode Ring alarm Bell alarm Your RingFlash unit has 3 ring tones Bell sound from to choose from. Just move the slider the speaker switch on the left hand side of your product to select ring tone 1, 2 or 3.
Seite 29
Using your RingFlash 100/200 Using the Doorbell Underneath the RingFlash unit you (RingFlash 200 only) will fi nd 8 little switches underneath a Press the Doorbell button, the red cover. You can change the setting of light in the button will turn on. The...
Seite 30
Using your RingFlash 100/200 Replace the back cover, position Service Hotline and tighten the 4 screws. Refi x the In the case of technical problems, Doorbell outside your front door as you can contact our hotline service, before. UK Tel. 0844 800 6503 (cost via...
Never use cleaning agents or solvents following intervention by the purchaser Guarantee or third parties. Damage caused as a AMPLICOM equipment is produced and result of improper handling or operation, tested according to the latest production incorrect positioning or storing, improper methods.
Seite 32
Maintenance/Guarantee purchased the AMPLICOM equipment together with the purchase receipt. All rights to claims under the terms of the guarantee in accordance with this agreement must be asserted exclusively with regard to your sales outlet. Two years after the purchase and transfer of our products, claims under the terms of guarantee can no longer be asserted.