Herunterladen Inhalt Inhalt Diese Seite drucken
LG STYLER S3WERB Bedienungsanleitung
Vorschau ausblenden Andere Handbücher für STYLER S3WERB:
Inhaltsverzeichnis

Werbung

Verfügbare Sprachen

Verfügbare Sprachen

OWNER'S MANUAL
STYLER
Read this owner's manual thoroughly before operating
the appliance and keep it handy for reference at all times.
S3*ERB
MFL66101232
www.lg.com

Werbung

Inhaltsverzeichnis
loading

Inhaltszusammenfassung für LG STYLER S3WERB

  • Seite 1 OWNER’S MANUAL STYLER Read this owner’s manual thoroughly before operating the appliance and keep it handy for reference at all times. S3*ERB www.lg.com MFL66101232...
  • Seite 2: Inhaltsverzeichnis

    TABLE OF CONTENTS TABLE OF CONTENTS Loading the Styler PRODUCT FEATURES Hangers IMPORTANT SAFETY INSTRUCTIONS Using the Moving Hanger Safety Instructions for Installation Pants Hanger or Pants Crease Care Safety Instructions for Connecting Electricity Shelf Basic Safety Precautions Control Panel Grounding Instructions Control Panel Features Cycle Guide...
  • Seite 3: Product Features

    PRODUCT FEATURES PRODUCT FEATURES REMOVE ODORS Use the Styler's Refresh cycle to quickly and easily remove odors from clothes. Control Lock REFRESH CLOTHING OR ADD AN AROMA Infuse items with the aroma from your favorite dryer fabric softener sheets to keep clothes and accessories looking, feeling, and smelling refreshed.
  • Seite 4: Important Safety Instructions

    IMPORTANT SAFETY INSTRUCTIONS IMPORTANT SAFETY INSTRUCTIONS READ ALL INSTRUCTIONS BEFORE USING THE APPLIANCE. There are many important safety messages in this manual and on your appliance. Always read and obey all safety messages. This is the safety alert symbol. This symbol alerts you to potential hazards that can result in product damage, property damage, or serious bodily harm or death.
  • Seite 5: Safety Instructions For Installation

    The electrical overload. Improper power product is not designed for use on ships circuits can melt, creating electric shock or airplanes. Check with an authorized LG and/or fire hazard. service center for use under other special circumstances.
  • Seite 6: Safety Instructions For Connecting Electricity

    Failure to follow these electric shock. instructions can result in fire, explosion, • Contact LG or a qualified repair person or death. immediately to repair or replace all • This appliance must be plugged into power cords that have become frayed a properly grounded outlet.
  • Seite 7 IMPORTANT SAFETY INSTRUCTIONS IMPORTANT SAFETY INSTRUCTIONS READ ALL INSTRUCTIONS BEFORE USING THE APPLIANCE. WARNING To reduce the risk of fire or explosion, electric shock, property damage, injury to persons or death when using this appliance, follow basic safety precautions, including the following: •...
  • Seite 8: Maintenance And Disposal

    IMPORTANT SAFETY INSTRUCTIONS WARNING To reduce the risk of fire or explosion, electric shock, property damage, injury to persons or death when using this appliance, follow basic safety precautions, including the following: Do not open door during operation. The • •...
  • Seite 9: Product Overview

    PRODUCT OVERVIEW PRODUCT OVERVIEW PARTS interior light hooks for Pants Crease moving hanger Care interior light Pants Crease Care shelf holder door* shelf aroma filter steam nozzle hot air circulation vent water water drain tank supply tank drip tray * The door swing can be reversed by the installer to fit the installation location.
  • Seite 10: Accessories

    If the fit is too loose, it may result in vibration, noise, and damage to clothing. NOTE y Contact the store where the product was purchased or LG customer service if any accessories are damaged or missing. y For your safety and for extended product life, use only authorized components. The manufacturer is not responsible for product malfunction or accidents caused by the use of separately purchased unauthorized components or parts.
  • Seite 11: The Moving Hanger

    Crease Care to crease pants. Pants Crease Care feature. This cycle can be • Anything that can be securely placed on a downloaded using the LG Smart Styler app hanger and steamed or dried without retaining and used as the Downloaded cycle.
  • Seite 12: The Shelf

    PRODUCT OVERVIEW THE SHELF CHOOSING STYLER FEATURES Use the shelf when styling clothes or other items item how to style it that are difficult to hang or that may be damaged by hang drying. suit coat, blazer moving hanger coat, jacket (short) moving hanger moving hanger coat (long)
  • Seite 13: Installation

    INSTALLATION INSTALLATION INSTALLATION OVERVIEW Please read the following installation instructions first after purchasing this product or transporting it to another location. Remove material from inside and outside of cabinet Check and choose the Level the Styler Unpack and remove proper location shipping material Reverse the door swing Connect to grounded outlet...
  • Seite 14: Unpacking The Styler

    INSTALLATION UNPACKING THE STYLER • Remove tape and any temporary labels from the Styler before using. Do not remove any warning labels, the model WARNING and serial number label, or the Tech Sheet y Use two or more people to move and that is located under the front of the Styler.
  • Seite 15: Installation Location Requirements

    INSTALLATION INSTALLATION LOCATION REQUIREMENTS WARNING Read all installation instructions completely before installing and operating the Styler. It is important to review this entire manual before installing and using the Styler. The installation requires: y A grounded electrical outlet located within y A sturdy floor to support the total appliance 2 ft.
  • Seite 16 INSTALLATION Recommended Installation Spacing The following clearances are recommended for the Styler. Although the Styler has been tested for 7 3/4 in. clearances of 1 inch (3 cm) on the sides and rear, (20 cm) recommended clearances should be considered for the following reasons: • Additional space should be considered for ease of installation and servicing.
  • Seite 17: Leveling The Styler

    INSTALLATION LEVELING THE STYLER WARNING WARNING y The Styler is heavy. Use two or more people if installing the rear leveling feet. y To reduce the risk of injury to persons, Failure to do so can result in back injury or adhere to all industry recommended other injury.
  • Seite 18: Reversing The Door

    LG Customer Information Center. the interior parts. • Install the anti-tip device packed with the •...
  • Seite 19: Assembling The Drip Tray

    INSTALLATION ASSEMBLING THE DRIP TRAY Before using the Styler, insert the drip tray onto the bottom of the cabinet. 1 Hold the tray so the arrow and letter on the front of the tray face up. 2 Insert one side of the tray first, then the other. Push the tray until it slides completely in. 3 To detach, pull one side out then the other. If the tray collects water, detach it and empty the water. After emptying it, re-assemble the tray.
  • Seite 20: Operation

    Remove adhesive residue by wiping it off with your thumb or dish detergent. Unpack accessories. Unpack the shelf and hangers. Accessories can be purchased separately from the LG Customer Information Center. Assemble the drip tray. Insert the drip tray at the bottom of the cabinet.
  • Seite 21: Using The Styler

    OPERATION USING THE STYLER 1 PREPARE ITEMS • Wash clothes first, if needed. • No heat-sensitive items or items that can be damaged by exposure to water. • Place items on hangers or the shelf. • Fasten buttons and close zippers to keep items on moving hangers and prevent damage.
  • Seite 22: Sorting Loads

    OPERATION SORTING LOADS Grouping Similar Items • For best fabric care results, always treat fabrics Fabric Care Labels with similar care requirements together. Most articles of clothing feature fabric care labels • Different fabrics have different care that include instructions for proper care. Below requirements, and some fabrics cannot be are some of the symbols that are relevant to treated in certain Styler cycles or should be...
  • Seite 23: Fabric Care Guide

    OPERATION FABRIC CARE GUIDE = yes  § = check label Refresh cycle Gentle Control Lock Control Lock Control Lock Sanitary fabric clothes comments cycle removing removing cycle wrinkles odors towels, socks, Wrinkles may underwear, remain in 100% jeans, cotton fabrics. cotton ...
  • Seite 24 OPERATION FABRIC CARE GUIDE (CONTINUED) = yes  § = check label Refresh cycle Gentle Control Lock Control Lock Control Lock Sanitary fabric clothes comments cycle removing removing cycle wrinkles odors suit lining, blouses, neckties, acetate     pajamas thermal acrylic...
  • Seite 25: Checking The Filters Before Every Load

    OPERATION CHECKING THE FILTERS Changing the Aroma Sheet BEFORE EVERY LOAD Use a dryer fabric softener sheet to add a refreshing aroma to items. Replace the fabric softener sheet Checking the Lint Filter after every use. Always make sure the lint filter is clean before 1 Remove the aroma filter from the Styler.
  • Seite 26: Checking The Water Tanks

    OPERATION CHECKING THE WATER TANKS LOADING THE STYLER Check the water in the water tanks before use. CAUTION The water supply tank must be filled with water before using the Styler. The Styler does not work y Check all pockets to make sure that they without water.
  • Seite 27: Hangers

    OPERATION Hangers Using the Moving Hanger The hangers that come with the Styler are for 1 Insert hangers into slots and pull down to use with the Styler only. Any plastic or metal secure the hook snugly. hanger that has a hook less than 5/32 in. (4 mm) Hooks should fit down in the slots snugly to thick and hooks snugly into the indentations in prevent noise, vibration, or damage to items the moving hanger can be used in the Styler.
  • Seite 28 OPERATION Opening and Closing the Pants Hanger Using the Pants Crease Care 1 Open the Pants Crease Care by pressing on 1 To open, fold the hook down toward the the icon on the side. hanger blades to unlock and separate the blades. hook hanger blades 2 Once pants are inserted, bring the blades together and rotate the hook up and away from the blades to lock them in place. 2 Hang the pants hanger on the hook above the Pants Crease Care that best fits the length of the pants being pressed. If the pants are longer, use the higher hooks Hanging Pants On the Pants Hanger to keep the pants from hitting the floor of the cabinet.
  • Seite 29: Shelf

    OPERATION Shelf • Hang the shelf on the shelf holder when treating long clothes such as coats or dresses. Use the shelf for clothes and items that cannot be placed on hangers. Do not stack items on the shelf. For best drying performance, use the shelf for a single item or smaller items with space between.
  • Seite 30: Control Panel

     CYCLE COMPLETION INDICATOR Place an NFC-equipped smart phone over this This portion of the display shows which stage of icon to use the LG Smart Styler application using the styling cycle is currently underway. NFC (Near Field Communication) tags.
  • Seite 31: Delay Start

    Go cycle. The default Downloaded 2 cycle is the Extra Pants Care cycle. Download a new cycle in either position using the LG Smart Styler application on an NFC-equipped smart phone. Press and hold for three seconds to activate the Smart Diagnosis™...
  • Seite 32: Cycle Guide

    OPERATION CYCLE GUIDE Cycle Processes Cycle Setting Clothing / Fabric Type Preparing Heating Steaming Sanitizing Drying suit, coat, school uniform, Normal    scarf, wool, knitwear, outdoor/ performance clothing, towels, underwear, t-shirts, socks, jeans, Light jean jackets, lingerie, sportswear, ...
  • Seite 33: Choosing A Cycle

    OPERATION CHOOSING A CYCLE Special Care Downloaded 1 or Downloaded 2 Styler cycles are designed to fit a variety of situations. Select the cycle and setting that best Use Downloaded 1 and 2 to add two cycles. match the load contents and desired results for Download two cycles and use them to treat maximum performance and fabric care.
  • Seite 34: Cycle Settings And Options

    • The moving hanger will move even when only 3 Touch Start/Pause. the shelf is being used. • Download and use the LG Smart Styler app • Cycle times may vary depending on the usage environment, including water temperature. on a smart phone to confirm the current downloaded cycle or to download another • Cycle time for the Gentle Dry cycle may be...
  • Seite 35: Special Functions

    Control Lock function. * Smart Diagnosis™ 2 The Control Lock icon lights in the display, and all controls are disabled except the Use this function with the LG Smart Styler Power button. application on a smart phone or when contacting the LG service center to help diagnose problems • Control Lock does not lock the door.
  • Seite 36: Storage Function

    OPERATION STORAGE FUNCTION The storage function is set. • Once completed, a selected course will lead to the storage function. NOTE • During the drying course, no storage function is set. • After the storage function is entered and the power button pressed, the setting is released.
  • Seite 37: Smart Features Tag On

    On function. Using Tag On with Apps 1 Look for the Tag On icon next to the Start/ Pause button on the control panel. Touch an LG Styler’s Tag On logo with an NFC- equipped smart phone, and the LG Smart Styler apps use the Tag On function. LG Smart Styler Hold to Start...
  • Seite 38: Downloading Styler Cycles

    SMART FEATURES Downloading Styler Cycles LG Smart Styler’s Smart Download Cycle app allows you to download a cycle for later use. The cycle is available at the Downloaded cycle position on the control panel until another cycle is downloaded. 1 Install the LG Smart 2 Select the Smart Download 3 Click through the NFC info.
  • Seite 39: Maintenance Regular Cleaning

    MAINTENANCE MAINTENANCE Cleaning the Lint Filter Always remove the lint from the filter after every REGULAR CLEANING cycle. WARNING If the lint filter has become very dirty or clogged, wash the lint filter in warm, soapy water and To reduce the risk of fire, electric shock, or allow to dry thoroughly before reinstalling. injury to persons when using this appliance, • Never operate the Styler without the lint filter.
  • Seite 40: Disposal Of Your Old Appliance

    WEEE collection point. For the most up to date information for your country please see www.lg.com/global/recycling • I nformation of fluorinated greenhouse gases used as refrigerant of this dryer Contains fluorinated greenhouse gases.
  • Seite 41: Troubleshooting

    MAINTENANCE TROUBLESHOOTING FAQS: FREQUENTLY ASKED QUESTIONS What are aroma sheets and how do I use them? You can use your favorite brand of dryer fabric softener sheets in the aroma filter to infuse items with a refreshing aroma. The sheets will not soften garments or reduce static. To use the aroma filter, add a softener sheet before running a cycle. Dispose of the softener sheet at the end of the cycle. For best performance, clean the aroma filter after every 5-7 uses. Can I put fur, leather, or silk items in the Styler? Download the Air Fresh cycle for use with fur, leather, or silk items in the Styler.
  • Seite 42: Before Calling For Service

    MAINTENANCE BEFORE CALLING FOR SERVICE Your appliance is equipped with an automatic error-monitoring system to detect and diagnose problems at an early stage. If your appliance does not function properly or does not function at all, check the following before you call for service. Operation Problem Possible Cause...
  • Seite 43 MAINTENANCE Operation Problem Possible Cause Solutions Control panel won’t Control panel or button has Dirt or foreign objects on the control panel respond dirt on it will interfere with the operation of the buttons. Clean the control panel. Control panel is locked Disable the Control Lock function.
  • Seite 44: Error Codes

    MAINTENANCE Performance Problem Possible Cause Solutions Wrinkles at back of Item too large for hanger or Use the right size hanger for the item neck after cycle fabric too delicate so the fabric won't bunch up and cause wrinkles. Some fabrics are delicate and will bunch around the hanger no matter what you do.
  • Seite 45: Smart Diagnosis

    Should you experience any problems with your appliance, it has the capability of transmitting data to your smart phone using the LG Smart Styler application or via your telephone to the LG Customer Information Center. Smart Diagnosis™ cannot be activated unless your appliance is turned on by pressing the Power button. If your appliance is unable to turn on, then troubleshooting must be done without using Smart Diagnosis™.
  • Seite 46 MEMO...
  • Seite 47 GEBRUIKERSHANDLEIDING STYLER Lees deze handleiding zorgvuldig door voordat u het apparaat in gebruik neemt en bewaar deze om later iets op te kunnen zoeken S3*ERB www.lg.com...
  • Seite 48 INHOUDSOPGAVE INHOUDSOPGAVE Waterreservoirs controleren PRODUCTKENMERKEN Wasgoed in de Styler laden BELANGRIJKE VEILIGHEIDSAANWIJ- Hangers ZINGEN Bewegende hanger gebruiken Veiligheidsaanwijzingen voor installatie Broekhanger of broekpers Veiligheidsaanwijzingen voor elektrische aansluiting Bedieningspaneel Algemene veiligheidsmaatregelen Functies van het bedieningspaneel Aanwijzingen voor aarding Overzicht programma's PRODUCTOVERZICHT Programma-onderdelen Programma kiezen Onderdelen...
  • Seite 49: Productkenmerken

    PRODUCTKENMERKEN PRODUCTKENMERKEN VERWIJDERT GEURTJES Gebruik het Refresh-programma van de Styler om snel en eenvoudig ongewenste geurtjes uit uw kleding te verwijderen. Control Lock VERFRIST KLEDING OF VOEGT EEN AROMA TOE Voorzie uw kleding en accessoires van de geur van uw favoriete wasverzachter en laat ze er weer fris uitzien, aanvoelen en ruiken.
  • Seite 50: Belangrijke Veiligheidsaanwij- Zingen

    BELANGRIJKE VEILIGSHEIDSAANWIJZINGEN BELANGRIJKE VEILIGSHEIDSAANWIJZINGEN LEES VOOR GEBRUIK ALLE AANWIJZINGEN. In deze handleiding en op het apparaat is een groot aantal veiligheidswaarschuwingen vermeld. Lees altijd alle veiligheidswaarschuwingen en houd u eraan. Dit is het waarschuwingssymbool. Dit symbool waarschuwt u voor mogelijke gevaren die kunnen leiden tot schade aan het product, schade aan uw eigendommen en ernstig of dodelijk lichamelijk letsel.
  • Seite 51: Veiligheidsaanwijzingen Voor Installatie

    Het product is niet gebruik eerst op kamertemperatuur te ontworpen voor gebruik op schepen komen. of in vliegtuigen. Raadpleeg een • Repareer of vervang geen onderdelen geautoriseerd LG-servicecentrum van het apparaat en voer geen...
  • Seite 52 BELANGRIJKE VEILIGSHEIDSAANWIJZINGEN WAARSCHUWING Volg in verband met uw veiligheid de informatie in deze handleiding stipt op om brand-, explosie- en schokgevaar te vermijden en om materiële schade evenals ernstig of dodelijk letsel te voorkomen. VEILIGHEIDSAANWIJZIGINGEN VOOR INSTALLATIE • Als de netstroomkabel onderhoudswerkzaamheden uit tenzij dat uitdrukkelijk wordt aanbevolen is beschadigd, dient...
  • Seite 53: Veiligheidsaanwijzingen Voor Elektrische Aansluiting

    Neem meteen contact op met LG of y Dit apparaat dient te worden met een bevoegde reparateur om een aangesloten op een correct geaard gerafeld of anderszins beschadigde stopcontact.
  • Seite 54 BELANGRIJKE VEILIGSHEIDSAANWIJZINGEN BELANGRIJKE VEILIGSHEIDSAANWIJZINGEN LEES VOOR GEBRUIK ALLE AANWIJZINGEN. WAARSCHUWING Neem naast de algemene veiligheidsmaatregelen om het risico op brand-, explosie- en schokgevaar, materiële schade evenals ernstig of dodelijk letsel door het gebruik van het apparaat te verminderen de volgende waarschuwingen in acht: GEBRUIK stoomopening tijdens gebruik.
  • Seite 55: Aanwijzingen Voor Aarding

    BELANGRIJKE VEILIGSHEIDSAANWIJZINGEN WAARSCHUWING Neem naast de algemene veiligheidsmaatregelen om het risico op brand-, explosie- en schokgevaar, materiële schade evenals ernstig of dodelijk letsel door het gebruik van het apparaat te verminderen de volgende waarschuwingen in acht: • Gebruik het product uitsluitend waarvoor het bedoeld • Raak het glazen paneel aan de voorkant niet met is.
  • Seite 56: Productoverzicht

    PRODUCTOVERZICHT PRODUCTOVERZICHT ONDERDELEN binnenverlichting haken voor broekpers bewegende hanger binnenverlichting broekpers knoppen om rek op te bergen deur* aromafilter stoomopening heteluchtcirculatie- rooster afvoertank aanvoertank lekbak * De draairichting van de deur kan indien nodig door de installateur worden omgedraaid.
  • Seite 57: Accessoires

    OPMERKING y Neem contact op met de winkel waar u het product heeft gekocht of met de LG-klantenservice als er accessoires beschadigd zijn of missen. y Gebruik voor uw veiligheid en om de levensduur van uw product te verlengen uitsluitend goedgekeurde componenten.
  • Seite 58: Bewegende Hanger

    • Alles wat veilig op een hanger geplaatst kan worden ontworpen voor de broekpers. Dit programma en gestoomd of gedroogd kan worden zonder dat er kan worden gedownload met de LG Smart afdrukken van de hanger of andere beschadigingen Styler-app en worden gebruikt als Downloaded optreden, kan op de bewegende hanger geplaatst programma.
  • Seite 59: Rek

    PRODUCTOVERZICHT FUNCTIES VAN DE STYLER KIEZEN Gebruik het rek voor het stylen van kleding of voor artikel Styler-functie andere artikelen die moeilijk op te hangen zijn of die bewegende beschadigd kunnen raken bij hangend drogen. jasje, blazer hanger bewegende jas, jack (kort) hanger bewegende jas (lang)
  • Seite 60: Installatie

    INSTALLATIE INSTALLATIE INSTALLATIEOVERZICHT Lees na aankoop van dit product of vervoer naar een andere locatie eerst de volgende instructies door. Verwijder materiaal van de binnen- en buitenzijde van de kast Verwijder al het Controleer en kies de Plaats de Styler waterpas verpakkingsmateriaal juiste locatie Draai de draairichting van...
  • Seite 61: Styler Uitpakken

    INSTALLATIE • Verwijder voor gebruik plakband en tijdelijke STYLER UITPAKKEN etikettering van de Styler. Verwijder geen waarschuwingen en ook niet Waarschuwing het label met model- en serienummer of het y Er zijn minimaal twee mensen nodig om plaatje met technische specificaties onder de de Styler te verplaatsen en te installeren.
  • Seite 62: Locatie-Eisen Voor Installatie

    INSTALLATIE LOCATIE-EISEN VOOR INSTALLATIE WAARSCHUWING Lees voor het installeren en gebruiken van de Styler alle installatie-instructies volledig door. Het is belangrijk om voor het installeren en gebruiken van de Styler de gehele handleiding te bestuderen. Voor de installatie is het volgende nodig: y Een geaard stopcontact binnen 61 cm van een van y Een stevige vloer om het totale gewicht van het beide kanten van het apparaat.
  • Seite 63 INSTALLATIE Aanbevolen plaatsingsafstand De volgende plaatsingsafstanden voor de Styler worden aanbevolen. Hoewel de Styler is getest bij 20 cm een plaatsingsafstand van 3 cm van de zijkanten en achterkant, worden om de volgende redenen de hiernaast afgebeelde plaatsingsafstanden aanbevolen: • Extra ruimte voor eenvoudige installatie en onderhoud.
  • Seite 64: Styler Waterpas Plaatsen

    INSTALLATIE STYLER WATERPAS PLAATSEN Waarschuwing Waarschuwing y De Styler is zwaar. Er zijn minimaal twee mensen nodig om de achterste stelvoeten te installeren. y Om het risico op persoonlijk letsel te verminderen, Als u dit nalaat, kan dit leiden tot rugletsel of ander dient u alle veiligheidsprocedures die worden persoonlijk letsel.
  • Seite 65: Draairichting Van De Deur Omdraaien

    LG-Klanteninformatiecentrum. • Breng de verankering die met de Styler is meegeleverd aan om het risico op omvallen te verminderen.
  • Seite 66: Beschermdoppen Installeren

    INSTALLATIE installeren. Dit kan leiden tot waterschade als gevolg van lekkage. BESCHERMDOPPEN INSTALLEREN Plaats de noppen van de beschermdop op de gaten in de bovenhoek van de kast. Klik de beschermdop vast. Herhaal dit met de andere beschermdop voor de andere hoek. SCHARNIERKAPJES INSTALLEREN Open de deur van de Styler.
  • Seite 67: Werking

    Styler niet. OPMERKING Verwijder kleverige resten met uw duim of afwasmiddel. Accessoires uitpakken. Pak het rek en de hangers uit. Accessoires zijn afzonderlijk verkrijgbaar via het LG- Klanteninformatiecentrum. Lekbak monteren. Monteer de lekbak aan de onderkant van de kast.
  • Seite 68: Styler Gebruiken

    WERKING DE STYLER GEBRUIKEN 1 KLEDINGSTUKKEN VOORBEREIDEN • Was de kleding indien nodig. • Hang of stop geen warmtegevoelige kleding, of kleding dat beschadigd kan raken door blootstelling aan water, in de Styler. • Hang kledingstukken aan de hangers of plaats ze op het rek. • Maak knopen vast en sluit ritsen zodat de kledingstukken aan de bewegende hangers blijven hangen en om schade te voorkomen.
  • Seite 69: Wasladingen Sorteren

    WERKING WASLADINGEN SORTEREN Soortgelijke artikelen groeperen • Behandel voor het beste resultaat stoffen met Wasvoorschriften vergelijkbare wasvoorschriften tegelijkertijd. De meeste kledingstukken bevatten wasvoorschriften • Verschillende stoffen hebben verschillende met instructies voor de juiste zorg. Hieronder vindt u wasvoorschriften en sommige stoffen mogen niet een overzicht van de symbolen die relevant zijn voor worden behandeld in bepaalde Styler-programma's de juiste kledingstukken voor de Styler.
  • Seite 70: Overzicht Van Typen Stof

    WERKING OVERZICHT VAN TYPEN STOF = ja  § = zie wasvoorschrift Control Lock Control Lock Control Lock Refresh-programma Sani- Gentle stof kleding tary-pro- Dry-pro- opmerkingen kreukels geurtjes verwijde- gramma gramma verwijderen handdoeken, In stoffen van 100% sokken, katoen kunnen ondergoed, kreukels achterblijven.
  • Seite 71 WERKING OVERZICHT VAN TYPEN STOF (VERVOLG) = ja  § = zie wasvoorschrift Control Lock Control Lock Control Lock Refresh-programma Sani- Gentle stof kleding tary-pro- Dry-pro- opmerkingen kreukels geurtjes verwijde- gramma gramma verwijderen voering pak, acetaat blouses, dassen,   ...
  • Seite 72: Filters Voor Elke Waslading Controleren

    WERKING FILTERS VOOR ELKE WASLADING Aromablad vervangen Gebruik een blad van de wasverzachter CONTROLEREN om uw kledingstukken te voorzien van een verfrissend aroma. Vervang na elk gebruik het Pluizenfilter controleren wasverzachterblad. Zorg altijd dat het pluizenfilter schoon is voor een nieuwe waslading; een verstopt pluizenfilter Verwijder het aromafilter uit de Styler.
  • Seite 73: Waterreservoirs Controleren

    WERKING WATERRESERVOIRS CONTROLEREN WASGOED IN DE STYLER LADEN Controleer voor gebruik het water in de LET OP waterreservoirs. De aanvoertank dient voordat y Controleer of alle zakken leeg zijn. u de Styler gebruikt gevuld te zijn met water. Voorwerpen zoals paperclips, pennen, Zonder water werkt de Styler niet.
  • Seite 74: Hangers

    WERKING Hangers Bewegende hanger gebruiken De hangers die met de Styler worden Plaats de hangers in de inkepingen en druk ze meegeleverd, mogen alleen met de Styler goed aan. worden gebruikt. Elke plastic of metalen hanger De hangers dienen goed in de inkepingen met een haak kleiner dan 4 mm die goed gehaakt te zijn om overmatige vasthaakt in de inkepingen van de bewegende...
  • Seite 75 WERKING Broekhanger openen en sluiten Broekpers gebruiken Open de broekpers door op het pictogram aan Om de broekhanger te openen klapt u de haak de zijkant te drukken. naar beneden richting de bladen van de hanger om deze te ontgrendelen en te scheiden. haak bladen van hanger...
  • Seite 76: Rek

    WERKING • Hang het rek aan de knoppen aan de achterkant van de kast als u lange kleding Gebruik het rek voor kleding en artikelen die niet zoals jassen en jurken behandelt. op hangers geplaatst kunnen worden. Stapel geen artikelen op het rek. Gebruik voor het beste resultaat het rek voor een enkel artikel of voor kleinere artikelen met ruimte ertussen.
  • Seite 77: Bedieningspaneel

    Plaats een smartphone met NFC-technologie  OPTIES- EN WAARSCHUWINGSINDICATORS over dit pictogram om de LG Smart Styler- Delay On: brandt wanneer de optie Delay app te gebruiken via NFC-tags (Near Field Start (start uitstellen) is ingeschakeld.
  • Seite 78 Control Lock-functie te activeren/ Ready to Go-programma en 2 is het Extra Pants deactiveren. Care-programma Vervang deze door een nieuw downloadbaar programma met de LG Smart  GENTLE DRY-PROGRAMMA Styler-app op een smartphone met NFC. Druk op het pictogram om het Gentle Dry-...
  • Seite 79: Overzicht Programma's

    WERKING OVERZICHT PROGRAMMA'S Programma-onderdelen Programma Instelling Type kleding/stof Voorbereiden Warmte Stoom Reinigen Drogen Normal pak, jas, schooluniform, sjaal,    wol, breiwerk, outdoorkleding, handdoeken, ondergoed, T-shirts, sokken, spijkerbroeken, spijkerjacks, Light    lingerie, sportkleding, tafelkleden 100% wol, polyester, rayon, urethaan, gabardine, Gore-Tex, katoen, nylon, Heavy ...
  • Seite 80: Programma Kiezen

    WERKING PROGRAMMA KIEZEN Special Care-programma De programma's van de Styler zijn ontworpen om verschillende Downloaded 1 of Downloaded situaties aan te kunnen. Selecteer het programma en de instelling Gebruik Downloaded 1 of 2 om twee programma's toe te die het beste passen bij de inhoud en de gewenste resultaten voor voegen.
  • Seite 81: Programma-Instellingen En Opties

    • Tijdens het Refresh- en het Sanitary-programma maakt de machine een borrelend en sissend geluid, omdat er water wordt • Download en gebruik de LG Smart Styler- gekookt om stoom te maken die op de kleding wordt gespoten. app op een smartphone om het huidige Dit is normaal.
  • Seite 82: Speciale Functies

    • De instelling Control Lock (Bediening * Smart Diagnosis™ vergrendelen) blijft ook ingeschakeld als de Gebruik deze functie met de LG Smart Styler- stroom uitvalt. app op een smartphone of wanneer u contact • Als Control Lock is ingeschakeld, blijft...
  • Seite 83: Opbergfunctie

    WERKING OPBERGFUNCTIE De opbergfunctie is ingeschakeld. Als een programma is voltooid, schakelt het apparaat over op de opbergfunctie. • OPMERKING: Tijdens de droogfase is de opbergfunctie niet ingeschakeld. • Als de opbergfunctie is ingeschakeld kan deze door het indrukken van de AAN/UIT-knop •...
  • Seite 84: Slimme Functies Tag On

    TAG ON Touch Styling van de LG Smart Styler-app Voor gebruik van de Tag On-functie gebruikt. Met de Tag On-functie kunt u de functies LG Smart Plaats de smartphone zo dat het NFC- Diagnosis en Smart Download Cycle gebruiken antennedoelwit in het scherm van de smartphone om direct vanaf uw smartphone met uw apparaat te het Tag On-pictogram op het apparaat bedekt.
  • Seite 85: Programma's Voor De Styler Downloaden

    Programma's voor de Styler downloaden Met de optie Smart Download Cycle van de LG Smart Styler-app kunt u een programma downloaden om later te gebruiken. Dit programma is onder het downloadbare programma op het bedieningspaneel beschikbaar totdat er een ander programma wordt gedownload.
  • Seite 86: Onderhoud Regelmatige Reiniging

    ONDERHOUD ONDERHOUD Pluizenfilter reinigen Verwijder altijd na elk gebruik de pluizen uit het REGELMATIGE REINIGING filter. Zie Pluizenfilter controleren, pagina 24. Als het pluizenfilter erg vuil of verstopt is, kunt WAARSCHUWING u het in warm water met zeep wassen. Zorg dat Neem naast de algemene veiligheidsmaatregelen om het het filter volledig droog is voordat u het terug risico op brand-, en schokgevaar evenals ernstig letsel...
  • Seite 87 WEEE- verzamelpunt. Voor de meest geactualiseerde informatie voor uw land wordt verwezen naar www.lg.com/global/recycling • Informatie omtrent gefluoreerde broeikasgassen, gebruikt als koelmiddel voor de droger.
  • Seite 88: Probleemoplossing Veelgestelde Vragen

    ONDERHOUD PROBLEEMOPLOSSING VEELGESTELDE VRAGEN Wat zijn aromabladen en hoe gebruik ik ze? U kunt bladen van uw favoriete merk wasverzachter in het aromafilter doen om uw kledingstukken te voorzien van een verfrissend aroma. De bladen verzachten de kleding niet en verminderen de statische elektriciteit niet. Voeg een blad van de wasverzachter toe aan het aromafilter voor u een programma start.
  • Seite 89: Voordat U Contact Opneemt Met Het Servicecentrum

    ONDERHOUD VOORDAT U CONTACT OPNEEMT MET HET SERVICECENTRUM Uw apparaat is uitgerust met een automatisch foutdetectiesysteem om problemen al in een vroeg stadium vast te stellen en te analyseren. Als uw apparaat niet correct of helemaal niet functioneert, kunt u het volgende controleren voordat u contact opneemt met het servicecentrum. Werking Probleem Mogelijke oorzaak...
  • Seite 90 ONDERHOUD Werking Probleem Mogelijke oorzaak Oplossingen Het bedieningspaneel Er zit vuil op het bedieningspaneel Vuil of vreemde objecten op het bedieningspaneel reageert niet of op een knop verstoren het bedienen van de knoppen. Reinig het bedieningspaneel. Het bedieningspaneel is vergrendeld Deactiveer de Control Lock-functie (bediening vergrendelen).
  • Seite 91: Foutcodes

    ONDERHOUD Resultaten Probleem Mogelijke oorzaak Oplossingen Er zijn na een programma Het artikel is te groot voor de Gebruik een hanger van de juiste grootte , kreukels ontstaan aan de hanger of de stof is te kwetsbaar zodat de stof niet plooit en er geen kreukels achterzijde van een kraag ontstaan.
  • Seite 92: Smart Diagnosis

    Mocht u problemen ondervinden met uw apparaat, dan bestaat de mogelijkheid om data naar uw smartphone te versturen via de LG Smart Styler-app of via uw telefoon naar het Klanteninformatiecentrum. Smart Diagnosis™ kan alleen geactiveerd worden wanneer het apparaat aan staat. Wanneer u uw apparaat niet aan kunt zetten, kan Smart Diagnosis™...
  • Seite 93 BEDIENUNGSANLEITUNG STYLER Lesen Sie diese Bedienungsanleitung gründlich durch, bevor Sie das Gerät in Betrieb nehmen und halten Sie die Anleitung jederzeit griffbereit S3*ERB www.lg.com...
  • Seite 94 INHALTSVERZEICHNIS INHALTSVERZEICHNIS DEN STYLER BELADEN PRODUKTMERKMALE Kleiderbügel Verwendung des beweglichen Aufhängers WICHTIGE SICHERHEITSHINWEISE Kleiderbügel für Hosen oder Hosenpresse SICHERHEITSHINWEIS FÜR DIE INSTALLATION Regal SICHERHEITSHINWEIS FÜR DEN BEDIENFELD STROMANSCHLUSS Funktionen des Bedienfelds GRUNDLEGENDE SICHERHEITSHINWEISE PROGRAMM-ANLEITUNG ERDUNGSANLEITUNGEN Programmablauf EIN PROGRAMM AUSWÄHLEN PRODUKTÜBERSICHT PROGRAMM-EINSTELLUNGEN UND -OPTIONEN BAUTEILE SONDERFUNKTIONEN...
  • Seite 95: Produktmerkmale

    PRODUKTMERKMALE PRODUKTMERKMALE ENTFERNT GERÜCHE Verwenden Sie das Refresh Programm des Styler's, um schnell und einfach Gerüche aus der Kleidung zu entfernen. Control Lock KLEIDUNG AUFFRISCHEN ODER EINEN DUFT ANWENDEN Verleihen Sie Ihrer Kleidung und Ihrem Zubehör mit Ihren bevorzugten Dufttüchern einen angenehmen Geruch.
  • Seite 96: Wichtige Sicherheitshinweise

    Wichtige Sicherheitshinweise WICHTIGE SICHERHEITSHINWEISE LESEN SIE DIE ANWEISUNGEN BEVOR SIE DAS GERÄT IN BETRIEB NEHMEN. Es gibt viele wichtige Sicherheitshinweise in diesem Handbuch und auf dem Gerät. Bitte lesen und beachten Sie immer alle Sicherheitshinweise. Dieses Symbol weist auf einen Sicherheitshinweis hin. Dieses Symbol warnt vor möglichen Gefahren, die zu Produktschäden, Sachschäden, schweren Verletzungen oder zum Tod führen können.
  • Seite 97: Sicherheitshinweis Für Die Installation

    Für den Einsatz unter anderen besonderen • Kontaktieren Sie den autorisierten Umständen, wenden Sie sich an den Kundendienst vor der Installation oder autorisierten LG Kundendienst. vor einem Umzug des Styler's, um Verletzungen oder Schäden zu vermeiden, • Die Bedienelemente dürfen nicht wenn das Produkt bewegt wird.
  • Seite 98 Wichtige Sicherheitshinweise ACHTUNG Zu Ihrer eigenen Sicherheit müssen Sie die Informationen in diesem Handbuch lesen, um die Gefahr von Feuer, Explosion, Stromschlag, oder auch Sachschäden, Verletzungen von Personen oder sogar Tod zu verhindern. SICHERHEITSHINWEIS FÜR DIE INSTALLATION qualifizierte Person • Versuchen Sie nicht Teile des Geräts zu reparieren oder zu ersetzen ersetzt werden, um eine oder eine Wartung durchzuführen,...
  • Seite 99: Sicherheitshinweis Für Den Stromanschluss

    Gefahr durch Feuer und einen eine 15-Ampere Sicherung oder einen Stromschlag hervorrufen. Schutzschalter abgesichert sein muss. • Kontaktieren Sie LG oder eine Die Nichtbeachtung dieser Anweisung qualifizierte Person, um das Netzkabel kann zu Brand, Explosion oder zum Tod oder alle Netzkabel sofort zu führen.
  • Seite 100: Grundlegende Sicherheitshinweise

    Wichtige Sicherheitshinweise WICHTIGE SICHERHEITSHINWEISE LESEN SIE DIE ANWEISUNGEN BEVOR SIE DAS GERÄT IN BETRIEB NEHMEN. ACHTUNG Um das Risiko eines Brandes oder einer Explosion, eines elektrischen Schlags, Sachschäden, Verletzungen von Personen oder Tod zu vermeiden, wenn Sie dieses Gerät verwenden, müssen Sie grundlegende Sicherheitsvorkehrungen treffen, einschließlich der folgenden: GRUNDLEGENDE SICHERHEITSHINWEISE • Lassen Sie Kinder nicht auf oder in dem Gerät...
  • Seite 101: Wartung Und Entsorgung

    Wichtige Sicherheitshinweise ACHTUNG Um das Risiko eines Brandes oder einer Explosion, eines elektrischen Schlags, Sachschäden, Verletzungen von Personen oder Tod zu vermeiden, wenn Sie dieses Gerät verwenden, müssen Sie grundlegende Sicherheitsvorkehrungen treffen, einschließlich der folgenden: • Öffnen Sie die Türe nicht während des Betriebs. können Verfärbungen verursachen, wenn sie auf die Die Leistung des Produkts könnte nachteilig beeinflusst Oberfläche des Produkts aufgebracht werden.
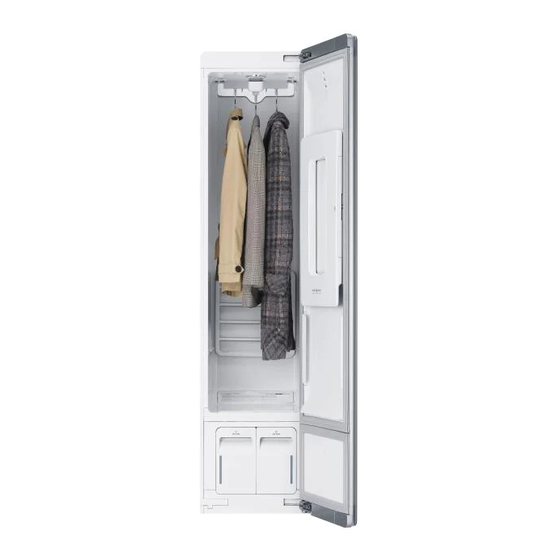
  • Seite 102: Produktübersicht

    PRODUKTÜBERSICHT PRODUKTÜBERSICHT BAUTEILE Innenbeleuchtung Haken für die Hosenpresse beweglicher Aufhänger Innenbeleuchtung Hosenpresse Regalhalter Tür* Regal Duftfilter Dampfdüse Ventilator zur Zirkulation der warmen Luft Wasserablaufbehälter Wasservorratsbehälter Abtropfschale * Der Türanschlag kann durch den Installateur gewechselt werden, sodass sich die Öffnung dem Aufstellort anpasst.
  • Seite 103: Zubehör

    HINWEIS • Kontaktieren Sie das Geschäft, in dem Sie das Produkt erworben haben oder den LG Kundendienst unter wenn Zubehörteile beschädigt sind oder fehlen. • Für Ihre Sicherheit und für eine längere Lebensdauer, verwenden Sie nur zugelassene Komponenten. Der Hersteller ist nicht für die Fehlfunktion des Gerätes oder Unfälle durch die Nutzung von separat erworbenen...
  • Seite 104: Der Bewegliche Aufhänger

    Hosenpresse ausgelegt ist. Dieser Programm kann • Pullover oder Strickwaren legen Sie auf das Regal, damit mit der LG Smart-Styler App heruntergeladen und als Abdrücke eines Kleiderbügels vermieden werden. heruntergeladenes Programm verwendet werden. • Die Kleidung sollte sicher aufgehängt werden, deswegen müssen Sie die Reißverschlüsse und Knöpfe schließen,...
  • Seite 105: Das Regal

    PRODUKTÜBERSICHT DAS REGAL WÄHLEN DER STYLER FUNKTION Verwenden Sie das Regal, wenn die Kleidung oder andere Artikel schwer aufzuhängen sind oder diese beim Trocknen Artikel Ausführung mit beschädigt werden könnten. Anzug, Blazer beweglicher Aufhänger Mantel, Jacke (kurz) beweglicher Aufhänger beweglicher Aufhänger Mantel (lang) (Regal entfernen) Kleid (kurz)
  • Seite 106: Installation

    INSTALLATION INSTALLATION INSTALLATIONSÜBERSICHT Bitte lesen Sie nach dem Kauf zuerst die folgenden Installationsanweisungen oder wenn das Gerät an einen anderen Standort transportiert werden muss. Entfernen Sie das Innen- und Außenmaterial des Schrankes Packen Sie das Gerät aus Überprüfen und wählen Sie Richten Sie den Styler aus und entfernen Sie das den richtigen Standort...
  • Seite 107: Den Styler Auspacken

    INSTALLATION DEN STYLER AUSPACKEN • Vor dem Gebrauch entfernen Sie das Klebeband und ACHTUNG alle temporären Etikette von dem Styler. Entfernen Sie keine Warnschilder, das Typenschild mit • Zwei oder mehr Personen müssen den Styler dem Modell und der Seriennummer oder die Tech- bewegen und installieren.
  • Seite 108: Anforderungen Des Aufstellorts

    INSTALLATION ANFORDERUNGEN DES AUFSTELLORTS Lesen Sie alle Installationsanweisungen vor der Installation und der Inbetriebnahme des Styler's. Es ist WARNUNG wichtig, das gesamte Handbuch vor der Installation und Verwendung des Styler's zu lesen. Die Installation erfordert: • Eine geerdete Steckdose muss sich innerhalb von 61 • Ein stabiler Boden der das gesamte Gerätegewicht cm (2 ft.) an der Seite des Gerätes befinden.
  • Seite 109 INSTALLATION Empfohlener Einbauabstand Folgende Abstände werden für den Styler empfohlen. Obwohl der Styler für einen Abstand von (1 Zoll) 3 cm an den Seiten und hinten getestet wurde, werden die Abstände 20 cm (7 ¾ Zoll) aus den folgenden Gründen empfohlen: • Zusätzlicher Abstand sollte für eine einfache Installation und Wartung berücksichtigt werden.
  • Seite 110: Den Styler Ausrichten

    INSTALLATION DEN STYLER AUSRICHTEN ACHTUNG ACHTUNG • Der Styler ist schwer. Zwei oder mehr • Um die Gefahr von Verletzungen zu Personen müssen bereit sein, wenn die hintere verringern, beachten Sie sämtliche Nivellierung stattfindet. Bei Nichtbeachtung empfohlenen Sicherheitsvorkehrungen und können Rückenverletzungen oder andere tragen Sie lange Arbeitshandschuhe sowie Verletzungen verursacht werden.
  • Seite 111: Türanschlag Wechseln

    Kind oder einen Erwachsenen zu wechseln. Wenn Sie den Türanschlag nach der kippen. Auch durch ein übermäßiges Gewicht auf der Installation wechseln möchten, kontaktieren Sie den LG offenen Tür oder im Inneren des Gerätes kann der Styler Kundendienst unter kippen.
  • Seite 112: Montage Der Abtropfschale

    INSTALLATION MONTAGE DER ABTROPFSCHALE ABDECKKAPPEN INSTALLIEREN Bevor Sie den Styler verwenden, setzen Sie die 1 Richten Sie die Noppen der Abtropfschale am Boden des Gerätes ein. Abdeckkappe mit den Löchern in der 1 Halten Sie die Schale so, dass der Pfeil und die oberen Ecke des Gehäuses aus.
  • Seite 113: Betrieb

    HINWEIS Entfernen Sie Klebstoffreste, indem Sie sie mit dem Daumen oder Spülmittel abwischen. Zubehör auspacken. Packen Sie das Regal und die Kleiderbügel aus. Zubehör kann separat beim LG Kundendienst erworben werden. Montage der Abtropfschale. Setzen Sie die Abtropfschale am Boden des Gehäuses ein.
  • Seite 114: Den Styler Benutzen

    BETRIEB DEN STYLER BENUTZEN 1 ARTIKEL VORBEREITEN • Wenn nötig, waschen Sie die Artikel zuerst. • Keine wärmeempfindliche Artikel oder Gegenstände, die durch Einwirkung von Wasser beschädigt werden können, eingeben. • Hängen Sie die Artikel auf Kleiderbügel oder legen Sie sie auf das Regal. • Sind Knöpfe vorhanden, knöpfen Sie die Kleidungsstücke zu, bei Reißverschlüssen schließen Sie den Reißverschluss, so dass Einzelteile auf den beweglichen Kleiderbügeln nicht verrutschen und Schaden vermieden werden kann.
  • Seite 115: Sortieren Der Beladung

    BETRIEB SORTIEREN DER BELADUNG Gruppierung ähnlicher Artikel • Für das beste Ergebnis bei der Textilpflege, behandeln Textilpflegeetiketten Sie immer Textilien mit ähnlichen Pflegeanforderungen Die meisten Kleidungsstücke verfügen über ein zusammen. Textilpflegeetikett, das auf die richtige Pflege hinweist. Im • Verschiedene Textilien verfügen über unterschiedliche Folgenden sind einige der Symbole aufgeführt, die für die Pflegeanforderungen, und einige Textilien können nicht Auswahl geeigneter Artikel für den Styler relevant sind.
  • Seite 116: Anleitung Für Die Textilpflege

    BETRIEB ANLEITUNG FÜR DIE TEXTILPFLEGE  = ja § = Etikett überprüfen Control Lock Control Lock Control Lock Refresh-Programm Sanitary Gentle Dry Entfernen Stoffart Kleidung Kommentare Entfernen Programm Programm der Falten Gerüchen Handtücher, Falten können bei 100% Socken, Unter- Baum- Baumwollgewebe nicht entfernt ...
  • Seite 117 BETRIEB ANLEITUNG FÜR DIE TEXTILPFLEGE (FORTSETZUNG)  = ja § = Etikett überprüfen Control Lock Control Lock Control Lock Refresh-Programm Sanitary Gentle Dry Entfernen Stoffart Kleidung Kommentare Entfernen Programm Programm der Falten Gerüchen Anzug-Futter,     Acetate Blusen, Krawatten, Pyjamas Thermo- Legen Sie die Kleidung...
  • Seite 118: Prüfen Sie Vor Jeder Beladung Die Filter

    BETRIEB PRÜFEN SIE VOR JEDER BELADUNG DIE Wechseln der Dufttücher Verwenden Sie ein Dufttuch, um Ihrer Kleidung einen FILTER erfrischenden Duft zu geben. Nach dem Gebrauch entfernen Sie das Dufttuch. Überprüfen Sie den Flusenfilter Achten Sie immer darauf, dass der Flusenfilter sauber ist, 1 Entfernen Sie den Duftfilter aus dem Styler.
  • Seite 119: Wasserbehälter Überprüfen

    BETRIEB WASSERBEHÄLTER ÜBERPRÜFEN DEN STYLER BELADEN Überprüfen Sie vor dem Gebrauch das Wasser in den VORSICHT Wasserbehältern. Der Wassertank für die Wasserzufuhr muss vor der Verwendung des Styler's mit Wasser gefüllt werden. • Überprüfen Sie alle Taschen, um Der Styler funktioniert ohne Wasser nicht. Der Wassertank sicherzustellen, dass sie leer sind.
  • Seite 120: Kleiderbügel

    BETRIEB Kleiderbügel Verwendung des beweglichen Aufhängers Die Kleiderbügel, die mit dem Styler geliefert wurden, sind 1 Hängen Sie die Kleiderbügel in die vorgesehenen nur für die Verwendung mit dem Styler gedacht. Jeder Schlitze und drücken Sie die Haken für einen festen Kunststoff- oder Metall-Kleiderbügel, der über einen Haken mit weniger als 4 mm Dicke (5/32 Zoll) verfügt und genau Sitz leicht herunter.
  • Seite 121 BETRIEB Den Kleiderbügel für Hosen öffnen und schließen Wie man die Hosenpresse verwendet 1 Um den Bügel zu öffnen müssen Sie den Haken des 1 Öffnen Sie die Hosenpresse Bügels nach unten in Richtung der Auflagen klappen und durch Drücken des Symbols auf dann die Auflagen auseinander drücken.
  • Seite 122: Regal

    BETRIEB Regal • Hängen Sie das Regal auf die Regalhalterung, wenn lange Kleidung wie Mäntel oder Kleider behandelt Verwenden Sie das Regal für die Kleidung und Artikel, werden. die nicht auf Kleiderbügeln platziert werden kann. Auf dem Regal keine Artikel übereinander legen. Für eine optimale Trockenleistung verwenden Sie das Regal für einzelne Kleidungsstücke oder kleinere Artikel mit Abstand dazwischen.
  • Seite 123: Bedienfeld

    ④ OPTIONS- UND WARNANZEIGE Legen Sie ein mit einem NFC Chip ausgestattetes Delay On: leuchtet, wenn die Delay On Funktion Smartphone über dieses Symbol, um die LG Smart-Styler- eingestellt wurde. Anwendung über das NFC (Near Field Communication) Tag zu verwenden.
  • Seite 124 Ausgehfertig und das Hosen Pflege Extra Programm. Laden Sie ein neues Programm auf eine dieser Positionen, indem Sie es mit einem NFC fähigen Smartphone über die LG Smart Styler Anwendung herunterladen. Berühren Sie das Symbol drei Sekunden lang, um die Smart- Diagnose ™...
  • Seite 125: Programm-Anleitung

    BETRIEB PROGRAMM-ANLEITUNG Programmablauf Programm Einstellung Kleidungs-/Textil-Typ Preparing Heating Steaming Sanitizing Drying Anzug, Mantel, Schuluniform, Schal,    Normal Wolle, Strickwaren, Outdoor-/ Sportkleidung, Handtücher, Unterwäsche, T-Shirts, Socken,    Light Jeans, Jeansjacken, Dessous, Sportbekleidung, Tischdecken 100% Wolle, Polyester, Rayon, ...
  • Seite 126: Ein Programm Auswählen

    BETRIEB EIN PROGRAMM AUSWÄHLEN Special Care Die Styler Programme sind für eine Vielzahl an Downloaded 1 oder Downloaded 2 Verwendungsmöglichkeiten geeignet. Wählen Sie ein Verwenden Sie die Programmplätze Downloaded 1 und 2, Programm und die Einstellung, die am besten den zu um zwei Programme nach Wahl hinzuzufügen.
  • Seite 127: Programm-Einstellungen Und -Optionen

    Wasser und ein zischendes Geräusch, da Dampf 3 Berühren Sie Start/Pause. aufbereitet wird, um ihn auf die Kleidung zu sprühen. • Laden Sie die LG Smart-Styler-App auf ein Smartphone • Der bewegliche Aufhänger bewegt sich auch, wenn herunter und verwenden Sie die App, um das aktuelle nur das Regal verwendet wird.
  • Seite 128: Sonderfunktionen

    Verwenden Sie diese Funktion mit der LG Smart-Styler-App • Die Tastensperre verriegelt nicht die Tür. auf ihrem Smartphone, oder wenden Sie sich an den LG- • Die Einstellung für die Tastensperre bleibt erhalten, Kundendienst, um Probleme mit dem Styler festzustellen.
  • Seite 129: Aufbewahrungsfunktion

    BETRIEB AUFBEWAHRUNGSFUNKTION Die Aufbewahrungsfunktion ist aktiviert. HINWEIS • Nach der Fertigstellung des Programmes, geht das ausgewählte Programm automatisch in die Aufbewahrungsfunktion über. • Während dem Trockenprogramm ist keine Aufbewahrungsfunktion ausgewählt. • Nachdem die Aufbewahrungsfunktion eingegeben ist und Sie das Power Symbol berührt haben, wird die Einstellung freigeschaltet.
  • Seite 130: Smart Features

    Modelle.) Download Funktion bequem mit Ihrem Smartphone. So verwenden Sie die Funktion Tag On: 1 Laden Sie die App LG Smart Styler auf Ihr Smartphone herunter. 2 Schalten Sie bei Ihrem Smartphone die NFC-Funktion (NFC - Near Field Communication) ein.
  • Seite 131: Styler Programme Herunterladen

    SMART FEATURES Styler Programme herunterladen Die LG Smart Styler App erlaubt Ihnen mit der Funktion Smart Programm Downloaded für eine später Verwendung herunterzuladen. Die heruntergeladenen Programme finden Sie auf dem Bedienfeld unter den Programmplätzen Downloaded, bis Sie andere Programme zur Verwendung herunterladen.
  • Seite 132: Wartung

    WARTUNG WARTUNG Reinigen Sie den Flusenfilter Entfernen Sie, nach jedem Programm, die Flusen aus dem REGELMÄSSIGES REINIGEN Filter. Wenn der Flusenfilter sehr verschmutzt oder verstopft ACHTUNG ist, waschen Sie den Filter in warmem Seifenwasser und Um die Gefahr von Bränden, Stromschlägen oder trocknen ihn gründlich bevor Sie ihn wieder einsetzen.
  • Seite 133: Entsorgung Ihrer Altgeräte

    Produkt ursprünglich erworben haben oder Sie kontaktieren Ihre Gemeindeabfallstelle für Informationen über die nächstgelegene autorisierte WEEE Sammelstelle. Die aktuellsten Informationen für Ihr Land finden Sie unter www.lg.com/global/recycling • Informationen über fluorierte Treibhausgase, die für diesen Trockner als Kältemittel eingesetzt werden.
  • Seite 134: Fehlerbehebung

    WARTUNG FEHLERBEHEBUNG FAQ: Häufig gestellte Fragen Was sind Dufttücher und wie verwende ich sie? Sie können Ihre Lieblings-Marke für die Dufttücher im Duftfilter verwenden, um die Artikel mit einem erfrischenden Duft zu behandeln. Die Tücher sorgen nicht für weiche Kleidung und reduzieren die statische Aufladung nicht.
  • Seite 135: Bevor Sie Sich An Den Kundendienst Wenden

    WARTUNG BEVOR SIE SICH AN DEN KUNDENDIENST WENDEN Ihr Gerät verfügt über ein automatisches Fehlerüberwachungssystem, das Probleme in einem frühen Stadium erkennt und diagnostiziert. Wenn das Gerät nicht richtig funktioniert oder gar nicht funktioniert, überprüfen Sie die folgenden Punkte, bevor Sie sich mit dem Kundendienst in Verbindung setzen.
  • Seite 136 WARTUNG Betrieb Problem Mögliche Ursache Lösungen Bedienfeld reagiert nicht Bedienfeld oder Taste ist verschmutzt Schmutz oder Fremdkörper auf dem Bedienfeld stören die Bedienung der Tasten. Reinigen Sie das Bedienfeld. Bedienfeld ist gesperrt Deaktivieren Sie die Tastensperre. Das Programm startet nicht Start/Pause wurde nicht berührt, Berühren Sie Start/Pause.
  • Seite 137: Fehlercodes

    WARTUNG Leistung Problem Mögliche Ursache Lösungen Falten am Kragen des Artikel zu groß für den Kleiderbügel Verwenden Sie die richtige Kleiderbügelgröße für Kleidungsstückes nach dem oder die Textilien sind zu empfindlich das Kleidungsstück, damit es frei hängt und keine Programm Falten verursacht.
  • Seite 138: Smart Diagnosis

    SMART DIAGNOSIS SMART DIAGNOSIS™ Sollte ein Problem mit Ihrem Gerät auftreten, dann können Sie die Daten mit Ihrem Smartphone mittels der LG Smart-Styler- App oder über Ihr Telefon an den LG Kundendienst übertragen. Smart Diagnosis ™ kann nur dann aktiviert werden, wenn Ihr Gerät mittels der Power-Taste eingeschaltet wurde. Wenn das Gerät nicht eingeschaltet werden kann, dann muss die Fehlersuche ohne Verwendung von Smart-Diagnosis™...
  • Seite 139 MANUALE DEL PROPRIETARIO STYLER Si prega di leggere il manuale del proprietario con attenzione prima di usare l'elettrodomestico e di tenerlo a portata di mano per riferimento in qualsiasi momento. S3*ERB www.lg.com...
  • Seite 140 CONTENUTI CONTENUTI CONTROLLARE I FILTRI PRIMA DI OGNI CARATTERISTICHE DEL PRODOTTO CARICO Controllare il filtro antipelucchi IMPORTANTI ISTRUZIONI DI Sostituire il foglio di aroma SICUREZZA CONTROLLARE I SERBATOI D'ACQUA ISTUZIONI DI SICUREZZA PER L'INSTALLAZIONE CARICAMENTO DELLO STYLER Appendiabiti ISTRUZIONI DI SICUREZZA PER IL COLLEGAMENTO ELETTRICO Utilizzare l'appendiabiti mobile PRECAUZIONI DI SICUREZZA DI BASE...
  • Seite 141: Caratteristiche Del Prodotto

    CARATTERISTICHE DEL PRODOTTO CARATTERISTICHE DEL PRODOTTO RIMOZIONE DEGLI ODORI Utilizzare il ciclo Refresh di Styler per rimuovere rapidamente e facilmente gli odori dagli indumenti. Control Lock RINFRESCARE GLI INDUMENTI O AGGIUNGERE UN AROMA Impregna i tuoi capi con l'aroma dei tuoi fogli preferiti di ammorbidente per asciugatrice per mantenere indumenti e accessori con un aspetto, una sensazione e un profumo di fresco.
  • Seite 142: Importanti Istruzioni Di Sicurezza

    IMPORTANTI ISTRUZIONI DI SICUREZZA IMPORTANTI ISTRUZIONI DI SICUREZZA LEGGERE TUTTE LE ISTRUZIONI PRIMA DI UTILIZZARE L'ELETTRODOMESTICO. Sono stati forniti molti messaggi di sicurezza importanti in questo manuale e sul vostro elettrodomestico. Siate sempre pronti ad applicare tutti i messaggi di sicurezza. Questo è...
  • Seite 143 è destinato all'uso su aerei o autorizzato prima di installare o imbarcazioni. Informarsi presso un ricollocare lo Styler per evitare lesioni centro assistenza LG per l'utilizzo in altre o danni al prodotto quando si sposta il circostanze speciali. prodotto.
  • Seite 144 IMPORTANTI ISTRUZIONI DI SICUREZZA AVVERTENZA Per la vostra sicurezza, le informazioni di questo manuale devono essere applicate per rendere minimo il rischio di incendio, esplosione o scossa elettrica, o per evitare danni alla proprietà, ferimento delle persone, o la loro morte. ISTUZIONI DI SICUREZZA PER L'INSTALLAZIONE • con tutti i codici e le ordinanze vigenti.
  • Seite 145 • Il presente apparecchio dev'essere elettrica. inserito in una presa messa a terra da • Contattare immediatamente LG o un 220-240 VCA, 50-Hz protetta da un riparatore qualificato per la sostituzione fusibile da 15 ampere o interruttore.
  • Seite 146: Precauzioni Di Sicurezza Di Base

    IMPORTANTI ISTRUZIONI DI SICUREZZA IMPORTANTI ISTRUZIONI DI SICUREZZA LEGGERE TUTTE LE ISTRUZIONI PRIMA DI UTILIZZARE L'ELETTRODOMESTICO. AVVERTENZA Per ridurre il rischio di incendio o esplosione, scossa elettrica, danni alla proprietà o evitare ferimenti alle persone o morte quando usano questo elettrodomestico, seguire le precauzioni di sicurezza di base, comprendenti le seguenti: PRECAUZIONI DI SICUREZZA DI BASE • Non consentire ai bambini di giocare al di...
  • Seite 147: Manutenzione E Smaltimento

    IMPORTANTI ISTRUZIONI DI SICUREZZA AVVERTENZA Per ridurre il rischio di incendio o esplosione, scossa elettrica, danni alla proprietà o evitare ferimenti alle persone o morte quando usano questo elettrodomestico, seguire le precauzioni di sicurezza di base, comprendenti le seguenti: • Non aprire lo sportello durante il funzionamento. prodotto.
  • Seite 148: Panoramica Sul Prodotto

    PANORAMICA SUL PRODOTTO PANORAMICA SUL PRODOTTO PARTI luce interna ganci antipiega per pantaloni appendiabiti mobile luce interna Antipiega per pantaloni supporto del ripiano sportello* ripiano filtro degli aromi ugello del vapore condotto di circolazione dell'aria calda Serbatoio di serbatoio di scarico alimentazione dell'acqua dell'acqua...
  • Seite 149 NOTA • Contattare il negozio in cui è stato acquistato il prodotto o l'assistenza clienti LG in caso di accessori danneggiati o mancanti. • Per la sicurezza dell'utente e una durata del prodotto estesa, utilizzare esclusivamente componenti autorizzati.
  • Seite 150 Antipiega per pantaloni. Tale ciclo può essere • Tutto ciò che non può essere collocato saldamente scaricato utilizzando l'app LG Smart Styler e utilizzato su un appendiabiti e vaporizzato o asciugato senza come ciclo scaricato.
  • Seite 151 PANORAMICA SUL PRODOTTO IL RIPIANO SCEGLIERE LE FUNZIONI DI STYLER Utilizzare il ripiano quando si trattano abiti difficili da come effettuare il appendere o che si potrebbero danneggiare con se capo trattamento asciugati appesi. abito, cappotto, giacca appendiabiti mobile cappotto, giacca, (corto) appendiabiti mobile appendiabiti mobile cappotto (lungo)
  • Seite 152: Panoramica Sull'installazione

    INSTALLAZIONE INSTALLAZIONE PANORAMICA SULL'INSTALLAZIONE Leggere prima le seguenti istruzioni d'installazione dopo l'acquisto del presente prodotto o il trasporto in un'altra posizione. Rimuovere il materiale dall'interno e l'esterno dell'armadio Disimballare e rimuovere il Controllare e scegliere la Mettere in piano lo Styler materiale di spedizione posizione appropriata Invertire l'apertura dello...
  • Seite 153 INSTALLAZIONE DISIMBALLAGGIO DELLO STYLER • Rimuovere nastro ed etichette temporanee dallo AVVERTENZA Styler prima dell'uso. Non rimuovere le etichette di avvertenza, l'etichetta • Utilizzare due o più persone per spostare del modello e numero di serie, o la scheda tecnica o installare lo Styler.
  • Seite 154 INSTALLAZIONE REQUISITI DELLA POSIZIONE D'INSTALLAZIONE Leggere integralmente le istruzioni d'installazione prima di installare e azionare lo Styler. E' AVVERTENZA importante analizzare l'intero manuale prima di installare e utilizzare lo Styler. L'installazione richiede: • Una presa elettrica messa a terra posizionata entro 2 • Un pavimento robusto per supportare il peso ft.(61 cm) da uno dei lati dell'apparecchio.
  • Seite 155 INSTALLAZIONE Spaziatura d'installazione raccomandata Si raccomanda di lasciare gli spazi seguenti installando lo Styler. Benché Styler sia stato testato per spazi 7 ¾ in. vuoti di 1 inch (3 cm) sui lati e il retro, gli spazi vuoti (20 cm) raccomandati devono essere considerati per le ragioni seguenti: • Si deve considerare spazio aggiuntivo per facilitare...
  • Seite 156: Mettere In Piano Lo Styler

    INSTALLAZIONE METTERE IN PIANO LO STYLER AVVERTENZA AVVERTENZA • L'elettrodomestico è pesante. Utilizzare due o più persone per installare i piedini di • Per ridurre il rischio di danno alle persone, livellamento posteriori.La mancata osservanza applicare tutte le procedure di sicurezza di quanto precede può...
  • Seite 157 Centro informazioni clienti LG • Installare il dispositivo antiribaltamento imballato con lo Styler per ridurre il rischio di ribaltamento.
  • Seite 158 INSTALLAZIONE MONTAGGIO DELLA VASCHETTA INSTALLARE LE COPERTURE DEI RACCOGLIACQUA CAPPUCCI Prima di utilizzare lo Styler, inserire la vaschetta 1 Allineare le sporgenze sulla copertura raccogliacqua sul fondo dell'armadio. del cappuccio con i fori dell'angolo superiore dell'armadio. 1 Tenere la vaschetta in modo che la freccia e la lettera sulla parte anteriore della vaschetta siano rivolte verso 2 Inserire in sede la copertura del l'alto.
  • Seite 159 Rimuovere il residuo di adesivo strofinandolo con il pollice o detergente per i piatti. Disimballaggio degli accessori. Disimballare ripiano e appendiabiti. Gli accessori si possono acquistare separatamente presso il Centro informazioni clienti LG. Montare la vaschetta raccogliacqua. Inserire la vaschetta raccogliacqua sul fondo dell'armadio.
  • Seite 160 FUNZIONAMENTO UTILIZZO DELLO STYLER 1 PREPARAZIONE DEI CAPI • Se necessario, lavare prima i capi. • Nessun capo sensibile al calore o capi che si possano danneggiare con l'esposizione all'acqua. • Collocare i capi su appendiabiti o ripiano. • Chiudere bottoni e cerniere per mantenere i capi sugli appendiabiti e prevenire i danni.
  • Seite 161 FUNZIONAMENTO SCELTA DEI CARICHI Raggruppare capi simili • Per i migliori risultati di trattamento dei tessuti, Etichette di trattamento tessuti raggruppare sempre insieme i tessuti con requisiti di La maggior parte degli indumenti reca etichette di trattamento simili. • Tessuti differenti hanno requisiti di trattamento trattamento dei tessuti che includono le istruzioni per la differenti e alcuni tessuti non possono essere trattati loro cura.
  • Seite 162 FUNZIONAMENTO GUIDA AL TRATTAMENTO DEI TESSUTI  = sì § = controllare l'etichetta Control Lock Control Lock Control Lock Ciclo Refresh Ciclo Ciclo Gentle rimozione tessuto indumenti commenti rimozione Sanitary delle degli odori pieghe asciugamani, Nei tessuti al 100% calze, biancheria, cotone le pieghe jeans, ...
  • Seite 163 FUNZIONAMENTO GUIDA AL TRATTAMENTO DEI TESSUTI (CONTINUA)  = sì § = controllare l'etichetta Control Lock Control Lock Control Lock Ciclo Refresh Ciclo Ciclo Gentle tessuto indumenti commenti rimozione rimozione Sanitary delle pieghe degli odori fodere di vestiti, camicette,  ...
  • Seite 164 FUNZIONAMENTO CONTROLLARE I FILTRI PRIMA DI OGNI Sostituire il foglio di aroma Utilizzare un foglio di ammorbidente per asciugatrice per CARICO aggiungere un aroma rinfrescante ai capi. Sostituire il foglio di ammorbidente dopo ogni utilizzo. Controllare il filtro antipelucchi Accertare sempre che il filtro antipelucchi sia pulito prima 1 Rimuovere il filtro per gli aromi dallo Styler.
  • Seite 165 FUNZIONAMENTO CONTROLLARE I SERBATOI D'ACQUA CARICAMENTO DELLO STYLER Controllare l'acqua nei serbatoi dell'acqua prima dell'uso. CAUTELA Il serbatoio dell'alimentazione dell'acqua dev'essere riempito d'acqua prima di utilizzare lo Styler. Lo Styler • Controllare tutte le tasche per accertarsi senza acqua non funziona. Il serbatoio di scarico che siano vuote.
  • Seite 166 FUNZIONAMENTO Appendiabiti Utilizzare l'appendiabiti mobile Gli appendiabiti in dotazione con lo Styler sono 1 Inserire gli appendiabiti nelle fessure e tirare verso il da utilizzare esclusivamente con lo Styler. Tutti gli basso per fissare saldamente i ganci appendiabiti in plastica o metallo che abbiano un gancio I ganci devono inserirsi saldamente nelle fessure per di spessore inferiore a 5/32 in.(4 mm) e si inseriscano impedire rumore, vibrazioni o danni ai capi durante il...
  • Seite 167 FUNZIONAMENTO Apertura e chiusura dell'Appendipantaloni Utilizzare l'Antipiega per pantaloni. 1 Per aprire, piegare il gancio verso le lame 1 Aprire l'Antipiega per dell'appendiabiti per sbloccare e separare le pantaloni premendo l'icona lame. sulla parte laterale. gancio lame dell'appendiabiti 2 Una volta inseriti i pantaloni, avvicinare le lame e ruotare il gancio verso l'alto e lontano dalle lame per bloccarle in sede.
  • Seite 168 FUNZIONAMENTO Ripiano • Appendere il ripiano sul porta-ripiano quando si trattano abiti lunghi come cappotti o vestiti. Utilizzare il ripiano per indumenti e articoli che non si possono collocare sull'appendiabiti. Non impilate i capi sul ripiano. Per le migliori prestazioni di asciugatura, utilizzare il ripiano per un capo singolo o capi più...
  • Seite 169: Pannello Di Controllo

    ICONA TAG ON annullerà il ciclo e le impostazioni del ciclo andranno Collocare lo smartphone dotato di NFC su questa icona perse. per utilizzare l'applicazione LG Smart Styler utilizzando i tag NFC (Near Field Communication). ③ INDICATORE DI COMPLETAMENTO DEL CICLO Questa pozione del display mostra quale fase del ciclo di ⑧...
  • Seite 170 FUNZIONAMENTO il ciclo Pronto a uscire e Trattamento pantaloni extra dei pantaloni. Scaricare un nuovo ciclo in questa posizione utilizzando l'applicazione LG Smart Styler su uno smartphone dotato di NFC. Premere e tenere premuto per tre secondi per attivare la funzione Smart Diagnosis™.
  • Seite 171: Guida Ai Cicli

    FUNZIONAMENTO GUIDA AI CICLI Processi dei cicli Ciclo Impostazione Tipo indumenti/tessuto Preparing Heating Steaming Sanitizing Drying vestito, cappotto, uniforme    Normal scolastica, sciarpa, capi in lana e maglia, indumenti da esterno/ prestazione, asciugamani,    biancheria, t-shirt, calze, jeans, Light giacche in jeans, biancheria intima, abbigliamento sportivo...
  • Seite 172 FUNZIONAMENTO SCEGLIERE UN CICLO Special Care I cicli di Styler sono progettati per adattarsi a una varietà Downloaded 1 o Downloaded 2 di situazioni. Selezionare il ciclo e l'impostazione che Utilizzare i cicli scaricati 1 e 2 per aggiungere due meglio corrisponde al contenuto del carico e ai risultati funzioni.
  • Seite 173 3 Premere Avvio/Pausa vapore viene spruzzato sugli indumenti. È normale. • Scaricare e utilizzare l'app LG Smart Styler su uno • L'appendiabiti mobile si sposterà anche quando smartphone per confermare il ciclo scaricato corrente viene utilizzato solo il ripiano.
  • Seite 174: Funzioni Speciali

    Styler su uno smartphone o quando si contatta il centro accensione. assistenza LG per diagnosticare i problemi di Styler. • Il Blocco del controllo non blocca lo sportello. • L'impostazione di Blocco del controllo viene conservata anche in caso di interruzione di corrente.
  • Seite 175 FUNZIONAMENTO FUNZIONE CONSERVAZIONE La funzione conservazione è impostata NOTA • Una volta completato, un funzionamento selezionato condurrà alla funzione di conservazione. • Durante il funzionamento di asciugatura, non è impostata alcuna funzione di conservazione. • Una volta che la funzione di conservazione viene inserita e il pulsante di accensione premuto, l'impostazione viene disattivata.
  • Seite 176 Utilizzare Tag On con App Utilizzare la funzione Tag On Sfiorare il logo Tag On di LG Styler con uno smartphone dotato di NFC e l'app LG Smart Styler utilizzerà la 1 Cercare l'icona Tag On accanto al pulsante funzione Tag On function.
  • Seite 177 Download dei cicli di Styler L'app Smart Download Cycle di LG Smart Styler consente di scaricare un ciclo per un utilizzo successivo. Il ciclo è disponibile alla posizione Ciclo scaricato sul pannello di controllo finché viene scaricato un altro ciclo.
  • Seite 178 MANUTENZIONE MANUTENZIONE Pulire il filtro antipelucchi. Rimuovere sempre i pelucchi dal filtro dopo ogni ciclo. PULIZIA REGOLARE Vedere Controllare il filtro antipelucchi, pagina 24. Se il filtro antipelucchi è troppo sporco o intasato, lavare il AVVERTENZA filtro antipelucchi in acqua saponata e lasciare asciugare Per ridurre il rischio di incendio, scossa elettrica, prima di reinstallare.
  • Seite 179 MANUTENZIONE 1 Pulire l'esterno dei serbatoi con un panno umido. 3 Accertarsi che l'ugello di scarico collegato al serbatoio di scarico dell'acqua e il foro di alimentazione dell'acqua collegato al serbatoio di alimentazione dell'acqua non 2 Utilizzare una spazzola o detergente per pulire l'interno siano intasati.
  • Seite 180: Risoluzione Dei Problemi

    MANUTENZIONE RISOLUZIONE DEI PROBLEMI FAQ: DOMANDE FREQUENTI Cosa sono i fogli di aroma e come posso utilizzarli? E' possibile utilizzare la propria marca preferita di fogli di ammorbidente per asciugatrice nel filtro per aromi impregnando i capi di aroma rinfrescante. I fogli non ammorbidiscono gli indumenti né riducono l'elettricità...
  • Seite 181: Prima Di Contattare L'assistenza

    MANUTENZIONE PRIMA DI CONTATTARE L'ASSISTENZA Il vostro apparecchio è dotato di sistema di monitoraggio degli errori automatico per rilevare e diagnosticare i problemi in fase precoce. Se il vostro apparecchio non funziona correttamente o per nulla, controllare quanto segue prima di contattare l'assistenza.
  • Seite 182 MANUTENZIONE Funzionamento Problema Causa possibile Soluzioni Il pannello di controllo non Il pannello di controllo o i pulsanti Sporco o oggetti estranei sul pannello di risponde sono sporchi controllo interferiscono con il funzionamento dei pulsanti. Pulire il pannello di controllo. Il pannello di controllo è...
  • Seite 183: Codici Di Errore

    MANUTENZIONE Prestazioni Problema Causa possibile Soluzioni Grinze nella parte Capo troppo grande per Utilizzare l'appendiabiti della giusta dimensione posteriore del collo dopo il l'appendiabiti o tessuto troppo per il capo in modo che il tessuto non si ciclo delicato ammucchi causando pieghe Alcuni tessuti sono delicati e si ammucchiano intorno all'appendiabiti qualsiasi cosa si faccia.
  • Seite 184 In caso di problemi, l'apparecchio ha la capacità di trasmettere i dati allo smartphone dell'utente utilizzando l'applicazione LG Smart Styler o attraverso il telefono al Centro informazioni clienti LG. Smart Diagnosis™ può essere attivato solo se l'apparecchio viene acceso premendo il pulsante di accensione. Se l'apparecchio non si accende, si deve eseguire la risoluzione dei problemi senza utilizzare Smart Diagnosis™.

Inhaltsverzeichnis