Herunterladen Inhalt Inhalt Diese Seite drucken

Werbung

Verfügbare Sprachen
  • DE

Verfügbare Sprachen

  • DEUTSCH, seite 34
SAMPLEPAD PRO
User Guide
English ( 2 – 9 )
Guía del usuario
Español ( 10 – 17 )
Guide d'utilisation
Français ( 18 – 25 )
Guida per l'uso
Italiano ( 26 – 33 )
Benutzerhandbuch
Deutsch ( 34 – 42 )
Appendix
English ( 43 )

Werbung

Inhaltsverzeichnis
loading

Inhaltszusammenfassung für Alesis SAMPLEPAD PRO

  • Seite 1 SAMPLEPAD PRO User Guide English ( 2 – 9 ) Guía del usuario Español ( 10 – 17 ) Guide d’utilisation Français ( 18 – 25 ) Guida per l'uso Italiano ( 26 – 33 ) Benutzerhandbuch Deutsch ( 34 – 42 )
  • Seite 3: Connection Diagram

    Safety Instructions & Warranty Information Booklet Support For product registration, visit alesis.com. For the latest information about this product (system requirements, compatibility information, etc.), visit alesis.com/samplepad-pro. For additional product support, visit alesis.com/support. Connection Diagram Kick Pad* ("Trigger") Power Media player*...
  • Seite 4: Top Panel Features

    Aux In - Connect a phone, CD player, or media player to this input using a stereo 1/8" cable. Aux In Volume - Adjusts the level of the device connected to the Aux Input. Power Switch - Press this button to turn SamplePad Pro on. Hold this button for two seconds and release to turn SamplePad Pro off.
  • Seite 5: Lcd Screen

    LCD Screen Kit - Displays the name of the kit that is currently being edited. Sample Location - Displays the location of the sample assigned to the velocity layer being edited. Sample Name - Displays the sample that is currently assigned to the velocity layer of the trigger location being edited.
  • Seite 6 • The max number of files that can be located in the root directory is 512. • When a .WAV file is selected, it will take a few seconds to load into the memory. • SamplePad Pro supports mono or stereo .WAV files, with a sample rate of 48K, 44.1K, 32K, 22.05K, and 11.025K.
  • Seite 7: Mute Groups

    • STOP After the pad or ext. trigger is struck, all samples currently being played by SamplePad Pro will be muted. • Strike the pad or ext. trigger several times in the TMP mode to set the tempo of the metronome.
  • Seite 8: Footswitch

    7/4, 7/8, 7/16, 8/2, 8/4, 8/8, 8/16, 9/2, 9/4, 9/8, and 9/16. Footswitch The footswitch input of SamplePad Pro supports both standard 1/4" TS single-button and 1/4" TRS dual-button footswitches. For 1/4" TS single-button footswitches, you can only assign one...
  • Seite 9: Factory Reset

    • Send Program Changes: Sets whether SamplePad Pro will send program changes over the MIDI Send Channel when a kit is changed. The available parameters are Yes and No. • Ext. Clock: Sets whether the SamplePad Pro will send or receive MIDI Clock. This feature can also be set to OFF. Load Samples/Kits Via USB •...
  • Seite 10: Contenido De La Caja

    Para registrar el producto, visite alesis.com. Para obtener la información más reciente acerca de este producto (requisitos de sistema, información de compatibilidad, etc.), visite alesis.com/samplepad-pro. Para soporte adicional del producto, visite alesis.com/support. Diagrama de conexión Pad de bombo* ("Disparador") Suministro eléctrico...
  • Seite 11 Volumen de la entrada auxiliar - Ajusta el nivel del dispositivo conectado a la entrada auxiliar. Interruptor de encendido - Pulse este botón para encender el SamplePad Pro. Mantenga pulsado este botón durante dos segundos y suéltelo para apagar el SamplePad Pro.
  • Seite 12: Pantalla Lcd

    Salida MIDI - Utilice un cable MIDI estándar de cinco patillas para conectar esta salida a la ENTRADA MIDI de un dispositivo MIDI externo. Puerto USB/MIDI- Conecte el SamplePad Pro a un ordenador para enviar y recibir datos MIDI o para cargar muestras en la tarjeta SD.
  • Seite 13 • Cuando se selecciona un archivo .WAV, demora algunos segundos en cargarse en la memoria. • SamplePad Pro es compatible con archivos .WAV mono o estéreo con frecuencia de muestreo de 48 K, 44.1 K, 32 K, 22.05 K y 11.025 K.
  • Seite 14 • PARAR Tras golpear un pad o disparador externo, todas las muestras actualmente en reproducción en el SamplePad Pro se silenciarán. • Golpee el pad o disparador externo varias veces en modo TMP para establecer el tempo del metrónomo. •...
  • Seite 15: Menú De Opciones

    Menú de opciones El menú de opciones del SamplePad Pro contiene ajustes globales que afectan la operación general así como también la información y las funciones relacionadas con el sistema.
  • Seite 16: Interruptor De Pedal

    MIDI cuando se cambia un kit. Los parámetros disponibles son Yes (Sí) y No. • Ext. Clock (Reloj externo): Establece si el SamplePad Pro enviará o recibirá un reloj MIDI. Esta característica también puede ajustarse en OFF (Apagada). Carga de muestras/kits por USB •...
  • Seite 17: Restablecimiento De Los Valores De Fábrica

    Para restablecer los kits internos y ajustes globales a los valores de fábrica, mantenga pulsados los botones cursor izquierdo y cursor derecho mientras enciende el SamplePad Pro. Esto no afectará a las muestras o kits almacenados en su tarjeta SD.
  • Seite 18: Contenu De La Boîte

    Consignes de sécurité et informations concernant la garantie Assistance technique Pour l'enregistrement du produit, veuillez visiter alesis.com. Pour les toutes dernières informations concernant ce produit (la configuration système requise, la compatibilité, etc.), veuillez visiter alesis.com/samplepad-pro. Pour de l’assistance supplémentaire, veuillez visiter alesis.com/support.
  • Seite 19: Caractéristiques Du Panneau Supérieur

    Volume de l’entrée auxiliaire – Ce bouton permet d'ajuster le niveau d’entrée de l’appareil branché à l’entrée auxiliaire. Interrupteur d’alimentation – Cette touche permet de mettre le SamplePad Pro sous et hors tension. Maintenez cette touche enfoncée pendant deux secondes et relâchez-la pour mettre le SamplePad Pro hors tension.
  • Seite 20: Fonctionnement De Base

    Sortie MIDI – Utilisez un câble MIDI à cinq broches afin de brancher cette sortie à l’entrée MIDI IN d’un appareil MIDI externe. Port USB/MIDI – Ce port permet de brancher le SamplePad Pro à un ordinateur pour envoyer et recevoir des données MIDI ou pour charger des échantillons sur la carte SD.
  • Seite 21 • Lorsqu'un fichier .wav est sélectionné, cela prend quelques secondes pour le charger en mémoire. • Le SamplePad Pro prend en charge les fichiers .wav mono et stéréo avec des fréquences d’échantillonnage de 48 K, 44,1 K, 32 K, 22,05 K et 11,025 K.
  • Seite 22 STOP (Arrêt) Après que le pad ou le déclencheur externe est frappé, tous les échantillons en cours de lecture par le SamplePad Pro sont mis en sourdine. • Frappez le pad ou le déclencheur externe plusieurs fois en mode TMP afin de régler le tempo du métronome.
  • Seite 23: Menu Options

    Menu Options Le menu Options du SamplePad Pro contient les réglages globaux qui affectent le fonctionnement global, ainsi que des informations et fonctions système.
  • Seite 24: Interrupteur Au Pied

    MIDI (Send Channel) lorsqu’un kit est modifié. Les paramètres sont Yes (oui) et No (non). • Ext. Clock : Définit si le SamplePad Pro transmet ou reçoit les données d’horloge MIDI (MIDI Clock). Cette fonction peut également être désactivée (OFF).
  • Seite 25: Réinitialisation Des Paramètres D'usine

    Pour réinitialiser les kits internes et les paramètres globaux aux paramètres d'usine par défaut, maintenez les deux touches de déplacement horizontales enfoncées lors de la mise sous tension du SamplePad Pro. Cela n'affectera pas les échantillons ou les kits sauvegardés sur votre carte SD.
  • Seite 26: Schema Dei Collegamenti

    Istruzioni di sicurezza e garanzia Studiare lo schema dei collegamenti. Assistenza Per la registrazione del prodotto, recarsi alla pagina alesis.com. Per le ultime informazioni in merito a questo prodotto (requisiti di sistema, informazioni sulla compatibilità, ecc.) recarsi alla pagina alesis.com/samplepad-pro.
  • Seite 27: Caratteristiche Pannello Superiore

    1/8". Volume aux In - Regola il livello del dispositivo collegato all'ingresso Aux. Interruttore di alimentazione Power - Premere questo tasto per accendere il SamplePad Pro. Tenere questo tasto premuto per due secondi e rilasciarlo per spegnere il SamplePad Pro.
  • Seite 28: Schermo Lcd

    MIDI Out (uscita MIDI) – Servirsi di un cavo MIDI standard a cinque poli per collegare questa uscita all’ingresso MIDI di un dispositivo MIDI esterno. Porta USB/MIDI Port - Collegare il SamplePad Pro a un computer per inviare e ricevere dati MIDI o caricare campioni sulla scheda SD.
  • Seite 29 • Il numero massimo di file che possono trovarsi nella directory principale è 512. • Quando un file .Wav viene selezionato, occorreranno pochi secondi per caricarlo nella memoria. • Il SamplePad Pro supporta file WAV mono o stereo con una frequenza di campionamento di 48K, 44,1K, 32K, 22,05K, e 11,025K.
  • Seite 30 Dopo aver battuto un pad o un trigger esterno, il campione continuerà ad essere riprodotto dall'inizio, dopo aver raggiunto la fine del campione. Per interrompere il loop, battere nuovamente il pad o il trigger esterno. • STOP Dopo aver battuto il pad o il trigger esterno, tutti i campioni attualmente riprodotti dal SamplePad Pro saranno silenziati.
  • Seite 31: Menu Opzioni

    Battere un altro pad o trigger esterno, navigare fino all'MGRP e servirsi dei tasti Cursore sinistro o Cursore destro per impostare questo pad sullo stesso numero impostato per il primo pad. Menu Opzioni Il menu Opzioni del SamplePad Pro contiene impostazioni globali che influiscono sul funzionamento complessivo, nonché su informazioni e sistemi relativi al sistema.
  • Seite 32: Interruttore A Pedale

    MIDI quando un kit viene modificato. I parametri disponibili sono Sì e No. • Ext. Clock: stabilisce se il SamplePad Pro invia o riceve MIDI Clock. Questa funzione può anche essere impostata su OFF.
  • Seite 33 Possibilità di caricare campioni/kit tramite USB • Dopo aver selezionato questa funzione, il SamplePad Pro si collega al proprio Mac o PC tramite il collegamento USB per una facile gestione della scheda SD. Per uscire da questa modalità, tenere premuti il Cursore sinistro e il Cursore su del SamplePad Pro per due secondi.
  • Seite 34: Lieferumfang

    Besuchen Sie alesis.com, um Ihr Produkt zu registrieren. Die neuesten Informationen zu diesem Produkt (Systemanforderungen, Informationen zur Kompatibilität etc.) finden Sie auf alesis.com/samplepad-pro. Um weitere Unterstützung zu Ihrem Produkt zu erhalten, besuchen Sie alesis.com/support. Anschlussdiagramm Kick Pad* ("Trigger") Externes MIDI-Gerät...
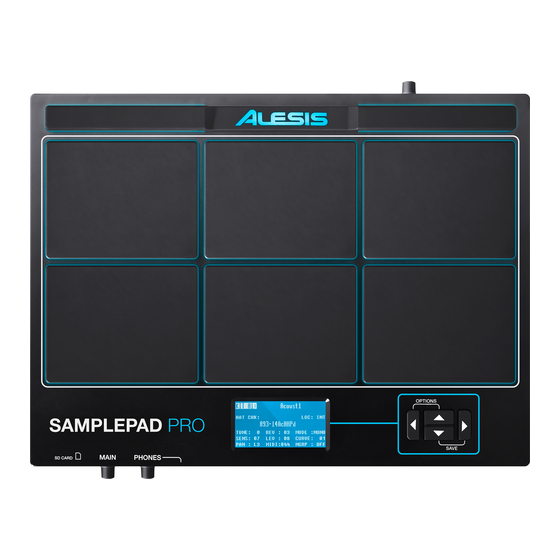
  • Seite 35: Elemente Der Oberseite

    Aux In - Schließen Sie Telefon, CD-Player oder Media-Player über ein 1/8"-Stereokabel an diesen Eingang an. Aux In Pegel - Stellt den Pegel des Geräts ein, das an den Aux-Eingang angeschlossen ist. Ein-/Ausschalter - Drücken dieser Taste, um SamplePad Pro ein- und auszuschalten. Halten Sie diese Taste zwei Sekunden lang gedrückt, um SamplePad Pro auszuschalten.
  • Seite 36: Lcd-Bildschirm

    MIDI Out - Verwenden Sie ein handelsübliches MIDI-Kabel mit 5 Pins, um diesen Ausgang mit dem MIDI IN eines externen MIDI-Geräts zu verbinden. USB/MIDI-Anschluss- Verbinden Sie SamplePad Pro mit einem Computer, um MIDI-Daten zu senden oder zu empfangen oder Samples auf die SD-Karte zu laden.
  • Seite 37 • Die maximale Anzahl von Wave-Dateien im Stammverzeichnis ist 512. • Das Laden einer ausgewählten Wave-Datei dauert einige Sekunden. • SamplePad Pro unterstützt Mono und Stereo Wave-Dateien mit einer Samplerate von 48K, 44.1K, 32K, 22.05K und 11.025K. • Wenn keine SD-Karte eingesteckt ist, kann kein Speicherort auf der Karte ausgewählt werden.
  • Seite 38: Bearbeiten Von Layer-Parametern

    Bearbeiten von Layer-Parametern So stellen Sie die Tonhöhe eines Samples ein: Schlagen Sie auf ein Pad oder den ext. Trigger. Bewegen Sie den Cursor auf den Bereich TUNE, indem Sie die Tasten Cursor Aufwärts oder Cursor Abwärts drücken. Drücken Sie dann die Tasten Cursor Links oder Cursor Rechts, um das Tuning anzupassen. [-4, -3, -2, -1, 0, 1, 2, 3, 4] So stellen Sie den Reverb-Anteil eines Samples ein: Schlagen Sie auf ein Pad oder den ext.
  • Seite 39 STOP Nachdem das Pad oder der ext. Trigger angeschlagen wurde, werden alle Samples, die derzeit von SamplePad Pro abgespielt werden, stumm geschaltet. • Schlagen Sie das Pad oder den ext. Trigger im TMP-Modus mehrmals an, um das Tempo des Metronoms einzustellen.
  • Seite 40: Optionsmenü

    Optionsmenü Das Optionsmenü von SamplePad Pro enthält die globalen Einstellungen, die den gesamten Betrieb sowie systembezogene Informationen und Funktionen betreffen. So gelangen Sie in das Optionsmenü und ändern diese globalen Einstellungen: Halten Sie die Tasten Cursor Aufwärts und Cursor Abwärts 2 Sekunden lang gedrückt, um das Optionsmenü...
  • Seite 41: Fußschalter

    • Senden von Programmwechsel: Legt fest, ob SamplePad Pro Programmwechsel über den MIDI-Sendekanal sendet, wenn ein Kit geändert wird. Die verfügbaren Parameter sind Ja und Nein. • Ext. Uhr: Legt fest, ob SamplePad Pro MIDI Clock sendet oder empfängt. Diese Funktion kann auch auf OFF gestellt werden. Laden von Samples/Kits via USB •...
  • Seite 42: Speichern Eines Kits

    Um die internen Kits und globalen Einstellungen auf die Werkseinstellungen zurückzusetzen, halten Sie die Tasten Cursor Links und Cursor Rechts beim Einschalten des SamplePad Pro gedrückt. Dies wirkt sich nicht auf Samples oder Kits aus, die auf der SD-Karte gespeichert sind.
  • Seite 43: Appendix (English)

    11.025K. Trademarks and Licenses Alesis is a trademark of inMusic Brands, Inc., registered in the U.S. and other countries. SD is a trademark of SD-3C, registered in the U.S. and other countries. All other product or company names are trademarks or registered trademarks of their respective owners.
  • Seite 44 Manual Version 1.1...

Inhaltsverzeichnis