Herunterladen Inhalt Inhalt Diese Seite drucken

Werbung

Verfügbare Sprachen
  • DE

Verfügbare Sprachen

  • DEUTSCH, seite 41
DS 1716-001
MONITOR AIKO
AIKO MONITOR
MONITEUR AIKO
MONITOR AIKO
MONITOR AIKO
Sch./Ref. 1716/1 -/2
Mod.
1716
LBT 8484

Werbung

Inhaltsverzeichnis
loading

Inhaltszusammenfassung für urmet domus AIKO 1716/1

  • Seite 1 Mod. 1716 DS 1716-001 LBT 8484 MONITOR AIKO AIKO MONITOR MONITEUR AIKO MONITOR AIKO MONITOR AIKO Sch./Ref. 1716/1 -/2...
  • Seite 2 ITALIANO I videocitofoni Aiko Sch. 1716/1 e Sch. 1716/2 sono dedicati all’utilizzo sui sistemi 2Voice. DESCRIZIONE DEI COMPONENTI E CARATTERISTICHE Display Microfono Indicazione mute chiamata inserito (led verde) Indicazione apriporta automatico attivo (led verde) Indicazione messaggi presenti (led verde) Indicazione porta aperta o segnalazione di assenza inserita (led rosso) Pulsante apriporta Pulsanti di navigazione Pulsante apriporta passo carraio...
  • Seite 3: Installazione

    INSTALLAZIONE Murare la scatola incasso all’altezza indicata nel disegno seguente. Fissare la staffa alla scatola incasso. Eseguire i collegamenti e le impostazioni dei dip-switch. Al termine della programmazione fi ssare il videocitofono alla staffa. DESCRIZIONE DEI MORSETTI LINE IN Connessione al BUS di sistema LINE OUT Connessione al successivo dispositivo per connessione entra e esci Ripetizione di chiamata Ripetizione di chiamata...
  • Seite 4 § Per le impostazioni dei dip-switch fare riferimento al libretto di sistema fornito a corredo dell’alimentatore Sch. 1083/20. CODE: codice utente. Impostare un numero da 0 a 127 secondo le regole seguenti: • Nella colonna non ci devono essere appartamenti diversi con lo stesso codice utente. •...
  • Seite 5: Risposta Alla Chiamata

    Terminazione Terminazione Terminazione LINE OUT Terminazione LINE OUT LINE OUT LINE IN LINE 3 LINE 1 LINE 3 LINE 1 1083/55 1083/55 LINE 4 LINE 2 LINE 4 LINE 2 LINE IN LINE IN PRESTAZIONI RICEZIONE DELLE CHIAMATE E FUNZIONE ‘PALLEGGIAMENTO VIDEO’ Alla ricezione di una chiamata, il posto interno dell’utente squilla con la melodia impostata a seconda della provenienza: •...
  • Seite 6: Suoneria Supplementare

    MUTE ALTOPARLANTE SUONERIA Questa funzione permette di escludere la suoneria di chiamata. Per attivare questa funzione premere il tasto . Quando questa è attivata il led MUTE si accende ed alla ricezione della chiamata il dispositivo non suonerà. SUONERIA SUPPLEMENTARE Il videocitofono è...
  • Seite 7 CHIAMATA A CENTRALINO Questa funzione permette di entrare in comunicazione con il centralino di portineria: premere il tasto per inviare la chiamata al centralino. Se entro 10 s non vi è risposta alla chiamata il videocitofono si spegne e la chiamata verrà memorizzata nel centralino. §...
  • Seite 8: Apriporta Automatico

    MENU Per accedere al menu generale del videocitofono premere il tasto MENU. Appare la seguente schermata: In ogni momento è possibile tornare in standby tenendo premuto il tasto X per almeno 3 secondi. § Se la colonna è impegnata in una conversazione il dispositivo non si accenderà e verrà generato dal dispositivo un tono di dissuasione.
  • Seite 9 SEGRETERIA VIDEOCITOFONICA In caso di presenza di video messaggi registrati, il led lampeggia lentamente. Per accedere ai messaggi: • Premere il tasto MENU per accedere al menu. • Selezionare l’icona e premere OK. § Questa funzione sarà disponibile se sull’impianto è presente la segreteria videocitofonica centralizzata di colonna.
  • Seite 10 Modifi care un record della rubrica Per modifi care un record della rubrica: • Premere il tasto MENU per accedere al menu. • Selezionare l’icona premere OK. • Selezionare l’icona premere OK e selezionare l’icona • Selezionare il record che si vuole modifi care e premere OK. •...
  • Seite 11: Caratteristiche Tecniche

    Selezionare YES per confermare il reset o selezionare NO per tornare indietro. • § L’operazione di Reset non cancella la rubrica CARATTERISTICHE TECNICHE Tensione di alimentazione: ......................36 ÷ 48Vdc Assorbimento a riposo: ........................3mA max Assorbimento max: ........................160mA max Temperatura di funzionamento: ....................-5°C ÷...
  • Seite 12 ENGLISH Aiko video door phones Ref. 1716/1 and Ref. 1716/2 are designed to be used in 2Voice systems. COMPONENTS DESCRIPTION AND CHARACTERISTICS Display Microphone Indication of “mute function” active (green led) Indication of automatic door lock release active (green led) Indication of present messages (green led) Indication of open door or absence active (red led) Door lock release button...
  • Seite 13: Installation

    INSTALLATION Fix the fl ush mounting box at the height shown in the following fi gure. Fasten the bracket to the embedding box. Perform connections and dip-switch settings. At the end of programming, fasten the video door phone to the bracket. TERMINAL PINS DESCRIPTION LINE IN Connection to the system BUS...
  • Seite 14 § For dip switch settings, see the system manual provided with the power supply Ref. 1083/20. CODE: user code. Set a number from 0 to 127, according to the following rules: • In the column there must not be any apartments with the same user code. •...
  • Seite 15 FEATURES CALL RECEPTION AND ‘VIDEO TRANSFER’ FUNCTION When a call is received, the user apartment station rings with the programmed tone, according to the source: • From main door unit • From secondary door unit • From Intercom • From fl oor call •...
  • Seite 16 This menu will be displayed over the image coming from the door unit • Select (Loudspeaker volume), (Brightness), (Contrast), (Colour) using directional buttons Up/Down. • Select the desired value using directional buttons Right/Left • Press (OK) to confi rm; press (X) to cancel or press MENU to quit the setting menu. FLOOR CALL The video door phone is equipped with a pair of terminal pins (CP) for the connection of a fl...
  • Seite 17 § If the system is busy, the user can not access the menu. Intercom call using quick selection keys The fi rst 4 users of the video door phone directory can be called using quick selection keys; the fi rst 4 users are associated to directional buttons as follows: User 1 - User 2 -...
  • Seite 18: Automatic Door Lock Release

    MARIO ROSSI PAOLO BIANCHI < > AUTOMATIC DOOR LOCK RELEASE The automatic door lock release function allows to directly open the door after receiving a call. To activate this function: • Press the button MENU to access the menu. • Select the icon and press OK.
  • Seite 19 VIDEO DOOR PHONE DIRECTORY Up to 32 calls can be included in the video door phone directory (calls to users and special calls). Adding a record to the directory To add a name to the directory: Press the button MENU to access the menu. •...
  • Seite 20: Technical Characteristics

    • Select the icon and press OK. • Select the icon to adjust the ringer volume with directional buttons Right/Left, select to adjust audio volume, and select BEEP to activate or not the button beep. • After confi guration, press OK to confi rm. VIDEO ADJUSTMENTS In this menu the user can adjust brightness, contrast, colour and themes (5 available themes) of the menu.
  • Seite 21 FRANÇAIS Les vidéophones Aiko Réf. 1716/1 et Réf. 1716/2 ont été projetés pour être utilisés dans les systèmes 2Voice. DESCRIPTIONS DES PARTIES ET CARACTÉRISTIQUES Écran Microphone Indication de fonction «appel muet» (mute) actif (led verte) Indication d’ouvre-porte automatique actif (led verte) Indication de présence de messages (led verte) Indication de porte ouverte ou signal d’absence actif (led rouge) Touche ouvre-porte...
  • Seite 22: Description Des Bornes

    INSTALLATION Fixer le boîtier en encastrement à la hauteur montrée dans le dessin suivant. Fixer la bride sur le boîtier à encastrer. Faire les connexions et confi gurer les dip-switch. A la fi n de la programmation, fi xer le vidéophone/interphone sur la bride. DESCRIPTION DES BORNES LINE IN Connexion au BUS de système...
  • Seite 23 § Pour les confi gurations des dip switch, consulter le livret de système livré avec l’alimentation Réf. 1083/20. CODE: code utilisateur. Confi gurer un numéro de 0 à 127 selon les règles suivantes: • Dans la colonne il ne doit pas y avoir d’appartements différents avec le même code utilisateur; •...
  • Seite 24 Terminaison Terminaison Terminaison LINE OUT Terminaison LINE OUT LINE OUT LINE IN LINE 3 LINE 1 LINE 3 LINE 1 1083/55 1083/55 LINE 4 LINE 2 LINE 4 LINE 2 LINE IN LINE IN PRESTATIONS RÉCEPTION DES APPELS ET FONCTION ‘TRANSFERT VIDÉO’ Dès la réception d’un appel, le poste interne de l’utilisateur sonne avec la tonalité...
  • Seite 25 FONCTION MUET DU HAUT-PARLEUR DE LA SONNERIE Cette fonction permet d’exclure la sonnerie d’appel. Pour activer cette fonction, appuyer sur la touche . Quand la fonction est activée, la led MUTE s’allume et le dispositif ne sonnera pas à l’arrivée d’un appel. SONNERIE SUPPLÉMENTAIRE Le vidéophone est équipé...
  • Seite 26 APPEL À LA CENTRALE Cette fonction permet d’établir une communication avec la centrale de conciergerie: appuyer sur la touche pour envoyer l’appel à la centrale. Si dans 10 secondes il n’y a pas de réponse à l’appel, le vidéophone s’éteint et l’appel sera mémorisé dans la centrale. §...
  • Seite 27: Ouvre-Porte Automatique

    MENU Pour accéder au menu général du vidéophone appuyer sur la touche MENU. L’écran affi che: À chaque moment on peut rétablir l’état de repos en appuyant sur la touche X pendant 3 secondes § Si la colonne est occupée dans une conversation, le dispositif ne s’allumera pas et émettra une tonalité de dissuasion.
  • Seite 28 RÉPONDEUR DE VIDÉOPHONE S’il y a des messages vidéo enregistrés, la led clignote lentement. Pour accéder aux messages: Appuyer sur la touche MENU pour accéder au menu. • • Sélectionner l’icône et appuyer sur OK. § Cette fonction sera disponible si le système est équipé d’un répondeur de vidéophone de colonne. CONFIGURATIONS Pour accéder au menu des confi...
  • Seite 29 • Sélectionner l’icône et appuyer sur OK. • Sélectionner l’icône , appuyer sur OK et sélectionner l’icône • Sélectionner l’article qu’on veut modifi er et appuyer sur OK. • Après avoir sélectionné l’article, procéder comme indiqué dans le paragraphe précédent « Ajouter un article au répertoire ».
  • Seite 30: Caractéristiques Techniques

    § L’opération de Restauration n’efface pas le répertoire CARACTÉRISTIQUES TECHNIQUES Tension d’alimentation: ........................36 ÷ 48Vdc Consommation au repos: ........................3mA max Consommation maximale: ......................160mA max Température de fonctionnement: ....................-5°C ÷ +45°C Conformité aux normes: ..................EN61000-6-3, EN61000-6-1 DS1716-001...
  • Seite 31 ESPAÑOL Los vidéointerfonos Aiko Sch. 1716/1 y Sch. 1716/2 son dedicados para el uso en los sistemas 2Voice. DESCRIPCIÓN DE LOS COMPONENTES Y CARACTERÍSTICAS Pantalla Micrófono Indicación llamada muda activa (led verde) Indicación apertura de la puerta automatica activa (led verde) Indicación mensajes presentes (led verde) Indicación puerta abierta o señalación de ausencia activa (led rosso) Tecla apertura puerta...
  • Seite 32: Descripción De Los Bornes

    INSTALLATION Tapiar la caja de encaje en la altura indicada en el diseño siguiente. Fijar el soporte a la caja de empotrar. Efectuar las conexiones y las impostaciones de los interruptores dip. Una vez fi nalizada la programación, fi jar el videointerfono al soporte. DESCRIPCIÓN DE LOS BORNES LINE IN Conexión al BUS del sistema...
  • Seite 33 § Para las impostaciones de los interruptores dip consultar el manual del sistema anexo con el alimentador Sch. 1083/20. CODE: código usuario. Programar un número desde 0 hasta 127 según las siguientes reglas: • En la columna no pueden existir habitaciones diferentes con el mismo código usuario. •...
  • Seite 34 Terminación Terminación Terminación LINE OUT Terminación LINE OUT LINE OUT LINE IN LINE 3 LINE 1 LINE 3 LINE 1 1083/55 1083/55 LINE 4 LINE 2 LINE 4 LINE 2 LINE IN LINE IN PRESTACIONES RECEPCIÓN DE LAS LLAMADAS Y FUNCIÓN ‘INTERCAMBIO VIDÉO’ Con la recepción de una llamada, el interfóno del usuario timbra con la soneria programada a según de la procedencia de la llamada: •...
  • Seite 35 DESACTIVACIÓN SONERÍA ALTAVOZ Esta función permite de excluir la sonería de llamada. Para activar esta función presionar la tecla Cuando la función es activa el led MUTE se enciende y con la recepción de una llamada el dispositivo no emitirá algun sonido. TIMBRE ADICIONAL El vidéointerfono tiene un par de bornes (S+, S-) para la conexión de un timbre adicional o de un relé.
  • Seite 36 LLAMADA HACIA CENTRALITA Esta función permite de entrar en comunicación con la centralita de portería: presionar la tecla para mandar la llamada hacia la centralita. Si en 10s no se obtiene una respuesta a la llamada el vidéointerfono se apaga y la llamada será memorizada en la centralita. §...
  • Seite 37 MENU Para entrar en el menú general del vidéointerfono presionar la tecla MENU. Aparece la siguiente pantalla: En cada momento es posible regresar en descanso presionando la tecla X por almenos 3 segundos. § Si la columna está ocupada en una conversación el dispositivo no se enciende y mandará un señal disuasorio.
  • Seite 38 SECRETERÍA VIDÉOCITOFONICA En caso de presencia de mensajes vidéo grabados, el led relampaguea en manera lenta. Para entrar en los mensajes: • Presionar la tecla MENU para entrar en el menú. • Seleccionar el icono y presionar OK. § Esta función será disponible si en el sistema está instalada la secretería vidéointerfonica centralizada de columna.
  • Seite 39 Cambiar un record de la agenda Para cambiar un record de la agenda: • Presionar la tecla MENU para entrar en el menú. • Seleccionar el icono presionar OK. • Seleccionar el icono presionar OK y seleccionar el icono • Seleccionar el record que se desea cambiar y presionar OK.
  • Seite 40 • Seleccionar el icono y presionar OK. Seleccionar el icono RESET y presionar OK • Seleccionar YES para confi rmar el reajuste o seleccionar NO para regresar atrás. • Sélectionner YES pour confi rmer la restauration ou NO pour revenir en arrière. •...
  • Seite 41: Beschreibung Der Bestandteile Und Merkmale

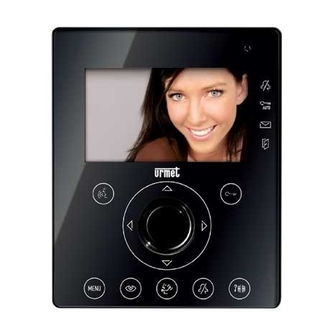
    DEUTSCH Die Videosprechanlagen Aiko Sch. 1716/1 und Sch. 1716/2 sind speziell für den Gebrauch der 2 Voice Systeme entworfen. BESCHREIBUNG DER BESTANDTEILE UND MERKMALE Display Mikrophon Anzeige lautlose Anrufe eingegeben (grünes Led) Anzeige automatischer Türöffner aktiv (grünes Led) Anzeige vorhandene Nachrichten (grünes Led) Anzeige offene Tür oder Abwesenheitssignal eingegeben (rotes Led) Türöffnertaste Navigiertasten...
  • Seite 42: Klemmenbeschreibung

    INSTALLATION Die Unterputzdose in der angegebenen Höhe, (siehe nachfolgende Zeichnung), einbauen. Befestigen Sie den Bügel am Einbaukasten. Die Anschlüsse und die Einstellungen der Dip-Switch ausführen. Befestigen Sie die Gegensprechanlage nach der Programmierung an dem Bügel. KLEMMENBESCHREIBUNG LINE IN Anschluss ans BUS System LINE OUT Anschluss ans nachfolgende Gerät für die Eingang-/Ausgangsverbindung Anrufwiederholung Anrufwiederholung...
  • Seite 43: Einstellung Des Linienabschlusses

    § Für die Einstellungen des Dip-Switch sollte man sich an das mitgelieferte Systemhandbuch des Netzgerätes Sch.1083/20 halten. CODE: Teilnehmercode. Eine Nummer von 0-127 sollte man nach folgenden Richtlinien einstellen: • In derselben Steigleitung darf es keine unterschiedlichen Wohnungen geben, die den gleichen Teilnehmercode haben.
  • Seite 44: Anruferhalt Und Videobildübertragungsfunktion

    Abschluss Abschluss Abschluss LINE OUT Abschluss LINE OUT LINE OUT LINE IN LINE 3 LINE 1 LINE 3 LINE 1 1083/55 1083/55 LINE 4 LINE 2 LINE 4 LINE 2 LINE IN LINE IN LEISTUNGEN ANRUFERHALT UND VIDEOBILDÜBERTRAGUNGSFUNKTION Bei Erhalt eines Anrufs klingelt die Innenstelle beim Teilnehmer mit der jeweils eingestellten Melodie, je nachdem woher der Anruf kommt: •...
  • Seite 45: Mute Lautstärkeneinstellung Des Klingeltons

    MUTE LAUTSTÄRKENEINSTELLUNG DES KLINGELTONS Diese Funktion erlaubt das Ausschalten des Klingeltons. Durch Drücken der Taste wird diese Funktion aktiviert. Bei Aktivierung ist das LED MUTE eingeschaltet und bei Erhalt eines Anrufs klingelt das Gerät nicht. ZUSÄTZLICHER KLINGELTON Die Videosprechanlage ist mit einem Klemmenpaar (S+, S-) ausgestattet, die den Anschluss eines zusätzlichen Klingelton oder eines Relais ermöglicht.
  • Seite 46: Interkommunizierender Anruf

    Es ist nicht möglich, eine Selbsteinschaltung vorzunehmen, wenn sich die Steigleitung schon in einem Gespräch befi ndet. Wenn sich die Steigleitung beim Absenden einer Selbsteingabeanfrage schon in einem Gespräch befi ndet, sendet die Videosprechanlage einen Abschreckton aus. ANRUF AN DIE ZENTRALE Diese Funktion erlaubt es, das Gespräch mit der Pförtner-Zentrale aufzunehmen;...
  • Seite 47: Automatischer Türöffner

    MENÜ Um in das allgemeine Menü der Videosprechanlage zu gelangen, die MENU Taste drücken. Es erscheint folgender Bildschirm: Es ist jederzeit möglich in den Stand-by Modus zurückzukehren, indem man die Taste X mindestens 3 Sekunden lang drückt. § Sollte sich die Steigleitung in einem Gespräch befi nden, schaltet sich das Gerät nicht ein, und ein Abschreckton erfolgt.
  • Seite 48: Anrufbeantworter Der Videosprechanlage

    informieren. Um diese Funktion von der Videosprechanlage aus mit INT = 0 zu aktivieren: • Die MENU Taste drücken, um in das Menü zu gelangen. • Das Symbol wählen und OK drücken. Bei aktivierter Funktion blinkt das Led langsam. ANRUFBEANTWORTER DER VIDEOSPRECHANLAGE Sollten aufgenommene Videonachrichten vorhanden sein, blinkt das Led langsam.
  • Seite 49 das Zeichen wählen, rechts / links Tasten bewegen den Kursor, die Taste X löscht) und zur Bestätigung OK drücken. Für interne Anrufe gelten die erlaubten Codes 0 bis 3 – Für externe Anrufe gelten die erlaubten Codes 0 bis 127 –...
  • Seite 50: Technische Merkmale

    RESET In diesem Menü ist es möglich, das Gerät zu resetten, und alle Einstellungen wie vom Hersteller geliefert, zurückzusetzen. • Die MENU Taste drücken, um in das Menü zu gelangen. • Das Symbol wählen und OK drücken. • Das Symbol RESET wählen und OK drücken. •...
  • Seite 51 DS1716-001...
  • Seite 52 DS 1716-001 LBT 8484 FILIALI SEDE 20151 MILANO - V.Gallarate 218 URMET DOMUS S.p.A. Tel. 02.380.111.75 - Fax 02.380.111.80 10154 TORINO (ITALY) 00043 CIAMPINO (ROMA) V.L. Einaudi 17/19A VIA BOLOGNA 188/C Tel. 06.791.07.30 - Fax 06.791.48.97 Telef. +39 011.24.00.000 (RIC. AUT.) 80013 CASALNUOVO (NA) V.Nazionale delle Puglie 3...

Diese Anleitung auch für:

Aiko 1716/2

Inhaltsverzeichnis