Herunterladen Inhalt Inhalt Diese Seite drucken

Cameo STEAM WIZARD 2000 Bedienungsanleitung

Led fog machine
Vorschau ausblenden Andere Handbücher für STEAM WIZARD 2000:
Inhaltsverzeichnis

Werbung

Verfügbare Sprachen
  • DE

Verfügbare Sprachen

  • DEUTSCH, seite 11
USER´S MANUAL
BEDIENUNGSANLEITUNG
MANUEL D`UTILISATION
MANUAL DE USUARIO
INSTRUKCJA OBSŁUGI
MANUALE D' USO
STEAM WIZARD 2000
LED FOG MACHINE
CLSW2000

Werbung

Inhaltsverzeichnis
loading

Inhaltszusammenfassung für Cameo STEAM WIZARD 2000

  • Seite 1 USER´S MANUAL BEDIENUNGSANLEITUNG MANUEL D`UTILISATION MANUAL DE USUARIO INSTRUKCJA OBSŁUGI MANUALE D‘ USO STEAM WIZARD 2000 LED FOG MACHINE CLSW2000...
  • Seite 2: Inhaltsverzeichnis

    CONTENTS / INHALTSVERZEICHNIS / CONTENU / CONTENIDO / TREŚĆ / CONTENUTO ENGLISH ESPAÑOL PREVENTIVE MEASURES MEDIDAS DE SEGURIDAD 28-29 INTRODUCTION INTRODUCCIÓN CONNECTIONS, OPERATING AND DISPLAY ELEMENTS CONEXIONES, ELEMENTOS DE MANEJO Y ELEMENTOS DE VISUALI- OPERATION ZACIÓN 30-31 CABLE REMOTE CONTROL FUNCIONAMIENTO INSTALLATION AND ASSEMBLY MANDO A DISTANCIA POR CABLE...
  • Seite 3: English

    We have designed this product to operate reliably over many years. Please read this User‘s Manual carefully, so that you can begin making optimum use of your Cameo Light product quickly. Learn more about Cameo Light on our website WWW.CAMEOLIGHT.COM.
  • Seite 4: Introduction

    1. This product has been developed for professional use in the field of event technology and is not intended for use in the home! 2. Use only Cameo fog fluid (water-based) and never add flammable liquid to the container! 3. Switch off the fog machine and disconnect it from the power supply before filling the container! 4.
  • Seite 5: Connections, Operating And Display Elements

    CONNECTIONS, OPERATING AND DISPLAY ELEMENTS POWER IN IEC mains socket with built-in fuse holder. A suitable power cable is included. IMPORTANT: Replace the fuse only with a fuse of the same type and of the same value according to the stamp on the device! In the event of repeated fuse failure, please contact an authorised service centre.
  • Seite 6: Operation

    Switch off the LED fog machine and disconnect it from the power supply before filling the container! Fill the container of the LED fog machine only with Cameo fog fluid (preferably Cameo Fast Fluid) and close it carefully. The fog machine is ready for operation a few minutes after switching on (approx.
  • Seite 7: Installation And Assembly

    TIME Knob for adjustment of time between bursts of the interval function (all the way to the left = continuous bursts / 0 second interval, all the way to the right = approx. 60 seconds interval). An integrated LED indicator lights up as soon as the heating-up phase of the evaporator is complete. MANUAL Button for manual triggering of the combined effect.
  • Seite 8 For traverse installation, two M10 threads are located on the base of the housing (Fig. H) to receive the traverse mounting bolts. (Fig. I, not included). Secure the device via the integrated safety eyelets (Fig. J) and appropriate securing cables (not included). IMPORTANT: Overhead installation must only be carried out by qualified personnel.
  • Seite 9: Dmx Technology

    DMX TECHNOLOGY DMX-512 DMX (Digital Multiplex) is the designation for a universal transmission protocol for communications between corresponding devices and controllers. A DMX controller sends DMX data to the connected DMX device(s). The DMX data is always transmitted as a serial data stream that is forwarded from one connected device to the next via the "DMX IN"...
  • Seite 10: Technical Data

    TECHNICAL DATA Model name: CLSW2000 Product type: Effect fog machine Type: Fog generator operating on evaporation principle combined with LED spotlights Warm-up time: Approximately 5 minutes Colour spectrum LED: RGBA Number of LEDs: LED type: 10 W 4-in-1 DMX input: 3-pin male XLR DMX output: 3-pin female XLR...
  • Seite 11: Deutsch

    Dieses Gerät wurde unter hohen Qualitätsanforderungen entwickelt und gefertigt, um viele Jahre einen reibungslosen Betrieb zu gewähr- leisten. Bitte lesen Sie diese Bedienungsanleitung sorgfältig, damit Sie Ihr neues Produkt von Cameo Light schnell und optimal einsetzen können. Weitere Informationen über Cameo Light erhalten Sie auf unserer Website WWW.CAMEOLIGHT.COM.
  • Seite 12: Einführung

    1. Das Produkt ist für den professionellen Einsatz im Bereich der Veranstaltungstechnik entwickelt worden und ist nicht für den Betrieb in Haushalten geeignet! 2. Verwenden Sie ausschließlich Cameo Nebelfluid (wasserbasierend) und füllen Sie niemals brennbare Flüssigkeiten in den Kanister! 3. Schalten Sie die Nebelmaschine aus und trennen sie vom Netz, bevor Sie den Kanister befüllen! 4.
  • Seite 13: Anschlüsse, Bedien- Und Anzeigeelemente

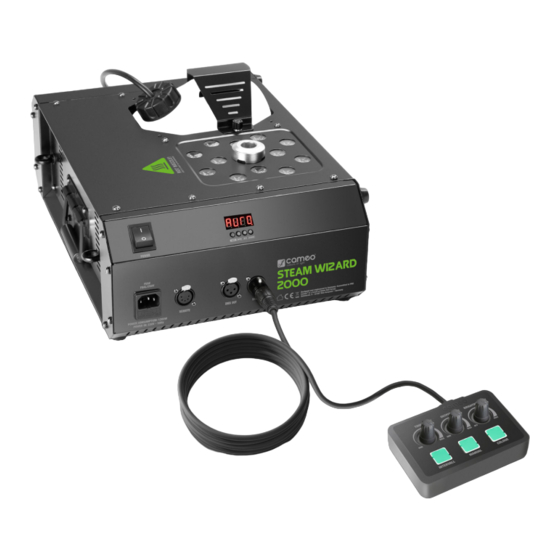
    ANSCHLÜSSE, BEDIEN- UND ANZEIGEELEMENTE POWER IN IEC Netzbuchse mit integriertem Sicherungshalter. Ein geeignetes Netzkabel befindet sich im Lieferumfang. WICHTIGER HINWEIS: Ersetzen Sie die Sicherung ausschließlich durch eine Sicherung des gleichen Typs und mit gleichen Werten entsprechend des Aufdrucks auf dem Gerät! Sollte die Sicherung wiederholt auslösen, wenden Sie sich bitte an ein autorisiertes Servicezentrum. POWER Ein- / Ausschalter für die Spannungszufuhr des Geräts.
  • Seite 14: Bedienung

    Schalten Sie die LED-Nebelmaschine aus und trennen sie stets vom Netz, bevor Sie den Kanister befüllen. Befüllen Sie den Kanister der LED-Nebelmaschine ausschließlich mit Cameo Nebelfluid (vorzugsweise Cameo Fast Fluid) und verschließen ihn sorgfältig. Wenige Minuten nach dem Einschalten ist die LED-Nebelmaschine betriebsbereit (ca. 5 Minuten). Sie verfügt über eine Kanisterbeleuchtung (LED) und das 4-stellige LED-Display, die über den Betriebszustand Auskunft geben.
  • Seite 15: Aufstellung Und Montage

    TIME Regler zum Einstellen der Zeitdauer zwischen zwei Ausstößen für die Intervall-Funktion (Linksanschlag = permanenter Ausstoß / 0 Sekunden Zeitspanne, Rechtsanschlag = ca. 60 Sekunden Zeitspanne). Eine integrierte Anzeige-LED leuchtet, sobald die Aufheizphase des Verdampfers abgeschlossen ist. MANUAL Taster für das manuelle Auslösen des Kombi-Effekts. Die Dauer von Nebelausstoß und Aufleuchten der LEDs entspricht der Haltedauer. Beim Drücken des Tasters leuchtet die Anzeige-LED im Taster.
  • Seite 16 Da die LED-Nebelmaschine in jedem beliebigen Winkel an einer Traverse montiert werden kann, besitzt sie ein Kanisterfach, das von Ober- und Unterseite bestückt werden kann. Bestücken Sie das Kanisterfach von der Unterseite, falls die LED-Nebelmaschine um mehr als 90° geneigt montiert wird. Demontieren Sie hierzu den Kanisterhaltebügel (Abb. D), entnehmen den Kanister und entfernen den Kanisterfachboden von der Unterseite des Gehäuses mit Hilfe eines geeigneten Werkzeugs (Abb.
  • Seite 17: Dmx Technik

    DMX TECHNIK DMX-512 DMX (Digital Multiplex) ist die Bezeichnung für ein universelles Übertragungsprotokoll für die Kommunikation zwischen entsprechenden Geräten und Controllern. Ein DMX-Controller sendet DMX-Daten an das/die angeschlossene(n) DMX-Gerät(e). Die DMX-Datenübertragung erfolgt stets als serieller Datenstrom, der über die an jedem DMX-fähigen Gerät vorhandenen DMX IN- und DMX OUT-Anschlüsse (XLR-Steckverbinder) von einem angeschlossenen Gerät an das nächste weitergeleitet wird, wobei die maximale Anzahl der Geräte 32 nicht überschreiten darf.
  • Seite 18: Technische Daten

    TECHNISCHE DATEN Modellbezeichnung: CLSW2000 Produktart: Effekt-Nebelmaschine Typ: Nebelerzeuger nach Verdampfungsprinzip kombiniert mit LED-Strahlern Aufheizzeit: ca. 5 Minuten Farbspektrum LED: RGBA LED Anzahl: LED Typ: 10W 4in1 DMX-Eingang: 3-Pol XLR männlich DMX-Ausgang: 3-Pol XLR weiblich DMX-Modus: 4-Kanal DMX Funktionen: Nebelmenge, Dimmer, Strobe, Farbmakros, Farbwechsel, Farbüberblenden Funktionen Kabel-Fernbedienung: Nebelmenge, Dimmer, Farbmakros, Farbwechsel, Intervall-Funktion, manuelle Bedienung Steuerung:...
  • Seite 19: Francais

    Cet appareil a été développé et fabriqué en appliquant des exigences de qualité très élevées: il garantit des années de fonctionnement sans problème.Veuillez lire attentivement ce Manuel Utilisateur : vous apprendrez rapidement à utiliser votre appareil Cameo Light de façon optimale.
  • Seite 20: Risque De Brûlure

    1. Ce produit est conçu pour un usage professionnel dans le domaine du spectacle vivant. Il n’est pas destiné à être utilisé par des particuliers ! 2. Utiliser exclusivement le liquide fumigène Cameo (à base d’eau) ; ne jamais verser de liquide inflammable dans le bidon ! 3.
  • Seite 21: Introduction

    INTRODUCTION MACHINE À BROUILLARD À LED CLSW2000 FONCTIONS DE COMMANDE Pilotage DMX sur 4 canaux Télécommande filaire CARACTÉRISTIQUES Machine à brouillard à LED avec 12 LED RGBA 10 W 4-en-1, imite l’effet pyrotechnique, pilotage DMX-512, protection contre les surchauffes et avertissement en cas de bidon vide, pattes en caoutchouc, montage sur traverse dans l’angle voulu, œillets de sécurité à vis, télécommande filaire incluse, tension d’alimentation : 230 V CA / 50 Hz, consommation électrique : 1200 W.
  • Seite 22: Écran À Led

    Couper la tension d’alimentation de la machine à brouillard à LED et la débrancher avant de remplir le bidon. Utiliser exclusivement du liquide fumigène Cameo pour remplir le bidon de la machine à brouillard à LED (de préférence Cameo Fast Fluid). Refermer soigneusement le bidon.
  • Seite 23: Télécommande Filaire

    TÉLÉCOMMANDE FILAIRE INTERVALL Fonction commandant l’émission de fumée et l’illumination des LED. Appuyer sur cette touche pour activer la fonction ; appuyer à nouveau sur la touche pour la désactiver. La durée d’émission de fumée et d’illumination des LED est d’environ 2 secondes. Régler l’intervalle entre deux émissions de fumée à...
  • Seite 24: Installation Et Montage

    INSTALLATION ET MONTAGE La machine à brouillard à LED est munie de quatre pieds en caoutchouc sur sa partie inférieure (fig. A, émission de fumée à la verticale vers le haut) et d’une partie latérale plus fine (fig. B, émission de fumée horizontale) en vue d'une installation sur une surface plane. Pour faciliter le transport, une poignée rabattable est disponible sur le côté...
  • Seite 25: Technique Dmx

    Pour un montage sur traverse, la partie inférieure du boîtier est munie de deux filetages M10 (fig. H), destinés à accueillir les pinces de fixation de la traverse (fig. I, non fournies). Sécuriser l’appareil via un câble de retenue adapté (non fourni) inséré dans les œillets de sécurité prévus à cet effet (fig.
  • Seite 26: Caractéristiques Techniques

    Assignation des contacts Connecteur XLR 3 points Connecteur XLR 5 points Pour utiliser des appareils DMX munis de connecteurs 3 points avec des appareils DMX munis de connecteurs 5 points, il faut utiliser un adaptateur. Assignation des contacts Adaptateur XLR 5 points mâle vers XLR 3 points femelle K3DGF0020 Les points 4 et 5 ne sont pas connectés.
  • Seite 27: Declarations

    DECLARATIONS GARANTIE FABRICANT & LIMITATION DE RESPONSABILITÉ Nos conditions actuelles de garantie et de limitation de responsabilité sont disponibles à l‘adresse suivante : http://www.adamhall.com/media/ shop/downloads/documents/manufacturersdeclarations.pdf. Pour les réparations, veuillez contacter Adam Hall GmbH, Daimlerstraße 9, 61267 Neu Anspach / E-Mail Info@adamhall.com / +49 (0)6081 / 9419-0. TRI ET MISE AUX DÉCHETS CORRECTE DE CE PRODUIT (Valid in the European Union and other European countries with waste separation) (Applicable dans l‘Union Européenne et les autres pays européens pratiquant le tri des déchets) La présence de ce symbole sur le...
  • Seite 28: Español

    Este equipo está diseñado y fabricado con los estándares de calidad más exigentes, para garantizar un correcto funcionamiento durante muchos años.Lea atentamente este manual de usuario para poder aprovechar rápidamente toda la funcionalidad de su nuevo producto de Cameo Light. Más información sobre Cameo Light en la web WWW.CAMEOLIGHT.COM. MEDIDAS DE SEGURIDAD 1.
  • Seite 29 1. El producto ha sido desarrollado para un uso profesional en el sector de la tecnología de eventos y no es apto para uso doméstico. 2. Use exclusivamente líquido para efectos de niebla Cameo (a base de agua) y nunca llene el bidón con líquidos inflamables.
  • Seite 30: Introducción

    INTRODUCCIÓN MÁQUINA DE NIEBLA LED CLSW2000 FUNCIONES DE CONTROL Control DMX de 4 canales Mando a distancia por cable CARACTERÍSTICAS Máquina de niebla LED con 12 focos LED de 10 W 4 en 1 RGBA, efecto similar a pirotecnia, control DMX-512, protección contra sobrecalentamiento y advertencia en caso de bidón vacío, patas de goma, montaje sobre travesaños en el ángulo deseado, anillas roscadas de seguridad, mando a distancia por cable incluido, tensión operativa 230V CA / 50Hz, consumo de potencia 1200W.
  • Seite 31: Funcionamiento

    Antes de llenar el bidón, apague la máquina de niebla LED y desconéctela siempre de la red eléctrica. Llene el bidón de la máquina de niebla LED exclusivamente con líquido para efectos de niebla Cameo (preferiblemente, Cameo Fast Fluid) y ciérrelo con cuidado. Pocos minutos (unos 5) después de encender la máquina de niebla LED, estará...
  • Seite 32: Mando A Distancia Por Cable

    MANDO A DISTANCIA POR CABLE INTERVALL Función de intervalo para la emisión de niebla e iluminación simultánea de las luces LED. Pulse el botón una vez para iniciar la función de inter- valo y púlselo nuevamente para detenerla. La emisión de niebla y la iluminación de las luces LED durarán unos 2 segundos; puede configurar de forma libre el intervalo de tiempo entre dos emisiones mediante el regulador TIME.
  • Seite 33: Instalación Y Montaje

    INSTALACIÓN Y MONTAJE Para facilitar la instalación sobre una superficie plana, la máquina de niebla LED dispone de cuatro patas de goma en la base (Fig. A: emisión de niebla en sentido vertical hacia arriba) y en una fina sección lateral (Fig. B: emisión de niebla en sentido horizontal). Para facilitar el transporte, la máquina cuenta con un mango plegable situado en uno de los finos laterales de la carcasa (Fig.
  • Seite 34: Tecnología Dmx

    Para el montaje sobre travesaños, en la base de la carcasa se encuentran dos piezas con rosca M10 (Fig. H) para montar las abrazaderas de los travesaños (Fig. I, no incluidas en el contenido suministrado). Fije el aparato a las anillas de seguridad integradas (Fig. J) mediante cuerdas de seguridad apropiadas (no incluidas en el contenido suministrado).
  • Seite 35: Datos Técnicos

    TERMINACIÓN DMX (TERMINADOR): Para evitar errores de sistema, debe conectarse una resistencia de terminación (120 ohmios, 1/4 W) en el último equipo de la cadena DMX. XLR aéreo de 3 pines con resistencia de terminación: K3DMXT3 XLR aéreo de 5 pines con resistencia de terminación: K3DMXT5 Asignación de pines: Conector XLR aéreo de 3 pines: Conector XLR aéreo de 5 pines:...
  • Seite 36: Declaración Del Fabricante

    Peso (sin bidón): 8,3kg Otras características: Asa de transporte, bidón y cierre con válvula compensadora de presión y tubo de aspiración incluidos, 2 roscas M10, 2 anillas de seguridad, posibilidad de montaje en cualquier ángulo, compartimento para bidón en la parte superior o inferior, 8 patas de goma, mando a distancia por cable con cable de 10 m DECLARACIÓN DEL FABRICANTE GARANTÍA DEL FABRICANTE Y LIMITACIÓN DE RESPONSABILIDAD...
  • Seite 37: Polski

    To urządzenie zostało zaprojektowane i wyprodukowane przy zastosowaniu najwyższych kryteriów jakościowych w celu zapewnienia wieloletniej bezawaryjnej eksploatacji. Proszę starannie przeczytać niniejszą instrukcję obsługi, aby móc jak najszybciej zacząć użytkować ten produkt marki Cameo Light. Więcej informacji na temat Cameo Light znajdą Państwo na naszej stronie internetowej pod adresem WWW.CAMEOLIGHT.COM.
  • Seite 38 1. Produkt jest przeznaczony do profesjonalnych zastosowań w organizacji imprez i nie nadaje się do użytku domowego! 2. Używaj wyłącznie płynu do wytwornic dymu firmy Cameo (na bazie wody). Nigdy nie wlewaj do kanistra urządzenia cieczy palnych! 3. Przed napełnieniem kanistra wyłącz urządzenie i odłącz zasilanie! 4.
  • Seite 39: Wprowadzenie

    WPROWADZENIE WYTWORNICA DYMU LED CLSW2000 FUNKCJE STEROWANIA Sterowanie DMX 4-kanałowe Pilot przewodowy CHARAKTERYSTYKA Wytwornica dymu LED. 12 diod LED RGBA 4w1 o mocy 10 W, efekt zbliżony do pirotechniki, sterowanie DMX-512, ochrona przed przegrzaniem i ostrzeżenie o pustym kanistrze, gumowe nóżki, montaż na kratownicy pod dowolnym kątem, wkręcane haki oczkowe, pilot przewodowy w zestawie, napięcie robocze 230 V AC / 50 Hz, pobór mocy 1200 W.
  • Seite 40: Obsługa

    Przed napełnieniem kanistra wyłącz wytwornicę dymu LED i odłącz zasilanie! Kanister wytwornicy dymu LED napełniaj wyłącznie płynem firmy Cameo (najlepiej Cameo Fast Fluid). Dokładnie zakręć kanister. Urządzenie jest gotowe do pracy wkrótce po jego włączeniu (ok. 5 minut). Wytwornica dymu jest wyposażona w kontrolkę kanistra (LED) i 4-znakowy wyświetlacz LED, które informują o stanie pracy urządzenia. W ustawieniach fabrycznych kontrolka kanistra i wyświetlacz są...
  • Seite 41: Pilot Przewodowy

    PILOT PRZEWODOWY INTERVALL Funkcja przerw między fazami wyrzutu dymu z jednoczesnym zaświecaniem się diod LED. Naciśnij przycisk, aby włączyć funkcję Intervall. Naciśnij przycisk ponownie, aby ją wyłączyć. Czas wyrzutu dymu i świecenia diod wynosi ok. 2 sekund. Odstęp czasu między dwoma wyrzutami dymu ustaw bezstopniowo pokrętłem TIME.
  • Seite 42: Ustawianie I Montaż

    USTAWIANIE I MONTAŻ Do ustawienia wytwornicy dymu LED na płaskiej powierzchni służą cztery gumowe nóżki na spodzie urządzenia (ryc. A, wyrzut dymu pionowo w górę) oraz cztery gumowe nóżki na węższym boku (ryc. B, wyrzut dymu w poziomie). Bezpieczny transport urządzenia ułatwia składany uchwyt umieszczony na węższym boku obudowy (ryc.
  • Seite 43: Technika Dmx

    Do montażu urządzenia na kratownicy służą dwa gwinty M10 znajdujące się na dole obudowy (ryc. H), do których należy przymocować zaciski do kratownic (ryc. I, nie znajdują się w zestawie). Zabezpiecz urządzenie odpowiednimi linkami (nie znajdują się w zestawie), przeciągając je przez oczka zintegrowanych haków (ryc.
  • Seite 44: Dane Techniczne

    TERMINATOR DMX: Aby zapobiec awariom systemu, należy wyposażyć ostatnie urządzenie w łańcuchu DMX w terminator (120 Ω, 1/4 W). 3-stykowa wtyczka XLR z terminatorem: K3DMXT3 5-stykowa wtyczka XLR z terminatorem: K3DMXT5 Przyporządkowanie wtyczek: 3-stykowa wtyczka XLR: 5-stykowa wtyczka XLR: ADAPTER DMX: Możliwa jest także kombinacja urządzeń...
  • Seite 45: Deklaracje Producenta

    Pozostałe cechy: uchwyt do przenoszenia, kanister i zamknięcie z zaworem wyrównawczym i wężem ssą- cym w zestawie, 2 gwinty M10, 2 zabezpieczające haki oczkowe, montaż pod dowolnym kątem, komora kanistra na górze lub na dole, 8 nóżek gumowych, pilot przewodowy z kablem 10 m DEKLARACJE PRODUCENTA GWARANCJA PRODUCENTA I OGRANICZENIE ODPOWIEDZIALNOŚCI...
  • Seite 46: Italiano

    Questo dispositivo è stato sviluppato e prodotto in conformità con elevati standard qualitativi che ne garantiscono il regolare funzionamento per molti anni. Leggete attentamente questo manuale d‘uso per utilizzare al meglio il vostro nuovo prodotto Cameo Light. Per maggiori informazioni su Cameo Light consultare la nostra pagina Web WWW.CAMEOLIGHT.COM.
  • Seite 47: Pericolo Di Ustioni

    1. Il prodotto è stato progettato per l’uso professionale nell’ambito della tecnologia per eventi e non è adatto per l’uso domestico! 2. Utilizzare esclusivamente il liquido per effetto nebbia Cameo (a base d’acqua) e non versare mai liquidi infiammabili nella tanica! 3.
  • Seite 48: Introduzione

    INTRODUZIONE MACCHINA DEL FUMO LED CLSW2000 FUNZIONI DI CONTROLLO Controller DMX a 4 canali Telecomando con cavo PROPRIETÀ Macchina del fumo LED con 12 LED RGBA da 10 W 4 in 1, effetto simil pirotecnico, comando DMX-512, dispositivo antisurriscaldamento, dispositivo di allarme in caso di tanica vuota, piedini in gomma, montaggio su traverse formando l'angolo desiderato, occhielli a vite di sicurezza, telecomando con cavo incluso, tensione di esercizio 230 V AC / 50 Hz, potenza assorbita 1200 W.
  • Seite 49: Display Led

    Spegnere la macchina del fumo LED e staccarla sempre dalla rete prima di riempire la tanica. Riempire la tanica della macchina del fumo LED soltanto con il liquido per effetto nebbia Cameo (preferibilmente Cameo Fast Fluid) richiudendola con cura. Pochi minuti dopo l'accen- sione, la macchina del fumo LED è...
  • Seite 50: Telecomando Con Cavo

    TELECOMANDO CON CAVO INTERVALL Funzione Intervall per l’emissione della nebbia e l’illuminazione contemporanea dei LED. Premere il tasto per avviare la funzione Intervall e premerlo nuovamente per terminarla. La durata dell’emissione della nebbia e dell’illuminazione dei LED è pari a ca. 2 secondi. Per impostare l’intervallo di tempo tra due emissioni, utilizzare il regolatore TIME a regolazione continua.
  • Seite 51: Installazione E Montaggio

    INSTALLAZIONE E MONTAGGIO Per l’installazione su superfici piane, la macchina del fumo LED dispone di quattro piedini in gomma posizionati sul retro (fig. A, uscita nebbia verticale verso l’alto) e su una piccola parte laterale (fig. B, emissione della nebbia orizzontale). Per agevolare il trasporto, è presente un manico ripiegabile su uno dei lati più...
  • Seite 52: Tecnologia Dmx

    Per il montaggio su traversa, nella parte inferiore dell’alloggiamento sono presenti due filettature M10 (fig. H) per l’applicazione dei dispo- sitivi di fissaggio della traversa (fig. I, non in dotazione). Fissare il dispositivo all’occhiello di sicurezza fornito (fig. J) con cavi di sicurezza adeguati (non in dotazione).
  • Seite 53: Dati Tecnici

    CONNETTORE TERMINALE DMX (TERMINATORE): Per evitare errori di sistema, l'ultimo dispositivo di una catena DMX deve essere dotato di una resistenza di terminazione (120 ohm, 1/4 W). Connettore XLR a 3 poli con resistenza di terminazione: K3DMXT3 Connettore XLR a 5 poli con resistenza di terminazione: K3DMXT5 Configurazione dei connettori: Connettore XLR a 3 poli: Connettore XLR a 5 poli:...
  • Seite 54: Dichiarazioni Del Produttore

    Peso (senza tanica): 8,3kg Altre caratteristiche: manico, tanica e chiusura con valvola di compensazione della pressione e tubo flessibile di aspirazione incluso, 2 filettature M10, 2 occhielli di sicurezza, montaggio secondo l'angolo desiderato, vano tanica nella parte superiore o inferiore, 8 piedini in gomma, telecomando con cavo da 10 m DICHIARAZIONI DEL PRODUTTORE MANUFACTURER’S WARRANTY &...
  • Seite 55: Dmx Control

    DMX CONTROL / DMX STEUERUNG / PILOTAGE DMX / CONTROL DMX / STEROWANIE DMX / CONTROLLO DMX Channel Value Function No function Fog output low -> high Blackout Dimmer low -> high No Strobe Strobe <1Hz -> 30Hz Colour off Colour 1 Red Colour 2 Green Colour 3 Blue...
  • Seite 56 WWW.CAMEOLIGHT.COM Adam Hall GmbH | Daimlerstrasse 9 | 61267 Neu-Anspach | Germany Tel. +49(0)6081/9419-0 | Fax +49(0)6081/9419-1000 web : www.adamhall.com | e-mail : mail@adamhall.com REV: 02...

Diese Anleitung auch für:

Clsw2000

Inhaltsverzeichnis