AmazonBasics B09JWN5F8W Bedienungsanleitung
Inhaltsverzeichnis
Quicklinks
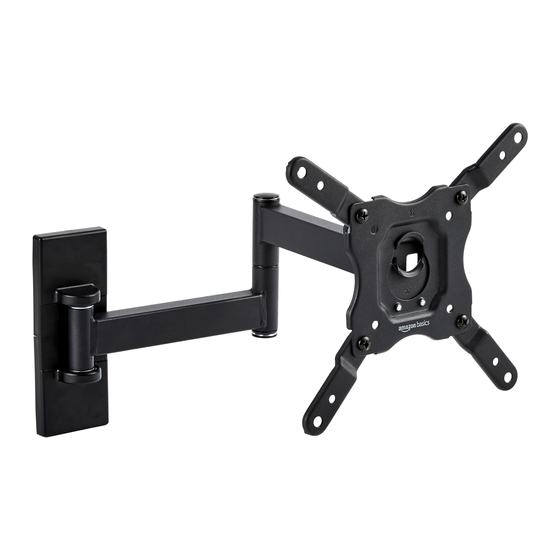
Full Motion
TV wall
Mount
Support Mural Mobile Toutes Directions pour Téléviseurs de 12 Pouces ä 40 Pouces
(30,48
cm ä 101,6 cm)
Vollbewegliche
TV-Wandhalterung
Supporto a Parete per TV Full Motion per TV da 12 Pollici a 40 Pollici
(da 30,48 cm a 101,6 cm)
Soporte de Montaje en Ia Pared para TV con Movimiento
Televisores de 12 Pulgadas a 40 Pulgadas (30,48 cm a 101,6 cm)
TV-Muurbeugel
met Volledige
(30,48
cm tot 101,6 cm)
7/LÆ—Ya:.'
TV
B09JWN5F8W
for
12" to 40" TVs
für 12-Zoll- bis 40-Zoll (30,48 cm bis 101,6 cm TVs)
beweging
voor TV's van 12 inch tot 40 inch
12
40
(30.48 cm
the images to
Scansionare il codice QR e scorrere le immagini
per trovare un esempio di montaggio o un video
dimostrativo
Escanee eI cödigo QR y desplåcese por las imågenes
para encontrar un video tutorial o montaje
Sie durch
Scan de QR-code en bekijk de afbeeldingen om een
gepaste montage- of how-to video te vinden
Page
4
ES
Page
6
. Seite
8
.Pagina
10
Total para
101.6 cm)
.Pégina
.Pagina
12
15
17
21
Inhaltsverzeichnis

Verwandte Anleitungen für AmazonBasics B09JWN5F8W


Inhaltszusammenfassung für AmazonBasics B09JWN5F8W
- Seite 1 (30,48 cm tot 101,6 cm) 7/LÆ—Ya:.' (30.48 cm 101.6 cm) B09JWN5F8W Scan the QR Code and scroll through the images to Scansionare il codice QR e scorrere le immagini find an assembly or how-to video per trovare un esempio di montaggio o un video Scannez le code QR et faites défiler les images pour...
- Seite 2 Tools Needed • Outils Nécessaires • Erforderliche Werkzeuge • Strumenti necessar • Herramientas Necesarias • Benodigd gereedschap • Voltage detector • Détecteur de tension • Spannungsdetektor • Rilevatore di tensione • Detector de tensi6n • Spanningsdetector • Stud finder • Détecteur de montants •Balkensucher •...
-
Seite 3: Inhaltsverzeichnis
Delivery Content • Contenu du Colis • Lieferumfang • Contenuto delta • Contenido del paquete • Levering • EA(x1) AP (x 4) MP (x 1) WPC-T (x 1) WPC-B (x 1) TS(x2) x 63 mm M4 x 12 mm M4 x 22 mm M6 x 10 mm M6 x 14 mm M6 x 24 mm... -
Seite 4: Important Safety
Refer to the instruction manual provided with 1. Important Safety the TV you are going to install on this product. Instructions It includes additional information for mounting, ventilation and suitable mounting locations. Compare the technical data and requirements Readthese instructions carefully and retain make sure that this product is suitable for the TV. - Seite 5 4. Disposal 6. Feedback and Help Dispose of the product according to local We would love to hear your feedback. To ensure we regulations. If in doubt, consult your local are providing the best customer experience possible, authorities. please consider writing a customer review.
-
Seite 6: Consignes De Sécurité Importantes
1. Consignes de Sécurité 2. Installation Importantes Pour obtenir des illustrations supplémentaires des étapes de montage/ Veuillez lire attentivement les présentes assemblage/installation, reportez-vous å la instructions et les conserver afin de pouvoir fin des directives écrites des consignes. vous y référer ultérieurement. En cas de cession de ce produit ä... -
Seite 7: Avant Le Montage
6. Vos Avis et Aide REMARQUE Leproduitestconqu pours'adapter divers téléviseurs de différentes dimensions. Tous les Nous serions ravis de connaitre votre avis. Afin de éléments de fixation livrés ne sont pas nécessaires å nous assurer de fournir la meilleure expérience l'installation du produit. -
Seite 8: Sicherheitshinweise
1. Wichtige 2. Installation Sicherheitshinweise Weitere bebilderte Montage- / Zusammenbau- / Installationsschritte finden Lesen Sie diese Bedienungsanleitung Sie am Ende der schriftlichen Anweisungen. sorgfältig und bewahren Sie sie zum späteren Gebrauch auf. Fügen Sie diese Dieses Produkt sollte nur von 2 Erwachsenen Bedienungsanleitung bei, wenn Sie dieses montiert werden. -
Seite 9: Vor Der Montage
6. Feedback Hilfe HINWEIS Das produkt ist für verschiedene Fernsehgeräte mit unterschiedlichen Abmessungen Wir würden uns sehr über Ihr Feedback freuen. geeignet. Es werden nicht alle mitgelieferten Um sicherzustellen, dass wir die bestmögliche Befestigungselemente zur Installation des Produkts Kundenerfahrung bieten, möchten wir Sie bitten, eine benötigt. - Seite 10 1. Istruzioni Importanti 2. Installazione la Sicurezza Per ulteriori passaggi illustrati relativi a montaggio/assemblaggio/installazione, fare Leggere attentamente le istruzioni e riferimento alla fine delle istruzione scritte. conservarle per un utilizzo futuro. In caso di cessione del prodotto a terzi, avere cura di Questo prodotto deve essere installato solo da...
-
Seite 11: Prima Del Montaggio
6. Feedback e Aiuto AVVISO II prodotto realizzato per adattarsi a diversi televisori di dimensioni differenti. Non tutti Ci piacerebbe ricevere il tuo feedback. Affinché gli elementi di fissaggio forniti sono necessari per sia possibile garantire la migliore esperienza cliente l'installazione del prodotto. -
Seite 12: Instrucciones Importantes De Seguridad
1. Instrucciones Importantes 2. Instalaci6n de Seguridad Para pasos adicionales ilustrados sobre el montaje/configuraciön/instalaciön, consulte Lea estas instrucciones atentamente al final de las instrucciones por escrito. y guårdelas para futuras consultas. Si transfiere el producto a una tercera persona, Este producto solo debe ser instalado debe incluir... -
Seite 13: Antes Del Montaje
Servicios Comerciales Amazon México, S. de R.L. de C.V.a ti como comprador original de producto(s) de Tamaöo de la 12—40pulgadas (30,5—101,6 cm) AmazonBasics. pantalla Mix. carga 40 libras (18,2 kg) Garantizamos el producto contra defectos de fabricaciön por un periodo de un ar10,siempre y... - Seite 14 Todas las partes o productos que envies en devoluci6n para reembolso o reemplazo, se convertirån en nuestra propiedad y estarån sujetos a Ias Politicas de Devoluci6n. 7.2 C6mo obtener el servicio Por teléfono Contacta servicio al cliente al 01800 874 8725 En linea Visita: https://www.amazon.com.mx/gp/help/customer/contact-us/ Servicio al cliente te harå...
-
Seite 15: Belangrijke Veiligheidsinstructies
1. Belangrijke 2. Installatie veiligheidsinstructies Voor aanvullende gélllustreerde montage-/ installatiestappen gaat u naar het einde van Lees deze gebruiksaanwijzing aandachtig de geschreven instructies. door en bewaar ze voor later gebruik. Doe bij overdracht van dit product aan derden Dit product mag alleen door twee volwassenes deze gebruiksaanwijzing erbij. -
Seite 16: Specificaties
6. Feedback en Hulp OPMERKING Het product is gemaakt om op tv's van verschillende groottes te passen. Niet alle Graag ontvangen Wij uw feedback. 0m u in de meegeleverde bevestigingsmiddelen moeten worden toekomst de best mogelijke klantenervaring te kunnen gebruikt om het product te installeren. bieden, willen Wij u vragen een klantenbeoordeling te schrijven. - Seite 17 Ä55'J! < tdäwo VESA (18.2 kg) (18.2 kg) (30.5 -v 101.6 cm)
- Seite 18 0.63 (16 mm) 0.4 4 y + (10 mm) (51 mm x 102 mm) (406mm) F No. 2 (51 mm x 102 mm) x 3.5 (38 mm x 89 mm) < tdä ffiF—9 ASTM C39,...
- Seite 19 (30.5 101.6 cm) (18.2 kg) 2.95 x 2.95 (75 x 75 mm) 3.94 x 3.94 (100 x 100 mm) 7.87 X3.94 Z*ÄJ-x-DZ-HTV (200 x 100 mm) 7.87 x 7.87 d Y (200 x 200 mm) 200 (-5—150 ±/F) 3.83*ÜZZfii'j'Z -50åg 50 h/G 2.28 K e-w16.3...
- Seite 20 amazon.jp/review/review-your-purchases# Amazon Basics Fådtl amazon.jp/gp/help/customer/contact-us : f153-0064 1 T H 8-1...
- Seite 21 Wall Type• Typede Mur • Wandtyp • Tipo di parete • Tipo de pared • Soort muur • Drywall with woodenstudsor woodenwall: Drywallshouldhavemaximum 0.63"(16mm) thickness,wood stud sizeat least 1.5 x 3.5" (39 x 89 mm). Start drywall installation from n. Concrete/masonrywall: Concretewall should haveat least 8"...
- Seite 22 Panelesde yeso con montantes de madera o paredesde madera: Lospanelesdeyeso debentener ungrosormåximode0,63pulgadas (16mm),eItamaöodeIosmontantes demadera debeserdeal menos 1,5x 3,5 pulgadas(39 x 89 mm). Empiecela instalaciönen panel deyesodesden. Pared decemento/obra: Lapared de cementodebetener un grosor minimo de8 pulgadas(203 mm), el tamaäo decada bloque decementodebeserde 7,99x 7,99 x 15,98pulgadas(203 x 203x 406 mm) como minimo.
- Seite 23 Locate a wood stud with stud finder: Use a stud finder to locate a wood stud. Mark the two sides of the stud to find the middle point of the stud. The studs must becapableof supporting 4 times the combined weight of the product andthe TV.
- Seite 24 Placedrilling template: Selectthe desiredinstallation height andtapethe drilling template (IT) onthe wall aligning it with the stud marking. Checkthat the TV CenterLine (2) on the template is at eye levelto the location whereyou would besitting. Placeaspirit level on the CheckLevelline (I) of the drilling template (IT) to ensurethat it is in astraight line.
- Seite 25 2-1/2" ø 5/32" (64 mm) (4 mm) Drill holes: Drill 2-1/2" (64 mm) deepholesthrough the 2 locations (A and B)as markedon the template(IT)usinga 5/32" (4mm)drill bit. Takeoffthe drilling template(IT)after drilling. Perpge destrous: percez destrousde2-1/2 pouces (64mm)deprofondeur dansles 2 emplacements(A et B) indiquéssur Ie gabarit (IT) I'aide d'un foret de 5/32 pouce(4 mm). RetirezIe gabaritdeperqage (IT)aprésle perqage.
-
Seite 26: Ea(X1)
WPC.T EA(x1) wpc.B Removemounting plate: Unscrewthe 2 bolts at the lower back of the mount assembly(EA).Takeoff the mounting plate and storethe bolts in asafe place. Remove the coversWPC-T andWPC-B. A pply force as eachcoveris pulled. Slideoff the frame. Retirez la plaque de montage : dévissezles 2 boutonssituésdans la partie inférieurearriére du dispositifdemontage (EA). - Seite 27 EA(x1) Preparefor mounting: Pull out the extensionarm from the mounting bracket(EA)and fully tighten both tilt bolts. Préparation du montage: sortezIe brasextensible dusupportde montage (EA) et serrez complétementles deux boulons d'inclinaison. Montagevorbereiten: ZiehenSieden Verlängerungsarmausder Montagehalterung(EA)und ziehen Siebeide Neigeschrauben vollständig an. Prepararsi per il montaggio: estrarreil braccioestensibiledalla staffa di montaggio (EA)eserrare completamentei bulloni di inclinazione.
- Seite 28 EA(x1) TS (x 2) Attach mounting bracket: One adult holdsthe mounting bracketwith the arrow pointing upwards. Secondadult half-waytightens the mounting bracket into eachof the holesusing the fasteners(TS).Using a spirit level,check that the mountingbracketisalignedverticallythen fully tightenthe fasteners. A fter this step, proceedto 'D Fixation du support de montage : un adulte tient Iesupport de montage avecIafléche dirigée versle haut.
- Seite 29 ConcreteInstallation • Montagesur Béton• Installation an einer Betonwand • Installazione su muro in cemento • Instalaci6n cemento • Installatie in beton • — Selectinstallation position: Selectsuitablemounting position. Donot drill into anypipesor powerlines beneaththe surfaceduring mounting holespreparation. Usevoltage/metal detector before drilling any holes to eliminateanysuchpotentialrisks.
- Seite 30 IT(x1) Placedrilling template: Selectthe desiredinstallation height andtape the drilling template (IT) on the wall. Checkthat the TV CenterLine (2) on the template is at eye levelto the location whereyou would besitting. Placea spirit level on the CheckLevel line (1) of the drilling template (IT) to ensurethat it is in a straight line.
- Seite 31 8 (x 2) ø 5/16" ø 5/16" (8 mm) (8 mm) (76 mm) Drill holes: Drill 3" (76 mm) deep holesthrough the 2 locations (A and B) asmarkedon the template (IT) using a 5/16" (8 mm) drill bit. Takeoff the drilling template (IT) after drilling. Insertthe wall plugs (U8)into the drilled holes.
- Seite 32 EA(x1) Preparefor mounting: Repeat then pull out the extensionarm from the mounting bracket (EA) andfully tightenbothtilt bolts. Préparation du montage : reproduisez puis sortez Iebrasextensibledu support de montage (EA) et serrezcomplitement les deux boulons d'inclinaison. Montage vorbereiten:Wiederholen Sie9. ZiehenSiedanndenVerlängerungsarm a usder Montagehalterung(EA)und ziehenSie beide Neigeschrauben voll an.
- Seite 33 TS(x2) Attach mounting bracket: One adult holds the mounting bracketwith the arrow pointing upwards. Secondadult half-way tightens the mounting bracketinto eachof the holes usingthe fasteners(TS).Usinga spirit level,checkthat the mounting bracketis aligned vertically then fully tighten the fasteners. Fixationdu supportdemontage: unadultetient Iesupportdemontage avecIafléchedirigée vers le haut.
- Seite 34 Identify mounting pattern • Identifiez le profil de montage • Montageschablonen ermitteln • Individuazionedello schema di montaggio• Identifiqueel patr6nde montaje • Montagepatroon identificeren • 2.9" (75 mm) 3.9" (100 mm) 3.9" (75 mm) (100 mm) 7.9" (200 mm) (200 mm) 7.9"...
-
Seite 35: Ap (X 4)
D(x4) AP (x 4) MP (x 1) Attach the mount arms(AP)to the mounting plate (MP)as required usingthe bolts (D). Fixezles pattesde montage (AP) la plaque de montage(MP)seton les besoinså ('aide des boulons (D). BefestigenSie bei Bedarfdie Montagearme(AP)mit den Schrauben(D)an der Montageplatte (MP). Fissare i braccidi montaggio (AP)alla piastra di montaggio (MP)comerichiesto utilizzando i bulloni (D). - Seite 36 Fastenersguide • Guide desfixations • Anleitung zu Befestigungselementen• Guida agli elementidi fissaggio• GuiadeIospasadores • Gidsvoor bevestigingen • I.Bolt diameter • Diamitre de bouton • Schraubendurchmesser • Diametro bulloni • Diimetro de los pernos Boutdiameter 2.Bolt length • Longueur de boulon • Schraubenlänge•...
- Seite 37 Spacersguide • Guide desentretoises • Anleitung zu Abstandshaltern • Guida ai distanziatori• Guiadeseparadores • Gidsvoor afstandshouders • To accommodatevarious TV models,the product comeswith spacers with different diametersand thicknesses. T akeinto accountthat the inner diameter of the spacershould matchthe fastenerused.The spacertype is determined byTV'senclosuretype andits mounting holes. (I) Flat TVswith no obstructions:do not needspacers (2)TVswith inset mounting holes, (3)TVswith cablessocketsprotruding outwards, (4) TVswith curved backs...
- Seite 38 Paraadaptarseavarios modelosdeTV, eI productoviene con separadores de diferentes diåmetros y grosor.Tengaen cuenta queeI diåmetro interior del separadordebecoincidir con eI pasadorutilizado. EI tipo deseparadorestå determinadopor el tipo de caja del televisor y susorificios de montaje. (1)Televisores planos sin obstrucciones:No necesitanseparadores (2)Televisores con orificios de montaje empotrados,(3)Televisores contomas de cablesquesobresalen hacia afuera, (4)Televisores con parte posterior curvada:necesitanseparadorespara proporcionar suficiente espaciolibre para Ia placa de montaje Bij dit product zijn afstandshoudersmetverschillendediametersen dikten meegeleverd,zodat er...
- Seite 39 Flator curvedTV• Téléviseur p lat oucourbé• Flaches OdergewölbtesFernsehgerät • Televisore a schermopiatto o curvo • Televisor plano o curvo • Platte of gebogentv •...
- Seite 40 M(x4) Choose the screw(mountarmswith flat TV):Testthe depthanddiameterof TV'smountingholes using bolts A, J and M (sizesM4, M6and M8).Do not force anyof the bolts in. If there is resistance, s top immediately andtry a bolt with asmallerdiameter. F indthe suitablebolts(A/J/M)andpairit with the correspondin washers (R/S).Doa test fit of all 4 holesbeforefully fasteningthe mountingplateto the TV.
- Seite 41 Elegirlostornillos (brazosdemontajeconTVPlano):Pruebe laprofundidad y el diåmetrode losorificiosdemontajedelTVconlostornillosA,Jy M (tamaöos M4,M6y M8).Nofuerceningunode los pernos.Si hay resistencia,deténgaseinmediatamentey pruebecon uno perno de menor diémetro. Encuentre los perno adecuados(A/J/M) y emparéjeloscon las arandelascorrespondientes (R/S).Realiceuna prueba de ajustede Ios4 orificios antes defijar completamenteIa placa de montaje al TV.Pasea Kiesde schroeven(bevestigingarmen met platte tv): test dediepte en diametervan de montagegaten v andetv met boutenA,JenM (M4,M6enM8).Forceer deboutenniet in hetgat.
- Seite 42 Installationdesentretoises(pattesde montageavectéléviseurcourbé): Ie but decetteétapeest d'aplanir l'arriére dutéléviseur courbépour obtenir une surfaceplane.Vérifiezla profondeur et le diamétre destrous defixation du téléviseurå l'aide desboulons B,K et N (tailles M4,M6 et M8). Ne forcezaucundes boulons Encasderésistance, arrétezimmédiatement et essayez u n boulondepluspetitdiamétre.Testez ensuite les boulons adaptésavecles rondelles(R/S)correspondantes et associez-les aveclesentretoises Q pour trouver la combinaisonqui convient.
-
Seite 43: Mp (X1)
MP (x1) Install spacers(flat TV): Testthe depth and diameter of TV'smounting holesusing bolts A andJ (sizesM4and M6). Do not force anyof the bolts in. If there is resistance, s top immediately and try a bolt with asmaller diameter.Findthe suitable bolts (A/J) and pair it with the washers(R).Do atest fit of all 4 holes beforefully fastening the mounting plate to the TV.Proceedto Installation des entretoises (téléviseur plat) : vérifiez la profondeur et le diamitre destrous de fixation du téléviseur å... - Seite 44 a*iä (A/J) "IV K(x4) B(x4) Install spacers(mount armswith curved TV): Thegoal of this stepis to levelthe back of the curvedTV into aflat surface.Testthe depth and diameterof TV'smounting holesusing bolts B and K(sizesM4and M6). Do not force any of the bolts in. If there is resistance, s top immediately andtry a bolt with a smaller diameter. Thentest the suitable bolts with the washers(R)and pair it with spacersQ to find the suitable combination.
- Seite 45 Instalar separadores(brazosde montaje con televisor curvo): eI objetivo de estepasoes nivelar la parte posterior del televisor curvo en una superficieplana. Pruebela profundidady el diémetro de los orificiosdemontajedel TVconlospernosBy K (tamafios M4y M6).NofuerceningunodeIospernos.Si hayresistencia, deténgase i nmediatamente y pruebeconunopernode menordiåmetro.Luego pruebeIos pernosadecuadoscon las arandelas(R)y emparéjeloscon los separadoresQ para encontrar la combinaci6n adecuada.Realiceuna pruebade ajuste de los 4 orificios antesde fijar completamente la placa de montaje al TV.
-
Seite 46: Wpc-T (X 1)
Mount the TV to the mounting bracket: With 1 adult on either side of the TV, lift upthe TV to hook the mounting plate (MP)onto the mounting bracket (EA). ! Holdthe TV firmly and fully tighten the 2 bolts at the lower back of the mount assemby Fixez Ietéléviseur a usupportdemontage : avec I adultedechaque c ötédutéléviseur, soulevez l etéléviseur pour accrocher la plaquede montage(MP)au supportde montage(EA). - Seite 47 +150 Adjust the tilt: Askanother adult to hold the TV firmly, then loosenthe 2 tilt screws.Oncethe other adult adjust the tilt, fully tighten the 2 tilt screws. Réglage deI'inclinaison: demandez å unautreadultedemaintenirsolidement I etéléviseurenplace, puis desserrez les 2vis d'inclinaison. Unefois l'inclinaison régléepar l'autre adulte, serrezcomplitement les 2 vis d'inclinaison.
-
Seite 48: S(X4)
Adjust the angle: Askanother adult to hold the TVfirmly, then loosenthe 2 angle screwson the mounting base.Oncethe other adult adjust the angle,fully tighten the 2 anglescrewsof the TV. Réglagede l'angle : demandezå un autre adulte de maintenir solidement le téléviseuren place, puis desserrez les 2vis d'angle de la basede montage.Unefois l'angle réglé... - Seite 49 O(xl) Cablemanagement: Secure the audio/video cablesand power cable of the TV to the bottom portion of the extensionarm using the cable tie (O).Ensure that there is sufficient cableslack for the extensionarm to fully extend andthat cableswill not be pinched when the mount is closed. Gestiondes cäbles: fixez les cäblesaudio/vidéo et le cåble d'alimentation du téléviseur la partie inférieuredu brasextensible l'aide du serre-cäble(O).Assurez-vous q u'il y asuffisammentdejeu dansles cäblespour que le brasextensiblepuissesedéployercomplétement et que lescäblesnesoient pas pincés...
- Seite 52 MADE IN CHINA FABRIQUÉ EN CHINE HERGESTELLT IN CHINA PRODOTTO IN CINA HECHO EN CHINA GEMAAKT IN CHINA V03-12/22...