Herunterladen Inhalt Inhalt Diese Seite drucken

Dexford RCT 200 Bedienungsanleitung

Funkwecker mit thermometer

Werbung

Verfügbare Sprachen

Verfügbare Sprachen

Funkwecker mit Thermometer
Réveil radio-piloté avec thermomètre
Orologio sveglia radiocontrollato con
termometro
Radio Controlled Alarm Clock with
Thermometer
Bedienungsanleitung
Istruzioni per l'uso
Operating Manual
RCT200
Mode d'emploi

Werbung

Inhaltsverzeichnis
loading

Inhaltszusammenfassung für Dexford RCT 200

  • Seite 1 RCT200 Funkwecker mit Thermometer Réveil radio-piloté avec thermomètre Orologio sveglia radiocontrollato con termometro Radio Controlled Alarm Clock with Thermometer Bedienungsanleitung Mode d'emploi Istruzioni per l'uso Operating Manual...
  • Seite 2: Sicherheitshinweise

    Einleitung Dieses Gerät dient als funkgesteuerte Uhr mit Weckfunktion und Temperaturanzeige. Aufgrund der handlichen Größe kann dieses Gerät bequem auf Reisen mitgenommen werden und mit der Funktion der Zeitzoneneinstellung kurzfristig auf eine neue Zeitzone umgestellt werden. Sicherheitshinweise 1. Lesen Sie vor dem Gebrauch diese Bedienungsanleitung vollständig durch. 2.
  • Seite 3: Automatischer Zeitabgleich

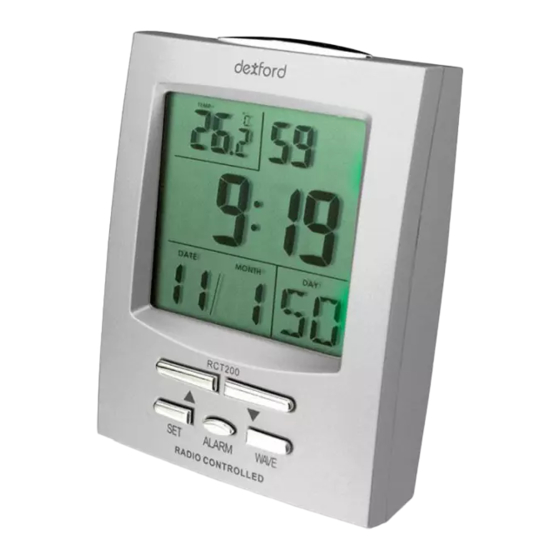
    Bedienelemente Anzeige TEMP (Temperatur) Wecksymbol Anzeige für Stunden Anzeige für Minuten Anzeige DATE (Tag) Anzeige DAY (Wochentag, abgekürzt) Anzeige MONTH (Monat) Taste Î Taste Ï Taste WAVE Taste SET Taste RESET Taste ALARM Batteriefach Taste SNOOZE/LIGHT Sensoröffnung Anzeige für Sekunden Standfuß...
  • Seite 4: Uhrzeit Einstellen

    Uhrzeit einstellen Das Gerät kann die Uhrzeit im 12- oder 24-Stunden Format darstellen. Im 12-Stunden Format erscheint neben der Zeitanzeige „AM“ für vormittags und „PM“ für nachmittags. 1. Taste SET (6) gedrückt halten, bis die Jahresanzeige blinkt. Mit den Tasten Ï (5) oder Î (13) die Jahreszahl einstellen.
  • Seite 5 7. Ansonsten drücken Sie die Taste ALARM so oft, bis die aktuelle Uhrzeit wieder angezeigt wird. 8. Zur eingestellten Weckzeit ertönt ein Piepton, der zuerst langsam und dann in Abständen schneller wird. Drücken Sie eine beliebige Taste, um den Weckton abzuschalten oder die Taste SNOOZE/LIGHT (8), um die Schlummerfunktion zu aktivieren (siehe Abschnitt Schlummerfunktion).
  • Seite 6: Konformitätserklärung

    Vorsatz oder grober Fahrlässigkeit des Herstellers beruhen. Sollte Ihr Gerät dennoch einen Defekt innerhalb der Garantiezeit aufweisen, wenden Sie sich bitte unter Vorlage Ihrer Kaufquittung ausschließlich an das Geschäft, in dem Sie Ihr DEXFORD − Gerät gekauft haben. Alle Gewährleistungsansprüche nach diesen Bestimmungen sind ausschließlich gegenüber Ihrem Fachhändler geltend zu machen.
  • Seite 7: Remarques Concernant La Sécurité

    Introduction Cet appareil sert d'horloge radiopilotée avec fonction réveil et affichage de la température. Sa taille maniable vous permet de l'emmener facilement avec vous en voyage et sa fonction de réglage du fuseau horaire peut le régler à court terme sur un nouveau fuseau. Remarques concernant la sécurité...
  • Seite 8: Éléments De Manipulation

    Éléments de manipulation Affichage TEMP (température) Icône réveil Affichage heures Affichage minutes Affichage DATE (jour) Affichage DAY (jour de la semaine, abrégé) Affichage MONTH (mois) Touche Î Touche Ï Touche WAVE Touche SET Touche RESET Touche ALARM Compartiment à piles Touche SNOOZE/LIGHT Ouverture capteur Affichage secondes...
  • Seite 9: Régler L'heure

    Régler l'heure L'appareil peut représenter l'heure en format 12 ou 24 heures. En format 12 heures „AM“ pour matin et „PM“ pour après-midi apparaissent à côté de l'affichage de l'heure. Appuyez longuement sur la touche SET (6) jusqu'à ce que l'affichage de l'année clignote. Régler le chiffre de l'année avec les touches Ï...
  • Seite 10: Caractéristiques Techniques

    Vous entendez un bip à l'heure réglée dont le son ira en s'accélérant. Appuyez sur une touche quelconque pour désactiver la sonnerie du réveil ou sur la touche SNOOZE/LIGHT (8) pour activer la fonction Snooze (voir point Fonction Snooze). Appeler l'heure de réveil Appuyez sur la touche ALARM pour voir s'afficher les heures de réveil que vous avez entrées.
  • Seite 11: Déclaration De Conformité

    Si votre appareil devait malgré tout présenter une défectuosité pendant la période de garantie, veuillez vous adresser, muni de votre reçu, exclusivement au magasin où vous avez acheté votre appareil DEXFORD. Vous ne pouvez faire valoir vos droits à la garantie selon ces dispositions qu'exclusivement auprès de votre revendeur.
  • Seite 12: Indicazioni Di Sicurezza

    Introduzione L'apparecchio opera come orologio radiocontrollato con funzione sveglia e indicazione della temperatura. Le dimensioni compatte dell'apparecchio ne fanno un ottimo compagno di viaggio e grazie alla funzione dell'impostazione dei fusi orari è possibile passare al nuovo fuso orario in brevissimo tempo. Indicazioni di sicurezza Prima dell'uso, leggere attentamente e per intero le presenti istruzioni per l'uso.
  • Seite 13: Elementi Di Comando

    • Le pile non vanno ricaricate o riattivate in altro modo, non vanno smontate, cortocircuitate o gettate nel fuoco. Elementi di comando Indicazione TEMP (temperatura) Simbolo sveglia Indicazione delle ore Indicazione dei minuti Indicazione DATE (giorno) Indicazione DAY (giorno della settimana, abbreviato) Indicazione MONTH (mese) Tasto Î...
  • Seite 14: Impostazione Del Fuso Orario

    quindi di individuare automaticamente il segnale radio DCF in modo da poter impostare automaticamente e quindi visualizzare l'orario. In caso di mancata ricezione del segnale, l'orario andrà impostato manualmente. Impostazione dell'orario L'apparecchio è in grado di visualizzare l'orario in formato 12 ore o 24 ore. Nel formato 12 ore, accanto all'orario è...
  • Seite 15 Sul display LCD lampeggia di nuovo l'orario e „A2“ per indicare il secondo orario di sveglia. Se occorre, procedere all'immissione del secondo orario di sveglia. Con il tasto Ï si attiva l'orario di sveglia. Il simbolo sveglia per il secondo orario di sveglia scompare dal display LCD. Procedere secondo la procedura già...
  • Seite 16: Dichiarazione Di Conformità

    Smaltire confezioni ed imballaggi in base a quanto indicato dalle norme in vigore a livello locale. Garanzia Gli apparecchi DEXFORD sono costruiti e collaudati in osservanza dei processi di produzione più moderni. L'impiego di materiali selezionati e tecnologie altamente sviluppate sono garanti di una perfetta funzionalità e lunga durata in vita.
  • Seite 17: Safety Information

    Introduction This device serves as a radio controlled clock with alarm function and temperature display. Its compact size means it can easily be taken on journeys and the time zone function enables quick adjustment to new time zones. Safety information Read this operating manual thoroughly before putting the clock into operation.
  • Seite 18: Operating Elements

    Operating elements TEMP display (temperature) Alarm icon Hour display Minute display DATE display DAY display (weekday, abbreviated) MONTH display Î button Ï button WAVE button SET button RESET button ALARM button Battery compartment SNOOZE/LIGHT button Sensor opening Second display Base Automatic time synchronisation The transmitter for the DCF radio signal in Germany is near Frankfurt and also reaches other European countries.
  • Seite 19: Setting The Time Zone

    Setting the time The device can display the time in 12 or 24-hour format. When the 12-hour format is selected, "AM" (morning) or "PM" (afternoon) appears beside the time display. Press and hold the SET button (6) until the year display flashes. Use the button Ï (5) or Î (13) to set the year.
  • Seite 20 Displaying the alarm time Press the ALARM button to display the alarm times set. "A1" appears in the display together with the set alarm time. Press the Ï button to activate or deactivate the alarm time. Press the ALARM button again to display the 2nd alarm time set.
  • Seite 21: Declaration Of Conformity

    Packaging materials must be disposed of according to local regulations. Guarantee DEXFORD equipment is produced and tested according to the latest production methods. The implementation of carefully chosen materials and highly developed technologies ensure trouble-free functioning and a long service life. The terms of guarantee do not apply to the batteries or power packs used in the products.

Inhaltsverzeichnis