Inhaltsverzeichnis
Werbung
Verfügbare Sprachen
Verfügbare Sprachen
Quicklinks
Werbung
Kapitel
Inhaltsverzeichnis

Verwandte Anleitungen für COOLIFE SV-TCL


Inhaltszusammenfassung für COOLIFE SV-TCL
- Seite 3 Contents English......1-24 Deutsch......25-50 Francais......51-75 Español......76-99 Italiano......100-125...
-
Seite 4: Inhaltsverzeichnis
2.1. Alarm receiver introduction ································· 03 2.2. Alarm receiver overview ·····································04 2.3. Operating guide ··············································· 05 2.4. Multiple SV-TCL cameras connect to the same alarm ··· 07 3. SV-TCL Trail Camera Introduction 3.1. Trail camera working principle ···························· 09 3.2. Warning ·························································10 3.3. -
Seite 5: After Sales Service
We are committed to sincere and thoughtful service to ensure customer satisfaction. If you have any questions or concerns about our products, please feel free to email us at: support@coolife.site We will reply you within 24 hours and provide you with a 100% perfect solution. -
Seite 6: Alarm Receiver Introduction
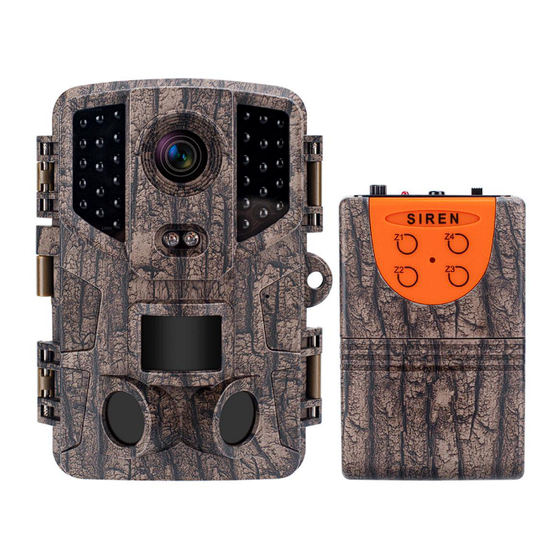
Alarm Receiver Introduction 2.1. Alarm receiver introduction This product is designed to accompany the trail camera with the alarm function. It can receive the wireless alarm signal from the hunting camera at a distance Instructions for use 400m/1300ft(open area)! and alarm with the sound, light and vibration. -
Seite 7: Alarm Receiver Overview
Alarm Receiver Introduction 2.2. Alarm receiver overview... -
Seite 8: Operating Guide
Alarm Receiver Introduction 2.3. Operating guide In normal circumstances, the wireless alarm and the trail hunting camera will be pre-paired before leaving the factory, so customers do not need to "Match Code". The customer only needs to turn on the alarm function. - Seite 9 Alarm Receiver Introduction Note: 1.The alarm function is only valid when the automatic sensor mode (" ON ") is turned ON. 2.The camera will continue to transmit the alarm signal for 20 seconds. This 20 seconds is used for code pairing of the alarm receiver. 3.
-
Seite 10: Multiple Sv-Tcl Cameras Connect To The Same Alarm
Alarm Receiver Introduction 2.4. Multiple SV-TCL cameras connect to the same alarm operating guide Step 1: Turn on "Match code" for the hunting camera: 1. Turn ON the alarm power switch from "OFF" to "ON". 2. Turn the switch of the camera to "TEST" mode. - Seite 11 Alarm Receiver Introduction is completed. 5. For other zone selections and settings: Press and hold the "Match Code" button for 4 seconds to enter the Alarm Receiver Zone 2 (Z2) pairing. Press and hold the "Match Code" button for 6 seconds to enter the Alarm Receiver Zone 3 (Z3) pairing.
-
Seite 12: Sv-Tcl Trail Camera Introduction
SV-TCL Trail Camera Introduction 3.1. Trail camera working principle The trail camera is triggered by motion and variance in temperature. The trail camera is able to do this by using a motion sensor. The PIR sensor is aware that something is in front of them by changes in motion and the temperature difference between the moving object and the background environment. -
Seite 13: Warning
SV-TCL Trail Camera Introduction 3.2. Warning ■ While you are checking the camera under the TEST mode, the ambient light source is unstable because your hands are holding the camera and moving, the PIR sensor will be triggered to work, and you might hear clicking sounds accompanied by screen flickering, which is normal. - Seite 14 SV-TCL Trail Camera Introduction could be damaged in the rain. ■ The included mini USB cable is only used to transfer files from the camera to the PC, please do not use it to charge the camera or the rechargeable battery, it will seriously damage the camera.
-
Seite 15: Camera Overview
SV-TCL Trail Camera Introduction 3.3. Camera overview... -
Seite 16: Brief Operation Of The Camera
SV-TCL Trail Camera Introduction 3.4. Brief operation of the camera... -
Seite 17: Specification
SV-TCL Trail Camera Introduction 3.5. Specification... -
Seite 18: Preparing The Camera
Preparing the Camera 4.Preparing the Camera 4.1. Power supply This camera supports 2 ways of power supply: AA battery or external power supply. ■A battery: Place 4 or 8 pieces 1.5V AA batteries,and make sure the battery polarity is correct. ■A good option to get longer battery life is to add an external power supply: At the bottom of camera, there is an external power supply(DC) port, you can use a 6V 1.5A-2A AC adapter with 3.5mm*1.35mm... -
Seite 19: Inserting The Memory Card
Preparing the Camera damaged camera. ■ Anytime you place or remove the batteries, make sure that the camera is OFF. ■ Most batteries will lose their activity when working at low temperatures, leading to a camera failure. Put the camera indoors and it will return to work normally. - Seite 20 Preparing the Camera has been used with other cameras before. ■ Don’t remove the card or turn off the power while formatting or reading or saving the files from the memory card, this might lead to data losses. ■ Suggest to use the micro SD card at least class 10 or higher. ■...
-
Seite 21: Setup Menu And Functions
Setup Menu and Functions 5.Setup Menu and Functions Mode Photo:Capture photos with motion detection. Video: Capture video clips with motion detection. Photo + Video: Capture both photo and video with motion detection. Photo resolution Set resolution for still photos. Options:32MP(7680*4320P)/ 28MP(7168*4032P)20MP (6144*3456P)16MP(5376*3024P)12MP(4608*2592P)8MP (3840*2160P)5MP(3072*1728P) Photo series... - Seite 22 Setup Menu and Functions IR distance Also called IR flash distance, it is the distance at which a trail camera can illuminate an object with the IR LEDs. Auto: It will automatically adjust the brightness of the infrared light. When working at night, the camera's image sensor will adjust the brightness of the IR light according to the brightness of the object.
- Seite 23 Setup Menu and Functions For example, if shot lag is set for 1 minute, then the time interval between the previous shot and the next shot will be 1 minute. During this 1 minute, the camera will record nothing even though the animal keeps on moving inside the detection area, but the camera will restart to detect motion and record the next shot after this 1 minute ends.
- Seite 24 Setup Menu and Functions [Normal]: The camera will take pictures automatically as per set time interval. For example,set the interval time to 1 hour, the camera will take a photo or video each hour(Confirmation according to your work mode is taken photo or video). If you want to observe that a plant blooms, the camera will take 24 photos in 24 hours to record the whole process of blooming.
- Seite 25 Official email: support@coolife.site Format memory card Delete (erase) all files stored on a card to prepare it for reuse. Always format a card that has been previously used in other devices.
- Seite 26 Setup Menu and Functions location when reviewing the photos, since each camera will imprint its number on all photos it captures. Alarm Options:【On】/【Off】 Note: The alarm can only function properly when this feature is enabled. Match code The alarm and camera matching code is successful, and the alarm will send three signal prompts: sound, light and vibration Reset settings Select 'Yes' and press OK to restore all parameters to the original...
-
Seite 27: Faq
6.FAQ Q(1) Can I use the external supply if tired of replacing the battery? A: If you are tired of replacing the battery, yes, there is also the option of the external power supply such as a 6V 1.5A-2A AC adapter with 3.5mm*1.35mm DC jack size or a 6V 1.5A-2A trail camera solar panel. - Seite 28 1.Kundendienst ······················································26 2.Alarmempfänger Einführung 2.1. Einführung in den Alarmempfänger ··························27 2.2. Übersicht Alarmempfänger ····································28 2.3. Bedienungsanleitung ··········································· 29 2.4. Mehrere SV-TCL-Kameras werden mit derselben Alarm Bedienungsanleitung verbunden ··································· 31 3.SV-TCL Wildkamera Einführung 3.1. Funktionsprinzip der Wildkamera ···························· 33 3.2.Warnung ·························································· 34 3.3.
-
Seite 29: Kundendienst
Dienstleistungen, und konzentriert sich immer auf professionelle Marken. Unsere Produkte haben eine zweijährige Garantie, wenn Ihr Produkt irgendwelche Qualitätsprobleme hat, können Sie sich gerne per E-Mail support@coolife.site an unser Kundendienstteam wenden: Wir werden Ihnen innerhalb von 24 Stunden antworten und Ihnen eine 100%ig perfekte Lösung anbieten. -
Seite 30: Alarmempfänger Einführung
Alarmempfänger Einführung 2.1. Einführung in den Alarmempfänger Dieses Produkt wurde entwickelt, um die Wildkamera mit Alarmfunktion zu begleiten. Es kann das drahtlose Alarmsignal von der Jagdkamera in einer Entfernung von 400 m/1300 ft (offenes Gelände) empfangen! und Alarm mit Ton, Licht und Vibration. Funktionsweise des Produkts: Wenn die Alarmfunktion der Jagdkamera (mit installiertem Alarmsendermodul) eingeschaltet ist und der drahtlose Alarm ebenfalls eingeschaltet ist, wenn die Jagdkamera im... -
Seite 31: Übersicht Alarmempfänger
Alarmempfänger Einführung 2.2. Übersicht Alarmempfänger... -
Seite 32: Bedienungsanleitung
Alarmempfänger Einführung 2.3. Bedienungsanleitung "Unter normalen Umständen werden der drahtlose Alarm und die Trail-Jagdkamera im Werk bereits miteinander gekoppelt, sodass Kunden keinen 'Übereinstimmung Code' benötigen.". Der Kunde muss Alarmfunktion einschalten. Standardeinstellung Alarmempfänger Zone1 (Z1) . 1) Alarm--Schalten Sie die Alarmfunktion ein: Legen Sie die Batterie ein →... - Seite 33 Alarmempfänger Einführung Für weitere Details scannen Sie bitte den QR-Code oder besuchen Sie unsere offizielle Website(www.coolifeeu.com), um das spezifische Betriebsvideo anzusehen. Notiz: 1. Die Alarmfunktion ist nur gültig, wenn der automatische Sensormodus (" ON ") eingeschaltet ist. 2. Die Kamera sendet das Alarmsignal 20 Sekunden lang weiter. Diese 20 Sekunden werden für die Code-Kopplung des Alarmempfängers verwendet.
-
Seite 34: Mehrere Sv-Tcl-Kameras Werden Mit Derselben Alarm Bedienungsanleitung Verbunden
Alarmempfänger Einführung 2.4. Mehrere SV-TCL-Kameras werden mit derselben Alarm Bedienungsanleitung verbunden Schritt 1: Kamera-„Übereinstimmung Code“ für die neu SV-TCL Wildkamera aktivieren: 1. Schalten Sie den Netzschalter des Alarms von „OFF“ auf „ON“. 2. Stellen Sie den Schalter der Kamera auf den „TEST“-Modus. - Seite 35 Alarmempfänger Einführung Anzeige blinkt 3 Mal. Dies zeigt an, dass der Alarm bereit ist, Signale zu empfangen. Nachdem der Code erfolgreich gekoppelt wurde, ertönt und vibriert der Alarm und zeigt damit an, dass Zone 1 erfolgreich eingestellt wurde. Drücken Sie nach 20 Sekunden des Abgleichs des Kameracodes die Alarmstummschalttaste, um den Alarm zu stoppen, und die Einstellung von Zone 1 ist abgeschlossen.
-
Seite 36: Sv-Tcl Wildkamera Einführung
SV-TCL Wildkamera Einführung 3.1. Funktionsprinzip der Wildkamera ■ Die Wildkamera wird durch Bewegung und. Temperaturschwankungen ausgelöst. Die Wildkamera kann dies mithilfe eines Bewegungssensors tun. Der PIR-Sensor erkennt durch Bewegungsänderungen und den Temperaturunterschied zwischen dem sich bewegenden Objekt und der Hintergrundumgebung, dass sich etwas vor ihm befindet. -
Seite 37: Warnung
SV-TCL Wildkamera Einführung 3.2. Warnung ■ Im Testmodus hören Sie möglicherweise Klickgeräusche, begleitet von Bildschirmflackern, was normal ist. 1.Bitte platzieren Sie die Kamera vertikal, damit das Umgebungslicht stabilisiert werden kann. 2. Legen Sie Ihre Hände oder andere Hindernisse nicht vor das Objektiv, um zu verhindern, dass die Kamera die Bedingungen der Lichtquelle falsch einschätzt. - Seite 38 SV-TCL Wildkamera Einführung Bitte beachten Sie, dass die Kamera nicht durch einen Kurzschluss geschützt ist! ■ Wenn Sie das Produkt zum ersten Mal verwenden, entfernen Sie bitte die Schutzfolie auf dem Objektiv und auf dem Sensor des Produkts. ■ Die Oberfläche des Produktsensors darf nicht beschädigt werden.
-
Seite 39: Kameraübersicht
SV-TCL Wildkamera Einführung 3.3. Kamera übersicht... -
Seite 40: Kurze Bedienung Der Kamera
SV-TCL Wildkamera Einführung 3.4. Kurze Bedienung der Kamera... -
Seite 41: Spezifikation
SV-TCL Wildkamera Einführung 3.5. Spezifikation... -
Seite 42: Vorbereiten Der Kamera
Vorbereiten der Kamera 4.Vorbereiten der Kamera 4.1. Stromversorgung This camera supports 2 ways of power supply: AA battery or external power supply. ■ AA-Batterie: Legen Sie 4 or 8 Stück 1,5-V-AA-Batterien ein und vergewissern Sie sich, dass die Polarität der Batterien korrekt ist. ■... - Seite 43 Vorbereiten der Kamera ■ Vermeiden Sie das Mischen von Marken, Typen oder Alter der Batterien, da dies die Wahrscheinlichkeit stark erhöht, dass eine Batterie ausläuft und die Kamera beschädigt wird. ■ Achten Sie immer darauf, dass die Kamera ausgeschaltet ist, wenn Sie die Batterien einlegen oder entfernen.
-
Seite 44: Einlegen Der Speicherkarte
Vorbereiten der Kamera 4.2. Einlegen der Speicherkarte Die Kamera verwendet eine Micro-SD-Speicherkarte zum Speichern von Fotos (im .jpg-Format) und/oder Videos (im .AVI-Format). Unterstützt werden SD-Karten bis maximal 128 GB Kapazität. 1. Schalten Sie die Kamera aus; 2. Setzen Sie die Speicherkarte ein; 3. - Seite 45 Vorbereiten der Kamera nachlässt, ersetzen Sie bitte die alte neue Speicherkarte durch die neue. ■ Die linke LED-Anzeige dient zum Testen, ob der Bewegungssensor ordnungsgemäß funktioniert. Sie leuchtet also nur auf, wenn sich der Schalter in der TEST-Position befindet, wenn die Bewegung erkannt wird.
- Seite 46 Einstellungsmenü und Funktionen 5.Einstellungsmenü und Funktionen Modus Foto: Bilderaufnahme mit Bewegungserkennung. Video: Videoaufnahme mit Bewegungserkennung. Foto + Video: BiIder- und Videoaufnahme mit Bewegungserk- ennung. Fotoauflösung Stellen Sie die Auflösung für ein Foto ein. Wir empfehlen 5MP Optionee:32MP(7680*4320P)/ 28MP(7168*4032P)20MP (6144*3456P)16MP(5376*3024P)12MP(4608*2592P)8MP (3840*2160P)5MP(3072*1728P). Serienaufnahme Legen Sie hier fest, wie viele Fotos bei einmal Auslösen in Folge gemacht werden sollen.
-
Seite 47: Einstellungsmenü Und Funktionen
Einstellungsmenü und Funktionen Tonaufnahme Wenn Sie diese Funktion auswählen, wird derTon während der Videoaufnahme mit aufgezeichnet. IR-Entfernung Auch IR-Blitzentfernung genannt, ist die Entfernung, in der eine Wildkamera ein Objekt mit den IR-LEDs beleuchten kann. Auto: Die Helligkeit des Infrarotlichts wird automatisch angepasst. Bei Nachtarbeiten passt der Bildsensor der Kamera die Helligkeit des IR-Lichts an die Helligkeit des Objekts an. - Seite 48 Einstellungsmenü und Funktionen Aufnahmeabstand Hier stellen Sie die Zeitdauer ein, die zwischen dem ersten Auslösen und einer erneuten Aktivierung des Hauptsensors vergehen soil. Während dieses Zeitraumes wird keine Aufeeich- nung gestartet. Dies soil verhindern, dass Sie Aufnahmen von immer gleichen Auslöseereignissen bekommen und sich Ihr Speicherplatz zu schnell füllt.
- Seite 49 Einstellungsmenü und Funktionen für warme Umgebungstemperaturen, während „Low“ für Kälte geeignet ist. Zielaufnahmezeit Wählen Sie „On“ wenn die Kamera nur in einem bestimmten Zeitraum aktiv sein soil. Anschließend erscheint die Eingabemaske, in der Sie Start und Endzeit eintragen können. Die vorgenommenen Einstellungen gelten jeden Tag. Die Kamera macht außerhalb ihrer Einstellungen keine Aufzeichnungen.
- Seite 50 Einstellungsmenü und Funktionen Hinweis Wenn Sie „On“ mit der OK-Taste bestätigen, wird der PIR-Sensor im Zeitraffermodus deaktiviert. Die Kamera nimmt in jedem von Ihnen eingestellten Zeitintervall Fotos auf, unabhängig davon, ob sich ein Tier im Erfassungsbereich befindet. Dies hat den Vorteil, dass Sie weitere Entfernungen auskundschaften können, die außerhalb der Reichweite des PIR-Sensors liegen, z.
- Seite 51 Sie sich bitte an unsere offizielle E-Mail-Adresse, um die Datei zum Zurücksetzen der Kamera zu erhalten. Offizielle E-Mail: support@coolife.site Speicherkarte formatieren Löschen aller Dateien auf der Speicherkarte für einen erneuten Einsatz.Speicherkarten, die vorher in anderen Geräten verwendet wurden, müssen immer formatiert werden.
- Seite 52 Einstellungsmenü und Funktionen Serien - Nr Wählen Sie „ON“, wenn Sie eine Seriennummer für Ihre Kameras verwenden möchten. Sie können eine 4-stellige Zahlenkombination eingeben. Falls Sie viele Kameras benutzen, können Sie diese einfacher identifizieren, weil die Kamera die Seriennummer auf alien Bildern einblendet.
-
Seite 53: Faq
6. FAQ Wie: Was tun, wenn ich das Passwort vergesse, das ich für die Kamera festgelegt habe? A: Schalten Sie den Schalter in die Position; Drücken Sie gleichzeitig die Schaltflächen für die Auf- und Ok, halten Sie fest und schieben Sie den Switch in die Testposition. Sie können dann in die Menüeinstellung gehen, zur Kennwortschutzeinstellung gehen. - Seite 54 2.1. Présentation du récepteur d'alarme ··························· 53 2.2. Aperçu du récepteur d'alarme ································· 54 2.3. Guide d'utilisation ·············································· 55 2.4. Plusieurs caméras SV-TCL se connectent au même guide d'utilisation d'alarme ·················································57 3.Introduction de la caméra SV-TCL Trail 3.1. Principe de fonctionnement de la caméra de trail ·········· 59 3.2.
-
Seite 55: Service Après-Vente
Nos produits ont une garantie de deux ans, si votre produit a des problèmes de qualité, s'il vous plaît n'hésitez pas à contacter notre support@coolife.site équipe de service à la clientèle par e-mail : Nous vous répondrons dans les 24 heures et vous fournirons une solution 100% parfaite. -
Seite 56: Introduction Du Récepteur D'alarme
Introduction du récepteur d'alarme 2.1. Présentation du récepteur d'alarme Ce produit est conçu pour accompagner la caméra de trail avec la fonction d'alarme. Il peut recevoir le signal d'alarme sans fil de la caméra de chasse à distance Instructions d'utilisation 400 m/1300 pieds (zone ouverte) ! et alarme avec le son, la lumière et les vibrations. -
Seite 57: Aperçu Du Récepteur D'alarme
Introduction du récepteur d'alarme 2.2. Aperçu du récepteur d'alarme... -
Seite 58: Guide D'utilisation
Introduction du récepteur d'alarme 2.3. Guide d'utilisation Dans des circonstances normales, l'alarme sans fil et la caméra de chasse aux sentiers seront pré-jumelées avant de quitter l'usine, de sorte que les clients n'ont pas besoin de "Match Code". Le client n'a qu'à activer la fonction d'alarme. - Seite 59 Introduction du récepteur d'alarme Note: 1. La fonction d'alarme n'est valide que lorsque le mode capteur automatique (" ON ") est activé. 2. La caméra continuera à transmettre le signal d'alarme pendant 20 secondes. Ces 20 secondes sont utilisées pour l'appariement du code du récepteur d'alarme.
-
Seite 60: Plusieurs Caméras Sv-Tcl Se Connectent Au Même Guide
Introduction du récepteur d'alarme 2.4. Plusieurs caméras SV-TCL se connectent au même guide d'utilisation d'alarme Étape 1 : Activez "Match code" pour la caméra de chasse : 1. Allumez l'interrupteur d'alimentation de l'alarme de "OFF" à "ON". 2. Mettez le commutateur de la caméra en mode "TEST". - Seite 61 Introduction du récepteur d'alarme recevoir des signaux. Une fois le code jumelé avec succès, l'alarme retentira et vibrera, indiquant que la zone 1 est réglée avec succès. Après 20 secondes de correspondance du code de la caméra, appuyez sur le bouton de désactivation de l'alarme pour arrêter l'alarme et le réglage de la zone 1 est terminé.
-
Seite 62: Introduction De La Caméra Sv-Tcl Trail
Introduction de la caméra SV-TCL Trail 3.1. Principe de fonctionnement de la caméra de chasse ■ La caméra animalière est déclenchée par le mouvement et la variation de température dans une zone définie. La caméra utilise un capteur de mouvement et un capteur PIR qui s’activent dès que quelque chose se déplace devant eux, grâce la différence de... -
Seite 63: Avertissement
Introduction de la caméra SV-TCL Trail 3.2. Avertissement ■ En mode test, vous pouvez entendre des clics accompagnés d'un scintillement de l'écran, ce qui est normal. 1.Veuillez placer l'appareil photo verticalement afin que la lumière ambiante puisse être stabilisée. 2. Ne placez pas vos mains ou d'autres obstacles devant l'objectif, pour éviter à... - Seite 64 Introduction de la caméra SV-TCL Trail rayure ou un dommage, cela affectera le déclenchement normal de la caméra. ■ Installation sur le terrain : veuillez vous assurer que la boucle de la caméra et la prise DC inférieure sont toutes fermées et scellées, sinon la caméra pourrait être endommagée en cas de pluie.
-
Seite 65: Aperçu De La Caméra
Introduction de la caméra SV-TCL Trail 3.3.Aperçu de la caméra... -
Seite 66: Brève Utilisation De La Caméra
Introduction de la caméra SV-TCL Trail 3.4. Brève utilisation de la caméra... -
Seite 67: Spécification
Introduction de la caméra SV-TCL Trail 3.5. Spécification... -
Seite 68: Préparation De La Caméra
Préparation de la caméra 4.Préparation de la caméra 4.1.Source de courant Cette caméra prend en charge 2 modes d'alimentation : pile AA ou alimentation externe. ■ Pile AA : placez 4 or 8 piles AA de 1,5 V et assurez-vous que la polarité... -
Seite 69: Insertion De La Carte Mémoire
Préparation de la caméra ■ Chaque fois que vous placez ou retirez les piles, assurez-vous que l'appareil est éteint. ■ La plupart des batteries perdent de leur puissance lorsqu'elles fonctionnent à basse température, ce qui entraîne une panne de l'appareil photo. Mettez la caméra à l'intérieur et elle refonctionnera normalement. - Seite 70 Préparation de la caméra pas de la retirer sans l'avoir d'abord enfoncée). La carte est libérée de la fente et prête à être retirée lorsque vous entendez un "clic". Noter: ■ Veuillez formater la carte mémoire si elle est utilisée pour la première fois ou si elle a déjà...
-
Seite 71: Menu De Configuration Et Fonctions
Menu de configuration et fonctions 5.Menu et fonctions de configuration Mode Photo: Prendre des photos avec la détection de mouvement. Vidéo: Prendre des clips vidéo avec la détection de mouvement. Photo + Vidéo: Prendre à la fois des photos et des vidéos avec Résolution de l'image Options :32MP(7680*4320P)/ 28MP(7168*4032P)20MP (6144*3456P)16MP(5376*3024P)12MP(4608*2592P)8MP... - Seite 72 Menu de configuration et fonctions de I'enregistrement vidéo. Distance IR Aussi appelée distance de flash IR, c'est la distance à laquelle une caméra de trail peut éclairer un objet avec les LED IR. Auto : Il ajustera automatiquement la luminosité de la lumière infrarouge.
- Seite 73 Menu de configuration et fonctions I'enregistrement initial. Pendant I'intervalle sélectionné, I'appareil n'enregistra pas des photos ou des vidéos. Ceci empêche le remplissage de la carte de mémoire par des enregistrements concernant un même événement. Vous pouvez choisir entre 5-60 secondes ou 1-60 minutes. Par exemple, j'ai configuré...
- Seite 74 Menu de configuration et fonctions Durée d’enregistrement cible Sélectionnez "On" si I'appareil doit être actif pendant une certaine période. Dans le menu de l'écran qui apparaît ensuite, vous pouvez définir I'heure de début et de fin de la phase active. Les réglages effectués s'appliquent tous les jours.
- Seite 75 Menu de configuration et fonctions intervalle de temps que vous avez défini, indépendamment de la présence d'un animal dans la zone de détection. Ce mode a l'avantage de permettre de repérer des distances plus importantes qui sont hors de portée du capteur PIR, comme les grandes zones ouvertes (parcelles de nourriture, champs, etc.), ou de surveiller la floraison, le lever et le coucher du soleil.
- Seite 76 Si vous avez oublié votre mot de passe, veuillez contacter notre e-mail officiel pour obtenir le fichier de réinitialisation de la caméra. support@coolife.site Email officiel: Formatar la carte mémoire Supprimez (effacez) tous les fichiers enregistrés sur une carte pour la préparer pour une réutilisation ultérieure.
- Seite 77 Menu de configuration et fonctions Alarme Options: 【【sur】 / 【off】 Remarque: l'alarme ne peut fonctionner correctement que lorsque cette fonction est activée. Paire Le code d'alarme et de correspondance de la caméra est réussi, et l'alarme enverra trois invites de signal: son, lumière et vibration Réglages d'usine Sélectionnez 'YES' et appuyez sur OK pour rétablir tous les paramètres aux réglages d'usine par défaut.
-
Seite 78: Faq
6.FAQ Q: Que faire si j'oublie le mot de passe que je définis pour la caméra? R: Faites glisser l'interrupteur en position OFF; Appuyez et maintenez les boutons Up et OK en même temps, continuez à maintenir, puis glissez l'interrupteur pour tester la position, puis vous pouvez accéder au paramètre de menu, accédez au paramètre de protection par mot de passe, sélectionnez, vous verrez le mot de passe d'origine que vous définissez avant , vous pouvez le réinitialiser... - Seite 79 2.1. Introducción al receptor de alarma ··························· 78 2.2. Descripción general del receptor de alarma ················· 79 2.3. Guía de funcionamiento ········································80 2.4. Múltiples cámaras SV-TCL se conectan a la misma guía de operación de alarma ······························· 82 3.Introducción a la cámara de trail de SV-TCL 3.1.
-
Seite 80: Servicio Postventa
Nuestros productos tienen una garantía de dos años, si su producto tiene algún problema de calidad, no dude en ponerse en contacto con nuestro equipo de atención al cliente por correo electrónico: support@coolife.site Le responderemos dentro de las 24 horas y le proporcionaremos una solución 100% perfecta. -
Seite 81: Introducción Del Receptor De Alarma
Introducción del receptor de alarma 2.1. Introducción al receptor de alarma Este producto está diseñado para acompañar a la cámara de rastreo con la función de alarma. Puede recibir la señal de alarma inalámbrica de la cámara de caza a distancia. Instrucciones de uso 400 m/1300 pies (área abierta). -
Seite 82: Descripción General Del Receptor De Alarma
Introducción del receptor de alarma 2.2. Descripción general del receptor de alarma... -
Seite 83: Guía De Funcionamiento
Introducción del receptor de alarma 2.3. Guía de funcionamiento En circunstancias normales, la alarma inalámbrica y la cámara de rastreo se emparejarán previamente antes de salir de fábrica, por lo que los clientes no necesitan "Match Code". El cliente solo necesita activar la función de alarma. - Seite 84 Introducción del receptor de alarma Nota: 1. La función de alarma solo es válida cuando el modo de sensor automático ("ON") está activado. 2. La cámara seguirá transmitiendo la señal de alarma durante 20 segundos. Estos 20 segundos se utilizan para el emparejamiento de códigos del receptor de alarma.
-
Seite 85: Múltiples Cámaras Sv-Tcl Se Conectan A La
Introducción del receptor de alarma 2.4. Múltiples cámaras SV-TCL se conectan a la misma guía de operación de alarma Paso 1: active "Match code" para la cámara de caza: 1. Encienda el interruptor de alimentación de la alarma de "OFF" a "ON". - Seite 86 Introducción del receptor de alarma indicador parpadea 3 veces. Esto indica que la alarma está lista para recibir señales. Una vez que el código se haya emparejado correctamente, la alarma sonará y vibrará, lo que indica que la Zona 1 se ha configurado correctamente.
-
Seite 87: Introducción A La Cámara De Trail De Sv-Tcl
Introducción a la cámara de trail de SV-TCL 3.1. Principio de funcionamiento de cámara Sendero ■ La cámara se activa con el movimiento gracias a un sensor PIR que detecta la radiación infrarroja emitida por la fauna (o personas) que pasan por su campo de visión. -
Seite 88: Advertencia
Introducción a la cámara de trail de SV-TCL 3.2. Advertencia ■ En el modo de prueba, es posible que escuche clics acompañados de un parpadeo de la pantalla, lo cual es normal. 1. Coloque la cámara en posición vertical para que se pueda estabilizar la luz ambiental. - Seite 89 Introducción a la cámara de trail de SV-TCL daño, afectará al disparo normal de la cámara. ■ Instalación en campo: asegúrese de que la hebilla de la cámara y el enchufe de CC inferior estén cerrados y sellados, de lo contrario, la cámara podría dañarse en caso de lluvia.
-
Seite 90: Descripción General De La Cámara
Introducción a la cámara de trail de SV-TCL 3.3. Descripción general de la cámara... -
Seite 91: Breve Manejo De La Cámara
Introducción a la cámara de trail de SV-TCL 3.4. Breve manejo de la cámara... -
Seite 92: Especificación
Introducción a la cámara de trail de SV-TCL 3.5. Especificación... -
Seite 93: Preparando La Cámara
Preparando la cámara 4.Preparando la cámara 4.1.Fuente de alimentación Esta cámara admite 2 modos de alimentación: batería AA o fuente de alimentación externa. ■Pila AA: inserte 4 or 8 pilas AA de 1,5 V y asegúrese de que la polaridad de las pilas sea la correcta. ■Una buena opción para prolongar la vida útil de la batería es agregar una fuente de alimentación externa: hay un puerto de alimentación de corriente continua (CC) externo en la parte inferior de la cámara, puede... -
Seite 94: Inserción De La Tarjeta De Memoria
Preparando la cámara esté APAGADA. ■ La mayoría de las baterías se descargan más rápido y/o fallan cuando se trabaja a bajas temperaturas, lo que hace que la cámara no funcione correctamente. Coloque la cámara en el interior y volverá a funcionar con normalidad. - Seite 95 Preparando la cámara Nota: ■ Formatee la tarjeta de memoria si se utiliza por primera vez o si se ha utilizado anteriormente con otras cámaras. ■ Se sugiere utilizar al menos la clase 10 o superior. ■ Asegúrese de que el interruptor de alimentación esté apagado antes de insertar o extraer las tarjetas SD o las baterías.
-
Seite 96: Menú De Configuración Y Funciones
Menú de configuración y funciones 5.Menú de configuración y funciones Modo Foto: captura fotos con detección de movimiento. Video: capture clips de video con detección de movimiento. Foto + Video: capture fotos y videos con detección de movimiento. Resolución de foto Opciones: 32MP(7680*4320P)/ 28MP(7168*4032P)20MP (6144*3456P)16MP(5376*3024P)12MP(4608*2592P)8MP (3840*2160P)5MP(3072*1728P) - Seite 97 Menú de configuración y funciones Distancia IR También llamada distancia de flash IR, es la distancia a la que una cámara de caza puede iluminar un objeto con los LED IR. Automático: Ajustará automáticamente el brillo de la luz infrarroja. Cuando trabaje de noche, el sensor de imagen de la cámara ajustará...
- Seite 98 Menú de configuración y funciones 5-ó0 segundos o 1-ó0 minutos. Sensibilidad del sensor movimiento Aquf se ajusta la senslbilldad del sensor de movimiento principal. Para interiores, zonas y entomos con pocas interferencias, como ramas balanceándose por el aire, seteccione "High” (Alta). Seleccione "Medium"...
- Seite 99 Menú de configuración y funciones Si quieres observar que una planta florece, la cámara tomará 24 fotos en 24 horas para grabar todo el proceso de floración. [ Video TL]: Puede configurar el tiempo de intervalo. El rango de tiempo es de 1 segundo a 24 horas. Por ejemplo, establezca el intervalo en 1 hora, la cámara tomará...
- Seite 100 Si olvidó su contraseña, comuníquese con nuestro correo electrónico oficial para obtener el archivo para restáblecer la cámara. Correo electrónico oficial: support@coolife.site Formatear tarjeta de memoria Elimina (borra) todos los archivos almacenados en una tarjeta para prepararia para ser reútilizada. Formatee siempre una taijeta que haya...
- Seite 101 Menú de configuración y funciones Aasegúrese de haber descargado y hecho una copla de seguridad de tod os los archivos que desee conservar primero! Prestone OK para ejecutar, presione MENÚ para salir sin fbrmatear. Número de serie. Seleccione "On" si desea usar un ndmero de serie para dasificar la cámera.
-
Seite 102: Faq
6.FAQ P: Qué hacer si olvido la contraseña que configuré para la cámara? A: Deslice el interruptor a la posición de apagado; Mantenga presionado los botones Up y Ok al mismo tiempo, siga reteniendo, luego deslice el interruptor a la posición de prueba, luego puede ir a la configuración del menú, ir a la configuración de protección de contraseña, seleccione, verá... - Seite 103 2.1. Introduzione al ricevitore di allarme ························102 2.2. Panoramica del ricevitore di allarme ······················· 103 2.3. Guida operativa ················································104 2.4. Più telecamere SV-TCL si collegano alla stessa guida operativa dell'allarme ·············································· 106 3.Introduzione SV-TCL Fototrappola 3.1. Principio di funzionamento della FVT ····················· 108 3.2.
-
Seite 104: Servizio Post-Vendita
Noi siamo impegna a fornire un servizio sincero e premuroso per garantire la soddisfazione del cliente. In caso di domande o problemi sui nostri prodotti, non esitare a contattarci via e-mail: support@coolife.site Ti risponderemo entro 24 ore e ti forniremo una soluzione perfetta al 100%. -
Seite 105: Introduzione Del Ricevitore Di Allarme
Introduzione del ricevitore di allarme 2.1. Introduzione al ricevitore di allarme Questo prodotto è progettato per accompagnare la telecamera trail con la funzione di allarme. Può ricevere il segnale di allarme wireless dalla telecamera di caccia a distanza Istruzioni per l'uso 400 m/1300 piedi (area aperta)! e allarme con il suono, la luce e la vibrazione. -
Seite 106: Panoramica Del Ricevitore Di Allarme
Introduzione del ricevitore di allarme 2.2. Panoramica del ricevitore di allarme... -
Seite 107: Guida Operativa
Introduzione del ricevitore di allarme 2.3. Guida operativa In circostanze normali, l'allarme wireless e la telecamera per la caccia al sentiero saranno pre-accoppiati prima di lasciare la fabbrica, quindi i clienti non hanno bisogno di "Match Code". Il cliente deve solo attivare la funzione di allarme. - Seite 108 Introduzione del ricevitore di allarme 2.La telecamera continuerà a trasmettere il segnale di allarme per 20 secondi. Questi 20 secondi vengono utilizzati per l'accoppiamento del codice del ricevitore dell'allarme. 3. Funzione di allarme sonoro, luminoso e a vibrazione Arresto: quando l'allarme riceve il segnale di allarme dalla telecamera di caccia e avvia l'allarme, questo stato durerà...
-
Seite 109: Più Telecamere Sv-Tcl Si Collegano Alla Stessa Guida
Introduzione del ricevitore di allarme 2.4. Più telecamere SV-TCL si collegano alla stessa guida operativa dell'allarme Passaggio 1: attiva "Match code" per la telecamera di caccia: 1. Turn ON the alarm power switch from "OFF" to "ON". 2. Turn the switch of the camera to "TEST" mode. - Seite 110 Introduzione del ricevitore di allarme pulsante di disattivazione dell'allarme per arrestare l'allarme e l'impostazione della Zona 1 è completata. 5. Per altre selezioni e impostazioni di zona: Tenere premuto il pulsante "Match Code" per 4 secondi per accedere all'associazione del ricevitore di allarme Zona 2 (Z2). Tenere premuto il pulsante "Match Code"...
-
Seite 111: Introduzione Sv-Tcl Fototrappola
Introduzione SV-TCL Fototrappola 3.1.Principio di funzionamento della FVT ■ La fototrappola viene attivata dal movimento e dalla variazione della temperatura attraverso un sensore di movimento. Il sensore PIR si accorge che qualcosa è davanti alla camera dal movimento e dalla differenza di temperatura tra l'oggetto in movimento e l'ambiente di sfondo. -
Seite 112: Avvisi
Introduzione SV-TCL Fototrappola 3.2. Avvisi ■Nella modalità di prova si potrebbero sentire dei clic accompagnati da uno sfarfallio dello schermo: è normale. 1.Posizionare la fotocamera verticalmente in modo che la luce ambientale possa essere stabilizzata. 2.Non mettere le mani o altri ostacoli davanti all'obiettivo per evitare che la fotocamera giudichi erroneamente le condizioni della sorgente luminosa. - Seite 113 Introduzione SV-TCL Fototrappola ■ Quando si utilizza il prodotto per la prima volta, rimuovere lo strato di pellicola protettiva sulla lente e sul sensore del prodotto. ■ Non danneggiare la superficie del sensore del prodotto, se sono presenti graffi o danni, ciò influirà sulla normale attivazione della fotocamera.
-
Seite 114: Panoramica Della Fotocamera
Introduzione SV-TCL Fototrappola 3.3. Panoramica della fotocamera... -
Seite 115: Breve Utilizzo Della Fotocamera
Introduzione SV-TCL Fototrappola 3.4. Breve utilizzo della fotocamera... -
Seite 116: Specifica
Introduzione SV-TCL Fototrappola 3.5. Specifica... -
Seite 117: Preparazione Della Fotocamera
Preparazione della fotocamera 4.Preparazione della fotocamera 4.1.Alimentazione Questa fotocamera supporta 2 modi di alimentazione: batteria AA o alimentatore esterno. ■ Batteria AA: inserire 4 or 8 batterie AA da 1,5 V e assicurarsi che la polarità della batteria sia corretta. ■... -
Seite 118: Inserimento Della Scheda Di Memoria
Preparazione della fotocamera fornite). ■ Evitare di abbinare marche, tipi o età delle batterie diverse tra loro, perché aumenta notevolmente la probabilità che una batteria perda, causando danni alla fotocamera. ■ Ogni volta che si posizionano o si rimuovono le batterie, assicurarsi che la fotocamera sia SPENTA. - Seite 119 Preparazione della fotocamera schede SD fino a una capacità massima di 128 GB. 1. Spegnere la fototrappola; 2. Inserire la scheda di memoria; 3.Spingere la scheda di memoria nell'apposito slot finché non scatta in posizione; Per estrarre la scheda Micro SD, basta spingere delicatamente la scheda (non tentare di estrarla senza prima spingerla).
- Seite 120 Preparazione della fotocamera formattazione, la lettura o il salvataggio perché i dati potrebbero venire danneggiati. ■ Quando la schedasi riempie di foto e/o filmati, la fotocamera interromperà automaticamente la registrazione e i LED si spegneranno. Per continuare a registrare è necessario attivare la funzione Endless Capture: in questo caso i dati più...
-
Seite 121: Menu Di Configurazione E Funzioni
Menu di configurazione e funzioni 5.Menu di configurazione e funzioni Modalità 1)Foto: cattura foto con rilevamento del movimento. 2)Video: Cattura clip video con rilevamento del movimento. 3)Foto + Video: Cattura sia foto che video con rilevamento del movimento. Risoluzione foto Opzioni: 32MP(7680*4320P)/ 28MP(7168*4032P)20MP (6144*3456P)16MP(5376*3024P)12MP(4608*2592P)8MP (3840*2160P)5MP(3072*1728P) - Seite 122 Menu di configurazione e funzioni Registrazione audio Aprendo questa funzione, è possibile registrare l'audio durante la registrazione di video. Distanza IR Chiamata anche distanza flash IR, è la distanza alla quale una telecamera da trail può illuminare un oggetto con i LED IR. Auto: regolerà...
- Seite 123 Menu di configurazione e funzioni Distanza di registrazione Impostare il periodo di tempo che la telecamera deve attendere prima di reagire alla successiva attivazione del sensore principale dopo la registrazione iniziale. Durante l'intervallo selezionato, la fotocamera non registrerà immagini o video. Ciò impedisce che la scheda di memoria venga riempita con troppi file dello stesso evento.
- Seite 124 Menu di configurazione e funzioni Tempo di registrazione target Selezionare "On" se la fbtocamera dovrebbe essere attivata solo durante un dato periodo. Nella schermata del menu che appare successivamente, è possibile impostare l'orario di inizio e di fine per la fese attiva.
- Seite 125 Menu di configurazione e funzioni all'interno dell'area di rilevamento. Questo ha il vantaggio di esplorare ulteriori distanze che sono fuori dalla portata del sensore PIR, come grandi aree aperte (appezzamenti di cibo, campi, ecc.), o di monitorare la fioritura, l'alba e il tramonto. Lingua Qui è...
- Seite 126 Se hai dimenticato la password, contatta la nostra email ufficiale per ottenere il file per ripristinare la fotocamera. Email ufficiale: support@coolife.site Formatta scheda di memoria Elimina (cancella) tutti i file memorizzati su una carta per il riutilizzo. Formattare sempre una scheda precedentemente utilizzata su altri dispositivi.
- Seite 127 Menu di configurazione e funzioni Match code L'allarme e il codice di corrispondenza della fotocamera hanno esito positivo e l'allarme invierà tre istruzioni di segnale: suono, luce e vibrazioni Reset impostazioni Ripristinare la fotocamera alle impostazioni predefinite di fabbrica tra cui sono incluse anche password, numero di serie e così...
-
Seite 128: Faq
6.Domande frequenti D: Cosa fare se dimentico la password che ho impostato per la fotocamera? A: Far scorrere l'interruttore in posizione OFF; Premere e tieni premuto i pulsanti su e OK contemporaneamente, continua a tenere in mano, quindi fai scorrere l'interruttore in posizione di prova, quindi è...