Inhaltsverzeichnis
Werbung
Verfügbare Sprachen
Verfügbare Sprachen
Quicklinks
PROFESSIONAL SECURITY MADE EASY
Quick Start Guide
App store
Google play
Zosi Smart
IPC Quick Start Guide --- 1
Guía de Inicio Rápido de la Cámara IP ---10
Notice de la caméra IP --- 19
Руководство по быстрой эксплуатации IPC --- 28
IPC Schnellstartanleitung --- 37
Z18.8.T.1.4040000740
For more information of your new system, please refer to
www.zositech.com
Werbung
Inhaltsverzeichnis

Verwandte Anleitungen für ZOSI 1NB-2622MW-W


Inhaltszusammenfassung für ZOSI 1NB-2622MW-W
- Seite 1 PROFESSIONAL SECURITY MADE EASY Quick Start Guide App store Google play Zosi Smart IPC Quick Start Guide --- 1 Guía de Inicio Rápido de la Cámara IP ---10 Notice de la caméra IP --- 19 Руководство по быстрой эксплуатации IPC --- 28 IPC Schnellstartanleitung --- 37 Z18.8.T.1.4040000740...
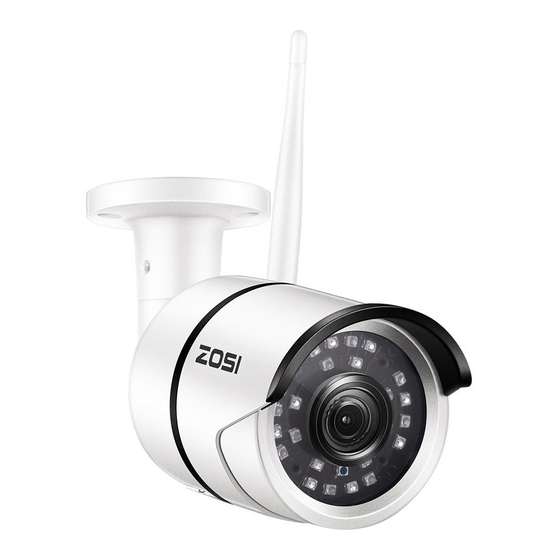
- Seite 2 1. Camera Overview Wi-Fi antenna IP66 Metal Housing 24pcs, 5mm LEDs 3.6mm lens TF card Reset Button RJ45 Port Power Port 2. Mounting Camera 2.1 Camera Connection Diagram Power adapter WiFi Camera Router Your smart device...
-
Seite 3: Wired Connection
The following instructions are for the Android App; instructions for the iOS version are slightly different. • Start and install the mobile App “Zosi Smart”, which can be downloaded by scanning the QR Code shown on the front page of this manual ). - Seite 4 Note: If adding the device unsuccessfully, please hold the reset button to reset the camera and then start reconnecting by following the above instructions (from steps A to E) until you see the video on your phone. Pause for 5 seconds then you can hear crisp switch voice from the switcher inside the camera, as shown in the figure.
-
Seite 5: Device Information
My Information Device Setting 5.2 Device Information Share QR Code of the device; (2) Video: click to start recording or stop recording; (3) Screen Shot: click to start screen capture; (4) Event Playback: click to view the motion detection video and other videos stored by the camera. -
Seite 6: Device Management
6.2 Device Management 6.2.1 Click “Device Management” to add areas and devices. 6.2.2 Add Area: Right click the blank to add area and enter the name. The Area Name is used to describe the place being monitored. - Seite 7 6.2.3 Add Device: Right click the Area Name to add device and change type of the device. Enter the device name, device ID, user name, device password and channel number, then click “OK” to save.
- Seite 8 6.3 Preview Click preview to find device list, right click device to Play All and Stop All, preview video can be displayed or stopped. 6.4 Playback Click “PlayBack”; select device ID, channel number, date and then search to find the video. Double click record time to set the exact time and click “Start Play”.
- Seite 9 7. Installing 7.1 Before Installing the Camera Adjustment Screw • Decide whether to run the cables Camera Base through the wall / ceiling (drilling required) or along the wall / ceiling. • If you run the cables along the wall / ceiling, you must run the cable through the cable notch on the base.
- Seite 10 Q. Why can't I add a device using local search? A: Make sure that your device is in the same LAN as your phone. If you cannot make both devices in the same LAN, manually enter the UID of your device to complete the adding.
-
Seite 11: Descripción De La Cámara
1. Descripción de la cámara Wi-Fi Antena IP66 Carcasa de Metal 24 piezas, 5mm LEDs Lente Tarjeta TF Botón Restablecer Puerto Ethernet Puerto de alimentación 2. Montaje de la Cámara 2.1 Diagrama de conexión de cámara Adaptador de corriente WiFi Cámara Enrutador Los dispositivos inteligentes... -
Seite 12: Conexión Por Cable
Las siguientes instrucciones son para la aplicación de Android; las instrucciones para la versión de iOS son ligeramente diferentes. • Inicie e instale la aplicación móvil "Zosi Smart" (que se puede descargar escaneando el código QR que se muestra en la página principal de este manual). - Seite 13 Nota: Si añadir el dispositivo sin éxito, mantenga presionado el botón restablecer para reiniciar la cámara y luego vuelva añadir siguiendo las instrucciones anteriores (desde los pasos A a E) hasta que vea el vídeo en su teléfono. Presione 5 segundos y luego podrá oír la voz desde la cámara.
-
Seite 14: Información Del Dispositivo
Mis informaciones Configuración del dispositivo 5.2 Información del dispositivo Compartir el código QR del dispositivo (2) Vídeo: haga clic para comenzar a grabar o detener la grabación; (3) Captura de pantalla: haga clic para hacer la captura de pantalla; (4) Reproducción de eventos: haga clic para ver el vídeo de detección de movimiento y otros vídeos almacenados por la cámara. - Seite 15 6.2 Gestión de dispositivo 6.2.1 Haga clic en "Device Management" para añadir áreas y dispositivos. 6.2.2 Add Area: haga clic derecho en el espacio en blanco para añadir área y nombre. El Nombre del área se usa para describir el lugar que se está monitoreando.
- Seite 16 6.2.3 Add Device: haga clic con derecho en “Area Name” para añadir el dispositivo y cambiar el tipo de dispositivo. Ingrese el nombre del dispositivo, ID del dispositivo, nombre de usuario, contraseña del dispositivo y número de canal, luego haga clic en "OK" para guardar.
-
Seite 17: Vista Previa
6.3 Vista Previa Haga clic en "Preview" para buscar la lista de dispositivos, haga clic derecho en "Device" para reproducir todo y detener todo. 6.4 Reproducción Haga clic en "PlayBack"; seleccione ID del dispositivo, número de canal, fecha y luego haga clic en “search”... - Seite 18 7. Instalación 7.1 Antes de instalar la cámara • Decida si debe pasar los cables Tornillo de ajuste Base de la cámara a través de la pared / techo (se requiere perforación) o a lo largo de la pared / techo. •...
-
Seite 19: Preguntas Más Frecuentes
Preguntas Más Frecuentes Q. ¿Por qué no se puede añadir el dispositivo usando “la búsqueda local”? A: Asegúrese de que el dispositivo y el móvil estén en la misma red; Si no puede hacer los dos en la misma LAN, ingrese el UID del dispositivo manualmente para completar la adición. - Seite 20 1. Aperçu de la caméra Wi-Fi antenne Boîtier en métal IP66 24pcs, 5mm LEDs Objectif Carte TF Button de réinitialisation Interface de RJ45 Power Interface 2. Branchement 2.1 Diagramme de connexion de caméra Adaptateur secteur WiFi Caméra Routeur PC & Mobile...
-
Seite 21: Connexion Filaire
Les instructions suivantes sont basées sur l’application Android; les instructions pour la version iOS sont légèrement différentes. • Installez et lancez l'application “Zosi Smart”, qui peut être téléchargée en scannant le code QR affiché sur la première page de ce manuel. - Seite 22 Remarque: Si vous ne parvenez pas à ajouter la caméra, maintenez le bouton de réinitialisation enfoncé pour réinitialiser la caméra, puis commencez à vous reconnecter en suivant les instructions ci-dessus (les étapes de A à E) jusqu'à ce que la vidéo apparaisse sur votre téléphone.
- Seite 23 Informations personnelles Réglages 5.2 Informations de l’appareil Partager le code QR de l'appareil; (2) Vidéo: cliquer pour commencer l'enregistrement ou pour arrêter l'enregistrement; (3) Capture d'écran: cliquer pour lancer la capture d'écran; (4) Lecture d'événement: cliquer pour afficher la vidéo de détection de mouvement et les autres vidéos stockées par la caméra;...
- Seite 24 6.2 Gestion des appareils 6.2.1 Cliquez sur “Device Management” pour ajouter des zones et des appareils. 6.2.2 Add Area: Cliquez avec le bouton droit sur le blanc pour ajouter une zone et puis entrez un nom de la zone. Le nom de zone est utilisé pour décrire l'endroit surveillé.
- Seite 25 6.2.3 Add Device: Cliquez avec le bouton droit sur le nom de la zone pour ajouter un appareil et modifier le type de l’appareil. Saisissez le nom de l'appareil, l'ID de l'appareil, le nom d'utilisateur, le mot de passe de l'appareil et le numéro de canal, puis cliquez sur "OK" pour sauvegarder.
- Seite 26 6.3 Aperçu Cliquez sur “Preview” pour rechercher la liste des appareils, cliquez avec le bouton droit de la souris sur “Play” et “Stop”, la vidéo d'aperçu peut être affichée ou arrêtée. 6.4 Relecture Cliquez sur “Playback”; sélectionnez l'identifiant de l'appareil, le numéro de canal, la date et recherchez ensuite la vidéo.
- Seite 27 7. Installation 7.1 Avant d'installer la caméra Réglage des vis • Décider de faire passer les câbles Base de caméra à travers le mur / plafond (perçage requis) ou le long du mur / plafond. • Si vous faites passer les câbles le long du mur / plafond, vous devez passer le câble à...
- Seite 28 Q. Pourquoi je n’arrive pas à ajouter un appareil à l'aide de la recherche locale? A: Assurez-vous que votre appareil est sur le même réseau local que votre téléphone. Si vous ne pouvez pas faire les deux appareils sur le même réseau local, entrez manuellement l’ID utilisateur de votre appareil pour terminer l’ajout.
-
Seite 29: Монтаж Камеры
1. Обзор камеры Wi-Fi антенна Металлический корпус IP66 24pcs, 5mm LED объектив TF карта Кнопка сброса RJ45 Порт Разъем питания 2. Монтаж камеры 2.1 Диаграмма соединения камеры Адаптер питания WiFi камера Роутер Ваше устройство... - Seite 30 Следующие инструкции предназначены для Android-приложения; инструкции для версии iOS немного отличаются. • Запустите и установите мобильное приложение «Zosi Smart», которое можно загрузить, сканируя QR-код, показанный на первой странице данного руководства). • Нажмите «Register» в нижней части интерфейса, чтобы зарегистрировать свою...
- Seite 31 Примечание. Если Вы не используете устройство, пожалуйста, удерживайте кнопку сброса, чтобы сбросить камеру и начать повторное подключение, следуя приведенным выше инструкциям (начиная с этапов A до E), пока не увидите видео на своем телефоне. Пауза в течение 5 секунд, после чего вы...
-
Seite 32: Информация Об Устройстве
Моя информация Настройка устройств 5.2 Информация об устройстве Поделитесь QR-кодом устройства; (2) Видео: нажмите, чтобы начать или остановить запись; (3) Экранный снимок: нажмите, чтобы сделать скрин экрана; (4) Воспроизведение событий: нажмите, чтобы просмотреть видеоролик обнаружения движения и другие видеоролики, хранящиеся камерой. (5) SD / HD: отрегулируйте... -
Seite 33: Управление Устройствами
6.2 Управление устройствами 6.2.1 Нажмите “Device Management” для добавления устройств и областей. 6.2.2 Add Area: Нажмите правой кнопкой мыши пробел, чтобы добавить область, и введите имя. Имя области используется для описания контролируемого места. - Seite 34 6.2.3 Add device: Нажмите правой кнопкой мыши имя области, чтобы добавить устройство и изменить тип устройства. Введите имя устройства, ID устройства, имя пользователя, пароль устройства и номер канала, затем нажмите «ОК» для сохранения.
- Seite 35 6.3 Предварительный просмотр Нажмите «Preview», чтобы найти список устройств, щелкнуть правой кнопкой мыши на «Play» и «Stop», предварительный просмотр видео может быть отображен или остановлен. 6.4 Воспроизведение Нажмите «PlayBack (Воспроизведение)»; выберите идентификатор устройства, номер канала, дату и затем найдите видео. Дважды щелкните по времени...
-
Seite 36: Установка Камеры
7. Установка 7.1 Перед установкой камеры • Определитесь,, следует ли Основание прокладывать кабели через Регулировочный камеры стену / потолок (требуется ли винт сверление) или вдоль стены / потолка. • Если Вы прокладываете кабели вдоль стены / потолка, необходимо пропустить кабель через вырез кабеля на основании. - Seite 37 Вопросы-ответы Q. Почему я не могу добавить устройство, используя локальный поиск? A: Убедитесь, что Ваше устройство находится в той же локальной сети, что и Ваш телефон. Если Вы не можете сделать оба устройства в одной локальной сети, тогда вручную введите UID своего устройства для завершения...
-
Seite 38: Kameraübersicht
1. Kameraübersicht Wi-Fi-Antenne IP66 Metallgehäuse 24 Stück, 5mm LEDs Objektiv TF-Kartenslot Reset-Knopf RJ45-Anschluss Stromanschluss 2. Installation 2.1 Anschlussdiagramm Netzteil Wi-Fi Kamera Router Ihr mobiles Gerät... -
Seite 39: Persönliche Kontoregistrierung
Die folgenden Anweisungen gelten für die Android App; Anweisungen für die iOS Version sind etwas anders. • Installieren Sie die App „Zosi Smart". (Sie können den QR Code auf der Vorderseite dieses Handbuchs scannen). • Klicken Sie auf „Register" , um ein Konto zu erstellen. -
Seite 40: Einführung In Die App-Funktion
Hinweis: Wenn Sie das Gerät nicht hinzufügen können, drücken Sie bitte die Reset-Knopf, um die Kamera zurückzusetzen. Dann starten Sie die Verbindung erneut, indem Sie die obigen Anweisungen (von Schritt A bis E) befolgen, bis das Video der Kamera auf Ihrem Handy angezeigt wird. -
Seite 41: Geräteinformationen
Meine Information Geräteeinstellung 5.2 Geräteinformationen Um den QR-Code des Geräts zu teilen; (2) Video: Um die Aufnahme zu beginnen oder zu stoppen. (3) Screenshot: Um den Bildschirmschnappschuss zu starten. (4) Wiedergabe: Um das Bewegungserkennungsvideo und gespeicherte Videos anzuzeigen. (5) SD/HD: Einstellung der Bildqualität des Bildes; (6) Gegensprechanlage: Zweiwege-Audio (gilt für Geräte, die diese Funktion unterstützen). -
Seite 42: Geräteverwaltung
6.2 Geräteverwaltung 6.2.1 Klicken Sie auf „Device Management", um Bereiche und Geräte hinzuzufügen. 6.2.2 Add Area: Klicken Sie mit der rechten Maustaste auf den leeren Bereich, und geben Sie den Namen ein. Der Bereichsname wird verwendet, um den überwachten Ort zu beschreiben. - Seite 43 6.2.3 Add Device: Klicken Sie mit der rechten Maustaste auf den Bereichsnamen, um das Gerät hinzuzufügen und den Gerätetyp zu ändern. Geben Sie den Gerätenamen, die Geräte-ID, den Benutzernamen, das Gerätekennwort und die Kanalnummer ein und klicken Sie zum Speichern auf „OK".
-
Seite 44: Wiedergabe
6.3 Vorschau Klicken Sie auf die Vorschau, um nach der Geräteliste zu suchen. klicken Sie mit der rechten Maustaste auf das Gerät, um Alle zu spielen und Alle zu stoppen. Das Vorschauvideo kann angezeigt oder gestoppt werden. 6.4 Wiedergabe Klicken Sie auf „Playback”; Wählen Sie Geräte-ID, Kanalnummer und Datum und suchen Sie dann nach dem Video. -
Seite 45: Vor Der Installation Der Kamera
7. Installation 7.1 Vor der Installation der Kamera • Entscheiden Sie ob die Kabel Einstellschraube Kamerabasis durch die Wand / Decke (Bohren erforderlich) oder entlang der Wand / Decke verlegt werden sollen. • Wenn Sie die Kabel entlang der Wand / Decke, müssen Sie das Kabel durch die Kabelkerbe auf der Basis führen. - Seite 46 Q. F. Warum kann ich das Gerät nicht mit der lokalen Suche hinzufügen? A: Stellen Sie sicher, dass sich Ihr Gerät im selben LAN wie Ihr Handy befindet. Wenn • • Sie nicht beide Geräte im selben LAN einrichten können, geben Sie die UID Ihres •...
- Seite 47 All rights reserved. No part of this publication may be reproduced by any means without written permission from ZOSI. The information in this publication is believed to be accurate in all respects. ZOSI cannot assume responsibility for any consequences resulting from the use thereof.