Behringer 902 VOLTAGE CONTROLLED AMPLIFIER Schnellstartanleitung
Verfügbare Sprachen
Verfügbare Sprachen
Quick Start Guide
902 VOLTAGE
CONTROLLED AMPLIFIER
Legendary Analog VCA Module
for Eurorack
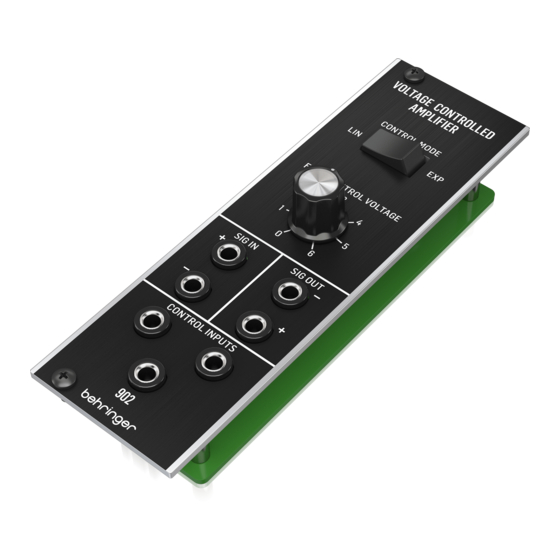
Controls
(3)
CONTROL MODE (LIN/EXP) rocker switch toggles
(1)
between linear and logarithmic response modes.
FIXED CONTROL VOLTAGE knob allows you to manually
(2)
set a control voltage.
SIG IN input jacks accept audio and control signals over
(3)
cables with 3.5 mm TS connectors. These dual inputs
allow the unit to amplify two signals simultaneously.
SIG OUT output jacks send out amplified audio and control
(4)
signals over cables with 3.5 mm TS connectors.
CONTROL INPUTS accept control voltage signals from
(5)
other modules to change the amplification level.
V 1.0
A54-00002-93994
Power Connection
The 902 VCA comes with the required power cable for connecting
to a standard Eurorack power supply system. Follow these steps
to connect power to the module. It is easier to make these
connections before the module has been mounted into a rack case.
1.
Turn the power supply or rack case power off and
(1)
disconnect the power cable.
2.
Insert the 16-pin connector on the power cable into the
socket on the power supply or rack case. The connector has
a tab that will align with the gap in the socket, so it cannot
be inserted incorrectly. If the power supply does not have
(2)
a keyed socket, be sure to orient pin 1 (-12 V) with the
red stripe on the cable.
3.
Insert the 10-pin connector into the socket on the back of
the module. The connector has a tab that will align with the
(4)
socket for correct orientation.
4.
After both ends of the power cable have been securely
attached, you may mount the module in a case and turn on
(5)
the power supply.
Installation
The necessary screws are included with the module for mounting
in a Eurorack case. Connect the power cable before mounting.
Depending on the rack case, there may be a series of fixed holes
spaced 2 HP apart along the length of the case, or a track that
allows individual threaded plates to slide along the length
of the case. The free-moving threaded plates allow precise
positioning of the module, but each plate should be positioned in
the approximate relation to the mounting holes in your module
before attaching the screws.
Hold the module against the Eurorack rails so that each of the
mounting holes are aligned with a threaded rail or threaded plate.
Attach the screws part way to start, which will allow small
adjustments to the positioning while you get them all aligned.
After the final position has been established, tighten the
screws down.
Inhaltsverzeichnis

Verwandte Anleitungen für Behringer 902 VOLTAGE CONTROLLED AMPLIFIER


Inhaltszusammenfassung für Behringer 902 VOLTAGE CONTROLLED AMPLIFIER
-
Seite 4: Bedienelemente
902 VOLTAGE CONTROLLED AMPLIFIER Netzanschluss Bedienelemente (DE) Der 902 VCA wird mit dem erforderlichen Stromkabel für den Anschluss an ein Standard-Eurorack-Stromversorgungssystem geliefert. Befolgen Sie diese Schritte, um das Modul mit Strom zu versorgen. Es ist einfacher, diese Verbindungen herzustellen, bevor das Modul in ein Rackgehäuse eingebaut wurde. - Seite 11 Quick Start Guide...
- Seite 15 Quick Start Guide...
- Seite 17 Quick Start Guide...
- Seite 18 902 VOLTAGE CONTROLLED AMPLIFIER...
- Seite 19 Quick Start Guide...
- Seite 20 We Hear You...