Werbung
Verfügbare Sprachen
Verfügbare Sprachen
Quicklinks
Werbung
Kapitel
Fehlerbehebung

Verwandte Anleitungen für Casada SKYLINER III


Inhaltszusammenfassung für Casada SKYLINER III
- Seite 1 Bringen Sie Entspannung in Ihren Alltag. Spitzentechnologie kombiniert wohltuende Massageprogramme mit intelligenter Audiostimulation der Gehirnwellen. Gönnen Sie Ihrem Geist und Körper Zeit zum Träumen und tanken Sie pure Lebensenergie. SKYLINER III...
- Seite 2 < timetorelax Seit der Gründung im Jahr 2000 steht der Name CASADA für hochwertige Produkte im Bereich Wellness und Fitness. Heute sind CASADA Geräte weltweit erhältlich. Kontinuierliche Weiterentwicklung, unverwechselbares Design und die strikte Ausrichtung auf eine Verbesserung der Lebensqualität zeichnen die CASADA Produkte ebenso aus, wie die zuverlässige und hervorragende Qualität.
-
Seite 3: Inhaltsverzeichnis
Mit dem Kauf dieses Massagesessels haben Sie Gesundheitsbewusstsein bewiesen. Damit Sie auf lange Zeit die Vorzüge dieses Gerätes nutzen können, möchten wir Sie bitten, die Sicherheitshinweise aufmerksam zu lesen und zu beachten. Wir wünschen Ihnen viel Freude mit Ihrem persönlichen Skyliner III. Inhaltsverzeichnis 1. Sicherheitshinweise ........................04 2. -
Seite 4: Sicherheitshinweise
1. SICHERHEITSHINWEISE 1. Sicherheitshinweise Bevor Sie Ihren Massagesessel in Betrieb nehmen, lesen Sie bitte sorgfältig die folgenden Hinweise, um die einwandfreie Funktion und optimale Wirkungsweise zu gewährleisten. Bitte bewahren Sie diese Bedienungsanleitung sorgsam auf! • Der Massagesessel entspricht den anerkannten Grundsätzen der Technik und den aktuellen Sicherheitsbestimmungen. -
Seite 5: Kontraindikationen
2. KONTRAINDIKATIONEN 2. Kontraindikationen Falls Sie nicht sicher sind, ob Sie den Massagesessel benutzen dürfen, konsultieren Sie in jedem Fall Ihren Arzt. • Massagen während der Schwangerschaft oder bei einer/mehreren der folgenden Beschwerden im Massagebe- reich sind untersagt: Frische Verletzungen, thrombotische Erkrankungen, Entzündungen und Schwellungen aller Art, sowie Krebs. -
Seite 6: Platzierung Des Massagesessels
3. PLATZIERUNG DES MASSAGESESSELS 3. Platzierung des Massagesessels Platzierung Stellen Sie sicher, dass der Abstand zur Wand mindestens 10 cm beträgt, damit der Sessel vollständig in die Liegeposition fahren kann. Schützen Sie den Sessel vor zu hohen Raum- temperaturen. Platzieren Sie ihn so, dass direkte Sonneneinstrahlung vermieden und genügend Abstand zu Heizgeräten gewährleistet wird. - Seite 7 3. Platzierung des Massagesessels Massagesessel umstellen Verwenden Sie die Rollen auf der Rückseite, um den Massagesessel zu bewegen. Bewegen Sie den Sessel, indem Sie ihn um etwa 45° nach hinten kippen (siehe Abbildung). Anmerkung: Übermäßige Kraftaufwendung führt dazu, dass der Sessel umkippt und gegebenenfalls beschädigt wird.
-
Seite 8: Aufbau Und Montage
4. AUFBAU UND MONTAGE 4. Aufbau und Montage Installation der Armlehne 1. Schalten Sie das Gerät ein und fahren Sie mithilfe der Fernbedienung die Rückenlehne zurück. 2. Stecken Sie den Kabelbaumanschluss und die Luftleitung auf die Seite des Stahlrahmens sowie in die entspre- chenden Anschlüsse der Armlehne (Abbildung 1). - Seite 9 4. Aufbau und Montage Inbetriebnahme des Wadenmechansimus 1. Stecken Sie das Kabel und die Luftleitung des Wadenmechanismus in den jeweiligen Anschluss an der Vorder- seite des Strahlrahmens (Abbildung 1). 2. Öffnen Sie nach dem Anschließen die Abdeckung der Halterung auf beiden Seiten des Stahlrahmens (Ab- bildung 2).
-
Seite 10: Aufbau Des Sessels
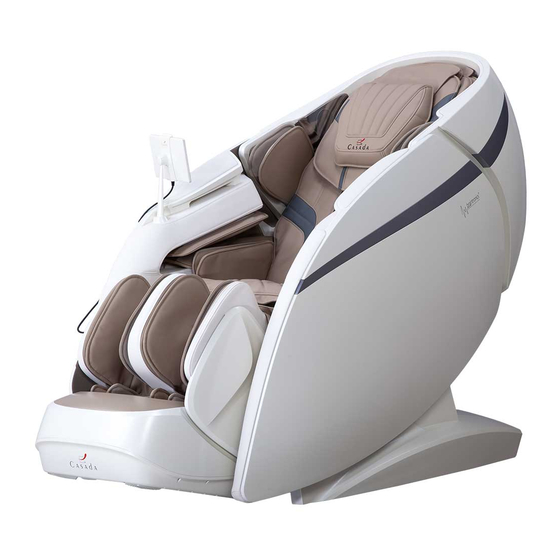
5. AUFBAU DES SESSELS 5.1 Elemente am Massagesessel Großes Kissen Beleuchtung Kopfkissen Schnellbedienfeld Fernbedienung Gesundheitsscanner Arm Luftpolster Schultermechanismus / Rückenpolster Fußteil Seitenverkleidung Schulter Luftpolster Beleuchtung... -
Seite 11: Funktionen Des Massagesessels
5.2 Funktionen des Massagesessels Schultern Kopf • Luftpolstermassage • Lautsprecher Arm (rechts) Arm (links) • Fernbedienung • NFC induktive Ladestation • Sprachsteuerung • USB-Anschluss • Luftpolstermassage • Luftpolstermassage Hände • Ionen Luftzufuhr • Luftpolstermassage Kopf und Nacken, bis Gesäß Beine •... -
Seite 12: Gürtelwärmer
5.3 Gürtelwärmer Anwendung des Gürtelwärmers • Der Sessel ist mit einem einzigartigen Gürtelwärmer mit innovativer Graphenheizung ausgestattet, die nicht nur Schultern, sondern auch Rücken, Taille und den Bauchbereich wärmt. Der Gürtelwärmer kann ganz nach Bedarf anwendet werden. Auf den Schultern positioniert, werden die Akupunkturpunkte Bingfend, Tianzong, Yunmen und Qihu erwärmt. - Seite 13 5.3 Gürtelwärmer Darstellung der Anwendung auf Darstellung der Anwendung auf Rücken und Taille. Schulter und Bauch.
-
Seite 14: Aufbau Der Fernbedienung
5.4 Aufbau der Fernbedienung Hauptmenü An-/ Ausschaltknopf Pausieren oder Fortsetzen der Massage Aktiviert oder deaktiviert die Gürtelwärme Aktiviert oder deaktiviert die Heizfunktion in der Körpermitte Aktiviert oder deaktiviert die O2-Ion-Funktion Aktiviert oder deaktiviert der Fußrollen Aktiviert oder deaktiviert Wadenknetfunktion Aktiviert oder deaktiviert die Sprachsteuerungsfunktion Anpassen der Massageintensität 10. - Seite 15 5.4 Aufbau der Fernbedienung 15. Anzeige des aktuellen Status des Massagesessels 16. Auswahl der Automatischen Massageprogramme 17. Auswahl der manuell einstellbaren Funktionen 18. Einstellen der Sitzposition und den Winkel der Sitzhaltung 19. Einstellungen 20. Auswahltaste für die Massagetechniken 21. Erhöhen oder Verringern der Luftdruckintensität am Oberkörper 22.
-
Seite 16: Aufbau Des Schnellbedienfelds
5.5 Aufbau des Schnellbedienfelds 1. Ein-/Aus-Taste Drücken Sie die Taste drei Sekunden, um den Massagesessel zu starten oder auszuschalten. Drücken Sie die Taste kurz, um den Sessel zu pausieren bzw. um ihn in Stand-by zu schalten. 2. Zero Gravity Taste Drücken Sie diese Taste, um in die Schwerelosigkeitsposition gefahren zu werden. -
Seite 17: Vor Der Anwendung
6. VOR DER ANWENDUNG 6. Vor der Anwendung Umgebung prüfen Stellen Sie sicher, dass sich im Bereich des Sessels keine Personen, Haustiere oder Objekte befinden. Zwischenräume prüfen Stellen Sie vor der Massage sicher, dass sich an den Beinen, Füßen etc. keine Fremdkörper ver- fangen haben. - Seite 18 6. Vor der Anwendung Stromzufuhr anschließen Stecken Sie das Stecken Sie den Stecker Schalten Sie den Stromkabel ein. in die Steckdose. Hauptschatler ein (Position „I“). • Bitte prüfen Sie das Stromkabel und den Stecker vor der Anwendung auf Beschädigungen. • Bitte verwenden Sie eine Stromquelle, die in Übereinstimmung mit den Betriebsanforderun- gen dieses Produktes steht.
-
Seite 19: Bedienungsanleitung
7. BEDIENUNGSANLEITUNG 7.1 Massagesessel bedienen 1. Drücken Sie die Ein/Aus-Taste an der Seite der Fernbedienung oder halten Sie die Ein/Aus-Taste auf der Armlehne lange gedrückt, damit das System startet. 2. Wählen Sie nach dem Start des Systems die Massageintensität aus, indem Sie auf die Tasten „Sanft” „Moderat”... - Seite 20 7.1 Massagesessel bedienen 4. Der Sessel scannt nun Ihre Körperform. Warten Sie, bis die Körperformerkennung beendet ist. Sie können auch die Überspringen Taste drücken, um die Prüfung auszulassen und direkt mit der Massage zu beginnen. Nach dem Scannen der Körperform, gibt die Fernbedienung ein akustisches Signal. Das Signal macht Sie darauf aufmerksam, dass Sie nun eine Feineinstellung der Schulterposition vornehmen können.
-
Seite 21: Pausenfunktion
7.1 Massagesessel bedienen Position zu hoch Perfekte Position Position zu niedrig 7.2 Pausenfunktion (Bitte verwenden Sie diese Funktion erst nach dem Einschalten des Geräts [siehe Seite 19].) Drücken Sie nach dem Einschalten des Massagesessels die Pausentaste um den Massagevorgang zu Pausie- ren. - Seite 22 7.3 Automatikprogramme AI Intelligent - Programme Funktion Beschreibung Relax Der obere Massageroboter wird verwendet, um den Nacken, die Schultern und den Fengchi-Akupunkt durch Kneten zu massieren. Anschließend wird dann mit Klopfen und Shiatsu gearbeitet, um den ganzen Körper zu massieren. Der untere Massageroboter wird zur Massage von Taille und Hüfte durch Kneten und Klopfen verwendet.
- Seite 23 7.3 Automatikprogramme Entspannung & Aktivierung - Programme Funktion Beschreibung Meridian Massage Massage der Schultern, des Nackens, des Rückens und der Taille durch Kneten, Klopfen und Shiatsu-Techniken, um die Meridiane zu behandeln. Nacken & Schulter Massiert den Nacken und die Schultern vor allem mit Knet- und Dehntechniken so- wie den oberen Rücken mit einer Massage.
- Seite 24 7.3 Automatikprogramme Exklusiv für die Familie - Programme Funktion Beschreibung Power Massiert die Schultern, den Nacken, den Rücken und die Taille hauptsächlich durch Kneten, Klopfen, Kneten & Klopfen. Das lindert die Müdigkeit, fördert die Blutzirku- lation und baut den Stress durch die Tiefenmassage ab. Die Massageintensität ist moderat und dadurch insbesondere für Männer geeignet.
- Seite 25 7.3 Automatikprogramme Allgemeine Entspannung - Programme Funktion Beschreibung Energie Tiefenmassage des ganzen Körpers durch Kneten, Klopfen und Shiatsu-Techniken, um die Vitalität des menschlichen Körpers zu wecken und die Energie zu stimulie- ren. Auszeit Massiert den Rücken und die Taille durch Knet- und Klopftechniken und drückt dabei den Shenyu-Akupunkt.
-
Seite 26: Fernbedienung
7.4 Fernbedienung (Bitte verwenden Sie diese Funktion erst nach dem Einschalten des Geräts [siehe Seite 19].) Programmauswahl Wählen Sie die Taste auf der linken Menüleiste, um in das Auswahlmenü zu gelangen. Zur Auswahl stehen Ihnen folgende Einstellungen: Massagetechnik, Bereich, 4D-Intensität, Position, Massageweite und Massagege- schwindigkeit. - Seite 27 7.4 Fernbedienung Funktion Einstellen der Massagerollen Stop Drücken Sie diese Taste, um ohne Technik zu massieren. Kneten Geschwindigkeit und Stärke kön- nen eingestellt werden. Tap I Geschwindigkeit, Breite und Stärke können eingestellt werden. • In fünf Stufen einstellbare Geschwindigkeit. Tap II Geschwindigkeit, Breite und Stärke können eingestellt werden.
- Seite 28 7.4 Fernbedienung 2. Das Massagebereich-Menü bietet Ihnen fünf Bereiche als Option an: Punktuell, Partiell, Komplett, Oberer (Rücken), Unterer (Rücken). Wählen Sie den gewünschten Bereich für die Massage aus. Taste Beschreibung Punktuelle Massage Lokale Vorwärts- und Rückwärtsmassage in einem Teilbereich. Volle Vorwärts- und Rückwärtsmassage. Vorwärts- und Rückwärtsmassage des oberen Rückens.
- Seite 29 7.4 Fernbedienung 3. Sie können die 4D-Intensität im Menü einstellen. Es stehen die einstellbaren Stufen 1-5 zur Verfügung, wobei 1 die niedrigste und 5 die stärkste Stufe ist. Je höher die 4D-Intensität eingestellt ist, desto weiter ragt die Massageroboter hervor und desto stärker ist die Massage. Wählen Sie die Plus-Taste oder Minus-Taste , um die 4D-Intensität anzupassen.
- Seite 30 7.4 Fernbedienung Level 0 Level 1 Level 2 Level 3 Level 4 Level 5 Taste Beschreibung Drücken Sie diese Taste, um die 4D-Intensität in den Stufen 1 bis 5 zu erhöhen. Drücken Sie diese Taste, um die 4D-Intensität in den Stufen 1 bis 5 zu verringern. Hinweis: Sie können die 4D-Intensität mit der Plus-Taste oder der Minus-Taste auch auf dem...
- Seite 31 7.4 Fernbedienung 4. Für das Einstellen des Massageroboters wählen Sie den nach oben weisendem Pfeil oder den nach unten weisendem Pfeil , um die Feinjustierung der Massagehand nach oben oder unten vorzunehmen. Wählen Sie die Massagebreiten wie in der Abbildung unten dargestellt aus. (1) Die Breite kann nur eingestellt werden, wenn der Benutzer den Fernbedienungsmodus bei der Auswahl der Massagetechnik oder des Massagebereichs aktiviert.
- Seite 32 7.4 Fernbedienung Level 0 Level 1 Level 2 Level 3 Level 4 Level 5 Taste Beschreibung Drücken Sie diese Taste, um die Massagebreite in den Stufen 1 bis 5 zu erhöhen. Drücken Sie diese Taste, um die Massagebreite in den Stufen 1 bis 5 zu verringern. Wählen Sie die Massagegeschwindigkeit wie in der Abbildung unten dargestellt aus.
- Seite 33 7.4 Fernbedienung Hinweis: Sie können auch mit den Tasten Massagegeschwindigkeit + oder Massagegeschwindigkeit – auf der „Home“-Seite die Geschwindigkeit einstellen. Level 0 Level 1 Level 2 Level 3 Level 4 Level 5 Taste Beschreibung Drücken Sie diese Taste, um die Massageschwindigkeit in den Stufen 1 bis 5 zu erhöhen.
- Seite 34 7.4 Fernbedienung Gehen Sie in das Manuelle-Menü, um den Luftmodus auszuwählen, wie in der folgenden Abbildung gezeigt wird. Der Luftmodus umfasst den kompletten Rücken, den oberen Rücken oder den unteren Rücken. Außerdem gibt es auf der Innenseite des Arms eine Handrolle Massagefunktion, die sich automatisch einschaltet, wenn die Ganzkörper Luftmassage ausgewählt wurde.
- Seite 35 7.4 Fernbedienung Hinweis: Sie können auf der „Home“-Seite auch die Taste für die Luftmassage drücken und aus dem Pop-Up-Menü den gewünschten Luftmassage Bereich auswählen (Diese Funktion ist eine Schnelltaste zur Luft- massage auf der aktuellen „Home“-Seite der Fernbedienung). Für das Einstellen der Luftintensität muss die Luftmassage eingeschaltet sein. Bei den insgesamt 5 Stufen ist 1 die niedrigste und 5 die höchste Stufe.
- Seite 36 7.4 Fernbedienung Level 0 Level 1 Level 2 Level 3 Level 4 Level 5 Taste Beschreibung Drücken Sie diese Taste, um die Kompressionsintensität zwischen 1 bis 5 zu erhöhen. Drücken Sie diese Taste, um die Kompressionsintensität zwischen 1 bis 5 zu verringern.
-
Seite 37: Einstellung Des Sitzes
7.5 Einstellung des Sitzes (Bitte verwenden Sie diese Funktion erst nach dem Einschalten des Geräts [siehe Seite 19].) Klicken Sie auf die Taste Winkel in der Menüleiste auf der linken Seite des Bildschirms, um in das Einstellungs- menü zu kommen, wo Sie den Winkel vom Sessel anpassen können. Dazu gehören das Ausfahren der Beinstütze, das Ausfahren der Fußstütze, das Anheben der Beinstütze, das Anheben des Gelenks, das Anheben der Rücken- lehne, Schwerelosigkeit I und II und andere Einstellfunktionen. - Seite 38 7.5 Einstellung des Sitzes 3. Verlängern und Verkürzen de Beinstütze Taste Beschreibung Taste, um die Beinstütze zu verkürzen: Stellen Sie das Verkürzen der Beinstütze mit Beinstütze der Fernbedienung ein. Halten Sie diese Taste gedrückt, um die Beinstütze lang- verkürzen sam nach oben zu bewegen. Lassen Sie die Taste zum Anhalten los. Taste, um die Beinstütze zu verlängern: Stellen Sie das Verlängern der Beinstütze Beinstütze mit der Fernbedienung ein.
-
Seite 39: Einstellungen
Sie die Option Bluetooth aus. Aktivieren Sie das Bluetooth und suchen Sie nach Geräten in Ihrer Umgebung. b. Das Smart-Gerät sucht nach dem entsprechenden Bluetooth-Name - Skyliner III-XXXX (“X” steht für eine individuelle Nummer). Verbinden Sie Ihr Gerät mit dem Sessel. - Seite 40 7.6 Einstellungen 3. Sprachsteuerung a. Sagen Sie in der Nähe der linken Armlehne „Hi Alice“ oder „Hey Alice“, um den Sprachassistenten zu aktivieren, alternativ können Sie auch die Sprachtaste an der linken Armlehne drücken. Der Sprachassistent antwortet „I am here“ (Ich bin hier), um zu signalisieren, dass er zuhört. b.
- Seite 41 7.6 Einstellungen Sprachsteuerung Sage „Hi Alice“ oder „Hey Alice“ | Antwort: I am here. Die Kommunikation mit dem Sprachassistenten erfolgt nur auf Englisch. Befehl Antwort Massage on (Massage ein) Ok, massage on (Ok, Massage einschalten) Massage close (Massage beenden) Ok, massage close (Ok, Massage beenden) Total Relax (Relax) Ok, Total Relax (Ok, Relax) Energy Boost (Energie)
- Seite 42 7.6 Einstellungen 4. Energiesparmodus Energiesparmodus anschalten: Im Energiesparmodus können die Schnelltasten der Armlehne und die Sprach- steuerungsfunktion nicht verwendet werden, sie müssen im eingeschalteten Zustand verwendet werden. Energiesparmodus ausschalten: Die Schnelltasten der Armlehne und die Sprachsteuerungsfunktion können auch im Standby-Modus verwendet werden. 5.
-
Seite 43: Gesundheitsscan
7.7 Gesundheitsscan (Bitte verwenden Sie diese Funktion erst nach dem Einschalten des Geräts [siehe Seite 19].) 1. Starten des Gesundheitsscans a. Klicken Sie auf die Taste Gesundheits-Scan in der Menüleiste auf der linken Seite des Bildschirms. Um die Gesundheitsprüfung zu starten, drücken Sie und legen Sie dann vorsichtig den Zeige- finger oder den Mittelfinger auf den Sensor. - Seite 44 7.7 Gesundheitsscan 2. Empfohlenes Programm Wenn die normale Erkennung abgeschlossen ist, werden die Herzfrequenz, der Blutsauerstoff und der Ermü- dungsgrad angezeigt. Der Blutsauerstoff liegt normalerweise in einem Bereich zwischen 95 % und 99 %. Die Ermüdungsgrade umfassen gut, leicht, mäßig und schwer. Basierend auf Ihrem Ermüdungsgrad wird Ihnen ein automatisches Programm empfohlen.
- Seite 45 7.7 Gesundheitsscan 4. Beenden des Gesundheitsscans Drücken Sie während der Zustandserkennung die Taste um die Erkennung zu beenden und in den Massagezustand vor der Erkennung zurückzukehren.
-
Seite 46: Benutzerdefiniert
7.8 Benutzerdefiniert (Bitte verwenden Sie diese Funktion erst nach dem Einschalten des Geräts [siehe Seite 19].) Klicken Sie auf die Taste Benutzerdefiniert in der Menüleiste auf der linken Seite des Bildschirms. Dort haben Sie die möglichkeit Benutzerdefinierte Massagen zu erstellen und danach abzurufen. Zum Abrufen drücken Sie entweder „Benutzerdefiniert 1“... -
Seite 47: Andere Funktionen
7.9 Andere Funktionen (Bitte verwenden Sie diese Funktion erst nach dem Einschalten des Geräts [siehe Seite 19].) Wählen Sie auf dem Display unter „Home“ die Taste „Gürtelwärmer“ , um die Heizfunktion vom Gürtelwärmer (eine Graphenheizung) ein- oder auszuschalten. Nach dem Einschalten der Heizfunktion wird für 3 Minuten Wärme abgegeben. - Seite 48 7.9 Andere Funktionen Wählen Sie auf dem Display unter „Home“ die Taste „O2-Ion“ , um die O2-Ion-Funktion ein- oder auszuschalten. Klicken Sie auf der „Home“ Seite die Taste „Roller“ , um die Fußmassagefunktion mit drei einstellbaren Geschwindigkeiten ein- oder auszuschalten. Taste Beschreibung Drücken Sie diese Taste, um die Funktion der Sohlenrolle zu aktivieren oder...
- Seite 49 7.9 Andere Funktionen Wählen Sie auf dem Display im „Home“ die Taste „Bein“ , um die Wadenmassage ein- oder auszu- schalten. Auf der Innenseite der Wade befindet sich eine Massagefunktion mit Reibung, auf der Außenseite eine Airbag-Massagefunktion, die die Steifheit der Wadenmuskulatur oder Verspannungen, die durch langes Stehen verursacht werden, lindern kann.
- Seite 50 7.9 Andere Funktionen Wählen Sie auf dem Display im Bereich „Home“ die Taste „Schulter“ und drücken Sie im Menü die Pfeiltasten nach oben und unten, um die Schulterposition in insgesamt 11 Stufen manuell anzupassen. Drücken Sie auf dem Display im Bereich „Home“ die Taste „Fußgröße“...
- Seite 51 7.9 Andere Funktionen Wählen Sie auf dem Display im Bereich „Home“ die Taste „Massagezeiteinstellung“ . Drücken Sie die Plus- und Minus-Pfeiltaste im Pop-Up-Menü, um die Massagezeit zu verlängern oder zu verkürzen. Die Zeit wird in 5 Minuten Schritten verkürzt oder verlängert. Die maximale Laufzeit beträgt 40 Minuten. Wählen Sie auf dem Display im Bereich „Home“...
-
Seite 52: Speichern
7.10 Speichern (Bitte verwenden Sie diese Funktion erst nach dem Einschalten des Geräts [siehe Seite 19].) Klicken Sie auf die Taste „Speicher“ in der Menüleiste auf der linken Seite des Bildschirms, um auf den Spei- chern der Massagefunktion zuzugreifen. Dieser bietet zwei Kategorien: Speicherung und Abrufen der Massage- funktion. -
Seite 53: Massage Beenden
7.11 Massage beenden Drücken Sie während der Massage die Taste der Fernbedienung oder die Taste der rechten Armlehne, um das Gerät auszuschalten. Alle Massagefunktionen werden beendet und der Sessel wird auf seine Startposition zurückgesetzt. Es werden außerdem alle Massagefunktionen automatisch ausgeschaltet, wenn die Massagedauer abgelaufen ist, wobei die Rückenlehne und die Beinstütze nicht in die Startposition zurückgesetzt werden. -
Seite 54: Instandhaltung
8. INSTANDHALTUNG 8.1 Reinigung und Wartung Reinigung von Kunstleder- und Kunststoffteilen Wischen Sie das Leder mit einem weichen, trockenen Tuch ab. • Verwenden Sie keine Chemikalien wie Verdünner, Benzin, Alkohol usw., um das Gerät zu reinigen. • Bei der Verwendung handelsüblicher Lederpflegemitte (Tücher) beachten Sie bitte die Gebrauchsanweisung •... -
Seite 55: Fehlerbehebung
Sie sich bitte an ein autorisiertes Service-Center. Bei Fragen oder Zweifeln zu diesem Produkt, wenden Sie sich bitte an das zuständige Servicepersonal. Technische Details Model: Skyliner III Maße: Aufrecht: 85,5 x 177 x 130 cm Liegend: 85,5 x 190 x 90,5 cm... -
Seite 56: Besonderheiten
9. BESONDERHEITEN 9. Besonderheiten ROLLEN KLOPFEN Das Rollen ist eine angenehme Ab- Mit der Hand kante, der flachen Hand wechslung zwischen Spannung und oder der Faust werden kurze, klopfende Lösung der Muskulatur und wirkt daher Bewegungen ausgeführt. Dadurch wird besonders beruhigend und entspan- die Durchblutung gefördert und die nend. - Seite 57 9. Besonderheiten ARTHROSE TRAKTION STRECKMASSAGE RÜCKEN Bei der Traktion handelt es sich um Die gezielte Streckmassage aktiviert den sanften Streckdruck. Dieser wirkt Körper und hat eine belebende Wirkung stimulierend auf die Knorpel, so dass auf den gesamten Organismus. der Flüssigkeitstransport angeregt, Nährstoffe besser aufgenommen und 4D MASSAGE Einschränkungen bei Arthrose gemindert...
- Seite 58 9. Besonderheiten MUSIK DOPPELSENSORISCHER KÖRPERSCAN Zusätzlich entspannen und genießen mit Der Massagesessel führt einen der Musikfunktion. Körperscan durch, um die wichtigsten Bereiche des gesamten Rückenbereichs zu erfassen und so den optimalen Druck BLUETOOTH während der Massage zu gewährleis- ten. Die Scan-Technologie erkennt die Eine kabellose Verbindung zu Ihrem Position Ihrer Schultern, diese kann bei Smartphone oder Tablet sichert Ihnen...
-
Seite 59: Rechtliches
Casada International GmbH Obermeiers Feld 3 33104 Paderborn, Germany info@casada.com www.casada.com Copyright Bilder und Texte unterstehen dem Copyright von CASADA International GmbH und dürfen ohne ausdrückliche Bestätigung nicht weiter verwendet werden. Copyright © 2022 CASADA International GmbH. Alle Rechte vorbehalten. A1.3-SK3-DE0723... - Seite 60 Today, CASADA devices are available worldwide. Continuous development, unmistakable design and a strict focus on improving quality of life are just as much characteristic of CASADA products as reliable and top-class quality. www.casada.com...
- Seite 61 In order for you to enjoy the benefits of this device for a long time, we would like to ask you, to read and follow the safety instructions carefully. We wish you much pleasure with your personal Skyliner III. Table of contents 1.
-
Seite 62: Safety Instructions
1. Safety Instructions Please read the following instructions carefully before using your massage chair to ensure that it functions properly and with optimal efficiency. Please keep these operating instructions for further use! • The massage chair conforms to recognised technical principles and the latest safety regulations. •... -
Seite 63: Contraindications
2. Contraindications If you are unsure whether you should use the massage chair, be sure to consult your doctor. • Use of the massage chair is prohibited during pregnancy or if any of the following complaints are present in the massage area: recent injuries, thrombotic diseases, any kinds of inflammations and swellings or cancer. -
Seite 64: Placement Of The Massage Chair
3. Placement of the Massage Chair Placement Make sure that there is at least 10 cm of space behind the chair so that the chair can be tilted. Protect the chair from excessive room tempera- tures. Position it to avoid direct sunlight and to ensure sufficient distance from heating devices. - Seite 65 3. Placement of the Massage Chair Repositioning the Massage Chair Use the castors on the back to move the massage chair. Move the chair by tilting it backwards by about 45° (see illustration). Note: Excessive force will cause the chair to tip over and be damaged.
-
Seite 66: Set-Up And Assembly
4. Set-up and Assembly Installing the Armrest 1. Switch on the unit and lower the backrest using the remote control. 2. Plug the wiring harness connector and the air line into the side of the steel frame and into the corresponding connectors of the armrest (Figure 1). - Seite 67 4. Set-up and Assembly Starting the Calf Mechansim 1. Plug the cable and the air line of the calf mechanism into the respective connector on the front of the steel frame (Figure 1). 2. After connecting, open the cover of the bracket on both sides of the steel frame (Figure 2). 3.
-
Seite 68: Stucture Of The Chair
5. STUCTURE OF THE CHAIR 5.1 Elements on the massage chair Large cushion Illumination Small cushion Quick control panel Remote control Health scanner Arm air cushion Shoulder mechanism / back cushion Foot section Side panel Shoulder air cushion Illumination... -
Seite 69: Functions Of The Massage Chair
5.2 Functions of the massage chair Shouders Head • Air cushion massage • Speakers Arm (right) Arm (left) • Remote control • NFC inductive charging station • Voice control • USB charging socket • Air cushion massage • Air cushion massage Hands •... -
Seite 70: Belt Heater
5.3 Belt heater Using the belt heater • The chair is equipped with a unique wrap with innovative graphene heating, which not only warms the shoul- ders, but also the back, waist and abdominal area. The user can apply the wrap as needed. When placed over the shoulder, it warms the acupuncture points of Bingfend, Tianzong, Yunmen and Qihu. - Seite 71 5.3 Belt heater Illustration showing use for back Illustration showing use for shoulder and waist. and abdomen.
-
Seite 72: Structure Of The Remote Control
5.4 Structure of the remote control Main menu On-/ Off-Button Pause or continue the massage Activates or deactivates the belt heat Activates or deactivates the heating function in the center of the body Activates or deactivates the O2 ion function Activates or deactivates the foot rollers Activates or deactivates calf knead function Activates or deactivates the voice control function... - Seite 73 5.4 Structure of the remote control 15. Display of the current status of the massage chair 16. Selection of automatic massage programs 17. Selection of manually adjustable functions 18. Adjusting the position of the seat and the angle of the sitting posture 19.
-
Seite 74: Structure Of The Quick Control Panel
5.5 Structure of the quick control panel 1. On/ Off button Press the button for three seconds to start or switch off the massage chair. Press the button briefly to pause the chair or to switch it to stand-by. 2. Zero Gravity button Press this button to be moved to the zero gravity position. -
Seite 75: Before Use
6. Before use Checking Surroundings Make sure that there are no people, pets or objects in the area of the chair. Check gaps Before the massage, make sure that no foreign objects are caught on the legs, feet, etc. Make sure that your hands, feet and head do not get into the area between the lower leg mecha- nism and the main part or between the armrest and the capsule. - Seite 76 6. Before use Connect power supply Connect the power cable. Insert the plug into Switch on the main swith the socket. (position „I“) • Please check the power cable and plug for damage before use. • Please use a power source that is in accordance with the operating requirements of this product.
-
Seite 77: Operating Instructions
7. OPERATING INSTRUCTIONS 7.1 Operate massage chair 1. Press the On/Off button on the side of the remote control or long press the On/Off button on the armrest for the system to start. 2. After starting the system, select the massage intensity by pressing the “Gentle” “Soothing”... - Seite 78 7.1 Operate massage chair 4. The chair now scans your body shape. Wait until your body shape check has been fully scanned. You can also press the Skip button or skip the test and start the massage directly. After scanning your body shape, the remote control will give an acoustic signal. The signal alerts you that you can now fine-tune the shoulder position.
-
Seite 79: Pause Function
7.1 Operate massage chair Position to high Perfect position Position to low 7.2 Pause function (Please use this function only after switching on the chair [see page 77].) After switching on the massage chair, press the Pause button to pause the massage process. Press the Pause button again to resume the programme. - Seite 80 7.3 Automatic programs AI Intelligent - Programs Function Description Total Relax The upper mechanical core is used to massage the neck, shoulders and Fengchi acupoint by kneading. This is followed by tapping and shiatsu to massage the whole body. The lower mechanical core is used to massage the waist and hips by kneading and tapping.
- Seite 81 7.3 Automatic programs Relaxing and activating - Programs Function Description Meridian Treatment Massage of the shoulders, neck, back and waist using kneading, tapping and shiatsu techniques to treat the meridians. Neck & Shoulder Massages the neck and shoulders mainly with kneading and stretching techniques and the upper back with a medical massage.
- Seite 82 7.3 Automatic programs Exclusiv for Family - Programs Function Description Power Massage the shoulders, neck, back and waist mainly by kneading, tapping and kneading&tapping. This relieves fatigue, promotes blood circulation and reduces stress through deep massage. The massage intensity is moderate, making it suitable for men.
- Seite 83 7.3 Automatic programs Overall Relaxation - Programs Function Description Energy Boost Deep massage of the whole body using kneading, tapping and shiatsu techniques to awaken the vitality of the human body and stimulate energy. Lunch Break Massages the back and waist using kneading and tapping techniques while press- ing the Shenyu acupoint.
-
Seite 84: Remote Control
7.4 Remote Control (Please use this function only after switching on the chair [see page 77].) Program selection Select the button on the left menu bar to enter the selection menu. You can choose from the following settings: Massagetechnique, Massage Area, 4D intensity, Position, Massage Width und Massage Speed. 1. - Seite 85 7.4 Remote control Function Setting the Massage Rollers Stop Press this button for massaging without a technique. Knead Speed and strength can be set. Tap I Speed, width and strength can be set. • Speed can be set at five levels.
- Seite 86 7.4 Remote control 2. The massage area menu offers you five areas as options: Point-by-Point, Partial, Full, Upper (back) and Lower (back). Select the desired area for the massage. Button Description Fixed point massage Local forwards and backwards massage in a partial area. Full forwards and backwards massage.
- Seite 87 7.4 Remote control 3. You can set the 4D intensity in the menu. Setting levels 1-5 are available, with 1 being the lowest and 5 the strongest. The higher the 4D intensity is set, the further the massage roller protrudes and the stronger the massage.
- Seite 88 7.4 Remote control Level 0 Level 1 Level 2 Level 3 Level 4 Level 5 Button Description Press this button to increase the 4D intensity in levels 1 to 5. Press this key to decrease the 4D intensity in levels 1 to 5. Please note: You can also set the 4D intensity with the Plus button or the Minus button n the...
- Seite 89 7.4 Remote control 4. To set the massage robot, select the arrow pointing upwards or the downward pointing arrow , to fine- tune the massage hand up or down. Select the massage widths as shown in the illustration below. (1) The width can only be set when the user activates the remote control mode when selecting the massage technique or massage area.
- Seite 90 7.4 Remote control Level 0 Level 1 Level 2 Level 3 Level 4 Level 5 Button Description Press this button to increase the massage width in steps 1 to 5. Press this button to decrease the massage width in steps 1 to 5. Select the massage speed as shown in the illustration below.
- Seite 91 7.4 Remote control Level 0 Level 1 Level 2 Level 3 Level 4 Level 5 Button Description Press this button to increase the massage speed in steps 1 to 5. Press this button to decrease the massage speed in steps 1 to 5.
- Seite 92 7.4 Remote control Go to the Manual menu to select the Air mode as shown in the following figure. The air mode includes full back, upper back or lower back. There is also a hand roller massage function on the inside of the arm that automatically turns on when the full body air massage is selected.
- Seite 93 7.4 Remote control Please note: You can also press the air massage button on the “Home” screen and select the de- sired air massage area from the pop-up menu. (This function is a quick key to the air massage on the current “Home”...
- Seite 94 7.4 Remote control Level 0 Level 1 Level 2 Level 3 Level 4 Level 5 Button Description Press this key to increase the compression intensity between 1 to 5. Press this key to decrease the compression intensity between 1 to 5. Please note: You can select the Upper Body Air Massage + button or Lower Body Air Mas- sage -...
-
Seite 95: Adjusting The Chair
7.5 Adjusting the Chair (Please use this function only after switching on the chair [see page 77].) Click on the Angle button in the menu bar on the left side of the screen to enter the settings menu where you can adjust the angle of the chair. - Seite 96 7.5 Adjusting the Chair 3. Lengthening or shortening the legrest Button Description Button for shortening the legrest: Shorten the legrest using the remote control. Shortening Press and hold this button to slowly move the legrest upwards. Release the button legrest to stop.
-
Seite 97: Settings
Access the main menu of your smart device (e.g., mobile phone). Open Settings and select the Blue- tooth option. Activate the Bluetooth and search for devices in your vicinity. b. The smart device will search for the corresponding Bluetooth name - Skyliner III-XXXX (“X” stands for an individual number). Connect your device to the chair. - Seite 98 7.6 Settings 3. Voice control a. Say “Hi Alice” or “Hey Alice” near the left armrest to activate the voice assistant, or alternatively press the voice button on the left armrest. The voice assistant will respond “I am here” to indicate that it is listening.
- Seite 99 7.6 Settings Voice control Say “Hi Alice” or “Hey Alice” | Answer: I am here. Communication with the voice assistant is in English only. Command Response Massage on Ok, massage on Massage close Ok, massage close Total Relax Ok, Total Relax Energy Boost Ok, Energy Boost Sweet Dream...
- Seite 100 7.6 Settings 4. Energy-saving mode Energy-saving mode on: The armrest quick buttons and voice control functions cannot be used in energy-sav- ing mode; they must be used when switched on. Energy-saving mode off: The quick buttons on the armrest and the voice control function can also be used in standby mode. 5.
-
Seite 101: Health Detection
7.7 Health detection (Please use this function only after switching on the chair [see page 77].) 1. Starting the Health detection a. Click on the Health button in the menu bar on the left side of the screen. To start the health detec- tion, press and then gently place your index finger or middle finger on the sensor. - Seite 102 7.7 Health detection 2. Recommended Programm When the normal check is complete, heart rate, blood oxygen and fatigue level are displayed. Blood oxygen is normally in a range between 95% and 99%. Fatigue levels include good, light, moderate and heavy. Based on your fatigue level, an automatic programme is recommended.
- Seite 103 7.7 Health detection 4. Ending the Health Scan During the health scan, press the button to stop the ckeck process and return to the massage mode running before the check.
-
Seite 104: User Defined
7.8 User Defined (Please use this function only after switching on the chair [see page 77].) Click on the User-Defined button in the menu bar on the left side of the screen. There you select either “Custom- ise 1” or “Customise 2” for the massage. (This is only possible if the corresponding user definition has been set and saved beforehand.) Click either the “Customise 1 edit”... -
Seite 105: Other Funtions
7.9 Other funtions (Please use this function only after switching on the chair [see page 77].) On the display under “Home” , select the “Belt heater” button , to switch the heating function of the wrap (graphene heating) on or off. After switching on the heating function, heat will be emitted for 3 minutes. -
Seite 106: Other Functions
7.9 Other functions On the display under “Home” select the “O2 Ion” button , to switch the O2 ion heating function on or off. On the “Home” screen , click on the “Roller” button , to switch the foot massage function on or off with three adjustable speeds. - Seite 107 7.9 Other functions On the display under “Home” , select the “Calf” button , to switch the calf massage function on or off. There is a friction massage function for the inside of the calf and an air cushion massage function for the outside, which can relieve stiffness in the calf muscles or tension caused by standing for long periods of time.
-
Seite 108: Other Function
7.9 Other function On the display under “Home” , select the “Shoulder” button and press the up and down arrow buttons in the pop-up menu to adjust the shoulder position to a total of 11 levels. On the “Home” screen display , press the “Foot Size”... - Seite 109 7.9 Other functions On the “Home” screen display , select the “Massage Time Setting” button . Press the plus and minus arrow button in the pop-up menu to lengthen or shorten the massage time. The time is always shortened or length- ened in 5 minute steps.
-
Seite 110: Memory
7.10 Memory (Please use this function only after switching on the chair [see page 77].) Click on the “Memory” button in the menu bar on the left side of the screen to access the massage function memories. There are two categories: saving and recall of the massage function. The massage can be saved under “Save I”, “Save II”... -
Seite 111: Ending Massage
7.11 Ending massage During the massage, press the button on the remote control or the button on the right armrest to switch off the unit. All massage functions are ended, and the chair is reset to its starting position. All massage functions are automatically switched off when the massage time has elapsed;... -
Seite 112: Maintenance
8. MAINTENANCE 8.1 Cleaning and maintenance Cleaning synthetic leather and plastic parts Wipe the synthetic leather with a soft, dry cloth. • Do not use chemicals such as thinner, petrol, alcohol, etc. to clean the unit. • When using commercially available leather care products (cloths), please adhere to the instructions for use. •... -
Seite 113: Troubleshooting
If you have any questions or concerns about this product, please contact the service personnel. Technical details Model: Skyliner III Dimensions: Upright: 85,5 x 177 x 130 cm Reclining: 85,5 x 190 x 90,5 cm Weight:... -
Seite 114: Specials
9. Specials ROLLING SOLE ROLLER Pleasant alternation between relaxation The foot massage stimulates the nerve and releasing the muscles – also endings and certain organs of the body, perfectly suited for a final massage, for which also relaxes the muscles. relaxation and recovery of the muscles. - Seite 115 9. Specials ADJUSTABLE PILLOW SHIATSU If necessary, the double cushion can be Shiatsu (finger press) is a form of body placed to reduce the neck and shoulder therapy originating in Japan. The massage intensity. massage technique consists of soft, rhythmic, far-reaching stretches and rotations.
- Seite 116 9. Specials HUMAN HANDS FEELING SLIM LCD TOUCH SCREEN REMOTE CONTROL Specially designed massage heads im- itate the hand motion of a professional Using the touch screen, you can select masseur. The maximum stretch space is your desired massage comfortably 6,5 cm, and the maximum stretch angle and adjust all other settings.
-
Seite 117: Legal
Obermeiers Feld 3 33104 Paderborn, Germany info@casada.com www.casada.com Copyright Pictures and texts are subject to the copyright of CASADA International GmbH and may not be used further without express confirmation. Copyright © 2022 CASADA International GmbH. All rights reserved. A1.3-SK3-GB0723... - Seite 118 < timetorelax Depuis la création de l’entreprise CASADA en 2000, ce nom est reconnu pour ses produits de grande qualité dans le domaine du bien-être et du fitness. Aujourd’hui, les appareils CASADA sont disponibles dans le monde entier. Un développement continuel à la pointe de l’innovation, un design unique et un seul objectif d’amélioration de la qualité...
- Seite 119 In order for you to enjoy the benefits of this device for a long time, we would like to ask you, to read and follow the safety instructions carefully. We wish you much pleasure with your personal Skyliner III. Sommaire 1.
-
Seite 120: Consignes De Sécurité
1. Consignes de sécurité Avant de mettre en route votre fauteuil massant, veuillez lire très attentivement les instructions suivantes afin de garantir une utilisation optimale du produit et d’obtenir ainsi les meilleurs résultats possibles. Veuillez conserver soigneusement ce manuel d’utilisation ! •... -
Seite 121: Contre-Indications
2. Contre-indications Si vous n’êtes pas sûr de pouvoir utiliser le fauteuil massant, nous vous recommandons vivement de consulter votre médecin. • Tout massage est contre-indiqué chez la femme enceinte, ainsi que chez les personnes présentant les troubles mentionnés ci-dessous : blessures récentes, troubles thrombotiques, inflammations et gonflements de toutes sortes, ainsi que les cancers. -
Seite 122: Placement Du Fauteuil Massant
3. Placement du fauteuil massant Placement Assurez-vous qu’il existe au moins 10 cm de distance entre le mur et l’appareil, afin que le fauteuil puisse entièrement passer en position allongée. Protégez le fauteuil des températures ambiantes élevées. Le placer de manière à éviter une expo- sition directe au soleil et à... - Seite 123 3. Placement du fauteuil massant Déplacer le fauteuil massant Utilisez les roues situées à l’arrière afin de dépla- cer le fauteuil de massage. Déplacez le fauteuil en le basculant vers l’arrière d’environ 45° (voir illustration). Remarque : exercer une force excessive entraîne le basculement du fauteuil, qui peut éventuelle- ment être endommagé.
-
Seite 124: Structure Et Montage
4. Structure et montage Installation de l’accoudoir 1. Allumez l’appareil et inclinez le dossier vers l’arrière en vous aidant de la télécommande. 2. Branchez le connecteur du faisceau de câbles du côté de l’armature en acier ainsi que dans les raccords correspondants de l’accoudoir (illustration 1). - Seite 125 4. Structure et montage Mise en service du mécanisme pour les mollets 1. Branchez le câble et la conduite d’air du mécanisme pour les mollets dans chaque raccord respectif à l’avant de l’armature métallique (illustration 1). 2. Après raccordement, ouvrez le couvercle du support des deux côtés de l’armature métallique (illustration 2). 3.
-
Seite 126: Structure Du Fauteuil
5. STRUCTURE DU FAUTEUIL 5.1 Éléments sur le fauteuil massant Grand coussin Éclairage Coussin de tête Panneau de commande rapide Télécommande Scanner de santé Coussin d’air bras Mécanisme des épaules / Coussin dorsal Repose-pied Revêtement latéral Coussin d’air épaule Éclairage... -
Seite 127: Functions Of The Massage Chair
5.2 Functions of the massage chair Épaules Tête • Massage par coussin d’air • Haut-parleurs Bras (droit) Bras (gauche) • Télécommande • Port USB • Commande vocale • Massage par coussin d’air • Massage par coussin d’air • Alimentation d’air par ions Mains Tête et nuque jusqu’au fessier •... -
Seite 128: Ceinture De Chaleur
5.3 Ceinture de chaleur Utilisation de la ceinture de chaleur • Le fauteuil est équipé d’une ceinture de chaleur unique comprenant un système de chauffage innovant au graphène qui ne chauffe pas seulement les épaules, mais également le dos, la taille et la zone du ventre. La ceinture de chaleur peut être utilisée selon vos besoins. - Seite 129 5.3 Ceinture de chaleur Représentation de l’utilisation dans Représentation de l’utilisation au le dos et la taille. niveau des épaules et du ventre.
-
Seite 130: Structure De La Télécommande
5.4 Structure de la télécommande Menu principal Bouton Marche/Arrêt Pause ou reprise du massage Activation ou désactivation de la ceinture de chaleur Activation ou désactivation de la fonction chauffe au centre du corps Activation ou désactivation de la fonction ion O2 Activation ou désactivation des rouleaux pour pieds Activation ou désactivation de la fonction pétrissage des mollets Activation ou désactivation de la fonction commande vocale... - Seite 131 5.4 Structure of the remote control 15. Affichage du statut actuel du fauteuil de massage 16. Sélection des programmes de massage automatiques 17. Sélection des fonctions manuellement réglables 18. Réglage de la position assise et de l’angle de la position assise 19.
-
Seite 132: Structure Du Panneau De Commande Rapide
5.5 Structure du panneau de commande rapide 1. Touche Marche/Arrêt Appuyez sur la touche trois secondes pour démarrer ou arrêter le fauteuil de massage. Appuyez brièvement sur la touche pour mettre en pause le fauteuil ou pour passer en mode Veille. 2. -
Seite 133: Avant L'utilisation
6. Avant l’utilisation Contrôler l’environnement Assurez-vous qu’aucune personne, aucun animal ou aucun objet ne se trouve dans la zone du fauteuil. Contrôler l’espacement Avant le massage, assurez-vous qu’aucun corps étranger ne s’est accroché aux jambes, pieds, etc. Veillez à ce que les mains, les pieds et la tête ne se trouvent pas dans la zone située entre le méca- nisme inférieur des jambes et la partie principale, ou entre l’accoudoir et la capsule. - Seite 134 6. Avant l’utilisation Brancher l’alimentation électrique Branchez le Branchez la fiche secteur Allumez l’interrupteur princi- câble d’alimentation. dans la prise de courant. pal (Position « I »). • Avant l’utilisation, veuillez contrôler le câble d’alimentation et la fiche secteur afin de contrô- ler d’éventuels dommages.
-
Seite 135: Mode D'emploi
7. MODE D’EMPLOI 7.1 Utilisation du fauteuil massant 1. Appuyez sur la touche Marche/Arrêt sur le côté de la télécommande ou maintenez pressée la touche Marche/Arrêt sur l’accoudoir, afin de démarrer le système. 2. Après démarrage du système, sélectionnez l’intensité du massage en appuyant sur les touches « Doux » « Apaisant »... - Seite 136 7.1 Utilisation du fauteuil massant 4. Le fauteuil scanne à présent la forme de votre corps. Attendez la fin de la détection de la forme du corps. Vous pouvez également appuyer sur la touche Passer , afin de contourner cette vérification et de commencer directement le massage.
-
Seite 137: Fonction Pause
7.1 Utilisation du fauteuil massant Position à haute Position idéale Position basse 7.2 Fonction Pause (Veuillez utiliser cette fonction uniquement après la mise en marche de l’appareil [voir page 135].) Après la mise en marche du fauteuil de massage, appuyez sur la touche Pause afin de mettre en pause le pro- cessus de massage. - Seite 138 7.3 Programmes automatiques Programmes intelligents IA Fonction Description Relaxation totale Le robot de massage supérieur est utilisé pour masser par pétrissage la nuque, les épaules et le point d’acupuncture Feng Chi. Le robot applique ensuite des mouve- ments de tapotement puis de shiatsu, afin de masser l’ensemble du corps. Le robot de massage inférieur est utilisé...
- Seite 139 7.3 Programmes automatiques Programmes de détente et d’activation Fonction Description Traitement méridien Masse les épaules, la nuque, le dos et la taille par pétrissage, tapotement et tech- niques de shiatsu, afin de traiter les méridiens. Cou et épaules Masse la nuque et les épaules en employant surtout des techniques de pétrissage et a ainsi que la partie supérieure du dos avec un massage.
- Seite 140 7.3 Programmes automatiques Programmes exclusifs pour la famille Fonction Description Superieur Masse les épaules, la nuque, le dos et la taille, principalement par pétrissage, tapotement, pétrissage et tapotement. Cela soulage la fatigue, stimule la circulation sanguine et réduit le stress grâce au massage en profondeur. L’intensité du massage est modérée et convient donc particulièrement aux hommes.
- Seite 141 7.3 Programmes automatiques Programmes de détente et d’activation Fonction Description Booster l’énergie Masse les épaules, la nuque, le dos et la taille par pétrissage, tapotement et tech- niques de shiatsu, afin de traiter les méridiens. Pause déjeuner Masse la nuque et les épaules en employant surtout des techniques de pétrissage et d’assouplissement ainsi que la partie supérieure du dos avec un massage.
-
Seite 142: Remote Control
7.4 Remote Control (Veuillez utiliser cette fonction uniquement après la mise en marche de l’appareil [voir page 135].) Sélection du programme Sélectionnez la touche dans la barre du menu gauche, afin d’accéder au menu de sélection. Vous disposez des paramètres suivants : technique de massage, zone, intensité 4D, position, largeur de massage et vitesse de massage. - Seite 143 7.4 Télécommande Fonction Réglage des rouleaux de massage Stop Pressez cette touche pour masser sans technique. Pétrir Vitesse et puissance peuvent être réglées. Battement I Vitesse, largeur et puissance peuvent être réglées. • Vitesse réglable en cinq Battement II Vitesse, largeur et puissance étapes.
- Seite 144 7.4 Télécommande 2. Le menu de zone du massage vous permet de choisir cinq options de zone : ponctuelle, partielle, complète, supérieure (dos), inférieure (dos). Sélectionnez la zone souhaitée pour le massage. Touche Description Massage ponctuel Massage local en avant et en arrière sur une zone partielle. Massage intégral en avant et en arrière.
- Seite 145 7.4 Télécommande 3. Vous pouvez paramétrer l’intensité 4D dans le menu. Vous avez le choix entre les niveaux 1-5, 1 étant le plus bas et 5 le plus élevé. Plus l’intensité 4D est élevée, plus les robots de massage sont actifs et plus le massage est puissant.
- Seite 146 7.4 Télécommande Niveau 0 Niveau 1 Niveau 2 Niveau 3 Niveau 4 Niveau 5 Touche Description Appuyez sur cette touche pour augmenter l’intensité 4D des niveaux 1 à 5. Appuyez sur cette touche pour réduire l’intensité 4D des niveaux 1 à 5. Remarque : vous pouvez également régler l’intensité...
- Seite 147 7.4 Télécommande 4. Pour régler le robot de massage, sélectionnez la flèche orientée vers le haut ou la flèche pointant vers le , afin d’ajuster précisément la main de massage vers le haut ou vers le bas. Sélectionnez les largeurs de massage comme représenté ci-dessous sur l’illustration. (1) La largeur peut être uniquement réglée lorsque l’utilisateur active le mode Télécommande lors de la sélection de la technique de massage ou de la zone de massage.
- Seite 148 7.4 Télécommande Niveau 0 Niveau 1 Niveau 2 Niveau 3 Niveau 4 Niveau 5 Touche Description Appuyez sur cette touche pour augmenter la largeur du massage des niveaux 1 à 5. Appuyez sur cette touche pour réduire la largeur du massage des niveaux 1 à 5. Sélectionnez la vitesse de massage comme représenté...
- Seite 149 7.4 Télécommande Niveau 0 Niveau 2 Niveau 3 Niveau 4 Niveau 5 Niveau 1 Touche Description Appuyez sur cette touche pour augmenter la vitesse du massage des niveaux 1 à 5. Appuyez sur cette touche pour réduire la vitesse du massage des niveaux 1 à 5.
- Seite 150 7.4 Télécommande Allez dans le menu manuel afin de sélectionner le mode Air, comme indiqué sur l’illustration suivante. Le mode Air inclut l’ensemble du dos, le haut du dos ou le bas du dos. Il existe également une fonction de massage avec rouleau manuel sur l’intérieur du bras, qui s’active automatiquement quand le massage d’air de tout le corps a été...
- Seite 151 7.4 Télécommande Remarque : sur la page « Maison » , vous pouvez également appuyer sur la touche pour le massage d’air et sélectionner la zone souhaitée pour le massage d’air dans le menu pop-up. (Cette fonction est une touche de raccourci vers le massage d’air sur la page « Accueil » actuelle de la télécommande) Pour régler l’intensité...
- Seite 152 7.4 Télécommande Niveau 0 Niveau 1 Niveau 2 Niveau 3 Niveau 4 Niveau 5 Touche Description Appuyez sur cette touche pour augmenter l’intensité de compression entre 1 et 5. Appuyez sur cette touche pour réduire l’intensité de compression entre 1 et 5. Remarque : Vous pouvez sélectionner la touche Massage d’air haut du corps + ou la touche Massage d’air haut du corps –...
-
Seite 153: Réglage Du Siège
7.5 Réglage du siège (Veuillez utiliser cette fonction uniquement après la mise en marche de l’appareil [voir page 135].) Cliquez sur la touche Angle dans la barre de menu du côté gauche de l’écran, afin d’accéder au menu des paramètres, où vous pouvez ajuster l’angle du fauteuil. On y retrouve la sortie du repose-jambe, la sortie du re- pose-pied, le soulèvement du repose-jambe, le soulèvement de l’articulation, le soulèvement du dossier, Apesanteur I et II ainsi que d’autres fonctions de réglage. - Seite 154 7.5 Réglage du siège 3. Rallonger et raccourcir le repose-jambe Touche Description Touche pour raccourcir le repose-jambe : réglez la réduction du repose-jambe Raccourcir le avec la télécommande. Maintenez cette touche appuyée pour déplacer lentement repose-jambe le repose-jambe vers le haut. Relâchez la touche pour arrêter. Touche pour rallonger le repose-jambe : réglez le rallongement du repose-jambe Rallonger le avec la télécommande.
-
Seite 155: Paramètres
Bluetooth. Activez le Bluetooth et recherchez des appareils dans votre environnement. b. L’appareil intelligent recherche le nom Bluetooth correspondant - Skyliner III-XXXX (« X » étant un numé- ro individuel). Connectez votre appareil au fauteuil. c. Démarrez maintenant la musique de votre choix sur votre appareil. - Seite 156 7.6 Paramètres 3. Commande vocale a. À proximité de l’accoudoir gauche, dites « Hi Alice » ou « Hey Alice », afin d’activer l’assistant vocal ; vous pouvez autrement appuyer sur la touche vocale e l’accoudoir gauche. L’assistant vocal répond « I am here » (Je suis là), pour signaler qu’il écoute. b.
- Seite 157 7.6 Paramètres Commande vocale Dire « Hi Alice » ou « Hey Alice » | Réponse : I am here. La communication avec l’assistance vocale reste en anglais. Command Response Massage on (Activer le massage) Ok, massage on (Ok, activer le massage) Massage close (Arrêter le massage) Ok, massage close (Ok, arrêter le massage) Total Relax (Relaxation) Ok, Total Relax (Ok, Relaxation)
- Seite 158 7.6 Paramètres 4. Mode économique d’énergie Activer le mode économique d’énergie : en mode économique d’énergie, les touches rapides de l’accoudoir et la fonction de commande vocale ne peuvent pas être utilisées, elles doivent être utilisées en état de marche. Désactiver le mode économique d’énergie : les touches rapides de l’accoudoir et la fonction de commande vocale peuvent également être utilisées en mode Veille.
-
Seite 159: Scanner De Santé
7.7 Scanner de santé (Veuillez utiliser cette fonction uniquement après la mise en marche de l’appareil [voir page 135].) 1. Démarrer le scanner de santé a. Cliquez sur la touche du scanner de santé dans la barre du menu à gauche de l’écran. Afin de démarrer l’examen de santé, appuyez sur et placez délicatement l’index ou le majeur sur le capteur. - Seite 160 7.7 Scanner de santé 2. Programme recommandé Lorsque la détection normale est terminée, s’affichent alors la fréquence cardiaque, l’oxygène dans le sans et le degré de fatigue. L’oxygène dans le sang se situe normalement dans une plage comprise entre 95 % et 99 %.
- Seite 161 7.7 Scanner de santé 4. Terminer le scanner de santé Durant la détection de l’état, appuyez sur la touche pour terminer la détection et revenir au statut de massage précédant la détection.
-
Seite 162: Définition De L'utilisateur
7.8 Définition de l’utilisateur (Veuillez utiliser cette fonction uniquement après la mise en marche de l’appareil [voir page 135].) Cliquez sur la touche Définition de l’utilisateur dans la barre du menu à gauche de l’écran. Ici, vous pouvez créer des massages selon l’utilisateur pour y accéder ensuite. Pour y accéder, appuyer soit sur « Pessonnalisation 1 »... -
Seite 163: Autres Fonctions
7.9 Autres fonctions (Veuillez utiliser cette fonction uniquement après la mise en marche de l’appareil [voir page 135].) Sur l’écran sous « Maison » , sélectionnez la touche « Chauffage de la taille » , to switch the heating function of the wrap (graphene heating) on or off. After switching on the heating function, heat will be emitted la chaleur se diffuse pendant 3 minutes. - Seite 164 7.9 Autres fonctions Sur l’écran sous « Maison » , sélectionnez la touche « Ion O2 » , afin d’activer ou de désactiver la fonction d’ion O2. Sur la page « Maison » , cliquez sur la touche « Rouleau » , pour activer ou désactiver la fonction de massage des pieds avec trois réglages de vitesse.
- Seite 165 7.9 Autres fonctions Sur l’écran dans « Maison » , sélectionnez la touche « Mollets » , afin d’activer ou de désactiver le massage des mollets. À l’intérieur du mollet se trouve une fonction de massage par frottement, et à l’extérieur une fonction de massage par coussin d’air, qui peut soulager les raideurs ou tensions du muscle du mollet provoquées par une position debout prolongée.
- Seite 166 7.9 Autres fonctions Sélectionnez sur l’écran dans l’espace « Maison » la touche « Epaules » et appuyez dans le menu sur les touches de flèche vers le haut et vers le bas, afin d’ajuster la position des épaules sur 11 niveaux au total. Sur l’écran dans l’espace « Maison »...
- Seite 167 7.9 Autres fonctions Dans l’espace « Maison » , sélectionnez sur l’écran la touche « Réglage du temps de massage » Appuyez sur la touche de flèche Plus et Moins dans le menu pop-up afin de rallonger ou de réduire le temps de massage. Le temps se raccourcit ou se prolonge par palier de 5 minutes. Le temps de fonctionnement maximal est de 40 minutes.
-
Seite 168: Mémoire
7.10 Mémoire (Veuillez utiliser cette fonction uniquement après la mise en marche de l’appareil [voir page 135].) Cliquez sur la touche « Mémoire » dans la barre du menu à gauche de l’écran, afin d’accéder à la sauve- garde de la fonction de massage. Vous y trouvez deux catégories : Sauvegarde et Consultation de la fonction de massage. -
Seite 169: Terminer Le Massage
7.11 Terminer le massage Durant le massage, appuyez sur la touche de la télécommande ou sur la touche de l’accoudoir droit, afin d’éteindre l’appareil. Toutes les fonctions de massage se terminent et le fauteuil revient dans sa position initiale. En outre, toutes les fonctions de massage s’éteignent automatiquement lorsque la durée de massage est écoulée, tandis que le dossier et le repose-jambe ne retournent pas en position initiale. -
Seite 170: Maintenance
8. MAINTENANCE 8.1 Nettoyage et entretien Nettoyage de composants en similicuir et en plastique Essuyez le cuir avec un chiffon sec et doux. • Ne pas utiliser de produits chimiques comme des diluants, de l’essence, de l’alcool etc., afin de nettoyer l’appareil. -
Seite 171: Résolution Des Problèmes
En cas de questions ou doutes autour de ce produit, veuillez vous adresser au personnel de service responsable. Détails techniques Modèle : Skyliner III Dimensions : Debout : 85,5 x 177 x 130 cm Allongé : 85,5 x 190 x 90,5 cm... -
Seite 172: Specials
9. Specials ROULEMENT MARTELER Une technique qui alterne agréablement Le marteler consiste à exécuter de courts contraction et détente de la musculature mouvements pulsatifs avec le bord ou le pour un effet apaisant et relaxant. Cette plat de la main ou avec le poing. Cette technique est souvent mise en œuvre technique favorise l‘irrigation sanguine à... - Seite 173 9. Specials TRACTION ARTHROSE MASSAGE 4D La traction est une pression douce Avec cette technologie sophistiquée roulante. Elle stimule le cartilage pour de massage L-track 4D, le massage est favoriser le transport des liquides, mieux plus large, plus intensif et plus rythmé absorber les nutriment et apaiser les qu’avec des rouleaux de massage douleurs liées à...
- Seite 174 9. Specials POINTS D’ACUPRESSION HAUT-PARLEUR BLUETOOTH SON D’AMPHITHÉÂTRE Points d‘acupression majeurs sont massés. Le fauteuil de massage est équipé de la technologie Bluetooth et d’un système audio « amphithéâtre » qui ZONES RÉFLEXE réduit les bruits environnants et enrichit La réflexologie régénère la musculature votre expérience sonore.
-
Seite 175: Légal
Obermeiers Feld 3 33104 Paderborn, Germany info@casada.com www.casada.com Copyright Pictures and texts are subject to the copyright of CASADA International GmbH and may not be used further without express confirmation. Copyright © 2022 CASADA International GmbH. All rights reserved. A1.1-SK3-FR0723... - Seite 176 Hoy los aparatos CASADA están presentes en todo el mundo. Evolución constante, un diseño sin igual y un enfoque claro en la mejora constante de la calidad de vida de sus usuarios han hecho de CASADA una marca confiable y de altísima gama.
- Seite 177 Para que pueda disfrutar de los beneficios de este dispositivo durante mucho tiempo, nos gustaría pedirle que lea y siga cuidadosamente las instrucciones de seguridad. Le deseamos mucho placer con su personal Skyliner III. Tabla de contenidos 1. Instrucciones de seguridad ......................178 2.
-
Seite 178: Instrucciones De Seguridad
1. Instrucciones de seguridad Lea atentamente las siguientes instrucciones antes de usar su sillón de masaje para asegurarse de que funcione correctamente y con una eficiencia óptima. ¡Guarde estas instrucciones de uso para futuras consultas! • El sillón de masaje se ajusta a los principios técnicos reconocidos ya las normas de seguridad más recientes. •... -
Seite 179: Contraindicaciones
2. Contraindicaciones Si no está seguro de si debe usar el sillón de masaje, asegúrese de consultar a su médico. • Está prohibido el uso del sillón de masaje durante el embarazo o si se presenta alguna de las siguientes dolencias en el área de masaje: lesiones recientes, enfermedades trombóticas, cualquier tipo de inflamaciones e hinchazones o cáncer. -
Seite 180: Colocación Del Sillón De Masaje
3. Colocación del Sillón de Masaje Colocación Asegúrese de que haya al menos 10 cm de espacio detrás de la silla para poder inclinarla. Proteja la silla de temperaturas ambiente excesi- vas. Colóquelo para evitar la luz solar directa y para garantizar una distancia suficiente de los dispositivos de calefacción. - Seite 181 3. Colocación del Sillón de Masaje Reposicionamiento del sillón de masaje Utilice las ruedas del respaldo para mover el sillón de masaje. Mueva la silla inclinándola hacia atrás unos 45° (ver ilustración). Nota: La fuerza excesiva hará que la silla se vuelque y se dañe.
-
Seite 182: Configuración Y Montaje
4. Configuración y montaje Instalación del soporte para pantorrillas 1. Encienda la unidad y baje el respaldo con el control remoto. 2. Enchufe el conector del arnés de cableado y la línea de aire en el costado del marco de acero y en los conectores correspondientes del reposabrazos (Figura 1). - Seite 183 4. Configuración y montaje Colocando el mecanismo de la pantorrilla 1. Enchufe el cable y la línea de aire del mecanismo de pantorrilla en el conector respectivo en la parte delantera del marco de acero (Figura 1). 2. Después de conectar, abra la cubierta del soporte en ambos lados del marco de acero (Figura 2) 3.
-
Seite 184: Estructura De La Silla
5. ESTRUCTURA DE LA SILLA 5.1 Elementos del sillón de masaje Cojín grande Iluminación Almohadilla Panel de control rápido Control remoto Escáner de salud Cojín de aire de los brazos Mecanismo de hombro / cojín de respaldo Sección de pies Panel lateral Cojín de aire para hombros Iluminación... -
Seite 185: Funciones Del Sillón De Masaje
5.2 Funciones del sillón de masaje Hombros Cabeza • Masaje con colchón de aire • Altavoces Brazo (derecho) Brazo (izquierda) • Control remoto • Estación de carga inductiva NFC • Control de voz • Toma de carga USB • Masaje con colchón de aire •... -
Seite 186: Calentador Frontal
5.3 Calentador frontal Uso del calentador frontal • La silla está equipada con una envoltura única con calefacción de grafeno innovadora, que no solo calienta los hombros, sino también la espalda, la cintura y el área abdominal. El usuario puede aplicar la envoltura según sea necesario. - Seite 187 5.3 Calentador frontal Ilustración que muestra el uso de la Ilustración que muestra el uso del espalday cintura hombro y abdomen...
-
Seite 188: Estructura Del Mando A Distancia
5.4 Estructura del mando a distancia Menú principal Botón de encendido/apagado Pausa o continúa el masaje Activa o desactiva el calentamiento frontal Activa o desactiva la función de calefacción en el centro del cuerpo Activa o desactiva la función de iones O2 Activa o desactiva los rodillos de pie Activa o desactiva la función de amasado de pantorrillas Activa o desactiva la función de control por voz... - Seite 189 5.4 Estructura del mando a distancia 15. Visualización del estado actual del sillón de masaje 16. Selección de programas de masaje automático 17. Selección de funciones ajustables manualmente 18. Ajuste de la posición del asiento y el ángulo de la postura sentada 19.
-
Seite 190: Estructura De Los Botones De Acceso Dorecto
5.5 Estructura de los botones de acceso dorecto 1. Botón de encendido/apagado Presione el botón durante tres segundos para encender o apagar el sillón de masaje. Pulse brevemente el botón para pausar el sillón o ponerlo en modo de esperads to start or switch off the massage chair. Press the button briefly to pause the chair or to switch it to stand-by. -
Seite 191: Antes De Usar
6. Antes de usar Comprobación de los alrededores Asegúrese de que no haya personas, mascotas u objetos en el área de la silla. Comprobar huecos Antes del masaje, asegúrese de que no haya ob- jetos extraños atrapados en las piernas, pies, etc. Asegúrese de que sus manos, pies y cabeza no entren en el área entre el mecanismo de la parte inferior de la pierna y la parte principal o entre el... - Seite 192 6. Antes de usar Conecte la fuente de alimentación Conecte el cable Inserte el enchufe en Enciende el interruptor de alimentación. la toma. principal (posición „I“). • Por favor, compruebe el cable de alimentación y el enchufe en busca de daños antes de su uso.
-
Seite 193: Instrucciones De Funcionamiento
7. INSTRUCCIONES DE FUNCIONAMIENTO 7.1 Operar el sillón de masaje 1. Presione el botón de encendido/apagado en el costado del control remoto o mantenga presionado el botón de encendido/apagado en el reposabrazos para que se inicie el sistema. 2. Después de iniciar el sistema, seleccione la intensidad del masaje presionando el botón “Suave” “Calmante”... - Seite 194 7.1 Operar el sillón de masaje 4. El sillón ahora escanea la forma de su cuerpo. Espere hasta que la verificación de la forma de su cuerpo se haya escaneado por completo. También puede presionar el botón Saltar o saltarse la prueba y comenzar directamente el masaje.
-
Seite 195: Función De Pausa
7.1 Operar el sillón de masaje Posición demasiado alto Posición perfecta Posición a baja 7.2 Función de pausa (Utilice esta función sólo después de encender el sillón [véase la página 193].) Después de encender el sillón de masaje, presione el botón Pausa para pausar el proceso de masaje. - Seite 196 7.3 Programas automáticos Proramas - AI Inteligente Función Descripción Total Relax El núcleo mecánico superior se utiliza para masajear el cuello, los hombros y el punto de acupuntura Fengchi amasando. A esto le sigue tapping y shiatsu para masajear todo el cuerpo. El núcleo mecánico inferior se utiliza para masajear la cintura y las caderas amasando y golpeando.
- Seite 197 7.3 Programas automáticos Programas - Relajantes y Activadores Función Descripción Tratamiento de Masaje de hombros, cuello, espalda y cintura mediante técnicas de amasamiento, meridianos tapping y shiatsu para tratar los meridianos. Cuello hombro Masajea el cuello y los hombros principalmente con técnicas de amasado y estiramiento y la parte superior de la espalda con un masaje médico.
- Seite 198 7.3 Programas automáticos Programas - Exclusivo para la Familia Función Descripción Fuerza Masajee los hombros, el cuello, la espalda y la cintura principalmente amasando, golpeando y amasando y golpeando. Esto alivia la fatiga, promueve la circulación sanguínea y reduce el estrés a través de un masaje profundo. La intensidad del masaje es moderada, por lo que es apto para hombres.
- Seite 199 7.3 Programas automáticos Programa - Relajación General Función Descripción Aumento de energía Masaje profundo de todo el cuerpo mediante técnicas de amasamiento, tapping y shiatsu para despertar la vitalidad del cuerpo humano y estimular la energía. Pausa para almorzar Masajea la espalda y la cintura utilizando técnicas de amasado y golpeteo mientras presiona el punto de acupuntura Shenyu.
-
Seite 200: Mando A Distancia
7.4 Mando a Distancia (Utilice esta función sólo después de encender el sillón [véase la página 193].) Selección de programa Selecciona el en la barra de menú izquierda para entrar en el menú de selección. Puede elegir entre los siguientes ajustes: Técnica de masaje, Área de masaje, Intensidad 4D, Posición, Ancho de masaje y Velocidad de masaje. - Seite 201 7.4 Mando a Distancia Función Ajuste de los rodillos de masaje Detener Pulse este botón para masajear sin técnica. Amasar La velocidad y la fuerza se pueden configurar. Aplauso I Se puede configurar la velocidad, el ancho y la fuerza. •...
- Seite 202 7.4 Mando a Distancia 2. El menú del área de masaje le ofrece cinco áreas como opciones: Punto por Punto, Parcial, Completo, Supe- rior (atrás) e Inferior (atrás). Seleccione la zona deseada para el masaje. Botón Descripción Masaje de punto fijo Masaje local hacia delante y hacia atrás en una zona parcial.
- Seite 203 7.4 Mando a Distancia 3. Puede configurar la intensidad 4D en el menú. Los niveles de configuración 1-5 están disponibles, siendo 1 el más bajo y 5 el más fuerte. Cuanto mayor sea la intensidad 4D, más sobresaldrá el rodillo de masaje y más fuerte será...
- Seite 204 7.4 Mando a Distancia Nivel 0 Nivel 1 Nivel 2 Nivel 3 Nivel 4 Nivel 5 Botón Descripción Presione este botón para aumentar la intensidad 4D en los niveles 1 a 5. Presione esta tecla para disminuir la intensidad 4D en los niveles 1 a 5. Anotación : También puede configurar la intensidad 4D con el botón Más o el botón Menos en la “Pantalla de inicio”...
- Seite 205 7.4 Mando a Distancia 4. Para configurar el robot de masaje, seleccione la flecha que apunta hacia arriba o la flecha que apunta hacia abajo , para un ajuste fino del cabezal de masaje hacia arriba o hacia abajo. Seleccione los anchos de masaje como se muestra en la siguiente ilustración. (1) El ancho solo se puede configurar cuando el usuario activa el modo de control remoto al seleccionar la técnica de masaje o el área de masaje.
- Seite 206 7.4 Mando a Distancia Nivel 0 Nivel 1 Nivel 2 Nivel 3 Nivel 4 Nivel 5 Botón Descripción Pulse este botón para aumentar la amplitud del masaje en los pasos 1 a 5. Presione este botón para disminuir el ancho del masaje en los pasos 1 a 5. Seleccione la velocidad de masaje como se muestra en la siguiente ilustración.
- Seite 207 7.4 Mando a Distancia Nivel 0 Nivel 1 Nivel 2 Nivel 3 Nivel 3 Nivel 4 Botón Descripción Presione este botón para aumentar la velocidad del masaje en los pasos 1 a 5. Presione este botón para disminuir la velocidad del masaje en los pasos 1 a 5.
- Seite 208 7.4 Mando a Distancia Vaya al menú Manual para seleccionar el modo Aire como se muestra en la siguiente figura. El modo aéreo incluye espalda completa, espalda alta o espalda baja. También hay una función de masaje manual con rodillo en el interior del brazo que se enciende automáticamente cuando se selecciona el masaje de aire de cuerpo completo.
- Seite 209 7.4 Mando a Distancia Tenga en cuenta: también puede presionar el botón de masaje de aire en la pantalla de “Inicio” y seleccione la opción área de masaje de aire deseada en el menú emergente. (Esta función es una tecla rápida para el masaje de aire en la página “Inicio”...
- Seite 210 7.4 Mando a Distancia Nivel 0 Nivel 1 Nivel 2 Nivel 3 Nivel 4 Nivel 5 Botón Descripción Presione esta tecla para aumentar la intensidad de compresión entre 1 y 5. Presione esta tecla para disminuir la intensidad de compresión entre 1 y 5. Nota: Ud.
-
Seite 211: Ajuste De La Silla
7.5 Ajuste de la silla (Utilice esta función sólo después de encender el sillón [véase la página 193].) Haga clic en el botón Ángulo en la barra de menú en el lado izquierdo de la pantalla para ingresar al menú de configuración donde puede ajustar el ángulo de la silla. Los ajustes incluyen extender el reposapiernas, extender el reposapiés, levantar el reposapiernas, levantar la articulación, levantar el respaldo, gravedad cero I y II y otras funciones de ajuste. - Seite 212 7.5 Ajuste de la silla 3. Alargar o acortar el reposapiernas Botón Descripción Acortamiento Botón para acortar el reposapiernas: Acorte el reposapiernas con el mando a descanso de distancia. Mantenga presionado este botón para mover lentamente el reposapier- pierna nas hacia arriba. Suelte el botón para detener. Cuaresma Botón para alargar el reposapiernas: Alargue el reposapiernas con el mando a descanso de...
-
Seite 213: Ajustes
Acceda al menú principal de su dispositivo inteligente (por ejemplo, teléfono móvil). Abra Configura- ción y seleccione la opción Bluetooth. Active el Bluetooth y busque dispositivos en su vecindad. b. El dispositivo inteligente buscará el nombre de Bluetooth correspondiente: Skyliner III-XXXX (“X” repre- senta un número individual). Conecte su dispositivo a la silla. - Seite 214 7.6 Ajustes 3. Control de voz a. Diga “Hola Alice” o “Hola Alice” cerca del reposabrazos izquierdo para activar el asistente de voz, o presione el botón de voz en el reposabrazos izquierdo. El asistente de voz responderá “Estoy aquí” para indicar que está escuchando. b.
- Seite 215 7.6 Ajustes Control de voz Di “Hi Alice” o “Hey Alice” | Respuesta: Estoy aquí. La comunicación con el asistente de voz es solo en inglés. Comando Respuesta Massage on (Masaje en) Ok, massage on (Ok, masaje en) Massage close (Masaje cerrar) Ok, massage close (Ok, masaje cerca) Total Relax (Relax total) Ok, Total Relax (Ok, Total Relax)
- Seite 216 7.6 Ajustes 4. Modo de ahorro de energía Modo de ahorro de energía activado: los botones rápidos del reposabrazos y las funciones de control por voz no se pueden utilizar en el modo de ahorro de energía; deben usarse cuando están encendidos. “Modo de ahorro de energía desactivado”.
-
Seite 217: Detección De Salud
7.7 Detección de salud (Utilice esta función sólo después de encender el sillón [véase la página 193].) 1. Iniciar la detección de Salud a. Clickea en el botón salud del en la barra de menú en el lado izquierdo de la pantalla. Para iniciar la detección de salud, presione el boton “Comienzo”... - Seite 218 7.7 Detección de salud 2. Programa recomendado Cuando finaliza la comprobación normal, se muestran la frecuencia cardíaca, el oxígeno en sangre y el nivel de fatiga. El oxígeno en la sangre normalmente está en un rango entre 95% y 99%. Los niveles de fatiga in- cluyen bueno, ligero, moderado y pesado.
- Seite 219 7.7 Detección de salud 4. Finalización del análisis de salud Durante el análisis de salud, pulse el botón para detener el proceso de verificación y volver al modo de masaje activo antes de la comprobación.
-
Seite 220: Definido Por El Usuario
7.8 Definido por el usuario (Utilice esta función sólo después de encender el sillón [véase la página 193].) Haga clic en el botón Definido por el usuario en la barra de menú en el lado izquierdo de la pantalla. Allí selecciona “Personalizar 1”... -
Seite 221: Otras Funciones
7.9 Otras funciones (Utilice esta función sólo después de encender el sillón [véase la página 193].) En la pantalla debajo de “Inicio” , seleccione el botón “Cinturón de calor” ,para cambiar la función de calentamiento del envolver (calentamiento de grafeno) encendido o apagado. Después de encender la función de calentamiento, se emitirá... - Seite 222 7.9 Otras funciones En la pantalla debajo de “Inicio” seleccione el botón “O2- Ion” , para cambiar la función de calenta- miento de iones de O2 o a apagado. En la pantalla “Inicio” , haga clic en el botón “Rodillo” para activar o desactivar la función de masaje de pies con velocidades ajustables.
- Seite 223 7.9 Otras funciones En la pantalla debajo de “Inicio” , seleccione el botón “Gemelos” para activar o desactivar la función de masaje de pantorrillas. Hay una función de masaje de fricción para el interior de la pantorrilla y una función de masaje con colchón de aire para el exterior, que pueden aliviar la rigidez en los músculos de la pantorrilla o la tensión causada por estar de pie durante largos períodos de tiempo.
- Seite 224 7.9 Otras funciones En la pantalla debajo de “Inicio” , seleccione el botón “Hombro” y presione los botones de flecha hacia arriba y hacia abajo en el menú emergente para ajustar la posición del cabezal en el cuello a un total de 11 niveles.
- Seite 225 7.9 Otras funciones En la visualización de la pantalla “Inicio” , seleccione el botón “Ajuste de tiempo de masaje” . Pre- siona el más y el menos en el menú emergente para alargar o acortar el tiempo de masaje. El tiempo siempre se acorta o alarga en pasos de 5 minutos.
-
Seite 226: Memoria
7.10 Memoria (Utilice esta función sólo después de encender el sillón [véase la página 193].) Haga clic en el botón “Memoria” en la barra de menú en el lado izquierdo de la pantalla para acceder a la función de memorias de masaje. Hay dos categorías: guardar y recuperar la función de masaje. El masaje se puede guardar en “Guardar I”, “Guardar II”... -
Seite 227: Fin Del Masaje
7.11 Fin del Masaje Durante el masaje, presione el botón en el mando a distancia o en el botón en el reposabrazos derecho para apagar la unidad. Todas las funciones de masaje finalizan y el sillón vuelve a su posición inicial. Todas las funciones de masaje se apagan automáticamente cuando ha transcurrido el tiempo de masaje;... -
Seite 228: Mantenimiento
8. MANTENIMIENTO 8.1 Limpieza y mantenimiento Limpieza de cuero sintético y piezas de plástico Limpie el cuero sintético con un paño suave y seco. • No utilice productos químicos como diluyentes, gasolina, alcohol, etc. para limpiar la unidad. • Cuando utilice productos para el cuidado del cuero disponibles comercialmente (paños), siga las instruccio- nes de uso. -
Seite 229: Solución De Problemas
Si tiene alguna pregunta o inquietud sobre este producto, comuníquese con el personal de servicio. Detalles técnicos Modelo: Skyliner III Dimensiones: Upright: 85,5 x 177 x 130 cm Reclining: 85,5 x 190 x 90,5 cm... -
Seite 230: Especial
9. Especial RODAR GOLPETEO Agradable alternancia entre relaja- Este masaje se caracteriza por movi- ción y distensión de los músculos, es mientos cortos que se llevan a cabo adecuado para un masaje final, para con el borde de la mano, la palma de la relajación y recuperación de los la mano o el puño. - Seite 231 9. Especial TRACCIÓN EN ARTROSIS MASAJEADOR 4D La tracción funciona con un estiramien- El innovador masajeador 4D L-Track to y presión suaves. Esto estimula los permite efectuar masajes más amplios, cartílagos de manera que se mejora el profundos y rítmicos que con cualquier transporte de fluidos, los nutrientes se rodillo masajeador convencional.
- Seite 232 9. Specials BLUETOOTH ALTAVOZ BLUETOOTH CON SONIDO ANFITEATRO Transferencia de datos sin cables. El sillón de masaje está equipado con tecnología Bluetooth y un sistema de PUNTOS DE ACUPRESIÓN sonido anfiteatro que reduce el ruido Se masajean puntos distintos de ambiental y mejora la experiencia acupresión.
-
Seite 233: Legal
Obermeiers Feld 3 33104 Paderborn, Germany info@casada.com www.casada.com Copyright Pictures and texts are subject to the copyright of CASADA International GmbH and may not be used further without express confirmation. Copyright © 2022 CASADA International GmbH. All rights reserved. A1.1-SK3-ES0723... - Seite 234 < timetorelax 2000. évi alapítása óta a CASADA név a kiváló minőségű wellness es fitnesz termékek védjegye. Ma a CASADA termékek világszerte kaphatok. A megbízható és kiváló minőség mellett a folyamatos fejlesztés, az összetéveszthetetlen design és az életmentősig javítását célzó szigorú törekvés jellemzi a CASADA termekéit.
- Seite 235 Köszönjük, hogy a Casada termékcsalád masszázsfotele mellett döntött. Örülünk, hogy támogathatjuk személyes egészség megőrzési törekvéseit. Hogy pontosan tisztában legyen a termek működésével es rendeltetésszerű használatával, kérjük figyelmesen olvassa el a hasz- nálati útmutatót. Reméljük, hogy örömét leli személyes Skyliner III masszázs fotelében. Tartalomjegyzék 1. Biztonsági előírások ..........................236 2.
-
Seite 236: Biztonsági Előírások
1. BIZTONSÁGI ELŐÍRÁSOK 1. Biztonsági előírások Mielőtt üzembe helyezi a masszázs fotelt, kérjük, a kifogástalan működés és az optimális hatásmód biztosítása érdekében figyelmesen olvassa el a következő tudnivalókat. Kérjük, gondosan őrizze meg ezt a használati útmutatót! • A masszázs fotel megfelel a jelenlegi műszaki elvarasoknak es az aktuális biztonsági előírásoknak. •... -
Seite 237: Ellenjavallatok
2. ELLENJAVALLATOK 2. Ellenjavallatok Amennyiben nem biztos abban, hogy használhatja a masszázs fotelt, akkor mindenképpen konzultáljon orvosával. • A terhesség ideje alatt vagy a masszírozott területen fellepő következő panasz(ok) eseten a maszszázs fotel használata tilos: Friss sérülések, trombózisos megbetegedések, gyulladások es bármilyen típusú duzzanat, valamint rákos megbe- tegedések eseten. -
Seite 238: Masszázsfotel Elhelyezése
3. MASSZÁZSFOTEL ELHELYEZÉSE 3. Masszázsfotel elhelyezése Elhelyezés Ügyeljen a faltól való távolságra! Legalább 10 cm szükséges, hogy a fotel teljesen dönthető. Óvja a fotelt a túl magas szobahőmérséklettől. Helyezze úgy, hogy közvetlenül napsugárzás ne érje. Továbbá figyeljen a fűtőtestek távolságára is. A padló... - Seite 239 3. Masszázsfotel elhelyezése Masszázsszék átrendezése Használja a hátul lévő görgőket a masszázsfotel mozgatásához. Mozgassa a fotelt úgy, hogy körül- belül 45°-kal hátradönti (lásd az ábrát). Megjegyzés: A túlzott erő hatására a szék felborul, és megsérülhet. 1. Mielőtt elmozdítaná a széket, állítsa vissza a kiinduló...
-
Seite 240: Felépítés És Összeszerelés
4. Felépítés és összeszerelés A kartámasz felszerelése 1. Kapcsolja be a készüléket, és a távirányítóval döntse meg a háttámlát. 2. Dugja be a kábelköteg-csatlakozót és a levegővezetéket az acélkeret oldalára, valamint a kartámasz megfelelő csatlakozóiba (1. ábra). 3. Emelje fel a kartámaszt a levegőcsővel és a kábellel bedugva, és akassza fel a kampókat az acélkeret mindkét oldalán (2. - Seite 241 4. Felépítés és összeszerelés Lábrész üzembe helyezése 1. Dugja be a lábrész kábelét és légzsák vezetékét a sugárkeret elején található megfelelő csatlakozóba (1. ábra). 2. A csatlakoztatás után nyissa ki a tartó fedelet az acélkeret mindkét oldalán (2. ábra). 3. Emelje fel a lábrészt, és helyezze be a tartóba. Zárja le a fedelet és rögzítse két M4-es csavarral (3. ábra). Ábr.
-
Seite 242: Fotel Felépítése
5. FOTEL FELÉPÍTÉSE 5.1 A masszázsfotel részei Nagy párna Világítás Fejpárna Gyorsvezérlőpult Távirányító Egészségügyi szkenner Kar légpárna Vállszerkezet / Hátpárna Lábrész Oldalsó panel Váll légpárna Világítás... -
Seite 243: A Masszázsfotel Részei
5.2 A masszázsfotel részei Váll • Légpárnás masszázs • Hangszóró Kar (jobb) Kar (bal) • Távirányító • NFC induktív töltőállomás • Hangvezérlés • USB csatlakozás • Légpárnás masszázs • Légpárnás masszázs Kéz Fej és nyak a fenékig • Légpárnás masszázs •... -
Seite 244: Övmelegítő
5.3 Övmelegítő Az övmelegítő használata • A masszázsfotel egyedi övmelegítővel van felszerelve innovatív grafén fűtéssel, amely nem csak a vállakat melegíti, hanem a hátat, a derekat és a hasat is. Az övmelegítő szükség szerint bármely testrészen használható. A vállakon történő elhelyezéskor a következő akupunktúrás pontokat fogja melegíteni: Bingfend, Tianzong, Yunmen és Qihu összemelegedett. - Seite 245 5.3 Övmelegítő Felhasználása a hát és a derék rész Felhasználása a váll és a hasi rész esetében. esetében.
-
Seite 246: A Távirányító Felépítése
5.4 A távirányító felépítése Főmenü Be/ki gomb A masszázs szüneteltetése vagy folytatása Aktiválja vagy kikapcsolja az övfűtést Aktiválja vagy kikapcsolja a központi testmelegítő funkciót Aktiválja vagy deaktiválja az O2 ion funkciót Aktiválja vagy deaktiválja a lábgörgőket Aktiválja vagy deaktiválja a vádli gyúrás funkciót Aktiválja vagy deaktiválja a hangvezérlő... - Seite 247 5.4 A távirányító felépítése A masszázsfotel aktuális állapotának kijelzése Az automatikus masszázsprogramok kiválasztása Manuálisan állítható funkciók kiválasztása Az ülőhelyzet és annak a dőlésszögének a beállítása Beállítások Masszázstechnika választó gomb Növelje vagy csökkentse a felsőtestet érő légnyomás intenzitását Állapotjelző Kompressziós masszázs terület kiválasztása A masszázsprogram hosszának kiválasztása A masszázs sebességének beállítása A 4D intenzitás beállítása...
-
Seite 248: Gyorskezelő Panel Felépítése
5.5 Gyorskezelő panel felépítése 1. Bekapcsológomb Nyomja le három másodpercig a gombot a masszázsfotel elindításához vagy kikapcsolásához. Nyomja meg röviden a gombot a szék szüneteltetéséhez vagy készenléti állapotba kapcsolásához. 2. Zero Gravity gomb Nyomja meg ezt a gombot a nulla gravitáció eléréséhez. A súlytalanságot két különböző pozícióba lehet állítani. Nyomja meg és tartsa lenyomva a gombot 2 másodpercig, hogy visszatérjen az alaphelyzetbe. -
Seite 249: Használat Előtt
6. Használat előtt Ellenőrizze a környezetet Győjödjön meg róla, hogy a fotel környékén nincse- nek emberek, háziállatok vagy tárgyak Köztes terek ellenőrzése A masszázs előtt győződjön meg arról, hogy nem akadt-e idegen tárgy a lábon, lábfejen stb. Tartsa távol a kezét, lábát és fejét az alsó lábrész mechanizmustól illetve a kartámasz és a kapszula közötti területtől. - Seite 250 6. Használat előtt Csatlakoztassa a tápegységet Dugja be a tápkábelt Dugja be a dugót Kapcsolja be a főkapcsolót a konnektorba („I” állás). • Használat előtt ellenőrizze, hogy a tápkábel és a csatlakozódugó nem sérült-e. • Kérjük, olyan áramforrást használjon, amely megfelel a termék működési követelményeinek. •...
-
Seite 251: Használati Útmutató
7. HASZNÁLATI ÚTMUTATÓ 7.1 A masszázsfotel működtetése 1. A rendszer elindításához nyomja meg a távkapcsolón található Be/Ki gombot vagy tartsa sokáig nyomva a kartámaszon lévő Be/Ki gombot. 2. A rendszer beindítása után válassza ki a masszázs intenzitását a távkapcsolón található gombok megnyomásával a következőképpen: „Enyhe“... - Seite 252 7.1 Masszázsfotel üzemeltetése 4. Ezután a fotel letapogatja a testformáját. Kérjük, várja meg a testszkennelés befejeződését. Ha ezt inkább kihagyná és elkezdené a masszázst, nyomja meg az „Átugrás“ gombot. A testforma szkennelése után a távirányító hangjelzést ad. A jel arra figyelmezteti, hogy most már finom hangol- hatja a vállpozíciót.
-
Seite 253: Szünetfunkciók
7.1 A masszázsfotel működtetése Túl magasan pozíció Tökéletes pozíció Túl alacsony pozíció 7.2 Szünetfunkciók (Kérjük, ezt a funkciót csak a készülék bekapcsolása után használja [lásd 251 old.].) A masszázsfotel bekapcsolása után nyomja meg a „Szünet“ gombot a masszázsfolyamat szüneteltetéséhez. Majd a program folytatásához nyomja meg ismét a „Szünet“... - Seite 254 7.3 Automata programok AI Intelligent programok Funkció Leírás Relaxáció A felső masszázsrobot a nyak, a vállak és a fengchi akupunktúrás pontgyúrással történő masszírozására szolgál. Ezután ütögetés és a shiatsu technika segítségével az egész test masszírozására sor kerül. Az alsó masszázsrobot gyúrással és ütögetéssel a derekat és a csípőt célozza meg.
- Seite 255 7.3 Automata programok Feszültségoldó & aktiváló programok Funkció Leírás Meridián masszázs A vállak, a nyak, a hát és a derék masszírozása gyúrás, ütögetés és shiatsu technikákkal, különös tekintettel a meridiánok kezelésére. Tarkó & váll A nyak és a vállak, valamint a hát felső részének masszírozása elsősorban gyúrás és nyúj- tás technikákkal.
- Seite 256 7.3 Automata programok Exkluzív családi programok Funkció Leírás Erő A vállak, a nyak, a hát és a derék masszírozása elsősorban gyúrással, ütögetéssel, illetve gyúrással és ütögetéssel. Ez enyhíti a fáradtságot, felpezsdíti a vérkeringést és a mély- masszázs révén csökkenti a stresszt. A masszázs intenzitása mérsékelt, így leginkább férfiak számára alkalmas.
- Seite 257 7.3 Automata programok Általános feltöltődést célzó programok Funkció Leírás Energia Az egész test mélymasszázsa gyúrás, ütögetés valamint shiatsu technika segítségével az emberi test vitalitásának felébresztése és az energiastimulálás érdekében. Pihenőidő A hát és a derék masszírozása gyúrás és ütögetés révén, miközben a shenyu akupunktú- rás pont is stimulálásra kerül.
-
Seite 258: Távirányítás
7.4 Távirányítás (Kérjük, ezt a funkciót csak a készülék bekapcsolása után használja. [lásd 251 old.]) Programválasztás A programválasztás megnyitásához válassza ki a bal oldali menüsorban található gombot . A következő beállítások állnak rendelkezésére: Masszázstechnika, Terület, 4D erősség, Pozíció, Masszázsszélesség és Masszázssebesség. 1. - Seite 259 7.4 Távirányítás Funkció A masszázsgörgők beállítása Stop Technika nélküli masszírozáshoz nyomja meg ezt a gombot. Gyúrás Beállítható a sebesség és az erősség. Csapkodás I Beállítható a sebesség, a szélesség és az erősség. Csapkodás II Beállítható a sebesség, a szélesség és •...
- Seite 260 7.4 Távirányítás 2. A masszázsmenü öt masszázstartományt kínál Önnek lehetőségként: pontmasszázs, részleges, teljes, felső (hát), alsó (hát). Válassza ki a kívánt területet a masszázshoz. Gombok Leírás Pontmasszázs Lokális masszázs előre és hátra a részterületen. Teljes masszázs előre és hátra. Masszázs előre és hátrafelé a felsőháton. Masszázs előre és hátrafelé...
- Seite 261 7.4 Távirányítás 3. A menüben beállíthatja a 4D intenzitást. A beállítható szintek 1-5-ig állnak rendelkezésre, ahol az 1 a legalacso- nyabb és az 5 a legerősebb. Minél magasabbra van állítva a 4D intenzitás, annál jobban felemelkedik a masszázsro- bot és annál erősebb a masszázs. Válassza a „Plusz“ vagy „Mínusz“...
- Seite 262 7.4 Távirányítás Szint 0 Szint 1 Szint 2 Szint 3 Szint 4 Szint 5 Gomb Leírás Ezt a gombot megnyomva növelheti a 4D intenzitást 1-5 szintig. Ezt a gombot megnyomva csökkentheti a 4D intenzitást 1-5 szintig. Megjegyzés: A 4D intenzitását a plusz vagy a mínusz gombbal is beállíthatja a távirányító...
- Seite 263 7.4 Távirányítás 4. A masszázsrobot beállításához válassza a felfelé vagy lefelé mutató nyilat, ezzel a masszázskéz felfelé vagy lefelé finomhangolható. 5. A lenti ábra segítségével válassza ki a masszázsszélességet. (1) A szélesség csak akkor állítható be, ha a felhasználó a masszázstechnika vagy a masszázsterület kiválasztásakor aktiválja a távirányító...
- Seite 264 7.4 Fernbedienung Szint 0 Szint 1 Szint 2 Szint 3 Szint 4 Szint 5 Gomb Leírás Ezt a gombot megnyomva növelheti a masszázsszélességet 1-5 szintig. Ezt a gombot megnyomva csökkentheti a masszázsszélességet 1-5 szintig. 6. A lenti ábra segítségével válassza ki a masszázssebességet. (1) A sebesség csak akkor állítható...
- Seite 265 7.4 Távirányítás Szint 0 Szint 2 Szint 3 Szint 4 Szint 5 Szint 1 Gomb Leírás Ezt a gombot megnyomva növelheti a masszázssebességet 1-5 szintig. Sebesség + Ezt a gombot megnyomva csökkentheti a masszázssebességet 1-5 szintig.
- Seite 266 7.4 Távirányítás Lépjen be a „Kézi menü”-be a légmasszázs üzemmód kiválasztásához a következő ábrán látható módon. A légmasz- százs üzemmód magában foglalja a teljes testet, a felsőtestet vagy az alsótestet. A kar belső oldalán található egy kézi görgős masszázsfunkció is, amely automatikusan bekapcsol, ha a teljes test légmasszázs kerül kiválasztásra. Gomb Leírás A teljes test légmasszázs aktiválásához vagy deaktiválásához nyomja meg ezt a gombot.
- Seite 267 7.4 Távirányítás Megjegyzés: A „Kezdőlap”-on megnyomhatja a légmasszázs gombot is, majd a felugró menüből kivá- laszthatja a kívánt légmasszázs területet. (Ez a funkció a távirányító aktuális „Kezdőlap”-ján lévő légmasszázs gomb gyorsbillentyűje.) A légnyomás intenzitásának beállításához a légmasszázst be kell kapcsolni. Az összesen 5 fokozat közül az 1 a legalacsonyabb, az 5 pedig a legmagasabb.
- Seite 268 7.4 Távirányítás Szint 0 Szint 1 Szint 2 Szint 3 Szint 4 Szint 5 Gomb Leírás A kompresszió intenzitásának 1 és 5 közötti növeléséhez nyomja meg ezt a gombot. A kompresszió intenzitásának 1 és 5 közötti csökkentéséhez nyomja meg ezt a gombot.
-
Seite 269: Az Ülés Beállítása
7.5 Az ülés beállítása (Kérjük, ezt a funkciót csak a készülék bekapcsolása után használja. [lásd 251 old.]) Kattintson a képernyő bal oldalán található menüsorban a „Dőlésszög“ gombra. Itt a „Beállítások“ menüben lehe- tősége van a masszázsfotel dőlésszögének beállítására. Ez magában foglalja a láb-és lábfejtartó meghosszabbítását, a lábtámasz, az ízület illetve háttámla megemelését, a súlytalanság I és II, valamint egyéb beállítási funkciókat. - Seite 270 7.5 Az ülés beállítása 3. A lábtámasz rövidítése és hosszabbítása Gomb Leírás Gomb a lábtámasz rövidítéséhez: A lábtámasz rövidítésének beállítása a távirányító Lábtámasz segítségével. A lábtámasz fokozatosan felfelé történő mozgatásához tartsa lenyomva rövidítése ezt a gombot, leállításához pedig engedje el. Gomb a lábtámasz hosszabbításához: A lábtámasz hosszabbításának beállítása a Lábtámasz távirányító...
-
Seite 271: Beállítások
és válassza ki a Bluetooth opciót. Aktiválja a Bluetooth-t és keresse meg a környezetében lévő eszközöket. b. Ha az okoseszköz kikereste a megfelelő Bluetooth nevet - Skyliner III-XXXX („X” egy egyedi számot jelöl), csatlakoztassa a készüléket a fotelhez. c. Most indítsa el a kívánt zenét az okoseszközön. - Seite 272 7.6 Beállítások 3. Hangvezérlés a. A hangasszisztens aktiválásához mondja a bal kartámasz közelében: „Hi Alice” vagy „Hey Alice”, de meg- nyomhatja a bal kartámlán lévő „Hangvezérlés” gombot is. A hangasszisztens az „Itt vagyok” választ adja, hogy jelezze, odafigyel. b. A hangasszisztens aktiválása után 6 másodpercen belül mondja ki a parancsot, hogy a masszázsfotel funk- cióvezérlője válaszoljon.
- Seite 273 7.6 Beállítások Hangvezérlés Mondja: „Hi Alice“ vagy „Hey Alice“ | Válasz: „I am here. ” A hangasszisztenssel folytatott kommunikáció kizárólag angol nyelven lehetséges. Parancs Válasz Massage on (Masszázs be) Ok, massage on (Oké, masszázs bekapcsolása) Massage close (Masszázs vége) Ok, massage close (Oké, masszázs befejezése) Total Relax (Teljes relaxáció) Ok, Total Relax (Oké, Teljes relaxáció) Energy Boost (Energia)
- Seite 274 7.6 Beállítások 4. Energiatakarékos mód Energiatakarékos üzemmód bekapcsolása: A kartámasz gyorsgombjai és a hangasszisztens funkció nem használha- tók, ezek csak bekapcsolt állapotban érhetők el. Energiatakarékos üzemmód kikapcsolása: A kartámasz gyors- gombjai és a hangasszisztens funkció készenléti üzemmódban is elérhetők. 5. Nyelv kiválasztása A nyelv angolra van beállítva.
-
Seite 275: Egészségügyi Állapotfelmérés
7.7 Egészségügyi állapotfelmérés (Kérjük, ezt a funkciót csak a készülék bekapcsolása után használja. [lásd 251 old.]) 1. Egészségügyi állapotfelmérés a. Kattintson a képernyő bal oldalán található menüsorban az “Egészségügyi állapotfelmérés” gombra. A funkció elindításához nyomja meg a Start” gombot, majd óvatosan helyezze mutató- vagy középső ujját az érzékelőre. - Seite 276 7.7 Egészségügyi állapotfelmérés 2. Ajánlott program A szkennelés után megjelenik a pulzusszám, a vér oxigénszintje és a fáradtsági szint. A vér oxigénszintje álta- lában 95% és 99% közötti tartományban van. A fáradtsági szintek a következők: jó, könnyű, közepes és súlyos. A fáradtsági szint alapján a készülék felajánl egy automatikus programot.
- Seite 277 7.7 Egészségügyi állapotfelmérés 4. Az egészségügyi állapotfelmérés befejezése Amennyiben az állapotfelmérés közben úgy dönt, hogy kilép ebből a funkcióból, nyomja meg a “Kilépés“ Kilépés gombot, és visszatér a vizsgálat előtti masszázsállapotba.
-
Seite 278: Testreszabás
7.8 Testreszabás (Kérjük, ezt a funkciót csak a készülék bekapcsolása után használja. [lásd 251 old.]) Kattintson a képernyő bal oldalán található menüsorban az “Felhasznàlóra beállítva” gombra. Itt lehetősége van egyéni masszázsok létrehozására, majd azok visszahívására. A visszahíváshoz nyomja meg az „Felhasználóra beállítva 1” vagy az „Felhasználóra beállítva 2”... -
Seite 279: Egyéb Funkciók
7.9 Egyéb funkciók (Kérjük, ezt a funkciót csak a készülék bekapcsolása után használja. [lásd 251 old.]) Válassza az „Övmelegítő” gombot a kezdőlapon , az övmelegítő (egy grafén fűtőberendezés) fűtési funkciójának be- vagy kikapcsolásához. A fűtési funkció bekapcsolása után a készülék 3 percig ad hőt. Válassza ki a kezdőlapon a „Hátmelegítés”... - Seite 280 7.9 Egyéb funkciók Válassza ki a kezdőlapon az „O2-Ion“ gombot , az oxigén ionizációs funkció be- vagy kikapcsolásához. A kezdőlapon kattintson a „Görgők” , ugombra a három állítható sebességű lábmasszázsfunkció be- vagy kikapcsolásához. Gomb Leírás Ezt a gombot megnyomva aktiválhatja vagy deaktiválhatja a talpgörgő funkciót.
- Seite 281 7.9 Egyéb funkciók Nyomja meg a kezdőlapon , a „Láb“ gombot , a vádlimasszázs be- vagy kikapcsolásához. A vádli belső oldalán egy dörzsöléses masszázsfunkció, a külső oldalán pedig egy légpárnás masszázsfunkció enyhítheti a vádli izmainak merevségét vagy a hosszú ideig tartó állás okozta feszültséget. A képernyő...
- Seite 282 7.9 Egyéb funkciók Kattintson a kezdőlapon a „Váll“ gombra és nyomja meg a menüben található felfelé és lefelé mutató nyila- Váll kat a vállpozíció összesen 11 fokozatú manuális beállításához. Kattintson a kezdőlapon a „Lábméret“ gombra a megfelelő lábméret beállítása és az optimális masszázsél- Lábméret mény elérése érdekében.
- Seite 283 7.9 Egyéb funkciók Kattintson a kezdőlapon a „Masszázsidő“ gombra . A felugró menüben a plusz és mínusz nyilakkal meghosz- szabbíthatja vagy lerövidítheti a masszázsidőt, 5 perces időközönként. A maximálisan beállítható idő 40 perc. A kezdőlapon a „Enyhe” , „Nyugtató” vagy „Erős” gombokkal kiválasztható...
-
Seite 284: Információtárolás
7.10 Információtárolás (Kérjük, ezt a funkciót csak a készülék bekapcsolása után használja. [lásd 251 old.]) Kattintson a képernyő bal oldalán található menüsorban a „Memória” gombra a masszázsfunkció-memóriához való hozzáféréshez, amely két kategóriát kínál fel: a masszázsfunkció tárolása és visszahívása. A masszázs elmenthető a „Men- tés I”, „... -
Seite 285: Masszázs Befejezése
7.11 Masszázs befejezése Masszázs közben nyomja meg a távirányítón vagy a jobb kartámaszon található gombot a készülék kikapcsolásá- hoz. Minden masszázsfunkció befejeződik és a masszázsfotel visszaáll a kiindulási helyzetbe. A készülék automatikusan kikapcsolja az összes masszázsfunkciót akkor is, ha a masszázsidő letelt, de a háttámla és a lábtámasz nem áll vissza a kiindulási helyzetbe. -
Seite 286: Karbantartás
8. KARBANTARTÁS 8.1 Tisztítás és karbantartás Műbőr és műanyag részek tisztítása Törölje le a bőrt egy puha, száraz ruhával. • Az eszköz tisztítására ne használjon olyan vegyszereket, mint hígító, benzin, alkohol stb. • A kereskedelemben kapható bőrápolási termékek (kendők) használatakor kérjük, tartsa be a használati utasítást. •... -
Seite 287: Hibaelhárítás
Ne használja tovább a készüléket, és kapcsolja ki az áramellátást. A balesetek elkerülése érde- kében forduljon hivatalos szakszervizhez. Ha bármilyen kérdése vagy kétsége van a termékkel kapcsolatban, kérjük, forduljon az illetékes szervizszemélyzethez. Műszaki adatok Modell: Skyliner III Méret: Állítva: 85,5 x 177 x 130 cm Fekteve: 85,5 x 190 x 90,5 cm Súly: 186,5 kg Feszültség:... -
Seite 288: Különlegességek
9. KÜLÖNLEGESSÉGEK 9. Különlegességek GÖRGETÉS VEREGETÉS A görgetés az izomzat feszülésének és A veregetés során rövid ütögető mozdu- elernyedésének kellemes váltakozása, latokat végeznek kézéllel, tenyérrel vagy ezért különösen nyugtató és pihentető. ököllel. Ez serkenti a bőr vérellátását és Ezt a technikát gyakran alkalmazzák a lazítja a feszült izmokat. - Seite 289 9. Különlegességek BEÁLLÍTHATÓ LÁBTÁMASZ SHIATSU A lábtámasz is meghosszabítható és A Shiatsu (ujjnyomás) a testterápia egy így minden testmagassághoz egyénre Japánban kifejlesztett formája. A masz- szabottan hozzáigazítható. százstechnika gyengéd, ritmikus, mélyre ható nyújtásokból és forgatásokból áll. A shiatsu célja, hogy serkentse a test bizo- BEÁLLÍTHATÓ...
- Seite 290 9. Különlegességek MASSZÍROZÓ KEZEK ÉRZET LAPOS LCD ÉRINTŐKÉPERNYŐS TÁVIRÁ- NYÍTÁS A speciálisan kifejlesztett masszázsfejek a masszőr kezének mozgását utánozzák. Az érintőképernyő segítségével a kívánt Legfeljebb 41 fokos szögben akár 6,5 masszázs kényelmesen kiválasztható és cm távolságra is ki tudnak nyúlni, és a minden további beállításhoz igazítható.
-
Seite 291: Jogi
Obermeiers Feld 3 33104 Paderborn, Germany info@casada.com www.casada.com A képek és a szövegek szerzői joga a CASADA International GmbH cég birtokában van, ezek további felhasználása tilos a cég kifejezett hozzájárulása nélkül. Copyright © 2019 CASADA International GmbH. Minden jog fenntartva. - Seite 292 < timetorelax Odkąd firma powstała w 2000 roku, nazwa CASADA stała się synonimem wysokiej jakości produktów w sektorze well- ness i fitness. Dzisiaj, urządzenia marki CASADA są dostępne na całym świecie. Ciągły rozwój, niepowtarzalny design i skupienie się na poprawie jakości życia są tak samo charakterystyczne dla produktów CASADA, jak ich niezawodna jakość.
- Seite 293 Gratulacje! Dziękujemy za wybranie fotela do masażu marki Casada. Cieszymy się, że możemy wspierać Twoje zdrowie. Przeczytaj uważnie instrukcję obsługi, aby dokładnie zapoznać się z prawidłową obsługą urządzenia. Mamy nadzieję, że spodoba Ci się Twój nowy fotel do masażu Skyliner III.
-
Seite 294: Wskazówki Bezpieczeństwa
1. Wskazówki bezpieczeństwa Przed użyciem fotela do masażu należy uważnie przeczytać poniższe wskazówki, aby upewnić się, że działa on prawidłowo i z optymalną wydajnością. Prosimy zachować tę instrukcję obsługi do dalszego użytku! • Fotel masujący został wykonany zgodny z ob.owiązującymi zasadami technicznymi i najnowszymi przepisami bezpie- czeństwa. -
Seite 295: Przeciwwskazania
2. Przeciwwskazania Jeśli nie masz pewności, co do możliwości korzystania z fotela masującego, skonsultuj się z lekarzem. • Korzystanie z fotela masującego jest zabronione w czasie ciąży lub w przypadku jednej lub kilku z następujących dole- gliwości: niedawno przebyte urazy, choroby zakrzepowe, wszelkiego rodzaju stany zapalne i obrzęki oraz nowotwory. W przypadku trwającego leczenia tych chorób lub stanów zaleca się... -
Seite 296: Umiejscowienie Fotela Masującego
3. Umiejscowienie fotela masującego Umiejscowienie Upewnij się, że za fotelem jest co najmniej 10 cm wolnej przestrzeni, aby można było go rozłożyć. Chroń fotel przed wysokimi temperaturami w po- mieszczeniu. Ustaw go tak, aby uniknąć bezpośred- niej ekspozycji na światło słoneczne i aby zapewnić odpowiednią... - Seite 297 3. Umiejscowienie fotela masującego Przemieszczanie fotela masującego Użyj kółek, aby przesunąć fotel masujący. W tym celu odchyl fotel do tyłu o około 45° (patrz ilustracja). Uwaga: użycie nadmiernej siły spowoduje przewrócenie się fotela i jego uszkodzenie. 1. Przed przesunięciem fotela należy go ustawić w pozycji wyjściowej i wyłączyć...
-
Seite 298: Konfiguracja I Montaż
4. Konfiguracja i montaż Montaż boków fotela 1. Włącz urządzenie i opuść oparcie za pomocą pilota. 2. Podłącz złącze wiązki przewodów i przewód pneumatyczny z boku stalowej ramy o do odpowiednich złączy podłokietnika (Rysunek 1). 3. Podnieś podłokietnik z podłączonym przewodem pneumatycznym i kablem i zawieś haki po obu stronach stalowej ramy (Rysunek 2). - Seite 299 4. Konfiguracja i montaż Montaż podnóżka 1. Podłącz kabel i przewód pneumatyczny mechanizmu podnóżka do odpowiedniego złącza z przodu stalowej ramy (Rysunek 1). 2. Po podłączeniu otwórz pokrywę wspornika po obu stronach stalowej ramy (Rysunek 2) Podnieś mechanizm podnóżka i umieść go w uchwycie. Zamknij pokrywę i przymocuj ją dwoma śrubami M4 (Rysunek 3).
-
Seite 300: Budowa Fotela Masującego
5. BUDOWA FOTELA MASUJĄCEGO 5.1 Budowa fotela masującego Duża poduszka Oświetlenie Mała poduszka Panel szybkiego dostępu Pilot Skaner Poduszka powietrzna przedramienia Poduszka oparcia Sekcje podnóżka Panel boczny Poduszka powietrzna ramienna Oświetlenie... -
Seite 301: Funkcje Fotela Masującego
5.2 Funkcje fotela masującego Barki Podeszwy stóp • masaż kompresyjny (poduszkami • masaż wałkujący powietrznymi) Głowa Prawe ramię • głośniki • pilot Lewe ramię • sterowanie głosowe • ładowarka indukcyjna • masaż kompresyjny • ładowarka USB Ręce • masaż kompresyjny •... -
Seite 302: Pas Grzejący
5.3 Pas grzejący Korzystanie z pasa grzejącego • Fotel wyposażony jest w unikatowy pas grzejący z innowacyjnym ogrzewaniem grafenowym, który ogrzewa nie tylko barki, lecz również plecy, talię i okolice brzucha. Użytkownik może korzystać z pasa w razie potrzeby. Po założeniu na ramiona pas ogrzewa punkty akupunkturowe Bingfend, Tianzong, Yunmen i Qihu. - Seite 303 5.3 Pas grzejący Zastosowanie pasa w obszarze Zastosowanie pasa w obszarze ramion pleców i talii. i brzucha.
-
Seite 304: Pilot Zdalnego Sterowania
5.4 Pilot zdalnego sterowania Główne menu Włącznik / wyłącznik Pauza / kontynuacja masażu Włączanie / wyłączanie pasa grzejącego Włączanie / wyłączanie ogrzewania ciała Wyłączanie / wyłączanie jonizacji powietrza Włączanie / wyłączanie rollera stóp Włączanie / wyłączanie fukcji masażu ugniatającego łydek Włączanie / wyłączanie sterowania głosowego Regulacja intensywności masażu Włączanie / wyłączanie fotela masującego... - Seite 305 5.4 Pilot zdalnego sterowania Aktualny status pracy fotela Wybór automatycznych programów masażu Wybór funkcji manualnych Regulacja pozycji fotela Ustawienia Wybór technik masażu Regulacja intensywności kompresji górnych partii ciała Status Wybór obszaru kompresji Ustawienie czasu trwania masażu Regulacja prędkości masażu Regulacja intensywności 4D Detekcja stanu zdrowia Menu użytkownika Pamięć...
-
Seite 306: Panel Sterowania
5.5 Panel sterowania 1. Włącznik / wyłącznik Naciśnij przycisk przez trzy sekundy, aby uruchomić lub wyłączyć fotel masujący. Naciśnij krótko przycisk, aby zatrzymać pracę fotela lub przełączyć go w tryb gotowości. 2. Przycisk Zero Gravity Naciśnij ten przycisk, aby przejść do pozycji zerowej grawitacji. Pozycja Zero Gravity ma dwa poziomy. Naciśnij i przytrzymaj przycisk przez dwie sekundy, aby powrócić... -
Seite 307: Before Use
6. Przed uruchomieniem fotela Sprawdzanie otoczenia Upewnij się, że w pobliżu fotela nie ma ludzi, zwie- rząt ani przedmiotów. Sprawdzanie wolnych przestrzeni Przed masażem należy upewnić się, że w podnóżku ani podłokietnikach nie znajdują się żadne przed- mioty. Należy uważać, aby ręce, stopy i głowa nie dostały się... - Seite 308 6. Przed uruchomieniem fotela Podłączenie zasilania Podłącz kabel zasilający. Włóż wtyczkę do gniazdka. Włącz włącznik główny (pozycja „I”) • Przed użyciem sprawdź kabel zasilający i wtyczkę pod kątem uszkodzeń. • Należy korzystać ze źródła zasilania, które jest zgodne z wymaganiami operacyjnymi tego produktu.
-
Seite 309: Instrukcja Obsługi
7. INSTRUKCJA OBSŁUGI 7.1 Obsługa fotela 1. Naciśnij przycisk włączania/wyłączania z boku pilota lub przyciśnij długo przycisk włączania/wyłączania na podłokietniku, aby uruchomić system. 2. Po uruchomieniu systemu wybierz intensywność masażu, naciskając przyciski „Delikatny” „Kojący” „Mocny” na pilocie. Spowoduje to przejście do programów masażu i ustawienie fotela masującego w pozycji leżącej. Jeśli w ciągu pięciu minut nie zostanie dokonany żaden wybór, fotel automatycznie się... - Seite 310 7.1 Obsługa fotela 4. Teraz fotel masujący skanuje Twoje ciało. Poczekaj, aż skanowanie zostanie zakończone. Możesz także nacisnąć przycisk Pomiń by pominąć skanownie i bezpośrednio rozpocząć masaż. Po zeskanowaniu ciała pilot wyda sygnał dźwiękowy. W tym momencie możesz wyregulować pozycję ramion. Gdy głowice masujące znajdą...
-
Seite 311: Funkcja Pauzy
7.1 Obsługa fotela Pozycja za wyzok Idealna pozycja Pozycja za niska 7.2 Funkcja pauzy (Z funkcji tej należy korzystać wyłącznie po włączeniu fotela [patrz strona 309]). Naciśnięcie przycisku Pauza w trakcie pracy fotela powoduje wstrzymanie masażu. Ponowne naciśnięcie przycisku Pauza wznowi program. - Seite 312 7.3 Programy automatyczne AI inteligentne - Programy Funkcja Opis Pełen relaks Górny robot masujący realizuje masaż karku, ramion i punktów akupunktur Fengchi, wykorzystując technikę ugniatanie. Następnie wykonuje masaż opukujący i shiatsu, w celu rozmasowania całego ciała. Dolny robot masujący wykonuje w tym czasie masaż talii i bioder poprzez ugniatanie i oklepywanie.
- Seite 313 7.3 Programy automatyczne Relaks i pobudzenie - Programy Funkcja Opis Odblokowanie Masaż ramion, szyi, pleców i talii za pomocą technik ugniatania, oklepywania i shiatsu. meridianów Jego celem jest aktywacja meridianów. Kark i barki W tym programie kark i ramiona masowane są głównie technikami ugniatania i rozcią- gania, a górna część...
- Seite 314 7.3 Programy automatyczne Rodzinne - Programy Funkcja Opis Otulający Głęboki masaż o umiarkowanej intensywności, który łagodzi zmęczenie, wspomaga krążenie krwi i zmniejsza stres. Dla kondycji Delikatny program masażu, odprężający ciało i umysł. Ramiona, szyja, talia i biodra masowane są technikami ugniatania i shiatsu. Wyjątkowa przyjemność...
- Seite 315 7.3 Programy automatyczne Głęboko relaksujace - Programy Funkcja Description Zastrzyk energii Głęboki masaż całego ciała, wykonywany technikami ugniatania, oklepywania i shiatsu. Ma on na celu przywrócenie witalności i dodanie energii. Przerwa na lunch Idealny w czasie przerwy na lunch, by wkroczyć w drugą część dnia z nową energią. Ple- cy i talia masowane są...
-
Seite 316: Pilot Zdalnego Sterowania
7.4 Pilot zdalnego sterowania (Z funkcji tej należy korzystać wyłącznie po włączeniu fotela [patrz strona 309]). Wybór programu Wybierz przycisk na lewym pasku menu, aby wejść do menu wyboru. Możesz wybrać spośród następujących usta- wień: Techniki masażu, Obszar masażu, Intensywność 4D, Pozycja, Rozstaw i Prędkość masażu. 1. - Seite 317 7.4 Pilot zdalnego sterowania Funkcja Ustawienia pracy głowic masujących Stop Brak techniki masażu Ugniatanie Regulacja prędkości i intensywności. Oklepywanie I Regulacja prędkości, rozstawu i intensywności. • Prędkość można ustawić na Oklepywanie II Regulacja prędkości, rozstawu i pięciu poziomach. intensywności. • Rozstaw można ustawić...
- Seite 318 7.4 Pilot zdalnego sterowania 1. Menu obszaru masażu oferuje pięć obszarów do wyboru: masaż punktowy, częściowy (obszarowy), pełny, górne plecy i dolne plecy. Wybierz żądany obszar do masażu. Przycisk Opis Masaż punktowy Masaż na wybranym odcinku pleców. Masaż całych pleców. Masaż...
- Seite 319 7.4 Pilot zdalnego sterowania 3. Możesz ustawić intensywność 4D w menu. Dostępne są poziomy ustawień od 1 do 5, przy czym 1 oznacza poziom najsłabszy, a 5 najsilniejszy. Im wyższa intensywność 4D jest ustawiona, tym bardziej wysunięte są głowice masują- ce i tym silniejszy jest masaż.
- Seite 320 7.4 Pilot zdalnego sterowania Poziom 0 Poziom 1 Poziom 2 Poziom 3 Poziom 4 Poziom 5 Przycisk Opis Naciśnij ten przycisk, aby zwiększyć intensywność 4D (poziomy od 1 do 5). Naciśnij ten przycisk, aby zmniejszyć intensywność 4D (poziomy od 1 do 5). Uwaga: Intensywność...
- Seite 321 7.4 Pilot zdalnego sterowania 4. Aby ustawić robota masującego, wybierz strzałkę skierowaną w górę lub strzałkę skierowaną w dół 5. Wybierz rozstaw mechanizmu masującego, jak pokazano na poniższej ilustracji. (1) Rozstaw można regulować tylko wtedy, gdy użytkownik aktywuje tryb manualny, podczas wybierania techniki masażu lub obszaru masażu.
- Seite 322 7.4 Pilot zdalnego sterowania Poziom 0 Poziom 1 Poziom 2 Poziom 3 Poziom 4 Poziom 5 Przycisk Opis Naciśnij ten przycisk, aby zwiększyć rozstaw (poziomy od 1 do 5). Naciśnij ten przycisk, aby zmniejszyć rozstaw (poziomy od 1 do 5). Wybierz prędkość...
- Seite 323 7.4 Pilot zdalnego sterowania Poziom 2 Poziom 0 Poziom 1 Poziom 3 Poziom 4 Poziom 5 Opis Description Naciśnij ten przycisk, aby zwiększyć prędkość masażu (poziomy od 1 do 5). Naciśnij ten przycisk, aby zmniejszyć prędkość masażu (poziomy od 1 do 5).
- Seite 324 7.4 Pilot zdalnego sterowania Przejdź do menu ustawień manualnych, aby wybrać tryb masażu kompresyjnego, jak pokazano na poniższym ry- sunku. Tryb masażu kompresyjnego umożliwia masaż całego ciała, , górnych partii ciała lub dolnych partii ciała. Na wewnętrznej stronie ramienia znajdują się rollery masujące, które włączają się automatycznie po wybraniu masażu kompresyjnego całego ciała.
- Seite 325 7.4 Pilot zdalnego sterowania Uwaga: Możesz również nacisnąć przycisk masażu kompresyjnego na ekranie głównym i wybrać żądany obszar masażu powietrznego z menu podręcznego. (Ta funkcja jest skrótem do zmiany intensywności masażu kompresyjnego na bieżącym ekranie głównym pilota). Aby ustawić intensywność masażu kompresyjnego, funkcja musi być uruchomiona. Istnieje 5 poziomów intensyw- ności, przy czym 1 oznacza najsłabszy, a 5 najmocniejszy poziom.
- Seite 326 7.4 Pilot zdalnego sterowania Poziom 0 Poziom 1 Poziom 2 Poziom 3 Poziom 4 Poziom 5 Przycisk Opis Naciśnij ten przycisk, aby zwiększyć intensywność kompresji (poziomy od 1 do 5). Naciśnij ten przycisk, aby zmniejszyć intensywność kompresji (poziomy od 1 do 5). Uwaga: Możesz wybrać...
-
Seite 327: Dopasowanie Pozycji
7.5 Dopasowanie pozycji (Z funkcji tej należy korzystać wyłącznie po włączeniu fotela [patrz strona 309]). Kliknij przycisk Pozycja na pasku menu po lewej stronie ekranu, aby wejść do menu ustawień kąta nachylenia fotela. Regulacja obejmuje wysuwanie podnóżka - obszar łydek, wysuwanie podnóżka - obszar stóp, podnoszenie podnóżka, podnoszenie oparcia, pozycję... - Seite 328 7.5 Dopasowanie pozycji 3. Odsuwanie i przysuwanie podnóżka - obszar łydek Przycisk Opis Przysuwanie Przycisk przysuwania podnóżka - obszar łydek: Aby przysunąć podnóżek, naciśnij i podnóżka przytrzymaj ten przycisk. Zwolnij przycisk by zatrzymać. Odsuwanie Przycisk odsuwania podnóżka - obszar łydek: Aby odsunąć podnóżek, naciśnij i przy- podnóżka trzymaj ten przycisk.
-
Seite 329: Ustawienia
Wejdź w menu swojego urządzenia (np. smartfona). Otwórz Ustawienia i wybierz opcję Bluetooth. Włącz Bluetooth i wyszukaj urządzenia w pobliżu. b. Gdy urządzenie wyszuka odpowiednią nazwę Bluetooth - Skyliner III-XXXX („X” oznacza indywidualny numer), podłącz urządzenia ze sobą. c. Teraz możesz odtwarzać przez głośniki fotela muzykę ze swojego telefonu. - Seite 330 7.6 Ustawienia 3. Sterowanie głosowe a. Powiedz „Hey Alice” lub „Hi Alice” w pobliżu lewego podłokietnika, aby aktywować sterowanie głosowe lub naciśnij przycisk głosowy na lewym podłokietniku. Asystent głosowy odpowie „I am here” - „Jestem tutaj”, aby wskazać, że słucha. b.
- Seite 331 7.6 Ustawienia Sterowanie głosowe Powiedz „Hi Alice” lub „Hey Alice” | Odpowiedź: „I am here”. Komunikacja z asystentem głosowym odbywa się wyłącznie w języku angielskim. Komenda Odpowiedź Massage on (Uruchom masaż) Ok, massage on (Ok, uruchamiam masaż) Massage close (Zakończ masaż) Ok, massage close (Ok, kończę...
- Seite 332 7.6 Ustawienia 4. Tryb oszczędzania energii Tryb oszczędzania energii włączony: Przyciski panelu szybkiego dostępu na podłokietniku i funkcje sterowania głosowego nie mogą być używane w trybie oszczędzania energii. Tryb oszczędzania energii wyłączony: Przyciski panelu szybkiego dostępu na podłokietniku i funkcja sterowania głosowego mogą być używane - również w trybie gotowości.
-
Seite 333: Detekcja Stanu Zdrowia
7.7 Detekcja stanu zdrowia (Z funkcji tej należy korzystać wyłącznie po włączeniu fotela [patrz strona 309]). 1. Rozpoczęcie skanowania stanu zdrowia a. Kliknij przycisk Zdrowie na pasku menu po lewej stronie ekranu. Aby rozpocząć detekcję stanu zdro- wia, naciśnij , a następnie delikatnie umieść palec wskazujący lub środkowy na czujniku. Po kilku sekundach wyświetlane są... - Seite 334 7.7 Detekcja stanu zdrowia 2. Zalecany program Po zakończeniu skanowania wyświetlane są: tętno, poziom tlenu we krwi i poziom zmęczenia. Saturacja (natlenie- nie) wynosi zwykle 95% do 99%. Poziomy zmęczenia obejmują: dobre samopoczucie, lekkie, umiarkowane i ciężkie zmęczenie. W zależności od stopnia zmęczenia zalecany jest program automatyczny. Wybierz „Tak”, aby uruchomić zalecany program lub „Nie”, aby powrócić...
- Seite 335 7.7 Detekcja stanu zdrowia 4. Kończenie procesu detekcji stanu zdrowia Podczas detekcji stanu zdrowia naciśnij przycisk , aby zatrzymać proces skanowania i powrócić do uprzednio działającego masażu.
-
Seite 336: Ustawienia Personalne
7.8 Ustawienia personalne (Please use this function only after switching on the chair [see page 17].) Kliknij przycisk Ustawień personalnych na pasku menu po lewej stronie ekranu. Tam wybierasz „Personalny 1” lub „Personalny 2” by uruchomić masaż. (Jest to możliwe tylko wtedy, gdy użytkownik został wcześniej zdefiniowany. ) Kliknij przycisk „Personalny 1 edytuj”... -
Seite 337: Inne Funkcje
7.9 Inne funkcje (Z funkcji tej należy korzystać wyłącznie po włączeniu fotela [patrz strona 309]). Na ekranie głównym wybierz przycisk „Pas grzejący” , aby włączyć lub wyłączyć ogrzewanie grafenowe w pasie. Po włączeniu funkcji ogrzewania ciepło będzie emitowane przez 3 minuty. Na ekranie głównym wybierz przycisk „Ogrzewanie rdzeniowe”... - Seite 338 7.9 Inne funkcje Na ekranie głównym wybierz przycisk Jonizacji , , aby włączyć lub wyłączyć funkcję jonizacji. Na ekranie głównym kliknij przycisk „Roller” , aby włączyć lub wyłączyć funkcję masażu stóp z trzema regulowa- nymi prędkościami. speeds. Przycisk Opis Naciśnij ten przycisk, aby włączyć lub wyłączyć wałkowanie stóp. Wielokrotne naciskanie przycisku powoduje przełączanie między stopniami prędkości 1, 2, 3 i wyłączaniem masażu stóp.
- Seite 339 7.9 Inne funkcje Na ekranie głównym ,wybierz przycisk „Łydki” , aby włączyć lub wyłączyć funkcję masażu łydek. Dostępna jest funkcja masażu obrotowego wewnętrznej strony łydek i funkcja masażu kompresyjnego na zewnątrz, która pomoże złagodzić sztywność mięśni łydek lub napięcia, spowodowane długim czasem stania. Na ekranie glównym , wybierz przycisk „Sterowanie głosowe”...
- Seite 340 7.9 Inne funkcje Na ekranie głównym wybierz przycisk „Ramiona” i naciskaj przyciski strzałek w górę i w dół w wyskakującym menu, aby dostosować pozycję ramion w zakresie 11 poziomów. Na ekranie głównym , naciśnij przycisk „Dł. Stóp” , aby dostosować mechanizm i poprawić komfort masażu.
- Seite 341 7.9 Inne funkcje Na ekranie głównym , wybierz przycisk „Ustawienie czasu masażu” . Naciśnij przycisk plus lub minus w wyskakującym menu, aby wydłużyć lub skrócić czas masażu. Czas jest zawsze skracany lub wydłużany o 5 minut. Maksymalny czas trwania masażu wynosi 40 minut. Na ekranie głównym wybierz przycisk „Delikatny”...
-
Seite 342: Pamięć
7.10 Pamięć (Z funkcji tej należy korzystać wyłącznie po włączeniu fotela [patrz strona 309]). Kliknij przycisk „Pamięć” na pasku menu po lewej stronie ekranu, aby uzyskać dostęp do funkcji zapamiętywania masażu. Istnieją dwie kategorie: zapisywanie ustawień masażu i przywoływanie zapisanych ustawień. Masaż można za- pisać... -
Seite 343: Kończenie Masażu
7.11 Kończenie masażu W czasie trwania masażu naciśnij przycisk na pilocie lub przycisk na prawym podłokietniku, aby wyłączyć urzą- dzenie. Wszystkie funkcje masażu zostają zakończone, a fotel powraca do pozycji wyjściowej. Wszystkie funkcje masażu są automatycznie wyłączane po upływie czasu masażu; oparcie i podnóżek nie wracają do pozycji wyjściowej. Odłącz fotel od zasilania, jak pokazano na poniższych ilustracjach. -
Seite 344: Pielęgnacja
Wytrzyj syntetyczną skórę miękką, suchą ściereczką. • Do czyszczenia urządzenia nie używaj środków chemicznych, takich jak rozcieńczalnik, benzyna, alkohol itp. • Rekomendujemy używanie kosmetyków Casada do skór syntetycznych. • Jeśli poszycie fotela jest szczególnie zabrudzone, potraktuje je w następujący sposób: •... -
Seite 345: Rozwiązywanie Problemów
Natychmiast zakończ korzystanie z urządzenia i odłącz zasilanie. Bezzwłocznie skontaktuj się z Rozwiązanie autoryzowanym serwisem. W przypadku jakichkolwiek pytań na temat produktu zachęcamy do kontaktu z naszym serwisem. Specyfikacja techniczna Model: Skyliner III Wymiary: Złożony: 85,5 x 177 x 130 cm Rozłożony: 85,5 x 190 x 90,5 cm Waga: 186,5 kg Napięcie:... -
Seite 346: Właściwości
9. Właściwości WAŁKOWANIE OSTUKIWANIE Wałkowanie to przyjemny ruch, po- Ostukiwanie to seria krótkich ruchów, wodujący naprzemienne napinanie i wykonywanych krawędzią dłoni, otwartą rozluźnianie mięśni, który kojąco działa na dłonią lub pięścią. Technika ta, dokładnie organizm. Ta technika stosowana jest za- naśladowana przez mechanizm masu- zwyczaj na koniec masażu, aby rozluźnić... - Seite 347 9. Właściwości POPRAWA KONDYCJI STAWÓW MASAŻ 4D Ta funkcja polega na delikatnym rozcią- Fotel posiada innowacyjny system masażu ganiu, połączonym z uciskiem. Stymuluje 4D L-Track, zapewniający szerszy, głębszy ona chrząstki w stawach kolanowych, i bardziej rytmiczny masaż niż przy które zaczynają lepiej przyswajać płyny konwencjonalnych systemach, opartych i składniki odżywcze.
- Seite 348 9. Właściwości PUNKTY AKUPRESURY SYSTEM NAGŁOŚNIENIA BLUETOOTH AMPHITHEATRE Masaż kluczowych punktów akupresury. Fotel do masażu wyposażony jest w tech- nologię Bluetooth i system dźwiękowy REFLEKSOLOGIA „amfiteatr’ , który redukuje szumy otocze- Masaż stref refleksologicznych regeneruje nia i zwiększa wrażenia dźwiękowe. W mięśnie stóp oraz harmonizuje pracę...
-
Seite 349: Informacje Prawne
Obermeiers Feld 3 33104 Paderborn, Germany info@casada.com www.casada.com Copyright Pictures and texts are subject to the copyright of CASADA International GmbH and may not be used further without express confirmation. Copyright © 2022 CASADA International GmbH. All rights reserved. A1.2-SK3-PL0723... - Seite 350 С момента своего основания в 2000 году название CASADA стало синонимом высококачественной продукции в области велнеса и фитнеса. Сегодня устройства CASADA доступны по всему миру. Постоянное совершенствование, неповторимый дизайн и строгое стремление к улучшению качества жизни - вот что отличает продукцию CASADA, а также ее надежность и превосходное качество. www.casada.com...
- Seite 351 Приобретая это массажное кресло, вы проявляете заботу о своем теле. Чтобы вы могли долгое время пользоваться преимуществами данного изделия, мы просим вас внимательно прочитать и соблюдать правила техники безопасности. Мы искренне надеемся, что вам понравится пользоваться вашим персональным массажным креслом Skyliner III. ОГЛАВЛЕНИЕ 1. Меры предосторожности ..................................352 2.
-
Seite 352: Меры Предосторожности
1.МЕРЫ ПРЕДОСТОРОЖНОСТИ 1.Меры предосторожности Перед использованием массажного кресла внимательно ознакомьтесь с данной инструкцией, чтобы убедиться, что кресло функционирует правильно и с оптимальной эффективностью. Сохраните эту инструкцию по эксплуатации для последующего использования! • Массажное кресло соответствует признанным техническим принципам и новейшим правилам безопасности. •... -
Seite 353: Противопоказания
2. ПРОТИВОПОКАЗАНИЯ 2. Противопоказания Если вы не уверены, стоит ли пользоваться массажным креслом, обязательно проконсультируйтесь с врачом. • Использование массажного кресла запрещено во время беременности или в случае одной или нескольких из следующих жалоб: недавние травмы, тромботические заболевания, любые виды воспалений и отеков, а также онкологическое... -
Seite 354: Размещение Массажного Кресла
3. РАЗМЕЩЕНИЕ МАССАЖНОГО КРЕСЛА 3. Размещение массажного кресла Размещение Убедитесь, что за стулом остается простран- ство не менее 10 см, чтобы кресло можно было наклонить. Защищайте кресло от повышенных температур в помещении. Расположите его так, чтобы избежать попадания прямых солнечных лучей и обеспе- чить... - Seite 355 3. Размещение массажного кресла Установка массажного кресла Используйте ролики на спинке, чтобы пе- ремещать массажное кресло. Переместите кресло, откинув его назад примерно на 45 ° (см. Рисунок). Примечание: Чрезмерное усилие может при- вести к опрокидыванию кресла, а также к его повреждению.
-
Seite 356: Настройка И Монтаж
4. НАСТРОЙКА И МОНТАЖ 4. Настройка и монтаж Установка подлокотника 1. Включите устройство и опустите спинку с помощью пульта дистанционного управления. 2. Подключите разъем жгута проводов и воздуховод к боковой стороне стальной рамы и к соответствующим разъемам подлокотника (рис.1). 3. Поднимите подлокотник с подключенными воздуховодом и кабелем и закрепите крючки с обеих сторон стальной... - Seite 357 4. Настройка и монтаж Установка блока массажа ног 1. Подключите кабель и направляющую механизма к соответствующему разъему на передней панели стальной рамы (рис. 1). 2. После подключения откройте крышку кронштейна с обеих сторон стальной рамы (рис. 2). 3. Поднимите блок и установите его в держатель. Закройте крышку и закрепите ее двумя винтами М4 (рис. 3). Рис.
-
Seite 358: Конструкция Массажного Кресла
5.КОНСТРУКЦИЯ МАССАЖНОГО КРЕСЛА 5.1 Элементы массажного кресла Большая подушка Освещение Маленькая подушка Панель быстрого управления Пульт дистанционного управления Сканер состояния здоровья Воздушная подушка для рук Плечевой механизм / подушка для спины Ножная секция Массажная капсула Плечевая воздушная подушка Освещение... -
Seite 359: Функциональные Особенности Массажного Кресла
5.2 Функциональные особенности массажного кресла Область массажа плеч Область головы • Массажные воздушно-компрессионные • Динамики с шумоподавлением подушки для плеч Подлокотник (левый) Подлокотник (правый) • Беспроводная зарядка для устройств • Пульт дистанционного управления с NFC • Блок голосового управления • USB-разъем для зарядки •... -
Seite 360: Прогревающая Накидка
5.3 Прогревающая накидка Использование прогревающей накидки • Кресло оснащено уникальной прогревающей накидкой с инновационным графеновым подогревом, который согревает не только плечи, но и спину, талию и область живота. Пользователь может использовать накидку в случае необходимости. При надевании на плечо он согревает акупунктурные точки Бинфенд, Тяньчжун, Юньмэнь... - Seite 361 5.3 Прогревающая накидка Иллюстрация, демонстрирующая Иллюстрация, демонстрирующая способ использования для прогре- способ использования для про- ва области спины и талии. грева плечевой области и области живота.
-
Seite 362: Пульт Дистанционного Управления
5.4 Пульт дистанционного управления Главное меню Кнопка включения/ выключения Приостановить или продолжить массаж Включить или выключить нагревательную накидку Включить или выключить функцию центрального прогрева Включить или выключить функцию ионизации O2 Включить или выключить ножные ролики Включить или выключить функцию разминания икр Включить... - Seite 363 5.4 Пульт дистанционного управления Отображение текущего состояния массажного кресла Выбор автоматических программ массажа Выбор функций, настраиваемых вручную Регулировка положения сиденья и угла наклона спинки Настройки Ключ к выбору массажных техник Регулировка интенсивности компрессии на нижнюю часть тела Отображение состояния Выбор зоны компрессионного массажа Выбор...
-
Seite 364: Панель Быстрого Управления
5.5 Панель быстрого управления 1. Кнопка включения/ выключения Нажмите кнопку в течение трех секунд, чтобы включить или выключить массажное кресло. Кратковременно нажмите кнопку, чтобы приостановить работу кресла или перевести его в режим ожидания. 2. Кнопка невесомости Нажмите эту кнопку, чтобы перейти в положение невесомости. Режим невесомости может быть установ- лен... -
Seite 365: Перед Использованием
6. ПЕРЕД ИСПОЛЬЗОВАНИЕМ 6. Перед использованием Рядом с креслом Убедитесь, что в зоне раскладывания кресла нет людей, домашних животных или каких-либо предметов. Посторонние предметы Перед началом массажа снимите украшения часы и любые посторонние предметы с голеней и запястий, а также пальцев рук и ног. Следите... - Seite 366 6. Перед использованием Подключение к электрической сети Вставьте кабель питания в Вставьте вилку в розетку Переключите кнопку включе- разъем в кресле. но в позицию “I” • Пожалуйста, перед использованием проверьте кабель питания и вилку на наличие по- вреждений. • Пожалуйста, используйте источник питания, соответствующий требованиям эксплуатации данного...
-
Seite 367: Инструкция По Эксплуатации
7. ИНСТРУКЦИЯ ПО ЭКСПЛУАТАЦИИ 7.1 Управление массажным креслом 1. Нажмите кнопку включения/выключения на боковой панели пульта дистанционного управления или дли- тельное время удерживайте кнопку включения/выключения на подлокотнике, чтобы кресло начало работу. 2. После запуска системы выберите интенсивность массажа, нажав кнопки “Нежный” , “Успокаивающий... - Seite 368 7.1 Управление массажным креслом 4. Теперь кресло приступает к сканированию вашего тела. Подождите, пока проверка формы вашего тела не будет полностью отсканирована. Вы также можете нажать кнопку «Пропустить» или пропустить тест и начать непосредственно массаж. После сканирования формы вашего тела пульт дистанционного управления подаст звуковой сигнал. Сигнал предупреждает...
-
Seite 369: Функция Паузы
7.1 Управление массажным креслом Высокое положение Оптимальное положение Низкое положение 7.2 Функция паузы (Пожалуйста, используйте эту функцию только после включения кресла [см стр. 367].) После включения массажного кресла нажмите кнопку «Пауза» , чтобы приостановить процесс массажа. Нажмите кнопку «Пауза» еще раз, чтобы возобновить программу. Пожалуйста, обратите внимание: в режиме паузы... - Seite 370 7.3 Автоматические программы Искусственный интеллект - программы Программа Описание Полное расслабление Верхняя массажная каретка используется для массажа шеи, плеч и акупунктурной точки Фэнчи путем разминания. После разминания начинается постукивающий массаж и массаж шиацу для разминания всего тела. Нижний массажная каретка используется...
- Seite 371 7.3 Автоматические программы Расслабление и восстановление Программа Описание Восстановление энергии Массаж плеч, шеи, спины и талии с использованием техник разминания, постукива- ния и шиацу для воздействия на меридианы. Забота о шее и плечах Массирует шею и плечи в основном с помощью приемов разминания и растяжки, а верхнюю...
- Seite 372 7.3 Автоматические программы Семейные программы Программа Описание Мужское здоровье Массируйте плечи, шею, спину и поясницу, главным образом, разминая, постуки- вая. Это снимает усталость, способствует циркуляции кровообращения и уменьша- ет стресс, благодаря глубокому массажу. Массаж проходит в интенсивном режиме, что делает его подходящим для мужчин. Женское...
- Seite 373 7.3 Автоматические программы Общее расслабление Программа Описание Энергия Глубокий массаж всего тела с использованием техник разминания, постукивания и шиацу пробуждает жизненные силы человеческого тела и стимулирует энергию. Обеденный перерыв Массируйте спину и поясницу, используя приемы разминания и постукивания, од- новременно надавливая на акупунктурную точку Шэнь Юй. Этот массаж направлен на...
-
Seite 374: Дистанционное Управление
7.4 Дистанционное управление (Пожалуйста, используйте эту функцию только после включения кресла [см стр. 367].) Выбор программ Нажмите кнопку в левой строке меню, чтобы войти в меню выбора. Вы можете выбрать одну из следующих настроек: Техника массажа, зона массажа, интенсивность 4D, положение, ширина массажа и скорость массажа. 1. - Seite 375 7.4 Дистанционное управление Режим Настройки массажных роликов Стоп Нажмите эту кнопку для простого масажа без применения специаль- ных техник Разминание Скорость, ширину и интенсивность можно установить. Постукивание I Скорость, ширину и интенсивность • Скорость можно установить можно установить. на пяти уровнях. Постукивание...
- Seite 376 7.4 Дистанционное управление 2. Меню выбора зоны массажа предлагает вам пять вариантов массажа: Точка, частичный, полный, верхний (спина) и нижний (поясница). Выберите нужную область для массажа. кнопка Описание Массаж в одной точке. Массаж в одной области. Массаж в зоне спины. Массаж...
- Seite 377 7.4 Дистанционное управление 3. Вы можете установить интенсивность 4D в меню. Доступны уровни настройки 1-5, причем 1 - самый низкий, а 5 – самый сильный. Чем выше установлена интенсивность 4D, тем дальше выступает массажный валик и тем сильнее массаж. Нажмите кнопку «Плюс» или...
- Seite 378 7.4 Дистанционное управление Уровень 0 Уровень 1 Уровень 2 Уровень 3 Уровень 4 Уровень 5 кнопка Описание Нажмите эту кнопку, чтобы увеличить интенсивность 4D на уровнях с 1 по 5. Нажмите эту кнопку, чтобы уменьшить интенсивность 4D на уровнях с 1 по 5. Пожалуйста, обратите...
- Seite 379 7.4 Дистанционное управление 4. Чтобы настроить массажную каретку, выберите стрелку, указывающую вверх , или стрелку, указывающую вниз , для точной настройки массажных роликов вверх или вниз. Выберите ширину массажа, как показано на рисунке ниже. (1) Ширину можно установить только в том случае, если пользователь активирует режим дистанционного управления...
- Seite 380 7.4 Дистанционное управление Уровень 0 Уровень 1 Уровень 2 Уровень 3 Уровень 4 Уровень 5 кнопка Описание Нажмите эту кнопку, чтобы увеличить ширину 4D на уровнях с 1 по 5. Нажмите эту кнопку, чтобы уменьшить ширину 4D на уровнях с 1 по 5. 6.
- Seite 381 7.4 Дистанционное управление Пожалуйста, обратите внимание: Вы также можете использовать «скорость массажа +» oили «ско- Скорость рость массажа –» на главном экране чтобы установить скорость массажа. Уровень 0 Уровень 1 Уровень 2 Уровень 3 Уровень 4 Уровень 5 кнопка Описание Нажмите...
- Seite 382 7.4 Дистанционное управление 7. Перейдите в ручное меню, чтобы выбрать режим воздушной компрессии, как показано на следующем рисунке. Режим воздушной компрессии включает в себя полную спину, верхнюю часть спины или нижнюю часть спины. На внутренней стороне руки также имеется функция роликового массажа, которая автоматиче- ски...
- Seite 383 7.4 Дистанционное управление Пожалуйста, обратите внимание: на главном экране вы также можете нажать кнопку воздушно-компрес- сионного массажа и выбрать нужную зону компрессии из всплывающего меню. (Эта функция является быстрым ключом к воздушно-компрессионному массажу на экране “Домашняя страница” пульта дистанцион- ного управления) 8.
- Seite 384 7.4 Дистанционное управление Уровень 0 Уровень 1 Уровень 2 Уровень 3 Уровень 4 Уровень 5 Кнопка Описание Нажмите эту кнопку, чтобы увеличить интенсивность компрессии на уров- нях с 1 по 5. Нажмите эту кнопку, чтобы уменьшить интенсивность компрессии на уров- нях...
-
Seite 385: Регулировка Положения Кресла
7.5 Регулировка положения кресла (Пожалуйста, используйте эту функцию только после включения кресла [см стр. 367].) Нажмите на кнопку «Угол наклона» в строке меню в левой части экрана, чтобы войти в меню настроек, где вы можете настроить угол наклона кресла. Регулировки включают выдвижение подставки для ног, выдвижение подножки, поднятие... - Seite 386 7.5 Регулировка положения кресла 3. Удлинение или укорачивание подножки Кнопка Описание Кнопка для укорачивания подножки: Чтобы вручную отрегулировать длину Укорачивание подножки, нажмите и удерживайте эту кнопку, чтобы медленно переместить подножки подножку вверх и укоротить подножку. Отпустите кнопку, когда вы закончите процесс...
-
Seite 387: Настройки
настройки и выберите опцию Bluetooth. Активируйте Bluetooth и выполните поиск устройств побли- зости от вас. b. Интеллектуальное устройство выполнит поиск соответствующего названия Bluetooth - Skyliner III- XXXX (“X” означает индивидуальный номер). Подключите свое устройство к креслу. c. Теперь запустите нужную музыку на вашем устройстве. - Seite 388 7.6 Настройки 3. Голосовое управление a. Произнесите “Hello, Alice” или “Hi, Alice” рядом с левым подлокотником, чтобы активировать голосо- вой помощник, или в качестве альтернативы нажмите голосовую кнопку на левом подлокотнике. Голосовой помощник ответит “I’m here”, указывая на то, что он слушает. b.
- Seite 389 7.6 Настройки Голосовой контроль Скажите “Hello, Alice” или “Hi, Alice” | Услышьте в ответ: “I’m here Взаимодействие с голосовым помощником на английском языке. Команда Ответ Massage on (Включи массаж) Ok, massage on (Ок, включила массаж) Massage close (Выключи массаж) Ok, massage close (Ок, выключила массаж) Total Relax (Полное...
- Seite 390 7.6 Настройки 4. Режим энергосбережения Включен режим энергосбережения: Кнопки быстрого доступа к подлокотнику и функции голосового управ- ления не могут использоваться в режиме энергосбережения; они должны использоваться при включении. Режим энергосбережения выключен: Кнопки быстрого доступа на подлокотнике и функция голосового управления...
-
Seite 391: Биосенсор
7.7 Биосенсор (Пожалуйста, используйте эту функцию только после включения кресла [см стр. 367].) 1. Запуск биосенсора для сканирования организма a. Нажмите на кнопку «Здоровье» в строке меню в левой части экрана. Чтобы начать проверку работоспособности, нажмите старт а затем осторожно приложите указательный или средний палец... - Seite 392 7.7 Биосенсор 2. Рекомендуемые программы Когда обычная проверка завершена, на дисплее отображаются частота сердечных сокращений, содержание кислорода в крови и уровень усталости. Содержание кислорода в крови обычно находится в диапазоне от 95% до 99%. Уровни усталости включают незаметную, легкую, умеренную и тяжелую. В зависимости от уровня...
- Seite 393 7.7 Биосенсор 4. Завершение сканирования Во время проверки состояния организма нажмите кнопку назад чтобы остановить процесс проверки и вернуться в режим массажа, запущенный до сканирования.
-
Seite 394: Пользовательский
7.8 Пользовательский (Пожалуйста, используйте эту функцию только после включения кресла [см стр. 367].) Нажмите на кнопку «Персональные настройки» пользователей в строке меню в левой части экрана. На экране будет выбор “Настройки 1”, либо “Настройки 2” для настройки эксклюзивного массажа. Нажмите кнопку “Настройки 1 редактирование” или “Настройки 2 редактирование”, чтобы получить доступ к меню... -
Seite 395: Дополнительные Функции
7.9 Дополнительные функции (Пожалуйста, используйте эту функцию только после включения кресла [см стр. 367].) На дисплее в разделе “Главная” нажмите кнопку “Нагрев накидки” , чтобы включить или выключить функцию нагрева накидки (графеновый прогрев). После включения функции нагрева тепло будет выделяться в течение... -
Seite 396: Другие Функции
7.9 Другие функции Нажмите кнопку „O2“ на дисплее в разделе „Главная“ , чтобы включить или выключить функцию иониза- ции O2. На странице „Главная“ нажмите кнопку „Ролик“ , чтобы включить или выключить функцию массажа стоп с тремя регулируемыми скоростями. Кнопка Описание Нажмите... - Seite 397 7.9 Другие функции На дисплее в разделе „Главная“ нажмите кнопку „Нога“ , чтобы включить или выключить массаж икр. На внутренней стороне голени имеется функция массажа с помощью трения, а на внешней стороне - функция массажа с помощью трения. Функция массажа подушек безопасности, которая может уменьшить скованность икроножных...
- Seite 398 7.9 Другие функции На дисплее в разделе „Главная“ выберите „Плечо“ и нажмите клавиши со стрелками вверх и вниз в меню, чтобы вручную отрегулировать положение плеч в общей сложности на 11 уровнях. На экране “Главная страница” нажмите кнопку “Размер стопы” чтобы оптимизировать массаж стоп под ваш...
- Seite 399 7.9 Другие функции На экране “Главная страница” выберите кнопку “Настройка времени массажа” . Нажмите кнопки со стрелками «плюс» и «минус» во всплывающем меню, чтобы увеличить или сократить время массажа. Время всегда сокращается или удлиняется с шагом в 5 минут. Самое продолжительное время - 40 минут. На...
-
Seite 400: Память
7.10 Память (Пожалуйста, используйте эту функцию только после включения кресла [см стр. 367].) Нажмите на кнопку “Память” в строке меню в левой части экрана, чтобы получить доступ к памяти функций массажа. Есть две категории: сохранение и отзыв функции массажа. Сообщение может быть сохранено в разделе “Сохранить... -
Seite 401: Окончание Массажа
7.11 Окончание массажа Во время массажа нажмите кнопку на пульте дистанционного управления или кнопку на правом подлокот- нике, чтобы выключить прибор. Все массажные функции завершаются, и кресло возвращается в исходное поло- жение. Все массажные функции автоматически отключаются по истечении времени массажа; спинка и подставка для... -
Seite 402: Уход За Изделием
8. УХОД ЗА ИЗДЕЛИЕМ 8.1 Очистка и обслуживание Очистка деталей из синтетической кожи и пластика. Протрите синтетическую кожу мягкой сухой тканью. • Не используйте химические вещества, такие как растворитель, бензин, спирт и т.д. для очистки устройства. • При использовании имеющихся в продаже средств по уходу за кожей (салфеток), пожалуйста, придерживай- тесь... -
Seite 403: Устранение Неполадок
Прекратите использование устройства и отсоедините его от источника питания. Во избе- Решение жание несчастных случаев, пожалуйста, обратитесь в авторизованный сервисный центр. Если у вас есть какие-либо вопросы или сомнения по поводу данного продукта, пожалуйста, свяжитесь с автори- зованным сервисным центром Casada Технические характеристики Модель: Skyliner III Размеры:... -
Seite 404: Отличительные Особенности
9. ОТЛИЧИТЕЛЬНЫЕ ОСОБЕННОСТИ 9. Отличительные особенности РОЛИКОВЫЙ МАССАЖ ПОКОЛАЧИВАНИЕ Попеременно расслабляет и напрягает При поколачивании производят мышцы, успокаивает и снимает напря- короткие постукивающие движения жение. Эта техни ка часто применяется при помощи ребра ладони или кулака.. при завершении массажа для рассла- Это... - Seite 405 9. Отличительные особенности НЕПРИЯТНЫЕ ОЩУЩЕНИЯ В ОБЛАСТИ 4D МАССАЖ КОЛЕН Массаж 4D – это когда ролики движутся по 3 плоскостям (вверх/вниз, вправо/ Мягко растягивает и воздействует с влево, вперед/назад), а так же ритм, помощью компрессионного массажа скорость «хода» роликов и сила воздей- на...
- Seite 406 9. Отличительные особенности МУЗЫКА ДВОЙНОЙ ДАТЧИК СКАНИРОВАНИЯ ТЕЛА Функция музыки для дополнительного расслабления и наслаждения. Массажное кресло выполняет сканиро- вание тела, чтобы рассчитать размеры пользователя и основные напряженные BLUETOOTH зоны, чтобы обеспечить оптималь- ное давление на протяжении сеанса Беспроводная передача даных. массажа.
-
Seite 407: Юридические Аспекты
Компания «Касада Интернешнл ГмбХ» ОбермайерсФельд, 3 г. Падерборн, Германия, 33104 info@casada.com www.casada.com Авторские права на изображения и тексты принадлежат компании «CASADA International GmbH» и не могут использоваться без явно выраженного ее согласия. Авторское право © 2023 CASADA International GmbH. Все права сохранены A1.2-SK3-RU0823...