Inhaltszusammenfassung für Blackmagic Design Blackmagic Studio Cameras
Seite 1
Installation and Operation Manual Blackmagic Studio Cameras Mac OS X ™ Windows ™ English, 日本語, Français, Deutsch, Español, 中文, and Русский 한국어 September 2015...
Seite 2
Blackmagic Studio Camera English 日本語 Français Deutsch Español 中文 한국어...
Seite 3
ATEM switcher or via custom remote. We hope you use your new camera for some amazing live productions and produce some fantastic looking work! We are extremely excited to see what creative work you produce! Grant Petty CEO Blackmagic Design...
Contents Blackmagic Studio Camera Getting Started Camera Video Output Attaching a Lens Connecting to Video Switchers Turning Your Camera On Connecting to Recorders Camera Features Blackmagic Camera Setup Blackmagic Studio Camera Features Attaching Accessories Blackmagic Micro Studio Camera 4K Features Sun Shade Camera Connections Other Accessories...
Getting Started Getting Started Attaching a Lens Getting started with your Blackmagic Studio Camera or Blackmagic Micro Studio Camera 4K is as simple as attaching a lens and turning the camera on. To remove the protective dust cap from the lens mount, hold down the locking button and rotate the cap counterclockwise until it is released.
Camera Features Blackmagic Studio Camera Features Front Panel 1. Front Tally Light Indicates to the on-air talent which camera is currently "live". See the 'monitoring settings' section in this manual for more details. Left Panel 2. LANC Remote 2.5mm stereo jack for LANC remote control supports iris, zoom and focus control. 3.
Camera Features Rear Panel 11. 10" LCD Monitor live camera output or program output, or view the menu. See the 'monitoring section' in this manual for more details. 12. Rear Tally Light When lit, it indicates to the camera operator that their camera is currently live. 13.
Camera Features Blackmagic Micro Studio Camera 4K Features Front Panel 1. Tally Light The Tally light indicates to on-air talent which camera is currently 'live,' as well as alerting the operator to the status of the camera. The following scenarios are possible: ...
Seite 9
Camera Features Right Panel 9. Analog Audio In 3.5mm stereo audio input, switchable between microphone and line-level input in menu. 10. SDI Out SDI output for connecting to a switcher, external recorder or other device. 11. SDI In SDI input allows camera control via ATEM switchers. 12.
Camera Connections Camera Connections Blackmagic Studio Camera - Left Side LANC Remote Control The remote port on your camera is used to remotely control lens focus, iris and zoom adjustments when using a compatible lens. The port takes a 2.5 mm stereo jack using the standard LANC protocol. Active MFT lenses allow you to control the zoom servo with a LANC controller.
To purchase an optical fiber SFP module for your Blackmagic Studio Camera, contact your nearest Blackmagic Design reseller. You can find your nearest reseller on our website at www.blackmagicdesign.com/resellers.
Camera Connections Blackmagic Micro Studio Camera 4K - Left Side HDMI Output The HDMI port on your Blackmagic Micro Studio Camera 4K outputs 10-bit 4:2:2 1080p video with 2 channels of audio for monitoring purposes. You can connect any HD capable HDMI monitor, such as Blackmagic Video Assist, to frame and focus shots as well as navigating the Micro Studio Camera 4K’s menus.
Camera Connections Blackmagic Micro Studio Camera 4K - Right Side Analog Audio In The 3.5mm stereo audio connector accepts microphone or line level audio. You can switch between these options in the camera’s ‘audio settings’ menu. It’s important to select the appropriate setting or your audio may sound too quiet or too loud.
Customization Customization Blackmagic Micro Studio Camera 4K Expansion Cable There are two ways to access the expansion port's functions. You can use the expansion cable that comes with your Micro Studio Camera 4K, or solder your own custom connectors. The expansion cable provides connectors for the following control options. 1.
Customization Wiring diagram for the Blackmagic Micro Studio Camera Expansion Cable When using Blackmagic Micro Studio Camera 4K’s expansion port you may Use the following diagram when wiring the expansion cable included or use it only want to access one or two functions. For example, you may want to control as an example for how you can wire up the connections on your own custom an attached B4 Broadcast Lens while simultaneously receiving 12V power and cable correctly.
Camera Settings Camera Settings Camera Settings To configure settings on your Blackmagic Studio Camera or Blackmagic Micro Studio Camera 4K, press the 'menu' button. Use the menu navigation buttons to highlight menus and press the 'set' button to confirm your selection. If you are using the Micro Studio Camera 4K, you will need to connect an external monitor via the camera's HDMI port to view menu settings.
Camera Settings Shutter + Iris Maintains the correct exposure levels by adjusting the shutter speed. If the maximum or minimum available shutter speed is reached and exposure still cannot be maintained, Micro Studio Camera 4K will begin adjusting the aperture to keep exposure constant. Manual Trigger Iris aperture and shutter speed are set manually and exposure may vary with changing light conditions.
Camera Settings Blackmagic Studio Cameras Supported Video Formats All Studio Cameras Micro Studio Camera 4K Studio Camera 4K Additional Formats Additional Formats 720p50 2160p23.98 2160p23.98 720p59.94 2160p24 2160p24 720p60 2160p25 2160p25 1080i50 2160p29.97 2160p29.97 1080i59.94 2160p30 2160p30 1080i60 2160p50 1080p23.98 2160p59.94...
Camera Settings Microphone Level Microphone input adjusts the recording levels of the built in microphone. Move the audio slider left or right to increase or decrease levels. Studio Camera has a built in stereo microphone. The built in microphone records to audio channels 1 and 2 when no external audio source is connected. Input Level External audio connectors support audio at microphone level or line level.
Camera Settings Monitoring Settings To adjust the display settings for the LCD, press the 'menu' button and select the monitor icon. Use the menu navigation buttons to highlight menus and use the 'set' button to confirm your selection. HDMI Meters Blackmagic Micro Studio Camera 4K gives you the option to select which meters you want to display on the HDMI output.
Camera Settings Focus Peaking Allows you to change the level of focus peaking. The settings include: off, low, medium and high. Adjust this setting when you are using a very sharp lens and the peaking covers the entire image. The default setting is medium. Front Tally Brightness Changes the brightness of the front tally light.
Camera Settings Headset Level Move the volume slider left or right to increase or decrease audio monitoring levels. The default setting is 50%. Headset Mic Level Move the volume slider left or right to increase or decrease audio microphone input levels. The default setting is 50%.
Camera Settings Additional Settings Push to Talk (PTT) Button When doing live production it's vital that camera operators can talk to the director and others within the control room. Simply press and hold the button to begin talking. Press twice in quick succession for hands free communication.
Camera Video Output Connecting to Video Switchers Blackmagic Studio Cameras output 10-bit 4:2:2 video so you can connect to broadcast switchers and other SDI video equipment. With the user upgradable SFP module installed you can connect via optical fiber, which means ATEM Camera Converters are not required at the camera end.
After the installation is complete, click on the Windows 'start' menu, and go to 'all programs'. Click on the Blackmagic Design folder to open the Blackmagic Camera setup software and instruction manuals. How to Update your Camera's Internal Software After installing the latest Blackmagic Camera setup software on your computer, connect a USB cable Blackmagic Camera Setup software.
Attaching Accessories Attaching Accessories Sun Shade The Studio Cameras include a foldable sun shade to shade the LCD in bright conditions and ensure optimum viewing is possible at all times. Step 1. Locate the 6 thumbscrews that are included with your Studio Camera. Step 2.
PGM SDI H/PHONE on the ATEM switcher, your camera number must also be set to 1. This ensures tally is sent to Connect multiple Blackmagic Studio Cameras via optical fiber using an ATEM Studio Converter. the correct camera. Open ATEM Software Control Preferences and set the switcher's button mapping to make sure you are switching the right camera with correct tally.
Using ATEM Software Control Using Camera Control Launch ATEM Software Control and click on the Camera button located at the bottom of the software window. You’ll see a row of labeled camera controllers containing tools to adjust and refine each camera’s image.
Seite 29
Using ATEM Software Control Iris/Pedestal Control The iris/pedestal control is located within the cross hairs of each camera controller. The control illuminates red when its camera is on air. To open or close the iris, drag the control up or down. Holding the shift key allows only iris adjustments. To darken or lift the pedestal, drag the control left or right.
Using ATEM Software Control Manual Focus Adjustment When you want to adjust the focus on your camera manually, you can use the focus adjustment located at the bottom of each camera controller. Drag the wheel control left or right to manually adjust focus while viewing the video feed from the camera to ensure your image is nice and sharp.
Seite 31
Using ATEM Software Control The color corrector panel can be expanded out of any camera controller and provides expanded color correction control with extra settings and a full primary color corrector interface. You have color wheels and settings such as saturation available and you can see shadows, mid tones and highlight settings all at the same time.
Using ATEM Software Control Contrast Setting The Contrast setting gives you control over the distance between the darkest and lightest values of an image. The effect is similar to making opposing adjustments using the lift and gain master wheels. The default setting is 50%. Saturation Setting Contrast, Saturation, Hue and Lum Mix settings.
If you are a software developer you can use the Video Device Embedded Control Protocol to construct devices that integrate with our products. Here at Blackmagic Design, our approach is to open up our protocols and we eagerly look forward to seeing what you come up with!
Seite 34
Developer Information Abstract Message Packet Format Every message packet consists of a three byte header followed by an optional variable length data block. The maximum packet size is 64 bytes. Destination device (uint8) Device addresses are represented as an 8 bit unsigned integer. Individual devices are numbered 0 through 254 with the value 255 reserved to indicate a broadcast message to all devices.
Seite 35
Developer Information Defined Commands Command 0 : change configuration Category (uint8) The category number specifies one of up to 256 configuration categories available on the device. Parameter (uint8) The parameter number specifies one of 256 potential configuration parameters available on the device. Parameters 0 through 127 are device specific parameters.
Seite 36
Developer Information 128: signed 5.11 fixed point Data elements are signed 16 bit integers representing a real number with 5 bits for the integer component and 11 bits for the fractional component. The fixed point representation is equal to the real value multiplied by 2^11. The representable range is from -16.0 to 15.9995 (15 + 2047/2048).
Seite 37
Developer Information Group Parameter Type Index Minimum Maximum Interpretation Lens Focus fixed16 0.0=near, 1.0=far Instantaneous autofocus void trigger instantaneous autofocus Aperture (f-stop) fixed16 -1.0 16.0 Aperture Value (where fnumber = sqrt(2^AV)) Aperture (normalised) fixed16 0.0=smallest, 1.0=largest Aperture (ordinal) int16 Steps through available aperture values from minimum (0) to maximum (n) Instantaneous auto void...
Seite 38
Developer Information Group Parameter Type Index Minimum Maximum Interpretation Reserved Reserved Reserved Reserved Exposure (us) int32 42000 time in us Exposure (ordinal) int16 Steps through available exposure values from minimum (0) to maximum (n) Dynamic Range Mode int8 enum 0 = film, 1 = video Video sharpening level int8 enum 0=Off, 1=Low, 2=Medium, 3=High...
Seite 39
Developer Information Group Parameter Type Index Minimum Maximum Interpretation Overlays int16 bit field 0x4 = zebra 0x8 = peaking Zebra level fixed16 0.0=minimum, 1.0=maximum Peaking level fixed16 0.0=minimum, 1.0=maximum Colour bars display time int8 0=disable bars, 1-30=enable bars with (seconds) timeout (s) Tally Tally brightness...
Seite 40
Developer Information Group Parameter Type Index Minimum Maximum Interpretation [3] luma -2.0 default 0.0 Gamma Adjust fixed16 [0] red -4.0 default 0.0 [1] green -4.0 default 0.0 [2] blue -4.0 default 0.0 [3] luma -4.0 default 0.0 Gain Adjust fixed16 [0] red 16.0 default 1.0...
Seite 41
Developer Information Example Protocol Packets Operation Packet Byte Length header command data trigger instantaneous auto focus on camera 4 turn on OIS on all cameras set exposure to 10 ms on 0x10 0x27 0x00 0x00 camera 4 (10 ms = 10000 us = 0x00002710) add 15% to zebra level 0x33...
Help Help Getting Help The fastest way to obtain help is to go to the Blackmagic Design online support pages and check the latest support material available for your camera. Blackmagic Design Online Support Pages The latest manual, software and support notes can be found at the Blackmagic Design support centre at www.blackmagicdesign.com/support.
Blackmagic Design parts or supplies, or d) to service a product that has been modified or integrated with other products when the effect of such a modification or integration increases the time or difficulty of servicing the product.
Seite 44
インストール / オペレーション マニュアル Blackmagic Studio Camera Mac OS X ™ Windows ™ 日本語 2015年9月...
Seite 45
ラ ・ パッケージには、 必要なすべての機能が詰め込まれているのです !風防付き大型 マイクをファンタム電源で接続できるだけでなく、 オプションでSFPモジュールをイン ストールすれば、 スイッチャーから何マイルも離れた場所のカメラに光ファイバーで 接続できます ! 必要であればHyperDeck Shuttleを追加して、 カメラを通常のプロ ダクションにも使用できます! Blackmagic Micro Studio Camera 4Kは、 Blackmagic Studio Cameraのコンパクト 性や機能をさらに進化させました ! この小型カメラは、 極めて小さな筐体に驚異的な Ultra HDセンサーを搭載しており、 多様なリモートコントロールに対応しています。 ATEMスイッチャーやカスタムリモートコントロールでカメラを制御し、 過去には不可 能だった場所から放送用フッテージを撮影できます。 ユーザーの皆様が弊社の新しいカメラを使い、 素晴らしいライブプロダクションや 最高の映像作品を作られることを願ってやみません。 皆様のクリエイティブな作品 を拝見することを、 心より楽しみにしています。 Blackmagic Design CEO グラント ・ペティ...
Seite 46
目次 Blackmagic Studio Camera はじめに カメラのビデオ出力 レ ンズの取り付け スイ ッチャーに接続 カメラの電源を入れる レコーダーに接続 カメラの機能 Blackmagic Camera Setup Blackmagic Studio Cameraの機能 アクセサリを装着 Blackmagic Micro Studio Camera 4Kの機能 サンシェード 接続 その他のアクセサリ Blackmagic Studio Camera - レ フトパネル ATEM Software Controlの使用 Blackmagic Studio Camera - ライトパネル カメラコントロールとは...
接続 接続 Blackmagic Studio Camera - レ フトパネル LANCリモートコントロール 互換性のあるレンズを使用している場合は、 カメラのリモートポートを使用してレンズのフォーカス、 アイリス、 ズームを遠隔操作で調整できます。 リモートポートは標準LANCプロトコルの2.5mmステレオジャックです。 アクティブ方式MFTレンズは、 LANCコントローラーでズームサーボを制御できます。 現在、 以下のレンズがサ ポートされています。 Panasonic Lumix G X Vario PZ 14-42mm f/3.5-5.6 Power O.I.S. レンズ Panasonic Lumix G X Vario PZ 45-175mm f/4.0-5.6 Zoom O.I.S. レンズ ...
接続 Blackmagic Micro Studio Camera 4K - 左側 HDMI出力 Blackmagic Micro Studio Camera 4KのHDMIポートからは、 10-bit 4:2:2 1080pビデオと2チャンネルのオー ディオを出力してモニタリングできます。 Blackmagic Video AssistなどあらゆるHD対応HDMIモニターを接続し て、 ショットのフレーミングやフォーカス合わせ、 さらにはMicro Studio Camera 4Kのメニューナビゲートが可 能です。 HDMI出力のフレームレートは、 カメラのフォーマットと一致します。 例えば、 カメラが2160p30に設定されてい る場合、 HDMI出力は1080p30となります。 拡張ポート (EXPANSION) Blackmagic Micro Studio Camera 4Kはサイズが小さいため、 アクションに接近した位置や手の届かない場所 などから、...
If you are a software developer you can use the Video Device Embedded Control Protocol to construct devices that integrate with our products. Here at Blackmagic Design our approach is to open up our protocols and we eagerly look forward to seeing what you come up with!
Seite 76
Developer Information Abstract Message Packet Format Every message packet consists of a three byte header followed by an optional variable length data block. The maximum packet size is 64 bytes. Destination device (uint8) Device addresses are represented as an 8 bit unsigned integer. Individual devices are numbered 0 through 254 with the value 255 reserved to indicate a broadcast message to all devices.
Seite 77
Developer Information Defined Commands Command 0 : change configuration Category (uint8) The category number specifies one of up to 256 configuration categories available on the device. Parameter (uint8) The parameter number specifies one of 256 potential configuration parameters available on the device. Parameters 0 through 127 are device specific parameters.
Seite 78
Developer Information 128: signed 5.11 fixed point Data elements are signed 16 bit integers representing a real number with 5 bits for the integer component and 11 bits for the fractional component. The fixed point representation is equal to the real value multiplied by 2^11. The representable range is from -16.0 to 15.9995 (15 + 2047/2048).
Seite 79
Developer Information Group Parameter Type Index Minimum Maximum Interpretation Lens Focus fixed16 0.0=near, 1.0=far Instantaneous autofocus void trigger instantaneous autofocus Aperture (f-stop) fixed16 -1.0 16.0 Aperture Value (where fnumber = sqrt(2^AV)) Aperture (normalised) fixed16 0.0=smallest, 1.0=largest Aperture (ordinal) int16 Steps through available aperture values from minimum (0) to maximum (n) Instantaneous auto void...
Seite 80
Developer Information Group Parameter Type Index Minimum Maximum Interpretation Reserved Reserved Reserved Reserved Exposure (us) int32 42000 time in us Exposure (ordinal) int16 Steps through available exposure values from minimum (0) to maximum (n) Dynamic Range Mode int8 enum 0 = film, 1 = video Video sharpening level int8 enum 0=Off, 1=Low, 2=Medium, 3=High...
Seite 81
Developer Information Group Parameter Type Index Minimum Maximum Interpretation Overlays int16 bit field 0x4 = zebra 0x8 = peaking Zebra level fixed16 0.0=minimum, 1.0=maximum Peaking level fixed16 0.0=minimum, 1.0=maximum Colour bars display time int8 0=disable bars, 1-30=enable bars with timeout (seconds) Tally Tally brightness...
Seite 82
Developer Information Group Parameter Type Index Minimum Maximum Interpretation [3] luma -2.0 default 0.0 Gamma Adjust fixed16 [0] red -4.0 default 0.0 [1] green -4.0 default 0.0 [2] blue -4.0 default 0.0 [3] luma -4.0 default 0.0 Gain Adjust fixed16 [0] red 16.0 default 1.0...
Seite 83
Developer Information Example Protocol Packets Operation Packet Byte Length header command data trigger instantaneous auto focus on camera 4 turn on OIS on all cameras set exposure to 10 ms on camera 0x10 0x27 0x00 0x00 4 (10 ms = 10000 us = 0x00002710) add 15% to zebra level 0x33 0x01...
Seite 86
Manuel d'utilisation et d'installation Blackmagic Studio Camera Mac OS X ™ Windows ™ Français septembre 2015...
Seite 87
Nous espérons que vous allez utiliser votre nouvelle caméra pour créer des productions en direct exceptionnelles et produire des travaux au rendu remarquable ! Nous nous réjouissons de voir les travaux créatifs que vous allez réaliser ! Grant Petty PDG de Blackmagic Design...
Seite 88
Sommaire Blackmagic Studio Camera Mise en route Sortie vidéo de la caméra Monter un objectif Connexion à des mélangeurs vidéo Mise en route de votre caméra Connexion à des enregistreurs Fonctions de la caméra Blackmagic Camera Setup Caractéristiques clés de la Blackmagic Studio Camera Fixation des accessoires Caractéristiques de la Blackmagic Micro Studio Camera 4K Pare-soleil...
Mise en route Mise en route 89 89 Monter un objectif Pour mettre en route votre Blackmagic Studio Camera ou Blackmagic Micro Studio Camera 4K, il vous suffit de monter un objectif et d'allumer la caméra. Pour retirer le cache de protection de la monture d'objectif, maintenez le bouton de verrouillage enfoncé...
Fonctions de la caméra Fonctions de la caméra Caractéristiques clés de la Blackmagic Studio Camera Face avant 1. Voyant tally frontal Indique à l'acteur quelle caméra passe actuellement à l'antenne. Pour plus d'information, consultez la section Paramètres Monitoring de ce manuel. Face gauche 2.
Seite 91
Fonctions de la caméra Face arrière 11. Écran LCD 10" Contrôlez le signal de la caméra en direct ou le signal du programme, ou visualisez le menu. Pour plus d'information, consultez la section Paramètres du menu Monitoring de ce manuel. 12.
Fonctions de la caméra Caractéristiques de la Blackmagic Micro Studio Camera 4K Face avant 1. Voyant tally Le voyant tally indique quelle caméra est à l'antenne et informe le caméraman de l'état de sa caméra. Les scénarios suivants sont possibles : ...
Seite 93
Fonctions de la caméra Face droite 9. Entrée audio analogique Entrée audio stéréo de 3,5mm. Commutable entre les entrées micro et de niveau ligne à partir du menu. 10. Sortie SDI Sortie SDI permettant de connecter des appareils tels que des mélangeurs, des enregistreurs externes ou d'autres appareils.
Connexions Connexions Blackmagic Studio Camera - Face gauche Contrôle à distance LANC Le port LANC de votre caméra permet de contrôler à distance la mise au point de l'objectif, l'iris et le zoom lorsque vous utilisez un objectif compatible. Le port fonctionne avec un jack stéréo de 2,5 mm qui prend en charge le protocole LANC.
été connecté en premier sera utilisé. Pour vous procurer un module SFP fibre optique, contactez le revendeur Blackmagic Design le plus proche de chez vous. Pour trouver un revendeur Blackmagic Design, veuillez vous rendre sur notre site web : www.blackmagicdesign.
Connexions Blackmagic Micro Studio Camera 4K - Face gauche Sortie HDMI Le port HDMI de votre Blackmagic Micro Studio Camera 4K achemine de la vidéo 1 080p 4:2:2 10 bits intégrant 2 canaux audio pour le contrôle de vos enregistrements. Vous pouvez connecter n'importe quel type de moniteur HDMI prenant en charge la HD, tel que le Blackmagic Video Assist, afin de faciliter le cadrage et la mise au point de vos images.
Connexions Blackmagic Micro Studio Camera 4K - Face droite Entrée audio analogique Le connecteur audio stéréo de 3,5mm fonctionne avec les liaisons micro et de niveau ligne. Vous pouvez choisir entre ces deux liaisons dans les paramètres du menu Audio de la caméra. Il est important de choisir le réglage approprié...
Personnalisation Personnalisation Câble expansion de la Blackmagic Micro Studio Camera 4K Il existe deux façons d'accéder aux fonctionnalités du port expansion. Vous pouvez utiliser le câble expansion vendu avec la Micro Studio Camera 4K ou personnaliser vos propres câbles. Le câble expansion est doté de connecteurs permettant de contrôler les options suivantes. 1.
Personnalisation Schéma de câblage pour le câble expansion de la Blackmagic Micro Studio Camera Lorsque vous utilisez le port expansion de la Blackmagic Micro Studio Camera 4K, vous Utilisez le schéma suivant pour connecter le câble expansion fourni ou consultez-le n'aurez peut-être besoin que d'une seule ou de deux fonctions.
Paramètres de la Studio Camera Paramètres de la Studio Camera Paramètres du menu Caméra Pour configurer les paramètres de votre Blackmagic Studio Camera ou de votre Blackmagic Micro Studio Camera 4K, appuyez sur le bouton Menu. Utilisez les flèches de navigation pour mettre les menus en surbrillance et confirmez votre sélection à...
Seite 101
Paramètres de la Studio Camera Shutter + Iris Maintient le niveau d'exposition approprié en modifiant la vitesse d'obturation. Lorsque la vitesse d'obturation maximale ou minimale a été atteinte et qu'il n'est toujours pas possible de maintenir la même exposition, la Micro Studio Camera 4K ajuste l'ouverture pour que l'exposition reste constante.
Paramètres de la Studio Camera Formats vidéo pris en charge par les Blackmagic Studio Camera All Studio Cameras Micro Studio Camera 4K Studio Camera 4K Additional Formats Additional Formats 720p50 2160p23.98 2160p23.98 720p59.94 2160p24 2160p24 720p60 2160p25 2160p25 1080i50 2160p29.97 2160p29.97 1080i59.94 2160p30...
Seite 103
Paramètres de la Studio Camera Niveau du microphone (Microphone Level) L'entrée microphone ajuste les niveaux d'enregistrement du microphone intégré. Déplacez le curseur vers la gauche ou la droite pour augmenter ou diminuer les niveaux. La Studio Camera est équipée d'un microphone stéréo intégré.
Paramètres de la Studio Camera Paramètres du menu Monitoring Pour ajuster les paramètres d'affichage de l'écran LCD, appuyez sur le bouton MENU et sélectionnez l'icône moniteur. Utilisez les boutons de navigation pour mettre les menus en surbrillance et confirmez votre sélection à l'aide du bouton SET. HDMI Meters La Blackmagic Micro Studio Camera 4K vous permet de choisir les outils de mesure que vous souhaitez afficher sur la sortie HDMI.
Paramètres de la Studio Camera Focus Peaking Ce paramètre vous permet de changer le niveau de la fonction focus peaking (aide à la mise au point). Faites votre choix entre : off, low, medium et high. Ajustez ce paramètre lorsque vous utilisez un objectif très net et que l'image entière est écrêtée.
Paramètres de la Studio Camera Niveau du casque (Headset Level) Déplacez le curseur de volume à gauche ou à droite pour augmenter ou diminuer les niveaux du contrôle audio. Par défaut, ce paramètre est réglé sur 50%. Niveau du micro du casque (Headset Mic Level) Déplacez le curseur de volume à...
Seite 107
Paramètres de la Studio Camera Paramètres supplémentaires Appuyer pour parler (PTT) Lors de la production en direct, il est primordial que les cameramen puissent communiquer avec le réalisateur et les personnes se trouvant en régie. Il vous suffit d'appuyer et de maintenir le bouton enfoncé et vous pouvez ensuite commencer à...
Sortie vidéo de la caméra Connexion à des mélangeurs vidéo Les Blackmagic Studio Cameras acheminent de la vidéo 4:2:2 10 bits, ce qui vous permet de vous connecter à des mélangeurs broadcast ainsi qu'à d'autres périphériques vidéo SDI. En installant un module SFP vous pouvez vous connecter via fibre optique, il n'est donc pas nécessaire de connecter de convertisseurs ATEM...
Une fois l'installation terminée, cliquez sur le menu Démarrer et allez sur Tous les programmes. Cliquez sur le dossier Blackmagic Design pour ouvrir le logiciel Blackmagic Camera Setup et le manuel d'utilisation. Comment mettre à jour le logiciel interne de votre caméra Après avoir installé...
Fixation des accessoires Fixation des accessoires Pare-soleil La Studio Camera inclut un pare-soleil pliable pour abriter l’écran lorsque la luminosité est forte et assurer un affichage optimal en permanence. Étape 1. Repérez les 6 vis ailées se trouvant sur votre Studio Camera. Étape 2.
à la Cam 1 sur le mélangeur ATEM, le numéro de la caméra doit également être configuré sur 1. Ainsi, le tally est envoyé à la caméra appropriée. Connectez plusieurs Blackmagic Studio Cameras via fibre optique au moyen d'un ATEM Studio Converter.
Utilisation de l'ATEM Software Control Utilisation de la fonction Camera Control Lancez le logiciel ATEM Software Control et cliquez sur le bouton Camera situé au bas de la fenêtre du logiciel. Vous apercevrez une rangée de fenêtres qui permettent de commander toutes les caméras et qui contiennent des outils puissants pour ajuster et affiner l'image de chaque caméra.
Seite 113
Utilisation de l'ATEM Software Control Contrôle de l'iris et du niveau de noir Le contrôle de l'iris et du niveau de noir est situé au sein de la croix de centrage de chaque fenêtre de contrôle de caméra. Le contrôle s'illumine en rouge lorsque la caméra est à l'antenne. Pour ouvrir ou fermer l'iris, déplacez le contrôle vers le haut ou vers le bas.
Utilisation de l'ATEM Software Control Ajustement manuel de la mise au point Lorsque vous souhaitez ajuster manuellement la mise au point sur votre caméra, vous pouvez utiliser l'ajustement de mise au point situé au bas de chaque fenêtre de contrôle de caméra. Déplacez la roue vers la gauche ou vers la droite pour ajuster manuellement la mise au point tout en visualisant le flux vidéo de la caméra pour vous assurer que votre image est belle et nette.
Seite 115
Utilisation de l'ATEM Software Control Vous disposez à présent de cercles chromatiques et de paramètres tels que la saturation. Vous pouvez également visualiser tous les paramètres relatifs aux basses lumières, tons moyens et hautes lumières en même temps. Il vous suffit de commuter entre les caméras à l'aide des commandes de sélection situées sur le haut de la fenêtre lorsqu'il est nécessaire.
Utilisation de l'ATEM Software Control Paramètre Contrast Le paramètre Contrast vous permet de contrôler la distance entre les valeurs les plus sombres et les plus claires d'une image. L'effet ressemble à celui effectué lorsque vous utilisez les roues maîtresses Lift et Gain. Par défaut, ce paramètre est réglé...
If you are a software developer you can use the Video Device Embedded Control Protocol to construct devices that integrate with our products. Here at Blackmagic Design our approach is to open up our protocols and we eagerly look forward to seeing what you come up with!
Seite 118
Developer Information Abstract Message Packet Format Every message packet consists of a three byte header followed by an optional variable length data block. The maximum packet size is 64 bytes. Destination device (uint8) Device addresses are represented as an 8 bit unsigned integer. Individual devices are numbered 0 through 254 with the value 255 reserved to indicate a broadcast message to all devices.
Seite 119
Developer Information Defined Commands Command 0 : change configuration Category (uint8) The category number specifies one of up to 256 configuration categories available on the device. Parameter (uint8) The parameter number specifies one of 256 potential configuration parameters available on the device. Parameters 0 through 127 are device specific parameters. Parameters 128 though 255 are reserved for parameters that apply to multiple types of devices.
Seite 120
Developer Information 128: signed 5.11 fixed point Data elements are signed 16 bit integers representing a real number with 5 bits for the integer component and 11 bits for the fractional component. The fixed point representation is equal to the real value multiplied by 2^11. The representable range is from -16.0 to 15.9995 (15 + 2047/2048).
Seite 121
Developer Information Group Parameter Type Index Minimum Maximum Interpretation Lens Focus fixed16 0.0=near, 1.0=far Instantaneous autofocus void trigger instantaneous autofocus Aperture (f-stop) fixed16 -1.0 16.0 Aperture Value (where fnumber = sqrt(2^AV)) Aperture (normalised) fixed16 0.0=smallest, 1.0=largest Aperture (ordinal) int16 Steps through available aperture values from minimum (0) to maximum (n) Instantaneous auto void...
Seite 122
Developer Information Group Parameter Type Index Minimum Maximum Interpretation Reserved Reserved Reserved Reserved Exposure (us) int32 42000 time in us Exposure (ordinal) int16 Steps through available exposure values from minimum (0) to maximum (n) Dynamic Range Mode int8 enum 0 = film, 1 = video Video sharpening level int8 enum 0=Off, 1=Low, 2=Medium, 3=High...
Seite 123
Developer Information Group Parameter Type Index Minimum Maximum Interpretation Overlays int16 bit field 0x4 = zebra 0x8 = peaking Zebra level fixed16 0.0=minimum, 1.0=maximum Peaking level fixed16 0.0=minimum, 1.0=maximum Colour bars display time int8 0=disable bars, 1-30=enable bars with timeout (seconds) Tally Tally brightness...
Seite 124
Developer Information Group Parameter Type Index Minimum Maximum Interpretation [3] luma -2.0 default 0.0 Gamma Adjust fixed16 [0] red -4.0 default 0.0 [1] green -4.0 default 0.0 [2] blue -4.0 default 0.0 [3] luma -4.0 default 0.0 Gain Adjust fixed16 [0] red 16.0 default 1.0...
Seite 125
Developer Information Example Protocol Packets Operation Packet Byte Length header command data trigger instantaneous auto focus on camera 4 turn on OIS on all cameras set exposure to 10 ms on camera 4 0x10 0x27 0x00 0x00 (10 ms = 10000 us = 0x00002710) add 15% to zebra level 0x33 0x01...
« Envoyez-nous un email » disponible sur la page d'assistance de votre caméra pour envoyer une demande d'assistance par email. Vous pouvez également cliquer sur le bouton « Trouver un support technique » situé sur la page d'assistance et contacter ainsi le centre de support technique Blackmagic Design le plus proche de chez vous.
Blackmagic Design, en frais de port prépayé. Il incombe au Consommateur de payer tous les frais de transport, d’assurance, droits de douane et taxes et toutes autres charges relatives aux produits qui nous auront été...
Seite 128
Installations- und Bedienungsanleitung Blackmagic Studio Camera Mac OS X ™ Windows ™ Deutsch September 2015...
Seite 129
Produktionsmaterial einfangen, weil die Kamera komplett über einen ATEM Mischer oder über eine anwenderspezifische Fernbedienung steuerbar ist. Wir wünschen Ihnen kreatives Schaffen mit Ihrer neuen Kamera und sind sehr gespannt auf Ihre Liveproduktionen und sonstige filmische Arbeit! Grant Petty CEO Blackmagic Design...
Seite 130
Inhaltsverzeichnis Blackmagic Studio Camera Erste Schritte Videoausgang der Kamera Anbringen eines Objektivs Anschließen von Videomischern Einschalten Ihrer Kamera Anschließen von Aufzeichnungsgeräten Kamera-Funktionsmerkmale Blackmagic Camera Setup Software Funktionsmerkmale der Blackmagic Studio Camera Befestigen von Zubehör Funktionsmerkmale der Blackmagic Micro Studio Camera 4K Gegenlichtblende Anschlüsse Weiteres Zubehör...
Erste Schritte Erste Schritte Anbringen eines Objektivs Um die Arbeit mit Ihrer Blackmagic Studio Camera oder Blackmagic Micro Studio Camera 4K aufzunehmen, brauchen Sie nichts weiter tun, als ein Objektiv anzubringen und die Kamera einzuschalten. Halten Sie zum Entfernen der Staubschutzkappe vom Objektivanschluss die Verriegelungstaste gedrückt und drehen Sie dann die Kappe gegen den Uhrzeigersinn bis sie sich löst.
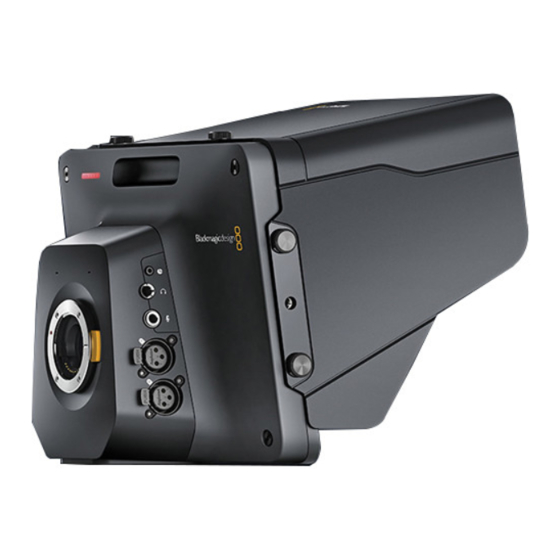
Kamera-Funktionsmerkmale Kamera-Funktionsmerkmale Funktionsmerkmale der Blackmagic Studio Camera Kamerafront 1. Vorderes Tally-Licht Zeigt den Darstellern bei Live-Auftritten an, welche Kamera sich gegenwärtig auf Sendung befindet. Näheres ist dem Abschnitt „Einstellungen für das Monitoring" in diesem Handbuch zu entnehmen. Linke Kameraseite 2. LANC-Fernbedienung Die 2,5-mm-Klinkenbuchse für die LANC-Fernbedienung unterstützt Blenden-, Zoom- und Fokussiersteuerung.
Kamera-Funktionsmerkmale Kamerarückseite 11. 10-Zoll LCD Für das Monitoring der Live-Kameraausgabe oder Programmausgabe, oder zur Menüansicht. Näheres siehe Abschnitt über das Monitoring in diesem Handbuch. 12. Rückwärtiges Tally-Licht Im erleuchteten Zustand zeigt es dem Kamerabediener an, dass seine Kamera gegenwärtig auf Sendung ist. 13.
Kamera-Funktionsmerkmale Funktionsmerkmale der Blackmagic Micro Studio Camera 4K Kamerafront 1. Tally-Licht Das Tally-Licht zeigt Darstellern die aktuell auf Sendung befindliche Kamera an und dem Bediener den Status der Kamera. Es gibt folgende Szenarien: Weiß – eingeschaltet Rot – live ...
Seite 135
Kamera-Funktionsmerkmale Rechte Kameraseite 9. Analogaudio-Eingang 3,5-mm-Stereoklinkenbuchse, im Menü zwischen Mikrofon- und Line-Level-Eingang umschaltbar. 10. SDI Out SDI-Ausgang zum Anschließen an einen Mischer, externen Rekorder oder andere Geräte. 11. SDI In Der SDI-Eingang gestattet die Steuerung der Kamera über ATEM Mischer. 12.
Anschlüsse Anschlüsse Blackmagic Studio Camera – linke Kameraseite LANC-Fernbedienung Über den Remote-Port Ihrer Kamera lassen sich bei Einsatz eines kompatiblen Objektivs die Fokussierung, Blenden- und Zoomeinstellungen des Objektivs fernsteuern. Der Port in Form einer 2,5-mm-Stereoklinkenbuchse verwendet das LANC-Standardprotokoll. Aktive MFT-Objektive gestatten Ihnen, den Zoomservo per LANC-Fernbedienung zu steuern. Folgende Objektive werden zurzeit unterstützt: ...
Wenn an beide Glasfaser- und SDI-Eingänge ein Gerät angeschlossen ist, wird die Ausgabe des zuerst angeschlossenen Geräts verwendet. Ein SFP-Glasfasermodul für Ihre Blackmagic Studio Camera erhalten Sie von Ihrem Blackmagic Design Fachhändler. Eine Liste mit Fachhändlern in Ihrer Umgebung finden Sie auf unsere Website unter www.blackmagicdesign.com/de/resellers „SDI Out"...
Anschlüsse Blackmagic Micro Studio Camera 4K – linke Kameraseite HDMI-Ausgang Der HDMI-Port Ihrer Blackmagic Micro Studio Camera 4K gibt 10-Bit-Video bei 4:2:2 in 1080p aus. Dieses Video enthält zwei Audiokanäle, die zum Monitoring eingesetzt werden können. Sie können jeden beliebigen HD-fähigen HDMI-Monitor wie den Blackmagic Video Assist anschließen, um die Bildausschnittswahl und Fokussierung von Shots vorzunehmen und um durch die Menüs der Micro Studio Camera 4K zu navigieren.
Anschlüsse Blackmagic Micro Studio Camera 4K – rechte Kameraseite Analogaudio-Eingang Der 3,5-mm-Stereo-Audioeingang eignet sich für Mikrofon- oder Line-Pegel-Audio. Unter „Kameraeinstellungen“ können Sie zwischen diesen Optionen hin- und herschalten. Es ist wichtig, die entsprechende Einstellung auszuwählen, sonst könnte Ihr Audio zu leise oder zu laut klingen. SDI Out Verwenden Sie den SDI-Ausgang, um 10-Bit Videodaten in 4:2:2 an professionelles SDI-Equipment wie Kreuzschienen, Monitore, SDI-Erfassungsgeräte und Broadcast-Mischer auszugeben.
Individualisierung Individualisierung Blackmagic Micro Studio Camera 4K Expansionskabel Es gibt zwei Möglichkeiten, auf die Funktionen des Expansionsports zuzugreifen. Sie können dazu entweder das mit Ihrer Micro Studio Camera 4K gelieferte Expansionskabel benutzen oder Ihre eigenen individualisierten Anschlüsse löten. Das Expansionskabel verfügt über Anschlüsse für die folgenden Steuermöglichkeiten. 1.
Individualisierung Anschlussplan für das Expansionskabel der Blackmagic Micro Studio Camera Wenn Sie mit dem Expansionsport der Blackmagic Micro Studio Camera 4K arbeiten, Der folgende Plan dient als Vorlage, um das mitgelieferte Expansionskabel zu verdrahten möchten Sie unter Umständen auf nur zwei Funktionen zugreifen. Vielleicht möchten oder um Ihre eigenen Kabel korrekt miteinander zu verdrahten und anzuschließen.
Kamera- Einstellungen Kamera-Einstellungen Kamera-Einstellungen Um die Einstellungen auf der Blackmagic Studio Camera oder der Blackmagic Micro Studio Camera 4K zu konfigurieren, drücken Sie die Menütaste. Benutzen Sie die Navigationstasten, um Menüs zu markieren, und bestätigen Sie Ihre Auswahl per Druck auf die SET-Taste. Wenn Sie mit der Micro Studio Camera 4K arbeiten, müssen Sie einen externen Monitor an den HDMI- Kameraport anschließen, um Menüeinstellungen zu sehen.
Seite 143
Kamera-Einstellungen Verschluss + Iris Behält die korrekte Belichtungsstärke durch Anpassung der Verschlusszeit bei. Wenn die Belichtung bei maximal oder minimal verfügbarer Verschlusszeit nicht beibehalten werden kann, beginnt die Micro Studio Camera 4K mit der Anpassung der Verschlusszeit, um die Blendenöffnung konstant zu halten. „Manual Trigger"...
Kamera-Einstellungen Von Blackmagic Studio Cameras unterstützte Videoformate Alle Studio Cameras Micro Studio Camera 4K Studio Camera 4K Zusätzliche Formate Zusätzliche Formate 720p/50 2160p/23,98 2160p/23,98 720p/59,94 2160p/24 2160p/24 720p/60 2160p/25 2160p/25 1080i/50 2160p/29,97 2160p/29,97 1080i/59,94 2160p/30 2160p/30 1080i/60 2160p/50 1080p/23,98 2160p/59,94...
Kamera-Einstellungen Mikrofonpegel Der Mikrofoneingang passt die Aufnahmepegel des eingebauten Mikrofons an. Schieben Sie zum Erhöhen oder Verringern der Pegel den Audio-Schieberegler nach links oder rechts. Die Studio Camera weist ein eingebautes Stereomikrofon auf. Wenn keine externe Audioquelle angeschlossen ist, zeichnet das eingebaute Mikrofon auf die Audiokanäle 1 und 2 auf.
Kamera-Einstellungen Einstellungen für das Monitoring Drücken Sie die MENU-Taste und wählen Sie das Monitor-Symbol aus, um die Display-Einstellungen des LCD vorzugeben. Aktivieren Sie Menüs mithilfe der Navigationstasten und drücken Sie die SET-Taste, um Ihre Auswahl zu bestätigen. HDMI-Meter Die Blackmagic Micro Studio Camera 4K gibt Ihnen die Möglichkeit, bevorzugte Pegelmesser mit der HDMI- Ausgabe anzuzeigen.
Kamera-Einstellungen Focus Peaking Erlaubt die Einstellung des Pegels für Focus Peaking. Verfügbare Einstellungen sind: „Off" (ausgeschaltet), „Low" (niedrig), „Medium" (Mittelwert) und „High" (hoch). Passen Sie diese Einstellung an, wenn Sie ein extrem scharfes Objektiv benutzen und das ganze Bild Peaking-Anzeigen verursacht. Focus Peaking ist auf einen Mittelwert voreingestellt. Helligkeit des vorderen Tally-Lichts (Tally Light Brightness) Ändert die Helligkeit des vorderen Tally-Lichts.
Kamera-Einstellungen Headset-Lautstärke (Headset Level) Bewegen Sie zum Erhöhen oder Verringern der Pegel für das Audio-Monitoring den Lautstärke-Schieberegler nach links oder rechts. Die Lautstärke ist auf 50 % voreingestellt. Lautstärke des Headset-Mikrofons (Headset Mic Level) Bewegen Sie zum Erhöhen oder Verringern der Audio-Eingabepegel des Mikrofons den Lautstärke-Schieberegler nach links oder rechts.
Seite 149
Kamera-Einstellungen Zusätzliche Einstellungen PTT-Taste (Push-to-Talk) Bei Liveproduktionen ist es unverzichtbar, dass Kamerabediener mit dem Regisseur und anderen Mitwirkenden in der Steuerzentrale sprechen können. Halten Sie einfach die PPT-Taste gedrückt und fangen Sie an zu sprechen. Zweimaliges Drücken der PPT-Taste in schneller Folge ermöglicht die handfreie Kommunikation. Erneutes Drücken bringt die standardmäßige Funktionsweise zurück.
Kamera Videoausgang der Kamera Anschließen von Videomischern Blackmagic Studio Cameras geben 10-Bit Videodaten in 4:2:2 aus, damit Sie Broadcast-Mischer und anderweitiges SDI-Videoequipment anschließen können. Bei Vorhandensein eines benutzerinstallierbaren SFP-Moduls können Sie Verbindungen über Glasfaser erstellen. Hiermit erübrigt sich der kameraseitige Gebrauch von ATEM Camera Convertern.
Sie den Bildschirmanweisungen zur Fertigstellung der Installation. Klicken Sie nach abgeschlossener Installation auf das Windows-Startmenü und gehen Sie zu „Alle Programme“. Klicken Sie auf den Blackmagic Design Ordner, um die Installationssoftware „Blackmagic Camera Setup“ und die Handbücher zu öffnen.
Befestigen von Zubehör Befestigen von Zubehör Gegenlichtblende Die mit der Studio Camera gelieferte faltbare Gegenlichtblende dient zum Schutz des LCD vor grellem Licht, damit das Display jederzeit klar erkennbar ist. Schritt 1. Legen Sie sich die im Lieferumfang Ihrer Studio Camera enthaltenen sechs Flügelschrauben zurecht. Schritt 2.
Drücken Sie die Menü-Taste Ihrer Blackmagic Studio Camera. Navigieren Sie zu „Studio Settings" > „Camera Number" (Studio-Einstellungen > Kameranummer) und stellen Sie diese analog zum Mischereingang ein. Anschluss mehrerer Blackmagic Studio Cameras via Glasfaser mithilfe eines ATEM Studio Converters Beispiel: Wenn Studio Camera 1 an den ATEM Mischereingang „Cam 1" angeschlossen ist, muss die Nummer Ihrer Kamera ebenfalls auf 1 eingestellt sein.
Arbeiten mit ATEM Software Control Arbeiten mit „Camera Control" (Kamerasteuerung) Starten Sie die Bediensoftware ATEM Software Control und klicken Sie am unteren Rand der Benutzeroberfläche auf das Kamerasymbol. Nun erfolgt die Anzeige einer Zeile von gekennzeichneten Kamerafenstern mit leistungsfähigen Tools zur Anpassung und Verfeinerung des Bildes der jeweiligen Kamera. Die Bedienelemente sind einfach handhabbar. Klicken Sie die Symbole mit Ihrer Maus an oder nehmen Sie Anpassungen per Klick und einer Ziehbewegung vor.
Arbeiten mit ATEM Software Control Blenden-/Schwarzwert-Steuerung Blende und Schwarzwert werden über den kreisförmigen Button im Fadenkreuz der einzelnen Kamerafenster gesteuert. Dieser Button leuchtet rot auf, wenn die Kamera auf Sendung ist. Ziehen Sie den Button zum Öffnen oder Schließen der Blende nach oben oder unten. Bei gedrückt gehaltener SHIFT-Taste ist nur der Blendenwert anpassbar.
Arbeiten mit ATEM Software Control Manuelle Fokuseinstellung Mithilfe des unten in jedem Kamerasteuerungsfenster befindlichen Fokussierrings können Sie Ihre Kamera manuell scharfstellen. Ziehen Sie den Fokussierring nach links oder rechts, um die Schärfe manuell einzustellen. Prüfen Sie dabei anhand des Videofeeds von der Kamera, ob Ihr Bild gewünscht scharf ist. Kameraeinstellung „Gain"...
Seite 157
Arbeiten mit ATEM Software Control Das Farbkorrekturfenster lässt sich von jedem Kamerasteuerungsfenster ausklappen und bietet eine erweiterte Farbkorrektursteuerung mit zusätzlichen Einstellungen und einer Bedienoberfläche mit allen Tools für die primäre Farbkorrektur. Zur Verfügung stehen Ihnen hier Farbräder und Einstellungen wie Sättigung, und die Einstellungen für Schatten, Mitteltöne und Glanzlichter sind alle gleichzeitig sichtbar.
Arbeiten mit ATEM Software Control Kontrasteinstellung („Contrast") Die Kontrasteinstellung („Contrast") lässt Sie die Spanne zwischen den dunkelsten und hellsten Tonwerten in einem Bild steuern. Die erzielte Wirkung ähnelt dem Einsatz der „Lift"- und „Gain"-Masterräder, um entgegengesetzte Anpassungen vorzunehmen. Die Helligkeit ist auf 50 % voreingestellt. Sättigungseinstellung („Saturation") Einstellungen für Kontrast, Sättigung, Farbton und Luminanzmischung...
If you are a software developer you can use the Video Device Embedded Control Protocol to construct devices that integrate with our products. Here at Blackmagic Design our approach is to open up our protocols and we eagerly look forward to seeing what you come up with!
Seite 160
Developer Information Abstract Message Packet Format Every message packet consists of a three byte header followed by an optional variable length data block. The maximum packet size is 64 bytes. Destination device (uint8) Device addresses are represented as an 8 bit unsigned integer. Individual devices are numbered 0 through 254 with the value 255 reserved to indicate a broadcast message to all devices.
Seite 161
Developer Information Defined Commands Command 0 : change configuration Category (uint8) The category number specifies one of up to 256 configuration categories available on the device. Parameter (uint8) The parameter number specifies one of 256 potential configuration parameters available on the device. Parameters 0 through 127 are device specific parameters. Parameters 128 though 255 are reserved for parameters that apply to multiple types of devices.
Seite 162
Developer Information 128: signed 5.11 fixed point Data elements are signed 16 bit integers representing a real number with 5 bits for the integer component and 11 bits for the fractional component. The fixed point representation is equal to the real value multiplied by 2^11. The representable range is from -16.0 to 15.9995 (15 + 2047/2048).
Seite 163
Developer Information Group Parameter Type Index Minimum Maximum Interpretation Lens Focus fixed16 0.0=near, 1.0=far Instantaneous autofocus void trigger instantaneous autofocus Aperture (f-stop) fixed16 -1.0 16.0 Aperture Value (where fnumber = sqrt(2^AV)) Aperture (normalised) fixed16 0.0=smallest, 1.0=largest Aperture (ordinal) int16 Steps through available aperture values from minimum (0) to maximum (n) Instantaneous auto void...
Seite 164
Developer Information Group Parameter Type Index Minimum Maximum Interpretation Reserved Reserved Reserved Reserved Exposure (us) int32 42000 time in us Exposure (ordinal) int16 Steps through available exposure values from minimum (0) to maximum (n) Dynamic Range Mode int8 enum 0 = film, 1 = video Video sharpening level int8 enum 0=Off, 1=Low, 2=Medium, 3=High...
Seite 165
Developer Information Group Parameter Type Index Minimum Maximum Interpretation Overlays int16 bit field 0x4 = zebra 0x8 = peaking Zebra level fixed16 0.0=minimum, 1.0=maximum Peaking level fixed16 0.0=minimum, 1.0=maximum Colour bars display time int8 0=disable bars, 1-30=enable bars with timeout (s) (seconds) Tally Tally brightness...
Seite 166
Developer Information Group Parameter Type Index Minimum Maximum Interpretation [3] luma -2.0 default 0.0 Gamma Adjust fixed16 [0] red -4.0 default 0.0 [1] green -4.0 default 0.0 [2] blue -4.0 default 0.0 [3] luma -4.0 default 0.0 Gain Adjust fixed16 [0] red 16.0 default 1.0...
Seite 167
Developer Information Example Protocol Packets Operation Packet Byte Length header command data trigger instantaneous auto focus on camera 4 turn on OIS on all cameras set exposure to 10 ms on camera 4 0x10 0x27 0x00 0x00 (10 ms = 10000 us = 0x00002710) add 15% to zebra level 0x33 0x01...
Der integrierte Akku kann nicht vom Benutzer repariert werden. Wenn der Akku ausgetauscht werden muss, müssen Sie die Kamera zu diesem Zweck an ein Blackmagic Design Service-Center in Ihrer Nähe einschicken. Wenn die Garantiezeit der Kamera abgelaufen ist, wird für den Austausch des Akkus, Arbeitszeit und Rücksendung der Kamera eine geringfügige Servicegebühr erhoben.
Blackmagic Design gewährt eine Garantie auf Material- und Verarbeitungsfehler von 12 Monaten ab Kaufdatum. Wenn sich ein Produkt innerhalb dieser Garantiezeit als fehlerhaft erweist, wird die Firma Blackmagic Design nach ihrem Ermessen das defekte Produkt entweder ohne Kosten für Teile und Arbeitszeit reparieren, oder Sie erhalten im Austausch für das defekte Produkt einen Ersatz.
Seite 170
Manual de instalación y funcionamiento Blackmagic Studio Camera Mac OS X ™ Windows ™ Español septiembre de 2015...
Seite 171
ATEM. Esperamos que la aproveches al máximo la Studio Camera durante tus producciones en directo y te permita realizar proyectos increíbles. ¡Estamos muy entusiasmados por ver plasmada toda tu creatividad! Grant Petty Director Ejecutivo de Blackmagic Design...
Seite 172
Indice Blackmagic Studio Camera Primeros pasos Salida de vídeo de la cámara Montaje del objetivo Conexión a mezcladores de vídeo Encendido de la cámara Conexión a dispositivos de grabación Características de la cámara Blackmagic Camera Setup Características de la cámara Accesorios Blackmagic Micro Studio Camera 4K Parasol...
Primeros pasos Primeros pasos Montaje del objetivo Para comenzar a utilizar la cámara, basta con colocar un objetivo y encenderla. Para quitar la tapa protectora de la montura, mantenga presionado el botón de bloqueo y gire la tapa hacia la izquierda para aflojarla. Recomendamos siempre apagar la cámara antes de colocar o retirar un objetivo.
Características de la cámara Características de la cámara Características de la cámara Panel frontal 1. Luz piloto frontal Indica a la persona frente a las cámaras cuál de ellas está transmitiendo. Consulte la sección «Ajustes de monitorización» en este manual para obtener más información al respecto. Panel izquierdo 2.
Características de la cámara Panel trasero 11. Pantalla LCD Permite monitorizar las imágenes transmitidas desde la cámara y la salida de programa o ver el menú. Consulte la sección «Ajustes de monitorización» en este manual para obtener más información al respecto. 12.
Seite 176
Características de la cámara Blackmagic Micro Studio Camera 4K Panel frontal 1. Luz piloto La luz piloto indica el estado del dispositivo y sirve para alertar a la persona situada frente a la cámara cuando esta se encuentra grabando. Cada color indica un estado distinto: ...
Seite 177
Características de la cámara Panel derecho 9. Entrada para audio analógico Entrada estéreo de 3.5 mm. Permite alternar entre señales de audio a nivel de línea o micrófono. 10. Salida SDI Salida SDI para conectar mezcladores, grabadores externos y otros dispositivos. 11.
Seite 178
Conexiones Conexiones Blackmagic Studio Camera: panel izquierdo Conexión LANC Permite ajustar el enfoque, acercar o alejar la imagen y modificar la apertura del diafragma en forma remota al utilizar objetivos compatibles. Incluye un conector hembra estéreo de 2.5 mm que emplea el protocolo LANC convencional.
Seite 179
Conexiones Blackmagic Studio Camera: panel derecho Entrada/Salida para fibra óptica Para este tipo de conexiones, es necesario instalar un módulo óptico SFP opcional. De este modo, es posible emplear conectores LC convencionales para señales SDI 3G en el modelo Studio Camera HD y SDI 6G en el modelo Studio Camera 4K.
Seite 180
Conexiones Blackmagic Micro Studio Camera 4K: lateral izquierdo Salida HDMI El puerto HDMI de la cámara permite transmitir señales en formato 4:2:2 de 10 bits (1080p) con dos canales de audio para monitorizar las imágenes. Se puede conectar cualquier monitor HD compatible (p. ej., el modelo Blackmagic Video Assist) para encuadrar y enfocar los planos o acceder a las distintas opciones de los menús.
Seite 181
Conexiones Blackmagic Micro Studio Camera 4K: lateral derecho Entrada para audio analógico El conector estéreo de 3.5 mm admite señales de audio a nivel de línea o micrófono. Se puede alternar entre ambas opciones desde el menú «Audio Settings» en la cámara. Es importante seleccionar los ajustes adecuados para evitar que el sonido sea demasiado alto o bajo.
Seite 182
Personalización Personalización Cable de expansión Existen dos maneras de acceder a las funciones que ofrece el puerto de expansión. Una de ellas es mediante el cable incluido con la cámara. De manera alternativa, el usuario cuenta con la posibilidad de armar sus propias conexiones.
Seite 183
Personalización Diagrama de conexiones en el cable de expansión del modelo Blackmagic Micro Studio Camera 4K Según las necesidades de cada usuario, es posible que solo se requiera acceder a Utilice el diagrama que se muestra a continuación para configurar el cable una o dos de las funciones que ofrece el puerto de expansión, por ejemplo, controlar proporcionado o como guía para asignar conexiones al diseñar una versión un objetivo B4 profesional instalado en la cámara y simultáneamente recibir corriente...
Ajustes de la Studio Camera Ajustes de la Studio Camera Ajustes de la cámara Presione el botón MENU para modificar los ajustes generales en los modelos Blackmagic Studio Camera o Blackmagic Micro Studio Camera 4K. Utilice los botones de navegación para resaltar menús y presione el botón SET si desea confirmar los parámetros seleccionados.
Seite 185
Ajustes de la Studio Camera Obturador y diafragma La opción «Shutter + Iris» permite mantener un nivel de exposición adecuado al ajustar la velocidad de obturación. En caso de que no sea posible garantizar una exposición uniforme incluso seleccionando la velocidad de obturación mínima o máxima, la cámara comenzará...
Ajustes de la Studio Camera Formatos de video compatibles Todas las cámaras de estudio Micro Studio Camera 4K Studio Camera 4K Formatos adicionales Formatos adicionales 720p50 2160p23.98 2160p23.98 720p59.94 2160p24 2160p24 720p60 2160p25 2160p25 1080i50 2160p29.97 2160p29.97 1080i59.94 2160p30 2160p30 1080i60 2160p50 1080p23.98...
Ajustes de la Studio Camera Volumen del micrófono Permite ajustar el volumen de grabación del micrófono integrado. Mueva el control deslizante hacia la derecha o la izquierda para aumentar o disminuir el valor. La cámara cuenta con un micrófono estéreo. El micrófono integrado graba el sonido en los canales de audio 1 y 2 cuando no se detecta una fuente de audio externa.
Seite 188
Ajustes de la Studio Camera Ajustes de monitorización Para modificar los ajustes de la pantalla, presione el botón MENU y seleccione el ícono de los auriculares. Utilice los botones de navegación para resaltar menús y presione el botón SET para confirmar los parámetros seleccionados.
Seite 189
Ajustes de la Studio Camera Indicador de enfoque Permite cambiar el nivel del indicador de enfoque (focus peaking). Las opciones son desactivado, bajo, medio y alto. Modifique este parámetro al utilizar un objetivo de gran nitidez para disminuir la cantidad de puntos en la imagen.
Seite 190
Ajustes de la Studio Camera Volumen del auricular Mueva el control deslizante hacia la derecha o la izquierda para aumentar o disminuir el volumen de monitorización del audio. El valor preestablecido es 50%. Volumen del micrófono del auricular Mueva el control deslizante hacia la derecha o la izquierda para aumentar o disminuir el volumen de entrada al micrófono.
Ajustes de la Studio Camera Ajustes adicionales Push to Talk (PTT) Al llevar a cabo una producción en directo, es de suma importancia que los camarógrafos puedan comunicarse con el director y con los demás integrantes del equipo en la sala de control. Simplemente presione este botón y manténgalo presionado mientras habla.
Seite 192
Salida de vídeo de la cámara Salida de vídeo de la cámara Conexión a mezcladores de vídeo Los modelos Studio Camera transmiten imágenes en formato 4:2:2 de 10 bits, de modo que es posible conectarlos a mezcladores y otros equipos SDI. Por otra parte, al instalar un módulo SFP opcional, brindan conectividad para señales transmitidas mediante fibra óptica, evitando de este modo la necesidad de utilizar un dispositivo ATEM Camera Converter.
Seite 193
Una vez finalizada, haga clic en Inicio y seleccione Todos los programas. Haga clic en la carpeta denominada Blackmagic Design para ejecutar el programa o acceder al manual de las cámaras. Cómo actualizar el sistema operativo interno de la cámara Luego de instalar la última versión del programa de configuración de la cámara en el equipo, conecte ambos...
Accesorios Accesorios Parasol La Studio Camera incluye un parasol plegable para dar sombra a la pantalla en condiciones de mucho brillo y asegurar una visualización óptima en todo momento. Paso 1. Ubique las seis tuercas de mariposa incluidas en la cámara. Paso 2.
Seite 195
Uso del programa de control Uso del programa de control Introducción La Studio Camera puede manejarse desde un mezclador ATEM mediante el módulo de control incluido en el programa ATEM Software Control. Se puede acceder al mismo haciendo clic en el botón de la cámara. Asimismo, permite ajustar con facilidad diferentes parámetros tales como la apertura del diafragma, la ganancia y el zoom al utilizar objetivos compatibles, equilibrar el color de las cámaras y crear imágenes extraordinarias con las herramientas de corrección primarias de DaVinci Resolve.
Uso del programa de control Uso del módulo de control Ejecute el programa ATEM Software Control y haga clic en el botón de la cámara situado en la parte inferior de la ventana. Verá una serie de controladores con herramientas para ajustar y mejorar la imagen de cada cámara.
Seite 197
Uso del programa de control Control del diafragma/pedestal Este control se encuentra en el retículo central de cada controlador y se enciende en rojo cuando la cámara está al aire. Para abrir o cerrar el diafragma, arrastre el círculo hacia arriba o abajo. Al mantener presionada la tecla de mayúsculas mientras se mueve el círculo solo se modifica la apertura del diafragma.
Uso del programa de control Enfoque manual Para modificar el enfoque de la cámara en forma manual, utilice el ajuste situado en la parte inferior de cada controlador. Deslice la rueda hacia la izquierda o derecha para ajustar el enfoque manualmente al mirar la señal de vídeo de la cámara de forma de obtener imágenes claras y nítidas.
Uso del programa de control Esta dispone de círculos cromáticos y otros controles que permiten ver las luces, tonos intermedios y sombras al mismo tiempo. Para cambiar de cámara, utilice los botones en la parte superior de la ventana. Círculos cromáticos Los controles “Lift”, “Gamma”...
Seite 200
Uso del programa de control Contraste Este control permite ajustar la distancia entre los valores más claros y oscuros de una imagen. El efecto es similar al que se obtiene realizando ajustes opuestos mediante los controles generales situados debajo de “Lift”...
If you are a software developer you can use the Video Device Embedded Control Protocol to construct devices that integrate with our products. Here at Blackmagic Design our approach is to open up our protocols and we eagerly look forward to seeing what you come up with!
Seite 202
Developer Information Abstract Message Packet Format Every message packet consists of a three byte header followed by an optional variable length data block. The maximum packet size is 64 bytes. Destination device (uint8) Device addresses are represented as an 8 bit unsigned integer. Individual devices are numbered 0 through 254 with the value 255 reserved to indicate a broadcast message to all devices.
Seite 203
Developer Information Defined Commands Command 0 : change configuration Category (uint8) The category number specifies one of up to 256 configuration categories available on the device. Parameter (uint8) The parameter number specifies one of 256 potential configuration parameters available on the device. Parameters 0 through 127 are device specific parameters. Parameters 128 though 255 are reserved for parameters that apply to multiple types of devices.
Seite 204
Developer Information 128: signed 5.11 fixed point Data elements are signed 16 bit integers representing a real number with 5 bits for the integer component and 11 bits for the fractional component. The fixed point representation is equal to the real value multiplied by 2^11. The representable range is from -16.0 to 15.9995 (15 + 2047/2048).
Seite 205
Developer Information Group Parameter Type Index Minimum Maximum Interpretation Lens Focus fixed16 0.0=near, 1.0=far Instantaneous autofocus void trigger instantaneous autofocus Aperture (f-stop) fixed16 -1.0 16.0 Aperture Value (where fnumber = sqrt(2^AV)) Aperture (normalised) fixed16 0.0=smallest, 1.0=largest Aperture (ordinal) int16 Steps through available aperture values from minimum (0) to maximum (n) Instantaneous auto void...
Seite 206
Developer Information Group Parameter Type Index Minimum Maximum Interpretation Reserved Reserved Reserved Reserved Exposure (us) int32 42000 time in us Exposure (ordinal) int16 Steps through available exposure values from minimum (0) to maximum (n) Dynamic Range Mode int8 enum 0 = film, 1 = video Video sharpening level int8 enum 0=Off, 1=Low, 2=Medium, 3=High...
Seite 207
Developer Information Group Parameter Type Index Minimum Maximum Interpretation Overlays int16 bit field 0x4 = zebra 0x8 = peaking Zebra level fixed16 0.0=minimum, 1.0=maximum Peaking level fixed16 0.0=minimum, 1.0=maximum Colour bars display time int8 0=disable bars, 1-30=enable bars with timeout (seconds) Tally Tally brightness...
Seite 208
Developer Information Group Parameter Type Index Minimum Maximum Interpretation [3] luma -2.0 default 0.0 Gamma Adjust fixed16 [0] red -4.0 default 0.0 [1] green -4.0 default 0.0 [2] blue -4.0 default 0.0 [3] luma -4.0 default 0.0 Gain Adjust fixed16 [0] red 16.0 default 1.0...
Seite 209
Developer Information Example Protocol Packets Operation Packet Byte Length header command data trigger instantaneous auto focus on camera 4 turn on OIS on all cameras set exposure to 10 ms on camera 4 0x10 0x27 0x00 0x00 (10 ms = 10000 us = 0x00002710) add 15% to zebra level 0x33 0x01...
Sírvase contactar al servicio de soporte técnico de Blackmagic Design para más detalles sobre dónde debe enviarse la cámara, cómo embalarla en forma segura y cuánto costará...
Seite 211
(c) reparar cualquier daño o mal funcionamiento provocado por el uso de piezas o repuestos no suministrados por Blackmagic Design; o (d) brindar servicio técnico a un producto que haya sido modificado o integrado con otros productos, cuando dicha modificación o integración tenga como resultado un aumento de la dificultad o el tiempo necesario para reparar el producto.
Seite 212
安装操作手册 Blackmagic Studio Camera Mac OS X ™ Windows ™ 中文 2015年9月...
Seite 213
此外, 这款优秀的摄影机还具备Tally指示灯、 对讲系统、 强劲的内置电池, 并配备 灵活的MFT镜头卡口。 您需要的所有配备都设计周全, 一步到位! 摄影机自带的 幻象电源可连接较大的防风型专业麦克风; 此外, 它还配有可自行安装的光纤接 口, 添加SFP模块后就可将摄影机部署到离切换台几英里外的地点! 您甚至可以 根据需要为摄影机增设HyperDeck Shuttle用于常规制作! Blackmagic Micro Studio Camera 4K将Blackmagic Studio Camera的紧凑设计 和卓越功能提升到一个新高度! 这款极致小巧的摄影机搭载先进的Ultra HD传感 器, 并拥有远程控制选项, 能实现前所未有的地点部署方案, 助您拍摄获得广播 级制作画面, 还可通过ATEM切换台或自定义遥控实现全面控制。 希望这款全新的摄影机能助您完成精彩纷呈的现场制作, 为观众带来视觉盛宴! 我们热忱期待一睹您的创意佳作! Grant Petty Blackmagic Design首席执行官...
Seite 214
目录 Blackmagic Studio Camera 入门 摄影机视频输出 安装镜头 连接视频切换台 启动摄影机 连接录机 摄影机功能 Blackmagic Camera Setup Blackmagic Studio Camera功能 安装配件 Blackmagic Micro Studio Camera 4K功能 遮光罩 接口 其他配件 Blackmagic Studio Camera - 左侧接口 使用ATEM Software Control软件控 Blackmagic Studio Camera - 右侧接口 制面板 Blackmagic Micro Studio Camera 4K - 左侧接口...
接口 接口 Blackmagic Studio Camera - 左侧接口 LANC遥控控制 使用兼容的镜头时, 您可通过摄影机上的遥控端口来遥控调节镜头对焦、 光圈和变焦功能。 该端口为2.5mm 立体声插孔, 使用标准LANC协议。 使用主动式MFT镜头时, 可以通过LANC控制器来操控伺服变焦。 目前支持以下几款镜头: 松下Lumix G X Vario PZ 14-42mm f/3.5-5.6 Power O.I.S.镜头 松下Lumix G X Vario PZ 45-175mm f/4.0-5.6 Zoom O.I.S.镜头 奥林巴斯12-50mm f/3.5-6.3 ED M.Zuiko EZ Micro 4/3镜头 ...
接口 Blackmagic Micro Studio Camera 4K - 左侧接口 HDMI输出 Blackmagic Micro Studio Camera 4K上的HDMI端口可输出10bit 4:2:2 1080p视频, 并带2通道音频用于监 测。 您可以连接如Blackmagic Video Assist等任何高清HDMI监看设备查看取景和对焦, 以及对Micro Studio Camera 4K进行菜单导航。 HDMI输出上的帧率将匹配摄影机的设置格式。 例如, 如果摄影机设置为2160p30, 那么HDMI输出则为 1080p30。 EXPANSION扩展端口 Blackmagic Micro Studio Camera 4K设计小巧, 便于部署在靠近现场或大型摄影机难以安装的位置来捕 捉精彩画面。 虽然摄影机可以轻巧地隐藏在拍摄现场, 但摄影师不能, 而摄影机的遥控功能正好能将它小 巧的优势发挥到极致。...
Studio Camera设置 Studio Camera设置 摄影机设置 在Blackmagic Studio Camera或Blackmagic Micro Studio Camera 4K上按 “MENU” 按钮可调整各项设 置。 使用菜单方向按钮在选项间导航, 并按 “SET” 按钮确认选择。 如果您使用的是Micro Studio Camera 4K, 那么需要通过摄影机HDMI端口连接外部监视器才能查看菜单 设置。 Video Format ( 视频格式) 通过导航按钮选择您想要的视频格式。 例如, 想要在1080p和1080i格式间进行选择, 只要在格式选项中按向 左或向右按钮。 按 “SET” 按钮确认想要的格式。 翻页查看支持的视频格式列表。 Gain (增益) 增益设置在低光照环境下拍摄时十分有用。...
Seite 227
Studio Camera设置 Shutter + Iris (快门+光圈) 调整快门速度来保持正确的曝光水平。 如果达到最大或最小快门速度, 曝光仍不能维持, 那么Micro Studio Camera 4K将调整光圈来保持曝光恒定。 Manual Trigger ( 手动触发) 光圈和快门速度可手动设定, 曝光可随照明条件变化而不同。 White Balance (白平衡) 共有18种白平衡预设, 可用于各类色温条件。 2500、 2800、 3000、 3200、 3400、 3600、 4000、 4500以及4800K设置可用于钨丝灯、 白炽灯或 荧光灯照明条件, 以及各类偏暗的自然光条件, 包括烛光、 日出/日落、 早晨和下午的光线。 5000、 5200、 5400和5600K设置适用于大晴天的户外拍摄。 ...
Seite 228
Studio Camera设置 Blackmagic Studio Camera支持的视频格式 所有Studio Camera Micro Studio Camera 4K Studio Camera 4K 更多支持格式 更多支持格式 720p50 2160p23.98 2160p23.98 720p59.94 2160p24 2160p24 720p60 2160p25 2160p25 1080i50 2160p29.97 2160p29.97 1080i59.94 2160p30 2160p30 1080i60 2160p50 1080p23.98 2160p59.94 1080p24 2160p60 1080p25 1080p29.97 1080p30 1080p50 1080p59.94 1080p60...
If you are a software developer you can use the Video Device Embedded Control Protocol to construct devices that integrate with our products. Here at Blackmagic Design our approach is to open up our protocols and we eagerly look forward to seeing what you come up with!
Seite 244
Developer Information Abstract Message Packet Format Every message packet consists of a three byte header followed by an optional variable length data block. The maximum packet size is 64 bytes. Destination device (uint8) Device addresses are represented as an 8 bit unsigned integer. Individual devices are numbered 0 through 254 with the value 255 reserved to indicate a broadcast message to all devices.
Seite 245
Developer Information Defined Commands Command 0 : change configuration Category (uint8) The category number specifies one of up to 256 configuration categories available on the device. Parameter (uint8) The parameter number specifies one of 256 potential configuration parameters available on the device. Parameters 0 through 127 are device specific parameters.
Seite 246
Developer Information 128: signed 5.11 fixed point Data elements are signed 16 bit integers representing a real number with 5 bits for the integer component and 11 bits for the fractional component. The fixed point representation is equal to the real value multiplied by 2^11. The representable range is from -16.0 to 15.9995 (15 + 2047/2048).
Seite 247
Developer Information Group Parameter Type Index Minimum Maximum Interpretation Lens Focus fixed16 0.0=near, 1.0=far Instantaneous autofocus void trigger instantaneous autofocus Aperture (f-stop) fixed16 -1.0 16.0 Aperture Value (where fnumber = sqrt(2^AV)) Aperture (normalised) fixed16 0.0=smallest, 1.0=largest Aperture (ordinal) int16 Steps through available aperture values from minimum (0) to maximum (n) Instantaneous auto void...
Seite 248
Developer Information Group Parameter Type Index Minimum Maximum Interpretation Manual White Balance int16 3200 7500 Colour temperature in K Reserved Reserved Reserved Reserved Exposure (us) int32 42000 time in us Exposure (ordinal) int16 Steps through available exposure values from minimum (0) to maximum (n) Dynamic Range Mode int8 enum 0 = film, 1 = video...
Seite 249
Developer Information Group Parameter Type Index Minimum Maximum Interpretation Overlays int16 bit field 0x4 = zebra 0x8 = peaking Zebra level fixed16 0.0=minimum, 1.0=maximum Peaking level fixed16 0.0=minimum, 1.0=maximum Colour bars display time int8 0=disable bars, 1-30=enable bars with (seconds) timeout (s) Tally Tally brightness...
Seite 250
Developer Information Group Parameter Type Index Minimum Maximum Interpretation [2] blue -2.0 default 0.0 [3] luma -2.0 default 0.0 Gamma Adjust fixed16 [0] red -4.0 default 0.0 [1] green -4.0 default 0.0 [2] blue -4.0 default 0.0 [3] luma -4.0 default 0.0 Gain Adjust fixed16...
Seite 251
Developer Information Example Protocol Packets Operation Packet Byte Length header command data trigger instantaneous auto focus on camera 4 turn on OIS on all cameras set exposure to 10 ms on 0x10 0x27 0x00 0x00 camera 4 (10 ms = 10000 us = 0x00002710) add 15% to zebra level 0x33...
Seite 252
在Windows系统下, 请到开始菜单或开始屏幕下打开Blackmagic Camera Setup。 点击 “Help” (帮助) 菜单并选择 “About Blackmagic Camera Setup” 即可查看版本号。 如何获得更新 检查完您电脑上安装的Blackmagic Camera Utility软件版本号之后, 请登录网址www.blackmagicdesign. com/cn/support访问Blackmagic Support Center支持中心查看最新版本。 请关注版本更新, 但请勿在工作 过程中升级软件。 更换电池 用户无法自行更换Studio Camera的内置电池。 如需更换内置电池, 请联系就近的Blackmagic Design服务 中心。 如果摄影机已过保修期, 更换电池可能需要收取少量服务费用, 包括电池成本费、 人工费以及将摄影 机邮寄给您的费用。 请联系Blackmagic Design Support获得以下详情: 将摄影机寄往何处, 如何安全包装 摄影机, 以及您所在国家和地区的电池更换费用等。...
Seite 254
설치 및 사용 설명서 Blackmagic Studio Camera Mac OS X ™ Windows ™ 한국어 2015 년 9 월...
Seite 255
ATEM 스위처나 사용자 지정 원격 제어 장치를 통해 카메라를 완벽하게 제어할 수 있습니다 . 새롭게 개발된 Studio Camera 를 사용하여 놀라운 라이브 프로덕션과 훌륭한 장면들을 연출해 내길 바랍니다 ! 여러분이 어떠한 창의적인 작품을 제작해낼지 상당히 기대하고 있습니다 ! 그랜트 패티 Blackmagic Design CEO...
Seite 256
목차 Blackmagic Studio Camera 시작하기 카메라의 비디오 출력 렌즈 장착하기 비디오 스위처에 연결 카메라 전원 켜기 리코더에 연결 카메라 주요 기능 Blackmagic Camera Setup Blackmagic Studio Camera 의 주요 기능 악세사리 장착 Blackmagic Micro Studio Camera 4K 의 주요 기능 선셰이드...
시작하기 시작하기 렌즈 장착하기 렌즈를 장착하고 카메라를 켜기만하면 Blackmagic Studio Camera 또는 Blackmagic Micro Studio Camera 4K 의 사용 준비가 완료됩니다 . 카메라의 잠금 버튼을 누르고 커버를 시계 반대 방향으로 돌리면 렌즈 마운트의 커버를 쉽게 분리할 수 있습니다 . Blackmagic Camera 에 렌즈를 장착 및 분리하기 전에 , 항상...
카메라 주요 기능 카메라 주요 기능 Blackmagic Studio Camera 의 주요 기능 전면 패널 1. 전면 탈리표시 장치 연기자에게 현재 어떤 카메라가 ' 라이브 ' 상태 인지를 보여주는 기능입니다 . 더 자세한 정보는 본 설명서의 [ 모니터링 설정 (Monitoring Settings)] 부분을 참고하세요 . 왼쪽...
Seite 259
카메라 주요 기능 뒷면 패널 11. 10" LCD 카메라 출력 및 프로그램 출력을 모니터링하거나 메뉴 보기가 가능합니다 . 더 자세한 정보는 본 설명서의 [ 모니터링 설정 (Monitoring Settings)] 부분을 참고하세요 . 12. 후면 탈리 신호 탈리 신호에 들어오는 불빛은 카메라 오퍼레이터에게 현재 그들의 카메라가 " 라이브 " 상태임을 알려주기 위한 신호입니다...
카메라 주요 기능 Blackmagic Micro Studio Camera 4K 의 주요 기능 전면 패널 1. 탈리 라이트 탈리 불빛은 카메라 운영자에게 카메라 상태를 알려줄 뿐만 아니라 연기자에게 현재 어떤 카메라가 ' 라이브 ' 상태인지 알려줍니다 . 흰색 - 전원 연결 ...
Seite 261
카메라 주요 기능 우측 패널 9. 아날로그 오디오 입력 3.5mm 스테레오 오디오 입력 ( 메뉴에서 마이크 레벨과 라인 레벨로 전환 가능 ). 10. SDI 출력 스위처 및 외부 리코더 , 기타 장비에 연결할 수 있는 SDI 출력 . 11. SDI 입력 SDI 입력에...
연결 연결 Blackmagic Studio Camera - 왼쪽 패널 LANC 원격 제어 호환 렌즈를 사용할 경우 , 카메라에 탑재된 원격 포트를 통해 렌즈의 포커스 , 조리개 , 줌을 조정할 수 있습니다 . 이 포트는 2.5mm 의 스테레오 단자이며 , 표준 LANC 프로토콜을 지원합니다 . 액티브...
있습니다 . 광섬유 입력과 SDI 입력을 모두 연결해서 사용하는 경우 , 먼저 연결된 장비의 출력이 사용됩니다 . Blackmagic Studio Camera 에 추가할 광섬유 SFP 모듈 구매하려면 가까운 Blackmagic Design 리셀러에게 문의하세요 . www.blackmagicdesign.com/kr/resellers 에서 가장 가까운 리셀러를 찾으실 수 있습니다 .
연결 Blackmagic Micro Studio Camera 4K - 좌측 HDMI 출력 Blackmagic Micro Studio Camera 4K 의 HDMI 포트는 모니터링을 위한 2 채널 오디오와 함께 10 비트 4:2:2 의 1080p 영상을 출력합니다 . Blackmagic Video Assist 처럼 HD 를 지원하는 모든 HDMI 모니터를 연결해...
연결 Blackmagic Micro Studio Camera 4K - 우측 아날로그 오디오 입력 마이크 또는 라인 레벨 오디오용 3.5mm 스테레오 오디오 커넥터 . 카메라의 오디오 설정 (Audio Settings) 메뉴에서 옵션 설정을 전환할 수 있습니다 . 적절한 수준으로 오디오를 설정해야 음량이 너무 작거나 너무 크게...
커스터마이즈 커스터마이즈 Blackmagic Micro Studio Camera 4K 확장 케이블 확장 포트의 기능에 연결하는 방법은 크게 두 가지가 있습니다 . Micro Studio Camera 4K 와 함께 제공되는 확장 케이블을 사용하거나 , 납땜 작업을 통해 필요한 커넥터를 직접 만들어 사용할 수도 있습니다 . 확장...
커스터마이즈 Blackmagic Micro Studio Camera 확장 케이블 배선도 Blackmagic Micro Studio Camera 4K 의 확장 포트를 사용할 때 한 두 개의 기능만 아래 배선도를 참고하여 제품과 함께 제공된 확장 케이블이나 사용자가 제작한 필요할 수도 있습니다 . 예를 들면 , 12V 전원과 레퍼런스 신호를 동시에 전송받으면서 커스텀...
카메라 설정 카메라 설정 카메라 설정 (Camera Settings) Blackmagic Studio Camera 및 Blackmagic Micro Studio Camera 4K 의 메뉴 버튼을 누르면 환경 설정을 변경할 수 있습니다 . 메뉴 검색 버튼으로 원하는 메뉴를 선택한 뒤 [Set] 버튼을 누르면 해당 목록이 선택됩니다 . Micro Studio Camera 4K 를...
Seite 269
카메라 설정 셔터 + 조리개 (Shutter+Iris) 셔터 속도를 조절하여 정확한 노출 수준을 유지합니다 . 셔터 속도를 최대한 올리거나 낮춰도 원하는 수준의 노출을 유지할 수 없을 경우 , Micro Studio Camera 4K 는 조리개를 조절하여 노출을 일정하게 유지합니다 . 수동 트리거 (Manual Trigger) 조리개와...
카메라 설정 Blackmagic Studio Camera 지원 비디오 포맷 Studio Camera 전체 모델 Micro Studio Camera 4K Studio Camera 4K 추가 지원 포맷 추가 지원 포맷 720p50 2160p23.98 2160p23.98 720p59.94 2160p24 2160p24 720p60 2160p25 2160p25 1080i50 2160p29.97 2160p29.97 1080i59.94 2160p30 2160p30 1080i60 2160p50 1080p23.98...
Seite 271
카메라 설정 Microphone Level 마이크 입력은 내장 마이크로 녹음되는 음량 수준을 조정할 수 있습니다 . 오디오 슬라이더를 좌우로 이동하여 음량 수준을 조절할 수 있습니다 . Studio Camera 에는 스테레오 마이크가 내장되어 있습니다 . 외부 오디오 소스가 연결되어 있지 않을 경우 , 내장 마이크는 1 채널과 2 채널에 녹음됩니다 . Input Level 외부...
카메라 설정 모니터링 설정 (Monitoring Settings) LCD 화면 설정을 조절하기 위해서는 MENU 버튼을 누른 뒤 , 모니터 아이콘을 선택하세요 . 내비게이션 버튼을 사용하여 메뉴를 선택한 뒤 , SET 버튼을 눌러 선택을 완료합니다 . HDMI 미터 (HDMI Meters) Blackmagic Micro Studio Camera 4K 는 HDMI 출력에 원하는 미터를 표시할 수 있는 옵션을 제공합니다 . 히스토그램...
카메라 설정 Focus Peaking 포커스 피킹 레벨을 변경할 수 있습니다 . 설정에는 Off, Low, Medium, High 이 있습니다 . 샤프한 렌즈의 사용으로 이미지 전체가 피킹되는 경우에는 이 설정을 조정하세요 . 기본 설정은 미디엄입니다 . Front Tally Brightness 전면 탈리 불빛의 밝기를 조절할 수 있습니다 . 밝기 설정에는 : Off, Low, Medium, High 가 있습니다 . 기본 설정은...
카메라 설정 Headset Level 볼륨 슬라이더를 좌우로 이동하여 오디오 모니터링 레벨을 조절할 수 있습니다 . 기본 설정은 50% 입니다 . Headset Mic Level 볼륨 슬라이더를 좌우로 이동하여 오디오 마이크 입력 레벨을 조절할 수 있습니다 . 기본 설정은 50% 입니다 . Program Mix 카메라...
Seite 275
카메라 설정 추가 설정 (Additional Settings) 푸시 투 토크 (PTT) 라이브 프로덕션에서 카메라 오퍼레이터가 감독 및 조정실의 다른 직원과 대화를 나누는 것은 상당히 중요합니다 . PTT 버튼을 누른 상태에서 대화를 시작하면 됩니다 . 버튼을 빠르게 두 번 누르면 핸즈 프리 기능을...
카메라의 비디오 출력 카메라의 비디오 출력 비디오 스위처에 연결 Blackmagic Studio Camera 는 10 비트 4:2:2 비디오를 출력하므로 방송 스위처와 기타 SDI 비디오 장비에 카메라를 연결할 수 있습니다 . SFP 모듈을 카메라에 추가하면 광섬유를 사용할 수 있어 , 카메라 끝에 ATEM Camera Converter 를...
Camera Setup 설치 프로그램 창이 나타납니다 . 설치 프로그램 아이콘을 더블 클릭한 뒤 , 화면에 나타나는 지시에 따라 설치를 완료합니다 . 설치가 완료되면 , Windows 의 [ 시작 ] 메뉴를 열고 [ 모든 프로그램 ] 을 클릭합니다 . Blackmagic Design 폴더를 클릭하면 Blackmagic Camera Setup 소프트웨어와 사용 설명서가 나타납니다 .
악세사리 장착 악세사리 장착 선셰이드 Studio Camera 에 장착된 접이식 선셰이드는 LCD 에 그림자를 드리워 밝은 환경에서도 항상 최적의 모니터링 환경을 제공합니다 . 1 단계 . Studio Camera 에 포함된 6 개의 나사를 끼웁니다 . 2 단계 . 선셰이드의 홈과 카메라의 마운팅 포인트를 맞춘 뒤 카메라의 윗부분과 옆면 부분에 각각 두 개의...
ATEM 소프트웨어 컨트롤 사용하기 ATEM 소프트웨어 컨트롤 사용하기 카메라 컨트롤 ATEM Software Control 의 카메라 컨트롤 기능을 사용하면 ATEM 스위처에서 Blackmagic Studio Camera 를 제어할 수 있습니다 . Camera 버튼을 클릭하면 카메라 컨트롤 실행됩니다 . 호환용 렌즈의 조리개 , 게인 , 초점 , 줌 컨트롤 등의 설정을 손쉽게 조절할 수 있으며 , 또한 DaVinci Resolve 의 프라이머리 컬러...
ATEM 소프트웨어 컨트롤 사용하기 카메라 컨트롤 사용하기 ATEM Software Control 을 실행한 뒤 소프트웨어 창의 하단에 위치한 카메라 아이콘을 클릭하세요 . 그러면 각 카메라의 이미지를 조정 및 개선할 수 있는 도구와 함께 카메라 제어 장치가 라벨 순으로 나타납니다 . 카메라 제어 장치의 사용법은 간단합니다 . 마우스로 해당 버튼을 클릭하거나 클릭한 뒤 드래그하여...
Seite 281
ATEM 소프트웨어 컨트롤 사용하기 조리개 / 페디스털 컨트롤 조리개 및 페디스털 컨트롤은 각 카메라 제어 장치의 십자선 중앙에 위치해있습니다 . 이 컨트롤에 빨간불이 들어오면 해당 카메라가 온에어 상태임을 나타냅니다 . 컨트롤을 위 / 아래로 드래그하면 조리개를 열거나 닫을 수 있습니다 . SHIFT 키를 누른 채 드래그하면 조리개만...
ATEM 소프트웨어 컨트롤 사용하기 수동 초점 조절 수동으로 카메라의 초점을 조절하려면 각 카메라 제어 장치의 하단에 있는 초점 조절 기능을 사용할 수 있습니다 . 멋지고 선명한 영상을 위해 카메라에서 전송되는 비디오 피드를 보면서 바퀴 모양의 제어 장치를 좌 / 우로 드래그하여 수동으로 초점을 조절할 수 있습니다 . 카메라...
Seite 283
ATEM 소프트웨어 컨트롤 사용하기 컬러휠과 채도 등의 설정을 모두 사용할 수 있고 섀도 , 미드톤 , 하이라이트 설정 또한 한꺼번에 볼 수 있습니다 . 제어 장치 창의 상단에 있는 카메라 선택 컨트롤을 사용하면 간단히 다른 카메라로 전환할 수 있습니다 . 컬러휠...
ATEM 소프트웨어 컨트롤 사용하기 Saturation 설정 채도 설정에서는 이미지 색상의 양을 증가 및 감소 시킬 수 있습니다 . 기본 설정은 50% 입니다 . Hue 설정 색조 설정에서는 컬러휠 전체 둘레의 색조로 이미지의 모든 색조를 변경할 수 있습니다 . 기본 설정인 180 색대비...
If you are a software developer you can use the Video Device Embedded Control Protocol to construct devices that integrate with our products. Here at Blackmagic Design our approach is to open up our protocols and we eagerly look forward to seeing what you come up with!
Seite 286
Developer Information Abstract Message Packet Format Every message packet consists of a three byte header followed by an optional variable length data block. The maximum packet size is 64 bytes. Destination device (uint8) Device addresses are represented as an 8 bit unsigned integer. Individual devices are numbered 0 through 254 with the value 255 reserved to indicate a broadcast message to all devices.
Seite 287
Developer Information Defined Commands Command 0 : change configuration Category (uint8) The category number specifies one of up to 256 configuration categories available on the device. Parameter (uint8) The parameter number specifies one of 256 potential configuration parameters available on the device. Parameters 0 through 127 are device specific parameters.
Seite 288
Developer Information 128: signed 5.11 fixed point Data elements are signed 16 bit integers representing a real number with 5 bits for the integer component and 11 bits for the fractional component. The fixed point representation is equal to the real value multiplied by 2^11. The representable range is from -16.0 to 15.9995 (15 + 2047/2048).
Seite 289
Developer Information Group Parameter Type Index Minimum Maximum Interpretation Lens Focus fixed16 0.0=near, 1.0=far Instantaneous autofocus void trigger instantaneous autofocus Aperture (f-stop) fixed16 -1.0 16.0 Aperture Value (where fnumber = sqrt(2^AV)) Aperture (normalised) fixed16 0.0=smallest, 1.0=largest Aperture (ordinal) int16 Steps through available aperture values from minimum (0) to maximum (n) Instantaneous auto void...
Seite 290
Developer Information Group Parameter Type Index Minimum Maximum Interpretation Sensor Gain int8 1x, 2x, 4x, 8x, 16x gain Manual White Balance int16 3200 7500 Colour temperature in K Reserved Reserved Reserved Reserved Exposure (us) int32 42000 time in us Exposure (ordinal) int16 Steps through available exposure values from minimum (0) to maximum (n)
Seite 291
Developer Information Group Parameter Type Index Minimum Maximum Interpretation Display Brightness fixed16 0.0=minimum, 1.0=maximum Overlays int16 bit field 0x4 = zebra 0x8 = peaking Zebra level fixed16 0.0=minimum, 1.0=maximum Peaking level fixed16 0.0=minimum, 1.0=maximum Colour bars display time int8 0=disable bars, 1-30=enable bars with (seconds) timeout (s) Tally...
Seite 292
Developer Information Group Parameter Type Index Minimum Maximum Interpretation Colour Correction Lift Adjust fixed16 [0] red -2.0 default 0.0 [1] green -2.0 default 0.0 [2] blue -2.0 default 0.0 [3] luma -2.0 default 0.0 Gamma Adjust fixed16 [0] red -4.0 default 0.0 [1] green -4.0...
Seite 293
Developer Information Example Protocol Packets Operation Packet Byte Length header command data trigger instantaneous auto focus on camera 4 turn on OIS on all cameras set exposure to 10 ms on 0x10 0x27 0x00 0x00 camera 4 (10 ms = 10000 us = 0x00002710) add 15% to zebra level 0x33...
Seite 294
기간이 만료된 경우에는 , 배터리 교체를 위한 추가 배터리 , 인건비 , 배송비를 포함한 서비스 비용이 발생합니다 . Blackmagic Design 고객 지원에 연락하면 카메라를 보내는 장소 및 포장 방법 , 국가별 배터리 교체 비용에 대한 자세한 정보를 얻으실 수 있습니다 .
Seite 295
판매 대리인이 아닌 개인에 의해 발생한 손상 . b) 부적절한 사용 및 호환하지 않는 장비와의 연결로 인한 제품 손상 . c) Blackmagic Design 사의 부품 및 공급품이 아닌 것을 사용하여 발생한 손상 및 고장 . d) 제품을 개조하거나 다른 제품과 통합하여 제품 작동 시간 증가 및 기능 저하가 발생한 경우 . BLACKMAGIC DESIGN 에서...
Seite 296
Руководство по установке и эксплуатации Blackmagic Studio Camera Mac OS X ™ Windows ™ Русский Сентябрь 2015 г...
Seite 297
в ранее недоступных местах и при этом иметь полное управление с микшера АТЕМ или иного устройства . Мы надеемся , что новая камера поможет вам в создании передач самого высокого качества . С ее помощью у вас появится возможность полностью раскрыть свой творческий потенциал ! Grant Petty Генеральный директор Blackmagic Design...
Seite 298
Blackmagic Studio Camera Blackmagic Camera Setup Blackmagic Studio Camera Blackmagic Micro Studio Camera 4K Blackmagic Studio Camera — ATEM Software Control Blackmagic Studio Camera — Blackmagic Micro Studio Camera 4K — Blackmagic Micro Studio Camera 4K — DaVinci Resolve Primary Color Corrector Blackmagic Micro Studio Camera 4K Developer Information...
Начало работы Начало работы Для начала работы с Blackmagic Studio Camera или Blackmagic Micro Studio Camera 4K достаточно установить объектив и включить камеру . Чтобы снять пылезащитную крышку с байонета , нажмите фиксирующую кнопку и поверните крышку против часовой стрелки . Перед установкой и снятием объектива...
Seite 300
Функциональные возможности Функциональные возможности Blackmagic Studio Camera Показывает ведущему программы , сигнал какой камеры передается в эфир . Подробнее см . раздел « Настройки мониторинга ». LANC Стереоразъем диаметром 2,5 мм для дистанционного управления диафрагмой , масштабированием и фокусом по протоколу LANC. Разъем...
Функциональные возможности 11. 10- Предназначен для просмотра живого сигнала камеры , программного изображения и работы с меню . Подробнее см . раздел « Настройки мониторинга ». Предназначен для оператора . Если индикатор горит , сигнал камеры передается в эфир . Focus Нажмите...
Seite 302
Функциональные возможности Blackmagic Micro Studio Camera 4K Этот индикатор показывает ведущему программы , сигнал какой камеры передается в эфир , а также сообщает о текущем состоянии камеры . Возможны несколько вариантов индикации . Белый цвет — питание включено . ...
Seite 303
Функциональные возможности Стереоразъем диаметром 3,5 мм с выбором микрофонного или линейного сигнала из меню . 10. SDI Out Выход SDI для подключения к видеомикшеру , внешнему рекордеру или другому устройству . 11. SDI In Вход SDI для управления камерой с видеомикшеров АТЕМ . Разъем...
Seite 304
Разъемы Разъемы Blackmagic Studio Camera — LANC Порт LANC используется для удаленного управления фокусом , диафрагмой и зуммирования , если объектив поддерживает данные функции . Порт представляет собой стереоразъем диаметром 2,5 мм и работает по стандартному протоколу LANC. Объективы MFT с активным управлением позволяют контролировать сервопривод зума в удаленном режиме...
Seite 305
условиях . Если одновременно задействованы SDI- и оптический входы , будет выводиться сигнал того устройства , которое подключено первым . Оптоволоконный SFP- модуль для Blackmagic Studio Camera можно приобрести у местных дилеров Blackmagic Design. Информацию о дилерах см . на нашем веб - сайте www.blackmagicdesign.com/ru/resellers.
Seite 306
Разъемы Blackmagic Micro Studio Camera 4K — HDMI Порт HDMI на Blackmagic Micro Studio Camera 4K выводит 10- битное видео в формате 1080p с частотой выборки 4:2:2, а также двухканальное аудио для мониторинга сигнала . Для кадрирования , установки фокуса и навигации по меню можно подключить любой HDMI- монитор с поддержкой HD- сигнала , например...
Seite 307
Разъемы Blackmagic Micro Studio Camera 4K — Стереоразъем диаметром 3,5 мм поддерживает запись микрофонного или линейного сигнала . Нужную опцию выбирают в меню Audio. Важно правильно выполнить настройку , чтобы звук не был слишком громким или слишком тихим . SDI Out Выход...
Seite 308
Индивидуальная адаптация Индивидуальная адаптация Blackmagic Micro Studio Camera 4K Есть два варианта доступа к функционалу порта расширения . Можно использовать кабель , поставляемый с Blackmagic Micro Studio Camera 4K, или свой собственный . Кабель для порта расширения содержит несколько разъемов . Разъем...
Seite 309
Индивидуальная адаптация Blackmagic Micro Studio Camera При использовании порта расширения на Blackmagic Micro Studio Camera 4K Диаграмма на рисунке ниже содержит схему разводки поставляемого кабеля и иногда требуются только одна или две функции , например управление вещательным может служить примером для создания собственного кабеля . Полный список объективом...
Seite 310
Настройки камеры Настройки камеры Для установки настроек на Blackmagic Studio Camera или Blackmagic Micro Studio Camera 4K нажмите кнопку MENU. Чтобы выбрать нужный параметр , используйте кнопки навигации , а для подтверждения настройки нажмите кнопку SET. При работе с Micro Studio Camera 4K для вывода настроек необходимо подключить внешний монитор через...
Настройки камеры Shutter + Iris Сохранение необходимого уровня экспозиции путем изменения скорости затвора . Если по достижении максимальной или минимальной выдержки затвора экспозиция не является стабильной , Micro Studio Camera 4K начнет корректировать значение диафрагмы . Manual Trigger Значение диафрагмы и выдержки затвора устанавливаются вручную , при этом уровень экспозиции может варьироваться...
Настройки камеры Blackmagic Studio Camera Micro Studio Camera 4K Studio Camera 4K 720p/50 2160p/23,98 2160p/23,98 720p/59,94 2160p/24 2160p/24 720p/60 2160p/25 2160p/25 1080i/50 2160p/29,97 2160p/29,97 1080i/59,94 2160p/30 2160p/30 1080i/60 2160p/50 1080p/23,98 2160p/59,94 1080p/24 2160p/60 1080p/25 1080p/29,97 1080p/30 1080p/50 1080p/59,94 1080p/60 Чтобы настроить параметры аудиовхода и мониторинга звука на Blackmagic Studio Camera, нажмите кнопку...
Seite 313
Настройки камеры Microphone Level ( Используется для настройки уровня при записи с помощью встроенного микрофона . Для увеличения или снижения уровня записи передвиньте ползунок влево или вправо . В Studio Camera предусмотрен встроенный стереомикрофон . Если не подключен внешний источник звука , микрофон ведет запись на аудиоканалах...
Seite 314
Настройки камеры Чтобы установить настройки ЖК - дисплея , нажмите кнопку MENU и выберите значок с изображением монитора . Для выбора отдельных параметров используйте кнопки навигации , а для подтверждения настройки нажмите кнопку SET. HDMI Meters Blackmagic Micro Studio Camera 4K позволяет...
Seite 315
Настройки камеры Focus Peaking ( Позволяет устанавливать уровень резкости при выделении контуров изображения . Возможные настройки : off ( выкл .), low ( низкий уровень ), medium ( средний уровень ) и high ( высокий уровень ). Эта функция полезна при использовании резко рисующего объектива , когда выделяется все изображение . По умолчанию...
Seite 316
Настройки камеры Reference Timing ( Позволяет вручную устанавливать способ синхронизации — по строкам или по пикселям . Headset Level ( Для увеличения или снижения уровня громкости передвиньте ползунок влево или вправо . По умолчанию установлено значение 50%. Headset Mic Level ( Для...
Seite 317
Настройки камеры экспозиция по самому светлому участку в кадре . Ручная установка диафрагмы на Studio Camera выполняется при помощи кнопок навигации ( вверх и вниз ). Push to Talk (PTT) При работе в прямом эфире важно обеспечить связь между оператором камеры и режиссером программы FOCUS IRIS в...
Seite 318
Выходной сигнал камеры Выходной сигнал камеры Blackmagic Studio Camera выводит 10- битное 4:2:2 видео , что позволяет подключаться к вещательным видеомикшерам и другому оборудованию с SDI- интерфейсом . С дополнительно - устанавливаемым SFP- модулем имеется возможность соединения через оптоволоконный кабель , что избавляет от необходимости использовать...
Seite 319
и следуйте инструкциям на экране . После завершения установки откройте меню « Пуск » и выберите « Все программы ». Программное обеспечение для камер Blackmagic и руководство по эксплуатации находятся в папке Blackmagic Design. После установки на компьютер последней версии программного обеспечения Blackmagic Camera Blackmagic Camera Setup подключитесь...
Установка аксессуаров Установка аксессуаров Studio Camera комплектуется складной солнцезащитной блендой для установки на ЖК - дисплей при съемке в условиях яркого освещения . Подготовьте шесть винтов , входящих в комплект поставки Studio Camera. Совместив отверстия на бленде с точками крепления на камере , закрутите по два винта на верхней...
Seite 321
Работа с ATEM Software Control Работа с ATEM Software Control В ATEM Software Control предусмотрена функция для управления камерой Blackmagic Studio с видеомикшера ATEM. Чтобы перейти к ней , нажмите кнопку Camera. При использовании совместимых объективов эта функция позволяет менять настройки диафрагмы , усиления и зума , устанавливать фокус и цветовой баланс , а...
Seite 322
Работа с ATEM Software Control Запустите панель ATEM Software Control и нажмите кнопку Camera в нижней части программного интерфейса . На экране будут отображаться окна управления камерами , которые содержат мощные инструменты для корректировки параметров изображения . В работе с этими инструментами используются кнопки...
Seite 323
Работа с ATEM Software Control Для управления диафрагмой / уровнем черного используется вкладка на пересечении двух линий в окне . Когда сигнал камеры выводится в эфир , она становится красной . Чтобы открыть или закрыть диафрагму , перетащите вкладку вверх или вниз при помощи кнопки мыши . Если...
Seite 324
Работа с ATEM Software Control Для ручной установки фокуса можно воспользоваться соответствующим инструментом , расположенным в нижней части каждого окна управления . Для настройки резкости передвиньте ползунок вправо или влево в момент просмотра изображения с камеры . Эта функция позволяет включать дополнительное усиление сигнала . Она полезна при съемке в условиях слабого...
Seite 325
Работа с ATEM Software Control Для этого используются цветовые круги и такие параметры , как насыщенность , а настройки для областей тени , полутона и света все время остаются на экране . Чтобы перейти к тому или иному изображению , достаточно...
Seite 326
Работа с ATEM Software Control Contrast Этот инструмент позволяет устанавливать диапазон между самой темной и самой светлой частью изображения . При его использовании достигается такой же эффект , как при работе с общими регуляторами L i f t и Gai n, когда с и х по м ощью выполн яют пр от ивополож ные корр ек т ир овк и . По...
If you are a software developer you can use the Video Device Embedded Control Protocol to construct devices that integrate with our products. Here at Blackmagic Design our approach is to open up our protocols and we eagerly look forward to seeing what you come up with!
Seite 328
Developer Information Abstract Message Packet Format Every message packet consists of a three byte header followed by an optional variable length data block. The maximum packet size is 64 bytes. Destination device (uint8) Device addresses are represented as an 8 bit unsigned integer. Individual devices are numbered 0 through 254 with the value 255 reserved to indicate a broadcast message to all devices.
Seite 329
Developer Information Defined Commands Command 0 : change configuration Category (uint8) The category number specifies one of up to 256 configuration categories available on the device. Parameter (uint8) The parameter number specifies one of 256 potential configuration parameters available on the device. Parameters 0 through 127 are device specific parameters.
Seite 330
Developer Information 128: signed 5.11 fixed point Data elements are signed 16 bit integers representing a real number with 5 bits for the integer component and 11 bits for the fractional component. The fixed point representation is equal to the real value multiplied by 2^11. The representable range is from -16.0 to 15.9995 (15 + 2047/2048).
Seite 331
Developer Information Group Parameter Type Index Minimum Maximum Interpretation Lens Focus fixed16 0.0=near, 1.0=far Instantaneous autofocus void trigger instantaneous autofocus Aperture (f-stop) fixed16 -1.0 16.0 Aperture Value (where fnumber = sqrt(2^AV)) Aperture (normalised) fixed16 0.0=smallest, 1.0=largest Aperture (ordinal) int16 Steps through available aperture values from minimum (0) to maximum (n) Instantaneous auto void...
Seite 332
Developer Information Group Parameter Type Index Minimum Maximum Interpretation Reserved Reserved Reserved Reserved Exposure (us) int32 42000 time in us Exposure (ordinal) int16 Steps through available exposure values from minimum (0) to maximum (n) Dynamic Range Mode int8 enum 0 = film, 1 = video Video sharpening level int8 enum 0=Off, 1=Low, 2=Medium, 3=High...
Seite 333
Developer Information Group Parameter Type Index Minimum Maximum Interpretation Overlays int16 bit field 0x4 = zebra 0x8 = peaking Zebra level fixed16 0.0=minimum, 1.0=maximum Peaking level fixed16 0.0=minimum, 1.0=maximum Colour bars display time int8 0=disable bars, 1-30=enable bars with timeout (seconds) Tally Tally brightness...
Seite 334
Developer Information Group Parameter Type Index Minimum Maximum Interpretation [3] luma -2.0 default 0.0 Gamma Adjust fixed16 [0] red -4.0 default 0.0 [1] green -4.0 default 0.0 [2] blue -4.0 default 0.0 [3] luma -4.0 default 0.0 Gain Adjust fixed16 [0] red 16.0 default 1.0...
Seite 335
Developer Information Example Protocol Packets Operation Packet Byte Length header command data trigger instantaneous auto focus on camera 4 turn on OIS on all cameras set exposure to 10 ms on camera 0x10 0x27 0x00 0x00 (10 ms = 10000 us = 0x00002710) add 15% to zebra level 0x33 0x01...
Seite 336
Studio Camera комплектуется встроенной батареей , которая не подлежит обслуживанию . Если батарея нуждается в замене , ее необходимо отправить в ближайший сервисный центр Blackmagic Design. По окончании срока гарантийного обслуживания при замене батареи взимается сервисный сбор в размере ее стоимости , трудозатрат и расходов на доставку . Адрес для отправки камеры , правила безопасной...