Werbung
Verfügbare Sprachen
Verfügbare Sprachen
Quicklinks
OceanProp 15000
Bedienungsanleitung D
Strömungspumpe für Meer- und Süßwasseraquarien
Mit dem Kauf dieser Pumpe haben Sie sich für ein Qualitätsprodukt entschieden. Sie ist speziell für
den aquaristischen Gebrauch entwickelt und von Fachleuten erprobt worden.
GmbH
Gewerbepark 24, 49143 Bissendorf, Germany
__________________________________________________________________________________
1
Werbung

Verwandte Anleitungen für Aqua Medic OceanProp 15000


Inhaltszusammenfassung für Aqua Medic OceanProp 15000
- Seite 1 OceanProp 15000 Bedienungsanleitung D Strömungspumpe für Meer- und Süßwasseraquarien Mit dem Kauf dieser Pumpe haben Sie sich für ein Qualitätsprodukt entschieden. Sie ist speziell für den aquaristischen Gebrauch entwickelt und von Fachleuten erprobt worden. GmbH Gewerbepark 24, 49143 Bissendorf, Germany...
- Seite 2 Saugerplatte. Durch den Knebel wird ein Vakuum erzeugt und der Sauger an der Scheibe befestigt. Die Pumpen sind zur Aufstellung unter Wasser vorgesehen. 3. Technische Daten, Tab. 1 Typ: OceanProp 15000 Spannung Pumpe: 15 – 24 V = Leistungsaufnahme in Watt: 9 –20 W...
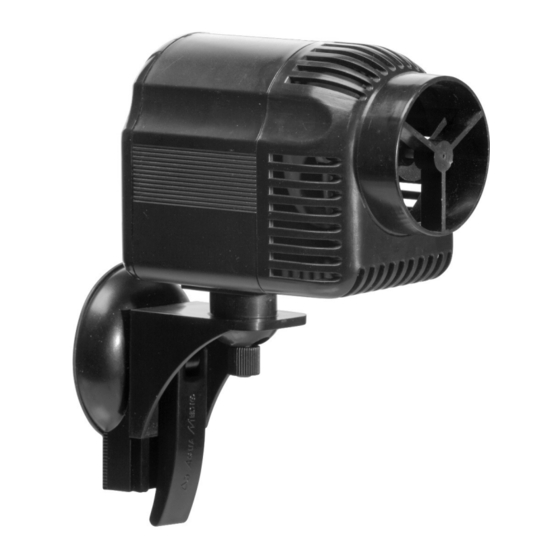
- Seite 3 4. Aufbau der Pumpe Abb.: OceanProp 15000 Abb. 1: Aufbau OceanProp 15000 Filterkorb Sicherungsmutter Gummilager, vorn Läuferbaugruppe Gummisauger Keramikachse Motorblock Saugerplatte Läufer Kugelgelenk Knebelgriff Keramiklager Pumpenhalter Splint Gummilager, hinten...
- Seite 4 Stelle, wo die Pumpe befestigt werden soll, wird sorgfältig gereinigt; am besten mit einem Klingenreiniger (Aqua Medic Scraper). Jetzt wird der Sauger angesetzt, der Hebel zuvor senkrecht gestellt. Man drückt den Sauger fest gegen die Scheibe (Abb. 2) und legt anschließend den Hebel um (Abb.
- Seite 5 6. OceanProp Control Zur Erzeugung unregelmäßiger Strömungen wird der Steuerungscomputer zwischen Netzteil und Pumpe geschaltet. Die Pumpe wird dabei im Wechsel zwischen 2 Geschwindigkeiten (max. und min.) geschaltet. Mit der Taste „Mode“ kann ein Programm vorgewählt werden. 9 Programme stehen zur Auswahl: Der Controller taktet im 15 Sek. Rhythmus. Vor Inbetriebnahme die Schutzfolie abziehen.
- Seite 6 Ansaugkorb und der Propeller gereinigt werden. 9. Garantie AB Aqua Medic GmbH gewährt eine 12-monatige Garantie ab Kaufdatum auf alle Material- und Verarbeitungsfehler des Gerätes. Als Garantienachweis gilt der Original-Kaufbeleg. Während dieser Zeit werden wir das Produkt kostenlos durch Einbau neuer oder erneuerter Teile instand setzen (ausgenommen Frachtkosten).
- Seite 7 OceanProp 15000 Operation Manual GB Current pump for fresh and salt water aquariums In purchasing this pump, you have selected a top quality product. It has been specifically developed for aquarium use and extensively tested by experts. GmbH Gewerbepark 24, 49143 Bissendorf, Germany...
- Seite 8 • 2. Features The OceanProp 15000 magnetically coupled current pump is very quiet in operation. They have fully encapsulated synchronous motors and can operate completely safely submerged. The polished ceramic shaft and bearing is practically wear-resistant, ensuring a long operating life. An integrated thermal overheat protection device prevents damage to the windings should the impeller rotation be impeded.
- Seite 9 4. Exploded parts diagram Fig. 1: OceanProp 15000 Fig. 1: Exploded parts diagram OceanProp 15000 Filter basket Securing nut Rubber bearing, front Rotor assembly Rubber sucker Ceramic shaft Motor Sucker plate Rotor Ball joint Leverage handle Ceramic bearing Pump holder...
- Seite 10 – preferably with a blade cleaner. We recommend to use the Aqua Medic Scraper. Now, the sucker is placed and the lever is put vertically and pressed to the glass (Fig. 2). Then, the lever is turned down (Fig. 3) and a vacuum is created. The holder with the pump can now be fixed on the sucker.
- Seite 11 6. OceanProp Control In order to create changing currents in the aquarium, the pump controller is mounted between power unit and pump. The pump is now switched between 2 speeds, minimum and maximum. With the “mode” button one of 9 current sceneries can be selected. The controller is switched in steps of 15 sec.
- Seite 12 If your AB Aqua Medic product does not appear to be working correctly or still appears to be defective having followed the instructions in 6. & 7. please contact your dealer in the first instance.
- Seite 13 OceanProp 15000 Mode d’emploi F Pompe de brassage pour aquariums d’eau de mer ou d’eau douce Cette pompe de qualité a été spécialement conçue pour l’usage aquariophile et elle a été testée par des professionnels. GmbH Gewerbepark 24, 49143 Bissendorf, Germany...
- Seite 14 à la vitre. La pompe est prévue pour être utilisée sous l’eau. 3. Données techniques, Tab. 1 Type: OceanProp 15000 Voltage pompe: 15 – 24 V Consommation en Watt: 9 – 20 W Voltage transformateur: 100 –...
- Seite 15 4. Détail pompe Schéma: OceanProp 15000 Schéma 1: Détail OceanProp 15000 Filtre de protection Ecrou de sécurité Coussinet caoutchouc, avant Rotor Ventouse caoutchouc Axe céramique Bloc moteur Support ventouse Rotor Articulation à bille Poignée Coussinet céramique Support de pompe Goupille...
- Seite 16 être soigneusement nettoyé; de préférence avec une lame de rasoir (Aqua Medic Scraper). Mettre la ventouse en place, en plaçant la poignée en position verticale au départ. Presser la ventouse contre la vitre (Schéma 2) et basculer la poignée (Schéma 3). Ce faisant cela crée le vide.
- Seite 17 6. OceanProp Control Pour la création de courants irréguliers on installe l’ordinateur de contrôle entre le secteur et la pompe. Ce faisant la pompe est branchée en alternance entre 2 vitesses (max. et min.). Il est possible de sélectionner un programme avec la touche „Mode“. 9 programmes sont disponibles pour la sélection: le rythme du Controller est de 15 secondes.
- Seite 18 9. Garantie AB Aqua Medic GmbH assure une garantie de 12 mois à partir de la date d’achat sur tous les défauts de matériel et de fabrication de l’appareil. Comme preuve de garantie il faut produire la preuve d’achat.
- Seite 19 Bomba magnética de bajo voltaje (DC) Manual de Instrucciones ES Bomba de circulación para acuarios de agua dulce y salada. Al adquirir esta bomba Vd. ha elegido un producto de la máxima calidad. Ha sido diseñada para su uso en acuarios e intensivamente probada por expertos. GmbH Gewerbepark 24, 49143 Bissendorf, Germany __________________________________________________________________________________...
- Seite 20 • 2. Características La bomba magnética OceanProp 15000 es muy silenciosa en su funcionamiento. Tiene motores sincrónicos totalmente encapsulados y puede funcionar completamente sumergida de forma segura. El eje cerámico pulido y su soporte son resistentes al desgaste, asegurando una vida operativa larga.
- Seite 21 4. Diagrama de componentes Fig. 1: OceanProp 15000 Fig. 1: Diagrama de componentes explorables OceanProp 15000 Filtro de canasta Retén de seguridad Rodamiento de goma, frontal Rotor ensamblado Ventosa de goma Eje cerámico Motor Plato de la ventosa Rotor Conexión de bola Palanca de vacío...
- Seite 22 Recomendamos use un Aqua Medic Scraper. A continuación se sitúa la ventosa, la palanca se posiciona verticalmente y se aprieta contra el cristal (Fig. 2). Ahora apretamos la palanca hacia abajo (Fig.
- Seite 23 Fig. OceanProp Control 1. Botón On/off 2. Botón Modo 3. Botón Modo noche 4. Sensor de luz 5. Pantalla LED, también muestra el modo noche (punto a la derecha) 6. Enchufe para conexión del transformador 7. Cable de conexión protegido para la bomba Modo Programa...
- Seite 24 9. Garantía Aqua Medic garantiza durante 12 meses a partir de la fecha de la compra. Aqua Medic repara ó sustituye las partes defectuosas de forma gratuita, siempre que dicho producto se haya instalado correctamente, se esté usando para lo que ha sido diseñado, se use conforme al manual de instrucciones y nos sea devuelto a portes pagados.