Inhaltsverzeichnis
Werbung
Quicklinks
Istruzioni per l'uso ed installazione
Εγχειριδιο Χρησησ Επαγωγικησ Εστιασ
Gebruiksaanwijzing voor Inductiekookplaat
Thank you for purchasing the HOOVER induction hob. Please read this instruction manual
carefully before using the hob and keep it in a safe place for future reference.
HPI 82
ENGLISH
ITALIANO
DEUTSCH
FRANÇAIS
ΕΛΛΗΝΙΚΆ
NEDERLANDS
Werbung
Inhaltsverzeichnis

Verwandte Anleitungen für Hoover HPI 82


Inhaltszusammenfassung für Hoover HPI 82
- Seite 1 FRANÇAIS ΕΛΛΗΝΙΚΆ Εγχειριδιο Χρησησ Επαγωγικησ Εστιασ NEDERLANDS Gebruiksaanwijzing voor Inductiekookplaat HPI 82 Thank you for purchasing the HOOVER induction hob. Please read this instruction manual carefully before using the hob and keep it in a safe place for future reference.
-
Seite 2: Safety Warnings
By placing the CE mark on this product, we are confirming compliance to all relevant European safety, health and environmental requirements which are applicable in legislation for this product. Safety Warnings Your safety is important to us. Please read this information before using your hob. -
Seite 3: Health Hazard
person responsible for installing the appliance as it could reduce your installation costs. • In order to avoid a hazard, this appliance must be installed according to these instructions for installation. • This appliance is to be properly installed and earthed only by a suitably qualified person. -
Seite 4: Hot Surface Hazard
safety standards. • However, persons with cardiac pacemakers or other electrical implants (such as insulin pumps) must consult with their doctor or implant manufacturer before using this appliance to make sure that their implants will not be affected by the electromagnetic field. -
Seite 5: Cut Hazard
Cut Hazard • The razor-sharp blade of a hob surface scraper is exposed when the safety cover is retracted.Use with extreme care and always store safely and out of reach of children. • Failure to use caution could result in injury or cuts. - Seite 6 • Do not allow children to play with the appliance or sit, stand, or climb on it. • Do not store items of interest to children in cabinets above the appliance. Children climbing on the cooktop could be seriously injured. •...
- Seite 7 glass. • If the power supply cable is damaged, it must only be replaced by a qualified technician. • This appliance is designed for domestic use only. • This appliance can be used by children aged from 8 years and above and persons with reduced physical, sensory or mental capabilities or lack of experience and knowledge if they have been given...
-
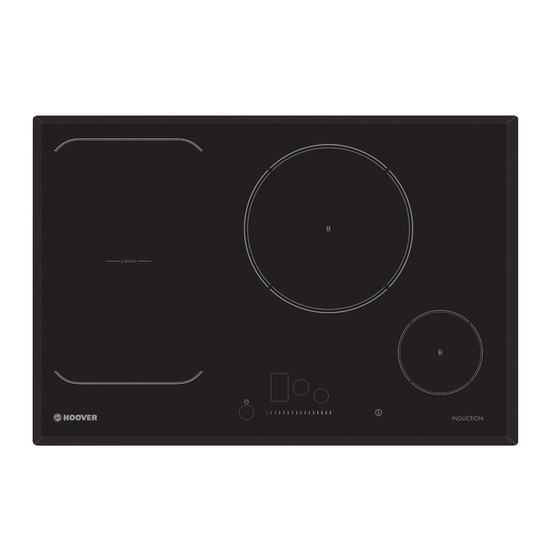
Seite 8: Product Overview
Congratulations on the purchase of your new Induction Hob. We recommend that you spend some time to read this Instruction / Installation Manual in order to fully understand how to install correctly and operate it. For installation, please read the installation section. Read all the safety instructions carefully before use and keep this Instruction / Installation Manual for future reference. -
Seite 9: A Word On Induction Cooking
A Word on Induction Cooking Induction cooking is a safe, advanced, efficient, and economical cooking technology. It works by electromagnetic vibrations generating heat directly in the pan, rather than indirectly through heating the glass surface. The glass becomes hot only because the pan eventually warms it up. iron pot magnetic circuit ceramic glass plate... -
Seite 10: Choosing The Right Cookware
Choosing the right Cookware • Only use cookware with a base suitable for induction cooking. Look for the induction symbol on the packaging or on the bottom of the pan. • You can check whether your cookware is suitable by carrying out a magnet test. -
Seite 11: Pan Dimension
Pan Dimension The cooking zones are, up to a limit, automatically adapted to the diameter of the pan. However the bottom of this pan must have a minimum of diameter according to the corresponding cooking zone. To obtain the best efficiency of your hob, please place the pan in the centre of the cooking zone. -
Seite 12: When You Have Finished Cooking
4. Adjust heat setting by touching the slider control. • If you don’t choose a heat setting within 1 minute, the Induction hob will automatically switch off. You will need to start again at step 1. • You can modify the heat setting at any time during cooking. - Seite 13 3. Turn the whole hob off by touching the ON/OFF control. 4. Beware of hot surfaces H will show which cooking zone is hot to touch. It will disappear when the surface has cooled down to a safe temperature. It can also be used as an energy saving function if you want to heat further pans, use the hotplate that is still hot.
- Seite 14 a: Touching the boost control “ ”, then the cooking zone will revert to its original setting. b: Touching the slider control, then the cooking zone will revert to the level you select. • The function can work in all cooking zones •...
-
Seite 15: Flexible Area
Cancel the keep warm function 1. Touching the heating zone selection control 2. a: Touching the slider control, then the cooking zone will revert to the level you select. b: Touching the function control such as , then the cooking zone will revert to the level you previously selected. - Seite 16 Examples of correct pan placement and incorrect pan placement. As large zone 1. To activate the flexible area as a single large zone, simply press the dedicated keys. 2. The power setting works as any other normal area. 3. If the pan is moved from the front to the rear part (or vice versa),the flexible area detects automatically the new position, keeping the same power.
-
Seite 17: Locking The Controls
Locking the Controls • You can lock the controls to prevent unintended use (for example children accidentally turning the cooking zones on). • When the controls are locked, all the controls except the ON/OFF control are disabled. To lock the controls Touch the keylock control. -
Seite 18: Using The Timer As A Minute Minder
People with a heart pace maker should consult with their doctor before using this unit. Using the Timer You can use the timer in two different ways: • You can use it as a minute minder. In this case, the timer will not turn any cooking zone off when the set time is up. - Seite 19 6. Buzzer will beep for 30 seconds and the timer indicator shows “00 “ when the setting time finished. Setting the timer to turn cooking zones off If the timer is set on one zone: 1. Touching the heating zone selection control that you want to set the timer for.
- Seite 20 6. When the time is set, it will begin to count down immediately. The display will show the remaining time and the timer indicator flash for 5 seconds. NOTE: The red dot next to power level indicator will illuminate indicating that zone is selected. 7.
- Seite 21 Using the boiling prompt control You can use the function to boil water and it will prompt when the water is boiled. Activate the boiling prompt function 1. Touching the heating zone selection control 2. Touching the boiling prompt control , the zone indicator show “2L”...
-
Seite 22: Cooking Guidelines
b: Touching the function control , then the cooking zone will revert to booster level. • It is important that the water temperature is neither too hot nor too cold when cooking begins, as this could affect the final result. •... - Seite 23 Searing steak To cook juicy flavor some steaks: 1. Stand the meat at room temperature for about 20 minutes before cooking. 2. Heat up a heavy-based frying pan. 3. Brush both sides of the steak with oil. Drizzle a small amount of oil into the hot pan and then lower the meat onto the hot pan.
-
Seite 24: Heat Settings
Heat Settings The settings below are guidelines only. The exact setting will depend on several factors, including your cookware and the amount you are cooking. Experiment with the induction hob to find the settings that best suit you. Heat setting Suitability •... -
Seite 25: Care And Cleaning
Care and Cleaning The settings below are guidelines only. The exact setting will depend on several factors, including your cookware and the amount you are cooking. Experiment with the cooktop to find the settings that best suit you. What? How? Important! Everyday soiling on 1. -
Seite 26: Hints And Tips
Spillovers on the 1. Switch the power to the hob • The hob may beep and turn touch controls off. itself off, and the touch controls 2. Soak up the spill may not function while there is 3. Wipe the touch control area liquid on them. - Seite 27 Fan noise coming A cooling fan built into your This is normal and needs no action. from the induction induction hob has come on to Do not switch the power to the hob. prevent the electronics from induction hob off at the wall while overheating.
-
Seite 28: Technical Specification
The above are the judgment and inspection of common failures. Please do not disassemble the unit by yourself to avoid any dangers and damages to the induction hob. Technical Specification Cooking Hob HPI 82 Cooking Zones 4 Zones Supply Voltage 220-240V~... -
Seite 29: Selection Of Installation Equipment
Installation Selection of installation equipment Cut out the work surface according to the sizes shown in the drawing. For the purpose of installation and use, a minimum of 5 cm space shall be preserved around the hole. Be sure the thickness of the work surface is at least 30mm. Please select heat-resistant work surface material to avoid larger deformation caused by the heat radiation from the hotplate. -
Seite 30: Before Locating The Fixing Brackets
Before you install the hob, make sure that • the work surface is square and level, and no structural members interfere with space requirements • the work surface is made of a heat-resistant material • if the hob is installed above an oven, the oven has a built-in cooling fan •... -
Seite 31: Connecting The Hob To The Mains Power Supply
Cautions 1. The induction hotplate must be installed by qualified personnel or technicians. We have professionals at your service. Please never conduct the operation by yourself. 2. The hob will not be installed directly above a dishwasher, fridge, freezer, washing machine or clothes dryer, as the humidity may damage the hob electronics 3. - Seite 32 380-415V 3N~ • If the cable is damaged or to be replaced, the operation must be carried out by the after-sale agent with dedicated tools to avoid any accidents. • If the appliance is being connected directly to the mains an omnipolar circuit-breaker must be installed with a minimum opening of 3mm between contacts.
-
Seite 33: Informazioni Di Sicurezza
“Inserendo la marcatura CE su questo prodotto, si dichiara , sotto la nostra responsabilità , la conformità a tutti i requisiti sulla sicurezza europea, sulla salute e sull’ambiente stabiliti dalla legislazione per questo prodotto.” Informazioni di sicurezza Per noi la sua sicurezza è importante. Per favore legga queste informazioni prima di utilizzare il piano. - Seite 34 Per evitare infortuni, il piano deve essere istallato seguendo le istruzioni di istallazione Questo dispositivo deve essere istallato esclusivamente da una persona qualificata. Il piano deve essere collegato alla rete elettrica integrando un interruttore di isolamento per un eventuale totale scollegamento dalla rete.
-
Seite 35: Istruzioni Di Sicurezza Importanti
impianti non risentano del campo elettromagnetico del piano. Non seguire le precauzioni può portare a shock elettrico o alla morte. Superficie rovente Durante l’uso alcune parti di questo prodotto possono surriscaldarsi provocando rischio incendio. Non appoggiarsi o appoggiare articoli sul piano a induzione fino a quando non si sarà... - Seite 36 Mai lasciare il piano incustodito durante l’utilizzo. Se l’acqua trabocca può causare fumo o causare un incendio. Mai utilizzare il piano come superficie da lavoro o do appoggio. Mai lasciare oggetti o utensili sul piano. Non lasciare o appoggiare oggetti magnetici (ad esempio carte di credito, memory card) o dispositivi elettronici (ad esempio computer o lettori mp3) vicino al piano, altrimenti risentiranno del suo campo elettromagnetico.
- Seite 37 Tutte le altre operazioni devono essere effettuate da un tecnico qualificato. Non utilizzare un pulitore a vapore per pulire il piano. Non appoggiare o fare cadere oggetti pesanti sul piano. Non stare sulla superficie del piano. Non utilizzare pentole con bordi taglienti e non trascinare le pentole sul vetro del piano al fine di non graffiarlo o rovinarlo.
- Seite 38 Oggetti metallici come coltelli, forchette, cucchiai e coperchi non devono essere posti sulla superficie del piano di modo che non si scaldino. Dopo l’utilizzo, spegnere gli elementi del piano con i comandi e non fare affidamento al rilevatore delle pentole. ...
-
Seite 39: Panoramica Del Prodotto
Panoramica del prodotto Vista dall’alto 1. max . 1800/3000 W zona 2. max. 1800/3000 W zona 3. max. 3000/4000 W zona 4. max. 1400/2000 W zona 5. zona flessibile 3000/4000 W 6. lastra di vetro 7. Controllo Pannello di controllo 1. - Seite 40 Pentola di ferro Circuito magnetico Lastra in vetroceramica Bobina induzione Correnti indotte Prima di usare il piano a induzione Leggere questa guida, facendo particolare attenzione alle informazioni di sicurezza. Rimuovere ogni pellicola protettiva sul piano cottura. Usare i comandi touch ...
- Seite 41 Scegliere le pentole giuste Usare solo pentole adatte alla cottura ad induzione. Accertarsi che ci sia il simbolo dell’induzione sulla confezione o sulla padella stessa. E’ possibile controllare che la padella sia adatta all’induzione tramite un test con magneti. Avvicinare un magnete alla base della padella, se viene attratto la padella è...
- Seite 42 Assicurarsi che la base della padella sia liscia, che appoggi correttamente sul vetro e che sia della stessa misura della zona cottura. Utilizzare pentole le cui dimensioni siano uguali a quella della grafica della zona cottura selezionata. Usando la pentola corretta si otterrà...
- Seite 43 Dimensione delle pentole Le zone di cottura si adattano automaticamente, fino ad un certo limite, al diametro delle pentole. La parte inferiore delle pentole deve comunque avere un diametro che possa essere un minimo adeguato alla zona di cottura corrispondente. Per ottenere la massima efficienza dal piano, posizionare la pentola al centro della zona di cottura.
- Seite 44 2. Posizionare una pentola adatta sulla zona cottura che si intende utilizzare. Assicurarsi che la parte inferiore della pentola e il piano siano puliti e asciutti. 3. Premere il tasto per la selezione delle zone cottura, un indicatore lampeggerà. 4.
- Seite 45 Se non viene selezionata una zona cottura entro 1 minuto, il piano si spegnerà automaticamente. Sarà necessario ripartire dal punto 1. Le impostazioni di calore possono essere cambiati in ogni momento durante la cottura. Se il display lampeggia alternativamente alle impostazioni di calore Questo significa che:...
- Seite 46 2. Spegnere la zona cottura scorrendo verso sinistra sul comando touch. Assicurarsi che il display indichi ‘0’. 3. Spegnere l’intero piano premendo il tasto ON/OFF. 4. Fare attenzione alla superficie calda. ‘H’ indicherà quali zone cottura sono calde. Sparirà non appena la temperatura avrà...
- Seite 47 Usare la funzione boost Attivare la funzione boost 1. Premere il tasto per la selezione della zona cottura. 2. Premere il tasto Boost l’indicatore mostretà ‘b’ e la potenza raggiungerà il massimo livello. Cancellare la funzione Boost 1. Premere il tasto per la selezione della zona cottura di cui si vuole cancellare la funzione boost.
- Seite 48 La funzione può essere impostata per tutte le zone di cottura La zona di cottura tornerà alle impostazioni iniziali dopo 5 minuti. Quando la funzione boost è attiva sulla prima zona cottura, la seconda zona sarà automaticamente limitata al 2° livello. ...
- Seite 49 Cancellare la funzione mantenimento calore 1. Premere il tasto per la selezione della zona cottura. 2. A: premere la barra di controllo, la zona cottura raggiungerà il livello selezionato. B: premere un tasto per controllare la funzione ad esempio , la zona di cottura tornerà al livello selezionato precedentemente.
- Seite 50 AREA FLESSIBILE Quest’area può essere utilizzata come singola zona o come due zone differenti, a seconda delle diverse esigenze. L’area flessibile è composta da due induttori differenti che possono essere controllati separatamente. Utilizzando l’area come singola zona e spostando la pentola da una zona all’altra verrà...
- Seite 51 3. Se la pentola è spostata dalla parte frontale a quella posteriore (o viceversa), l’area flessibile individua automaticamente la nuova posizione, mantenendo la stessa potenza. 4. Per aggiungere un’ulteriore pentola, premere nuovamente l’apposito tasto, al fine di individuare la pentola. Come due zone indipendenti Per usare l’area flessibile come due zone indipendenti con differenti impostazioni di potenza, premere gli appositi tasti.
- Seite 52 Per bloccare i comandi Premere il tasto per il blocco tastiera . Il timer mostrerà “Loc”. Per sbloccare i comandi 1. Tenere premuto il tasto di blocco per un momento. 2. E’ ora possibile utilizzare il piano a induzione. Quando il piano è in modalità di blocco, tutti i comandi sono disabilitati eccetto il tasto ON/OFF , è...
-
Seite 53: Utilizzare Il Timer
Auto bloccaggio L’autobloccaggio è una funzione di sicurezza per il piano a induzione. Si blocca automaticamente nel caso in cui venga lasciato acceso. I tempi predefiniti per ogni livello di potenza sono riportati nella tabella seguente: Livello di potenza Mantenimento calore 6-10 11-14 Tempi predefiniti (ore) - Seite 54 2. Premere il tasto del timer, “10” apparirà sul display e “0” lampeggerà. 3. Impostare il tempo toccando la barra di controllo. 4. Premere il tasto del timer nuovamente, “1” lampeggerà. 5. Impostare il tempo toccando la barra di controllo. In questo caso il tempo impostato è...
- Seite 55 Impostare il timer per spegnere le zone cottura Se il timer è impostato su una sola zona: 1. Premere il tasto della zona cottura di cui si vuole impostare il timer. 2. Premere il tasto del timer, “10” apparirà sul display e “0” lampeggerà.
- Seite 56 4. Premere il tasto del timer nuovamente, “1” lampeggerà. 5. Impostare il tempo toccando la barra di controllo. In questo caso il tempo impostato è di 96 minuti. 6. Una volta impostato il tempo, inizierà immediatamente il conto alla rovescia. Il display indicherà il tempo rimanente e il timer lampeggerà...
- Seite 57 Le altre zone cottura continueranno a funzionare se accese in precedenza. Se il timer è impostato su più zone cottura 1. Quando vengono impostate più zone cottura contemporaneamente i punti decimali delle zone di riferimento si accendono. Il display dei minuti segnerà i minuti, il timer e i punti delle zone corrispondenti.
- Seite 58 Usare la funzione controllo ebollizione E’ possibile utilizzare la funzione di controllo di ebollizione che ti avviserà quando l’acqua starà bollendo. Attivare la funzione 1. Premere il tasto di selezione della zona cottura. 2. Premere il tasto , l’indicatore della zona cottura mostrerà...
- Seite 59 2. A: premere la barra di controllo, la zona cottura raggiungerà il livello selezionato. B: premere il tasto , la zona di cottura tornerà al livello boost. E’ importante che l’acqua non sia ne troppo calda ne troppo fredda quando inizia la cottura, ne va del risultato finale. ...
-
Seite 60: Suggerimenti Per La Cottura
Fare attenzione, mentre si frigge, ad olio e grasso bollente che potrebbero schizzare velocemente, in particolare se si sta usando la potenza boost. A temperature estremamente alte l’olio e il grasso possono infiammarsi spontaneamente con un alto rischio di incendio. Suggerimenti per la cottura ... - Seite 61 Bistecche Per cucinare bistecche succose e saporite: 1. Lasciare la carne a temperatura ambiente per circa 20 minuti prima della cottura. 2. Riscaldare una pentola per friggere. 3. Spennellare entrambi i lati della bistecca con dell’olio. Versare un poco d’olio all’interno della padella e adagiare lentamente la bistecca.
-
Seite 62: Impostazioni Di Cottura
5. Soffriggere le verdure. Quando sono calde ma ancora croccanti, impostare la zona cottura ad una temperatura più bassa. Rimettere la carne nella pentola e aggiungere la salsa. 6. Mescolare lentamente gli ingredienti per assicurarsi che siano abbastanza cotti. 7. Servire immediatamente. Impostazioni di cottura Le impostazioni seguenti sono solo linee guida. -
Seite 63: Manutenzione E Pulizia
Scottare Zuppe Ebollizione dell’acqua Manutenzione e pulizia Le impostazioni seguenti sono solo linee guida. Le impostazioni esatte dipendono da diversi fattori, comprese le pentole e ciò che si deve cucinare. E’ necessario provare il piano a induzione per trovare le impostazioni più... - Seite 64 fuoriuscite di immediatamente con prima possibile. Se sostanze palette o accessori lasciate sul piano zuccherine adatti ai piani ad potrebbero diventare induzione, facendo difficile da rimuovere e attenzione alla danneggiare il vetro. Pericolo di taglio: superficie rovente: 1. Staccare la quando la copertura del corrente piano è...
- Seite 65 Problemi e suggerimenti Problema Possibili cause Cosa fare Il piano non si Non c’è corrente. Assicurarsi che il piano accende. sia collegato alla presa della corrente e che sia acceso. Controllare che non ci sia un black-out in casa o nella vostra zona.
- Seite 66 Il piano a Questo dipende dalla E’ normale ma il rumore induzione fa un tecnologia ad induzione tende a diminuire debole ronzio se abbassando la utilizzato ad alte temperatura. temperature. Rumore di ventola La ventola di E’ normale e non proveniente dal raffreddamento necessita di nessun...
- Seite 67 Difetto del display e Ispezione Se si presenta una anomalia, il piano a induzione entrerà automaticamente in uno stato di protezione e il display mostrerà i relativi codici di protezione. Problemi Possibili cause Cosa fare F1-F6 Difetto nel sensore della Contattare il fornitore temperatura F9-FA...
-
Seite 68: Specifiche Tecniche
Specifiche tecniche Piano cottura HPI 82 Zone cottura 4 zone Voltaggio corrente 220-240V Potenza elettrica installata 7400W Dimensioni prodotto (mm) 770x520x60 Dimensioni incasso (mm) 750x495 Pesi e misure sono approssimate. Ci sforziamo sempre di migliorare i nostri prodotti, per questo motivo specifiche e design potrebbero cambiare senza previo avviso. - Seite 69 In qualunque circostanza, assicurarsi che il piano cottura a induzione sia ben ventilato e che l’aria entri ed esca senza ostruzioni. Garantire al piano una corretta funzione. Come mostrato di seguito: Nota: la distanza di sicurezza tra il piano e la cappa sovrastante deve essere di almeno 760 mm.
- Seite 70 La superficie di lavoro sia in squadra e a livello, e che non vi siano elementi strutturali che interferiscano con lo spazio richiesto. La superficie di lavoro sia di un materiale resistente al calore. Se il piano viene istallato sopra un forno, il forno deve avere una ventola di raffreddamento.
- Seite 71 Prima di individuare le staffe di fissaggio L’unità deve essere appoggiata su una superficie morbida e stabile (usare la confezione). No fare forza sui comandi che sporgono dal piano. Regolare le staffe di fissaggio Fissare il piano alla superficie di lavoro avvitando le 4 viti (si veda la figura) dopo l’istallazione.
- Seite 72 4. La parete e la zona sovrastante il piano devono resistere al calore. 5. Al fine di evitare qualsiasi danno, lo strato isolante e l’adesivo utilizzati devono essere resistenti al calore. Collegare il piano alla corrente elettrica Questo piano deve essere collegato alla rete principale solamente da una persona qualificata.
- Seite 73 Controllare con un elettricista se la rete domestica è adatta senza interventi. Qualsiasi intervento alla rete deve essere effettuato da una persona qualificata. Il cavo di alimentazione deve essere collegato in conformità ai relativi standard. Il metodo di collegamento è mostrato sotto. Cablaggio Tensione e frequenza 380-415V 3N~...
- Seite 74 Questo dispositivo è etichettato in conformità con la direttiva europea 2012/19/EC sui rifiuti ed attrezzature elettroniche (WEEE). E’ necessario garantire un corretto smaltimento del dispositivo per prevenire qualsiasi danno all’ambiente e alla salute della persona che può essere altresì causato da uno smaltimento scorretto.
-
Seite 75: Wichtige Sicherheitshinweise
Sicherheitswarnungen Ihre Sicherheit ist uns wichtig. Bitte lesen Sie diese Informationen bevor Sie Ihr Kochfeld verwenden. Installation Stromschlaggefahr • Trennen Sie das Gerä t vom Stromnetz, bevor jegliche Arbeiten oder Wartungen daran vornehmen. • Der Anschluss an eine vorschriftsgemä ß e Erdung ist verpflichtend. - Seite 76 abgestellt werden. • Bitte stellen Sie diese Informationen der Person zur Verfü gung, die fü r die Installation des Gerä ts verantwortlich ist, da dies Ihre Installationskosten reduzieren kö nnte. • Um Gefahren zu vermeiden muss dieses Gerä t gemä ß dieser Anleitung installiert werden.
-
Seite 77: Gefahr Bei Heiß Er Oberflä Che
Warten an der Wand aus. • Nichtbeachtung dieser Maß nahme kann zu Stromschlä gen oder dem Tode fü hren. Gesundheitsgefahren • Dieses Gerä t entspricht den elektromagnetischen Sicherheitsstandards. • Allerdings mü ssen Personen mit Herzschrittmachern oder anderen elektrischen Implantaten (wie Insulinpumpen) ihren Arzt oder Implantat-Hersteller konsultieren, um sicherzustellen, dass ihre Implantate nicht durch das elektromagnetische Feld beeinflusst... - Seite 78 • Halten Sie Kinder fern. • Griffe von Kochtö pfen kö nnen heiß werden. Passen Sie auf, dass Topfgriffe nicht ü ber andere Kochzonen ragen, die an sind. Halten Sie Topfgriffe auß erhalb der Reichweite von Kindern. • Nichtbeachtung dieser Maß nahmen kann zu Verbrennungen und Verbrü...
- Seite 79 Schnittgefahr • Die messerscharfe Klinge des Kochfeld- Schabers ist ungeschü tzt, wenn die Sicherheitsabdeckung zurü ckgezogen ist. Behandeln Sie diesen mit ä uß erster Sorgfalt und bewahren Sie diesen stets sicher und auß erhalb der Reichweite von Kindern auf. • Unvorsichtiges Handeln kann zu Verletzungen oder Schnitten fü...
- Seite 80 Kochzonen und das Kochfeld, wie in diesem Handbuch beschrieben, aus (z.B. wenn Sie die Touch-Steuerung verwenden). Verlassen Sie sich nicht darauf, dass die Topferkennungsfunktion, die Kochzonen automatisch ausschaltet, wenn Sie die Tö pfe entfernen. • Erlauben Sie Kindern nicht, mit dem Gerä...
- Seite 81 von einem qualifizierten Techniker durchgefü hrt werden. • Keine Dampfreiniger zur Reinigung verwenden • Keine schweren Gegenstä nde auf das Kochfeld stellen oder darauf fallen lassen. • Stellen Sie sich nicht auf das Kochfeld. • Keine Tö pfe mit rauen Oberflä chen verwenden oder ü...
- Seite 82 Herd mit Fett und Ö l kann gefä hrlich sein und Feuerentstehung verursachen. Versuchen Sie NIEMALS das Feuer mit Wasser zu lö schen; schalten Sie den Herd aus und bedecken Sie die Flamme z.B. mit einem Deckel oder einer Feuerlö schdecke. •...
-
Seite 83: Produktübersicht
Glü ckwunsch zum Kauf Ihres neuen Induktionskochfelds. Wir empfehlen Ihnen sich Zeit zu nehmen diese Anweisung / Installationsanleitung zu lesen, um zu verstehen, wie man das Gerä t richtig installiert und betreibt. Zur Installation lesen Sie bitte den Installationsabschnitt. Lesen Sie alle Sicherheitshinweise sorgfä ltig vor dem Gebrauch und bewahren Sie diese Anleitung fü... -
Seite 84: Ein Wort Zum Induktionskochen
Ein Wort zum Induktionskochen Induktionskochen ist eine sichere, moderne, effiziente und wirtschaftliche Kochtechnik. Es funktioniert mit elektromagnetischen Schwingungen, die Wä rme direkt in der Pfanne erzeugen, anstatt indirekt erst die Glasplatte zu erwä rmen. Das Glas wird nur heiß , weil die Pfanne es unter Umstä... -
Seite 85: Die Wahl Des Richtigen Kochgeschirrs
Die Wahl des richtigen Kochgeschirrs • Verwenden Sie nur Kochgeschirr mit einem induktionsgeeigneten Boden. Beachten Sie auf das Indukionssymbol auf der Verpackung oder dem Boden, der Pfanne. • Sie kö nnen ü berprü fen, ob Ihr Kochgeschirr geeignet ist, indem Sie einen Magnet-Test durchfü... -
Seite 86: Abmessungen Der Pfanne
Abmessungen der Pfanne Die Kochzone passt sich, allerdings nicht unbegrenzt, automatisch an den Durchmesser der Pfanne an. Der Boden der Pfanne muß allerdings einen Minimum-Durchmesser haben, welcher der entsprechenden Kochzone entspricht. Platzieren Sie den Topf immer in der Mitte der Kochzone, um Ihr Kochfeld optimal zu nutzen. Der Boden-Durchmesser von Induktions- Kochzonen Kochgeschirr... -
Seite 87: Wenn Das Display Dieses Symbol Und Nicht Die Temperatureinstellungen Anzeigt
Stellen Sie die Kochstufe ein, indem Sie den Schieberegler bedienen. • Wenn Sie nicht innerhalb einer Minute eine Kochstufe wä hlen, schaltet sich das Kochfeld von alleine aus. Sie mü ssen dann mit Schritt 1 neu beginnen. • Sie kö nnen die Temperatureinstellung jederzeit wä... -
Seite 88: Benutzung Der Booster-Funktion
Schalten Sie das gesamte Kochfeld aus, indem Sie den ON/OFF Schalter berü hren. Vorsicht vor heiß en Flä chen “H“ zeigt an, welche Kochzonen heiß sind. Es wird nicht mehr angezeigt, wenn die Flä che auf eine sichere Temperatur abgekü hlt ist. Es kann auch als Energiesparfunktion verwendet werden, wenn Sie weitere Pfannen erhitzen wollen, benutzen Sie die bereits heiß... -
Seite 89: Warmhaltefunktion
a: Berü hren Sie die Booster-Funktion “<ICON>”, dann stellt sich der Kochbereich auf die Ausgangsstellung zurü ck. b: Berü hren des Schiebreglers, dann stellt sich der Kochbereich wieder auf dem Bereich ein, den Sie gewä hlt haben. ODER • Dies funktioniert in jeder Kochzone. •... -
Seite 90: Flexible Kochzone
Warmhalte-Funktion deaktivieren Berü hren Sie die Kochzonen-Auswahl-Funktion a: Berü hren des Schiebereglers, dann stellt sich der Kochbereich wieder auf dem Level ein, den Sie gewä hlt haben. b: Durch Berü hren der Funktions-Steuerung oder , stellt sich der Kochbereich wieder auf dem Level ein, den Sie gewä hlt haben. Flexible Kochzone •... - Seite 91 Beispiele fü r richtiges und falsches Plazieren von Pfannen. Als grosse Kochzone Um die flexible Kochzone als eine zentral zu steuernde Einheit zusammenzuschalten, drü cken Sie die entsprechenden Tasten. Die Power Einstellung funktioniert wie jeder andere Bereich auch. Bei Verschieben der Pfanne im flexiblen Bereich von vorn nach hinten oder umgekehrt, wird automatisch die Position erfasst und die gleiche Temperatur eingestellt.
-
Seite 92: Sperren Der Bedienelemente
Sperren der Bedienelemente Sie kö nnen die Steuerung sperren, um ungewollte Verwendung zu verhindern (z.B. • dass Kinder versehentlich die Kochzonen anstellen). Wenn das Bedienfeld gesperrt ist, sind alle Steuerelemente, mit Ausnahme der • ON/OFF-Taste, deaktiviert. Sperren Drü cken Sie die Taste <ICON> . Die Timer-Anzeige zeigt “Loc“ an. Entsperren Touch and hold the Sperrtasten Steuerung <ICON>... -
Seite 93: Verwendung Des Timers
Menschen mit einem Herzschrittmacher sollten vor der Verwendung dieses Gerä ts ihren Arzt konsultieren. Verwendung des Timers Sie kö nnen den Timer auf zwei verschiedene Arten verwenden: • Sie kö nnen ihn als Zeitschaltuhr verwenden. In diesem Fall werden die Kochzonen nicht automatisch nach Ablauf der Zeit ausgeschaltet. -
Seite 94: Einstellung Des Timers, Um Eine Oder Mehrere Kochzonen Auszuschalten
Ein Warnton wird 30 Sekunden ein Signal geben und die Timer-Anzeige zeigt “00“ an, wenn die Einstellung beendet ist. Einstellung des Timers, um eine oder mehrere Kochzonen auszuschalten Wenn der Timer auf einer Zone eingestellt ist: Berü hren Sie die Kochzonen-Auswahl-Steuerung der Zone, bei der Sie den Timer einstellen mö... - Seite 95 Nach Einstellen der Zeitschaltung startet sofort der Countdown. Das Display zeigt die verbleibende Zeit an und die Anzeige blinkt fü r fü nf Sekunden auf. HINWEIS: Der rote Punkt neben der Stufen-Anzeige leuchtet auf und zeigt an, dass die Zone ausgewä hlt wurde.
-
Seite 96: Mit Der Koch-Anzeigen-Steuerung Arbeiten
Mit der Koch-Anzeigen-Steuerung arbeiten Sie kö nnen mit der Koch-Anzeigen-Steuerung arbeiten. Es wird angezeigt, wenn das Wasser kocht. Die Koch-Anzeigen-Funktion aktivieren Das Berü hren der Kochzonen-Auswahl-Steuerung Bei Berü hren der Koch-Anzeigen-Steuerung <ICON>, zeigt die Kochfeldanzeige “2L”. Bei nochmaligem Berü hren der Koch-Anzeigen-Steuerung <ICON> zeigt die Kochfeldanzeige “3L”. - Seite 97 b: Durch Berü hren der Funktions-Steuerung <ICON>, stellt sich der Kochbereich wieder auf das Booster-Level ein. • Wichtig ist, daß die Wasser-Temperatur zu Beginn weder zu heiß noch zu kalt ist, da hierdurch das Kochergebnis beeinträ chtigt werden kö nnte. •...
- Seite 98 Zum Zubereiten saftiger Steaks Lagern Sie das Fleisch 20 Minuten vor dem Kochen in Raumtemperatur. Erhitzen Sie eine Pfanne mit schwerem Boden. Bestreichen Sie beide Seiten des Steaks mit Ö l. Geben Sie eine kleine Menge Ö l in die Pfanne und legen Sie das Fleisch in die heiß e Pfanne. Drehen Sie das Steak nur einmal wä...
-
Seite 99: Temperatureinstellungen
Temperatureinstellungen Die folgenden Einstellungen sind lediglich Richtlinien. Die genaue Einstellung hä ngt von mehreren Faktoren ab und der Art Ihres Kochgeschirrs und der Menge, die Sie kochen. Experimentieren Sie mit dem Kochfeld, um herauszufinden, welche Einstellung am besten passt. Temperatur- Eignung einstellung •... -
Seite 100: Pflege Und Reinigung
Pflege und Reinigung Die folgenden Einstellungen sind lediglich Richtlinien. Die genaue Einstellung hä ngt von mehreren Faktoren ab und der Art Ihres Kochgeschirrs und der Menge, die Sie kochen. Experimentieren Sie mit dem Kochfeld, um herauszufinden, welche Einstellung am besten passt. Was? Wie? Wichtig! - Seite 101 Ü berkoch-Flecken • Schalten Sie die Kochflä che aus. Das Kochfeld kann einen Warnton auf der Touch- abgeben und sich selbst Weichen Sie den Fleck ein. Steuerung ausschalten. Die Touch-Tasten Wischen Sie den Touch-Bereich kö nnten nicht funktionieren, mit einem sauberen, feuchten wä...
-
Seite 102: Fehleranzeigen Und Inspektion
Lü ftungsgerä usche In Ihr Induktionskochfeld ist ein Das ist normal und erfordert keine kommen aus dem Kü hlungsgeblä se eingebaut, um Handlung. Entfernen Sie das Kochfeld Induktionskochfeld die Elektronik vor Ü berhitzung zu nicht von der Hauptstromversorgung an schü tzen. Es kann auch der Wand, solange das Kü... -
Seite 103: Technische Daten
Die oben genannten Fä lle stellen hä ufig vorkommende Fragen aus der Praxis dar. Bitte demontieren Sie das Gerä t nicht selbst, um jegliche Gefahren und Schä den mit dem Induktionskochfeld zu vermeiden. Technische Daten Kochfeld HPI 82 Kochzonen 4 Zonen Versorgungsspannung 220-240V~... - Seite 104 Installation Auswahl der Installations-Werkzeuge Schneiden Sie die Arbeitsflä che entsprechend der, in der Zeichnung dargestellten Grö ß en aus. Fü r die Zwecke der Installation und Benutzung, sollte ein minimaler Abstand von 5cm um die Ö ffnung erhalten werden. Achten Sie darauf, dass die Dicke der Arbeitsflä che mindestens 30mm beträ gt. Bitte wä...
-
Seite 105: Vor Der Positionierung Der Befestigungswinkel
Bevor Sie die Kochplatte installieren, stellen Sie sicher, dass • die Arbeitsplatte rechtwinklig und eben ist und dass keine Bauteile den Platz einschrä nken • die Arbeitsplatte aus hitzebestä ndigem Material besteht • wenn das Kochfeld auf einem Ofen installiert ist, der Ofen eine eingebaute Lü ftung hat •... -
Seite 106: Verbindung Des Kochfelds Mit Dem Stromnetz
Warnung Die Induktionsplatte muss von qualifiziertem Personal oder einem Techniker installiert werden. Wir haben Fachleute fü r Ihren Service. Bitte fü hren Sie den Vorgang niemals selbst durch. Das Kochfeld kann nicht direkt ü ber einer Spü lmaschine, einem Kü hlschrank, einer Gefriertruhe, Waschmaschine oder einem Wä... - Seite 107 Drahtverbindung Spannung&Frequenz 380-415V 3N~ Schwarz Blau Gelb/Grün Braun Schwarz&Braun Blau Gelb/Grün Wenn das Kabel beschä digt ist oder ersetzt werden muss, muss dies durch den • Kundendiensttechniker mit Spezialwerkzeugen durchgefü hrt werden, um Unfä lle zu vermeiden. Wenn das Gerä t direkt an das Stromnetz angeschlossen ist, muss ein mehrpoligenr •...
- Seite 108 Par l'apposition du logo CE sur ce produit, nous déclarons, sur notre propre responsabilité, que ce produit répond à toutes les normes de sécurité, de santé et d'environnement requises par la législation europé enne. Mise en garde de sé curité Votre sé...
-
Seite 109: Utilisation Et Entretien
• Cet appareil doit être correctement installé et reliéà la terre par une personne qualifié e. • Cet appareil doit être connecté à une prise murale en parfait é tat. • Ne pas installer correctement l'appareil pourrait invalider toutes les ré clamations de garantie ou de responsabilité... - Seite 110 Risques de brû lures Pendant l'utilisation, la surface de la table de cuisson peut devenir suffisamment chaude ce qui peut entrainer des risques de brû lures. • Eviter de toucher la surface de la table et de laisser sur le verre des tissus ou tout objet autre que des plats compatibles avec le table tant que la surface est encore chaude •...
- Seite 111 Ne jamais utiliser l’appareil pour chauffer la piè ce. • Après utilisation, toujours é teindre les zones de cuisson et la table de cuisson comme dé crit dans ce manuel (c’est à dire en utilisant les commandes tactiles). Ne pas compter sur la fonction de dé...
- Seite 112 • Ne pas placer ou laisser tomber des objets lourds sur votre table de cuisson. • Ne jamais monter sur votre table de cuisson. • Ne pas utiliser de casseroles dont le dessous serait rugueux afin d’éviter d’endommager la surface en vitrocé ramique de votre table de cuisson.
-
Seite 113: Dé Tails Du Produit
Fé licitations pour l’achat de cette table à induction. Nous vous recommandons de prendre le temps de lire cette notice d’installation et d’utilisation pour comprendre comment installer et utiliser votre table. Pour l’installation, veuillez lire la partie « Installation » . Lire attentivement toutes les conseils de sé... -
Seite 114: Utilisation Des Commandes Tactiles
La cuisson à induction La cuisson à induction est une technologie sure, efficace et é conomique. Cela fonctionne par vibrations é lectromagné tiques qui gé nè rent de la chaleur directement dans la casserole, plutôt qu’indirectement par la chauffe de la surface en verre. - Seite 115 Choisir les bons ré cipients • Utiliser seulement des récipients compatibles avec l’induction. Pour cela, vérifier la pré sence du symbole induction sur l’emballage ou sous le récipient. • Pour vé rifier la compatibilité de votre récipient avec l’induction, il Suffit de faire un test en passant un aimant sous le ré...
- Seite 116 Les dimensions de casserole Jusqu’à une certaine limite, les zones de cuisson sont automatiquement adaptées au diamètre de la casserole. Cependant, le dessous de la casserole doit avoir un diamètre minimum selon la zone de cuisson correspondante. Pour obtenir la meilleure efficacité de votre plaque de cuisson, veuillez mettre la casserole au centre de la zone de cuisson.
- Seite 117 Si le display affiche en alternance avec la puissance de chauffe. • Le ré cipient n’est pas sur la zone de chauffe sélectionnée, ou • Le ré cipient utilisé n’est pas compatible avec l’induction, ou • Le ré cipient est trop petit ou mal positionné sur la zone et donc n’est pas dé...
-
Seite 118: Fonction Booster
FONCTION BOOSTER Pour activer la fonction booster 1. Appuyer sur l’icône de la zone que vous souhaitez utiliser. 2. Appuyer sur la touche booster “ ”, un « b » va alors apparaitre et la zone va atteindre le niveau maximum de chauffe. Dé... -
Seite 119: Zone Flexible
ZONE FLEXIBLE • Cette zone peut ê tre utilisé e comme une seule zone ou bien en diffé renciant les 2 zones, en fonction de vos besoins. • La zone flexible est constitué e de 2 inducteurs indé pendants qui peuvent ê tre contrô... -
Seite 120: Verrouillage Des Commandes
4. Pour ajouter un autre ré cipient, appuyer de nouveau sur les commandes, afin de dé tecter ce nouveau ré cipient. Utilisation indé pendante des 2 zones Pour utiliser les 2 zones de la zone flexible de maniè re indé pendante avec des puissances diffé... -
Seite 121: Fonction Spé Ciale
Fonction spé ciale Fonction maintien au chaud • Vous pouvez utiliser cette fonction pour maintenir des aliments au chaud sans les cuire • Cette fonction peut ê tre active sur toutes les zones. 1. Appuyez sur l’icône de la zone que vous souhaitez utiliser. 2. -
Seite 122: Sé Curité Anti-Surchauffe
Sé curité anti-surchauffe Un capteur de tempé rature surveille la tempé rature de la table. Si une température excessive est détectée, la table à induction d’arrête automatiquement. Dé tection des petits objets Si un ré cipient trop petit ou non magné tique (ex : aluminium) ou un autre petit objet (ex : couteau, clé... - Seite 123 Utiliser le minuteur comme un compte à rebours Si aucune zone n’est sélectionnée 1. S’assurer que la table est allumée. NB : vous pouvez utiliser le minuteur même si vous n’avez sélectionné aucune zone. 2. Toucher la commande du minuteur , “0:10” s’affiche alors et le « 0 » clignote.
- Seite 124 Si le minuteur est programmé sur plusieurs zones : 1. Si le minuteur est ré glé sur plusieurs zones en mê me temps, les points des zones concernées s’allument. L’afficheur du minuteur indique le temps restant sur la zone dont le point clignote. (ré...
- Seite 125 Utilisation du système de contrôle d’ébullition Utiliser cette fonction pour faire bouillir de l’eau. Quand l eau est portée à ébullition le système le détecte ; Activation de la fonction d’ébullition : 1. Appuyer sur la touche de contrôle de la zone de chauffe Appuyer sur les commandes de contrôle sensitives, puis la température de la zone de cuisson reviendra au niveau sélectionné...
- Seite 126 • Réduire la quantité de liquide ou de matiè re grasse pour ré duire les temps de cuisson. • Commencer la cuisson à température élevée puis réduire la température lorsque la nourriture est chaude. Fré mir, cuisson du riz • Le point de frémissement apparaît à environ 85˚C, lorsque des petites bulles remontent à...
- Seite 127 Ré gler la chaleur Les ré glages figurant ci-dessous sont seulement des recommandations. Le ré glage pré cis dé pend de plusieurs facteurs, notamment de votre ré cipient et de la quantité de nourriture à cuire. Nous vous recommandons d’essayer votre table à...
-
Seite 128: Trucs Et Astuces
Dé bordements, Les retirer immé diatement à • Enlever dè s que possible les taches aliments fondus ou l’aide d’un racloir, couteau plat restantes de sucre ou de projections. projections chaudes ou d’un grattoir compatible Si elles refroidissent sur la table, elles à... - Seite 129 Les touches de Il peut y avoir une fine pellicule S’assurer que le bandeau de commandes d’eau sur les commandes ou commande est sec et utiliser le bout ré pondent mal vous utilisez la pointe du doigt du doigt pour toucher les pour toucher les commandes commandes.
-
Seite 130: Spécifications Techniques
Affichage des erreurs et Inspection Si une anomalie apparait, la table à induction se bloque alors automatiquement et affiche les codes suivants : Problè me Causes Possibles Que faire ? F1-F6 Erreur sur le capteur de Merci de contacter le tempé... - Seite 131 Le poids et les dimensions sont des estimations. Parce que nous nous attachons à amé liorer continuellement nos produits, il est possible que les spé cifications et les designs changent sans modification de la notice. Installation Choix de l’équipement Dé couper le plan de travail selon les mesures indiqué es sur le dessin ci-dessous. Pour l’installation et l’utilisation, un espace minimum de 5 cm doit ê...
- Seite 132 A(mm) B(mm) C(mm) Avant d’installer la table, s’assurer que: • le plan de travail est plane, et qu’aucun élément ne vienne entraver l’espace né cessaire • le plan de travail est composé de maté riaux ré sistant à la chaleur •...
- Seite 133 Une fois la table installée, s’assurer que : • le câble d’alimentation n’est pas accessible à travers les portes de placard ou les tiroirs. • une quantité suffisante d’air puisse passer de l’extérieur vers la base de la table • si la table est installé e au-dessus d’un tiroir ou d’un placard, une barrière de protection thermique est installé...
- Seite 134 Raccorder la table Cette table doit ê tre raccordé e uniquement par une personne qualifié e. Avant de procé der au raccordement é lectrique, vé rifier que : 1. le systè me de câ blage domestique convient à la puissance de la table. 2.
- Seite 135 Cet appareil est commercialisé en accord avec la directive europé enne 20 2/ 19 EU sur les dé chets des é quipements é lectriques et é lectroniques (DEEE). En vous assurant que ce produit est correctement recyclé , vous participez à la pré...
-
Seite 136: Κίνδυνος Τραυματισμού
ΠΡΟΕΙΔΟΠΟΙΗΣΕΙΣ ΑΣΦΑΛΕΙΑΣ Η ασφάλειά σας είναι σημαντική για εμάς. Διαβάστε προσεκτικά τις παρακάτω οδηγίες προτού χρησιμοποιήσετε την εστία σας. Εγκατάσταση Κίνδυνος Ηλεκτροπληξίας • Αποσυνδέστε τη συσκευή από την κεντρική παροχή ρεύματος προτού προχωρήσετε σε οποιαδήποτε εργασία καθαρισμού ή συντήρησης. • Η σύνδεση σε δίκτυο που διαθέτει γείωση είναι... -
Seite 137: Σημαντικές Οδηγίες Ασφάλειας
Σημαντικές Οδηγίες Ασφάλειας • Διαβάστε προσεκτικά τις παρακάτω οδηγίες προτού εγκαταστήσετε ή χρησιμοποιήσετε αυτή τη συσκευή. • Μην τοποθετείτε εύφλεκτα υλικά ή προϊόντα πάνω στην εστία. • Κοινοποιήστε αυτές τις οδηγίες στον άνθρωπο που θα αναλάβει την εγκατάσταση της συσκευής καθώς μπορεί να μειωθεί το κόστος εγκατάστασης. - Seite 138 Λειτουργία και Συντήρηση Κίνδυνος Ηλεκτροπληξίας • Μην χρησιμοποιείτε την εστία εάν η επιφάνειά της έχει ραγίσει ή σπάσει. Εάν συμβεί κάτι τέτοιο, απενεργοποιήστε αμέσως τη συσκευή από την κεντρική παροχή κατεβάζοντας το διακόπτη και επικοινωνήστε με έναν τεχνικό. • Απενεργοποιήστε την εστία κατεβάζοντας τον κεντρικό...
- Seite 139 • Αποτυχία συμμόρφωσης με την παραπάνω οδηγία μπορεί να οδηγήσει σε θάνατο. Κίνδυνος από Θερμή Επιφάνεια • Όταν η συσκευή χρησιμοποιείται τα προσβάσιμα μέρη της θερμαίνονται και μπορεί να προκαλέσουν εγκαύματα. • Μην ακουμπάτε οι ίδιοι και μην φέρνετε σε επαφή...
- Seite 140 • Αποτυχία συμμόρφωσης με τις παραπάνω οδηγίες μπορεί να οδηγήσει σε καψίματα και εγκαύματα. Κίνδυνος Κοπής • Η αιχμηρή λεπίδα της ειδικής ξύστρας για επιφάνειες εστιών εκτίθεται όταν αφαιρείται το προστατευτικό κάλυμμα. Να τη χρησιμοποιείτε με προσοχή και να την αποθηκεύετε...
- Seite 141 • Μην αφήνετε ποτέ αντικείμενα και εργαλεία πάνω στη συσκευή. • Μην τοποθετείτε και μην αφήνετε μαγνητικά αντικείμενα (π.χ. πιστωτικές κάρτες, κάρτες μνήμης) ή ηλεκτρονικές συσκευές (π.χ. υπολογιστές, συσκευές αναπαραγωγής MP3) κοντά στην εστία καθώς υπάρχει κίνδυνος να επηρεαστούν από το ηλεκτρομαγνητικό πεδίο. •...
- Seite 142 • Μην αφήνετε τα παιδιά μόνα ή χωρίς επίβλεψη στο χώρο που λειτουργεί η συσκευή. • Παιδιά ή άτομα με αναπηρία η οποία περιορίζει την ικανότητά τους να χρησιμοποιήσουν τη συσκευή πρέπει να λάβουν οδηγίες για τη χρήση της από ένα υπεύθυνο και ικανό άτομο το...
- Seite 143 επιφάνεια και μην σέρνετε τα σκεύη πάνω στην επιφάνεια του επαγωγικού γυαλιού καθώς υπάρχει κίνδυνος αυτή να γρατζουνιστεί. • Μη χρησιμοποιείτε συρματάκια ή σκληρά καθαριστικά για να καθαρίσετε την επιφάνεια της εστίας σας καθώς υπάρχει κίνδυνος να γρατζουνιστεί το γυαλί. •...
- Seite 144 • ΠΡΟΣΟΧΗ : το μαγείρεμα με λίπος ή λάδι στην εστία χωρίς επίβλεψη είναι επικίνδυνο και ενέχει τον κίνδυνο φωτιάς. Μην επιχειρήσετε ΠΟΤΕ να σβήσετε μια φωτιά με νερό. Απενεργοποιήστε τη συσκευή και καλύψτε τη φλόγα με ένα καπάκι ή με μία πυρίμαχη...
-
Seite 145: Πίνακας Ελέγχου
παρόν Εγχειρίδιο Χρήσης / Συντήρησης σε ασφαλές μέρος για μελλοντική αναφορά. ΕΠΙΣΚΟΠΗΣΗ ΠΡΟΙΟΝΤΟΣ Επάνω Όψη 1. μέγ. ζώνη 1800/3000 W 2. μέγ. ζώνη 1800/3000 W 3. μέγ. ζώνη 3000/4000 W 4. μέγ. ζώνη 1400/2000 W 5-6. Ευέλικτη ζώνη 3000/4000 W 7. - Seite 146 Πρόλογος για το Μαγείρεμα με Επαγωγή Το μαγείρεμα με επαγωγή είναι μια ασφαλής, προηγμένη, αποδοτική και οικονομική τεχνολογία μαγειρέματος. Λειτουργεί μέσω ηλεκτρομαγνητικών κυμάτων που κατευθύνουν τη θερμότητα απευθείας στο σκεύος και όχι έμμεσα, μέσω θέρμανσης της γυάλινης επιφάνειας. Το γυαλί θερμαίνεται μόνο επειδή το ζεσταίνει το σκεύος. Προτού...
- Seite 147 Πώς Επιλέγουμε τα Κατάλληλα Μαγειρικά Σκεύη • Να χρησιμοποιείτε μόνο σκεύη με βάση κατάλληλη για μαγείρεμα σε επαγωγική εστία που φέρουν την κατάλληλη σήμανση στη συσκευασία τους ή στη βάση τους. • Μπορείτε να εκτελέσετε έναν μαγνητικό έλεγχο για να δείτε εάν τα...
- Seite 148 Διαστάσεις Σκευών Οι ζώνες μαγειρέματος προσαρμόζονται, έως ένα βαθμό, αυτόματα στη διάμετρο του σκεύους. Η ελάχιστη διάμετρος της βάσης του σκεύους ωστόσο θα πρέπει να είναι εντός των ορίων της αντίστοιχης ζώνης μαγειρέματος. Για να επωφεληθείτε κατά το μέγιστο από την απόδοση της...
- Seite 149 Ηένδειξη και η ρύθμιση θερμοκρασίας αναβοσβήνουν εναλλάξ. Αυτό σημαίνει ότι: • Το σκεύος είναι πολύ μικρό ή δεν είναι σωστά τοποθετημένο πάνω στη ζώνη μαγειρέματος. • Δεν έχετε τοποθετήσει το σκεύος στη σωστή ζώνη μαγειρέματος ή • Το σκεύος που χρησιμοποιείτε δεν είναι κατάλληλο για μαγείρεμα σε επαγωγική εστία...
- Seite 150 Πώς χρησιμοποιούμε τη λειτουργία Boost (Ενίσχυση) Πώς ενεργοποιούμε τη λειτουργία Boost 1. Αγγίξτε το πλήκτρο αφής της επιθυμητής ζώνης μαγειρέματος. 2. Αγγίξτε το πλήκτρο αφής της λειτουργίας Boost . Στη ζώνη ένδειξης θα εμφανιστεί το “b” και η ισχύς θα φτάσει στο μέγιστο (max). Πώς...
- Seite 151 Πώς χρησιμοποιούμε τη Λειτουργία Διατήρησης Θερμότητας Πώς ενεργοποιούμε τη Λειτουργία Διατήρησης θερμότητας 1. Αγγίξτε το πλήκτρο αφής της ζώνης μαγειρέματος. Εάν αγγίξετε το πλήκτρο αφής της λειτουργίας διατήρησης θερμότητας στο πεδίο ένδειξης θα εμφανιστεί η ένδειξη " | ". 1. Αγγίξτε το πλήκτρο αφής της ζώνης μαγειρέματος. 2.
- Seite 152 μια ενιαία ζώνη, μπορείτε να μεταφέρετε ένα σκεύος από τη μία ζώνη στην άλλη – εντός της ευέλικτης περιοχής πάντα – διατηρώντας το ίδιο επίπεδο ισχύος με αυτό που υπήρχε στην αρχική του θέση η οποία από τη στιγμή που δεν...
- Seite 153 Ως δύο ανεξάρτητες ζώνες μαγειρέματος Πιέστε τα αντίστοιχα πλήκτρα αφής για να ενεργοποιήσετε την ευέλικτη περιοχή ως δύο διαφορετικές ζώνες μαγειρέματος με διαφορετικές ρυθμίσεις. Κλείδωμα Πλήκτρων Αφής • Μπορείτε να κλειδώσετε τα πλήκτρα αφής για να αποτρέψετε την κατά λάθος χρήση...
- Seite 154 Προστασία κατά της Υπερθέρμανση Οενσωματωμένος αισθητήρας θερμοκρασίας παρακολουθεί τη θερμοκρασία στο εσωτερικό της επαγωγικής εστίας. Όταν ανιχνευθεί υπερβολικά υψηλή θερμοκρασία, η εστία επαγωγής θα σταματήσει να λειτουργεί αυτόματα. Ανίχνευση Μικρών σκευών Όταν έχετε αφήσει πάνω στην εστία σκεύη που δεν έχουν το κατάλληλο μέγεθος...
-
Seite 155: Χρήση Του Χρονοδιακόπτη
Χρήση του Χρονοδιακόπτη Μπορείτε να χρησιμοποιήσετε το χρονοδιακόπτη με δύο διαφορετικούς τρόπους: • Ως χρονόμετρο. Σε αυτή την περίπτωση ο χρονοδιακόπτης δεν θα απενεργοποιήσει τη ζώνη μαγειρέματος όταν παρέλθει ο επιλεγμένος χρόνος. • Μπορείτε να τον χρησιμοποιήσετε για να απενεργοποιήσει τις ζώνες μαγειρέματος... - Seite 156 4. Αγγίξτε το πλήκτρο αφής του χρονοδιακόπτη πάλι και θα αρχίσει να αναβοσβήνει η ένδειξη ‘’1’’. 5. Σύρετε το δάχτυλο στο πεδίο ρύθμισης για να ρυθμίσετε το χρόνο (π.χ. 9). Τώρα έχετε ρυθμίσει το χρονοδιακόπτ η στα 96 λεπτά. 6. Θα ακουστεί ένα ηχητικό σήμα για 30 δευτερόλεπτα και...
- Seite 157 4. Αγγίξτε πάλι το πλήκτρο αφής του χρονοδιακόπτη και θα αρχίσει να αναβοσβήνει η ένδειξη ‘’1’’. 5. Σύρετε το δάχτυλο στο πεδίο ρύθμισης για να ρυθμίσετε το χρόνο (π.χ. 9). Τώρα έχετε ρυθμίσει το χρονοδιακόπτη στα 96 λεπτά. 6. Όταν οριστεί ο χρόνος, θα αρχίσει αμέσως η αντίστροφη...
- Seite 158 εμφανίζει τη μέτρηση του χρονοδιακόπτη. Η κουκκίδα της αντίστοιχης ζώνης αναβοσβήνε (set to 15 minutes) (set to 45 minutes) 2. Μόλις η αντίστροφη μέτρηση ολοκληρωθεί η αντίστοιχη ζώνη μαγειρέματος θα απενεργοποιηθεί. Έπειτα θα εμφανίσει τη νέα αντίστροφη μέτρηση και θα αναβοσβήνει η κουκκίδα της αντίστοιχης...
- Seite 159 Εάν αγγίξετε το πλήκτρο αφής της λειτουργίας ειδοποίησης βρασμού και τρίτη φορά στο πεδίο ένδειξης θα εμφανιστεί η ένδειξη ‘’5L’’. Εάν αγγίξετε το πλήκτρο αφής της λειτουργίας ειδοποίησης βρασμού και τέταρτη φορά στο πεδίο ένδειξης θα εμφανιστεί η ένδειξη ‘’0’’. Πώς...
- Seite 160 επιλέξει. • Μην χρησιμοποιείτε σκεύη από χυτοσίδηρο (μαντεμένια). • Μην χρησιμοποιείτε καπάκι. • Όταν ενεργοποιείται η λειτουργία boost στην τρίτη ζώνη, η λειτουργία της τέταρτης ζώνης περιορίζεται. Οδηγίες Μαγειρέματος Προσέχετε κατά το τηγάνισμα καθώς το λάδι και το λίπος θερμαίνονται πολύ γρήγορα, ιδιαίτερα αν χρησιμοποιείτε τη λειτουργία...
- Seite 161 Θωράκιση Μπριζόλας Για να μαγειρέψετε ζουμερές και νόστιμες μπριζόλες: 1. Αφήστε το κρέας σε θερμοκρασία δωματίου για περίπου 20 λεπτά προτού το μαγειρέψετε. 2. Ζεστάνετε ένα τηγάνι με παχιά βάση. 3. Αλείψτε και τις δύο πλευρές της μπριζόλας με λάδι. Ρίξτε λίγο λάδι στο καυτό...
- Seite 162 Οδηγίες Μαγειρέματος Οι ρυθμίσεις που παρουσιάζονται είναι ενδεικτικές. Οι ακριβείς ρυθμίσεις εξαρτώνται από πολλούς παράγοντες, ανάμεσα στους οποίους ο τύπος των μαγειρικών σκευών και η ποσότητα του φαγητού. Πειραματιστείτε με την επαγωγική εστία για να βρείτε τις ρυθμίσεις που σας εξυπηρετούν καλύτερα. Ρύθμιση...
-
Seite 163: Φροντίδα Και Καθαρισμός
Φροντίδα και Καθαρισμός Οι ρυθμίσεις που παρουσιάζονται είναι ενδεικτικές. Οι ακριβείς ρυθμίσεις εξαρτώνται από πολλούς παράγοντες, ανάμεσα στους οποίους ο τύπος των μαγειρικών σκευών και η ποσότητα του φαγητού. Πειραματιστείτε με την επαγωγική εστία για να βρείτε τις ρυθμίσεις που σας εξυπηρετούν καλύτερα. Τι? Πώς;... - Seite 164 Φαγητά που Κρατήστε τη ξύστρα ή • Κίνδυνος κοψίματος: όταν τη αφαιρείτε το έχουν σπάτουλα σε γωνία προστατευτικό κάλυμμα, ξεχειλίσει, 30° και ξύστε το λεκέ η αιχμηρή λεπίδα της λιώσει πάνω προς μια κρύα πλευρά ξύστρας είναι στην εστία και της...
- Seite 165 Έξυπνα κόλπα και συμβουλές Πρόβλημα Πιθανές Αιτίες Τι πρέπει να κάνετε Η επαγωγική εστία Δεν υπάρχει τροφοδοσία Βεβαιωθείτε ότι έχετε δεν ενεργοποιείται συνδέσει την εστία στην παροχή ρεύματος και ότι η παροχή είναι ανοιχτή. Ελέγξτε εάν υπάρχει διαρροή ρεύματος στο σπίτι ή στην ευρύτερη...
- Seite 166 Η επαγωγική Αυτό οφείλεται στην Είναι φυσιολογικό αλλά το εστία κάνει ένα τεχνολογία βουητό θα σιγανό μαγειρέματος με επαγωγή πρέπει να μειωθεί ή να βουητό όταν σταματήσει χρησιμοποιείται εντελώς όταν μειώσετε τη η ρύθμιση θερμοκρασία. υψηλής θερμοκρασίας. Είναι φυσιολογικό και δεν Η...
-
Seite 167: Τεχνικές Προδιαγραφές
η επαγωγική εστία. Τα παραπάνω αφορούν τα πιο συνήθη σφάλματα. Μην αποσυναρμολογείτε μόνοι σας τη συσκευή για να αποφύγετε τυχόν κινδύνους και ζημιές στην επαγωγική εστία. Τεχνικές Προδιαγραφές Εστία Μαγειρέματος HPI 82 Ζώνες Μαγειρέματος 4 Ζώνες Τάση Τροφοδοσίας 220-240V~ Εγκατεστημένη Ηλεκτρική Ισχύς... - Seite 168 Το βάρος και οι διαστάσεις είναι κατά προσέγγιση. Επειδή προσπαθούμε συνεχώς να βελτιώσουμε τα προϊόντα μας, ενδέχεται να αλλάξουμε τις προδιαγραφές και τα σχέδια των μοντέλων χωρίς προειδοποίηση. Εγκατάσταση Επιλογή εξοπλισμού εγκατάστασης Κόψτε την επιφάνεια εργασίας σύμφωνα με τα μεγέθη που φαίνονται στο...
- Seite 169 Προτού εγκαταστήσετε την εστία βεβαιωθείτε ότι • Η επιφάνεια εργασίας είναι τετράγωνη και ευθυγραμμισμένη και τα δομικά μέρη της δεν επηρεάζουν τις απαιτήσεις σχετικά με το χώρο • Η επιφάνεια εργασίας είναι κατασκευασμένη από υλικό ανθεκτικό στη θερμότητα • Εάν εγκαταστήσετε την εστία πάνω από φούρνο βεβαιωθείτε ότι ο φούρνος έχει...
- Seite 170 Προσαρμογή των βραχιόνων στερέωσης Στερεώστε την επιφάνεια της εστίας στην επιφάνεια εργασίας βιδώνοντας τους 4 βραχίονες στο κάτω μέρος της εστίας (βλ. εικόνα) μετά την τοποθέτηση. Ρυθμίστε τη θέση των βραχιόνων ώστε να προσαρμοστούν στο πάχος του πάγκου εργασίας. Προσοχή 1.
- Seite 171 πινακίδα προδιαγραφών. 3. Οι τομές του καλωδίου τροφοδοσίας μπορούν να αντέξουν το φορτίο που καθορίζεται στην πινακίδα προδιαγραφών. Για να συνδέσετε την εστία στην τροφοδοσία, μην χρησιμοποιείτε προσαρμογείς, μειωτές ή διακλαδωτές καθώς μπορεί να προκαλέσουν υπερθέρμανση και πυρκαγιά. Το καλώδιο τροφοδοσίας δεν πρέπει να έρχεται σε επαφή με μέρη που...
- Seite 172 Αυτή η συσκευή φέρει σήμανση σύμφωνα με την Ευρωπαϊκή Οδηγία 2002/96/ΕΚ για τα Απόβλητα Ηλεκτρικού και Ηλεκτρονικού Εξοπλισμού (ΑΗΗΕ). Βεβαιώνοντας ότι η συσκευή αυτή απορρίπτεται σωστά, θα βοηθήσετε στην πρόληψη τυχόν καταστροφών στο περιβάλλον και στην ανθρώπινη υγεία, οι οποίες θα μπορούσαν να προκληθούν εάν η...
-
Seite 173: Veiligheidswaarschuwingen
Door het aanbrengen van de CE -markering op dit product, verklaren wij voor onze eigen verantwoordelijkheid dat dit product in overeenstemming is met alle Europese wettelijke voorschriften met betrekking tot de vereisten inzake veiligheid, gezondheid en milieu. Veiligheidswaarschuwingen Uw veiligheid is belangrijk voor ons. Lees deze informatie alstublieft voordat u uw kookplaat in gebruik neemt. -
Seite 174: Gevaar Voor De Gezondheid
producten op dit apparaat. • Breng de persoon die verantwoordelijk is voor de installatie van het apparaat op de hoogte van deze informatie, dat zou de installatiekosten kunnen beperken. • Om een gevaarlijke situatie te voorkomen, moet dit apparaat geïnstalleerd worden volgens deze installatie-instructies. - Seite 175 veiligheidsnormen. • Echter, mensen met pacemakers of andere elektrische implantaten (zoals insulinepompen) moeten hun arts of chirurg raadplegen voordat ze dit apparaat in gebruik nemen, om er zeker van te zijn dat het elektromagnetische veld niet van invloed is op hun implantaten.
- Seite 176 afdekking wordt verwijderd. Gebruik de schraper uiterst voorzichtig en berg hem altijd veilig en uit de buurt van kinderen op. • Het niet voorzichtig zijn kan leiden tot letsel of snijwonden. Belangrijke veiligheidsaanwijzingen • Laat het apparaat nooit zonder toezicht achter als het in gebruik is.
- Seite 177 die op de kookplaat klimmen kunnen ernstig letsel oplopen. • Laat kinderen niet alleen of zonder toezicht in de zone waar het apparaat in gebruik is. • Kinderen of personen met een beperking die van invloed is op hun vermogen om het apparaat te gebruiken zouden van een verantwoordelijke en competente persoon moeten leren hoe het apparaat gebruikt moet worden.
- Seite 178 • Dit apparaat mag gebruikt worden door kinderen ouder dan 8 jaar en personen met een lichamelijke, zintuiglijke of verstandelijke beperking of gebrek aan ervaring en kennis als zij in de gaten gehouden worden of aanwijzingen hebben gekregen over hoe zij het apparaat op veilige wijze kunnen gebruiken en als zij de bijbehorende gevaren begrijpen.
-
Seite 179: Productoverzicht
Gefeliciteerd met de aanschaf van uw nieuwe Inductiekookplaat. Wij adviseren u wat tijd te besteden aan het lezen van deze Handleiding voor Installatie / Gebruik zodat u volledig begrijpt hoe u de kookplaat correct kunt installeren en bedienen. Lees het installatiegedeelte voor de installatie. Lees alle veiligheidsaanwijzingen aandachtig door voordat u de kookplaat in gebruik neemt en bewaar deze Handleiding zodat u hem in de toekomst nog eens kunt raadplegen. -
Seite 180: Voordat U Uw Nieuwe Inductiekookplaat In Gebruik Neemt
Informatie over bereiding op Inductie Bereiding op inductie is een veilige, geavanceerde, efficiënte en economische bereidingstechnologie. Het werkt op elektromagnetische trillingen die rechtstreeks warmte in de pan genereren, in plaats van indirect via het glazen oppervlak. Het glas wordt alleen heet omdat de pan het eventueel opwarmt. - Seite 181 Keuze van het juiste kookgerei • Gebruik uitsluitend kookgerei met een onderkant die geschikt is voor bereiding met inductie. Zoek naar het inductiesymbool op de verpakking of op de bodem van de pan. • U kunt controleren of uw kookgerei geschikt is voor inductie door een magnetische test uit te voeren.
- Seite 182 Panmaat De kookzones worden tot op zekere hoogte automatisch aangepast aan de pandiameter. De panbodem moet afhankelijk van de kookzone een minimum diameter hebben. Voor een optimale werking van de kookplaat, dient u de pan in het midden van de kookzone te plaatsen.
- Seite 183 4. Selecteer de warmte-instelling door de schuiftoets aan te raken. MINDER VERMOGEN • Als u binnen 1 minuut geen warmte-instelling kiest, wordt de inductiekookplaat automatisch uitgeschakeld. Dan moet u weer vanaf stap 1 beginnen. • U kunt tijdens de bereiding te allen tijde de MEER VERMOGEN warmte-instelling veranderen.
- Seite 184 Schakel de hele kookplaat uit door de bedieningstoets AAN/UIT aan te raken. 4. Let op hete oppervlakken H geeft aan welke kookzone te heet is om aan te raken. Deze verdwijnt wanneer de kookzone is afgekoeld tot een veilige temperatuur. Deze functie kan ook gebruikt worden om energie te besparen als u een andere pan wilt verwarmen kunt u de kookzone die nog heet is gebruiken.
- Seite 185 ” a: Als de Boost-bedieningstoets “ wordt aangeraakt, zal de kookzone terugkeren naar de oorspronkelijke instelling. b: Als de schuiftoets wordt aangeraakt, zal de kookzone terugkeren naar het geselecteerde niveau. • De functie kan werken in alle kookzones. • De kookzone keert na 5 minuten naar de oorspronkelijke instelling terug. •...
- Seite 186 De functie Warmhouden annuleren 1. Raak de selectietoets voor de kookzone aan. 2. a: Als de schuiftoets wordt aangeraakt, zal de kookzone terugkeren naar het geselecteerde niveau. b: Bij het aanraken van de functiebedieningstoets, zoals , zal de kookzone terugkeren naar het geselecteerde niveau. FLEXIBELE ZONE •...
- Seite 187 Als grote zone 1. Druk om de flexibele zone als één grote zone te activeren gewoon op de daarvoor bestemde toetsen. 2. Het vermogen moet net als bij normale zones worden ingesteld. 3. Als de pan van voren naar achteren wordt verplaatst (of andersom), neemt de flexibele zone de nieuwe positie direct waar en wordt het vermogen gehandhaafd.
- Seite 188 Wanneer de toetsen van de kookplaat vergrendeld zijn, zijn alle bedieningstoetsen uitgeschakeld behalve de toets AAN/UIT; u kunt in een noodgeval de inductiekookplaat altijd uitschakelen met de toets AAN/UIT, maar om de kookplaat weer in werking te stellen moet u de toetsen eerst ontgrendelen.
- Seite 189 2. Raak de bedieningstoets van de timer aan. De “10” verschijnt in het timerdisplay waar u geraakt heeft en de “0” knippert. 3. Stel te tijd in door de schuiftoets aan te raken. (bijv. 6) 4. Raak de bedieningstoets van de timer opnieuw aan. De “1” gaat knipperen.
- Seite 190 Raak de bedieningstoets van de timer aan. De “10” verschijnt in het timerdisplay en de “0” knippert. 3. Stel te tijd in door de schuiftoets aan te raken. (bijv. 6) 4. Raak de bedieningstoets van de timer opnieuw aan. De “1” gaat knipperen.
- Seite 191 Als de timer voor meerdere zones is ingesteld: Als u tegelijkertijd de tijd instelt voor meerdere kookzones, zullen decimaalpunten voor de betreffende kookzones zichtbaar worden. Het minutendisplay toont de minutentimer. De punt van de betreffende zone knippert. (ingesteld op 15 minuten) (ingesteld op 45 minuten) Als de timer klaar is met aftellen, zal de betreffende zone worden uitgeschakeld.
- Seite 192 De Kookpunt-functie annuleren 1. Raak de selectietoets voor de kookzone aan. 2. a: Als de schuiftoets wordt aangeraakt, zal de kookzone terugkeren naar het geselecteerde niveau. b: Als de functiebedieningstoets wordt aangeraakt, zal de kookzone terugkeren naar het Boost-niveau. • Het is belangrijk dat de watertemperatuur niet te hoog of te laag is als met koken wordt begonnen, omdat dit het eindresultaat kan beïnvloeden.
- Seite 193 • Minimaliseer de hoeveelheid vocht of vet om de bereidingstijden te verkorten. • Begin de bereiding op een hoge instelling en verlaag de instelling zodra het voedsel is doorverwarmd. Rijst koken • Sudderen vindt plaats onder het kookpunt, op ongeveer 85˚C, wanneer luchtbelletjes zo nu en dan naar de oppervlakte van de kokende vloeistof komen.
- Seite 194 Warmte-instellingen Onderstaande instellingen zijn uitsluitend bedoeld als richtlijnen. De exacte instelling hangt af van verschillende factoren, met inbegrip van uw kookgerei en de hoeveelheid voedsel die u bereidt. Experimenteer met de inductiekookplaat om de instellingen te vinden die het beste bij u passen.
-
Seite 195: Onderhoud En Reiniging
Onderhoud en reiniging Onderstaande instellingen zijn uitsluitend bedoeld als richtlijnen. De exacte instelling hangt af van verschillende factoren, met inbegrip van uw kookgerei en de hoeveelheid voedsel die u bereidt. Experimenteer met de kookplaat om de instellingen te vinden die het beste bij u passen. Wat? Hoe? Belangrijk! -
Seite 196: Adviezen En Tips
Overgekookt voedsel Schakel de elektrische stroom De kookplaat kan een piep laten • op de aanraaktoetsen naar de kookplaat uit. horen en uitgeschakeld worden en de Laat het vuil weken aanraaktoetsen kunnen niet werken Veeg de zone van de als er aanraaktoetsen schoon met vloeistof op ligt. - Seite 197 Lawaai van een Een in uw inductiekookplaat Dit is normaal en er is geen actie ventilator afkomstig van ingebouwde ventilator is in noodzakelijk. Trek de stekker van de de inductiekookplaat. werking getreden om te inductiekookplaat niet uit de voorkomen dat de elektronica wandcontactdoos terwijl de ventilator oververhit raakt.
-
Seite 198: Technische Specificatie
E3/E4 Temperatuursensor van de Schakel de inductiekookplaat weer keramische glasplaat is hoog in nadat hij is afgekoeld. Temperatuursensor van de Schakel de inductiekookplaat weer in nadat hij is afgekoeld. IGBT is hoog Indien een zone van de flexibele zone moet worden beschermd, kan de selectietoets van de flexibele zone niet worden gebruikt. - Seite 199 Installatie Selectie van installatiegereedschappen Snijd een opening in het werkblad in overeenstemming met de afmetingen aangegeven op de tekening. Voor de installatie en het gebruik moet er minstens 5 cm ruimte vrij gelaten worden rond de opening. Controleer of de dikte van het werkblad minstens 30 mm is. Selecteer een werkblad van hittebestendig materiaal om vervorming veroorzaakt door de hittestraling van de kookplaat te voorkomen.
- Seite 200 Controleer, voordat u de kookplaat installeert, dat • het werkoppervlak vierkant en waterpas is, en dat er geen structurele onderdelen interfereren met de ruimtevereisten • het werkoppervlak gemaakt is van hittebestendig materiaal • als de kookplaat boven een oven geïnstalleerd wordt, dat de oven een ingebouwde koelventilator heeft •...
- Seite 201 Voorzichtig 1. De inductiekookplaat moet geïnstalleerd worden door gekwalificeerd personeel of technici. Wij hebben deskundigen voor u ter beschikking. Voer deze handeling nooit zelf uit. 2. De kookplaat mag niet geïnstalleerd worden rechtstreeks boven een afwasmachine, koelkast, vriezer, wasmachine of wasdroger, aangezien vocht de elektronica van de kookplaat kan beschadigen.
- Seite 202 • De kabel mag niet verbogen of platgedrukt worden. • De kabel moet regelmatig gecontroleerd worden en mag alleen vervangen worden door erkende technici. Dit apparaat is van een merkteken voorzien in overeenstemming met de Europese richtlijn 2012/19/EG inzake Afgedankte Elektrische en Elektronische Apparatuur (AEEA).