
Verwandte Anleitungen für XZENT xt8020

Inhaltszusammenfassung für XZENT xt8020
- Seite 1 INSTRUCTION MANUAL MOBILE ENTERTAINMENT STATION XT8020 2-DIN NAVICEIVER WITH 6.2’’ LCD DISPLAY...
-
Seite 2: Inhaltsverzeichnis
Contents Thank you for your choosing our product. We hope you will find the instructions in this user manual clear and easy to follow. If you take a few minutes to look through it, you 'll learn how to use all the features of your new unit for maximum enjoyment. After you have finished reading the instructions, please keep this manual in a safe place for future reference. - Seite 3 enGLIsH Auto Store (AS) Program Scan (PS) REG Function MO Function AF Function TA Function DVD Player Operation Insert/Eject Disc Reset the Loading Mechanism Accessing DVD Mode Using the Touch Screen Controls Controlling Playback Accessing the DVD Menu Moving through Chapters Fast Forward/Fast Reverse GOTO Search Direct Chapter/Track Selection...
-
Seite 4: Preparation
PreParatIon Please read all of the Instructions below before beginning your installation. We recommend that you have your unit installed by an experienced car navigation system installer. INTEGRATED GPS NAVIGATION SYSTEM ■ Integrated navigation system with built-in SD card reader ■... -
Seite 5: Warning
enGLIsH WARNING 1. Only connect the unit to a 12-volt negative ground system. 2. Never install this unit where operation and viewing could interfere with safe driving conditions. 3. To reduce the risk of a traffic accident (except when using for rear view video camera) never use the video display function while driving the vehicle. -
Seite 6: Controls And Indicators
ControLs and IndICators Button Operation 1. EJECT Press once for disc insertion/ejection. 2. POWER OFF/VOL/Smart dial Rotary encoder volume control. Press to power on when the machine is in power off state. Press and hold to power off while unit is on. Press short to enter EQ setting. -
Seite 7: The Key Areas Of Touch Screen
enGLIsH The Key Areas of Touch Screen The touch key areas are outlined below, for DVD playback mode and so forth. Area A Area F Area B Area C Area D Area E A — Return to MAIN MENU. B — Display playing information. C —... -
Seite 8: Remote Control
ControLs and IndICators Front Remote Control Name Ref # Signal Function Power Turn the power on/off Open Disc insertion/ejection Mute Toggle on/off audio output Select playing mode 1 2 3 4 5 Directly access certain chapter / track / preset station Numeric button 6 7 8 9 0 in current band... - Seite 9 enGLIsH Menu Menu Enter the main menu of system Picture Adjust the parameters of TFT settings Repeat A—B A➞B Set start point A and end point B to repeat continually Start or pause playback, confirm the settings Direction buttons Up/down/left/right to select items for setting ...
-
Seite 10: Tft Monitor Operation
tFt MonItor oPeratIon Disc Insertion/Ejection Press the (`) button on the front remote control or press the (@) button on the front panel for disc insertion/ejection. Rear Camera Mode When the vehicle is placed in "Reverse", and an optional rear camera is connected to the unit, the TFT monitor will automatically switch to the camera input source. -
Seite 11: Operating Instructions
enGLIsH oPeratInG InstruCtIons Power On/Off Press the POWER/VOL button to turn the unit on. You can also turn on the unit by pressing the button ( ) on the remote. Press and hold the POWER/VOL button on the front panel or press the POWER button ) on the remote to power off the unit. -
Seite 12: Video Output
Audio Adjustments Audio Adjustments Audio function Adjustable range User Flat EQ Jazz Classical BASS -7 to +7 TREBLE -7 to +7 FADE -7 to +7 -7 to +7 -7 to +7 LOUD Off, On NOTE: The bass and treble levels are only adjustable when EQ is in "User" mode. The loudness function compensates for deficiencies in sound ranges at low levels. -
Seite 13: System Setup Menu
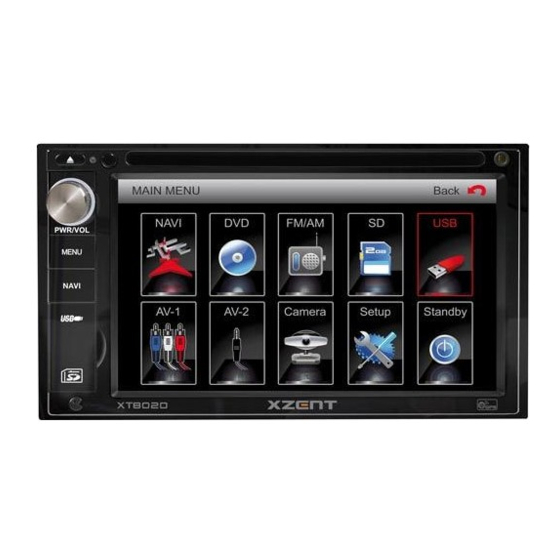
enGLIsH sYsteM setuP Menu MAIN Menu There are three methods to access the MAIN menu. • Press the MENU button on the front panel. • Press the MENU button on the remote control. • Touch the area A on the touch-screen. NOTE: Remote control, touch-screen operations and buttons on front panel are all useable to select menu and adjust settings. -
Seite 14: Screen Setting
Screen Setting Accessing the Screen Setup Menu • Press the setup on the screen. • Select the "Others" icon on the screen to access the screen setup. Selecting a Feature for Adjustment Press the (/) buttons on the remote to select a feature to be adjusted. Rotate SMART DIAL clockwise/anticlockwise to select a feature to be adjusted. -
Seite 15: General Setup Menu
enGLIsH General Setup Menu Accessing the General Setup Menu • Select the general icon on the screen to access the general setup. Selecting a Feature for Adjustment Press the direction buttons on the remote control or touch the option directly on the screen to select the feature to be adjusted. -
Seite 16: Video
Function Setting Options Select the appropriate setting based on Radio S-America1 the country in which you reside. Europe Clock (HH:MM) See "Adjusting the clock" to learn how to set the clock. 12Hr Clock displays 12 hour time using AM and PM. Clock Mode 24Hr Clock displays 24 hour time up to 23:59. -
Seite 17: Asp (Audio Signal Processing) Configuration Menu
enGLIsH Function Setting Options 16:9 Select the appropriate setting based on the aspect TV shape format of the movie. The video output is switched automatically based on the Auto current disc. Video format The video output is in the standard NTSC format NTSC The video output is in the standard PAL format ASP (Audio Signal Processing) Configuration Menu... -
Seite 18: Language Menu
Function Setting Options 60Hz Depending on the audio source, select the bass Bass freq 80Hz center frequency to achieve the best bass effect. 200Hz 10KHz 12.5KHz Depending on the audio source, select the treble Treble freq 15KHz Center frequency to achieve the best treble effect. 17KHz 80Hz Selecting a crossover frequency sets a cut-off... - Seite 19 enGLIsH Adjusting a Feature 1. Enter the option field for the feature you want to adjust by pressing the (OK) button on the remote or by pressing the SMART DIAL. A submenu appears in a second row with the selected option. 2.
-
Seite 20: Tuner (Fm/Am) Operation
tuner (FM/aM) oPeratIon Tuner TFT Display Touch to change among the following bands: FM-1, FM-2, FM-3 and AM. Touch to seek down. Touch to seek up. Touch to tune down once a step. Touch to tune up once a step. Touch to activate/deactivate scan mode. -
Seite 21: Using Preset Stations
enGLIsH Using Preset Stations 12 numbered preset buttons store and recall stations for each band. Front 6 stored stations (P1-P6) for the current band appear on the screen, touch the channel directly for use. You can touch the arrow buttons on the screen to see the other stations. -
Seite 22: Dvd Player Operation
dVd PLaYer oPeratIon NOTE: When properly installed, DVD video cannot be displayed on the main TFT screen unless the parking brake is applied. If you attempt to play a DVD while the vehicle is moving, the TFT screen displays caution information with a blue background. Rear video screens, if applicable, will operate normally. -
Seite 23: Controlling Playback
enGLIsH 1. Touch to play/pause 2. Touch to stop 3. Touch to fast reverse 4. Touch to fast forward 5. Touch to repeat from A to B. Select the repeat point A wherever you want to start and the point B wherever you want to end, then DVD displays from A to B continually 6. -
Seite 24: Moving Through Chapters
2. Use the arrow buttons on the remote to select a title from the menu. 3. Press the (TITLE) button on the remote control to select a different title for playback. 4. Press the (OK) button on the remote control or touch the item directly to confirm your selection and begin playback. -
Seite 25: Goto Search
enGLIsH GOTO Search During DVD playback, perform the following steps to use the GOTO feature to access a specific location on a disc: 1. Press the ( -/--) button on remote control or touch area F on the screen to enter "GOTO" mode. -
Seite 26: Direct Chapter/Track Selection
Direct Chapter/Track Selection During DVD and CD playback, you can use the numeric keypad on the remote control to access a track directly. Viewing an Alternate Picture Angle (DVD Only) Some DVDs contain scenes that have been shot simultaneously from different angles. For discs recorded with multiple angles, press the (ANGLE) button on the remote control to toggle available angles of the on-screen image. -
Seite 27: General Disc Information
enGLIsH 6. Indicates the first of 20 chapters on the DVD is currently playing. 7. Indicates audio setting. 8. Indicates the bitrate. General Disc Information Symbol 12cm Disc properties Max play time (MPEG 2 method) Single side single layer (DVD-5) 133 minutes Single side double layer (DVD-9) 242 minutes... - Seite 28 Disc Symbols Symbol Meaning Number of audio languages recorded. The number inside the icon indicates the number of languages on the disc (maximum of 8). Number of subtitle languages available on the disc (maximum of 32). Number of angles provided (maximum of 9). Aspect ratios available.
-
Seite 29: Cd/Mp3/Wma/Jpeg Operation
enGLIsH Cd/MP3/WMa/JPeG oPeratIon Instructions for Insert/Eject, Play/Pause, Stopping Playback, Track Selection, Fast Forward/ Fast Reverse, Scan, and Random Play are the same for DVD, CD and MP3 operation. Please see the DVD player operation section for information about these topics. The file naming formats listed below are compatible with this unit: •... -
Seite 30: Mp3/Wma Discs
Playing CD Files After inserting a CD disc, files will play in the sequence of the directory. In playing back, you can press the numeric button on the remote control or touch a track on the on- screen directly to play. Fast backward/fast forward Touch the on the screen to fast backward or fast forward play. -
Seite 31: Usb Operation
enGLIsH usB oPeratIon Accessing USB Mode 1. To switch to USB mode, press the menu button on the front panel or the (SRC) button on the remote control repeatedly until USB appears at the top left corner of the screen. 2. -
Seite 32: Sd Operation
sd oPeratIon Accessing SD Mode 1. To switch to SD mode, press the menu button on the front panel or the (SRC) button on the remote control repeatedly until SD appears at the top left corner of the screen. 2. Select the main menu, then touch the SD icon to select SD as your source. NOTE: Maximum SD card capacity is 2 GB. -
Seite 33: Navigation Operation
enGLIsH naVIGatIon oPeratIon Accessing Navigation 1. Access the MAIN menu and select the NAVI button on the touch-screen to enter the navigation touch-screen operation interface. 2. Press the remote control to switch the source to navigation. 3. Press NAVI button on the front panel of the unit. Navigation Operation Please read the navigation software user manual. -
Seite 34: Troubleshooting
trouBLesHootInG GENERAL Problem Cause Corrective action Unit will not power on. 1. Radio fuse blown. 1. Install new fuse with correct rating. 2. Car battery fuse blown. 2. Install new fuse with correct rating. 3. Illegal operation. 3. Press the [RESET] button located in the bottom right corner of the front panel. - Seite 35 enGLIsH TUNER Problem Cause Corrective action Weak station searching 1. Auto antenna is not fully extended. 1. Connect the auto antenna control cable properly. 2. Auto antenna not properly connected. 2. Connect the auto antenna control cable properly. 3. LOCAL function is activated. 3.
- Seite 36 Error Messages Message displayed Cause Corrective action Loading 1. Disc is being read. No Disc 1. Disc is dirty. 1. Clean disc with soft cloth. 2. Disc is upside down. 2. Insert disc with label side up. 3. Disc not present in loading 3.
- Seite 37 enGLIsH 1. When using the remote for the first time, you must pull out the insulation tape. 2. Remove the battery if the remote control is not used for a month or longer. Remove and dispose of the old battery immediately. Do not store the battery with metallic materials.
- Seite 38 Install the battery Keep the battery (+) side facing up Insert the battery holder NOTE: Use only one CR2025(3V) lithium battery. Danger of explosion if battery is incorrectly replaced. Replace only with the same or equivalent type. Do not recharge, disassemble, heat or dispose of the battery in fire. Keep batteries away from children to avoid the risk of accident.
-
Seite 39: Specifications
enGLIsH sPeCIFICatIons CEA Power Ratings Main Amplifier Power Output: 24 watts RMS X 4 channels into 4-ohms @ < 10% THD+N Signal to Noise Ratio: 70dBA below reference (Reference: 1 watt, 4-ohms) MAX Power: 4 X 40 watts into 4-ohms, all channels driven Frequency Response: 20Hz to 20kHz, -3dB. - Seite 40 Tuning Range: 530kHz- 1710kHz Sensitivity (-20dB): 20dBu Signal to Noise Ratio @ 1 kHz: 50dB Image Rejection: 60dB Frequency Response: 50Hz - 2kHz, -3dB Monitor Section Screen Size: 6.2" (measured diagonally) Screen Type: TFT Liquid Crystal Display (LCD) active matrix Response Time: 30mSec rise time, 50mSec fall time Resolution: 1200 (W) X 234 (H) Viewing angle:...
-
Seite 41: Enclosed Accessories List
enGLIsH enCLosed aCCessorIes LIst Enclosed Accessories List: Item Description Quality Remote control Front remote control Power harness Cables and wires Pin cable output adapter GPS antenna Main user manual Manuals GPS manual Wiring diagram Trim frame Clean cloth Others Iron bar Screws Bolt NOTE:... -
Seite 43: Sonstige Merkmale
deutsCH Features INTEGRIERTES GPS-NAVIGATIONSSYSTEM ■ Integriertes Navigationssystem mit eingebautem SD-Kartenleser ■ 400 MHz CPU – 64MB SDRAM ■ Inklusive externem GPS-Empfänger ■ Inklusive 2GB SD-Karte mit Navigationssoftware und vorinstalliertem Kartenmaterial ■ Verschiedene Routenauswahlmöglichkeiten INTEGRIERTER DVD/CD/MP3/WMA-PLAYER ■ Wiedergabe von DVD, DVD-R/RW, DVD+R/RW, CD, CD-R/RW, MP3, WMA, AVI, DivX6, MPEG 1-4, JPEG und Kodak Photo CD ■... - Seite 44 InHaLtsVerZeICHnIs SICHERHEITSHINWEISE 46-47 BEDIENELEMENTE 48-51 BEDIENTEIL TOUCHSCREEN FERNBEDIENUNG 50-51 TFT BILDSCHIRM RÜCKFAHR KAMERA MODUS BILDEINSTELLUNGEN HANDBREMSE GRUNDFUNKTIONEN 53-54 POWER ON/OFF AUSWAHL DER WIEDERGABEQUELLE LAUTSTÄRKEEINSTELLUNG AUDIOMENÜ VIDEO AUSGÄNGE SYSTEM RESET MUTE SYSTEMMENÜ 54-61 HAUPTMENÜ BILDSCHIRMEINSTELLUNGEN GENERELLE EINSTELLUNGEN VIDEOEINSTELLUNGEN ASP EINSTELLUNGEN 58-59 SPRACHEINSTELLUNGEN 59-60 TUNER...
- Seite 45 deutsCH DVD-WIEDERGABE 63-68 EINLEGEN UND AUSWERFEN EINER DISC ZURÜCKSETZEN DES LADEMECHANISMUS AUSWAHL DES DVD MODUS VERWENDEN DES TOCHSCREENS WIEDERGABEOPTIONEN AUFRUFEN DES DVD MENÜ KAPITELAUSWAHL SCHNELLER VOR/RÜCKLAUF GOTO-FUNKTION DIREKTE AUSWAHL EINES KAPITELS/TRACKS AUSWAHL VON VERSCHIEDENEN KAMERAWINKELN (DVD) ZOOMEN AUSWAHL VON VERSCHIEDENEN TONSPUREN (DVD) AUSWAHL VON VERSCHIEDENEN UNTERTITELN (DVD) WIEDERGABEINFORMATIONEN GENERELLE CD/DVD INFORMATIONEN...
-
Seite 46: Sicherheitshinweise
Spannungsversorgung resultiert, müssen Sie die defekte Sicherung gegen ein neues Exemplar mit identischen Werten austauschen. Sollte der Kurzschluss immer noch vorhanden sein, wenden Sie sich bitte an Ihren XZENT-Händler. 7. Achten Sie darauf, dass bei ausgeschaltetem Motor die Batterie des Fahrzeuges nicht entladen wird. - Seite 47 Ihnen erst einmal das Kapitel “Fehlersuche“ genau durchzulesen, um auszuschließen, dass es sich nur um einen Bedienungsfehler handelt. 13. Wenn Sie Fragen oder Probleme bei der Installation haben, wenden Sie sich bitte an einen XZENT-Händler oder den jeweiligen Landesvertrieb.
-
Seite 48: Bedienelemente
BedIeneLeMente BEDIENTEIL 1. EJECT-Taste ■ Drücken Sie die Taste, um eine Disc auszuwerfen oder halten Sie die Taste gedrückt, um den Lademechanismus bei Betriebsstörungen zurückzusetzen. 2. POWER/VOL/ SMART DIAL -Drehregler ■ Drücken Sie den Drehregler, um das Gerät einzuschalten oder halten Sie ihn gedrückt, um das Gerät wieder auszuschalten. -
Seite 49: Touchscreen
deutsCH TOUCHSCREEN Area A Area F Area B Area C Area D Area E Bildschirmbereich A ➜ Berühren Sie Bereich A, um das Hauptmenü aufzurufen. Bildschirmbereich B ➜ Berühren Sie Bereich B, um Wiedergabeinformationen einer DVD anzuzeigen. Bildschirmbereich C ➜ Berühren Sie Bereich C, um das vorherige Kapitel einer DVD auszuwählen. Bildschirmbereich D ➜... -
Seite 50: Fernbedienung
FernBedIenunG Name Ref # Signal Funktion Drücken Sie die Taste um das Gerät ein- bzw. wieder Power auszuschalten. Drücken Sie die Taste, um den Bildschirm ein- und Open auszufahren. (ohne Funktion) Drücken Sie die Taste, um die Stummschaltung für die Mute Audiowiedergabe zu aktivieren bzw. - Seite 51 deutsCH Name Ref # Signal Funktion Select Drücken Sie die Taste, um das Audiomenü aufzurufen. Drücken Sie die Taste, um ein aufgerufenes Menü wieder zu beenden. Menu Menu Drücken Sie die Taste, um das Hauptmenü aufzurufen. Drücken Sie die Taste, um das Bildeinstellungsmenü Picture auszurufen.
-
Seite 52: Tft Bildschirm
tFt BILdsCHIrM RÜCKFAHR KAMERA MODUS Wenn der Rückwärtsgang eingelegt wird, das entsprechende Kabel „REVERSE“ ange- schlossen wurde und eine optionale Kamera mit dem Gerät verbunden wurde, schaltet das Gerät automatisch in den Kamera-Modus. BILDEINSTELLUNGEN ■ Die folgende Tabelle zeigt die Wiedergabequellen und die dazugehörigen Videoformate. Video Output Format Wiedergabequelle Videoformat... -
Seite 53: Grundfunktionen
deutsCH GrundFunKtIonen POWER ON/OFF ■ Drücken Sie die ( )-Taste auf der Fernbedienung oder den POWER/VOL-Drehknopf auf dem Bedienteil, um das Gerät einzuschalten. ■ Drücken Sie die ( )-Taste erneut oder halten Sie den POWER/VOL-Drehregler gedrückt, um das Gerät wieder auszuschalten. AUSWAHL DER WIEDERGABEQUELLE ■... -
Seite 54: Video Ausgänge
VIDEO AUSGÄNGE Wenn ein/mehrere Monitore an den Videoausgängen angeschlossen ist/sind, wird auf diesen dasselbe Bild wiedergegeben wie auf dem Display des Gerätes. Einzige Ausnahme stellt hier das Handbremssignal dar. Die Videoausgänge sind hiervon nicht betroffen. SYSTEM RESET ■ Drücken Sie mit einem spitzen Gegenstand die RESET-Taste auf dem Bedienteil des Gerätes, um alle Einstellungen in den Auslieferungszustand zurückzusetzen. -
Seite 55: Bildschirmeinstellungen
Aktivieren/deaktivieren des Bildschirmschoners. Load factory* Werkseinstellungen laden. Beep tone Aktivieren/deaktivieren von Beep Ton. Aktivieren/deaktivieren der Phantomspannung für Antenna die Antenne. *Nach dem laden der Werkseinstellung muss die DivX Funktion neu registriert/aktiviert werden. Bitte wenden Sie sich an Ihren XZENT Händler. -
Seite 56: Generelle Einstellungen
GENERELLE EINSTELLUNGEN Aufrufen des Menüs für generelle Einstellungen 1. Drücken Sie die MENU-Taste auf der Fernbedienung oder auf dem Bedienteil um das Hauptmenü aufzurufen. 2. Wählen Sie zuerst das Setupmenü und anschließend das Menü für generelle Ein- stellungen. Auswahl eines Menüpunktes ■... -
Seite 57: Videoeinstellungen
deutsCH Einstellung Optionen Funktion Auswählen der Empfangseinstellungen in dem Land in dem Sie Radio S-America1 sich befinden. Europe Schauen Sie in den Menüpunkt "Einstellen der Uhrzeit", wie Clock (HH:MM) man die Uhr einstellt. 12Hr Anzeige der Uhrzeit im 12 h Modus. Clock Mode 24Hr Anzeige der Uhrzeit im 24 h Modus. -
Seite 58: Asp Einstellungen
Einstellung Optionen Funktion 16:9 TV shape Auswählen des Bildschirmformates. Auto Das Videosignal wird automatisch eingestellt. Das Videosignal wird auf NTSC-Format eingestellt. NTSC Video format Das Videosignal wird auf PAL-Format eingestellt. Verlassen des Menüs Das Gerät kehrt automatisch in den zuletzt gewählten Wiedergabemodus zurück wenn Sie das Gerät 20 Sekunden nicht bedienen. -
Seite 59: Spracheinstellungen
deutsCH Einstellung Optionen Funktion 60Hz Bass freq 80Hz Wählen Sie eine Frequenz für die Bass-Einstellung aus. 200Hz 10KHz 12.5KHz Wählen Sie eine Frequenz für die Höhen-Einstellung Treble freq 15KHz aus. 17KHz 80Hz Sub filter Wählen Sie eine Trennfrequenz für den Subwoofer aus. 120Hz 160Hz Nachdem Sie die Mitten-Frequenz des Bass-EQ eingestellt... - Seite 60 Verändern der Menüeinstellung 1. Wählen Sie den Menüpunkt welchen Sie verändern möchten und drücken Sie die OK- Taste auf der Fernbedienung, um Ihre Auswahl zu bestätigen. Ein Untermenü, mit den zur Verfügung stehenden Auswahlmöglichkeiten, erscheint da- raufhin auf dem TFT Bildschirm. 2.
-
Seite 61: Tuner
deutsCH tuner BENUTZEROBERFLÄCHE Berühren Sie das Icon, um ein Band auszuwählen. Berühren Sie das Icon, um den Suchlauf durch verringern der Empfangsfrequenz zu starten. Berühren Sie das Icon, um den Suchlauf durch erhöhen der Empfangsfrequenz zu starten. Drücken Sie das Icon, um die Empfangsfrequenz um einen Schritt zu verringern. Berühren Sie das Icon, um die Empfangsfrequenz um einen Schritt zu erhöhen. -
Seite 62: Manueller Sendersuchlauf
Manueller Sendersuchlauf ■ Berühren Sie das ( ) Icon auf der Fernbedienung oder dem Touchscreen um schrittweise eine Frequenz zu erhöhen. ■ Berühren Sie das ( ) Icon auf der Fernbedienung oder dem Touchscreen um schrittweise eine Frequenz zu verringern. VERWENDUNG DER SENDERSPEICHERPLÄTZE Speichern einer Radiostation 1. -
Seite 63: Dvd-Wiedergabe
deutsCH dVd-WIederGaBe BITTE BEACHTEN: Es ist gesetzlich verboten Bild oder Videodateien während der Fahrt anzuschauen. Um diese Funktion nutzen zu können, muss die Handbremse angezogen sein. Verbinden Sie hierzu das entsprechende Kabel mit Ihrer Handbremse. EINLEGEN UND AUSWERFEN EINER DISC ■... -
Seite 64: Wiedergabeoptionen
1. Berühren Sie das Icon, um die Wiedergabe zu starten oder zu pausieren. 2. Berühren Sie das Icon, um die Wiedergabe zu stoppen. 3. Berühren Sie das Icon, um den schnellen Rücklauf zu starten. 4. Berühren Sie das Icon, um den schnellen Vorlauf zu starten. 5. -
Seite 65: Aufrufen Des Dvd Menü
deutsCH AUFRUFEN DES DVD MENÜ 1. Berühren Sie Bereich F des TFT Bildschirms und anschließend das Icon, um das DVD-Menü aufzurufen. 2. Verwenden Sie die Pfeiltasten auf der Fernbedienung, um die Titelauswahl auszu- wählen. 3. Drücken Sie die TITLE-Taste auf der Fernbedienung, um zwischen den verschiedenen Titeln zu wählen. -
Seite 66: Goto-Funktion
GOTO-FUNKTION ■ Während der Wiedergabe einer DVD können Sie mit der GOTO-Funktion direkt an einer bestimmten Stelle der Disc mit der Wiedergabe fortfahren. 1. Drücken Sie die (-/--)-Taste auf der Fernbedienung oder berühren Sie Bereich A auf dem TFT Bildschirm, um die GOTO-Funktion zu aktivieren. 2. -
Seite 67: Direkte Auswahl Eines Kapitels/Tracks
deutsCH DIREKTE AUSWAHL EINES KAPITELS/TRACKS ■ Während der Wiedergabe einer CD oder DVD können Sie durch drücken einer der numerischen Tasten auf der Fernbedienung direkt einen Track bzw. ein Kapitel aus- wählen. AUSWAHL VON VERSCHIEDENEN KAMERAWINKELN (DVD) ■ Einige DVDs bieten die Möglichkeit, einzelne Szenen aus verschiedenen Kamera- perspektiven wiederzugeben. -
Seite 68: Generelle Cd/Dvd Informationen
GENERELLE CD/DVD INFORMATIONEN Symbol 12cm Disc properties Max play time (MPEG 2 method) Single side single layer (DVD-5) 133 minutes Single side double layer (DVD-9) 242 minutes Double side single layer (DVD-10) 266 minutes Double side double layer (DVD-18) 484 minutes (MPEG 1 method) Single side single layer (VCD) 74 minutes... -
Seite 69: Cd-Wiedergabe
deutsCH Cd-WIederGaBe BENUTZEROBERFLÄCHE Die Bedienung der Grundfunktionen ist identisch mit denen des DVD Modus. BITTE BEACHTEN: Stellen Sie sicher, das die Dateien der ISO 9660 Norm entsprechen, um eine korrekte Wiedergabe und Anzeige zu gewährleisten. : Track zurück : Track vor : Wiedergabe/Play : Vorherige Seite : Nächste Seite... -
Seite 70: Wiedergabe Einer Audio Cd
WIEDERGABE EINER AUDIO CD ■ Nachdem Sie eine CD in das Gerät eingelegt haben, startet die Wiedergabe automatisch und die Tracks werden nacheinander wiedergegeben. ■ Drücken Sie eine der numerischen Tasten auf der Fernbedienung oder berühren Sie das Icon für den jeweiligen Track, um direkt mit der Wiedergabe zu starten. MP3/WMA Discs Das Gerät erlaubt es Ihnen MP3/WMA Dateien von CDROM, CD-R, CD-RW, DVD+R/ RW und DVD-R/RW wiederzugeben. -
Seite 71: Usb-Wiedergabe
deutsCH usB-WIederGaBe AUSWAHL DES USB MODUS 1. Drücken Sie die MENU-Taste auf der Fernbedienung oder auf dem Bedienteil, um das Hauptmenü aufzurufen. 2. Wählen Sie USB als Wiedergabequelle aus. BITTE BEACHTEN: Die USB Buchse unterstützt den USB 1.1 Standard. BENUTZEROBERFLÄCHE Die Benutzeroberfläche sieht im USB Modus wie folgt aus: : Track zurück : Track vor... -
Seite 72: Sd-Wiedergabe
sd-WIederGaBe AUSWAHL DES SD MODUS 1. Drücken Sie die MENU-Taste auf der Fernbedienung oder auf dem Bedienteil um das Hauptmenü aufzurufen. 2. Wählen Sie SD als Wiedergabequelle aus. BITTE BEACHTEN: Die maximale Kapazität der kompatiblen SD Karten ist 2 GB. BENUTZEROBERFLÄCHE Die Benutzeroberfläche sieht im SD Modus wie folgt aus: : Track zurück... -
Seite 73: Navigation
deutsCH naVIGatIon AUSWAHL DES NAVIGATIONS MODUS 1. Drücken Sie die MENU-Taste auf der Fernbedienung oder auf dem Bedienteil, um das Hauptmenü aufzurufen. 2. Wählen Sie NAVI als Wiedergabequelle aus. 3. Drücken Sie die NAVI Taste auf dem Bedienteil. BEDIENUNG DER NAVIGATION Bitte lesen Sie die Bedienungsanleitung der Navigationssoftware. -
Seite 74: Fehlersuche
FeHLersuCHe GENERELLE PROBLEME: Problem Ursache Lösung Das Gerät lässt sich nicht einschalten. 1. Die Sicherung des Gerätes ist defekt. 1. Wechseln Sie die defekte Sicherung aus. 2. Die Fahrzeugsicherung ist defekt. 2. Wechseln Sie die defekte Sicherung aus. 3. Falsche Bedienung. 3. - Seite 75 deutsCH TUNER: Problem Ursache Lösung Der Radioempfang ist schlecht. 1. Die automatische Antenne ist nicht 1. Überprüfen Sie entsprechend die vollständig ausgefahren. Installation, bzw. die Verkabelung der automatischen Antenne. 2. Die automatische Antenne ist nicht 2. Überprüfen Sie entsprechend die richtig angeschlossen.
-
Seite 76: Fehlermeldungen
FEHLERMELDUNGEN: Problem Ursache Lösung Loading 1. Die Disc wird gerade geladen. No Disc 1. Die Disc ist verschmutzt. 1. Reinigen Sie die Disc mit einem weichen Tuch. 2. Die Disc wurde falsch herum eingelegt. 2. Legen Sie die Disc mit dem Label nach oben in das Gerät. -
Seite 77: Spezifikationen
deutsCH sPeZIFIKatIonen CEA Power Ratings Main Amplifier Power Output: 24 watts RMS X 4 channels into 4-ohms @ < 10% THD+N Signal to Noise Ratio: 70dBA below reference (Reference: 1 watt, 4-ohms) MAX Power: 4 X 40 watts into 4-ohms, all channels driven Frequency Response: 20Hz to 20kHz, -3dB. - Seite 78 AM Tuner Section Tuning Range: 530kHz- 1710kHz Sensitivity (-20dB): 20dBu Signal to Noise Ratio @ 1 kHz: 50dB Image Rejection: 60dB Frequency Response: 50Hz - 2kHz, -3dB Monitor Section Screen Size: 6.5" (measured diagonally) Screen Type: TFT Liquid Crystal Display (LCD) active matrix Response Time: 30mSec rise time, 50mSec fall time Resolution: 1200 (W) X 234 (H) Viewing angle:...
-
Seite 79: Einlegen Der Batterie In Die Fernbedienung
FERNBEDIENUNG deutsCH eInLeGen der BatterIe In dIe FernBedIenunG VOR DER INBETRIEBNAHME > Wenn Sie die Fernbedienung das erste Mal verwenden, müssen Sie die Isolation zwischen den Batteriekontakten entfernen. Entfernen ENTFERNEN DER BATTERIE Rückseite Herausziehen Batteriehalterung Drücken... -
Seite 80: Einlegen Der Batterie
Legen Sie die Batterie mit der Vorderseite nach oben (+) ein Herausziehen Drücken EINLEGEN DER BATTERIE Rückseite Drücken Batteriehalterung BITTE BEACHTEN: > Verwenden Sie für diese Fernbedienung nur Lithium Batterien des Typs CR2025 (3V). > Entfernen Sie die Batterie wenn sie leer ist oder die Fernbedienung eine längere Zeit nicht benutzt wird. -
Seite 81: Liste Des Beiliegenden Zubehörs
deutsCH LIste des BeILIeGenden ZuBeHÖrs Liste des beiliegenden Zubehörs: Teil Beschreibung Anzahl Fernbedienung Front remote control Anschlusskabel Strom Kabel Ausgangskabel A/V GPS-Antenne Hauptbedienungsanleitung Bedienungs- Navigationsanleitung anleitungen Anschlussdiagram Einbaurahmen Tuch Sonstiges Metallbügel Schrauben Bolzen NOTE: This unit is manufactured under license from Dolby Laboratories. 2. -
Seite 82: Garantie
Dear customer Dear customer Thank you for purchasing this XZENT product. It is advisable to keep the original packing material Thank you for purchasing this XZENT product. It is advisable to keep the original packing material Thank you for purchasing this XZENT product. It is advisable to keep the original packing material for any future transporting of the product. - Seite 83 XZent MODEL: xT8020 Serial number: ............................Date of purchase: ............................ Your name: .............................. Your address: ............................City: ................................. State: ..........ZIP or postal code................Country: ..............................Dealer’s address & stamp...
- Seite 84 MOBILE ENTERTAINMENT STATION XT8020...