Anmelden
Hochladen
Anleitungen
Marken
Lutron Anleitungen
Steuergeräte
GRAFIK Eye GRX-4124
Lutron GRAFIK Eye GRX-4124 Handbücher
Anleitungen und Benutzerhandbücher für Lutron GRAFIK Eye GRX-4124. Wir haben
1
Lutron GRAFIK Eye GRX-4124 Anleitung zum kostenlosen PDF-Download zur Verfügung: Installationsanleitung
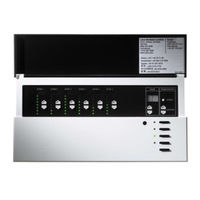
Lutron GRAFIK Eye GRX-4124 Installationsanleitung (196 Seiten)
Marke:
Lutron
| Kategorie:
Steuergeräte
| Dateigröße: 11 MB
Inhaltsverzeichnis
Inhaltsverzeichnis
1
GRAFIK Eye ® 4000 Series Control Unit
2
Factory Presets
3
Accessories
3
System Communications And Capacities
3
Step 1: Turn The Power OFF
4
Step 2: Control Wiring
4
Step 3: Mount The Wallbox
7
Step 4: Connect PELV (Class 2: USA) Cable To The Control Unit
7
Step 5: Mount The Control Unit
8
Step 6: Connect The Wallstations
8
Step 7: Connect Other Accessories - Optional
8
Step 8: Connect Multiple Control Units - Optional
9
Special Mounting Considerations
9
Activate The GRAFIK Eye Control Unit
10
Activate The Wallstations
10
Check System Communication
10
Circuit Selector Functions
11
Set Normal/Emergency Switch
11
Assign Load Types
12
Address The Circuit Selector
12
Assign Primary Zones
13
Set Low Or High End
13
Assign Link Hierarchy
14
Control Unit Buttons And Indicators
15
Enter And Exit Setup Mode
15
Address Each GRAFIK Eye Control Unit
16
Identify The Load Type For Each Zone
17
Program Scenes
18
Program Scenes 1 Through 16 (Setup Mode)
20
Select The Save Mode You Want To Use
21
16- And 24-Zone GRX Control Units
21
Selecting Scenes
22
Temporarily Adjusting Light Levels And Shade Positions
22
Control Directory
25
Troubleshooting
26
Warranty
27
Contact Information
28
Unidad De Control GRAFIK Eye Serie
30
Comunicaciones Del Sistema Y Capacidades
31
Paso 1: DESCONECTE La Alimentación
32
Paso 2: Controle El Cableado
32
Paso 3: Monte La Caja De Pared
35
Paso 4: Conecte El Cable PELV (Clase 2: EE.UU.) A La Unidad De Control
35
Paso 5: Monte La Unidad De Control
36
Paso 6: Conecte Las Estaciones De Control
36
Paso 7: Conecte Otros Accesorios - Opcional
36
Paso 8: Conecte Múltiples Unidades De Control - Opcional
37
Consideraciones De Montajes Especiales
37
Active La Unidad De Control GRAFIK Eye
38
Active Las Estaciones De Control
38
Verifique La Comunicación Del Sistema
38
Funciones Del Selector De Circuitos
39
Fije El Interruptornormal/Emergencia
39
Asigne Los Tipos De Carga
40
Asigne La Dirección Del Selector De Circuitos
40
Asigne Las Zonas Primarias
41
Establezca El Extremo Inferior O Superior
41
Asigne La Jerarquía De Vínculos
42
Botones E Indicadores De La Unidad De Control
43
Programar Escenas
46
Unidades De Control GRX De 16 Y 24 Zonas
49
Selección De Escenas
50
Ajuste Temporal De Los Niveles De Luz Y Las Posiciones De Las Cortinas
50
Directorio De Control
53
Solución De Problemas
54
Causa Posible
54
Garantía
55
Información De Contacto
56
Abschnitt 1: Einleitung
58
GRAFIK Eye
58
Steuerstelle Serie 4000
58
Werkseinstellungen
59
Systemkommunikation und Leistungsfähigkeit
59
Abschnitt 2: Installation einer GRAFIK Eye
60
Schritt 1: Stromabschaltung
60
Schritt 2: Steuerleitungen
60
Spezifikation der Bus-Leitungen
60
Link-Verkabelungsdetail: Link B (C an C, + an +, - an -)
62
Schritt 3: Montage der Unterputzdose
63
Steuerstellenmodell
63
Schritt 4: Anschluss des PELV-Kabels (Klasse 2: USA) an der Steuerstelle
63
Zum Anschluss der PELV-Leitungen (Klasse 2: USA) an der Steuerstelle
63
Schritt 5: Montage der Steuerstelle
64
Schritt 6: Anschluss der Bedienstellen
64
An den Bedienstellen Angeschlossene Steuerstelle
64
Schritt 7: Anschluss von anderem Zubehör -- Optional
64
Schritt 8: Anschluss Mehrerer Steuerstellen -- Optional
65
Maximale Systemauslegung: bis zu 8 Steuerstellen und 16 Bedienstellen und 8 Jalousie-Controller
65
Besondere Montageerwägungen
65
Montage und Abstände der Unterputzdose
65
Aktivierung der GRAFIK Eye-Steuerstelle
66
Aktivierung der Bedienstellen
66
Kontrolle der Systemkommunikation
66
Abschnitt 3: Programmierung des Controllers
67
Einstellen der Normal-/Notbeleuchtung
67
Zuordnen der Lasttypen
68
Adressierung des Controllers (Circuit Selector)
68
Zuordnung der Primären Zonen
69
Einstellen der Max .- Bzw . Min .-Begrenzung
69
Zuordnen der Steuer-Hierarchie
70
Abschnitt 4: Programmierung einer GRAFIK Eye
71
Tasten und Anzeigen an der Steuerstelle
71
Setup-Modus Aktivieren/Deaktivieren
71
Adressierung jeder GRAFIK Eye-Steuerstelle
72
Zur Adressenzuweisung für jede Steuerstelle
72
Bedeutung
72
Identifizierung des Lasttyps für jede Zone
73
Wichtige Hinweise
73
Programmierung der Szenen
74
Programmierung der Szenen 1 bis 4 (Speichermodus)
74
LED-Anzeigen zur Programmierung von Szeneneinstellungen
74
Programmierung der Szenen 1 bis 16 (Setup-Modus)
76
Auswahl des Gewünschten Speichermodus
77
GRX-Steuerstellen mit 16 und 24 Zonen
77
Abschnitt 5: Verwendung der GRAFIK Eye
78
Szenenauswahl
78
Vorübergehende Einstellung von Helligkeitsstufen und Jalousiepositionen
78
Zur Vorübergehenden Einstellung einer 230-V- Jalousiezone
79
LED-Anzeigen für Vorübergehend Geänderte Jalousieeinstellungen
79
Einrichtung der Kommunikation zwischen Zwei oder Mehr Steuerstellen
80
Einrichtung der Kommunikation zwischen Steuerstellen, Bedienstellen und anderem Zubehör
80
Verzeichnis der Bedien- U. Steuerstellen
81
Fehlersuche
82
Mögliche Ursache
82
Gewährleistung
83
Kontaktinformationen
84
Unité De Commande GRAFIK Eye ® Série 4000
86
Communications Et Capacités du Système
87
Étape 1 : Couper L'alimentation
88
Étape 2 : Câblage De Commande
88
Étape 3 : Monter Le Boîtier D'encastrement
91
Étape 4 : Connecter Le Câble TBTP (Classe 2 : É.-U.) À L'unité De Commande
91
Étape 5 : Monter L'unité De Commande
92
Étape 7 : Connecter Les Autres Accessoires - En Option
92
Étape 8 : Connecter Plusieurs Unités De Commande - En Option
93
Considérations Spéciales Pour Le Montage
93
Activer L'unité De Commande GRAFIK Eye
94
Vérifier Le Système De Communication
94
Fonctions du Sélecteur De Circuit
95
Régler L'interrupteur En Position Normale/Urgence
95
Attribuer Les Types De Charges
96
Attribuer des Zones Principales
97
Configurer Le Seuil Haut Ou Bas
97
Attribuer La Hiérarchie des Liaisons
98
Entrer Dans Le Mode De Configuration Et Le Quitter
99
Identifier Le Type De Charge Pour Chaque Zone
101
Remarques Importantes
101
Programmer Les Scènes
102
Programmer Les Scènes 1 À 16 (Mode De Configuration)
104
Sélectionner Le Mode De Sauvegarde Que L'on Souhaite Utiliser
105
Unités De Commande GRX À 16 Et 24 Zones
105
Sélection De Scènes
106
Réglage Provisoire des Niveaux D'éclairage Et des Positions De Stores
106
Répertoire De Commandes
109
Dépannage
110
Garantie
111
Infos De Contact
112
创艺眼(GRAFIK Eye ) 4000 系列控制器
114
系统通信和容量
115
第 1 步:切断电源
116
第 2 步:控制接线
116
第 3 步:安装墙盒
119
第 4 步:将 Pelv(二级:美国)电缆连接至控制器
119
第 5 步:安装控制器
120
第 6 步:连接墙控站
120
第 7 步:连接其它附件 - 可选
120
第 8 步:连接多个控制器 - 可选
121
特殊安装考虑事项
121
启动创艺眼(GRAFIK Eye )控制器
122
启动墙控站
122
检查系统通讯
122
回路选择器功能
123
设置正常(Normal)/ 应急(Emergency)开关
123
设定负载类型
124
设定回路选择器地址码
124
设定主光区
125
设定调光的低限或高限
125
设定链路层次
126
控制器按键和指示灯
127
进入和退出设定模式
127
设定每个创艺眼 (GRAFIK Eye) 控制器地址码
128
确认每个光区的负载类型
129
设定场景
130
设定场景 1 至 16(设定模式
132
选择想要使用的存储模式
133
16 和 24 光区 Grx 控制器
133
选择场景
134
临时调整灯光亮度和窗帘位置
134
控制器目录
137
疑难排解
138
质量保证
139
联系信息
140
Unidade De Controle GRAFIK Eye ® Série 4000
142
Predefinições De Fábrica
143
Etapa 1: Desligue A Alimentação
144
Etapa 2:Instalação Elétrica Dos Controles
144
Etapa 3: Instale A Caixa De Embutir
147
Etapa 4: Conecte O Cabo PELV (Classe 2: EUA) À Unidade De Controle
147
Etapa 5: Instale A Unidade De Controle
148
Etapa 6: Conecte Os Acessórios De Parede
148
Etapa 7: Conecte Outros Acessórios Opcional
148
Etapa 8: Conecte As Unidades De Controle Múltiplas Opcional
149
Aspectos Especiais De Instalação
149
Ative A Unidade De Controle GRAFIK Eye
150
Ative Os Acessórios De Parede
150
Verifique A Comunicação No Sistema
150
Funções Do Seletor De Circuitos
151
Defina As Zonas Primárias
153
Defina O Nível Mínimo Ou Máximo
153
Botões E Indicadores da Unidade De Controle
155
Entre E Saia Do Modo De Setup
155
Identifique O Tipo De Carga De Cada Zona
157
Programar Cenas
158
Programe As Cenas 1 A 16 (Modo De Configuração)
160
Selecione O Modo De Salvamento Desejado
161
Unidades De Controle GRX De 16 E 24 Zonas
161
Seleção De Cenas
162
Ajuste Temporário De Níveis De Iluminação E Posições De Cortinas
162
Solução De Problemas
166
Garantia
167
Informações De Contato
168
Leggere Attentamente
169
Centralina GRAFIK Eye
170
Serie 4000
170
Impostazioni DI Fabbrica
171
Comunicazioni DI Sistema E Potenze
171
Fase1: Togliere Tensione
172
Fase 2: Cablaggi DI Comando
172
Fase3: Montare La Scatola A Muro
175
Fase 4: Collegare Il Cavo PELV (Classe 2: USA) Alla Centralina
175
Fase 5: Installare La Centralina
176
Fase 6: Collegare I Tastierini
176
Fase 7: Collegare Gli Altri Accessori - Opzionale
176
Fase 8: Collegare Più Centraline - Opzionale
177
Osservazioni Sul Montaggio
177
Installazione in Scatole A Muro E Ingombri
177
Attivare La Cenralina GRAFIK Eye
178
Attivare I Tastierini
178
Funzioni Del Selettore DI Circuito
179
Pulsanti E Indicatori Della Centralina
183
Entrare E Uscire Dalla Modalità DI Programmazione
183
Identificare Il Tipo DI Carico Per Ogni Zona
185
Programmare Le Scene
186
Programmare Le Scene da 1 A 16
188
Selezionare La Modalità DI Salvataggio Che Si Vuole Usare
189
Selezione Delle Scene
190
Configurazioni Dei LED Per Modifiche Temporanee Delle Impostazioni Delle Tende
191
Individuazione Ed Eliminazione Dei Guasti
194
Garanzia
195
Indirizzi Sedi Lutron
196
Werbung
Werbung
Verwandte Produkte
Lutron GRAFIK Eye GRX-4102
Lutron GRAFIK Eye GRX-4104
Lutron GRAFIK Eye GRX-4106
Lutron GRAFIK Eye GRX-4108
Lutron GRAFIK Eye GRX-4116
Lutron GRAFIK Eye GRX-4516
Lutron GRAFIK Eye GRX-4524
Lutron GRAFIK Eye GRXSLD-4104
Lutron GRAFIK Eye GRXSLD-4103
Lutron GRAFIK Eye GRXSLD-4106
Lutron Kategorien
Steuergeräte
Schnittstellen
Module
Rollladen
Repeater
Weitere Lutron Anleitungen
Anmelden
Anmelden
ODER
Mit Facebook anmelden
Mit Google anmelden
Anleitung hochladen
Von PC hochladen
Von URL hochladen