Werbung
Quicklinks
English
Contents
Warning ................................................................................................. 1
Cleaning................................................................................................. 2
Operation precautions.......................................................................... 2
Introduction to functions...................................................................... 3
Part identification.................................................................................. 4
Installation of battery and adapter...................................................... 5
Connection of HDMI high-definition signal cable................................ 6
Hood ...................................................................................................... 6
Mounting method of device.................................................................. 7
Menu function........................................................................................ 7
Touch screen operation........................................................................ 9
Troubleshooting.................................................................................... 9
Available signal format......................................................................... 10
Product specifications.......................................................................... 10
Firmware update................................................................................... 10
Warning
About batteries, chargers and power adapters
Please use a compatible battery or power adapter. Please purchase a proper
battery or power adapter separately if necessary.
Operation of LCD screen
◎
Do not put any heavy objects on the LCD screen, otherwise, the screen may
lose the uniformity.
◎
If this device is used in a cold environment, horizontal lines or afterimages
may appear on the screen, which is not a malfunction. The screen will
return to normal after the display warms up.
◎
If a fixed image (such as a split image or time code, or a still image) is
displayed for a long time, afterimages may be left on the screen and even
layered into a ghost image.
◎
The screen and chassis may gradually become hot during operation, which
is not a malfunction.
◎
The LCD screen used in this equipment is produced with high precision
technology, so only a small number of pixels may appear as "bright
spots", or remain dark (black), brighten (red, green, or blue) or flicker. In
addition, sometimes such "bright spots" naturally be formed due to the
physical characteristics of LCD screen after a long period of use, which is not
a malfunction.
1
Introduction to functions
DC-550 Pro is a 5.5-inch touchscreen HD monitor with a resolution of
1920×1080 pixels. It can be used in digital cameras or digital HD camcord-
ers with interchangeable lenses to display the HDMI video signal from the
camera in real time. With powerful functions, it provides photographers
with an auxiliary system for monitoring, and meanwhile meets the needs
of photographers for HD images.
Product features:
◎
3D LUT function: 3D LUT is used to control full stereo color space and
greatly expand the color display potential of the monitor, and it is also a
solid backing for the realization of WYSIWYG for hardware calibration.3D
LUT files are loaded through SD card, and different display effects can be
switched by selecting different files.
◎
Audio column: Monitor the audio signal in the HDMI high-definition signal,
and switch the waveforms at different levels in real time.
◎
Gyroscope functions: This device has gyroscope detection function to
adjust the screen up and down and automatically flip the image without
manual adjustment, optimize and improve the user experience, and thus
better meet the needs of photographers.
◎
Brightness histogram: It can monitor the brightness of incoming HDMI
high-definition images, as well as capture and display brightness change
values in real time according to changes in the image.
◎
False color function: It can achieve more precise exposure and lighting
control through image conversion, with red for excessive lighting, blue for
insufficient lighting and green for appropriate lighting conditions.
Focusing function: Set the focus on the screen area.
◎
De-squeeze function: Restores the compressed and deformed image of the
◎
camera, displaying the original proportion of the physical object.
Power supply: It can switch among the three power supply modes of DC
◎
adapter, lithium battery and Type-C at any time to fully meet the power
supply needs of customers in different scenarios without waiting for a
single power supply.
◎
Shortcut keys: F1/F2/F3, it can set different shortcut keys according to the
customer's preferences, to meet the needs of one-key setting without
entering the menu for setting.
Signal: This device has HDMI IN function; in addition, it comes with HDMI
◎
OUT output function, which is convenient to connect other monitors or
devices on site and thus meet the external expansion display functions of
different photographers.
◎
SD card interface: It supports SD card upgrade, 3D LUT function file loading.
This interface is designed with an automatic pop-up function, SD card can
be inserted after pressing it lightly; the SD card will automatically pop up
after pressing it hard again, which is convenient for operation.
◎
Touch screen: 5.5-inch sensitive touch screen is provided to facilitate
different photographers to operate the device.
3
Installation of battery and adapter
Installation of battery
This product can be equipped with rechargeable lithium batteries.
The battery models include NP-F550/F570/F750/F770/F960/F970 and other
specifications.
1.
Gently press the battery inwards in
2.
Remove the battery. Slide the
the direction shown, and then slide
battery to the right while
it to the left (do not release).
holding down the battery
There is a clicking sound when the
release key, and then take
battery is fixed properly.
out the battery.
Note:Be careful to prevent the battery
from falling on the ground when
taking it out.
Installation of adapter
①
1. Select the direction in which the
adapter is mounted according to the
shape of hot shoe on the camera. (①)
2. Align the 1/4 screw of the adapter with
the 1/4 screw hole on the device. (②)
②
③
3. Tighten the adjustment knob of the
adapter. (③)
4. Use the adapter
①
Fully insert the base of the adapter into the universal hot shoe base in the
direction shown in the figure.
②
Tighten the rotary table of the adapter to fix it on the camera.
②
①
Note:
Before using a camera with a pop-up built-in flash, you need to note the following
points: Turn off the built-in flash of camera. If the camera is designed with a built-in
auto flash function, please turn off this function.
Please remove this device from the camera before using the flash.
5
Mounting method of device
The device can be mounted in the ways shown in ① or ② below according to
the needs.
②
①
Note
◎
This device may interfere with the built-in flash, so do not apply excessive
force when panning or tilting.
◎
When pulling the HDMI high-definition signal cable, do not make it tense or
trip over any moving parts.
Menu function
Menu operation
1. Press the <⑥Knob key> to the right, the screen will display the menu options.
2. Rotate the <⑥Knob key> up and down to select option.
3. Press the <⑥Knob key> to the right again to enter the function options.
4. Press <
> to return to the previous menu.
* Before operating the menu, please make sure that the product is connected to the
correct HDMI signal cable and power cable.
Introduction to menu
Power
Input
Source HDMI
Level-1 menu
Input Source
(primary menu)
HDMI
Level-2 menu
Volume Bar
Histogram
Vector
Parade
FullWaveform
LUT Table
Level-3 menu
【Wave form】
Input Source
HDMI
Volume Bar
Histogram
Vector
Parade
FullWaveform
LUT Table
7
Touch screen operation
Menu: Double-tap the screen start the menu options; tap the blank space to exit
the menu mode.
HDMI
Input Source
Volume Bar
Histogram
Vector
Parade
FullWaveform
LUT Table
Volume adjustment:
Backlight adjustment:
Scroll up and down on the left side
Scroll up and down on the right
of the screen for adjustment.
side of the screen for adjustment.
Zoom in and out: Zoom in and out with your finger (as shown in the figure) to
see details.
Input Source
HDMI
Volume Bar
Histogram
Vector
Parade
FullWaveform
LUT Table
(Zoom in)
(frame disappears)
(Double-tap again)
Note: Do not double-tap to display the menu in the process of zooming in and out, but
double-tap to display the menu after the "box for zooming in and out" disappears. (As
shown in the figure above)
Troubleshooting
Necessary inspections should be carried out before sending the device for
repair. Please contact your dealer if the device is still unable to work properly.
Fault
Causes and troubleshooting measures
The battery is not unlocked → press the battery release button, and then
Battery cannot be taken out
take out the battery.
The battery has run down → replace the battery.
This device has no power
The power adapter (not accompanied) is disconnected. Please reconnect it
properly.
This device cannot be
The model of adapter is not correct.
mounted in camera
Check the model of hot shoe of camera and choose the correct one.
The camera is in power saving mode and some camera operations cannot
be performed. Please press the shutter button halfway to exit the power
saving mode. The HDMI high-definition signal cable is disconnected; or the
No images are displayed
signal source is not turned on, please reconnect and set it properly. When
on the screen of this device
using a camera without a live view function, the captured images cannot be
displayed on this device. Please refer to the instruction manual of camera
for details.
This depends on the camera. When an HDMI high-definition signal cable is
No images are displayed
connected to this device, images may only displayed on the screen of this
on the screen of camera
device.
Please ensure that the volume of this device is not set to 0 before connecting
No sound can be heart
headphones. Make sure that the sound setting of camera is not set to OFF.
This depends on the camera. When it is connected to this device, it may
No photo can be captured
sometimes switch to playback mode.
Please switch the camera to capture mode before taking photos.
The screen is not clear outdoors
Block out the sun with a hood. Turn the backlight value of this device up.
The aspect ratio of the LCD screen of this device is 16:9. Therefore, black
The screen is not clear
streaks may appear in some images.
9
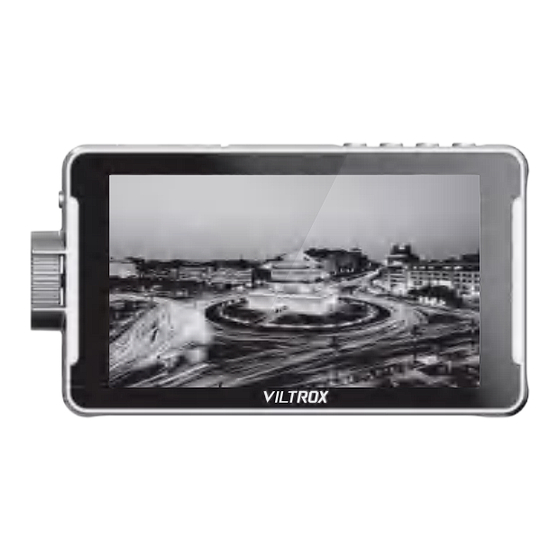
5.5-inch HD Portable Monitor - Touch Screen
Please read the User Manual carefully before using this product.
Please keep this Manual properly for future reference.
Please use it correctly after fully understanding the contents herein.
Shenzhen Jueying Technology Co., Ltd.
Executive standard: Q/JYKJ001-2019
Tel: +86-755-2877 9024
Fax: 0755-2877 4730
Email: info@viltrox.com
Website: www.viltrox.com
Address: 1207, Floor 12, Block B, Chinto Science&Technology Building, Minzhi Street ,
Longhua, Shenzhen,Guangdong,China
Production Address: Floor 3, Building 1, Simaiou Science Park, No. 52-1, Juyuan Road,
Qiuchang Town, Huiyang District, Huizhou, Guangdong ,China
Check accessories
Please check for the following accessories:
1. Monitor ×1
2. Sunshade hood ×1
3. Standard Shoe Adapter × 1
4. Carrying pouch ×1
5. Warranty card ×1
6. Micro HDMI-to-HDMI HD cable ×1
7. HDMI mini C-type data cable ×1
Cleaning
1.
Please remove the battery before cleaning.
2.
The surface of the LCD screen has been specially treated to reduce
reflected light, so its performance may be reduced in case of improper
maintenance.
3.
Gently wipe the screen or chassis with a soft and dry cloth (such as a
cleaning cloth or glass cleaning cloth).
4.
Remove stubborn stains using neutral detergent.
5.
Do not clean this device using thinner, alcohol and other organic solvents
to avoid damage to the chassis and screen.
6.
Do not wipe the chassis with a rough cloth to avoid scratching the surface
of the chassis.
7.
The surface coating of the chassis may be damaged or peeled off after it
has been in contact with rubber or vinyl products for a long time.
Operation precautions
Please read this User Manual and the operation instructions of camera
carefully.
1.
Do not place this device near liquids, because it is not designed with
waterproof, splash-proof and dust-proof functions.
2.
Do not place this device in the sun for a long time, or make it close to a place
with high temperature for a long time, so as not to cause deformation or
malfunction of machine.
3.
Do not place the device in a place with excessive vibration, so as to protect it
from being damage after falling from a high place.
4.
Do not place the device in a place with excessive electromagnetic strength
to avoid malfunction.
5.
Do not place the device in a sandy place, so as to avoid malfunction caused
after being attacked by sand and dust.
6.
Do not dispose of this device with general waste.
7.
The top, ventilation holes and metal parts of this device may become hot
after it has been used for a long time. Please use it with care.
8.
Please follow the regulations about the operation of this device on the
airplane in the take-off and landing process of airplane.
Parts identification
①
②
③
④
⑤
⑥
⑪
⑫
⑬ ⑭
⑮
⑯
⑰
① SD card cover
⑩ DC interface
② F1/F2/F3 shortcut keys
⑪ HDMI output
③ Return key
⑫ HDMI input
④ Display
⑬ Locating hole
⑤ ON/OFF key
⑭ 1/4 screw hole
⑥ Knob key*
⑮ Fan outlet
⑦ Type-C interface
⑯ Headphone jack
⑧ Locating hole
⑰ Battery release key
⑨ 1/4 screw hole
⑱ Cooling air inlet
* Note: ⑥Knob key: Rotate up and down→Select key;
Middle button→Menu key/Enter key.
Connection of HDMI high-definition signal cable
1.Connect the device to the camera using the accompanied HDMI
high-definition signal cable.
HDMI IN
HDMI OUT(mini)
Tip: Please purchase extra HDMI cables if the HDMI high-definition signal cable is not long
enough.
2.
The image of camera viewfinder will be displayed on the LCD screen of
the device after turning on the power switch of the camera and the
device. Please set it to AUTO or 16:9 if the camera is designed with an
HDMI output setting function.
Notes
When connecting this device to the camera via an HDMI high-definition signal cable, the
following situations may occur depending on the camera conditions:
— No image is displayed on the screen of camera.
— The camera is switched to playback mode.
(make sure the camera is in capture mode before taking a photo)
Tips
In the following cases, screen have no signal after a certain period of time:
— The camera is not outputting an HDMI signal.
— The HDMI high-definition signal cable is disconnected.
Backlight will be turned on again after performing the following operations:
— Press the rotary key of the device.
— Operate the camera and output HDMI signals.
— Reconnect the HDMI high-definition signal cable and turn on the power of camera.
Sunshade hood
1.
Put the device on the two bottom
2.
Pull the top of the hood
brackets of the hood, and then
frame outward to remove it.
gently buckle it up to complete the
installation of hood.
Please open and close the hood in the steps below:
Menu function
【Monitoring tool】
Camera mode
Image freezing
Gravity-induced flip
Mirror image flipping
Scanning mode
Pixel to pixel
Monochrome
Zebra-stripe
False color
Focus peaking
【Mark and composition】
De-squeeze function
Frame zoom
Aspect ratio zoom
Mark ratio
Triple centerline
Safe area
Tag setting
White
1
Make Color
Mark Thick
【Image】
System
settings
Brightness
Contrast
Saturation
Hue
Sharpness
【System settings】
dpfs
0
-6
Language
Fan Speed
Volume
Menu
-15
Chinese
-30
-40
-50
Monochro...
*Shortcut settings
-100
Center Mark
Set shortcut functions
Pix To Pix
Camera M...
Volume Bar
for F1/F2/F3 respectively
Main Menu
Cancel
Language
Fan Speed
F1 FullWaveform
Available signal format
This device supports the following signal formats:
Number
Number
Frame
System
Scanning
of effective
of buses
frequency
lines
575 / 50I ( PAL )
625
575
25
2:1 interlacing
480 / 60I ( NTSC )
525
483
30
2:1 interlacing
576 / 50P
625
576
50
Sequential scanning
480 / 60P
525
483
60
Sequential scanning
640 X 480 / 60P
525
480
60
Sequential scanning
1080 / 50I
1125
1080
25
2:1 interlacing
1080 / 60I
1125
1080
30
2:1 interlacing
720 / 50P
750
720
50
Sequential scanning
720 / 60P
750
720
60
Sequential scanning
1080 / 50P
1125
1080
50
Sequential scanning
3840X2160/30P
2250
2160
30
Sequential scanning
Design or specifications are subject to change without notice.
Product specifications
LCD screen
5.5-inch
Screen display
Resolution
1920X1080 pixels
Brightness
1200cd/㎡
Input signal
HDM I 1.4 signal input
interface
Output signal
HDM I 1.4 signal output
interface
Audio
Headphone jack Φ3.5
SD card upgrade
Firmware upgrade
Power interface
DC 12V-18V 2A、Type-C interface≥5V
Applicable battery
NP-F550/F570/F750/F770/F960/F970
Operating
+ 0 to +4 0 ° C (+ 3 2 to + 1 0 4 ° F)
temperature
Working
Storage
environment
-2 0 to + 6 0 ° C (-4 to + 1 4 0 ° F)
temperature
Dimensions
≈165X91X28.5mm
Weight
≈280g
* Input and output signal interface: HDMI 1.4, maximum supported size:
4K30HZ, 3840×2160 4096×2160; 24HZ 25HZ 30HZ
Firmware update
Please scan the QR code below with your browser to learn about the
firmware upgrade steps.
中文
User Manual
目 录
警 告.....................................................................................................
清 洁.....................................................................................................
使用须知...............................................................................................
功能介绍...............................................................................................
部件识别...............................................................................................
安装电池和转接座................................................................................
HDMI 高清信号线连接...........................................................................
遮光罩...................................................................................................
设备固定方式........................................................................................
菜单功能............................................................................................... 7
触屏操作............................................................................................... 9
故障排除............................................................................................... 9
可用信号格式........................................................................................10
产品规格............................................................................................... 10
固件升级............................................................................................... 10
警 告
关于电池、充电器及电源适配器
请使用兼容电池或电源适配器,如果您没有电池或电源适配器,请
另行购买。
LCD屏幕操作
◎ 请勿将任何重物压于LCD屏幕上,以免屏幕失去均匀性。
◎ 如果在寒冷的环境下使用本设备, 屏幕上可能会出现水平线或残留
影像,这不属于故障。当显示器变暖后, 屏幕会恢复到正常状况。
◎ 如果长时间显示一个固定的图像( 如 一 幅 分 割 图 像 或 时 间 码, 或是
静止图像) , 屏幕上可能会残留影像, 并层叠成重影。
◎ 屏幕和机壳在操作过程中会逐渐变热,这不属于故障。
◎ 本设备所用的LCD屏幕是采用高精密技术生产的。因此只有很少
一部分像素可能会 表 现 为"亮点" , 或者始终是暗点( 黑色) 、变亮(
红 色 、 绿 色 或 蓝 色 ) , 或呈闪烁 状 态 。 此 外, 经 过 长 时 间 使 用 后,
由 于 液 晶 显 示 屏 本 身 的 物 理 特 性, 有时也会自然形成这种"亮点"
这些问题并非故障。
2
1
功能介绍
DC-550 Pro是一款5.5英寸触屏式高清监视器, 分辨率为1920X1080像素;可
用于具有可更换镜头的数码相机或数码HD摄录一体机, 实时显示来自相机
的HDMI视频信号。监视器功能强大,为广大摄影师提供监视辅助系统,
同时满足摄影师对高清画质的摄影需求。
产品特点:
⑦
◎
3D LUT功能:使用3D LUT,能够实现全立体色彩空间的控制,极大扩充
⑧
⑨
了显示器的色彩显示潜力,也是实现硬件校准所见即所得的坚实后盾。
通过SD卡载入3D LUT文件,选择不同的文件即可切换不同的显示效果。
⑩
音频柱:监测HDMI高清信号内的音频信号,实时进行高低不同的波形切
◎
换。
◎
陀螺仪功能:本设备具有陀螺仪检测,调整屏幕的上下方向,可以自动
进行图像翻转,无需手动调节,优化提高使用体验,更好的满足广大摄
影爱好者的需求。
◎
亮度直方图:监测传入的HDMI高清图像的亮度,根据图像的变化实时捕
捉显示亮度变化值。
◎
伪彩功能:通过将图像转换进行更加精准的曝光与布光控制,红色为光
⑱
照过度,蓝色为光线不足,绿色为合适的光线环境。
聚焦功能:对画面区域进行聚焦设置。
◎
◎
反挤压功能:还原相机压缩变形的画面,显示实物原始的比例。
◎
供电:DC适配器,锂电池,Type-C,三种供电模式随时切换,全方位满
足客户在不同的场景下的供电需求,无需等待单一电源。
◎
快捷键:F1/F2/F3,可根据客户的喜好设置不同的快捷键,满足一键设
置,无需进入菜单设置。
◎
信号:本设备具有HDMI IN功能;同时自带HDMI OUT 输出功能,方便
现场其他监视器或设备连接,满足不同爱好者的外扩显示功能。
◎
SD卡接口:支持SD卡升级、3D LUT功能文件载入。本接口具有自动弹
出功能,轻按插入SD卡;再次深度按压,SD卡自动弹出,方便操作。
触摸屏:5.5英寸的灵敏触摸屏,方便不同爱好者对本设备的操作。
◎
4
3
安装电 池 和 转 接 座
安装电池
本产品可用可充电锂电池。
电池型号可选择NP-F550/F570/F750/F770/F960/F970等规格。
1. 沿所示的方向将电池轻轻向内
按压, 然后向左滑动( 不要松开) 。
电池固定就位时会发出卡哒声。
安装转接座
1. 根据相机上热靴的形状
选择转接座安装的方向。(
2. 将转接座的1/4螺丝对准本
设备的1/4螺丝孔。(
3. 将转接座的转盘锁紧。(
4. 使 用 转 接 座 :
①
沿图中所示的方向将转接座的底座完全插入通用
②
将转接座的转盘锁紧,从而将其固定在相机上。
①
注: 如果使用配
相机的内置闪光 灯。如果相机有内置自动闪光功能, 请将该功能
使用闪光灯之前, 请将本装置从相机上卸下。
6
5
设备固定方式
本设备可根据需求,选择①或②两种安装方式。
Input Source
HDMI
8
注 意
本设备可能会干扰内置闪光灯,摇摄和倾斜时请勿施加过大的力量。
牵引HDMI高清信号线时,请勿令其绷紧,或绊到任何移动部件。
Input Source
菜单功能
HDMI
菜单操作
⑥
1.向右按一下<
⑥
2.上、下旋转<
⑥
3.向右按一下<
Off
Border Transp...
4.按一下<
>,返回上一层
* 在进行菜单操作之前,请确保本产品连接正确的HDMI信号线及电源线。
菜单介绍
Input Source
HDMI
一级菜单
(主菜单)
Backlight
Color Temp
RGB
80
二级菜单
三级菜单
Input Source
HDMI
【波形图】
Reset
F Key
System
English
Input Source
HDMI
False Color
Peaking
Peaking C...
Screen Mark
Video Ratio
Scan Mode
Zoom
Flip
Freeze
Mute
Exposure
Lumia Hist...
Parade
Vector
FullWavefo...
None
OK
Volume
Menu
Reset
F Key
System
F2 False Color
F3 Peaking
8
7
触屏操作
菜单:双击屏幕唤出菜单选项;单击空白处退出菜单模式。
Aspect ratio
16 :9 / 4 :3
16 :9 / 4 :3
16 :9 / 4 :3
音量调节:
在屏幕左边,上下滑动调节。
16 :9 / 4 :3
4 :3
16 :9
16 :9
16 :9
放大缩小:用手指(如图所示)放大缩小可观看细节。
16 :9
16 :9
16 :9
(放大缩小)
注: 在放大缩小的情况下, 不能双击出菜单, 需要等待 "放大缩小框" 消失后, 再次双击才能
再次出菜单。 ( 如上图所示)
故障排除
送修前, 应进行必要的检查。如果本设备仍无法正常工作, 请与经销商联系。
故 障
无法取出电池
3A
本设备没有电
无法将本设备
安装至相机
本设备的屏幕上
未显示任何影像
相机的屏幕上
未显示任何影像
听不到声音
无法拍摄
在户外屏幕看不清
屏幕看不清
10
9
1
2
2
3
4
5
6
6
7
2. 取出电池。按住电池释放键的
同时,向右滑动电池,然后将
电池取出。
注:取出时,小心不要将电池掉到地上。
①
①
)
②
②
)
③
③
)
热靴
座
中。
②
有弹出式内置闪光灯的相机, 应注意以下几点: 务必
关闭
关闭。
②
①
旋钮键>,屏幕显示菜单选项
旋钮键>,选择需要的选项
旋钮键>,确认进入功能选项
信号源
电池
系统
HDMI
电量
设置
信号源
HDMI
音频柱
直方图
矢量图
Parade波形
全波形
LUT Table
信号源
HDMI
dpfs
0
-6
-15
-30
-40
-50
-100
音频柱
直方图
矢量图
Parade波形
全波形
LUT Table
HDMI
信号源
音频柱
亮度直方图
矢量图
Parade波形
全波形
LUT Table
背光调节:
在屏幕右边 上下滑动调节。
信号源
HDMI
音频柱
亮度直方图
矢量图
Parade波形
全波形
LUT Table
(方框消失)
(再次双击)
原 因 及 措 施
电池未解除锁定, →按下电池释放键,然后取出电池。
电池电量已用尽, →更换电池。
电源适配器( 未附带) 被断开。请重新进行正确连接。
所用转接座的类型不正确。
检查相机的热靴类型并选择正确的热靴。
相机处于节电模式下, 执行不了某些相机操作,请半按快
门按钮,从而退出节电模式。
HDMI高清信号线被断开;或信号源没有开启,请重新
正确连接与设置。
使用没有实时取景功能的相机时, 将无法在本设备显示
拍摄的影像, 有关详细信息, 请参阅相机的使用说明书。
取决于相机, 当HDMI高清信号线与本设备连接时,
影像可能只显示在本设备的屏幕上。
连接耳机时, 确保本设备的音量未设为0。 确保相机的声音
设置未设为OFF( 关) 。
取决于相机, 当与本设备连接时, 有时它会切换到播放模式。
请在拍摄照片前将相机切换到拍摄模式。
使用遮光罩遮挡阳光。将本设备的背光数值调高。
本设备 LCD屏幕的纵横比为 16: 9。 因此 有些影像
,
可能会出现黑色条纹。
产品说明书
5.5英寸 高清便携式触屏监视器
在使用本设备时, 请务必仔细阅读使用说明书。
请保管好本说明书, 以便日后能随时查阅。
请在充分理解内容的基础上, 正确使用。
深圳市爵影科技有限公司
执行标准: Q/JYKJ001-2019
电 话: +86-755-2877 9024
传 真:0755-2877 4730
电邮:info@viltrox.com
网址: www.viltrox.com
地址: 广东省深圳市龙华区民治街道展滔大厦B栋12楼1207号
生产地址: 广东省惠州市惠阳区秋长街道桔园路52-1号斯迈欧科技园1栋3楼
检查附件
请检查是否提供以下附件:
1.监视器 X1
2.遮光罩 X1
3.转接座 X1
4.便携包 X1
5.保修卡 X1
6.MICRO HDMI 转HDMI高清线 X1
7.HDMI mini C型数据线 X1
清 洁
1. 清 洁之前请务必先将电池取出。
2. 此 显示屏表面经过特殊处理, 可以减少反射光。维护不当可 能会降低
显 示器的性能。
3. 请使用柔软的干布(如清洁布或玻璃清洁布)轻轻擦拭屏幕或机壳。
4. 使用中性清洁剂,可以擦掉顽固污渍。
5. 请勿使用稀释剂、酒精等有机溶剂清洁本设备,以免损坏机壳和屏幕。
6. 请勿使用粗糙布料擦拭机壳,以免刮伤机壳表面。
7. 如果机壳长时间与橡胶或乙烯树脂产品接触,机壳的表面涂层将会被破
坏或脱落。
使用须知
请 仔 细 阅 读 本 使 用 说 明 书 及 相 机 的 使 用 说 明 书 。
1. 请勿将本设备放置于液体附近,本设备没有防水、防溅及防尘功能。
2. 请勿将本设备放置于阳光下长期暴晒,或者长时间靠近高温的地方,
以免机子变形或出现故障。
3. 请勿将本设备放置于振动过大的地方,以免摔坏机子。
4. 请勿将本设备放置于电磁强度过大的地方,以免出现故障。
5. 请勿将本设备放置于多沙的地方,以免受到沙尘的侵袭,导致故障。
6. 请勿将本设备与普通垃圾一起弃置。
7. 经过长时间使用后,本设备的顶部、通风孔及金属部件可能会变热,
请小心使用。
8. 在飞机上使用,起飞和着落过程中,请遵守飞机上有关本设备的规定。
部件识别
①
②
③
④
⑤
⑦
⑧
⑥
⑨
⑩
⑪
⑫
⑬ ⑭
⑮
⑯
⑰
⑱
①SD卡盖
⑩DC接口
②F1/F2/F3快捷键
⑪HDMI 输出
③返回键
⑫HDMI 输入
④显示屏
⑬定位孔
⑤ON/OFF键
⑭1/4螺丝孔
⑥旋钮键*
⑮风扇出风口
⑦Type-C接口
⑯耳机接口
⑧定位孔
⑰电池释放键
⑨1/4螺丝孔
⑱散热进风口
* 注: ⑥旋钮键: 上、 下旋转→是选择键; 中间按钮→是菜单键/确认键。
HD MI 高清信号线连接
1. 利用附带的HDMI 高清信号线,将本设备连接到相机上。
HDMI IN
HDMI OUT(mini)
提示: 如果HDMI高清信号线长度不够 , 请另购其他尺寸的HDMI线。
2. 打开相机及本设备的电源开关, 相 机取景器的影像将显示在本设备LCD屏幕
上。如果相机具有HDMI输出设置功能,请将其设为AUTO(自动)或16:9。
注 意
通过HDMI高清信号线将本设备连接至相机时, 取决于相机, 有时会出现
下列情况:
— 相机的屏幕上未显示任何影像。
— 相机切换至播放模式( 拍摄照片前, 确保相机处于拍摄模式下) 。
提 示
在下列情况,经过一定时间后,屏幕提示无信号:
— 相机没有输出HDMI信号。
— HDMI 高清信号线被断开。
执行下列操作将重新开启背光:
— 按压本设备的旋转键。
— 操作相机并输出HDMI信号。
— 重新连接HDMI高清信号线并打开相机电源。
遮 光 罩
1. 把本设备放在遮光罩的两个底托上,
2. 将遮光罩边框的顶部向
再轻轻往上扣,遮光罩就安装完成。
外拉, 从而将其卸下。
请按图中所示打开和关闭遮光罩:
菜单功能
【监看工具】
信号源
HDMI
相机模式
图像冻结
重力感应翻转
镜像翻转
扫描模式
点对点
单色
斑马线
伪彩
峰值聚焦
8
【标注与构图】
信号源
HDMI
反挤压功能
画面大小缩放
画面比例缩放
标记比例
三分中心线
安全框
标记设置
白
1
关
标记颜色
标记厚度
边沿透明度
【图像显示】
信号源
HDMI
亮度
对比度
饱和度
色调
锐度
背光
色温
RGB
80
【系统设置】
信号源
HDMI
语言选择
风扇速度
音量
菜单
复位
功能快捷键
系统
中文
英文
信号源
HDMI
* 快捷键设置
单色显示
伪彩
峰值聚焦
聚焦颜色
中心标记
安全框
画面比例
扫描模式
分别对F1/F2/F3/
点对点显示
变焦
镜像翻转
图像冻结
相机模式
静音
曝光
亮度直方图
设置快捷功能
音频柱
Parade波形
矢量图
全波形
主菜单功能
无
取消
完成
语言选择
电量显示
风扇速度
音量
菜单
复位
功能快捷键
系统
F1
F2
F3
全波形
伪彩
峰值聚焦
可用信号格式
本 设 备 支 持 以 下 信 号 格 式 :
有效
制 式
总线数
帧 频
扫 描
纵横比
线数
575/ 50I (PAL)
2:1隔行扫描
625
575
25
16:9 / 4:3
480/ 60I (NTSC)
525
483
30
2: 1隔行扫描
16:9 / 4:3
576 / 50P
625
576
50
逐行扫描
16:9 / 4:3
480 / 60P
逐行扫描
525
483
60
16:9 / 4:3
640X480 /60P
525
480
60
逐行扫描
4:3
1080/50I
1125
1080
25
2:1隔行扫描
16:9
1080/60I
2:1隔行扫描
1125
1080
30
16:9
720 /50P
750
720
50
逐行扫描
16:9
720 /60P
逐行扫描
750
720
60
16:9
1080/50P
逐行扫描
1125
1080
50
16:9
2250
2160
30
逐行扫描
16:9
3840X2160/30P
设计或规格如有变动, 恕不另行通知。
产品规格
液 晶 屏
5 .5 英 寸
屏 幕 显 示
分 辨 率
1920X1080像素
亮 度
1200cd/㎡
输 入
信号
接 口
HDM I 1.4信号输入
输 出
信
号 接 口
HDM I 1.4信号输出
音 频
耳 机 插 口 Φ 3.5
固件升级
SD卡升级
DC 12V-18V 2A、Type-C接口≥5V
3A
电源接口
适用电池
NP-F550/F570/F750/F770/F960/F970
操作温度
+ 0 ~ + 40℃(+ 32 ~ + 104° F)
工 作 环 境
储存温度
-20 ~ + 60℃(- 4 ~ + 140° F)
产品尺 寸
≈165X91X28.5mm
产品重 量
≈280g
* 输入、输出信号接口:HDMI 1.4,最高支持:4K30HZ,3840X2160
4096X2160; 24HZ 25HZ 30HZ
固件升级
请用浏览器扫描下方二维码,了解固件升级步骤。
2
4
6
8
10
Werbung

Inhaltszusammenfassung für Viltrox DC-550 PRO
- Seite 1 Introduction to functions Parts identification 功能介绍 部件识别 DC-550 Pro is a 5.5-inch touchscreen HD monitor with a resolution of DC-550 Pro是一款5.5英寸触屏式高清监视器, 分辨率为1920X1080像素;可 1920×1080 pixels. It can be used in digital cameras or digital HD camcord- 用于具有可更换镜头的数码相机或数码HD摄录一体机, 实时显示来自相机 ers with interchangeable lenses to display the HDMI video signal from the 的HDMI视频信号。监视器功能强大,为广大摄影师提供监视辅助系统,...
- Seite 2 "밝은점"이 자연적으로 나타나지만 이러한 문제는 고장이 아닙니다. 機能紹介 部品認識 기능 소개 부품 식별 DC‐550 Pro は、解像度1920×1080ピクセルの5.5インチタッチスクリー DC-550 Pro는5.5 인치 터치스크린식 에치디 모니터이며 해상도는 1920X1080 ンHDモニターであり、レンズ交換式のデジタルカメラまたはデジタルHD 픽셀입니다. 렌즈를 교체 가능한 디지털 카메라 또는 디지털HD녹화 촬영 ビデオカメラに使用できます。カメラからのHDMIビデオ信号をリアルタ 일체기에 적용하며 카메라의HDMI영상 신호를 실시간으로 디스플레이할 수 イムで表示します。このモニターは優れた機能を備え、フォトグラファー...
- Seite 3 Identificación de Componentes Das Modell DC-550 Pro ist ein 5,5" HD-Monitor mit einem Touchscreen von einer El DC-550 Pro es un monitor HD de pantalla táctil de 5.5 pulgadas, cuya resolución Auflösung von 1920x1080 Pixeln. Es kann mit Digitalkameras mit wechselbaren puede alcanzar 1920X1080 píxeles;...