Herunterladen Inhalt Inhalt Diese Seite drucken

Werbung

Verfügbare Sprachen
  • DE

Verfügbare Sprachen

  • DEUTSCH, seite 9
Cyrus AV Master 8.0 Surround Decoder
1*
LEFT
SPEAKER
1&
RIGHT
SPEAKER
1^
CTRE
SPEAKER
Fig 1
Fig 2
a
b
c
L
R
MC-
FRONT
SURR
BUS
MADE IN ENGLAND
1%
a
b
c
d
INPUT
h
d
e
f
g h i 1)
L
IN-2
R
BACK
SUB
IN-6
IN-5
IN-3
CTRE
IN-4
FRONT
SURR
BACK
+12V
L&R POWER AMP
1$
1#
1@
1!
e
SELECT
MODE
SETUP
AV Master 8.
0
g
f
IN-1

Werbung

Inhaltsverzeichnis
loading

Inhaltszusammenfassung für Cyrus AV Master 8.0

  • Seite 1 Cyrus AV Master 8.0 Surround Decoder g h i 1) LEFT SPEAKER IN-2 IN-1 1& RIGHT SPEAKER FRONT SURR BACK IN-6 IN-5 IN-3 CTRE IN-4 CTRE FRONT SPEAKER SURR BACK +12V L&R POWER AMP MADE IN ENGLAND Fig 1 SELECT...
  • Seite 2 The Cyrus AV Master 8.0 is supplied with a power cable terminated by a fused wet basement; or near a swimming pool and the like. The product must 13A mains plug.
  • Seite 3: Video Connections

    5~6. Make a note of the input number used for Before installing the AV Master 8.0 check that the following items are included each source as the inputs of the AV Master 8.0 can be re-named at the set-up in the accessory box.
  • Seite 4: Connecting A Subwoofer

    3.5mm mini-jack plugs. Connect one plug to the +12V output of the AV Master 8.0, and the other plug to the +12V input of your automated device. When the AV Master 8.0 is switched on from standby, the +12V feed will switch on and activate your automated devices.
  • Seite 5 AV Master 8.0. Connect the cable to a suitable AC power point. map of the menu options available is shown in the diagram on the next page. There is no mains power switch on the AV Master 8.0. To switch off the mains AV Config system set-up supply to the AV Master 8.0 remove the plug from the wall outlet.
  • Seite 6 Speaker distance (each speaker in turn). Each input of the AV Master 8.0 can be given a name to match the source that is connected to it, such as 'DVD' or 'Tuner'. To name the inputs of your AV Master 8.0, select this menu option, and you will see a list of Name inputs the input numbers with their current names.
  • Seite 7: Remote Control Operation

    Supplied handset Dolby Digital encoded material. The remote control handset supplied with the AV Master 8.0 will control all 11. DSP. When playing a two channel stereo program source such as a CD functions, apart from setup menu navigation as this requires the user to be or a tuner, pressing the DSP key will cycle through a selection of positioned at the front panel to read the display.
  • Seite 8: Troubleshooting Guide

    Cyrus AV Master 8.0 TROUBLESHOOTING GUIDE WARRANTY If your Cyrus AV Master 8.0 is not operating properly, disconnect the power The warranty card enclosed should be completed by the purchaser and and carefully check all connections and the set-up procedure using the notes returned to CYRUS or its Distributor within 8 days of purchase.
  • Seite 9: Wichtige Hinweise

    REINIGUNG: Vor der Reinigung den Netzstecker ziehen. Keine flüssigen Wenn Sie in eine andere Region mit unterschiedlicher Netzspannung umziehen, Reinigungsmittel oder Sprays verwenden. Das Gerät mit einem angefeuchteten wenden Sie sich an Ihren Cyrus Vertrieb, um die Anpassung des Geräts Tuch reinigen. vorzunehmen.
  • Seite 10: Anschluss

    Cyrus. Für den korrekten Betrieb der Anlage müssen beide Stereo- Steckdose. Überprüfen Sie deshalb beim Erstanschluss, dass die Steckdose Verstärker, sowohl für den AV Master 8.0., als auch dem von Cyrus in eine gut erreichbar ist. MC-Bussystemverbindungs-Schleife eingebunden sein (siehe auch Abschnitt Anschluss von digitalen Audiogeräten an den AV...
  • Seite 11: Nutzung Der Internen Verstärker

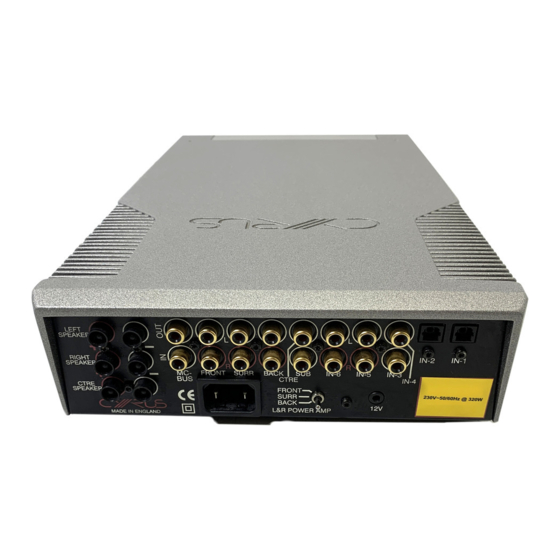
    Zeichnung ist ein Schaltplan als Beispiel für eine MC-Bussystemverbindung ein Lautsprecherkabel eine Verbindung vom Ausgang des zentralen Kanals für die Verbindung von Cyrus AV Master 8.0 mit einem DVD-Player und zwei zum zentralen Lautsprecher Ihrer Anlage her. Achten Sie dabei auf die Verstärkern zu sehen.
  • Seite 12 KONFIGURATION DES AV MASTER 8.0 Bedienung des CYRUS AV Master 8.0 über das Bedienfeld Der AV Master 8.0 ist äußerst vielseitig einsetzbar und lässt sich über das Einstellungsmenü leicht konfigurieren. Dadurch entspricht es genau den Erklärung der Zeichen auf der Gerätvorderseite (Abb. .2): unterschiedlichen Anforderungen der Heimkino-Anlagen.
  • Seite 13: Av Master 8.0 Einstellungsmenü

    Leistungsverstärkers, Feineinstellung der Lautsprecher (nacheinander), Lautsprecherentfernung (nacheinander). Jeder Eingang des AV Master 8.0 kann mit einem Namen gekennzeichnet werden, um ihn der passenden Quelle zuzuordnen, mit der er verbunden ist, wie z. B. „DVD“ oder „Kanalwähler“. Für die Benennung der Eingänge Ihres AV Master 8.0 wählen Sie diese Menüoption und Sie erhalten eine Liste der...
  • Seite 14: Anleitung Fernbedienung

    Einstellung abgespeichert und künftig immer aufgerufen, wenn dieser Eingang gewählt wird. STANDBY. Schaltet den AV Master 8.0 auf Standby und wieder aus 1. MUTE. Damit wird der Ton für alle Lautsprecher sofort auf stumm geschaltet. Sie können den Ton wieder herstellen, wenn Sie die Taste Handset für Anlagen von Cyrus...
  • Seite 15: Technische Daten

    Gebrauchsanleitung FEHLERBEHEBUNG GARANTIE Sollte Ihr Cyrus AV Master 8.0 nicht richtig funktionieren, ziehen Sie den Die Garantie tritt nur in Kraft, wenn die beigefügte Garantiekarte vom Händler Stecker heraus und überprüfen Sie vorsichtig alle Anschlüsse und den und Käufer ausgefüllt und innerhalb von 8 Tagen nach dem Kauf an den CYRUS Vertrieb zurückgeschickt wird.
  • Seite 16: Conexión De Alimentación

    Instrucciones de uso Cyrus AV Master 8.0 PROTECCIÓN DEL CABLE DE ALIMENTACIÓN: Los cables de alimentación se IMPORTANTE: LÉASE ANTES DE UTILIZAR EL tenderán de manera que no puedan ser pisados o aprisionados por los objetos EQUIPO que se coloquen sobre o contra ellos, prestando especial atención a los puntos de conexión a las tomas y de salida del equipo.
  • Seite 17 3. Salidas preamplificadas surround 12. Disparador 12 V CC 4. Salidas preamplificadas posteriores 13. Salida subwoofer El AV Master 8.0 cuenta con conexiones de salida de línea para un total de 7 5. Salida preamplificada centrales 14. Selector de etapas de potencia canales.
  • Seite 18: Conexión Del Subwoofer

    MC-Bus del primero. La siguiente ilustración muestra un ejemplo de conexión permanentemente conectada a la salida de canales centrales del decodificador. Para MC-Bus en un AV Master 8.0 de Cyrus dotado de reproductor DVD y de dos utilizar este amplificador y dirigir el altavoz de canales centrales, conecte un etapas de potencia.
  • Seite 19 óptima de su AV Master 8.0 seleccione la Cuando se activa la función de espera del AV Master 8.0 se memorizan todos opción AV Config para desplazarse secuencialmente por los ajustes del los ajustes de control para la próxima vez que se utilice la unidad.
  • Seite 20 AV Master 8.0 Sistema de menú El menú Config. AV recorre secuencialmente todos los ajustes del menú de configuración necesarios para configurar el AV Master 8.0 y adecuarlo mejor a los componentes de su sistema. El menú Config. AV 'AV Config' incluye los siguientes ajustes: config.
  • Seite 21: Funcionamiento Del Mando A Distancia

    Mando a distancia modo “Stereo Direct” (Estéreo Directo) para obtener el sonido bicanal de El mando a distancia provisto con el AV Master 8.0 controla todas las mayor calidad. Una vez habilitada la función “Stereo Direct” para una funciones con excepción de la navegación a través del menú de determinada entrada, el ajuste quedará...
  • Seite 22: Guía Para La Solución De Problemas

    Si el Cyrus AV Master 8.0 no funciona correctamente, desconéctelo y revise La tarjeta de garantía adjunta deberá ser cumplimentada por el Vendedor y el Comprador, y remitida a CYRUS o a su Distribuidor antes de 8 días a partir de la cuidadosamente todas las conexiones y el procedimiento de configuración fecha de compra.
  • Seite 23 (Voir Fig.1) fonctionnement doivent être gardées pour référence ultérieure. L’alimentation nécessaire à votre Cyrus AV Master 8.0 est indiqué sur une SUIVEZ LES INSTRUCTIONS : Toutes les instructions de sécurité et de étiquette sur le panneau arrière. Avant branchement, vérifiez que ce voltage fonctionnement doivent être observées.
  • Seite 24 AV Master 8.0. Now connect the cable to a suitable AC power point.. L'AV Master 8.0 peut être connecté à une chaîne stéréo hi-fi Cyrus existante, There is no mains power switch on the AV Master 8.0. To switch off the mains partageant les amplificateurs de puissance du système stéréo pour les supply to the AV Master 8.0, remove the plug from the wall outlet.
  • Seite 25 à l'enceinte du Cyrus connectés peut être contrôlée à partir de la face de l'AV Master 8.0 ou canal du centre. Vérifiez que la polarité de ce branchement est correcte : la de la télécommande.
  • Seite 26: Alimentation Électrique

    POUR FAIRE FONCTIONNER L'AV Master 8.0 CYRUS à partir de la face de l'appareil L'AV Master 8.0 est un appareil très souple d'emploi et facile à régler avec le système de menu de configuration de façon à répondre exactement aux Légende de la Figure 2 - Face :...
  • Seite 27 (chaque enceinte à son tour). Chaque entrée de l'AV Master 8.0 peut recevoir un nom adapté à la source à laquelle elle est connectée, par exemple "DVD" ou "Tuner". Pour donner un nom aux entrées de l'AV Master 8.0, sélectionnez cette option du menu et une liste des numéros d'entrée avec leurs noms existants s'affichera.
  • Seite 28 Si votre chaîne est déjà équipée d'autres appareils Cyrus, il est possible que vous ayez déjà une télécommande Cyrus contrôlant certaines fonctions de l'AV Master 8.0. Consultez le manuel de la télécommande de la chaîne ou visitez le site Cyrus à www.cyrusaudio.com pour obtenir la liste des commandes disponibles pour l'AV Master 8.0.
  • Seite 29: Diagnostic Des Pannes

    Sorties analogiques Tension de sortie ..................400mV Impédance de sortie .................220Ω Tension max de sortie .................5.4V Systèmes de décodage PCM Stereo, Dolby Pro Logic II, Dolby Digital, DTS Cyrus se réserve le droit de modifier toutes les spécifications sans préavis. E &OE...
  • Seite 30 Als u verhuist naar een regio met een andere netspanning, dient u WATER EN VOCHT: Gebruik dit toestel niet nabij water - bijv. nabij een contact op te nemen met uw lokale Cyrus-dealer om het toestel badkuip, wastafel, gootsteen of wastobbe, in een natte kelder, nabij een aan te passen.
  • Seite 31: Installatie Voorbereiden

    Analoge audiobronnen aansluiten op de AV Master 8.0 Proficiat met uw keuze voor Cyrus hifi-producten. Onze geavanceerde Op de analoge ingangen van de AV Master 8.0 (Input 5 - Input 6) kunt u ontwerptechnologie en uitstekende productiekwaliteit hebben over de analoge audiobronnen aansluiten.
  • Seite 32: Interne Eindversterkers Gebruiken

    De eindversterker voor het middenkanaal is permanent verbonden met de component te verbinden met de MC-Bus-ingang van de eerste component. uitgang voor het middenkanaal van de decoder in de AV Master 8.0. Als u Volgende tekening toont een voorbeeld van de MC-Bus-bedrading voor een deze versterker wenst te gebruiken om uw middenluidspreker aan te sturen, Cyrus AV Master 8.0 met een dvd-speler en twee eindversterkers.
  • Seite 33 De eerste optie in het menu is ‘AV Config’. Als u niet zeker weet welke opties u dient te kiezen om uw AV Master 8.0 optimaal te configureren, selecteert u Als de AV Master 8.0 in stand-by wordt gezet, worden alle instellingen in het de optie AV Config, zodat alle menu-instellingen worden doorlopen die geheugen bewaard.
  • Seite 34 U kunt een naam geven aan elke ingang van de AV Master 8.0, overeenkomstig de bron waarmee de ingang is verbonden (bijv. 'DVD' of 'Tuner'). Als u de ingangen van de AV Master 8.0 een naam wenst te geven, selecteert u deze menuoptie, waarna een lijst verschijnt van de ingangsnummers met hun huidige 'Name inputs' naam.
  • Seite 35 INPUT- INPUT+ VOL+ STANDBY. Hiermee kunt u de AV Master 8.0 in stand-by zetten of weer inschakelen. VOL- Cyrus-systeemafstandsbedieningen Als uw systeem ook andere Cyrus-producten omvat, heeft u misschien al een Cyrus-systeemafstandsbediening, waarmee u ook bepaalde functies van de AV Master 8.0 kunt bedienen.
  • Seite 36: Problemen Oplossen

    Cyrus AV Master 8.0 PROBLEMEN OPLOSSEN GARANTIE Als uw Cyrus AV Master 8.0 niet goed werkt, koppelt u de stroomtoevoer los De bijgesloten Nederlandse garantiekaart moet binnen de 8 dagen na de en controleert u alle aansluitingen en de configurateprocedure grondig zoals aankoop worden ingevuld door de klant en teruggestuurd worden naar de beschreven in deze handleiding.

Inhaltsverzeichnis