Inhaltsverzeichnis
Werbung
Verfügbare Sprachen
Verfügbare Sprachen
Quicklinks
Werbung
Inhaltsverzeichnis

Inhaltszusammenfassung für Zeegma Vers UV Grand
- Seite 1 Vers UV User manual Bedienungsanleitung Grand Instrukcja obsługi Manuale d’uso EN DE PL IT FR Manuel de l’Utilisateur Manual de usuario ES NL UK LT HR Handleiding Посібник користувача Vartotojo vadovas Korisnički priručnik...
- Seite 5 Introduction Dear customer! Thank you for placing trust in us and choosing Zeegma. We provide you with a product perfect for everyday use thanks to the use of high-quality materials and modern solutions. We are convinced that the product will satisfy your requirements as it has been designed with utmost care.
- Seite 6 5. Change the water and clean the tank every 72 hours to prevent the proliferation of micro-organisms in the water or the environment in which the humidifier is used and/or stored. 6. Be aware that high humidity promotes the growth of biological organisms in the surroundings.
- Seite 7 27. Do not use chemicals to clean the humidifier. 28. Do not use the humidifier for any purpose other than that for which it was designed. 29. Do not move or relocate the humidifier when there is water in the tank or when the humidifier is switched on.
-
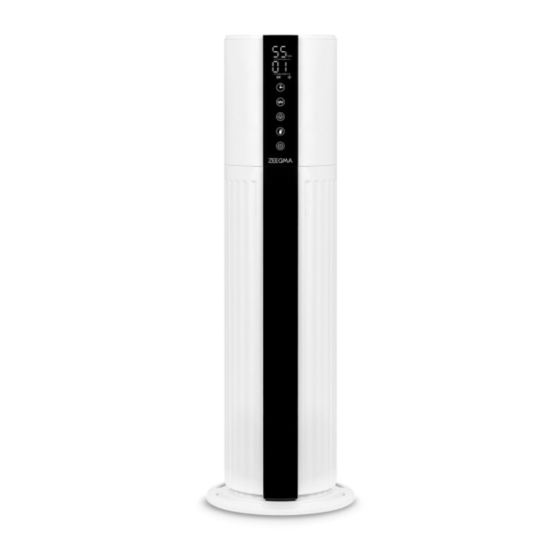
Seite 8: On/Off Switch
The information on the display will appear in the following order: detected air humidity, humidification level, room temperature, timer (if set). Control panel description (fig. E) 1. On/off switch Press this button to switch the device on/off. 2. Automatic humidification level setting Press this button to set the level of humidification the device will run until it reaches, after which it will switch off automatically. -
Seite 9: Cleaning And Descaling
Troubleshooting Problem Possible causes Solutions The device is Disconnected cable Connect the device to a power not working source No water in the tank Pour water into the device and wait 10 minutes No steam The device requires Clean the water tank and descale cleaning Weak steam Water temperature too... -
Seite 10: Einführung
Einführung Sehr geehrter Kunde! Wir möchten uns bei Ihnen bedanken, dass Sie uns vertraut und die Zeegma- Marke gewählt haben. Wir übergeben Ihnen das Produkt, dass sich dank hochqualitativer Materialien und moderner technologischer Lösungen in dem täglichen Bedarf perfekt bewährt. - Seite 11 ausgetauscht und der Wasserbehälter nicht gereinigt wird. 5. Wechseln Sie das Wasser und reinigen Sie den Wasserbehälter alle 72 Stunden, um die Vermehrung von Mikroorganismen im Wasser oder in der Umgebung, in der der Luftbefeuchter verwendet und/oder gelagert wird, zu verhindern. 6.
-
Seite 12: Gerätebeschreibung (Abb. A)
zu einem elektrischen Kurzschluss oder dauerhaften Schäden am Gerät führen kann. 23. Ist das Fließwasser hart, so sollte das Gerät mit demineralisiertem oder gefiltertem Wasser verwendet werden. 24. Gießen Sie niemals ätherisches Öl direkt in den Wasserbehälter. Es sollten nur natürliche ätherische Öle verwendet werden. 25. -
Seite 13: Beschreibung Des Bedienfeldes (Abb. E)
Montage- und Bedienungsanleitung 1. Verbinden Sie die beiden Elemente der Basis (13, Abb. A), indem Sie die Laschen in die entsprechenden Löcher einführen (Abb. B). Setzen Sie den Wasserbehälter (12, Abb. A) und das Gerätegehäuse (6, Abb. A) auf die Basis auf, indem Sie die Saugpumpe (8, Abb. -
Seite 14: Geeignet Für Aromatherapie
5. Timer Betätigen Sie diese Taste, um die Zeit einzustellen, nach der das Gerät sich automatisch ausschaltet (von 1 bis zu 12 Stunden). Die oben genannten Funktionen können auch mit der Fernbedienung aktiviert werden. Geeignet für Aromatherapie Um die Aromatherapie-Funktion zu verwenden, drücken Sie den Behälter für ätherische Öle hinein und ziehen Sie ihn heraus (9, Abb. -
Seite 15: Reinigung Und Entkalkung
Reinigung und Entkalkung Reinigen Sie den Luftbefeuchter regelmäßig, um das Wachstum von • Bakterien im Behälter und in der Basis zu verhindern und einen langfristigen und effizienten Betrieb zu gewährleisten. Stellen Sie vor der Reinigung sicher, dass das Gerät vom Stromnetz getrennt und abgekühlt ist. Wischen Sie die Außenseite des Luftbefeuchters mit einem weichen, •... -
Seite 16: Ostrzeżenia
Wprowadzenie Drogi Kliencie! Dziękujemy za obdarzenie nas zaufaniem i wybranie marki Zeegma. Oddajemy w Twoje ręce produkt idealny do codziennego użytkowania dzięki wykorzystaniu wysokiej jakości materiałów i nowoczesnych rozwiązań technicznych. Jesteśmy pewni, że ogromna staranność wykonania sprawi, że spełni on Twoje wymagania. - Seite 17 5. Wymieniaj wodę i czyść zbiornik co 72 godziny, aby zapobiec rozmnażaniu się mikroorganizmów w wodzie lub środowisku, w którym nawilżacz jest używany i/lub przechowywany. 6. Bądź świadomy faktu, iż wysoka wilgotność powietrza sprzyja rozwojowi organizmów biologicznych w otoczeniu. 7. Nie należy naprawiać oraz dokonywać modyfikacji nawilżacza. Czynności te może wykonywać...
- Seite 18 25. Używaj nawilżacz z dala od źródeł ciepła, wysokich temperatur, gorących powierzchni, bezpośredniego światła słonecznego, źródeł iskrzenia, otwartego ognia. 26. Aby uniknąć osadzania się wilgoci oraz rozmnażania bakterii, trzymaj nawilżacz z dala od sprzętów domowych takich jak np. dywany, obrusy, zasłony i meble. W przypadku pojawienia się...
- Seite 19 na ilustracji C. Nigdy nie wlewaj wody do wylotu pary wodnej (2, rys. C). 4. Nałóż pokrywę (4, rys. A) i podłącz urządzenie do źródła zasilania. Wciśnij włącznik (1, rys. E) aby uruchomić urządzenie. Wciśnij włącznik ponownie, aby wyłączyć urządzenie. 5.
-
Seite 20: Tryb Uśpienia
pojemnik, podłącz urządzenie do źródła zasilania i wciśnij włącznik. Należy używać wyłącznie naturalnych olejków eterycznych. Tryb uśpienia Aby uruchomić tryb uśpienia, wciśnij i przytrzymaj włącznik (1, rys. E). Wyświetlacz wyłączy się, a urządzenie będzie kontynuowało pracę. Aby wyłączyć tryb uśpienia, ponownie wciśnij i przytrzymaj włącznik. Powyższa funkcja może zostać... - Seite 21 Gentile Cliente! Grazie per aver riposto in noi la Vostra fiducia e aver scelto prodotto di un marchio Zeegma. Vi offriamo un prodotto perfetto per l’uso quotidiano grazie all’utilizzo di materiali di alta qualità e moderne soluzioni tecniche. Siamo sicuri che la grande cura nell’esecuzione soddisferà...
- Seite 22 5. Sostituire l’acqua e pulire il serbatoio ogni 72 ore per evitare che i microrganismi si moltiplichino nell’acqua o nell’ambiente in cui l’umidificatore viene utilizzato e/o conservato. 6. Essere consapevoli del fatto che l’elevata umidità promuove lo sviluppo di organismi biologici nell’ambiente. 7.
- Seite 23 26. Per evitare il depositarsi di umidità e la proliferazione di batteri, tenere l’umidificatore lontano da articoli domestici come ad es. tappeti, tovaglie, tende e mobili. In caso di comparsa di umidità vicino al dispositivo è necessario ridurre il livello selezionato di umidificazione. 27.
-
Seite 24: Interruttore On/Off
Premere nuovamente l’interruttore per spegnere il dispositivo. 5. Per cambiare la direzione del vapore in uscita, spostare i tappi sul coperchio come desiderato (fig. D). Attenzione! Se non è presente abbastanza acqua o non è presente il coperchio, sul display apparirà un’icona rossa lampeggiante contrassegnata da una goccia d’acqua sbarrata. -
Seite 25: Modalità Di Standby
Devono essere usati solo oli essenziali naturali. Modalità di standby Per avviare la modalità di standby, tenere premuto l’interruttore (1, fig. E). Il display si spegnerà e il dispositivo continuerà a funzionare. Per disattivare la modalità di standby, tenere premuto nuovamente l’interruttore di accensione. La funzione sopra descritta può... -
Seite 26: Avertissements
Introduction Cher client ! Merci de nous faire confiance et de choisir Zeegma. Nous vous offrons un produit idéalement adapté pour un usage quotidien grâce à l’utilisation de matériaux de haute qualité et de solutions techniques modernes. Nous sommes sûrs qu’il répondra à vos exigences grâce au grand soin apporté... - Seite 27 5. Changez l’eau et nettoyez le réservoir toutes les 72 heures afin d’éviter la prolifération de micro-organismes dans l’eau ou dans l’environnement dans lequel l’humidificateur est utilisé et/ou stocké. 6. Soyez conscient du fait qu’une humidité élevée favorise la croissance des organismes biologiques dans l’environnement.
- Seite 28 25. Utilisez l’humidificateur à l’écart des sources de chaleur, des températures élevées, des surfaces chaudes, des rayons directs du soleil, des sources d’étincelles et des flammes. 26. Pour éviter l’accumulation d’humidité et la prolifération de bactéries, éloignez l’humidificateur des articles ménagers tels que les tapis, les nappes, les rideaux et les meubles.
- Seite 29 3. Versez de l’eau dans le couvercle intérieur à l’endroit marqué du chiffre 1 dans l’illustration C. Ne versez jamais d’eau dans la sortie de vapeur (2, fig. C). 4. Remettez le couvercle en place (4, fig. A) et branchez l’appareil à l’alimentation électrique.
-
Seite 30: Mode Veille
essentielle (9, fig. A) et faites-le glisser vers l’extérieur, puis déposez l’huile choisie dans le diffuseur. Insérez le récipient, branchez l’appareil à la source d’alimentation et appuyez sur l’interrupteur. Seules des huiles essentielles naturelles doivent être utilisées. Mode veille Pour activer le mode veille, appuyez et maintenez enfoncé l’interrupteur (1, fig. - Seite 31 Introducción ¡Estimado Cliente! Gracias por confiar en nosotros y elegir la marca Zeegma. Le ofrecemos un producto perfecto para el uso diario gracias al uso de materiales de alta calidad y modernas soluciones técnicas. Estamos seguros que el gran cuidado de la ejecución hará que cumpla con sus requisitos.
- Seite 32 6. Tenga en cuenta el hecho de que la alta humedad promueve el desarrollo de organismos biológicos en el entorno. 7. No repare ni modifique el humidificador. Solo un centro de servicio autorizado puede hacerlo. 8. Utilice solo piezas de repuesto originales o recomendadas por el fabricante. 9.
- Seite 33 dispositivo, reduzca el nivel de humedad seleccionado. 27. No utilice productos químicos para limpiar el humidificador. 28. No use el humidificador para fines distintos a los previstos. 29. No desplace ni mueva el humidificador cuando haya agua en el depósito o cuando el humidificador esté...
-
Seite 34: Modo De Espera
¡Atención! Si no hay suficiente agua o tapa colocada, la pantalla mostrará un icono rojo parpadeante de una gota de agua tachada. La información en la pantalla aparecerá en el siguiente orden: humedad del aire detectada, nivel de humedad, temperatura ambiente, temporizador (si está... -
Seite 35: Solución De Problemas
La función anterior se puede activar con el mando a distancia o el panel de control. Solución de problemas Problema Posibles causas Soluciones El aparato no Cable desconectado Conecte el aparato a la fuente funciona de alimentación Sin agua en el depósito Vierta agua en el aparato y espere 10 minutos Sin vapor El aparato necesita... -
Seite 36: Waarschuwingen
Inleiding Geachte Klant! Wij danken u voor het vertrouwen in ons merk Zeegma. Wij bieden u een product dat ideaal is voor dagelijks gebruik dankzij de toepassing van hoogwaardige materialen en moderne technische oplossingen. We zijn er zeker van dat de grote zorg bij de afwerking aan uw eisen voldoet. - Seite 37 verspreiding van micro-organismen in het water of de omgeving waarin de luchtbevochtiger wordt gebruikt en/of opgeslagen te voorkomen. 6. Wees u ervan bewust dat een hoge vochtigheidsgraad de groei van biologische organismen in de omgeving bevordert. 7. De luchtbevochtiger niet repareren of aanpassen. Het wordt enkel door een erkend servicecentrum gedaan.
- Seite 38 temperaturen, hete oppervlakken, direct zonlicht, vonken, open vuur, olie en scherpe randen. 26. Houd de luchtbevochtiger uit de buurt van huishoudelijke voorwerpen bv. tapijten, tafelkleden, gordijnen en meubels om te voorkomen dat zich vocht ophoopt en bacteriën gaan broeien. Bij vocht in de buurt van het apparaat, moet dan het geselecteerde bevochtigingsniveau worden verlaagd.
- Seite 39 2. Plaats het binnenkapje (5, afb. A) in de behuizing van het apparaat. 3. Giet water in de binnenkap op de plaats die in afbeelding C met 1 is aangegeven. Giet nooit water in de stoomuitlaat (2, afbeelding C). 4. Plaats het deksel (4, afb. A) terug en sluit het apparaat aan op de stroomvoorziening.
-
Seite 40: Oplossing Van Problemen
etherische olie (9, afb. A) uit en druppel de gewenste olie in de diffuser. Plaats het reservoir, sluit het apparaat aan op de stroombron en druk op de schakelaar. Gebruik alleen natuurlijke essentiële oliën. Slaapstand Om de slaapstand te activeren, de schakelaar (1, afb. E) ingedrukt houden. De display schakelt uit en het apparaat blijft werken. - Seite 41 виправдає усі Ваші очікування. Перед використанням виробу детально ознайомтесь з нижченаведеною інструкцією обслуговування. Якщо у вас виникли будь-які запитання або зауваження щодо виробу, зв’яжіться з нами: support@zeegma.com Інформація про пристрій Джерело живлення: 220-240 В змінного струму 50/60 Гц Потужність: 25 Вт...
- Seite 42 для здоров’я, якщо воду не замінити та резервуар не очистити. 5. Замінюйте воду та очищуйте резервуар кожні 72 години, щоб запобігти розмноженню мікроорганізмів у воді або середовищі, в якому використовується та/або зберігається зволожувач. 6. Зверніть увагу на те, що висока вологість повітря сприяє розвитку біологічних...
- Seite 43 25. Використовуйте зволожувач повітря подалі від тепла, високих температур, гарячих поверхонь, прямих сонячних променів, іскор, відкритого вогню. 26. Щоб уникнути накопичення вологи та розмноження бактерій, тримайте зволожувач повітря подалі від побутових приладів, таких як килими, скатертини, штори та меблі. Якщо поблизу пристрою з’являється...
- Seite 44 3. Налийте воду у внутрішню кришку в місці, позначеному цифрою 1 на малюнку C. Ніколи не наливайте воду в вихідний отвір пари (2, рис. C). 4. Встановіть кришку (4, рис. A) і під’єднайте прилад до джерела живлення. Натисніть вмикач (1, рис. E), щоб запустити пристрій. Натисніть...
-
Seite 45: Вирішення Проблем
для ефірної олії (9, рис. A), потім капніть потрібну олію в дифузор. Вставте ємність, підключіть пристрій до джерела живлення і натисніть перемикач. Слід використовувати тільки натуральні ефірні масла. Режим сну Щоб активувати режим сну, натисніть і утримуйте перемикач живлення (1, мал. E). Дисплей вимкнеться, а машина продовжить роботу. Щоб вимкнути... - Seite 46 Įžanga Gerbiamas Kliente! Dėkojame, kad pasitikėjote mumis ir pasirinkote „Zeegma“ prekės ženklą. Dėl aukštos kokybės medžiagų naudojimo ir modernių technologinių sprendimų mes siūlome jums produktą, kuris puikiai tinka naudoti kasdien. Esame įsitikinę, kad dėka didelio rūpesčio puikiai atitiks Jūsų reikalavimus. Prieš naudodami gaminį, atidžiai perskaitykite šį...
- Seite 47 6. Turite žinoti, kad didelė oro drėgmė skatina biologinių organizmų vystymąsi aplinkoje. 7. Netaisykite ir nekeiskite drėkintuvo. Šias veiklas gali atlikti tik įgaliotas servisas. 8. Naudokite tik originalias arba gamintojo rekomenduojamas atsargines dalis. 9. Nenaudokite drėkintuvo, jei pastebėjote kokių nors pažeidimų. Tai taikoma tiek laidui, tiek kištukui.
- Seite 48 29. Nejudinkite ir nenešiokite drėkintuvo, kai vandens rezervuare yra vandens arba kai drėkintuvas įjungtas. Nenešiokite drėkintuvo laikydami už jo viršutinę dalį. 30. Nepalikite vandens rezervuare ilgą laiką, nes tai gali sukelti bakterijų dauginimąsi. 31. Neišimkite vandens rezervuaro, kai įjungtas drėkintuvas. 32.
-
Seite 49: Miego Režimas
Valdymo skydelio aprašymas (E pav.) 1. Įjungimo / išjungimo jungiklis Paspauskite šį mygtuką norėdami įjungti / išjungti prietaisą. 2. Automatinis drėkinimo lygio nustatymas Paspauskite šį mygtuką norėdami nustatyti drėkinimo lygį, iki kurio dirbs prietaisas, po kurio jis automatiškai išsijungs. Galima nustatyti diapazoną nuo 40% iki 90% drėgmės. -
Seite 50: Problemų Sprendimas
Problemų sprendimas Problema Galimos priežastys Sprendimai Prietaisas Laidas neprijungtas Prijunkite prietaisą prie neveikia maitinimo šaltinio Nėra vandens Į prietaisą įpilkite vandens ir rezervuare palaukite 10 minučių Nėra garų Prietaisą reikia išvalyti Išvalykite vandens rezervuarą ir pašalinkite kalkes Silpna garų Per žema vandens Nustatykite didžiausią... - Seite 51 Uvod Poštovani kupci Zahvaljujemo što ste nam ukazali povjerenje i odabrali marku Zeegma. Dajemo vam proizvod koji je savršen za svakodnevnu upotrebu zahvaljujući upotrebi visokokvalitetnih materijala i modernih tehničkih rješenja. Sigurni smo da će velika briga tijekom izrade proizvod osigurati ispunjavanje vaših zahtjeva.
- Seite 52 6. Imajte na umu da visoka vlažnost zraka potiče razvoj bioloških organizama u okolišu. 7. Nemojte popravljati niti mijenjati ovlaživač zraka. Ove radnje smije obavljati samo ovlašteni servis. 8. Koristite samo originalne ili zamjenske dijelove koje preporučuje proizvođač. 9. Nemojte koristiti ovlaživač ako primijetite bilo kakva oštećenja. Ovo se odnosi i na kabel i na utikač.
- Seite 53 29. Nemojte pomicati niti nositi ovlaživač dok se u spremniku za vodu nalazi voda ili dok je ovlaživač uključen. Ne nosite ovlaživač zraka držeći ga za gornji dio. 30. Ne ostavljajte vodu u spremniku dulje vrijeme jer to može dovesti do razvoja bakterija.
- Seite 54 Opis upravljačke ploče (sl. E) 1. Prekidač za uključivanje/isključivanje Pritisnite ovu tipku za uključivanje/isključivanje uređaja. 2. Automatsko podešavanje razine vlažnosti Pritisnite ovu tipku za postavljanje razine ovlaživanja do koje će uređaj raditi, nakon čega će se automatski isključiti. Raspon koji se može podesiti je od 40% do 90% vlažnosti.
-
Seite 55: Rješavanje Problema
Rješavanje problema Problem Mogući uzroci Rješenja Uređaj ne radi Kabel nije spojen Spojite uređaj na izvor napajanja Nema vode u Ulijte vodu u uređaj i pričekajte spremniku 10 minuta Nema pare Uređaj zahtijeva Očistite spremnik za vodu i čišćenje uklonite kamenac Mlaz pare je Temperatura vode Postavite razinu ovlaživanja... - Seite 56 EN: The product complies with requirements of EU directives. Pursuant to the Directive 2012/19/EU, this product is subject to selective collection. The product must not be disposed of along with domestic waste as it may pose a threat to the environment and human health. The worn-out product must be handed over to the electrics and electronics recycling center.
- Seite 57 ES: El producto cumple los requisitos de las directivas de la Unión Europea. De acuerdo con la Directiva 2012/19/UE, este producto está sujeto a recogida selectiva. El producto no debe eliminarse con los residuos municipales, ya que puede suponer una amenaza para el medio ambiente y la salud humana. Por favor, entrega el producto que ya no vayas a utilizar a un centro de reciclaje de dispositivos eléctricos y electrónicos.
- Seite 59 Lijst met erkende servicecentra: Список уповноважених сервісних центрів: Įgaliotų aptarnavimo centrų sąrašas: Popis ovlaštenih servisnih centara: www.zeegma.com/en/service Szczegółowe warunki gwarancji dostępne są na stronie: Detailed warranty conditions are available on the website: Detaillierte Garantiebedingungen finden Sie auf der Website: Le condizioni di garanzia dettagliate sono disponibili sul sito web: Les conditions de garantie détaillées sont disponibles sur le site:...
- Seite 60 zeegma.com...