
Verwandte Anleitungen für Bombard SUNRIDER 500


Inhaltszusammenfassung für Bombard SUNRIDER 500
- Seite 1 Manuel du Propriétaire Owner's Manual -Manuale del Proprietario Eignerhandbuch- Manual del propietario Tome 2 - Volume 2- Teil 2 - Tomo 2 SUNRIDER 500 - 550 - 650 609305 B Edition 3...
-
Seite 2: Inhaltsverzeichnis
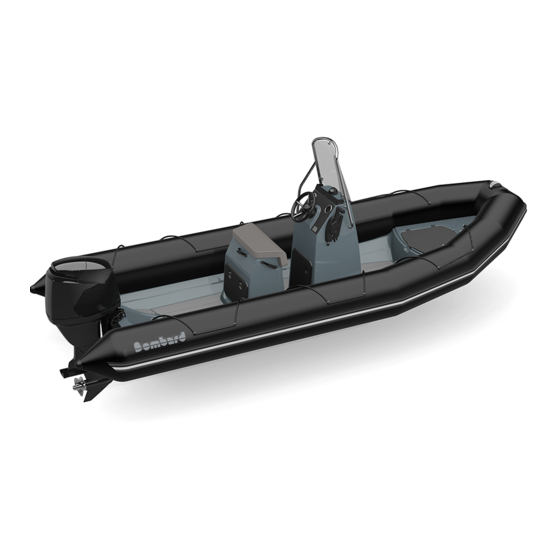
SOMMAIRE PAGE I - DESCRIPTIONS GENERALES I-1-Caractéristiques techniques ------------------------------------------------------ 3 - 6 I-2-Inventaire ---------------------------------------------------------------------------- 7 - 8 I-3-Elèments fonctionnels ------------------------------------------------------------- I-4-Manutention ------------------------------------------------------------------------ II – FLOTTEUR II-1-Grandes étapes de la mise en service du flotteur---------------------------- II-2-Système de gonflage--------------------------------------------------------------- 11 - 13 II-3-Pression ----------------------------------------------------------------------------- ... - Seite 3 DESCRIPTION - Caractéristiques techniques I -1-1- CARACTERISTIQUES TECHNIQUES SUNRIDER 500 Dimensions 5.00 16’05“ (ft) 3.77 12’ 4“ (ft) 6’ 11“ (ft) 3’ 7" (ft) 0.50 1“ 8“ (ft) Certification C / D (2013/53/EU) Capacité (ISO) 1060 2337 Motorisation L- monomoteur...
- Seite 4 DESCRIPTION - Caractéristiques techniques I -1-2- CARACTERISTIQUES TECHNIQUES SUNRIDER 550 Dimensions 5.50 18’ 01“ (ft) 4.20 13’ 9“ (ft) 2.18 7’ 2“ (ft) 1.22 4’ (ft) 0.50 1’ 8“ (ft) Certification (2013/53/EU) C / D Capacité (ISO) 1157 2550 Motorisation L- monomoteur Long Puissance MINI...
- Seite 5 DESCRIPTION - Caractéristiques techniques I -1-3- CARACTERISTIQUES TECHNIQUES SUNRIDER 650 Dimensions 6.35 20’ 10“ (ft) 15’ 9“ (ft) 2.45 8’ (ft) 1.35 4’ 5“ (ft) 0.55 1’ 10“ (ft) Certification C / D (96/15/CE) Capacité (ISO) 1000 1550 2204 3417 Motorisation L- monomoteur Long...
- Seite 6 DESCRIPTION - Caractéristiques techniques Tolérances sur les dimensions : +/- 4% NOTE Tolérances sur les poids : +/- 5% La charge maximale autorisée a été calculée selon la norme ISO 6185. Il est recommandé de naviguer avec précaution lorsque le bateau est chargé...
-
Seite 7: I-2-Inventaire
DESCRIPTION - Inventaire I-2- INVENTAIRE COQUE • Coque polyester en V prononcé avec • • • virures • Pont antidérapant • • • • 1 Anneau d'étrave • • • • 2 Anneaux arrière de remorquage • • • • 1 Trappe d’accès dans auge moteur •... - Seite 8 DESCRIPTION - Inventaire EQUIPEMENT STANDARD (SUITE) • 1 Récepteur de jauge (non montée) • • • • 2 Pagaies • • • • 1 Gonfleur à pied • • • • 1 Mallette de réparation • • • • 1 Manuel du propriétaire (2 tomes) •...
- Seite 9 DESCRIPTION - Eléments fonctionnels I-3-DESCRIPTION DES ELEMENTS FONCTIONNELS ESSENTIELS: • • • Anneau d’étrave • • • Davier + Taquet + Réa • • • Baille à mouillage • • • Console • • • Direction • • • Emplacement boîtier de commande •...
-
Seite 10: I-4-Manutention
Les conseils de la mise sur remorque sont spécifiés dans le manuel du propriétaire TOME I. I-5-2-Stockage : LE BATEAU DOIT IMPERATIVEMENT REPOSER SUR LA LIGNE D’ETRAVE (VOIR CROQUIS CI DESSOUS). ATTENTION SUNRIDER 500 SUNRIDER 550 SUNRIDER 650 Page 9 sur 35... -
Seite 11: Ii - Flotteur
FLOTTEUR - Grandes étapes II - FLOTTEUR II-1-GRANDES ETAPES DE LA MISE EN SERVICE DU FLOTTEUR La procédure de montage du bateau suit un ordre que nous vous engageons à respecter. Procédez étape par étape en vous reportant à chaque fois aux pages indiquées pour les explications de procédure. PROCEDURE DE GONFLAGE PAGE SECTION... - Seite 12 FLOTTEUR - Système de gonflage GONFLAGE DU FLOTTEUR • Ajoutez l'adaptateur correspondant au diamètre de la valve semi encastrée à l'embout du tuyau du gonfleur. Procédez au gonflage du flotteur en équilibrant les pressions entre les différents compartiments, jusqu'à ce que les cloisons (a) ne soient plus visibles (pression = 240 mb) NE JAMAIS METTRE UN COMPARTIMENT SOUS PRESSION LES...
-
Seite 13: Ii-3-Pression
FLOTTEUR - Pression II-3-PRESSION La pression d’utilisation pour le flotteur est de 200 à 240 mb/ 3,4 PSI (milieu de la zone verte du manomètre). Votre bateau est équipé d’un indicateur de pression ACCESS qui vous permettra une lecture rapide et efficace pendant le gonflage (voir explications d’utilisation section «... -
Seite 14: Systeme De Propultions
SYSTEME DE PROPULSIONS III- SYSTEME DE PROPULSIONS Conformez-vous aux recommandations BOMBARD et aux recommandations du constructeur de moteur. Pour une utilisation optimale de votre embarcation, veuillez consulter votre concessionnaire. Page 13 sur 35... -
Seite 15: Iv-1-Installation De Carburant
INSTALLATION ET CIRCUIT - Carburant IV- INSTALLATION ET CIRCUIT IV-1-INSTALLATION DE CARBURANT IV-1-1- Description Description des éléments fonctionnels essentiels: IV-1-1-1- Remplissage réservoir d’essence Réservoir d’essence Remplissage réservoir d’essence Vannes de fermeture circuit essence du réservoir Sortie évent Tuyau alimentation essence Filtre séparateur eau / essence Poire d’amorçage (non fournie) Récepteur de jauge du réservoir (non montée) - Seite 16 INSTALLATION ET CIRCUIT - Carburant IV-1-1-2- Description du réservoir sunrider 550/650 IV-1-1-3- Description du réservoir sunrider 500 Transmetteur de jauge Remplissage réservoir Vanne de fermeture circuit essence Event Page 15 sur 35...
- Seite 17 INSTALLATION ET CIRCUIT - Carburant IV-1-1-4- Description du filtre séparateur eau/essence REPERE DESIGNATION Tête du filtre, fixée au bateau Elément de filtration interchangeable IL EST INDISPENSABLE DE REMPLACER LA CARTOUCHE TOUTES LES 50 HEURES D’UTILISATION. CONTACTER LE RESEAU POUR L’ACHAT D’UNE AVERTISSEMENT CARTOUCHE DE REMPLACEMENT.
- Seite 18 INSTALLATION ET CIRCUIT - Carburant IV-1-2- Utilisation du circuit essence Déverrouiller les grenouillères (voir photo N°1), en tirant sur la NOTE : poignée. Ouvrir la console (voir photo N°2). Vanne du circuit essence : - Lorsque vous n’utiliser plus votre bateau, fermez la vanne du circuit essence.
- Seite 19 Si vous êtes amené a remplacer le réservoir d’essence, une NOTE : empreinte est prévue sur la console, pour être découpée. Une trappe d’accès au réservoir sera alors installée. Pour une optimisation optimale, veuillez consulter votre concessionnaire BOMBARD. Empreinte prévue pour remplacement du réservoir Page 18 sur 35...
- Seite 20 AVERTISSEMENT CARTOUCHE DE REMPLACEMENT. Changement de la cartouche du filtre : Conformez-vous aux recommandations BOMBARD et aux recommandations du constructeur du filtre. Placer un entonnoir de vidange sous l'endroit où la cartouche sera remplacée. Avant d'effectuer le remplacement du filtre la pression du système d'alimentation d'essence doit être libérée.
- Seite 21 INSTALLATION ET CIRCUIT - Carburant IV-1-4-Recommandations : EN CAS DE FUITE D’ESSENCE, OU DEBUT D’INCENDIE, LA VANNE DE FERMETURE DU CIRCUIT ESSENCE, SITUEE SUR LE RESERVOIR, EN DESSOUS DE LA CONSOLE AVERTISSEMENT PERMET D’ISOLER LE RESERVOIR DU CIRCUIT ESSENCE ET DOIT ETRE FERMEE.
-
Seite 22: Iv-2-Electricité
INSTALLATION ET CIRCUIT - Electricité IV-2- ELECTRICITE IV-2-1- Description IV-2-1--1 Schéma de câblage de la jauge essence Bleu Bleu Rouge Rouge Noir Noir Noir Rouge Transmetteur Jauge Eclairage jauge Interrupteur feu de route ou indépendant (optionnel) Branchement, repérer la sortie positive du contacteur Batterie Contacteur du boîtier de commande moteur Fusible... - Seite 23 INSTALLATION ET CIRCUIT - Electricité IV-2-1--2 Schéma de câblage de la pompe de cale (sunrider 650 uniquement) Interrupteur pompe de cale Déclencheur Pompe de cale Porte fusible étanche + fusible Coupe–circuit (non fournit) Batterie Vers faisceau accessoire (non fournit) Page 22 sur 35...
- Seite 24 INSTALLATION ET CIRCUIT - Electricité IV-2-2- Utilisation : IV-2-2-1- Faisceau électrique (non fournie) : Pour une utilisation optimale de votre embarcation, veuillez consulter votre concessionnaire. IV-2-2-2- Batterie (non fournie) Un emplacement du bac à batterie est prévu dans le coffre arrière NOTE : du bateau.
- Seite 25 INSTALLATION ET CIRCUIT - Electricité IV-2-3-Manutention IV-2-3-1- Entretien de la batterie Conformez-vous aux recommandations BOMBARD et aux recommandations du fabricant de batteries pour l’entretien courant. ENTRETENEZ VOTRE BATTERIE: MAINTENEZ LA BATTERIE PROPRE ET SECHE AFIN D’EVITER UNE USURE PREMATUREE.
-
Seite 26: Iv-3-Direction
INSTALLATION ET CIRCUIT - Direction IV-3-DIRECTION Conformez vous aux recommandations du constructeur de la direction (Installation, utilisation et maintenance). Pour une utilisation optimale de votre embarcation, veuillez consulter votre concessionnaire. Volant Câble Extrémité du câble et biellette de direction Page 25 sur 35... -
Seite 27: Iv-4-Passage Des Câbles
INSTALLATION ET CIRCUIT – Passage des câbles IV-4-PASSAGE DES CABLES Préparez l’extrémité du câble de direction. Enfilez le câble de direction dans la coque de l’arrière vers l’avant après avoir fixé le fourreau protégeant la crémaillère. Le récupérez au niveau de la console. Utilisez ensuite un câble de commande moteur auquel on aura également fixé... -
Seite 28: Iv-5-Installation D'assèchement
INSTALLATION ET CIRCUIT - Assèchement IV-5- INSTALLATION D’ASSECHEMENT IV-5-1- Description : IV-5-1-1- Evacuation : 1 Vide-vite de pont 1 Nable de coque 1 Evacuation de l’auge arrière 1 Sortie évacuation pompe de cale (sunrider 650) Page 27 sur 35... - Seite 29 INSTALLATION ET CIRCUIT - Assèchement IV-5-1-2- Pompe de cale (sunrider 650 uniquement) : 1 Interrupteur pompe de cale 2 Emplacements interrupteurs 1 Pompe de cale 1 Déclencheur pompe de cale 1 Sortie évacuation pompe de cale IV-5-1-3- Vide-vite Vide-vite de pont Membrane du vide -vite Lyre de maintien bouchon Bouchon...
- Seite 30 INSTALLATION ET CIRCUIT - Assèchement Le vide vite comprend : une membrane souple fixe qui : - se déforme, et permet de vidanger, sous certaines conditions, l’eau embarquée sur le pont de l’intérieur du bateau vers l’extérieur quand le bateau est en route. -se plaque, pour réaliser une étanchéité...
- Seite 31 INSTALLATION ET CIRCUIT - Assèchement IV-5-2-2 : Vide-vite IV-5-2-2-1 : Bateau hors de l’eau (remorque, sur bers…) POSITION OUVERTE, BOUCHON RETIRE. IV-5-2-2-2 : Bateau à l’eau EN NAVIGATION POSITION FERMEE, BOUCHON(S) EN PLACE. PROCEDURE DE VIDANGE DE L’EAU EMBARQUEE A L’ARRET, RETIREZ LE BOUCHON, PUIS NAVIGUEZ EN POSITION DEJAUGEE (>...
-
Seite 32: Iv-6-Extinction De Feu
INSTALLATION ET CIRCUIT - Assèchement IV-5-2-3 : Nable de coque IV-5-2-3-1 : Bateau hors de l’eau (remorque, sur bers…) POSITION OUVERTE, NABLE RETIRE. IV-5-2-3-2 : Bateau à l’eau POSITION FERMEE, NABLE EN PLACE. (BIEN S’ASSURER QUE LE NABLE EST CORRECTEMENT FERME) INSTALLATION ET CIRCUIT - Extinction de feu IV-6- EXTINCTION DE FEU Emplacement support extincteur... -
Seite 33: Iv-7-Mouillage/Amarrage
INSTALLATION ET CIRCUIT - Mouillage/Amarrage IV-7- MOUILLAGE /AMARRAGE Anneau de retenue de la ligne de mouillage situé à l’intérieur de la baille Davier + Taquet + Réa Anneau de retenue de la ligne de mouillage Anneau d’étrave Coffre de mouillage LES TAQUETS PERMETTENT UNIQUEMENT UN AMARRAGE OCCASIONNEL DU BATEAU. -
Seite 34: Montage Option
MONTAGE OPTIONS – Roll-bar V-1- MONTAGE ROLL-BAR Fabriquer 2 gabarits de perçage (épaisseur mini : 25 mm) Assembler le roll bar. Le caler comme représenté sur la figure ci-dessous. Vue suivant F Vue suivant F Vue suivant F Vue suivant F Equerre Equerre Repérer et percer les 2 x 2 trous Ø10.5 mm... - Seite 35 MONTAGE OPTIONS – Roll-bar Percer les 2 X 2 trous dans le tableau arrière en se servant du gabarit comme guide de perçage. Pour le côté bâbord, vous pouvez procéder de cette façon ou percer le tableau par l’intérieur de l’embarcation en utilisant le roll bar comme guide après l’avoir correctement positionné...
- Seite 36 MONTAGE OPTIONS – Roll-bar Mettre du mastic d’étanchéité (type Sikaflex) sur tous les boulons et dans les trous. Placer les entretoises côté bâbord. Fixer le roll bar. Faire un joint propre autour du trou Ø 50 Entretoise Entretoise Roll-bar Roll bar montage côté...
- Seite 37 2 chemin de la Val Priout 31450 AYGUESVIVES FRANCE SUNRIDER Edition 3...
- Seite 38 Manuel du Propriétaire Owner's Manual -Manuale del Proprietario Eignerhandbuch- Manual del propietario Tome 2 - Volume 2- Teil 2 - Tomo 2 SUNRIDER 500 - 550 - 650 609305 B Edition 3...
- Seite 39 CONTENTS PAGE I – GENERAL DESCRIPTIONS I-1-Technical characteristics ------------------------------------------------- 3 - 6 I-2-Inventory ----------------------------------------------------------------------- 7 - 8 I-3-Functional elements -------------------------------------------------------- I-4-Handling -------------------------------------------------------------------- II – BUOYANCY MECHANISM II-1-Major phases in starting the buoyancy mechanism ---------------------- II-2-Inflation mechanism --------------------------------------------------------- 10-12 II-3-Pressure--------------------------------------------------------- ...
- Seite 40 DESCRIPTION - TECHNICAL CHARACTERISTIC I -1-1- TECHNICAL CHARACTERISTICS SUNRIDER 500 Dimensions 5.00 16’05“ (ft) 3.77 12’ 4“ (ft) 6’ 11“ (ft) 3’ 7" (ft) 0.50 1“ 8“ (ft) Certification (2013/53/CE) C / D Capacity (ISO) 1060 2337 Motorisation L- single engine...
- Seite 41 DESCRIPTION - Technical Characteristics I -1-2- TECHNICAL CHARACTERISTICS SUNRIDER 550 Dimensions 5.50 18’ 1“ (ft) 4.20 13’ 9“ (ft) 2.18 7’ 2“ (ft) 1.22 4’ (ft) 0.50 1’ 8“ (ft) Certification C / D (2013/53/EU) Capacity (ISO) 1157 2551 Motorisation L-single engine Minimum power recommended...
- Seite 42 DESCRIPTION - Technical Characteristics I -1-3- TECHNICAL CHARACTERISTICS SUNRIDER 650 Dimensions 6.35 20’ 10“ (ft) 15’ 9“ (ft) 2.45 8’ (ft) 1.35 4’ 5“ (ft) 0.55 1’ 10“ (ft) Certification C / D (2013/53/EU) Capacity (ISO) 1000 1600 2205 3527 1036 Motorisation L-single engine...
- Seite 43 DESCRIPTION - Technical Characteristics Dimension tolerance: ± 4% NOTE Weight tolerance: ± 5% The maximum authorized load was calculated to standard ISO 6185. Navigate carefully when the boat carries the maximum load. Weight shown not including accessories The recommended power corresponds to optimum operation of the boat’s capabilities for an average load.
-
Seite 44: I-2-Inventory
DESCRIPTION - Inventory I -2-INVENTORY HULL • Pronounced V-shaped polyester hull with • • • strakes • Non-skid deck • • • • 1 bow ring • • • • 2 rear towing rings • • • • 1 access hatch to the engine trough •... - Seite 45 DESCRIPTION - Inventory STANDARD EQUIPMENT (CONT'D) • 1 dipstick holder (not installed) • • • • 2 paddles • • • • 1 foot inflator • • • • 1 repair kit • • • • 1 owner's manual (two volumes) •...
- Seite 46 DESCRIPTION - Functional Elements I-3-ESSENTIAL FUNCTIONAL ELEMENTS: I-3-DESCRIPTION DES ELEMENTS FONCTIONNELS ESSENTIELS: • • • Bow ring • • • Roller chock + cleat + rea • • • Anchoring tub • • • Console • • • Steering • •...
-
Seite 47: I-4-Handling
I -4-HANDLING I-5-1-Transport: Advice for fitting to a trailer is given in the owner's manual, Volume 1. I-5-2-Storage: THE BOAT MUST REST ON THE BOW (SEE SKETCH BELOW) CAUTION SUNRIDER 500 SUNRIDER 550 SUNRIDER 650 Page 9 of 35... -
Seite 48: Ii - Buoyancy Mechanism
BUOYANCY MECHANISM - Major Phases II – BUOYANCY MECHANISM II -1-MAJOR PHASES IN STARTING THE BUOYANCY MECHANISM The boat assembly procedure follows an order you must respect. Proceed step by step, referring each time to the pages indicated for explanations. INFLATING PROCEDURE PAGE SECTION... - Seite 49 BUOYANCY MECHANISM - INFLATING THE BOAT INFLATING THE BUOYANCY MECHANISM • Place the adapter corresponding to the diameter of the semi-built in valve at the inflator pipe nozzle. Inflate the buoyancy mechanism, balancing the pressure between the different compartments until the partitions (a) are no longer visible (pressure = 240 mb) NEVER PRESSURISE A COMPARTMENT WHEN...
-
Seite 50: In Case Of Overpressure
BUOYANCY MECHANISM - Pressure II -3-PRESSURE Operating pressure for the buoyancy unit is 240 mb/ 3.4 PSI (middle of the green zone of the pressure gauge). Your boat is equipped with an ACCESS pressure indicator that will enable you to read the pressure quickly and efficiently during inflating (see explanations for use in the section Inflating System). -
Seite 51: Propulsion System
PROPULSION SYSTEM III-PROPULSION SYSTEM Comply with Bombard recommendations and engine constructor recommendations. For optimum use of your boat, see your dealer. Page 13 of 35... -
Seite 52: Iv - Installation And Circuits
INSTALLATION AND CIRCUIT - Fuel IV - INSTALLATION AND CIRCUITS IV-1-FUEL INSTALLATION IV-1-1- Description Description of essential functional parts: IV-1-1-1- Fuel tank filling Fuel tank Fuel tank filling Fuel circuit closing valves Vent outlet Fuel supply pipe Fuel/water separator filter Priming device (not supplied) Tank dipstick holder (not installed) Page 14 of 35... - Seite 53 INSTALLATION AND CIRCUIT - Fuel IV-1-1-2- Description of the tank SUNRIDER 550/650 IV-1-1-3- Description of the tank SUNRIDER 500 Gauge transmitter Fuel tank filling Fuel circuit closing valve Vent Page 15 of 35...
- Seite 54 INSTALLATION AND CIRCUIT - Fuel IV-1-1-4- Description of the water/fuel separator filter MARK DESIGNATION Filter head, fixed to the boat Interchangeable filtering element THE CARTRIDGE MUST BE CHANGED EVERY 50 HOURS USE WARNING Page 16 of 35...
- Seite 55 INSTALLATION AND CIRCUIT - Fuel IV-1-2-Using the fuel circuit Unlock the clip pulling on the handle NOTE: Open the console (see photograph) Fuel circuit valve: - When you are no longer using your boat, close the fuel circuit valve - When you are going to use your boat, open the fuel circuit valve ...
- Seite 56 If you had to replace the fuel tank, an imprint is available on the NOTE: console to be cut out. A tank access door will then be installed. Consult your Bombard dealer for optimum use. Imprint for replacing the tank. Page 18 of 35...
- Seite 57 WARNING Changing the filter cartridge: Comply with BOMBARD recommendations and filter manufacturer recommendations Place a funnel and recovery bowl underneath the cartridge while it is being replaced. Before changing the filter, make sure the fuel supply line pressure is released.
- Seite 58 INSTALLATION AND CIRCUIT - Fuel IV-1-4-Recommendations: IN CASE OF FUEL LEAK OR FIRE, THE FUEL CIRCUIT CLOSING VALVE, LOCATED ON THE TANK, ABOVE THE CONSOLE ISOLATES THE FUEL CIRCUIT TANK AND WARNING SHOULD BE CLOSED A FULL TANK AVOIDS CONDENSATION ON EACH OPERATION.
-
Seite 59: Iv-2-Electricity
INSTALLATION AND CIRCUIT - Electricity IV-2- ELECTRICITY IV-2-1- Description IV-2-1-1 Fuel dipstick wiring diagram Blue Blue Black Black Black Transmitter Dipstick Dipstick lighting Headlight switch, or independent (option) Connection, identify the positive output of the switch Battery Engine control box switch Fuse Page 21 of 35... - Seite 60 INSTALLATION AND CIRCUIT - Electricity IV-2-1-2 Bilge pump wiring diagram (SUNRIDER 650 only) Bilge pump switch Trigger Bilge pump Tight fuse holder + fuse Circuit breaker (not supplied) Battery To accessory harness (not supplied) Page 22 of 35...
- Seite 61 INSTALLATION AND CIRCUIT - Electricity IV-2-2- Use IV-2-2-1- Wiring harness (not supplied): For optimum use of your boat, see your dealer. IV-2-2-2- Battery (not supplied) A battery tank space is available at the back of the boat NOTE: WE RECOMMEND USING A BATTERY TRAY. THE BATTERY MUST BE SECURED CORRECTLY.
- Seite 62 INSTALLATION AND CIRCUIT - Electricity IV-2-3-Handling IV-2-3-2 Battery maintenance Comply with Bombard recommendations and battery manufacturer recommendations for everyday maintenance. BATTERY CARE: KEEP THE BATTERY CLEAN AND DRY TO AVOID PREMATURE WEAR TIGHTEN AND MAINTAIN THE TERMINAL LUGS COATING...
-
Seite 63: Iv-3-Steering
INSTALLATION AND CIRCUIT - Steering IV-3-STEERING Comply with the recommendations of the Steering system manufacturer (installation, use and maintenance). For optimum use of your boat, see your dealer. Steering wheel Cable Cable end and driving rod Page 25 of 35... -
Seite 64: Iv-4-Passing Cables
INSTALLATION AND CIRCUIT - Passing the cables IV-4-PASSING CABLES Prepare the end of the steering cable. Thread the steering cable into the back of the hull towards the front after having fixed the sleeve protecting the rack. Pull it out from the console. - Seite 65 INSTALLATION AND CIRCUIT - Drainage IV-5-DRAINAGE SYSTEM IV-5-1- Description IV-5-1-1- Evacuation : 1 deck dumping system 1 hull drain hole 1 rear trough outlet 1 bilge pump drainage outlet (SUNRIDER 650) Page 27 of 35...
- Seite 66 INSTALLATION AND CIRCUIT - Drainage IV-5-1-2- Bilge pump (SUNRIDER 650): 1 Bilge pump switch 2 switch spaces 1 bilge pump 1 Bilge pump switch 1 bilge pump drainage outlet IV-5-1-3- Dumping System Deck dumping system Dumping system membrane Plug holding bracket Plug Page 28 of 35...
- Seite 67 INSTALLATION AND CIRCUIT - Drainage The dumping system comprises: a fixed flexible membrane that: - distorts, to drain in certain conditions the water on the bridge NOTE: from inside the boat to the outside when the boat is in operation. -sticks to the bottom to provide temporary tightness, stopping the water from coming into the boat from the outside.
- Seite 68 INSTALLATION AND CIRCUIT - Drainage IV-5-2-2: Dumping system IV-5-2-2-1: Boat outside the water (on trailer, cradle, etc.) POSITION OPEN, PLUG REMOVED. IV-5-2-2-2: Boat in the water DURING NAVIGATION POSITION CLOSED, PLUG(S) IN POSITION. DRAINING PROCEDURE FOR ON-BOARD WATER WITH THE BOAT STOPPED, REMOVE THE PLUG AND THEN SAIL IN BUOYANCY POSITION (>...
-
Seite 69: Iv-6-Fire Extinction
INSTALLATION AND CIRCUIT - Drainage IV-5-2-3 : Hull plug hole IV-5-2-3-1: Boat outside the water (on trailer, cradle, etc.) POSITION OPEN, PLUG REMOVED. IV-5-2-3-2: Boat in the water POSITION CLOSED, PLUG(S) IN POSITION. (MAKE SURE THE PLUG IS PROPERLY CLOSED) INSTALLATION AND CIRCUIT - Fire Extinction IV-6-FIRE EXTINCTION Extinguisher support position... -
Seite 70: Iv-7-Anchoring/Mooring
INSTALLATION AND CIRCUIT - ANCHORING/MOORING IV-7- ANCHORING/MOORING Anchoring line retaining the ring located inside the tub. Roller chock + cleat + rea Anchoring line retaining ring Bow ring Anchoring chest THE CLEATS CAN ONLY BE USED FOR OCCASIONAL MOORING OF THE BOAT. WARNING FOR PERMANENT MOORING, USE THE BOW CHAIN PLATE PROVIDED AT THE FRONT OF THE BOAT. -
Seite 71: Assembly Of Options
ASSEMBLY OF OPTIONS – Roll-bar V-1- ROLL-BAR ASSEMBLY Prepare 2 drilling templates (min. thickness: 25 mm) Assemble the roll bar. Block the roll bar in position as shown on the figure below. View on F View on F Vue suivant F Vue suivant F Support Equerre... - Seite 72 ASSEMBLY OF OPTIONS – Roll-bar Drill the 2 x 2 holes in the rear transom, using the template as drilling guide. On the port side, you can proceed in this way, or drill the transom from the inside of the ship, using the roll bar as a guide, after locating it correctly and holding it.
- Seite 73 MONTAGE OPTIONS – Roll-bar Apply sealing compound (Sikaflex type) on all the bolts and in the holes. Install the spacers on portside. Assemble the roll bar. Make a clean joint around the dia. 50 mm hole. Spacer Entretoise Roll bar Roll-bar Portside montage côté...
- Seite 74 2 chemin de la Val Priout 31450 AYGUESVIVES FRANCE SUNRIDER Edition 3...
- Seite 75 Manuel du Propriétaire Owner's Manual -Manuale del Proprietario Eignerhandbuch- Manual del propietario Tome 2 - Volume 2- Teil 2 - Tomo 2 SUNRIDER 500 - 550 - 650 609305 B Edition 3...
- Seite 76 INHALTSVERZEICHNIS SEITE I - ALLGEMEINE BESCHREIBUNGEN I-1-Technische Daten ------------------------------------------------------------------ 2 - 5 I-2-Inventur ------------------------------------------------------------------------------ 6 - 7 I-3-Funktionelle Bauteile -------------------------------------------------------------- I-4-Handhabung ------------------------------------------------------------------------- II – AUFTRIEBSKÖRPER II-1-Wesentliche Abschnitte für das Aufpumpen des Auftriebskörper------- II-2-Aufpumpsystem-------------------------------------------------------------------- 10 - 12 II-3-Druck ------------------------------------------------------------------------------- ...
- Seite 77 BESCHREIBUNG – Technische Daten I -1-1- TECHNISCHE DATEN SUNRIDER 500 Abmessungen 5.00 16’05“ (ft) 3.77 12’ 4“ (ft) 6’ 11“ (ft) 3’ 7" (ft) 0.50 1“ 8“ (ft) Zertifikation C / D (2013/53/EU) Kapazität (ISO) 1060 2337 Motorisierung L- einmotorig Long empf.
- Seite 78 BESCHREIBUNG – Technische Daten I -1-2- TECHNISCHE DATEN SUNRIDER 550 Abmessungen 5.50 18’ 1“ (ft) 4.20 13’ 9“ (ft) 2.18 7’ 2“ (ft) 1.22 4’ (ft) 0.50 1’ 8“ (ft) Zertifikation (2013/53/EU) C / D Kapazität (ISO) 1157 2551 Motorisierung L- einmotorig empf.
- Seite 79 BESCHREIBUNG – Technische Daten I -1-3- TECHNISCHE DATEN SUNRIDER 650 Abmessungen 6.35 20’ 10“ (ft) 15’ 9“ (ft) 2.45 8’ (ft) 1.35 4’ 5“ (ft) 0.55 1’ 10“ (ft) Zertifikation C / D (2013/53/EU) Kapazität (ISO) 1000 1600 2205 3527 1036 Motorisierung L- einmotorig...
- Seite 80 BESCHREIBUNG – Technische Daten Abmessungstoleranzen: ± 4% HINWEIS Gewichtstoleranz: ± 5% Das maximal zugelassene Gewicht wurde nach der ISO 6185-Norm berechnet. Es wird empfohlen, vorsichtig zu steuern, wenn das Boot mit der maximalen Last beladen ist. Angegebene Gewichte ohne Zubehör Die empfohlenen Leistungen entsprechen einem optimalen Betrieb des Bootes für eine mittlere Last Je nach der Verwendung werden Sie die HINWEIS...
-
Seite 81: I-2-Inventur
BESCHREIBUNG - Inventur I-2-INVENTUR BOOTSKÖRPER • Polyesterbootskörper mit ausgeprägtem V • • • mit Gang • Deck, rutschfest • • • • 1 Vorstevenring • • • • 2 Hintere Zugösen • • • • 1 Zugangsklappe für die Motormulde •... - Seite 82 BESCHREIBUNG - Inventur STANDARDAUSRÜSTUNG (FORTSETZUNG) • 1 Aufnahme für die Kraftstoffanzeige • • • (nicht montiert) • 2 Paddel • • • • 1 Blasbalg mit Fußbetätigung • • • • 1 Reparaturset • • • • 1 Bedienungshandbuch (2 Teile) •...
- Seite 83 BESCHREIBUNG – Funktionelle Bauteile I-3-BESCHREIBUNG DER WICHTIGSTEN FUNKTIONELLEN BAUTEILE: I-3-DESCRIPTION DES ELEMENTS FONCTIONNELS ESSENTIELS: • • • Vorstevenring • • • Seilrollenhalterung + Klampe + Seilrolle • • • Ankerkasten • • • Konsole • • • Steuerung • • •...
-
Seite 84: I-4-Handhabung
Die Empfehlungen für die Beladung auf einen Anhänger sind im Handbuch des Besitzers, TEIL I, genau angeführt. I-5-2-Lagerung: DAS BOOT MUSS UNBEDINGT AUF DER VORSTEVENLINIE AUFLIEGEN (SIEHE SKIZZE UNTEN). ACHTUNG SUNRIDER 500 SUNRIDER 550 SUNRIDER 650 Seite 9 von 36... -
Seite 85: Ii - Auftriebskörper
AUFTRIEBSKÖRPER – Wesentliche Abschnitte II - AUFTRIEBSKÖRPER II-1- DIE WESENTLICHEN ABSCHNITTE FÜR DEN EINBAU DES AUFTRIEBSKÖRPERS Der Zusammenbau des Bootes erfolgt in einer bestimmten Reihenfolge, die von Ihnen eingehalten werden muss. Gehen Sie Abschnitt für Abschnitt vor, lesen Sie jedes Mal in den angeführten Seiten die Erklärungen der Vorgehensweise. -
Seite 86: Auftriebskörper - Aufblasen Des Bootes
AUFTRIEBSKÖRPER - AUFBLASEN DES BOOTES AUFPUMPEN DES AUFTRIEBKÖRPERS • Das entsprechende Zwischenstück für den Durchmesser des halbeingelassenen Ventils auf das Ansatzstück des Blasbalgschlauches aufstecken. Den Auftriebskörper aufpumpen indem die Drücke in den verschiedenen Abteilen gleichmäßig verteilt werden, bis die Trennwände (a) nicht mehr sichtbar sind (Druck = 240 mb) NIEMALS EIN ABTEIL UNTER DRUCK SETZEN, WENN DIE... -
Seite 87: Ii-3-Druck
AUFTRIEBKÖRPER - Druck II-3-DRUCK Der Betriebsdruck des Auftriebskörpers ist 200 bis 240 mb/ 3,4 PSI (Mitte des grünen Bereiches des Druckanzeigers). Ihr Boot ist mit einem Druckanzeiger ACCESS ausgestattet, dies ermöglicht Ihnen ein rasches und sicheres Ablesen des Druckes während das Aufpumpens (siehe Erklärungen für die Verwendung im Abschnitt "Aufpumpsystem"). -
Seite 88: Antriebssystem
ANTRIEBSSYSTEM III-ANTRIEBSSYSTEM Halten Sie sich genau an die Empfehlungen von BOMBARD und an die Empfehlungen des Motorherstellers. Für eine optimale Verwendung Ihres Bootes wenden Sie sich an Ihren Vertragshändler. Seite 13 von 36... -
Seite 89: Einbau Und Kreisläufe
INSTALLATION UND KREISLAUF - Treibstoff EINBAU UND KREISLAUF IV-1-EINBAU TREIBSTOFFEINRICHTUNGEN IV-1-1- Beschreibung Beschreibung der wichtigsten funktionellen Teile: IV-1-1-1- Einfüllstutzen Benzinreservoir Benzinreservoir Einfüllstutzen Benzinreservoir Absperrhähne für Benzinkreislauf des Reservoirs Ausgang Entlüftungsstutzen Leitung für die Benzinzufuhr Abscheidungsfilter Wasser / Benzin Ansaugball (nicht mitgeliefert) Aufnahme für den Kraftstoffanzeiger (nicht montiert) Seite 14 von 36... - Seite 90 INSTALLATION UND KREISLAUF - Treibstoff IV-1-1-2- Beschreibung des Reservoirs Sunrider 550/650 IV-1-1-2- Beschreibung des Reservoirs Sunrider 500 Kraftstoffanzeige-Übertragung Einfüllstutzen Reservoir Absperrventil Benzinkreislauf Entlüftungsstutzen Seite 15 von 36...
- Seite 91 INSTALLATION UND KREISLAUF - Treibstoff IV-1-1-4- Beschreibung des Trennfilters Wasser/Benzin KENNZ. BEZEICHNUNG Filterkopf, auf dem Boot befestigt Austauschbares Filterelement DIE FILTERPATRONE MUSS IMMER NACH 50 BETRIEBSSTUNDEN AUSGEWECHSELT WERDEN ACHTUNG Seite 16 von 36...
- Seite 92 INSTALLATION UND KREISLAUF - Treibstoff IV-1-2- Verwendung des Benzinkreislaufes Die Schnallenverschlüsse öffnen indem am Griff gezogen wird. ANMERKUNG: Die Konsole aufklappen (siehe Foto). Absperrhahn des Benzinkreislaufes: - Wenn Sie Ihr Boot nicht mehr verwenden, schließen Sie den Absperrhahn des Benzinkreislaufes.
-
Seite 93: Anmerkung
Konsole eine Ausnehmung zum Ausschneiden vorgesehen. Eine Zugangsöffnung zum Reservoir wird somit geschaffen. Damit diese Arbeit wirklich optimal durchgeführt wird, setzen Sie sich bitte mit Ihrem BOMBARD-Vertragshändler in Verbindung. Vorgesehene Ausnehmung für den Austausch des Reservoirs Seite 18 von 36... - Seite 94 AUSGEWECHSELT WERDEN ACHTUNG Austausch der Filterpatrone: Halten Sie sich an die Empfehlungen von BOMBARD und Filterhersteller Stellen Sie einen Auffangbehälter unter den Filter während Sie die Filterpatrone wechseln. Vor dem Filterwechsel vergewissern Sie sich, das die Kraftstoffleitung Druckfrei und der Absperrhahn offen ist.
- Seite 95 INSTALLATION UND KREISLAUF - Treibstoff IV-1-4-Empfehlungen: FALLE EINER UNDICHTEN STELLE BENZINKREISLAUF ODER BEI BEGINN EINES BRANDES KANN MIT DEM ABSPERRHAHN DES BENZINKREISLAUFES, WARNUNG DER SICH AUF DER KONSOLE BEFINDET, DAS RESERVOIR VOM BENZINKREISLAUF GETRENNT WERDEN UND ER MUSS GESCHLOSSEN BLEIBEN. ...
-
Seite 96: Iv-2-Elektrik
EINBAU UND KREISLAUF - Elektrik IV-2- ELEKTRIK IV-2-1- Beschreibung IV-2-1--1 Verkabelungsschema der Kraftstoffanzeige Blau Blau Schwarz Schwarz Schwarz Anzeiger Kraftstoffanzeiger Beleuchtung Kraftstoffanzeiger Scheinwerferschalter oder unabhängiger Schalter (optional) Anschluss, Plusausgang des Wendeschalters markieren Batterie Wendeschalter des Motor-Steuerkastens Sicherung Seite 21 von 36... - Seite 97 EINBAU UND KREISLAUF - Elektrik IV-2-1--2 Verkabelungsschema der Lenzpumpe (nur bei 640 SB) Schalter Lenzpumpe Auslöser Lenzpumpe Dichter Sicherungseinsatzträger + Sicherung Schalter (nicht mitgeliefert) Batterie Vers Leitungsbündel Zubehör (nicht mitgeliefert) Seite 22 von 36...
- Seite 98 EINBAU UND KREISLAUF - Elektrik IV-2-2- Verwendung: IV-2-2-1- Leitungsbündel (nicht mitgeliefert): Für eine optimale Verwendung Ihres Bootes wenden Sie sich an Ihren Vertragshändler. IV-2-2-2- Batterie (nicht mitgeliefert) Ein Einbau für die Batteriewanne ist im Heckkasten des Bootes ANMERKUNG: vorgesehen. WIR EMPFEHLEN IHNEN, EINE BATTERIEWANNE ZU VERWENDEN.
-
Seite 99: Warten Und Pflegen Sie Ihre Batterie
IV-2-3-Handhabung IV-1-3-2- Wartung der Batterie Halten Sie sich bei den regelmäßigen Wartungsarbeiten genau an die Empfehlungen von BOMBARD und an die Empfehlungen des Batterieherstellers. WARTEN UND PFLEGEN SIE IHRE BATTERIE: HALTEN SIE DIE BATTERIE SAUBER UND TROCKEN UM EINE VORZEITIGE ALTERUNG ZU VERMEIDEN. -
Seite 100: Iv-3-Steuerung
EINBAU UND KREISLAUF - Steuerung IV-3-STEUERUNG Halten Sie sich genau an die Empfehlungen des Herstellers der Steuerung (Installation, Betrieb und Wartung). Für eine optimale Verwendung Ihres Bootes wenden Sie sich an Ihren Vertragshändler. Lenkrad Kabel Ende des Lenkkabels und der Steuerstange Seite 25 von 36... - Seite 101 EINBAU UND KREISLAUF – Kabeleinbau IV-4-KABELEINBAU Bereiten Sie das Ende des Lenkkabels vor. Schieben Sie das Lenkkabel von hinten nach vorne in den Rumpf ein, vorher die Schutzhülle für die Zahnstange befestigen. Es in Höhe der Konsole herausziehen. Dann ein Motorsteuerkabel verwenden, an dem man ebenfalls ein geflochtenes Seil mit ungefähr 5 m Länge befestigt hat, es wird als Einziehdraht verwendet werden.
-
Seite 102: Iv-5-Lenzeinrichtung
EINBAU UND KREISLAUF - Lenzen IV-5- LENZEINRICHTUNG IV-5-1- Beschreibung: IV-5-1-1- Ableitung: 1 Schnellablass für das Deck 1 Rumpfwasserklappe 1 Ableitung des hinteren Behälters 1 Ablauföffnung Lenzpumpe (Sunrider 650) Seite 27 von 36... - Seite 103 Seite 28 von 36...
- Seite 104 EINBAU UND KREISLAUF - Lenzen IV-5-1-2- Lenzpumpe (nur bei Sunrider 650): 1 Schalter Lenzpumpe 2 Schalterplätze 1 Lenzpumpe 1 Auslöser Lenzpumpe 1 Ablauföffnung Lenzpumpe IV-5-1-3- Schnellablass Schnellablass für das Deck Membran des Schnellablasses Lyra für die Befestigung des Stopfens Stopfen Seite 29 von 36...
- Seite 105 EINBAU UND KREISLAUF - Lenzen Zum Schnellablass gehören: eine fest eingebaute elastische Membran, die: - sich verformt und unter bestimmten Umständen das Ablaufen des ANMERKUNG an Deck befindlichen Wassers während der Fahrt ermöglicht. -sich andrückt, um eine vorübergehende Abdichtung zu gewährleisten, damit alle Öffnungen vor ungewolltem Wassereintritt ins Innere des Bootes geschützt werden.
- Seite 106 EINBAU UND KREISLAUF - Lenzen IV-5-2-2: Schnellablass IV-5-2-2-1: Boot nicht im Wasser (Anhänger, Stapellaufschlitten...) POSITION OFFEN, STOPFEN ENTFERNT. IV-5-2-2-2: Boot im Wasser WÄHREND DER FAHRT POSITION GESCHLOSSEN, STOPFEN EINGESETZT. VERFAHREN FÜR DAS ABLAUFEN VON WASSER BEIM STILLSTAND DES BOOTES ENTFERNEN SIE DEN STOPFEN, FAHREN SIE DANN (>...
-
Seite 107: Iv-6-Feuerlöscher
EINBAU UND KREISLAUF - Lenzen IV-5-2-3: Rumpfentleerungsöffnung IV-5-2-3-1: Boot nicht im Wasser (Anhänger, Stapellaufschlitten…) POSITION OFFEN, ENTLEERUNGSÖFFNUNGEN OFFEN. IV-5-2-3-2: Boot im Wasser POSITION GESCHLOSSEN, ENTLEERUNGSÖFFNUNGEN ZU. (SICHER STELLEN, DASS ENTLEERUNGSÖFFNUNG RICHTIG ZU IST) EINBAU UND KREISLAUF - Feuerlöscher IV-6- FEUERLÖSCHER Einbaustelle für Feuerlöscherhalterung WIR EMPFEHLEN IHNEN, EINEN FEUERLÖSCHER AN BORD ZU HABEN, HALTEN SIE SICH GENAU AN DIE... -
Seite 108: Iv-7-Ankern/Vertäuen
EINBAU UND KREISLAUF - Ankern/Vertäuen IV-7- ANKERN /VERTÄUEN Sicherungsring der Ankerleine im Inneren des Bootskörpers Seilrollenhalterung + Klampe + Seilrolle Sicherungsring für die Ankerleine Vorstevenring Ankerkasten KLAMPEN ERMÖGLICHEN LEDIGLICH GELEGENTLICHES VERTÄUEN DES BOOTES. WARNUNG LANGFRISTIGES VERTÄUEN MUSS MITHILFE RÜSTEISEN ERFOLGEN, DIE SICH AM BUG DES BOOTES BEFINDEN. - Seite 109 MONTAGE-OPTIONEN – Roll-Bar V-1- MONTAGE DER ROLL-BAR Stellen Sie 2 Bohrschablonen her (Mindeststärke: 25 mm) Bauen Sie die Roll-Bar zusammen. Bringen Sie die Roll-Bar wie in der Abbildung ersichtlich in Position. Ansicht von F aus Vue suivant F Vue suivant F Ansicht von F aus Winkel Equerre...
-
Seite 110: V-1-Roll-Bar
MONTAGE-OPTIONEN – Roll-Bar Bohren Sie die 2 X 2 Löcher in die Heckplatte, wobei die Schablone als Führung bei der Bohrung dient. Für die Backbordseite können Sie auf diese Weise verfahren oder die Platte von der Innenseite des Bootes her durchbohren, wobei die Roll- Bar korrekt positioniert und gehalten und als Führung benutzt wird. - Seite 111 MONTAGE-OPTIONEN – Roll-Bar Dichtungsmasse (Typ Sikaflex) für alle Bolzen und in den Löchern verwenden. Zwischenstücke auf der Backbordseite befestigen. Roll-Bar befestigen. Bringen Sie um die Bohrung mit dem Durchmesser Ø 50 mm eine saubere Dichtung an. Zwischenstück Entretoise Roll-bar Roll bar Backbord montage côté...
- Seite 112 2 chemin de la Val Priout 31450 AYGUESVIVES FRANCE SUNRIDER Edition 3...
- Seite 113 Manuel du Propriétaire Owner's Manual -Manuale del Proprietario Eignerhandbuch- Manual del propietario Tome 2 - Volume 2- Teil 2 - Tomo 2 SUNRIDER 500 - 550 - 650 609305 B Edition 3...
- Seite 114 Manuel du Propriétaire Owner's Manual -Manuale del Proprietario Eignerhandbuch- Manual del propietario Tome 2 - Volume 2- Teil 2 - Tomo 2 SUNRIDER 500 - 550 - 650 609305 B Edition 3...
- Seite 115 SUMARIO PÁGINA I – DESCRIPCIÓN GENERAL I-1-Características técnicas ---------------------------------------------------------- 2 - 5 I-2-Inventario -------------------------------------------------------------------------- 6 - 7 I-3-Elementos funcionales ----------------------------------------------------------- I-4-Manutención ---------------------------------------------------------------------- II - FLOTADOR II-1-Principales etapas de la puesta en servicio del flotador------------------ II-2-Sistema de inflado---------------------------------------------------------------- 10 - 12 II-3-Presión ----------------------------------------------------------------------------- ...
- Seite 116 DESCRIPCIÓN - Características técnicas I -1-1- CARACTERÍSTICAS TÉCNICAS SUNRIDER 500 Dimensiones 5.00 16’05“ (ft) 3.77 12’ 4“ (ft) 6’ 11“ (ft) 3’ 7" (ft) 0.50 1“ 8“ (ft) Certificación C / D (2013/53/EU) Capacidad (ISO) 1060 2337 Motorización L- monomotor Long Potencia MÍN.
- Seite 117 DESCRIPCIÓN - Características técnicas I -1-2- CARACTERÍSTICAS TÉCNICAS SUNRIDER 550 Dimensiones 5.50 18’ 1“ (ft) 4.20 13’ 9“ (ft) 2.18 7’ 2“ (ft) 1.22 4’ (ft) 0.50 1’ 8“ (ft) Certificación C / D (2013/53/EU) Capacidad (ISO) 1157 2551 Motorización L- monomotor Ñ...
- Seite 118 DESCRIPCIÓN - Características técnicas I -1-3- CARACTERÍSTICAS TÉCNICAS SUNRIDER 650 Dimensiones 6.35 20’ 10“ (ft) 15’ 9“ (ft) 2.45 8’ (ft) 1.35 4’ 5“ (ft) 0.55 1’ 10“ (ft) Certificación C / D (2013/53/EU) Capacidad (ISO) Maximum 1000 1600 2205 3527 1036 Motorización...
- Seite 119 DESCRIPCIÓN - Características técnicas Tolerancias de las dimensiones: ± 4 % NOTA Tolerancias de los pesos: ± 5% La carga máxima autorizada se ha calculado según la norma ISO 6185. Se recomienda navegar con precaución cuando el barco está cargado al máximo. Pesos indicados sin accesorios Las potencias recomendadas corresponden a una explotación óptima NOTA...
-
Seite 120: I-2-Inventario
DESCRIPCIÓN - Inventario I -2-INVENTARIO CASCO • Casco poliéster en V profunda con tracas • • • • Cubierta antideslizante • • • • 1 anilla de roda • • • • 2 anillas traseras de remolque • • • •... - Seite 121 DESCRIPCIÓN - Inventario EQUIPAMIENTO ESTÁNDAR (CONT.) • 1 Receptor de indicador de nivel (no • • • montado) • 2 pagayas • • • • 1 inflador de pie • • • • 1 maletín de reparación • • • •...
- Seite 122 DESCRIPCIÓN - Elementos funcionales I-3-DESCRIPCIÓN DE LOS PRINCIPALES ELEMENTOS FUNCIONALES I-3-DESCRIPTION DES ELEMENTS FONCTIONNELS ESSENTIELS: • • • Anilla de roda • • • Grulla + Cornamusa + Polea • • • Canasta de fondeo • • • Consola • •...
-
Seite 123: I-4-Manutención
Los consejos de colocación sobre remolque se especifican en el manual del propietario TOMO I. I-5-2-Almacenamiento EL BARCO DEBE TOMAR APOYO NECESARIAMENTE SOBRE LA RODA (VÉASE EL CROQUIS QUE FIGURA A CONTINUACIÓN). ATENCIÓN SUNRIDER 500 SUNRIDER 550 Ñ SUNRIDER 650 Pág. 9 de 35... -
Seite 124: Ii - Flotador
FLOTADOR - Grandes etapas II - FLOTADOR II -1-PRINCIPALES ETAPAS DE LA PUESTA EN SERVICIO DEL FLOTADOR El procedimiento de montaje del barco sigue un orden que se debe respetar. Proceder, etapa por etapa, refiriéndose siempre a las páginas indicadas para las explicaciones de procedimientos. PROCEDIMIENTO DE INFLADO PÁG. - Seite 125 FLOTADOR - INFLADO DEL BARCO INFLADO DEL FLOTADOR • Ajuste el adaptador correspondiente al diámetro de la válvula semiempotrada en el extremo del tubo del inflador. Infle el flotador equilibrando las presiones entre los diferentes compartimentos, hasta que los tabiques (a) no sean visibles (presión = 240 mbar). NO PONER NUNCA UN COMPARTIMENTO A PRESIÓN CUANDO LOS...
-
Seite 126: Ii-3-Presión
FLOTADOR - Presión II-3-PRESIÓN La presión de utilización para el flotador es de 200 a 240 mb/3,4 PSI (mitad de la zona verde del manómetro). Su barco está equipado con un indicador de presión ACCESS que le permitirá una lectura rápida y eficaz durante el inflado (véanse las explicaciones de utilización en la sección "Sistema de inflado"). -
Seite 127: Sistema De Propulsión
SISTEMA DE PROPULSIÓN III-SISTEMA DE PROPULSIÓN Remítase a las recomendaciones BOMBARD y a las del fabricante del motor. Para utilizar de forma óptima su embarcación, consulte a su concesionario. Ñ Pág. 13 de 35... -
Seite 128: Iv-1-Instalación De Combustible
INSTALACIÓN Y CIRCUITO - Combustible IV- INSTALACIÓN Y CIRCUITO IV-1-INSTALACIÓN DE COMBUSTIBLE IV-1-1- Descripción Descripción de los principales elementos funcionales IV-1-1-1- Boca de llenado del depósito de gasolina Depósito de gasolina Boca de llenado del depósito de gasolina Válvulas de cierre del circuito de gasolina del depósito Salida respiradero Tubo de alimentación de gasolina Filtro separador agua / gasolina... - Seite 129 INSTALACIÓN Y CIRCUITO - Combustible IV-1-1-2- Descripción del depósito SUNRIDER 550/650 IV-1-1-3- Descripción del depósito SUNRIDER 500 Ñ Transmisor del indicador de nivel Boca de llenado del depósito Válvula de cierre del circuito de gasolina Respiradero Pág. 15 de 35...
- Seite 130 INSTALACIÓN Y CIRCUITO - Combustible IV-1-1-4- Descripción del filtro separador agua / gasolina Nº DESCRIPCIÓN Cabeza del filtro, fijada a la embarcación Elemento de filtración intercambiable EL RECAMBIO SE DEBA CAMBIAR CADA 50 HORAS DE USO. ADVERTENCIA Pág. 16 de 35...
- Seite 131 INSTALACIÓN Y CIRCUITO - Combustible IV-1-2- Utilización del circuito de gasolina Desbloquear la palanca acodada de cierre tirando de la NOTA: empuñadura. brir la consola (véase la foto). Válvula del circuito de gasolina: - Cuando no utilice su barco, cierre la válvula del circuito de gasolina.
- Seite 132 Si tiene que cambiar el depósito de gasolina, se ha previsto una NOTA: marca en la consola para cortarla. Entonces se instalará una trampilla de acceso al depósito. Para una utilización óptima, consulte a su concesionario BOMBARD. Marca prevista para el cambio del depósito Pág. 18 de 35...
- Seite 133 ADVERTENCIA Cambio del cartucho del filtro: Siga las recomendaciones BOMBARD y las del fabricante del filtro Colocar un embudo debajo del lugar donde se colocará el recambio. Antes de efectuar el cambio del filtro, debe liberarse la presión del sistema de alimentación de combustible.
- Seite 134 INSTALACIÓN Y CIRCUITO - Combustible IV-1-4-Recomendaciones SI HAY UNA FUGA DE GASOLINA, O UN INCENDIO INICIAL, LA VÁLVULA DE CIERRE DEL CIRCUITO DE GASOLINA, SITUADA EN EL DEPÓSITO, DEBAJO DE LA ADVERTENCIA CONSOLA, AÍSLA EL DEPÓSITO DEL CIRCUITO DE GASOLINA Y DEBE PERMANECER CERRADA.
-
Seite 135: Iv-2-Electricidad
INSTALACIÓN Y CIRCUITOS - Electricidad IV-2- ELECTRICIDAD IV-2-1- Descripción IV-2-1--1 Esquema de cableado del indicador de nivel de gasolina Azul Azul Rojo Rojo Negro Negro Negro Rojo Ñ Transmisor Indicador de nivel Iluminación indicador de nivel Interruptor luces de circulación o independiente (opcional) Conexiones, localizar la salida positiva del contactor Batería Contactor de la caja de mando motor... - Seite 136 INSTALACIÓN Y CIRCUITOS - Electricidad IV-2-1--2 Esquema de cableado de la bomba de achique (650 únicamente) Interruptor bomba de achique Disparador Bomba de achique Portafusibles hermético + fusible Interruptor de batería (no incluido) Batería Hacia haz de hilos accesorio (no incluido) Pág.
- Seite 137 INSTALACIÓN Y CIRCUITOS - Electricidad IV-2-2- Utilización: IV-2-2-1- Haz de hilos (no incluido) Para utilizar de forma óptima su embarcación, consulte su concesionario. IV-2-2- Batería (no incluida) En la caja trasera del barco se ha previsto un emplazamiento para NOTA: la bandeja de la batería.
-
Seite 138: Mantenimiento De La Batería
INSTALACIÓN Y CIRCUITOS - Electricidad IV-2-3-Manutención IV-2-3-1 Mantenimiento de la batería Remítase a las recomendaciones BOMBARD y a las del fabricante de baterías para un mantenimiento normal. MANTENIMIENTO DE LA BATERÍA: MANTENGA LA BATERÍA LIMPIA Y SECA PARA EVITAR UN DESGASTE PREMATURO. -
Seite 139: Iv-3-Dirección
INSTALACIÓN Y CIRCUITOS - Dirección IV-3-DIRECCIÓN Remítase a las recomendaciones del fabricante de la dirección (instalación, utilización y mantenimiento). Para utilizar de forma óptima su embarcación, consulte su concesionario. Ñ Volante Cable Extremo del cable y biela de acoplamiento de la dirección Pág. -
Seite 140: Iv-4-Paso De Los Cables
INSTALACIÓN Y CIRCUITOS – Paso de los cables IV-4-PASO DE LOS CABLES Prepare el extremo del cable de dirección. Introduzca el cable de dirección en el casco, de atrás hacia delante, después de haber fijado el manguito que protege la cremallera. Sáquelo a la altura de la consola. -
Seite 141: Iv-5-Instalación De Achique
INSTALACIÓN Y CIRCUITO - Achique IV-5- INSTALACIÓN DEL ACHIQUE IV-5-1- Descripción IV-5-1-1- Evacuación 1 Desagüe rápido de cubierta 1 Desagüe de casco 1 Evacuación de la cubeta trasera Ñ 1 Salida evacuación bomba de achique (SUNRIDER 650) Pág. 27 de 35... - Seite 142 INSTALACIÓN Y CIRCUITO - Achique IV-5-1-2- Bomba de achique (SUNRIDER 650) 1 Interruptor bomba de achique 2 Ubicaciones interruptores 1 Bomba de achique 1 Disparador bomba de achique 1 Salida evacuación bomba de achique IV-5-1-3- Vaciador rápido Desagüe rápido de cubierta Membrana de vaciador rápido Lira de sostén del tapón Tapón...
- Seite 143 INSTALACIÓN Y CIRCUITO - Achique El vaciador rápido incluye: una membrana flexible fija, que: - se deforma y permite vaciar, en ciertas condiciones, el agua en NOTA: cubierta desde dentro del barco hacia afuera, cuando el barco está en marcha.
- Seite 144 INSTALACIÓN Y CIRCUITO - Achique IV-5-2-2: Vaciador rápido IV-5-2-2-1: Barco fuera del agua (en remolque, calzo) POSICIÓN ABIERTA, TAPÓN RETIRADO. IV-5-2-2-2: Barco en el agua EN NAVEGACIÓN POSICIÓN CERRADA, TAPÓN(ES) PUESTOS. PROCEDIMIENTO DE VACIADO DEL AGUA EMBARCADA CON EL BARCO DETENIDO, RETIRAR EL TAPÓN, LUEGO NAVEGAR EN POSICIÓN DE FLOTABILIDAD (>...
- Seite 145 INSTALACIÓN Y CIRCUITO - Achique IV-5-2-3: Desagüe de casco IV-5-2-3-1: Barco fuera del agua (en remolque, calzo) POSICIÓN ABIERTA, DESAGÜE RETIRADO. IV-5-2-3-2: Barco en el agua POSICIÓN CERRADA, DESAGÜE PUESTO. (ASEGÚRESE DE QUE EL DESAGÜE ESTÉ BIEN CERRADO) INSTALACIÓN Y CIRCUITOS - Extinción de incendio IV-6- EXTINCIÓN DE INCENDIO Ñ...
-
Seite 146: Iv-7-Fondeo / Amarre
INSTALACIÓN Y CIRCUITOS - Fondeo / Amarre IV-7- FONDEO / AMARRE Anilla de retención del cabo de fondeo situada en el interior del dofre de fondeo Grulla + Cornamusa + Polea Anilla de retención del cabo de fondeo Anilla de roda Cofre de fondeo LAS CORNAMUSAS SÓLO PERMITEN UN AMARRE OCASIONAL DEL BARCO. - Seite 147 MONTAJE DE OPCIONES – Roll bar V-1- MONTAJE DE LA ROLL BAR Fabricar 2 plantillas de taladrado (espesor mín.: 25 mm) Montar la roll bar. Bloquearla como se muestra en la figura a continuación. Vista según F Vista según F Vue suivant F Vue suivant F Escuadra...
- Seite 148 MONTAJE DE OPCIONES – Roll Bar Taladrar los 2 X 2 agujeros en el tablero posterior, utilizando la plantilla de guía de taladrado. A babor, proceder así o taladrar el tablero desde el interior del barco utilizando la roll bar de guía tras posicionarla correctamente y sujetarla.
- Seite 149 MONTAJE DE OPCIONES – Roll Bar Colocar masilla de estanqueidad (de tipo Sikaflex) en todos los bulones y en los agujeros. Colocar los separadores a babor. Sujetar la roll bar. Realizar un sello correcto alrededor del agujero de diám.50 mm. Separador Entretoise Roll-bar...
- Seite 150 2 chemin de la Val Priout 31450 AYGUESVIVES FRANCE SUNRIDER Edition 3...
- Seite 151 2 chemin de la Val Priout 31450 AYGUESVIVES FRANCE SUNRIDER Edition 3...
- Seite 152 Manuel du Propriétaire Owner's Manual -Manuale del Proprietario Eignerhandbuch- Manual del propietario Tome 2 - Volume 2- Teil 2 - Tomo 2 SUNRIDER 500 - 550 - 650 609305 B Edition 3...
- Seite 153 INDICE PAGIN I – GENERALITA’ I-1-Caratteristiche tecniche ---------------------------------------------------------- 2 - 5 I-2-Inventario --------------------------------------------------------------------------- 6 - 7 I-3-Elementi funzionali --------------------------------------------------------------- I-4-Manutenzione ---------------------------------------------------------------------- II – IL CANOTTO II-1-Tappe principali per la messa in servizio del gommone------------------- 10 – 12 II-2-Sistema di gonfiaggio------------------------------------------------------------- II-3-Pressione---------------------------------------------------------------------------- ...
-
Seite 154: I -1-1- Caratteristiche Tecniche Sunrider
DESCRIZIONE – Caratteristiche tecniche I -1-1- CARATTERISTICHE TECNICHE SUNRIDER 550 Dimensioni 5.00 16’05“ (ft) 3.77 12’ 4“ (ft) 6’ 11“ (ft) 3’ 7" (ft) 0.50 1“ 8“ (ft) Certificazione C / D (2013/53/EU) Capacità (ISO) 1060 2337 Motorizzazione L- monomotore Long Potenza MINIMA consigliata... - Seite 155 DESCRIZIONE – Caratteristiche tecniche I -1-2- CARATTERISTICHE TECNICHE SUNRIDER 550 Dimensioni 5.50 18’ 1“ (ft) 4.20 13’ 9“ (ft) 2.18 7’ 2“ (ft) 1.22 4’ (ft) 0.50 1’ 8“ (ft) Certificazione (2013/53/EU) C / D Capacità (ISO) 1157 2551 Motorizzazione L- monomotore Potenza MINIMA consigliata...
-
Seite 156: I -1-3- Caratteristiche Tecniche Sunrider
DESCRIZIONE – Caratteristiche tecniche I -1-3- CARATTERISTICHE TECNICHE SUNRIDER 650 Dimensioni 6.35 20’ 10“ (ft) 15’ 9“ (ft) 2.45 8’ (ft) 1.35 4’ 5“ (ft) 0.55 1’ 10“ (ft) Certificazione C / D (2013/53/EU) Capacità (ISO) 1000 1600 2205 3527 1036 Motorizzazione L- monomotore... - Seite 157 DESCRIZIONE – Caratteristiche tecniche Tolleranze sulle dimensioni: ± 4% NOTA Tolleranze sui pesi: ± 5% Il carico massimo consentito è stato calcolato in conformità alla norma ISO 6185. Si raccomanda di navigare con la massima prudenza quando l’imbarcazione è caricata fino al carico massimo consentito. Pesi indicati accessori esclusi Le potenze consigliate corrispondono ad uno sfruttamento ottimale delle capacità...
-
Seite 158: I-2-Inventario
DESCRIZIONE – Inventario I-2-INVENTARIO SCAFO • Scafo in poliestere a V pronunciato con fasciami • • • • Ponte antiscivolo • • • • 1 Anello di prua • • • • 2 Anelli posteriori di rimorchio • • • •... - Seite 159 DESCRIZIONE – Inventario EQUIPAGGIAMENTO STANDARD (CONTINUA) • 1 Indicatore di livello (non montato) • • • • 2 Pagaie • • • • 1 Pompa a piede • • • • 1 Valigetta porta-attrezzi • • • • 1 Manuale del proprietario (2 tomi) •...
- Seite 160 DESCRIZIONE – Elementi funzionali I-3-DESCRIZIONE DEI PRINCIPALI ELEMENTI FUNZIONALI: I-3-DESCRIPTION DES ELEMENTS FONCTIONNELS ESSENTIELS: • • • Anello di prua • • • Passacavo + Galloccia + Puleggia • • • Pozzo dell’ancora • • • Console di comando • •...
-
Seite 161: I-4-Manutenzione
Le raccomandazioni per la messa su rimorchio sono specificate nel manuale del proprietario TOMO I. I-5-2-Deposito: IL GOMMONE DEVE ASSOLUTAMENTE SOSTARE SULLA LINEA DI PRUA (VEDERE SCHIZZO SOTTOSTANTE). ATTENZIONE SUNRIDER 500 SUNRIDER 550 SUNRIDER 650 Pagina 9 di 35... -
Seite 162: Ii - Il Canotto
CANOTTO – Tappe fondamentali II – IL CANOTTO II-1-TAPPE FONDAMENTALI DELLA MESSA IN SERVIZIO DEL CANOTTO Raccomandiamo di seguire la procedura di montaggio del battello. Procedere passo passo, riportandosi sempre alle pagine indicate. PROCEDURA DI GONFIAGGIO PAGIN SEZIONE 1. Procedere all’inventario delle componenti costitutive 7 &... - Seite 163 GOMMONE – GONFIAGGIO DEL BATTELLO GONFIAGGIO DEL GOMMONE • Inserire l'adattatore corrispondente al tubo della valvola a scomparsa nel manicotto del tubo della pompa ad aria. Procedere al gonfiaggio del gommone equilibrando le pressioni dei diversi compartimenti, sino a quando le paratie (a) non scompaiano completamente (pressione = 240 mb) NON PORTARE MAI A SOVRAPRESSIONE UN SOLO...
-
Seite 164: Ii-3-Pressione
GOMMONE - PRESSIONE II-3-PRESSIONE La pressione d’utilizzo del gommone deve corrispondere a 200 - 240 mb/ 3,4 PSI (centro della zona verde del manometro). Il vostro gommone è dotato di un indicatore di pressione ACCESS suscettibile di consentirvi una lettura rapida ed efficace in fase di gonfiaggio (vedere le istruzioni d’utilizzo sezione “Sistema di gonfiaggio”). -
Seite 165: Sistema Di Propulsione
SISTEMA DIO PROPULSIONE III-SISTEMA DI PROPULSIONE Fare riferimento alle istruzioni BOMBARD, nonché alle istruzioni del fabbricante del motore. Per un impiego ottimale della vostra imbarcazione, siete pregati di contattare il vostro rivenditore di fiducia. Pagina 13 di 35... -
Seite 166: Impianto E Circuiti
IMPIANTO E CIRCUITO - Carburante IV - IMPIANTO E CIRCUITO IV-1-SISTEMA DI ALIMENTAZIONE DEL CARBURANTE IV-1-1- Descrizione Descrizione dei principali elementi funzionali: IV-1-1-1- Riempimento serbatoio della benzina Serbatoio della benzina Riempimento serbatoio della benzina Valvole di chiusura circuito d’alimentazione benzina del serbatoio Uscita di sfiato Tubo di alimentazione benzina... - Seite 167 IMPIANTO E CIRCUITO - Carburante IV-1-1-2- Descrizione del serbatoio SUNRIDER 550/650 IV-1-1-3- Descrizione del serbatoio SUNRIDER 500 Trasmettitore di flusso indicatore di livello Riempimento serbatoio Valvola di chiusura circuito d’alimentazione benzina Sfiato Pagina 15 di 35...
- Seite 168 IMPIANTO E CIRCUITO - Carburante IV-1-1-4- Descrizione del filtro di separazione acqua/carburante RIFERI- DENOMINAZIONE MENTO Testa del filtro, fissata al gommone Elemento di filtrazione intercambiabile SOSTITUIRE LA CARTUCCIA DEL FILTRO TUTTI 50 ORAS DE UTILIZZAZIONE ATTENZIONE Pagina 16 di 35...
- Seite 169 IMPIANTO E CIRCUITO - Carburante IV-1-2- Utilizzo del circuito d’alimentazione della benzina Sbloccare gli elementi a scatto tirando sulla manopola. NOTA: Aprire la console (vedi foto ). Valvola del circuito di benzina: - Quando la barca non viene utilizzata, chiudere la valvola del circuito di benzina.
- Seite 170 Se bisogna sostituire il serbatoio della benzina, ritagliare l’apposita NOTA: traccia predisposta sulla console. Si potrà così installare una botola di accesso al serbatoio. Per una perfetta ottimizzazione consultare il concessionario BOMBARD. Traccia predisposta per la sostituzione del serbatoio Pagina 18 di 35...
- Seite 171 ORAS DE UTILIZZAZIONE ATTENZIONE Sostituzione della cartuccia del filtro: Seguire scrupolosamente le istruzioni fornite da BOMBARD, nonché le disposizioni del costruttore del filtro. Posizionare un imbuto sotto la cartuccia da sostituire. Prima di sostituire il filtro a cartuccia, assicurarsi che il sistema d'alimentazione della benzina non sia in pressione.
-
Seite 172: Sostituzione Della Cartuccia Del Filtro
IMPIANTO E CIRCUITO - Carburante IV-1-4- Avvertenze: IN CASO DI EVENTUALI FUGHE DI BENZINA O INIZIO DI INCENDIO, LA VALVOLA DI CHIUSURA DEL CIRCUITO D’ALIMENTAZIONE DELLA BENZINA, POSTA ATTENZIONE SERBATOIO, AL DI SOTTO DELLA CONSOLE DI COMANDO, CONSENTE D’ISOLARE IL SERBATOIO DEL CIRCUITO D’ALIMENTAZIONE DELLA BENZINA E DEVE, PERTANTO, ESSERE IMMEDIATAMENTE CHIUSA. -
Seite 173: Iv-2-Impianto Elettrico
IMPIANTO E CIRCUITO – Impianto elettrico IV-2-IMPIANTO ELETTRICO IV-2-1- Descrizione IV-2-1--1 Schema elettrico dell’indicatore di livello benzina Rosso Rosso Nero Nero Nero Rosso Trasmettitore di flusso Indicatore di livello Luce indicatore di livello Interruttore luce di posizione o luce indipendente (optional) Collegamento, individuare l’uscita positiva del contattore Batteria Contattore della scatola comandi motore... - Seite 174 IMPIANTO E CIRCUITO – Impianto elettrico IV-2-1--2 Schema elettrico della pompa di sentina (solo SUNRIDER 650) Interruttore pompa di sentina Dispositivo di avviamento Pompa di sentina Porta fusibili a tenuta stagna + fusibile Interruttore di sicurezza (non in dotazione) Batteria Verso cablaggio accessori (non in dotazione) Pagina 22 di 35...
- Seite 175 IMPIANTO E CIRCUITO – Impianto elettrico IV-2-2- Utilizzo: IV-2-2-1- Cablaggio elettrico (non in dotazione): Per un impiego ottimale della vostra imbarcazione, siete pregati di contattare il vostro rivenditore di fiducia. IV-2-2- Batteria (non in dotazione) Lo spazio per la vasca batteria nel cofano posteriore della barca. NOTA: SI RACCOMANDA DI UTILIZZARE UNA VASCA BATTERIA.
- Seite 176 IV-2-3- Manutenzione: IV-2-3-1 Manutenzione della batteria Per tutti gli interventi di manutenzione ordinaria, si prega di fare riferimento alle istruzioni fornite da BOMBARD, nonché alle istruzioni fornite dal costruttore delle batterie. PROCEDERE ALLA MANUTENZIONE DELLA BATTERIA: MANTENERE LA BATTERIA PERFETTAMENTE PULITA E BEN ASCIUTTA, AL FINE DI EVITARE L’USURA PREMATURA DELLA...
-
Seite 177: Iv-3-Sterzo
IMPIANTO E CIRCUITO – Sterzo IV-3-STERZO Fare riferimento alle istruzioni fornite dal costruttore dello sterzo (installazione, uso e manutenzione). Per un impiego ottimale della vostra imbarcazione, siete pregati di contattare il vostro rivenditore di fiducia. Volante Cavo Estremità del cavo e bielletta dello sterzo Pagina 25 di 35... - Seite 178 IMPIANTO E CIRCUITO – Passaggio dei cavi IV-4-PASSAGGIO DEI CAVI Preparare l’estremità del cavo direzionale. Infilare il cavo direzionale nello scafo dalla parte posteriore verso la parte anteriore dopo aver fissato la guaina di protezione della cremagliera. Recuperarlo a livello della console. Usare quindi un cavo di comando motore a cui sarà...
-
Seite 179: Iv-5-Impianto D'asciugamento
IMPIANTO E CIRCUITO – Impianto di asciugamento IV-5-IMPIANTO D’ASCIUGAMENTO IV-5-1- Descrizione IV-5-1-1 Evacuazione: 1 Valvola di scarico rapido del ponte 1 Alleggio scafo 1 Evacuazione della vasca posteriore 1 Uscita evacuazione pompa di sentina (SUNRIDER 650) Pagina 27 di 35... - Seite 180 IMPIANTO E CIRCUITO – Impianto di asciugamento IV-5-1-2- Pompa di sentina (solo SUNRIDER 650): Interruttore pompa di sentina 2 Alloggiamenti per interruttori 1 Pompa di sentina 1 Dispositivo di avviamento pompa di sentina 1 Uscita evacuazione pompa di sentina IV-5-1-3- Valvola di scarico rapido Valvola di scarico rapido del ponte Membrana valvola di scarico rapido Dispositivo di mantenimento tappo...
- Seite 181 IMPIANTO E CIRCUITO – Impianto di asciugamento La valvola di scarico rapido comprende: una membrana flessibile fissa che: - si deforma consentendo di vuotare, in determinate condizioni, l’acqua imbarcata sul ponte dall’interno dell’imbarcazione verso NOTA: l’esterno con l’imbarcazione in funzione. -si appiattisce per dare luogo ad una tenuta precaria provvisoria, al fine di prevenire eventuali infiltrazioni improvvise d’acqua dall’esterno verso l’interno dell’imbarcazione.
- Seite 182 IMPIANTO E CIRCUITO – Impianto di asciugamento IV-5-2-2: Valvole di scarico IV-5-2-2-1: Imbarcazione a terra ( rimorchio, su invasature…) POSIZIONE APERTA, SENZA TAPPO. IV-5-2-2-2: Imbarcazione in acqua DURANTE LA NAVIGAZIONE POSIZIONE CHIUSA, TAPPO(I) IN POSIZIONE. PROCEDURA D’EVACUAZIONE DELL’ACQUA IMBARCATA IN POSIZIONE DI ARRESTO, TOGLIERE IL TAPPO, NAVIGARE A PELO D’ACQUA (>...
-
Seite 183: Iv-6-Estinzione D'incendi
IMPIANTO E CIRCUITO – Impianto di asciugamento IV-5-2-3 : Alleggio scafo IV-5-2-3-1: Imbarcazione a terra (rimorchio, su invasature…) POSIZIONE APERTA, SENZA ALEGGIO. IV-5-2-3-2: Imbarcazione in acqua POSIZIONE CHIUSA, ALEGGIO IN POSIZIONE. (ASSICURARSI CHE L’ALEGGIO SIA BEN CHIUSO) IMPIANTO E CIRCUITO – Estinzione incendi IV-6-ESTINZIONE D’INCENDI Spazio supporto estintore E’... -
Seite 184: Iv-7-Ormeggio/Ancoraggio
IMPIANTO E CIRCUITO - Ormeggio/Ancoraggio IV-7-ORMEGGIO/ANCORAGGIO Anello di ritenuta della linea d’ormeggio situato all’interno del pozzo dell’ancora. Passacavo + Galloccia + Puleggia Anello di ritenuta della linea d’ormeggio Anello di prua Telone d’ormeggio GALLOCCE CONSENTONO SOLO ANCORAGGIO OCCASIONALE DELL’IMBARCAZIONE. L’ANCORAGGIO PERMANENTE DEVE ESSERE EFFETTUATO ATTENZIONE TRAMITE LA CATENA DI PRUA SITUATA SULLA PARTE ANTERIORE DELL’IMBARCAZIONE. - Seite 185 MONTAGGIO OPTIONAL – Roll-bar V-1- MONTAGGIO ROLL-BAR Realizzare 2 dime di foratura (spessore minimo: 25 mm) Assemblare il roll-bar. Registrarlo come rappresentato nella figura di cui sotto. Vista secondo F Vue suivant F Vue suivant F Equerre Contrassegnare e perforare i fori 2 x 2 Ø10,5 mm nelle dime di foratura, utilizzando i fori del roll-bar come guida.
-
Seite 186: E' Importante Che Tutti I Fori Siano In Posizione
MONTAGGIO OPTIONAL – Roll-bar Perforare i fori 2 X 2 a livello del telaio posteriore, servendosi della dima come guida di foratura. Per il lato a babordo, procedere nello stesso modo o, in alternativa, perforare il telaio dall’interno dell’imbarcazione, utilizzando il roll-bar come guida, dopo aver correttamente posizionato e mantenuto quest’ultimo in... - Seite 187 MONTAGGIO OPTIONAL – Roll-bar Applicare mastice di tenuta (del tipo Sikaflex) su tutti i bulloni e all’interno dei fori. Posizionare i tiranti lato babordo. Fissare il roll-bar. Realizzare una guarnizione pulita attorno al foro avente Ø 50 mm. Tirante Entretoise Roll bar Roll-bar Lato babordo...
- Seite 188 2 chemin de la Val Priout 31450 AYGUESVIVES FRANCE SUNRIDER Edition 3...