Netatmo DOORBELL Benutzerhandbuch

Verwandte Anleitungen für Netatmo DOORBELL

Inhaltszusammenfassung für Netatmo DOORBELL
- Seite 1 Smart Video Doorbell User guide Instrukcja obsługi Guide de l’utilisateur Manuale di istruzioni Benutzerhandbuch Gebruikershandleiding...
- Seite 2 Read these instructions carefully before starting the installation. The documentation provided with this product must be kept throughout the product’s life time. Lire attentivement cette notice avant l’installation. Conserver impérativement la documentation fournie avec ce produit pendant toute sa durée de vie. Lesen Sie diese Anleitung aufmerksam durch, bevor Sie mit der Installation beginnen.
- Seite 3 Руководство пользователя доступно на нескольких Вы можете посмотреть онлайн-учебник по установке по языках по следующему адресу: следующему адресу: Guia do utilizador disponível em mais línguas em: Você pode assistir a um tutorial em vídeo de instalação on- line no seguinte endereço: https://doorbell.netatmo.com https://doorbell.netatmo.com...
- Seite 4 SUMMARY SPIS TREŚCI Pack Content Zawartość opakowania Product Overview Przegląd produktu Product Installation Instalacja produktu Troubleshooting Rozwiązywanie problemów Safety Warnings Ostrzeżenia dotyczące bezpieczeństwa Legal Mentions Wspomnienia prawne SOMMAIRE СОДЕРЖАНИЕ Contenu du pack Содержимое упаковки Aperçu du produit Обзор продукта Installation du produit Установка...
-
Seite 5: Pack Content
Pack content 1/3 Pack content 1/3 Pack content Zawartość opakowania A. 1 Smart Video Doorbell A. 1 Inteligentny Wideodomofon B. 1 wall mounting plate B. 1 płyta do montażu na ścianie C. 1 25° bracket C. 1 wspornik 25° D. 1 finish plate D. - Seite 6 Pack content 2/3 Pack content 2/3 Pack content Zawartość opakowania 1 chime module 1 moduł gongu 1 wire connector 1 złącze przewodu 1 drilling template 1 szablon dowiercenia 1 additional fuse otworów 1 Homekit card 1 dodatkowy bezpiecznik 1 karta HomeKit Contenu du pack Содержимое...
- Seite 7 Pack content 3/3 Pack content 3/3 Pack content Zawartość opakowania 4 bracket screws 4 śruby wspornika 2 mounting screws and 2 śruby montażowe i 2 anchors 2 kotwy 1 security screw and its 1 śruba zabezpieczająca i custom tool jej narzędzie 1 connector screw dopasowujące 1 śruba do złącza...
-
Seite 8: Product Overview
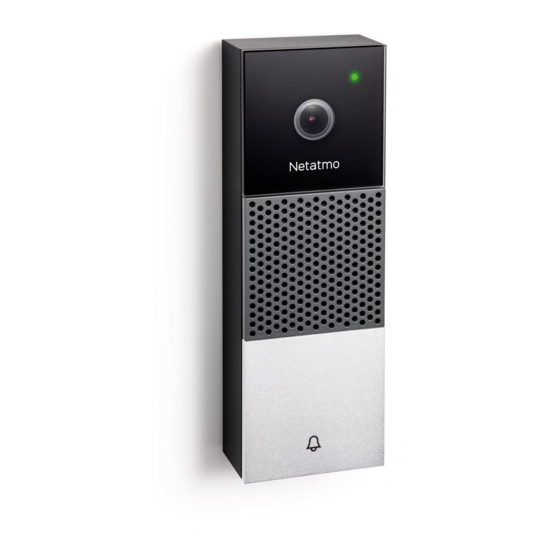
Product overview Przegląd produktu Night Vision LED Dioda LED noktowizji dioda LED Camera Kamera Speaker Głośnik Microphone Mikrofon Doorbell Button Przycisk dzwonka do drzwi Aperçu du produit Информация об изделии LED de vision nocturne Светодиод ночного Camera видения Microphone Светодиодный индикатор... -
Seite 9: Required Tools
Required tools Required tools Required tools Herramientas necesarias Philips screwdriver Śrubokręt krzyżakowy Drill - Ø6mm - 15/64 ″ Wiertło - Ø6mm - 15/64 ″ Pair of wagos Para złączek instalacyjnych (optional tool) WAGO (opcjonalne) Level (recommended tool) Poziomnica (zalecane narzędzie) Outils nécessaires Strumenti necessari Tournevis cruciforme... -
Seite 10: Electrical Diagrams
Electrical Diagrams A. Classical Doorbell Wiring B. Doorbell Wiring with your Smart Video Doorbell Note : The Smart Video Doorbell replaces your old doorbell button, and the chime module is plugged in parallel to your existing chime. 1. Power 3. Chime Classical Doorbell Wiring 2. - Seite 11 Check Wi-Fi Reception Check Wi-Fi Reception Check with your smartphone that you have Wi-Fi reception at your doorbell button with your door closed. If you do not, try to move your Wi-Fi router closer or install a Wi-Fi extender. Vérifiez la réception Wi-Fi Vérifiez avec votre smartphone que vous recevez une connexion...
- Seite 12 Locate your chime Locate your chime Press your doorbell button to locate your chime. Note: The chime is the little box that rings. If you don’t have a chime please visit the Help Center at helpcenter.netatmo.com. Localisez votre carillon Appuyez sur votre bouton de sonnette pour repérer votre carillon.
- Seite 13 Caution: Electrical Danger Caution: Electrical Danger Disconnect power at fuse or circuit breaker before proceeding to the installation. Avertissement : danger électrique Coupez le courant au disjoncteur général avant de procéder à l'installation. Vorsicht: elektrische Gefahr Schalten Sie den Strom der Sicherung oder Schutzschalter ab, bevor Sie mit der Installation beginnen..
- Seite 14 B. Si votre carillon est dans votre tableau électrique : Dévissez et retirez le couvercle de votre tableau électrique. Vous devriez voir les 2 fils connectés à votre carillon. Si vous voyez plus de 2 fils, rendez-vous sur l' A ssistance Netatmo à l'adresse helpcenter.netatmo.com. Öffnen Sie das Gong-Kästchen A.
- Seite 15 Connect the first wire of the chime module Connect the first wire of the chime module 1. Loosen one of the screws. 2. Hook one of the chime module's wires. Note: There is no polarity in the circuit, choose the wire you want. Connectez le premier fil du module de carillon 1.
- Seite 16 Secure the first wire Secure the first wire Tighten the screw in order to maintain the wires together. Note: Use wagos if you have troubles maintening the wires together. Sécurisez le premier fil Resserrez la vis pour maintenir les fils ensemble. Note: Utilisez des wagos si vous avez des difficultés à...
- Seite 17 Connect and secure the second wire Connect and secure the second wire Repeat steps (5) and (6) with the second wire. Connectez et sécurisez le second fil Répétez les étapes (5) et (6) pour le second fil. Verbinden und sichern Sie das zweite Kabel Wiederholen Sie Schritt (5) und (6) mit dem zweiten Kabel.
- Seite 18 Verify the chime module configuration Verify the chime module configuration Make sure the selectors are in 1 - LOW position. Vérifiez la configuration du module de carillon Assurez-vous que les sélecteurs soient sur la position 1 - LOW. Überprüfen Sie die Gong-Modul-Konfiguration Vergewissern Sie sich, dass die Schieber in der Position 1 - LOW stehen.
- Seite 19 Stick the chime module Stick the chime module Put the chime cover or switch board cover back on and stick the chime module next to your chime or on its cover using the two stickers on the back. Fixez le module de carillon Remettez le couvercle du carillon ou du tableau électrique et fixez le module de carillon à...
- Seite 20 Caution: Electrical Danger Caution: Electrical Danger Make sure power is still disconnected before continuing the installation. Avertissement : danger électrique Assurez-vous que le courant est toujours coupé au disjoncteur général avant de poursuivre l'installation. Vorsicht: elektrische Gefahr Stellen Sie sicher, dass die Stromzufuhr noch unterbrochen ist, bevor Sie mit der Installation fortfahren.
- Seite 21 Unmount your old doorbell button Unmount your old doorbell button from the wall and disconnect the wires. Note: Your old doorbell button may be tightly screwed or glued to your wall. Démontez votre ancien bouton de sonnette Démontez votre ancien bouton de sonnette du mur et déconnec- tez les fils.
- Seite 22 Mark the drilling holes Mark the drilling holes 1. Place the drilling template on the wall and pass the wires through the provided space. 2. Mark the drilling holes with a pen. Marquez les trous de perçage 1. Positionnez le gabarit de perçage sur le mur en faisant passer les fils dans l’espace prévu.
- Seite 23 Drill the holes Drill the holes Use a Ø6mm drill for the holes and insert the 2 provided anchors. Percez les trous Utilisez un foret de Ø6mm pour percer les trous et insérez les 2 chevilles fournies. 40 mm Bohren Sie die Löcher Verwenden Sie einen Bohrer mit einem Durchmesser von 6 mm und setzen Sie die zwei mitgelieferten Dübel ein.
- Seite 24 Choose your wall mount type Choose your wall mount type A. With the 25° bracket, go to step (15) B. Without the 25° bracket, go to step (18) Choisissez votre type de support mural A. Avec le support incliné à 25°, passez à l’étape (15) B.
-
Seite 25: Installieren Sie Die 25°-Halterung
Install the 25° bracket Install the 25° bracket Install the 25° bracket on the wall with the 2 provided mounting screws. Note: If you want to hide potential scratches and holes left behind, place the finish plate between the wall and the 25° bracket. - Seite 26 Secure the wires Secure the wires Insert the 2 wires from your old doorbell through the waterproof membrane of the wall mounting plate. Sécurisez les fils Insérez les 2 fils de votre ancienne sonnette à travers la membrane étanche du support mural.
- Seite 27 Install the wall mounting plate Install the wall mounting plate Screw the wall mounting plate to the 25° bracket with the 4 provided bracket screws. Skip steps (18) and (19), go directly to step (20). Installez le support mural Vissez le support mural au support incliné à l’aide des 4 vis de support incliné...
- Seite 28 Secure the wires Secure the wires Insert the 2 wires from your old doorbell through the waterproof membrane of the wall mounting plate. Note: If you want to hide potential scratches and holes left behind, place the finish plate between the wall and the wall mounting plate.
- Seite 29 Install the wall mounting plate Install the wall mounting plate Install the wall mounting plate on the wall with the 2 provided mounting screws. Installez le support mural Installez le support mural sur le mur à l’aide des 2 vis de montage fournies. Installieren Sie die Wandhalterung Installieren Sie die Wandhalterung an der Wand mit den 2 mitge- lieferten Befestigungsschrauben.
- Seite 30 Connect the wires Connect the wires Insert and secure the 2 wires into the wire connector. Note: There is no polarity in the circuit, insert the wires in the order you want. Connectez les fils Insérez et sécurisez les fils dans le connecteur de fils. Note: Il n’y a aucune polarité...
- Seite 31 Secure the wire connector Secure the wire connector 1. Place the wire connector on the wall mounting plate. 2. Secure it with the connector screw. Sécurisez le connecteur de vis 1. Positionnez le connecteur de fils sur le support mural. 2.
- Seite 32 Plug the Smart Video Doorbell on the wall mounting plate Plug the Smart Video Doorbell on the wall mounting plate Branchez la Sonnette Vidéo Intelligente au support mural Stecken Sie die Smarte Videotürklingel auf die Wandhalterung Podłącz Inteligentny Wideodzwonek do płyty do mon- tażu na ścianie...
-
Seite 33: Sichern Sie Die Türklingel Mit Der Mitgelieferten Sicherheitsschraube
1. By hand, insert and push the security screw into the wall mounting plate. The security screw should stay in place. 2. Finish securing the Doorbell with the custom tool. Sécurisez la sonnette avec la vis de sécurité fournie 1. À la main, insérez et poussez la vis de sécurité dans le support mural. - Seite 34 The Smart Video Doorbell will start and its LED will turn on. After a few seconds the LED will go from glowing to solid green. Once you see the solid green LED and hear the melody from the Doorbell go to step (27).
- Seite 35 Your chime module needs to be configured Your chime module needs to be configured A. If the LED is glowing blue: On your chime module, leave the 1-2 selector on 1 and set the LOW-HIGH selector on HIGH. B. If the LED is glowing purple: On your chime module, set the 1-2 selector on 2 and leave the LOW-HIGH selector on LOW.
- Seite 36 Press the doorbell button once you have configured your chime module Press the doorbell button once you have configured your chime module Note: Your chime is not connected yet, it is normal if you don't hear it ring. The LED will go from glowing blue or purple to glowing green, and turn to solid green after a few seconds.
- Seite 37 Refer to the troubleshooting section page 78 if your chime doesn’t ring. You have completed the electrical installation of your Smart Video Doorbell. The LED will glow white after a few seconds, indicating your doorbell is ready to be connected to the app. Testez votre carillon Après avoir entendu la mélodie venant de la Sonnette, appuyez sur...
- Seite 38 Download the App and follow the instructions Download the App and follow the instructions To finish the installation and control your Smart Video Doorbell from your smartphone or tablet, please download the app and follow the instructions. Téléchargez l'App et suivez les instructions Pour terminer l'installation et contrôler votre Sonnette Vidéo...
- Seite 39 Apple Homekit Apple Homekit Your Smart Video Doorbell is compatible with Apple Homekit. When asked by the App, you will need to scan the code « HomeKit setup code » on the provided card. The code is unique and cannot be generated again.
-
Seite 40: Résolution De Problèmes
Troubleshooting Résolution de problèmes For further help please visit the Help Center at helpcenter.netatmo.com. Pour plus de conseils d'aide, rendez-vous sur l' A ssistance Netatmo à l'adresse helpcenter.netatmo.com. Problem Possible causes Solutions Etat de Problème Causes possibles Solution Status la LED... -
Seite 41: Solución De Problemas
Fehlersuche Solución de problemas Für weitere Hilfe, konsultieren Sie das Hilfe-Center unter helpcenter.netatmo.com W celu uzyskania dalszej pomocy odwiedź Centrum pomocy pod adresem helpcenter.netatmo.com. Status PROBLEM Możliwe przyczyny Rozwiązania LED Status Problem Mögliche Ursachen Lösungen diody Mein Produkt Der Si- Schalten Sie den Sicherungsschalter ein. - Seite 42 Risoluzione di problemi Problemen oplossen Дополнительную помощь можно получить в Службе поддержки по адресу helpcenter. netatmo.com. Om du behöver mer hjälp går du till Help Center på helpcenter.netatmo.com Статус Проблема Возможные Решения Status Problem Möjliga orsaker Lösningar светодиодного причины lysdiod индикатора...
-
Seite 43: Fuse Replacement
Fuse Replacement Disconnect power at fuse or circuit breaker before proceeding. Remove the fuseholder from the back of the doorbell and replace the damaged fuse with the additionnal fuse. Plug the doorbell back on its wall mount and reconnect the power. -
Seite 44: Factory Reset
Factory Reset Factory Reset To perform a factory reset of your doorbell, plug it on a powered USB port. Wait for the LED to turn off then press and hold the Reset button with a pin for 10 seconds. The LED will go from blinking red to solid green. Keep the doorbell plugged until the LED is glowing white. -
Seite 45: Sicherheitshinweise
Ostrzeżenia dotyczące bezpieczeństwa Safety Warnings Urządzenie elektryczne klasy II: używać tylko na 8-24 lub 220-240 V AC 50-60 Hz. Class II electrical appliance: use only on 8-24 or 220-240 V AC 50-60Hz. Ryzyko porażenia prądem elektrycznym lub pożaru. Wymagana jest dobra Risk of electric shock or fire. - Seite 46 O texto integral da declaração de conformidade está disponível no seguinte en- sil: dereço de Internet: English - Hereby, NETATMO, declares that the radio equipment type NDB01 is in Slovensky [Slovak] - NETATMO týmto vyhlasuje, že rádiové zariadenie typu compliance with Directive 2014/53/EU.
- Seite 47 NETATMO. Unauthorized modification may void CE marking is the manufacturer's declaration that the product meets the equipment authorization from the FCC and will void the NETATMO warranty. the requirements of the applicable EC directives. The product meets the safety requirements specified for Class II Canadian Compliance Statement This device complies with Industry Canada licence-exempt RSS standard(s).
- Seite 48 991010 M/N: NDB01 FCC ID: N3A-NDB01 IC : 10860A-NDB01 Copyright Netatmo © 2020 All rights reserved. Reproduction and distribution prohibited without written authorization from Netatmo...