Inhaltszusammenfassung für eQ-3 homematic IP HmIP-WKP
Seite 1
Installations- und Bedienungsanleitung Installation and operating manual Notice d’installation et mode d’emploi Manual de instalación y uso Istruzioni per l’installazione e l’uso Installatie- en bedieningshandleiding Keypad S. 2 p. 23 p. 38 p. 54 pag. 69 pag. 85 HmIP-WKP...
Hinweise zur Anleitung Hinweise zur Anleitung Lesen Sie diese Anleitung sorgfältig, bevor Sie Ihr Homematic IP Gerät in Betrieb nehmen. Bewahren Sie die Anleitung zum späteren Nachschla- gen auf! Wenn Sie das Gerät anderen Personen zur Nutzung überlassen, überge- ben Sie auch diese Anleitung. Benutzte Symbole: Achtung! Hier wird auf eine Gefahr hingewiesen.
Funktion und Geräteübersicht Bei Sach- oder Personenschäden, die durch unsachgemäße Hand- habung oder Nichtbeachten der Gefahrenhinweise verursacht wer- den, übernehmen wir keine Haftung. In solchen Fällen erlischt jeder Gewährleistungsanspruch! Für Folgeschäden übernehmen wir kei- ne Haftung! Betreiben Sie das Gerät an einem witterungsgeschützten Standort. Setzen Sie es keinem Einfluss von Vibrationen, ständiger Sonnen- und anderer Wärmeeinstrahlung und keinen mechanischen Belas- tungen aus.
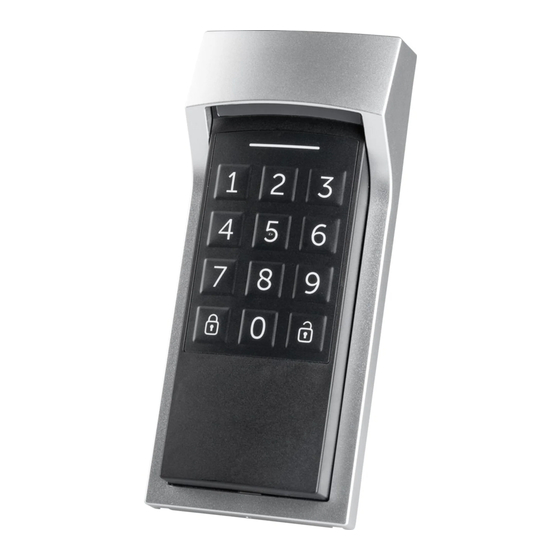
Allgemeine Systeminformationen Zusätzlichen Komfort liefert Ihnen der integrierte Näherungssensor. So können Sie auch bei schwacher Außenbeleuchtung jederzeit die Tasten Ihres Keypads, dank der intergrierten Beleuchtung, erkennen. Geräteübersicht (s. Abbildung 1 und 2): (A) Wandhalterung (B) Keypad (C) Tastaturfeld mit Tasten 0-9 (D) Taste „Verriegeln“...
Inbetriebnahme Inbetriebnahme Anlernen Bitte lesen Sie diesen Abschnitt erst vollständig, bevor Sie mit dem Anlernen beginnen. Sie können das Gerät an den Access Point oder an die Zentrale CCU3 anlernen. Weitere Informationen zum Anlernen und zur Konfigurati- on über eine Zentrale entnehmen Sie bitte dem Homematic IP An- wenderhandbuch finden Downloadbereich...
Inbetriebnahme Sobald der Isolierstreifen gezogen wurde, sendet das Gerät eine Sa- botagemeldung und die Geräte-LED (G) blinkt sechsmal rot auf (s. „7.5 Fehlercodes und Blinkfolgen“ auf Seite 18). • Der Anlernmodus ist für 3 Minuten aktiv. Sie können den Anlernmodus manuell für weitere 3 Minuten starten, indem Sie die Systemtaste (H) kurz drücken.
Inbetriebnahme Bitte lesen Sie diesen Abschnitt erst vollständig, bevor Sie mit der Montage beginnen. Montage der Wandhalterung Achten Sie bei der Auswahl des Montageorts und beim Bohren in der Nähe vorhandener Schalter oder Steckdosen auf den Verlauf elektrischer Leitungen bzw. auf vorhandene Versorgungsleitungen. Der Montageort sollte witterungsgeschützt und frei von direkter Sonnen- und anderer Wärmestrahlung sein.
Inbetriebnahme Achten Sie bei der Auswahl des Montageorts und beim Bohren in der Nähe vorhandener Schalter oder Steckdosen auf den Verlauf elektrischer Leitungen bzw. auf vorhandene Versorgungsleitungen. • Montieren Sie die Wandhalterung durch Verwendung der mitge- lieferten Dübel und Schrauben (s. Abbildung 8). •...
Batterien wechseln Batterien wechseln Wird das Batteriesymbol in der App bzw. eine leere Batterie am Gerät angezeigt (s. „7.5 Fehlercodes und Blinkfolgen“ auf Seite 18), tauschen Sie die beiden leeren Batterien gegen zwei neue Batterien des Typs LR03/ Micro/AAA aus. Beachten Sie dabei die Polungsrichtung der Batterien. Um die Batterien des Keypads zu wechseln, gehen Sie wie folgt vor: Entnehmen Sie das Keypad (B) aus der Wandhalterung (A), indem •...
Fehlerbehebung Fehlerbehebung Schwache Batterie Wenn es der Spannungswert zulässt, ist das Keypad auch bei niedriger Batteriespannung betriebsbereit. Je nach Beanspruchung kann evtl., nach kurzer Erholungszeit der Batterie, wieder mehrfach gesendet werden. Ist die Batteriespannung niedrig, wird dies in der Homematic IP App und am Gerät über die LED (G) angezeigt.
Fehlerbehebung In dem von uns genutzten Frequenzbereich 868 MHz beträgt die maxi- male Sendezeit eines jeden Geräts 1 % einer Stunde (also 36 Sekunden in einer Stunde). Die Geräte dürfen bei Erreichen des 1 %-Limits nicht mehr senden, bis diese zeitliche Begrenzung vorüber ist. Gemäß dieser Richt- linie, werden Homematic IP Geräte zu 100 % normenkonform entwickelt und produziert.
Seite 19
Fehlerbehebung 1x langes rotes PIN falsch oder PIN Prüfen Sie durch Neu- Leuchten zum aktuellen Zeit- eingabe die Korrektheit punkt nicht berech- des PIN oder, ob Sie tigt zum aktuellen Zeitpunkt berechtigt sind Eingabe temporär oder permanent Temporäre oder per- gesperrt manente Sperre nach Fehleingabe, setzen Sie...
Wiederherstellung der Werkseinstellungen Wiederherstellung der Werkseinstellungen Die Werkseinstellungen des Geräts können wiederhergestellt wer- den. Dabei gehen alle Einstellungen verloren. Um die Werkseinstellungen des Keypads wiederherzustellen, gehen Sie wie folgt vor: • Entnehmen Sie das Keypad (B) aus der Wandhalterung (A), indem Sie einen dünnen Gegenstand in das Loch auf der Unterseite der Wandhalterung einführen und damit die Verrastung (M) lösen (s.
Empfänger spielen Umwelteinflüsse wie Luftfeuchtigkeit neben baulichen Gegebenheiten vor Ort eine wichtige Rolle. Hiermit erklärt die eQ-3 AG, Maiburger Str. 29, 26789 Leer, Deutsch- land, dass der Funkanlagentyp Homematic IP HmIP-WKP der Richt- linie 2014/53/EU entspricht. Der vollständige Text der EU-Konfor- mitätserklärung ist unter der folgenden Internetadresse verfügbar:...
Seite 22
Entsorgungshinweis Gerät nicht im Hausmüll entsorgen! Elektronische Geräte sind ent- sprechend der Richtlinie über Elektro- und Elektronik-Altgeräte über die örtlichen Sammelstellen für Elektronik-Altgeräte zu entsorgen. Konformitätshinweis Das CE-Zeichen ist ein Freiverkehrszeichen, das sich ausschließlich an die Behörden wendet und keine Zusicherung von Eigenschaften beinhaltet.
Seite 24
Table of contents Information about this manual .............25 Hazard information .................25 Function and device overview ............. 26 General system information ..............27 Operation ....................27 Pairing ....................27 Installation ................... 29 Installing the wall bracket ............... 29 Operation .................... 30 Keypad illumination ................31 Changing the batteries ................31 Troubleshooting ..................32 Low battery ..................
Information about this manual Information about this manual Please read this manual carefully before beginning operation with your Homematic IP device. Keep the manual so you can refer to it at a later date if you need to. If you hand over the device to other persons for use, please hand over this manual as well.
Function and device overview The device must only be operated in locations where it is protected from the effects of weather. The device must be protected from the effects of vibrations, solar or other methods of heat radiation, and mechanical loads. The device may only be operated within residential buildings.
General system information (C) Keypad panel with keys 0-9 (D) “Lock” button (E) “Unlock” button (F) Proximity sensor (G) Device LED (H) System button (pairing button) Tamper contact (J) Battery compartment (and cover) (K) Drainage hole (L) Screw holes (M) Latch General system information This device is part of the Homematic IP smart home system and works with the Homematic IP protocol.
Seite 28
Operation First set up your Homematic IP Access Point via the Homematic IP app to enable operation of other Homematic IP devices within your system. For further information, please refer to the operating manu- al of the Access Point. To integrate the Homematic IP Keypad into your system and enable it to communicate with other Homematic IP devices, you must first add the device to your Homematic IP Access Point.
Operation TIN) in the app or scan the QR code. The device number can be found on the sticker supplied or attached to the device. • Please wait until pairing is completed. If pairing was successful, the device LED (G) lights up green. The •...
Operation If you have already paired the unit, you will receive a tamper mes- sage within the app. You can only acknowledge this after the instal- lation has been completed and the Keypad has been reinserted. • Position the wall bracket (A) with the bevelled surface facing up- wards at a suitable place on the wall and mark the drill holes (see figure 7).
Changing the batteries Keypad illumination Directly above the Keypad panel (C) is the slightly bevelled surface of the proximity sensor (F). When your hand approaches the Keypad, the inte- grated proximity sensor reacts, and the Keypad illumination is switched on. This means you can always make out the keypad panel of your Key- pad even in dim outdoor lighting.
Troubleshooting Used batteries should not be disposed of with regular domestic waste! Instead, take them to your local battery disposal point. Caution! There is a risk of explosion if the batteries are not replaced correctly. Replace only with the same or equivalent type. Never re- charge non-rechargeable batteries.
Troubleshooting • Receiver cannot be reached. • Receiver is unable to execute the command (load failure, me- chanical blockade, etc.). • Receiver is faulty. Duty cycle The duty cycle is a legally regulated limit of the transmission time of de- vices in the 868 MHz range.
Seite 34
Troubleshooting 1x long red flash PIN incorrect or not Re-enter the PIN to check authorised at the cur- its correctness or whether rent time you are authorised at the current time Entry temporarily or permanently locked Temporary or permanent lock after incorrect entry; reset the permanent lock in Duty cycle the app...
Restoring factory settings Restoring factory settings The device’s factory settings can be restored. If you do this, you will lose all your settings. To restore the Keypad’s factory settings, proceed as follows: • Remove the Keypad (B) from the wall bracket (A), by inserting a thin object into the hole on the bottom of the wall bracket and releasing the latch (M) (see figure 3).
Hereby, eQ-3 AG, Maiburger Str. 29, 26789 Leer/Germany declares that the radio equipment type Homematic IP HmIP-WKP is in compliance with Directive 2014/53/EU. The full text of the EU declaration of conformity is available at the following internet address: www.homematic-ip.com...
Seite 37
Technical specifications Instructions for disposal. Do not dispose of the device with normal domestic waste! Electron- ic equipment must be disposed of at local collection points for waste electronic equipment in compliance with the Waste Electrical and Electronic Equipment Directive. Information about conformity The CE mark is a free trademark that is intended exclusively for the authorities and does not imply any assurance of properties.
Seite 39
Table des matières Remarques sur la notice ................ 42 Mises en garde ..................42 Fonction et aperçu de l‘appareil ............43 Informations générales sur le système ..........44 Mise en service ..................45 Apprentissage ..................45 Montage ....................46 Montage du support mural ............. 47 Utilisation .....................48 Éclairage du clavier ................48 Remplacement des piles ...............
Remarques sur la notice Remarques sur la notice Lisez attentivement la présente notice avant de mettre votre appareil Ho- mematic IP en service. Conservez la notice pour pouvoir vous y référer ultérieurement ! Si vous laissez d’autres personnes utiliser l’appareil, n’oubliez pas de leur remettre également cette notice d’utilisation.
Fonction et aperçu de l‘appareil Notre responsabilité ne saurait être engagée en cas de dommages matériels ou de dommages corporels dus au maniement inappro- prié ou au non-respect des mises en garde. Dans de tels cas, tout droit à la garantie est annulé ! Nous ne pouvons être tenus respon- sables des dommages indirects occasionnés ! Installez l’appareil à...
Informations générales sur le système Le détecteur de capacité intégré vous offre un confort supplémentaire. Ainsi, même en cas de luminosité extérieure faible, vous pouvez toujours déceler les touches du Keypad équipé d’un éclairage intégré. Vue d’ensemble de l’appareil (voir les figures 1 et 2) : (A) Support mural (B) Keypad (C) Clavier numérique avec les touches 0-9...
Mise en service Mise en service Apprentissage Merci de lire attentivement cette section avant de procéder à l’ap- prentissage. Vous pouvez programmer l’appareil sur l’Access Point ou sur la cen- trale CCU3. De plus amples informations sur l’apprentissage et la configuration via une centrale figurent dans le manuel d’utilisateur Homematic ...
Mise en service Dès que la bande d’isolement est retirée, l’appareil émet un message de sabotage et sa LED (G) clignote six fois brièvement en rouge (v. „ 7 Élimination des défauts „ à la page 48). • Le mode d’apprentissage est actif pendant 3 minutes. Vous pouvez lancer manuellement le mode d’apprentissage pour 3 minutes supplémentaires en appuyant brièvement sur la touche sys- tème (H).
Mise en service Merci de lire attentivement cette section avant de procéder au mon- tage. Montage du support mural Lors du choix de l’emplacement de montage et du montage à proxi- mité d’interrupteurs ou de prises existants, veillez à la disposition des câbles électriques ou des câbles d’alimentation existants.
Remplacement des piles • Montez le support mural avec les chevilles et les vis fournies (voir la figure 8). • Installez le Keypad (B) de nouveau dans le support mural (A). Un bruit d’encliquetage vous indique que le Keypad a été inséré cor- rectement (voir la figure 8).
Seite 47
Remplacement des piles Pour remplacer les piles du Keypad, procédez comme suit : Retirez le Keypad (B) de son support mural (A) en insérant un • objet fin dans l’orifice sur le dessous du support mural pour dé- senclencher le verrouillage (M) (voir la figure 3). Un message de sabotage s’affiche alors dans votre application.
Élimination des défauts Élimination des défauts Pile faible Tant que la valeur de tension le permet, le Keypad est opérationnel, même lorsque la tension des piles est faible. En fonction des sollicitations, une brève période de repos permettra éventuellement plusieurs nouvelles émissions d’un signal.
Élimination des défauts Duty Cycle Le Duty Cycle décrit une limitation régulée légalement du temps d’émis- sion des appareils dans une plage 868 MHz. L’objectif de ce règlement est de garantir la fonction de tous les appareils qui travaillent dans une plage de 868 MHz.
Seite 50
Élimination des défauts 1x activation longue PIN erroné ou PIN Contrôlez par une nou- en rouge non autorisé à cet velle saisie si le PIN est instant correct ou si vous dis- posez des droits néces- saires à cet instant Saisie verrouillée temporairement ou en permanence...
Restauration des réglages d’usine Restauration des réglages d’usine Les réglages d’usine de l’appareil peuvent être rétablis. Dans ce cadre, tous les réglages antérieurs sont perdus. Afin de rétablir les réglages d’usine de l’appareil, procédez comme suit : • Retirez le Keypad (B) de son support mural (A) en insérant un objet fin dans l’orifice sur le dessous du support mural pour dé- senclencher le verrouillage (M) (voir la figure 3).
Par la présente, eQ-3 AG, basée à Maiburger Str. 29, 26789 Leer, en Allemagne, déclare que l’équipement radioélectrique Homematic IP HmIP-WKP est conforme à la directive 2014/53/EU. L’intégralité de la déclaration européenne de conformité...
Seite 53
Caractéristiques techniques Portée Portée radio en champ libre typ. : 200 m Catégorie du récepteur : SRD catégorie 2 Duty Cycle : < 1 % par h / < 10 % par h Sous réserve de modifications techniques. Consignes pour l’élimination L’appareil ne doit pas être jeté avec les ordures ménagères ! Les ap- pareils électroniques sont à...
Seite 55
Índice Advertencias sobre estas instrucciones ..........56 Advertencias de peligro ................. 56 Funciones y esquema del dispositivo ..........57 Información general del sistema ............58 Puesta en servicio ................... 58 Conexión ..................... 58 Montaje ....................60 Montaje del soporte de pared ............60 Manejo ....................
Advertencias sobre estas instrucciones Advertencias sobre estas instrucciones Lea atentamente estas instrucciones antes de poner en servicio su dispositi- vo Homematic IP. ¡Conserve estas instrucciones para consultas posteriores! Si cede este dispositivo para que lo utilicen otras personas, entregue tam- bién estas Instrucciones junto con el dispositivo.
Funciones y esquema del dispositivo garantía! ¡No se asume ninguna responsabilidad por daños indirectos! Instale el dispositivo en un emplazamiento protegido de la intempe- rie. No lo exponga a vibraciones, radiación solar continuada u otras fuentes de calor ni a cargas mecánicas. El dispositivo solo es apto para entornos domésticos.
Información general del sistema (C) Teclas numéricas 0-9 (D) Botón «bloquear» (E) Botón «desbloquear» (F) Sensor de proximidad (G) LED (H) Botón del sistema (botón de conexión) Contacto de sabotaje (J) (Tapa del) compartimento de las pilas (K) Orificio de extracción de agua (L) Orificios roscados (M) Enclavamiento Información general del sistema...
Seite 59
Puesta en servicio En primer lugar tiene que configurar su Homematic IP Access Point desde la app Homematic IP para poder utilizar otros dispositivos Homematic IP en su sistema. Encontrará más información al res- pecto en las instrucciones de uso del Access Point. Para poder integrar el Homematic IP Keypad en su sistema y para que pueda comunicarse con otros dispositivos Homematic IP es necesario conectarlo primero al Homematic IP Access Point.
Puesta en servicio cifras del número de aparato (SGTIN) o escanear el código QR. El número de aparato se encuentra en el adhesivo incluido en el volumen de suministro o bien directamente sobre el aparato. • Espere hasta que haya finalizado el proceso de conexión. •...
Seite 61
Puesta en servicio Modo de proceder para realizar el montaje del soporte de pared (A): • Elija un lugar de montaje apropiado. Dado el caso, extraiga el Keypad (B) del soporte de pared (A) intro- • duciendo un objeto fino en el orificio situado en la parte inferior del soporte para soltar el enclavamiento (M) (v.
Cambio de pilas Manejo Una vez conectado el Homematic IP Keypad al Access Point y configu- rado a través de la aplicación („5.1 Conexión“ en página 58) ya puede controlar cómodamente la función de acceso en combinación con el dispositivo Homematic IP Accionamiento de cerradura. Introduzca para ello su PIN con las teclas numéricas (C) y elija la acción deseada pulsando »Bloquear«...
Reparación de fallos Abra el compartimento de las pilas en la parte trasera (J) del • Keypad (B) aflojando el tornillo de la tapa (v. figura 4). • Extraiga las pilas vacías. • Coloque dos pilas LR03/Micro/AAA de 1,5 V nuevas en la posición correcta, indicada por las marcas grabadas en el compartimento (v.
Reparación de fallos la configuración de fábrica se ha fijado un tiempo de espera para poder introducir de nuevo del código PIN. Ese tiempo de bloqueo aumenta au- tomáticamente tras introducir un código erróneo por segunda vez en 15 s (30 s, 60 s, 120 s). Comando sin confirmar Si alguno de los receptores no confirma un comando se enciende el LED (G) rojo al final de la transmisión errónea (En función de la causa, la ilu-...
Reparación de fallos Códigos de errores y secuencias intermitentes Secuencia Significado Solución intermitente Luz naranja Comunicación inalám- Espere hasta que finalice la brica, transmisión de transmisión. intermitente datos de configuración rápida 1 vez luz Confirmación de una Puede continuar con el ma- operación nejo.
Restablecimiento de la configuración de fábrica 1 vez luz Indicación de prueba Cuando se apague la indica- naranja y 1 ción de prueba puede con- vez luz verde tinuar. (después de colocar la pila) Luz naranja Actualización del sof- Espere hasta que finalice la larga y corta tware del dispositivo actualización.
AG, Maiburger Str. 29, 26789 Leer, Alemania, declara que la in- stalación inalámbrica, Homematic IP HmIP-WKP, cumple la Di- rectiva 2014/53/UE. El texto de la declaración de conformidad CE está...
Seite 68
Datos técnicos Consumo de corriente: máx. 60 mA Tipo de protección: IP44 Temperatura ambiente: de -20 a 55 °C Dimensiones (A x H x P): 71 x 161 x 29 mm Peso: 137 g (incl. las pilas) Banda de radiofrecuencia: 868,0-868,6 MHz 869,4-869,65 MHz Potencia de radioemisión máx.:...
Seite 70
Indice Note su queste istruzioni ............... 71 Indicazioni di pericolo ................71 Funzioni e vista d'insieme dell'apparecchio ........72 Informazioni generali sul sistema ............73 Messa in funzione ..................74 Inizializzazione ................... 74 Montaggio ................... 76 Montaggio del supporto a parete ..........76 Uso ......................77 Illuminazione della tastiera ...............77 Sostituzione delle batterie ..............78...
Note su queste istruzioni Note su queste istruzioni Leggere attentamente queste istruzioni prima di mettere in funzione questo dispositivo Homematic IP. Conservare questo manuale per poter- lo consultare anche in futuro! Se si affida l’utilizzo dell’apparecchio ad altre persone consegnare anche queste istruzioni per l’uso.
Funzioni e vista d'insieme dell'apparecchio L’azienda declina qualsiasi responsabilità per danni a cose o persone causati da un utilizzo improprio o dalla mancata osservanza delle indicazioni di pericolo. In casi simili decade il diritto alla garanzia! Si declina qualsiasi responsabilità per danni indiretti! Utilizzare il dispositivo in un luogo al riparo dalle intemperie.
Informazioni generali sul sistema Un sensore di prossimità integrato rende il sistema ancora più como- do. Grazie alla luce integrata, infatti, anche con una scarsa illuminazione esterna si può sempre individuare il tastierino. Vista d’insieme dell’apparecchio (v. figura 1 e 2): (A) Supporto a parete (B) Keypad (C) Tastiera con tasti da 0 a 9...
Messa in funzione Messa in funzione Inizializzazione Leggere interamente questo paragrafo prima di cominciare l’ini- zializzazione. Questo dispositivo può essere inizializzato dall’Access Point o dalla centralina CCU3. Ulteriori informazioni sull’inizializzazione e sulla configurazione tramite centralina sono fornite nel Manuale dell’u- tente di Homematic IP (disponibile nella sezione Download all’indi- rizzo www.homematic-ip.com).
Seite 75
Messa in funzione Non appena viene estratta la linguetta isolante l’apparecchio invia una notifica di sabotaggio e il LED del dispositivo (G) lampeggia sei volte con luce rossa ( „7.5 Codici di errore e sequenze di spie lam- peggianti“ a pag. 80). •...
Messa in funzione Montaggio La scatola esterna del Keypad è predisposta con un foro di drenag- gio (K). Se necessario, aprirla con un attrezzo appuntito. Leggere interamente questo paragrafo prima di iniziare il montaggio dell’apparecchio. Montaggio del supporto a parete Nella scelta del luogo di installazione e se si eseguono fori nelle vi- cinanze di interruttori o prese già...
Messa in funzione Nelle pareti in pietra utilizzare una punta da 5 mm per i tasselli. Nel- le pareti di legno si può utilizzare una punta da 1,5 mm per avvitare le viti più facilmente. Nella scelta del luogo di installazione e se si eseguono fori nelle vi- cinanze di interruttori o prese già...
Sostituzione delle batterie Sostituzione delle batterie Quando nell’app compare l’icona della batteria o quando sull’apparecchio compare una batteria scarica (“7.5 Codici di errore e sequenze di spie lam- peggianti“ a pag. 80), sostituire le batterie scariche con due nuove bat- terie LR03/micro/AAA.
Risoluzione dei guasti Risoluzione dei guasti Batteria scarica Se il valore della tensione lo consente, il Keypad è operativo anche se la tensione delle batterie è ridotta. In base all’uso al quale viene sottoposto, il tastierino potrebbe inviare ripetutamente segnali dopo un breve tempo di recupero della batteria.
Risoluzione dei guasti Duty Cycle Il Duty Cycle indica un limite disciplinato dalla legge e applicato al tem- po di trasmissione degli apparecchi nella gamma 868 MHz. Lo scopo di questa disciplina è garantire il funzionamento di tutti gli apparecchi nella gamma 868 MHz.
Seite 81
Risoluzione dei guasti Luce rossa acce- PIN errato o PIN non Digitare di nuovo il PIN per sa a lungo 1 volta autorizzato al mo- verificare se è corretto o se mento al momento si possiede l’au- torizzazione Valore digitato bloc- cato temporanea- Blocco temporaneo o per- mente/per sempre...
Ripristino delle impostazioni di fabbrica Ripristino delle impostazioni di fabbrica L’utente può ripristinare le impostazioni di fabbrica dell’apparecchio. In questo caso tutte le impostazioni andranno perdute. Per ripristinare le impostazioni di fabbrica del Keypad procedere nel modo seguente: • Togliere il Keypad (B) dal supporto a parete (A) inserendo un og- getto sottile nel foro situato nella parte inferiore dello stesso sup- porto e staccare il sistema di aggancio (M) (v.
Con la presente la eQ-3 AG, Maiburger Str. 29, 26789 Leer, Germania, dichiara che l’apparecchio radio Homematic IP modello HmIP-WKP è conforme alla Direttiva 2014/53/UE. Il testo integrale della dichia- razione di conformità...
Seite 84
Dati tecnici Corrente assorbita 60 mA max. Grado di protezione: IP44 Temperatura ambiente: tra -20 e + 55 °C Dimensioni (L x A x P): 71 x 161 x 29 mm Peso: 137 g (comprese batterie) Banda di frequenza radio: 868,0-868,6 MHz 869,4-869,65 MHz Max.
Seite 86
Inhoudsopgave Instructies bij deze handleiding ............87 Gevarenaanduidingen ................87 Werking en overzicht van het apparaat ..........88 Algemene systeeminformatie .............. 89 Inbedrijfstelling ..................90 Aanleren ....................90 Montage ....................91 Montage van de wandhouder ............92 Bediening ..................... 93 Verlichting van het toetsenveld ............93 Batterijen vervangen ................
Instructies bij deze handleiding Instructies bij deze handleiding Lees deze handleiding zorgvuldig door voordat u uw Homematic IP ap- paraat in gebruik neemt. Bewaar de handleiding, om ze ook later nog te kunnen raadplegen! Als u het apparaat door andere personen laat gebruiken, geef dan ook deze handleiding mee.
Werking en overzicht van het apparaat Voor zaak- of personenschade die door een onjuist gebruik of niet-naleving van de gevarenaanduidingen veroorzaakt is, stellen wij ons niet aansprakelijk. In dergelijke gevallen vervalt ieder garantie- recht! Voor gevolgschade stellen wij ons niet aansprakelijk! Gebruik het apparaat op een tegen weer en wind beschermde plaats.
Inbedrijfstelling Inbedrijfstelling Aanleren Lees dit hoofdstuk volledig door, voordat u met het aanleren be- gint. U kunt het apparaat op het Access Point of op de centrale CCU3 aanleren. Voor meer informatie over het aanleren en de configuratie via een centrale verwijzen wij naar het Homematic IP gebrui- kershandboek vinden downloadgedeelte...
Inbedrijfstelling • De aanleermodus is 3 minuten actief. U kunt de aanleermodus voor nog eens 3 minuten handmatig star- ten door kort op de systeemtoets (H) te drukken. • Sluit het batterijvakje (J) en draai de schroef van het batterijvakje weer vast.
Inbedrijfstelling Montage van de wandhouder Houd bij de keuze van de montageplaats en het boren in de buurt van voorhanden schakelaars of contactdozen rekening met het ver- loop van elektrische kabels, water-, gas- en eventuele andere leidin- gen. De montageplaats dient tegen weer en wind beschermd en vrij van directe zonne- en andere warmtestraling te zijn.
Batterijen vervangen • Monteer de wandhouder met behulp van de bijgeleverde plug- gen en schroeven (zie afbeelding 8). • Plaats de Keypad (B) weer terug in de wandhouder (A). Een klik- geluid geeft aan dat de Keypad correct is geplaatst (zie afbeelding Indien u het apparaat al hebt aangeleerd, kunt u de sabotagemel- ding in uw app nu bevestigen.
Seite 94
Batterijen vervangen voorwerp in het gaatje aan de onderzijde van de wandhouder te steken en daardoor de vergrendeling (M) los te halen (zie afbeel- ding 3). U ontvangt in uw app nu een sabotagemelding. U kunt deze mel- ding bevestigen zodra de Keypad na het vervangen van de batterijen weer in de wandhouder is geplaatst.
Storingen oplossen Storingen oplossen Zwakke batterij Als de spanningswaarde dit toestaat, kan de Keypad ook bij een lage bat- terijspanning worden gebruikt. Al naargelang de belasting kan, na een kor- te hersteltijd van de batterij, eventueel weer meerdere keren een signaal worden gezonden.
Storingen oplossen Duty cycle De duty cycle beschrijft een wettelijk geregelde begrenzing van de zend- tijd van apparaten in het 868MHz-bereik. Het doel van deze regeling is om de werking van alle in het 868MHz-bereik werkende apparaten te garanderen. In het door ons gebruikte frequentiebereik van 868 MHz bedraagt de maximale zendtijd van een apparaat 1% van een uur (dus 36 seconden per uur).
Seite 97
Storingen oplossen 1x lang rood op- Pincode verkeerd Controleer door hernieuw- lichten of pincode op het de invoer van de pincode of actuele tijdstip niet deze correct is resp. of u op geautoriseerd het actuele tijdstip geautori- seerd bent Invoer tijdelijk of per- manent geblokkeerd Tijdelijke of permanente blokkering na verkeerde...
Herstellen van de fabrieksinstellingen Herstellen van de fabrieksinstellingen De fabrieksinstellingen van het apparaat kunnen worden hersteld. Hierbij gaan alle instellingen verloren. Ga als volgt te werk om de fabrieksinstellingen van het apparaat te her- stellen: • Neem de Keypad (B) uit de wandhouder (A) door met een dun voorwerp in het gaatje aan de onderzijde van de wandhouder te steken en daardoor de vergrendeling (M) los te halen (zie afbeel- ding 3).
Hierbij verklaart eQ-3 AG, Maiburger Str. 29, 26789 Leer, Duitsland, dat het draadloze apparaattype Homematic IP HmIP-WKP in overeenstemming is met de richtlijn 2014/53/EU. De volledige tekst van de EU- conformiteitsverklaring is beschikbaar onder het volgende internetadres: www.homematic-ip.com...
Seite 100
Technische gegevens Verwijdering Het apparaat hoort niet in de vuilnisbak! Elektronische apparaten moeten overeenkomstig de richtlijn voor afgedankte elektrische en elektronische apparaten worden ingeleverd bij de inzamelpunten voor afgedankte apparaten. Informatie met betrekking tot de conformiteit De CE-markering is een label voor het vrije verkeer van goederen binnen de Europese Unie en is uitsluitend bedoeld voor de desbe- treffende autoriteiten.
Seite 101
Kostenloser Download der Homematic IP App! Free download of the Homematic IP app! Bevollmächtigter des Herstellers: Manufacturer’s authorised representative: eQ-3 AG Maiburger Straße 29 26789 Leer / GERMANY www.eQ-3.de...